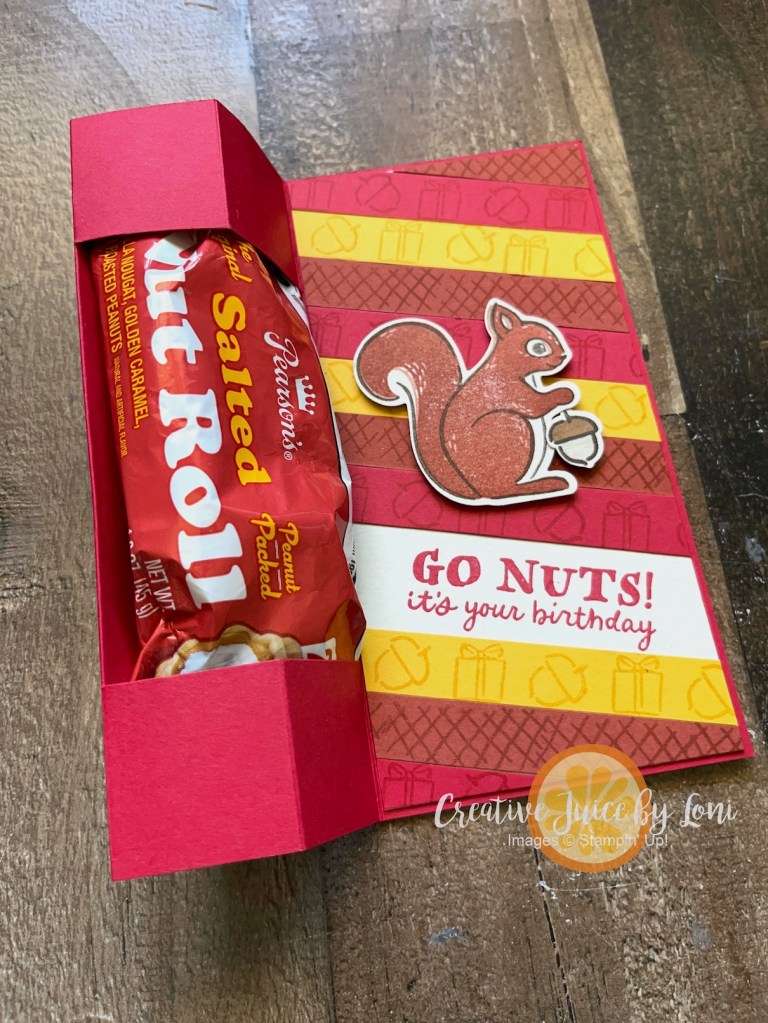
If having a sweet tooth is wrong, I don’t want to be right! Admittedly, I do *attempt* to control it, but peanuts are healthy, right? Even in a bit of caramel and nougat?
“Festive Treats” is the TGIF Challenges theme this week- this birthday treat fits for #tgifc548
Here’s a 90-second tutorial, then I’ll write the measurements below:
Card Base: 11″ x 6″, scored at 4-1/4″, 5-1/2″, 6-3/4″ and 8″
Card layer (front and inside: 5-7/8″ x 2-7/8″ with 1/2″ strips to stamp on.
Just 4 days left to take advantage of the Starter Kit Special! Smart Stampers won’t let this amazing shopping deal pass by (with the opportunity to get a discount on your stamping supplies, birthday and holiday gifts through April, 2026!) This offer EXPIRES OCTOBER 31, 2025!
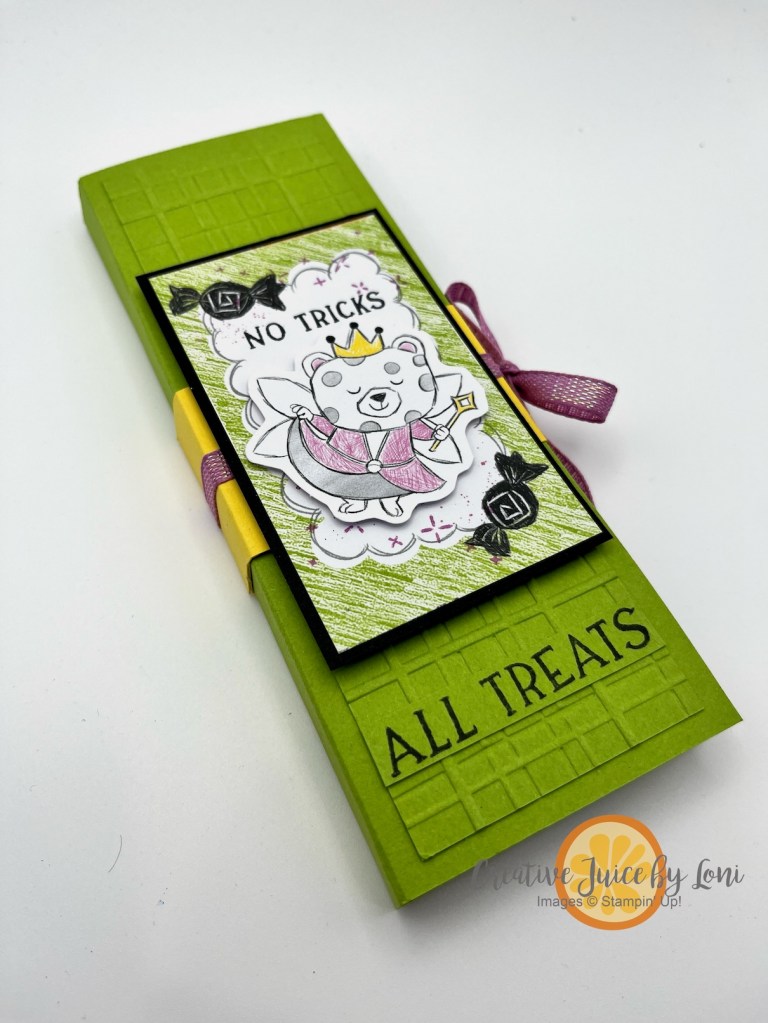
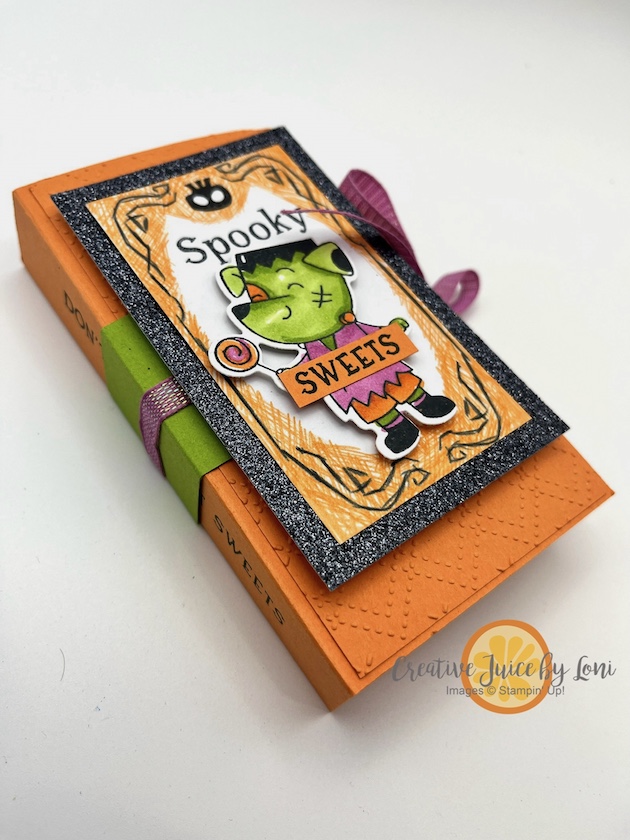
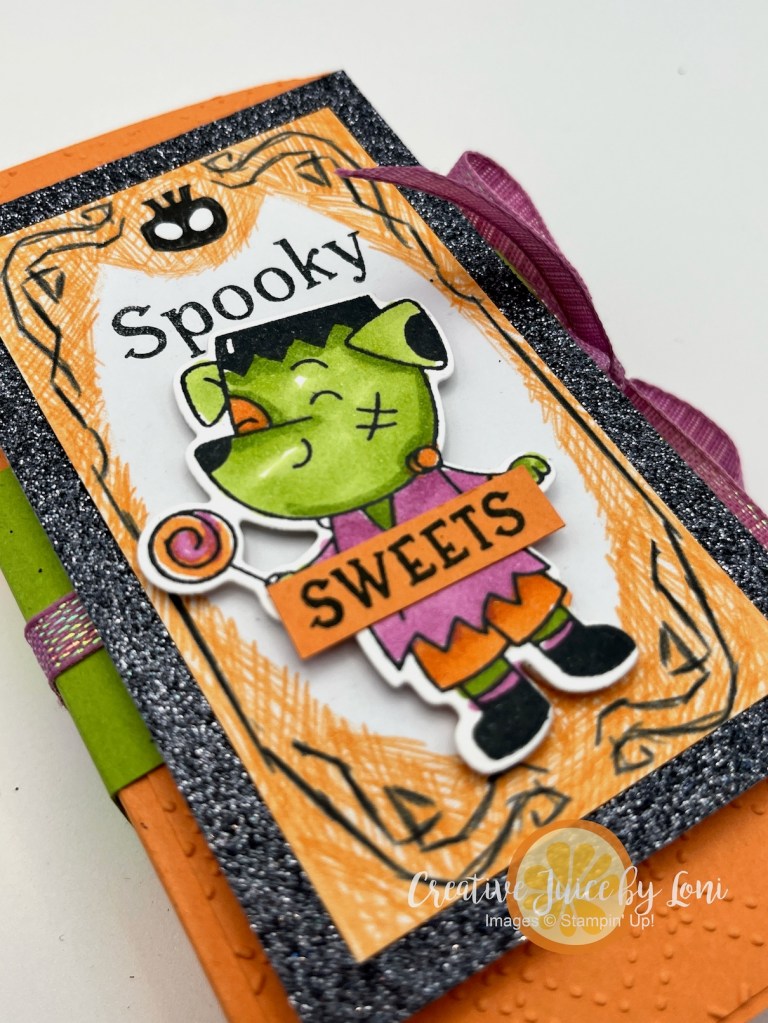
If your Halloween crafting stash is calling your name louder than a ghost in a graveyard, grab your Stampin’ Up!® Spooky Sweet Suite and conjure up something boo-tiful! Don’t worry, eat sweets with these dang cute CANDY BAR BOOKS:
I’ve brewed up two fun versions of this project. The Granny Apple Green “All Treats” Candy Bar Book holds two classic Hershey bars, while the Timid Tiger “Spooky Sweets” version was made to fit two Ghost Toast KitKats. Each one ties up neatly with ribbon to keep your candy secure until it’s time for a delicious reveal. Whether you’re giving these as gifts, party favors, or adding them to a Halloween goodie basket, they’re sure to get more “oohs” and “aahs” than a haunted house on October 31st.
These projects are surprisingly easy to assemble—no hocus pocus required! I’ve included an instructional video below, AND a printable .pdf with measurements.
Note that the belly band measurements are shown on white card stock, but the project uses Granny Apple Green card stock.
I embossed the covers to add some textured dimension (because even monsters like stampin’ style), then decorated with die cuts, stamped images, and a touch of sparkle. Isn’t it Franken-fun?
Here are the key measurements for both versions:
Green “All Treats” Book (fits two Hershey bars):
Cardstock base: 5 1/4″ x 6 1/2″ scored along shorter end at 2 3/8″and 2 7/8″
Belly Band: 1 1/2″ x 6 3/8″ scored at 1/2″, 2 7/8″, 3 3/8″ and 5 7/8″
Ribbon: 16″
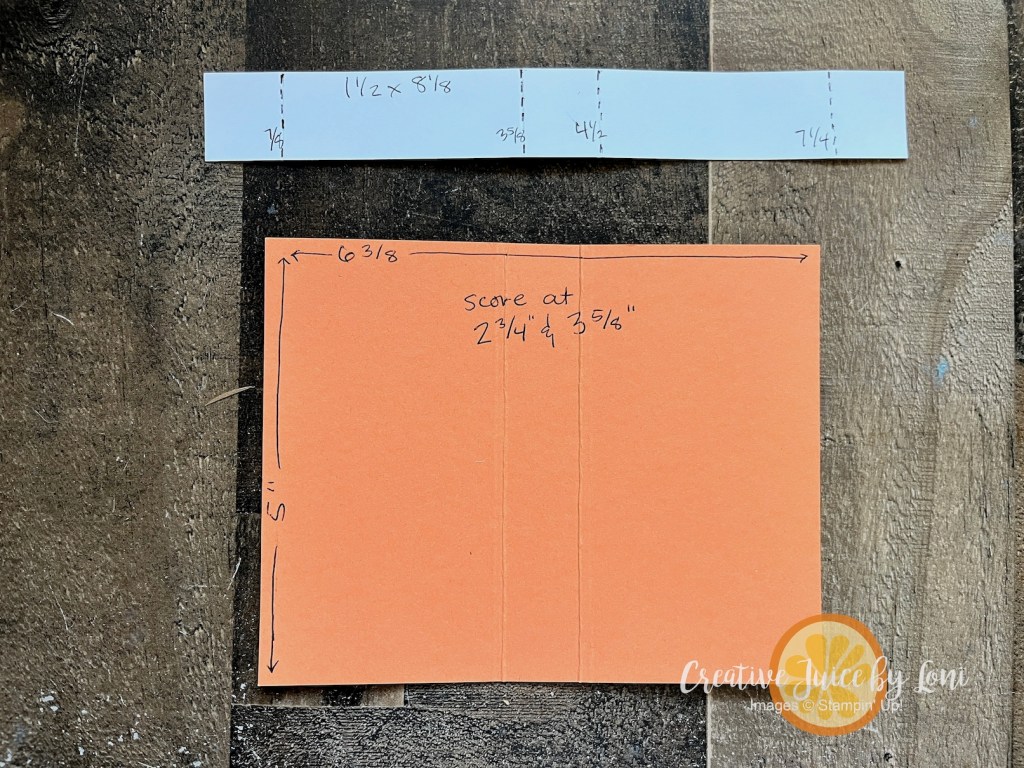
Orange “Spooky Sweets” Book (fits two KitKats):
Cardstock base: 5″ x 6 3/8″ scored along the longer side at 2 3/4″ and 3 5/8″
Belly Band: 1 1/2″ x 8 1/8″ scored at 7/8″, 3 5/8″, 4 1/2″ and 7 1/4″
Ribbon: 16″
Want to see the whole project come to life? Watch my full step-by-step tutorial on YouTube here:
What else did we talk about today? The 3-day KIT SALE (through October 8th):
AND we discussed FAQs on the Starter Kit Special! Bottom line: If you are planning to order more than $35 in crafting supplies from my Stampin’ Store this month, you may as well choose the Starter Kit!
To make your shopping Spooky Sweet, I’ll list the supplies for these projects below and THANK YOU for choosing me to serve your creativity!
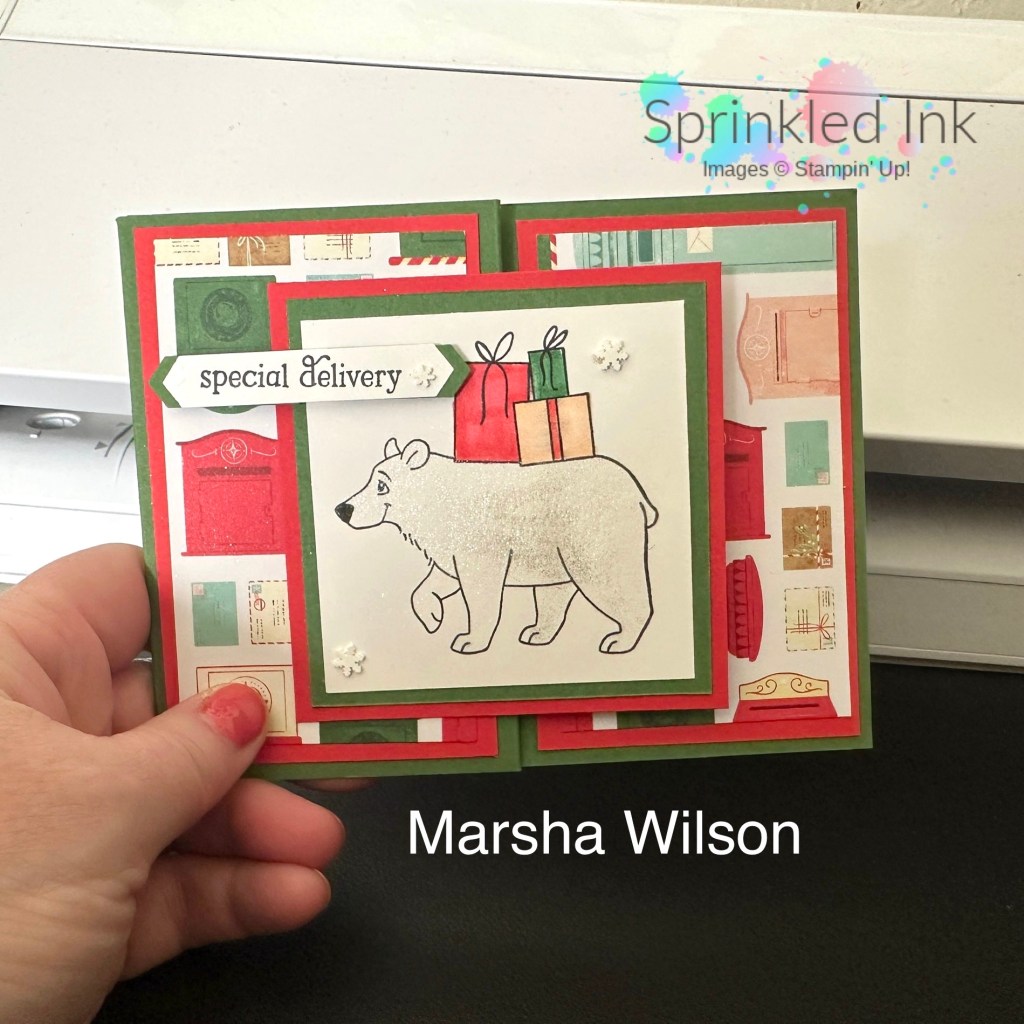
The art my teammates create is astounding! The Sprinkled Inkers (and friends) host a card swap for each new print publication, including new Online Exclusives. Michelle snapped these photos and I wanted to brag on the creators:
There were fun folds we learned in a virtual team meeting, gift card holders, tags, layers, specialty paper, ornaments, fun folds, embossing… all the creative ideas you collect by being a stamper! I’m so proud of these demonstrators, and there is ROOM IN OUR FAMILY FOR YOU!
For 31 days in October, there are two fabulous starter kit offers, and there is no reason you shouldn’t give take advantage of one of these two unbelievable deals:
As part of my team, you’ll have the opportunity to participate in the best card swaps EVER, and be embraced by a community of creatives you didn’t know you needed.
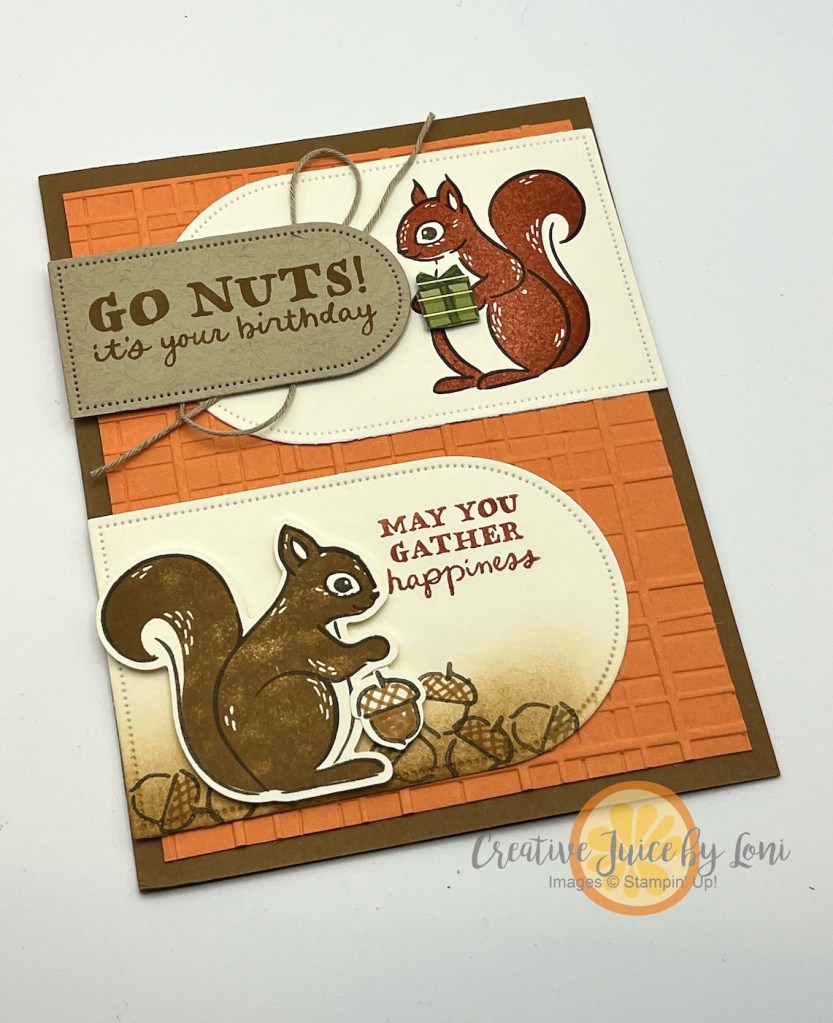
This was my card for the swap – just in time for Fall birthdays!
This playful card pairs the Stampin’ Up!®️ Fluffy Squirrel bundle (stamps & punch) with the Everyday Arches dies for an autumnal birthday greeting. The embossed background adds texture behind the sweet squirrels—one bringing a gift and the other gathering acorns. Turning the arches sideways adds to their versatility! A touch of twine and soft ink blending finish it off, making this card a charming way to celebrate someone’s day of birth in October or November.
There is always something NEW at Stampin’ Up! and September brought a SLEW of lovely new products, so the New at SU! Design Team is here to introduce you to your next “must have” item from the September-December Mini Catalog OR Online Exclusives!
When creating a card with matted layers on the front, consider ways to make it different: Use a different shape for the layers, or score the card base in an unexpected way. This card base is 5.5″ x 8.5″ as usual, but scored at 1.25″ and 5.5″, so it folds around the inside greeting:
The color palette for this card is Lost Lagoon (pretty color for pines), Cajun Craze, Pecan Pie, Early Espresso and Basic Beige – feels like fall 🍂 and the squirrels make autumn adorable, sitting on a tree stump and gathering acorns for the winter. Optional idea: add some texture to the background on the top of the card by using the Birch Wood embossing folder after stamping the branches.
The best things for YOU to gather is paper crafting supplies for hours of contented crafting in every season, so keep a shopping list handy as you discover other items featured in our blog hop to squirrel-away for a stamping day (I’ve listed my products used at the bottom of this page).
September 2025 New at SU! Blog Hop: New Product Showcase
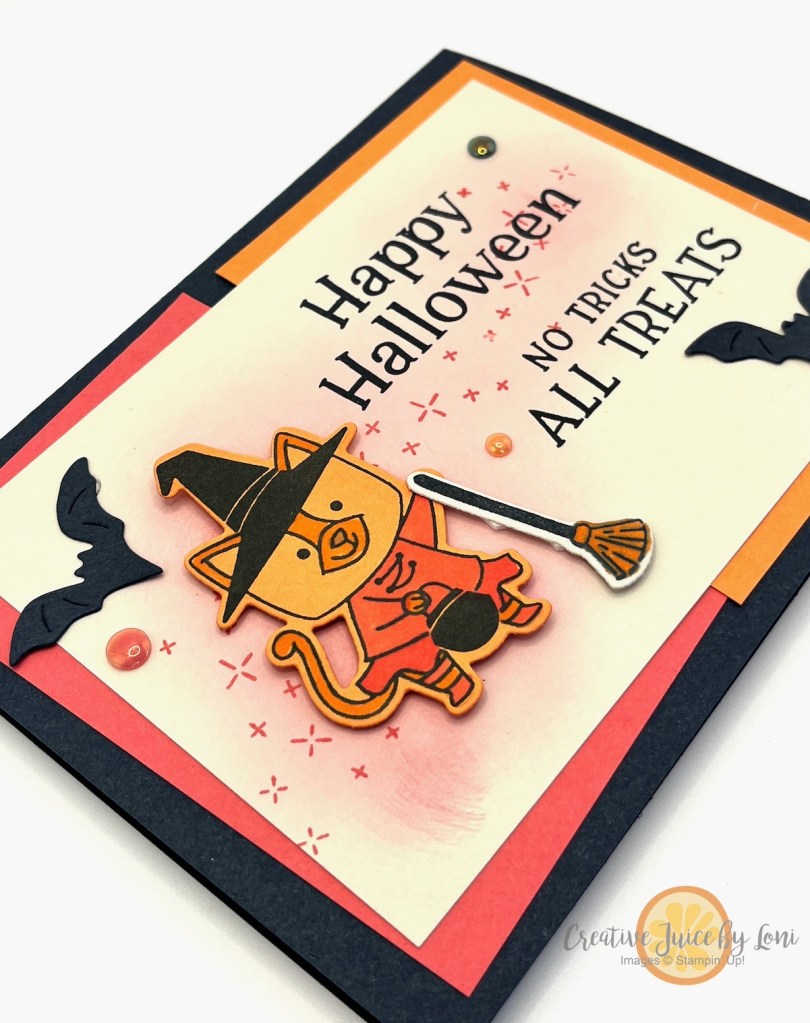
Annabelle Broom is a non-conformist witch who would rather help than hinder, and is the protagonist of a children’s musical play = one source of inspiration for this cute Halloween card! The other prompt for my color choices was the #tgifc541 color challenge of Strawberry Slush, Timid Tiger and Secret Sea:
Secret Sea is a deep, dark navy blue, which is really lovely in real life, and a perfect substitute for black in Halloween cards. Using Basic Beige as my neutral background gave my card a bewitching-hour feel.
As Annabelle would rather wear PINK than black, this fantastic feline witch asserts her fashion sense with a pink (Strawberry Slush) tutu and is ready to fly to help lost children on her trusty broom!
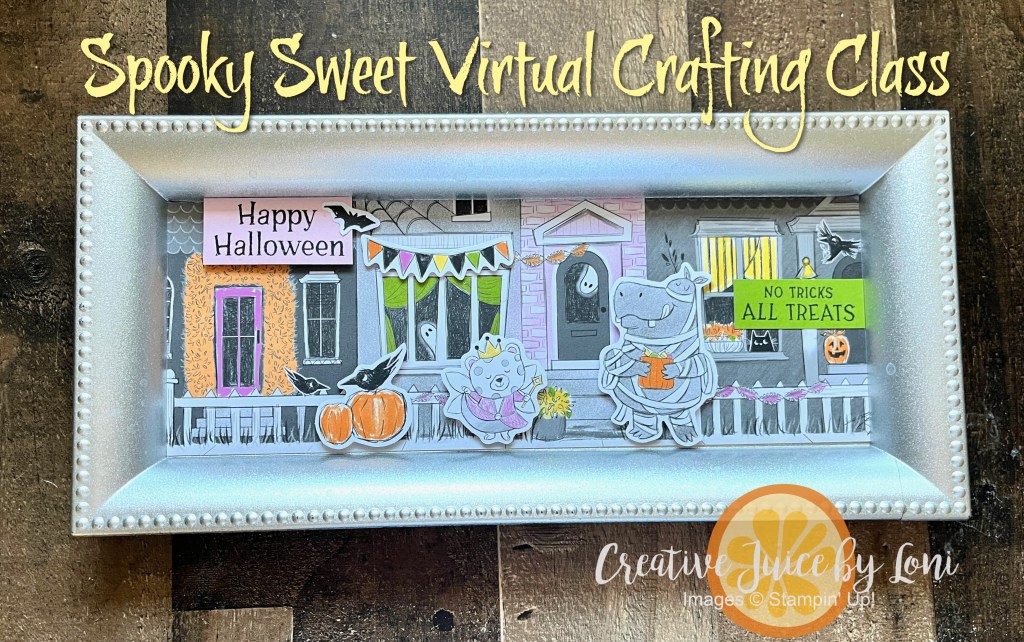
If Spooky Season is your favorite, here are two opportunities to craft with me virtually, or in person:
The video craft-along instructions will be broadcast on a private YouTube for those who register AND purchase the Spooky Sweet Suite Collection (an Online Exclusive). If you order the Suite from my store, the class is just $10 (includes shipping to you) and I’ll email asking if you’d like to join the class. Craft along LIVE with me -OR- watch later at your convenience.
Class kit includes card stock and envelopes, dimensionals, cutting guide and goodies for creating 5 projects SO CUTE, THEY ARE SPOOKY! ALSO NEEDED (not included): Adhesive, Paper Trimmer, Memento Tuxedo Black ink pad and the following Stampin’ Blends: Granny Apple Green, Petunia Pop, Pumpkin Pie, Smoky Slate.
If you have purchased the suite collection from another demonstrator (or as a demonstrator), the fee is $20 – contact me to register before September 22nd!
If you live in the Southern Utah area, you’ll want to come to the Cookies, Cards & Cocoa class at the Strap Tank Restaurant on October 16th, where you’ll learn to decorate 4 sugar cookies with LoveCookies Bakery and 2 paper crafting projects with me (DIFFERENT than the ones at the virtual class).
Some cards just make you grin from the moment you start cutting paper. This one certainly did—because honestly, how can you not smile at a trio of darling dinos in perfectly coordinated colors?
For this design, I paired three of the 2025-2027 In Colors—Timid Tiger, Cloud Cover and Secret Sea —with a fresh pop of Old Olive. The bold contrast gives each dinosaur its own “personality,” while the embossed background panels add texture without overwhelming the scene.
But wait- there is more to discover as you dig in to this fun-fold card! We call it a “Quarter Fold”:
It’s a greeting card that works for all ages—kids will love the creatures, and adults will appreciate the wink of whimsy. It’s easier to make than you think: 2 card bases (one long, one wide) overlap each other, and close like the top of a box. To help you create your own, I’ve got a tutorial to download and print so you can refer to it anytime~
Working with In Colors is one of my favorite ways to keep my cards looking fresh without overthinking. Stampin’ Up! has done the color-coordinating work, so all I have to do is choose my favorites and let the creativity flow. With the August 2025 In-Color sale, even dinosaurs know to nod YES to new colors!
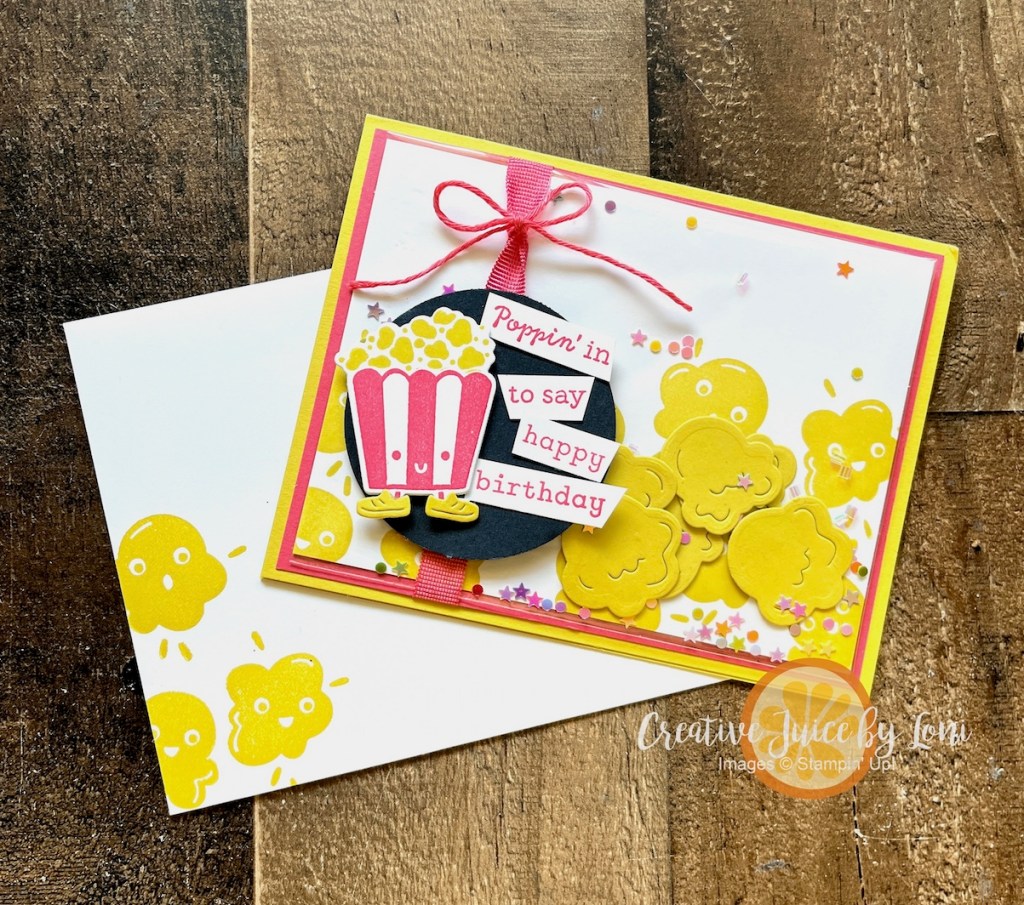
Creative Juice LIVE Crafting (on YouTube & Facebook) IS BACK…with a twist! Going forward, I’ll be going live in my channels at 12:30 p.m. MT ON THE FIRST MONDAY OF EACH MONTH. As I *pop* back into your social feed, I have an a-maize-ing Faux Shaker Card tutorial to share with you in today’s video!
Traditional shaker cards are quite thick, so using a clear envelope to hold the shaker elements makes the card thinner to mail, and easy to make.
Colors used: Darling Duckling, Strawberry Slush and Secret Sea, which are all 2025-2027 In Colors, and an announcement you’ll appreciate is that tomorrow (August 5th) is the beginning of an IN COLOR SALE!
Many In Color products are 15% off through August 31st, and I need to remember to order refills for my ink pads…my shopping list is started.
Without further adieu, here is the VIDEO TUTORIAL for the Faux Shaker Popcorn Birthday card, and you may add the supplies to your cart with the list below the video:
It’s a Birthday Bash for our July New at SU! Blog Hop, and our demonstrator design team from around the globe will inspire you to create a personalized birthday celebration using your Stampin’ Up! supplies!
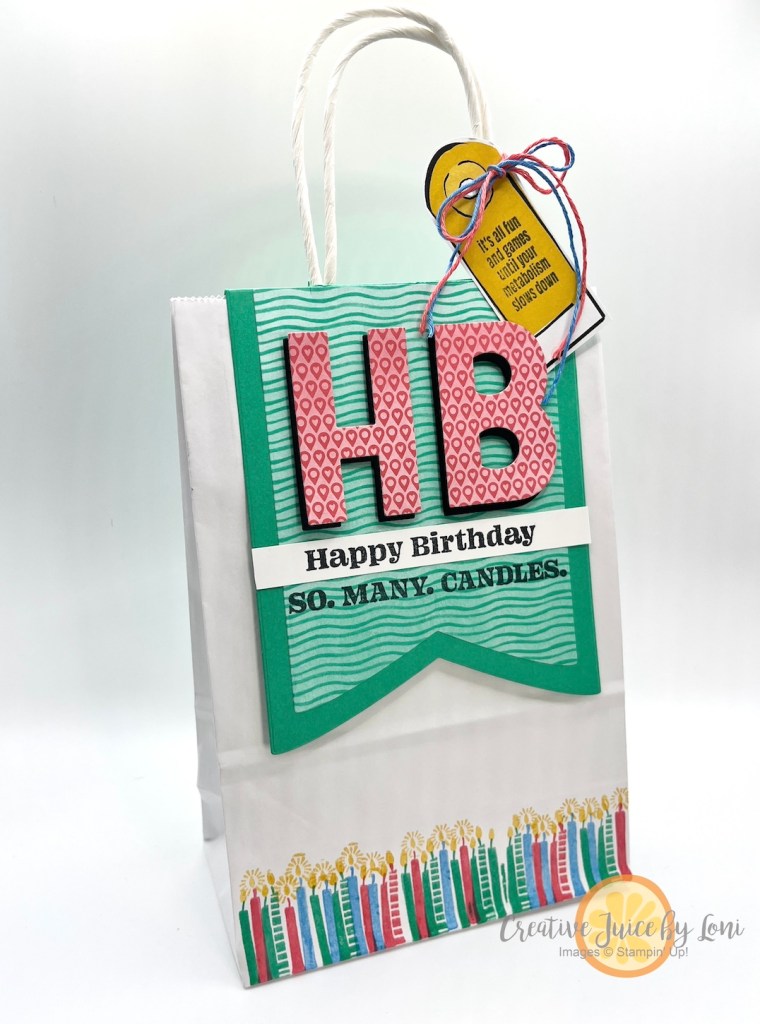
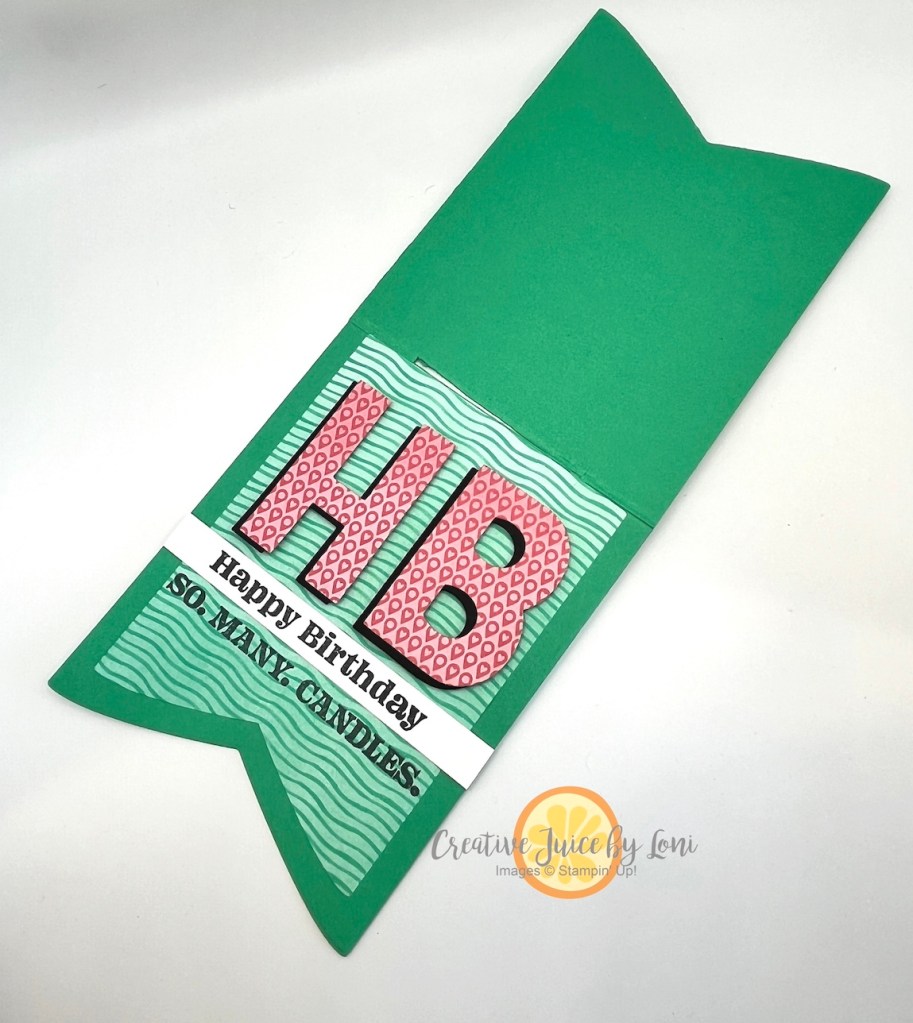
Remember the classic handled-gift-bag topper? I’m giving it a fresh look with the fabulous Party Dies Bundle (banners + big alphabet)!
Stampin’ Up!’s Sweet Jar stamp set has the perfect candles to stamp along the bottom edge of the bag in colors to match your theme!
The largest banner die is approx. 5″ x 7″ so you could create a topper for various sizes of bags. The plain white bag I used is about 5″ wide by 8.5″ tall, so I used the 4th largest banner die on a 4.5″ x 11″ piece of Shy Shamrock card stock (folded in half) for this topper:
Make sure the top of the banner die lays just off the folded edge as you cut through both layers with the bottom part of the die, so you don’t cut this piece into two pieces! Once you’ve die cut the banner, hold the fold up to the top of the bag and mark just outside the edges of the handles, then use a paper trimmer or snips to cut along the folded edge BETWEEN the two marks. This gives you a slit to slide over the handles (after decorating the topper and inserting your gift into the bag)
The On the Go Designer Series Paper gave me the color palette and the patterned paper for this project, and has a full page of adorable luggage tags that make perfect gift tags, too! Sentiments come from the hilarious new stamp set in my Online Exclusives called “Not 29 Anymore” and I also cut a second set of letters from Basic Black card stock to give it a shadow behind the DSP:
I’ll be making more of these to wrap birthday presents in, giving someone a laugh when I gift it! Would it make you giggle?Give me your thoughts in the comments at the top of the post, next to posting date.
Be sure to visit the other party-people participating in sharing birthday ideas this month:
Cleaning off my stamping surface, I found pieces for a card I had started to make showing how lovely Secret Sea and Cloud Cover card stock pair together. Since I had already embossed the background with the Happy Hibiscus Hybrid Embossing folder and stamped the background on the large label, all I had to do was stamp some Hibiscus flowers in Strawberry Slush (also a Stampin’ Up!®️ 2025-2027 In Color).
You can get TWO shades of the same color by stamping off the bold flower filler stamp onto a scrap paper once before stamping it inside the outline (stamped in full strength ink of same color). Do the same for the leaves!
TIP: If you haven’t created an ink spot with a Cloud Cover Ink refill and uninked stampin’ spot (because the ink formula didn’t work correctly for a full-sized foam ink pad), YOU CAN STAMP OFF WITH SECRET SEA for an in-between color, as shown in the leaves on this card. I also used VERSAMARK ink on the Cloud Cover label, which turns the stamped images a shade darker.
To make the background pop a bit, I softly sponged some Whisper White craft ink over the raised images. Top off the card with an elegant Cloud Cover bow and some Rhinestone Jewels in the center of the flowers.
One more suggestion: Make four of the same cards at one time! Why four? For this card, you’ll use two full sheets of Cloud Cover for the card bases, one full sheet of Secret Sea card stock for the 4 backgrounds and almost a full additional sheet of cloud cover for the large label: It makes the best use of your supplies, and takes LESS time to create four of the same cards than to come back later and make the same card another time!
Thank you for ordering the supplies from my Stampin’ Store – you are supporting a home-based business and allowing me the time to bring you more creative ideas!
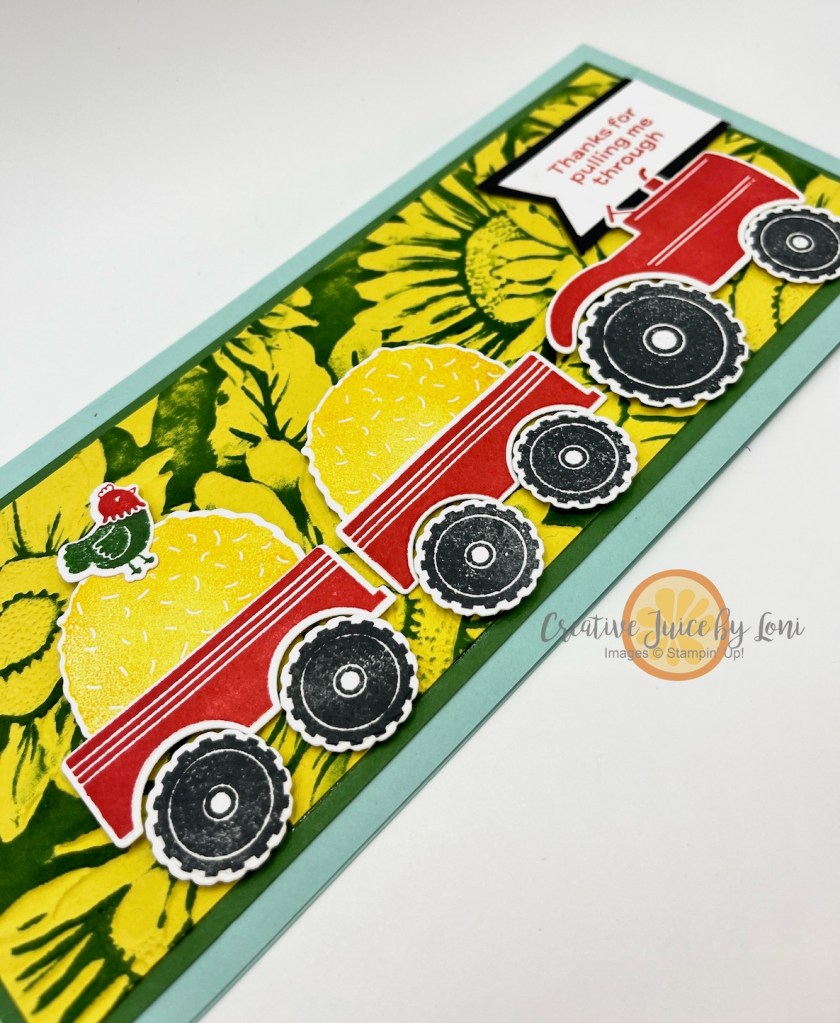
Did you know Stampin’ Up!®️ releases NEW products every other month? July is one of those months, and I wanted to mix two of the new items together for a large slimline card: The Tractor & Co. bundle (photopolymer stamps + dies) and the fabulous Sunflower 3D embossing folder!
To make the sunflowers pop, after you’ve embossed an 8.25″ x 3.25″ of Darling Duckling card stock with this extra-large embossing folder, drag the Garden Green ink pad across the flat side (where the flowers are pushed down, not up).
An 8.5″ x 3.5″ Garden Green Mat behind the sunflowers frames it nicely, and the tractor is popped up with Stampin’ Dimensionals.
The Pool Party card base is 9″ wide and 8″ tall, scored in half at 4″. This fits into a legal sized envelope.
Those are just two of the new products launched yesterday! Also check out the two new KITS for July (click on images to see the kits):
One more thing I’m looking forward to this month is the Sweeter With You Paper Pumpkin kit! In case you aren’t familiar with Paper Pumpkin, it’s a craft kit subscription by mail, and each kit includes an exclusive stamp set, ink spot and all the supplies prepared for you to enjoy a stress-free moment of creativity!
Each quarter, a coordinating set of dies is also offered to Paper Pumpkin subscribers, and they match all the kits released in those three months. The Circle of Seasons die set is only $12 and the strawberry die will also create an acorn (hint at the September kit!):
My Paper Pumpkin subscribers also receive a special email from me on the last week of the month, with ideas to use the stamp set, ink spot and add-on dies AFTER the kit is complete! I know you’d look forward to a kit in your mailbox each month, so give it a try!
Check out all the new products released this month HERE:
Keep your creative juices flowing! 🍊🧡– Loni Spendlove


![Fluffy Squirrel Bundle (English) [ 165819 ]](https://assets1.tamsnetwork.com/images/EC042017NF/165819s.jpg "Fluffy Squirrel Bundle (English) [ 165819 ]")
![Real Red 8-1/2" X 11" Cardstock [ 102482 ]](https://assets1.tamsnetwork.com/images/EC042017NF/102482s.jpg "Real Red 8-1/2\" X 11\" Cardstock [ 102482 ]")
![Basic Beige 8 1/2" X 11" Cardstock [ 164511 ]](https://assets1.tamsnetwork.com/images/EC042017NF/164511s.jpg "Basic Beige 8 1/2\" X 11\" Cardstock [ 164511 ]")
![Cajun Craze 8-1/2" X 11" Cardstock [ 119684 ]](https://assets1.tamsnetwork.com/images/EC042017NF/119684s.jpg "Cajun Craze 8-1/2\" X 11\" Cardstock [ 119684 ]")
![Crushed Curry 8-1/2" X 11" Cardstock [ 131199 ]](https://assets1.tamsnetwork.com/images/EC042017NF/131199s.jpg "Crushed Curry 8-1/2\" X 11\" Cardstock [ 131199 ]")
![Real Red Classic Stampin' Pad [ 147084 ]](https://assets1.tamsnetwork.com/images/EC042017NF/147084s.jpg "Real Red Classic Stampin' Pad [ 147084 ]")
![Cajun Craze Classic Stampin' Pad [ 147085 ]](https://assets1.tamsnetwork.com/images/EC042017NF/147085s.jpg "Cajun Craze Classic Stampin' Pad [ 147085 ]")
![Crushed Curry Classic Stampin' Pad [ 147087 ]](https://assets1.tamsnetwork.com/images/EC042017NF/147087s.jpg "Crushed Curry Classic Stampin' Pad [ 147087 ]")
![Early Espresso Classic Stampin' Pad [ 147114 ]](https://assets1.tamsnetwork.com/images/EC042017NF/147114s.jpg "Early Espresso Classic Stampin' Pad [ 147114 ]")
![Paper Trimmer [ 152392 ]](https://assets1.tamsnetwork.com/images/EC042017NF/152392s.jpg "Paper Trimmer [ 152392 ]")
![Stampin' Seal [ 152813 ]](https://assets1.tamsnetwork.com/images/EC042017NF/152813s.jpg "Stampin' Seal [ 152813 ]")
![Stampin' Dimensionals [ 104430 ]](https://assets1.tamsnetwork.com/images/EC042017NF/104430s.jpg "Stampin' Dimensionals [ 104430 ]")


![Spooky Sweet Suite Collection (English) [ 166205 ]](https://assets1.tamsnetwork.com/images/EC042017NF/166205s.jpg "Spooky Sweet Suite Collection (English) [ 166205 ]")
![Timid Tiger 8 1/2" X 11" Cardstock [ 165626 ]](https://assets1.tamsnetwork.com/images/EC042017NF/165626s.jpg "Timid Tiger 8 1/2\" X 11\" Cardstock [ 165626 ]")
![Granny Apple Green 8-1/2" X 11" Cardstock [ 146990 ]](https://assets1.tamsnetwork.com/images/EC042017NF/146990s.jpg "Granny Apple Green 8-1/2\" X 11\" Cardstock [ 146990 ]")
![Basic White 8 1/2" X 11" Cardstock [ 166780 ]](https://assets1.tamsnetwork.com/images/EC042017NF/166780s.jpg "Basic White 8 1/2\" X 11\" Cardstock [ 166780 ]")
![Timid Tiger Stampin’ Blends Combo Pack [ 165291 ]](https://assets1.tamsnetwork.com/images/EC042017NF/165291s.jpg "Timid Tiger Stampin’ Blends Combo Pack [ 165291 ]")
![Granny Apple Green Stampin' Blends Combo Pack [ 154885 ]](https://assets1.tamsnetwork.com/images/EC042017NF/154885s.jpg "Granny Apple Green Stampin' Blends Combo Pack [ 154885 ]")
![Petunia Pop Stampin’ Blends Combo Pack [ 163828 ]](https://assets1.tamsnetwork.com/images/EC042017NF/163828s.jpg "Petunia Pop Stampin’ Blends Combo Pack [ 163828 ]")
![Peaceful Garden 12" X 12" (30.5 X 30.5 Cm) Glimmer Paper [ 165929 ]](https://assets1.tamsnetwork.com/images/EC042017NF/165929s.jpg "Peaceful Garden 12\" X 12\" (30.5 X 30.5 Cm) Glimmer Paper [ 165929 ]")
![Stampin' Cut & Emboss Machine [ 149653 ]](https://assets1.tamsnetwork.com/images/EC042017NF/149653s.jpg "Stampin' Cut & Emboss Machine [ 149653 ]")
![Mini Glue Dots [ 103683 ]](https://assets1.tamsnetwork.com/images/EC042017NF/103683s.jpg "Mini Glue Dots [ 103683 ]")


![Everyday Arches Dies [ 164629 ]](https://assets1.tamsnetwork.com/images/EC042017NF/164629s.jpg "Everyday Arches Dies [ 164629 ]")
![Pecan Pie 8 1/2" X 11" Cardstock [ 161717 ]](https://assets1.tamsnetwork.com/images/EC042017NF/161717s.jpg "Pecan Pie 8 1/2\" X 11\" Cardstock [ 161717 ]")
![Crumb Cake 8-1/2" X 11" Cardstock [ 120953 ]](https://assets1.tamsnetwork.com/images/EC042017NF/120953s.jpg "Crumb Cake 8-1/2\" X 11\" Cardstock [ 120953 ]")
![Very Vanilla 8-1/2" X 11" Cardstock [ 101650 ]](https://assets1.tamsnetwork.com/images/EC042017NF/101650s.jpg "Very Vanilla 8-1/2\" X 11\" Cardstock [ 101650 ]")
![Pecan Pie Classic Stampin' Pad [ 161665 ]](https://assets1.tamsnetwork.com/images/EC042017NF/161665s.jpg "Pecan Pie Classic Stampin' Pad [ 161665 ]")
![Forever Plaid 3 D Embossing Folder [ 164049 ]](https://assets1.tamsnetwork.com/images/EC042017NF/164049s.jpg "Forever Plaid 3 D Embossing Folder [ 164049 ]")
![Baker's Twine Essentials Pack [ 155475 ]](https://assets1.tamsnetwork.com/images/EC042017NF/155475s.jpg "Baker's Twine Essentials Pack [ 155475 ]")
![Small Blending Brushes [ 160518 ]](https://assets1.tamsnetwork.com/images/EC042017NF/160518s.jpg "Small Blending Brushes [ 160518 ]")


![Branching Out Bundle (English) [ 165776 ]](https://assets1.tamsnetwork.com/images/EC042017NF/165776s.jpg "Branching Out Bundle (English) [ 165776 ]")
![Lost Lagoon 8-1/2" X 11" Cardstock [ 133679 ]](https://assets1.tamsnetwork.com/images/EC042017NF/133679s.jpg "Lost Lagoon 8-1/2\" X 11\" Cardstock [ 133679 ]")
![Lost Lagoon Classic Stampin' Pad [ 161678 ]](https://assets1.tamsnetwork.com/images/EC042017NF/161678s.jpg "Lost Lagoon Classic Stampin' Pad [ 161678 ]")
![Neutrals Stampin' Write Markers [ 161697 ]](https://assets1.tamsnetwork.com/images/EC042017NF/161697s.jpg "Neutrals Stampin' Write Markers [ 161697 ]")
![Birch Wood 3 D Embossing Folder [ 164069 ]](https://assets1.tamsnetwork.com/images/EC042017NF/164069s.jpg "Birch Wood 3 D Embossing Folder [ 164069 ]")


![Spooky Halloween Bundle (English) [ 166199 ]](https://assets1.tamsnetwork.com/images/EC042017NF/166199s.jpg "Spooky Halloween Bundle (English) [ 166199 ]")
![Secret Sea 8 1/2" X 11" Cardstock [ 165624 ]](https://assets1.tamsnetwork.com/images/EC042017NF/165624s.jpg "Secret Sea 8 1/2\" X 11\" Cardstock [ 165624 ]")
![Strawberry Slush 8 1/2" X 11" Cardstock [ 165625 ]](https://assets1.tamsnetwork.com/images/EC042017NF/165625s.jpg "Strawberry Slush 8 1/2\" X 11\" Cardstock [ 165625 ]")
![Secret Sea Classic Stampin' Pad [ 165285 ]](https://assets1.tamsnetwork.com/images/EC042017NF/165285s.jpg "Secret Sea Classic Stampin' Pad [ 165285 ]")
![Strawberry Slush Classic Stampin' Pad [ 165286 ]](https://assets1.tamsnetwork.com/images/EC042017NF/165286s.jpg "Strawberry Slush Classic Stampin' Pad [ 165286 ]")
![Strawberry Slush Stampin’ Blends Combo Pack [ 165290 ]](https://assets1.tamsnetwork.com/images/EC042017NF/165290s.jpg "Strawberry Slush Stampin’ Blends Combo Pack [ 165290 ]")
![Blending Brushes [ 153611 ]](https://assets1.tamsnetwork.com/images/EC042017NF/153611s.jpg "Blending Brushes [ 153611 ]")
![2025–2027 In Color™ Flat Pearls [ 165192 ]](https://assets1.tamsnetwork.com/images/EC042017NF/165192s.jpg "2025–2027 In Color™ Flat Pearls [ 165192 ]")
![Mini Stampin' Cut & Emboss Machine [ 150673 ]](https://assets1.tamsnetwork.com/images/EC042017NF/150673s.jpg "Mini Stampin' Cut & Emboss Machine [ 150673 ]")


![Darling Dinos Bundle (English) [ 164735 ]](https://assets1.tamsnetwork.com/images/EC042017NF/164735s.jpg "Darling Dinos Bundle (English) [ 164735 ]")
![Cloud Cover 8 1/2" X 11" Cardstock [ 165621 ]](https://assets1.tamsnetwork.com/images/EC042017NF/165621s.jpg "Cloud Cover 8 1/2\" X 11\" Cardstock [ 165621 ]")
![Old Olive 8-1/2" X 11" Cardstock [ 100702 ]](https://assets1.tamsnetwork.com/images/EC042017NF/100702s.jpg "Old Olive 8-1/2\" X 11\" Cardstock [ 100702 ]")
![Timid Tiger Classic Stampin' Pad [ 165278 ]](https://assets1.tamsnetwork.com/images/EC042017NF/165278s.jpg "Timid Tiger Classic Stampin' Pad [ 165278 ]")
![Multipurpose Liquid Glue [ 110755 ]](https://assets1.tamsnetwork.com/images/EC042017NF/110755s.jpg "Multipurpose Liquid Glue [ 110755 ]")


![Poppin' By Bundle (English) [ 165489 ]](https://assets1.tamsnetwork.com/images/EC042017NF/165489s.jpg "Poppin' By Bundle (English) [ 165489 ]")
![Darling Duckling 8 1/2" X 11" Cardstock [ 165622 ]](https://assets1.tamsnetwork.com/images/EC042017NF/165622s.jpg "Darling Duckling 8 1/2\" X 11\" Cardstock [ 165622 ]")
![Secret Sea 12" X 12" (30.5 X 30.5 Cm) Two Tone Cardstock [ 166709 ]](https://assets1.tamsnetwork.com/images/EC042017NF/166709s.jpg "Secret Sea 12\" X 12\" (30.5 X 30.5 Cm) Two Tone Cardstock [ 166709 ]")
![Darling Duckling Classic Stampin' Pad [ 165277 ]](https://assets1.tamsnetwork.com/images/EC042017NF/165277s.jpg "Darling Duckling Classic Stampin' Pad [ 165277 ]")
![Strawberry Slush 3/8" (1 Cm) Faux Linen Ribbon [ 165274 ]](https://assets1.tamsnetwork.com/images/EC042017NF/165274s.jpg "Strawberry Slush 3/8\" (1 Cm) Faux Linen Ribbon [ 165274 ]")
![Pack Your Bags Twine Three Pack [ 165582 ]](https://assets1.tamsnetwork.com/images/EC042017NF/165582s.jpg "Pack Your Bags Twine Three Pack [ 165582 ]")
![Clear Medium Envelopes [ 102619 ]](https://assets1.tamsnetwork.com/images/EC042017NF/102619s.jpg "Clear Medium Envelopes [ 102619 ]")
![Loose Shaker Elements [ 165268 ]](https://assets1.tamsnetwork.com/images/EC042017NF/165268s.jpg "Loose Shaker Elements [ 165268 ]")
![Stampin' Seal+ [ 149699 ]](https://assets1.tamsnetwork.com/images/EC042017NF/149699s.jpg "Stampin' Seal+ [ 149699 ]")


![Not 29 Anymore Photopolymer Stamp Set (English) [ 166182 ]](https://assets1.tamsnetwork.com/images/EC042017NF/166182s.jpg "Not 29 Anymore Photopolymer Stamp Set (English) [ 166182 ]")
![Sweet Jar Photopolymer Stamp Set (English) [ 165501 ]](https://assets1.tamsnetwork.com/images/EC042017NF/165501s.jpg "Sweet Jar Photopolymer Stamp Set (English) [ 165501 ]")
![Party Dies Bundle [ 165265 ]](https://assets1.tamsnetwork.com/images/EC042017NF/165265s.jpg "Party Dies Bundle [ 165265 ]")
![On The Go 12" X 12" (30.5 X 30.5 Cm) Designer Series Paper [ 165566 ]](https://assets1.tamsnetwork.com/images/EC042017NF/165566s.jpg "On The Go 12\" X 12\" (30.5 X 30.5 Cm) Designer Series Paper [ 165566 ]")
![Tuxedo Black Memento Ink Pad [ 132708 ]](https://assets1.tamsnetwork.com/images/EC042017NF/132708s.jpg "Tuxedo Black Memento Ink Pad [ 132708 ]")
![Shy Shamrock Classic Stampin Pad [ 163808 ]](https://assets1.tamsnetwork.com/images/EC042017NF/163808s.jpg "Shy Shamrock Classic Stampin Pad [ 163808 ]")
![Azure Afternoon Classic Stampin' Pad [ 161663 ]](https://assets1.tamsnetwork.com/images/EC042017NF/161663s.jpg "Azure Afternoon Classic Stampin' Pad [ 161663 ]")
![Basic Black 8-1/2" X 11" Cardstock [ 121045 ]](https://assets1.tamsnetwork.com/images/EC042017NF/121045s.jpg "Basic Black 8-1/2\" X 11\" Cardstock [ 121045 ]")
![Shy Shamrock 8 1/2" X 11" Cardstock [ 163795 ]](https://assets1.tamsnetwork.com/images/EC042017NF/163795s.jpg "Shy Shamrock 8 1/2\" X 11\" Cardstock [ 163795 ]")


![Happy Hibiscus Bundle (English) [ 164880 ]](https://assets1.tamsnetwork.com/images/EC042017NF/164880s.jpg "Happy Hibiscus Bundle (English) [ 164880 ]")
![Versamark Pad [ 102283 ]](https://assets1.tamsnetwork.com/images/EC042017NF/102283s.jpg "Versamark Pad [ 102283 ]")
![Uninked Stampin’ Craft Pad & Whisper White Refill [ 147277 ]](https://assets1.tamsnetwork.com/images/EC042017NF/147277s.jpg "Uninked Stampin’ Craft Pad & Whisper White Refill [ 147277 ]")
![Sponge Daubers [ 133773 ]](https://assets1.tamsnetwork.com/images/EC042017NF/133773s.jpg "Sponge Daubers [ 133773 ]")
![Cloud Cover 3/8" (1 Cm) Faux Linen Ribbon [ 165271 ]](https://assets1.tamsnetwork.com/images/EC042017NF/165271s.jpg "Cloud Cover 3/8\" (1 Cm) Faux Linen Ribbon [ 165271 ]")
![Rhinestone Basic Jewels [ 144220 ]](https://assets1.tamsnetwork.com/images/EC042017NF/144220s.jpg "Rhinestone Basic Jewels [ 144220 ]")


![Tractor & Co Bundle (English) [ 166116 ]](https://assets1.tamsnetwork.com/images/EC042017NF/166116s.jpg "Tractor & Co Bundle (English) [ 166116 ]")
![Sunflower 3 D Embossing Folder [ 166145 ]](https://assets1.tamsnetwork.com/images/EC042017NF/166145s.jpg "Sunflower 3 D Embossing Folder [ 166145 ]")
![Garden Green 8-1/2" X 11" Cardstock [ 102584 ]](https://assets1.tamsnetwork.com/images/EC042017NF/102584s.jpg "Garden Green 8-1/2\" X 11\" Cardstock [ 102584 ]")
![Pool Party 8-1/2" X 11" Cardstock [ 122924 ]](https://assets1.tamsnetwork.com/images/EC042017NF/122924s.jpg "Pool Party 8-1/2\" X 11\" Cardstock [ 122924 ]")
![Garden Green Classic Stampin' Pad [ 147089 ]](https://assets1.tamsnetwork.com/images/EC042017NF/147089s.jpg "Garden Green Classic Stampin' Pad [ 147089 ]")
![Poppy Parade Classic Stampin' Pad [ 119782 ] (Retired)](https://assets1.tamsnetwork.com/images/EC042017NF/119782s.jpg "Poppy Parade Classic Stampin' Pad [ 119782 ] (Retired)")