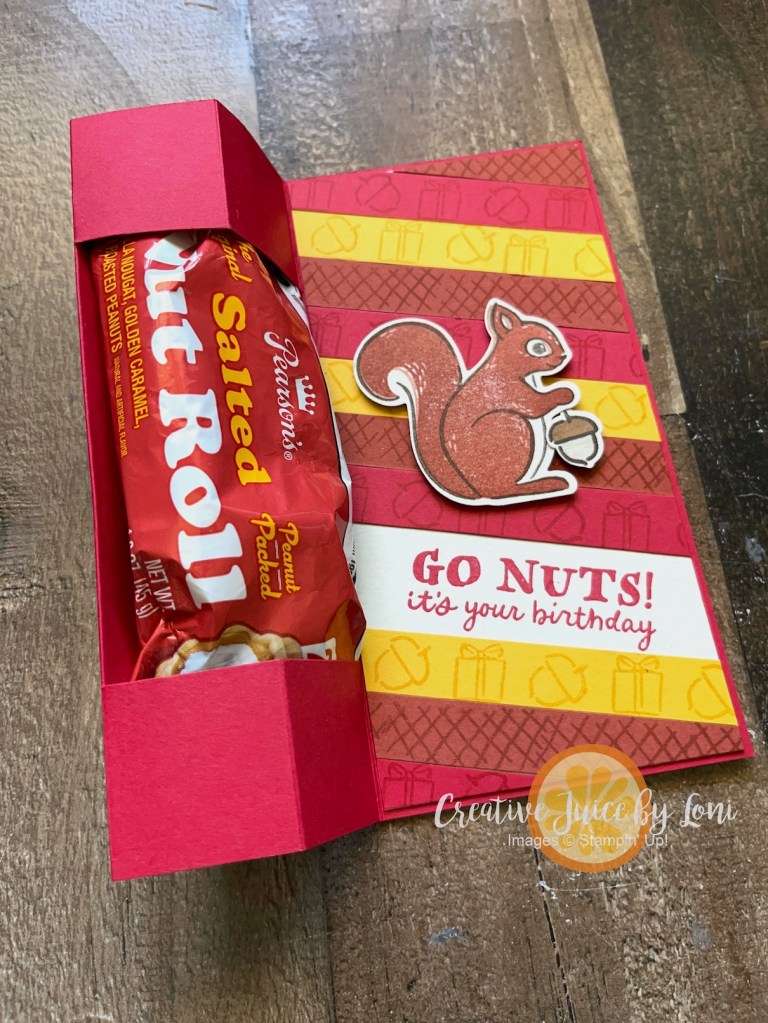
If having a sweet tooth is wrong, I don’t want to be right! Admittedly, I do *attempt* to control it, but peanuts are healthy, right? Even in a bit of caramel and nougat?
“Festive Treats” is the TGIF Challenges theme this week- this birthday treat fits for #tgifc548
Here’s a 90-second tutorial, then I’ll write the measurements below:
Card Base: 11″ x 6″, scored at 4-1/4″, 5-1/2″, 6-3/4″ and 8″
Card layer (front and inside: 5-7/8″ x 2-7/8″ with 1/2″ strips to stamp on.
Just 4 days left to take advantage of the Starter Kit Special! Smart Stampers won’t let this amazing shopping deal pass by (with the opportunity to get a discount on your stamping supplies, birthday and holiday gifts through April, 2026!) This offer EXPIRES OCTOBER 31, 2025!
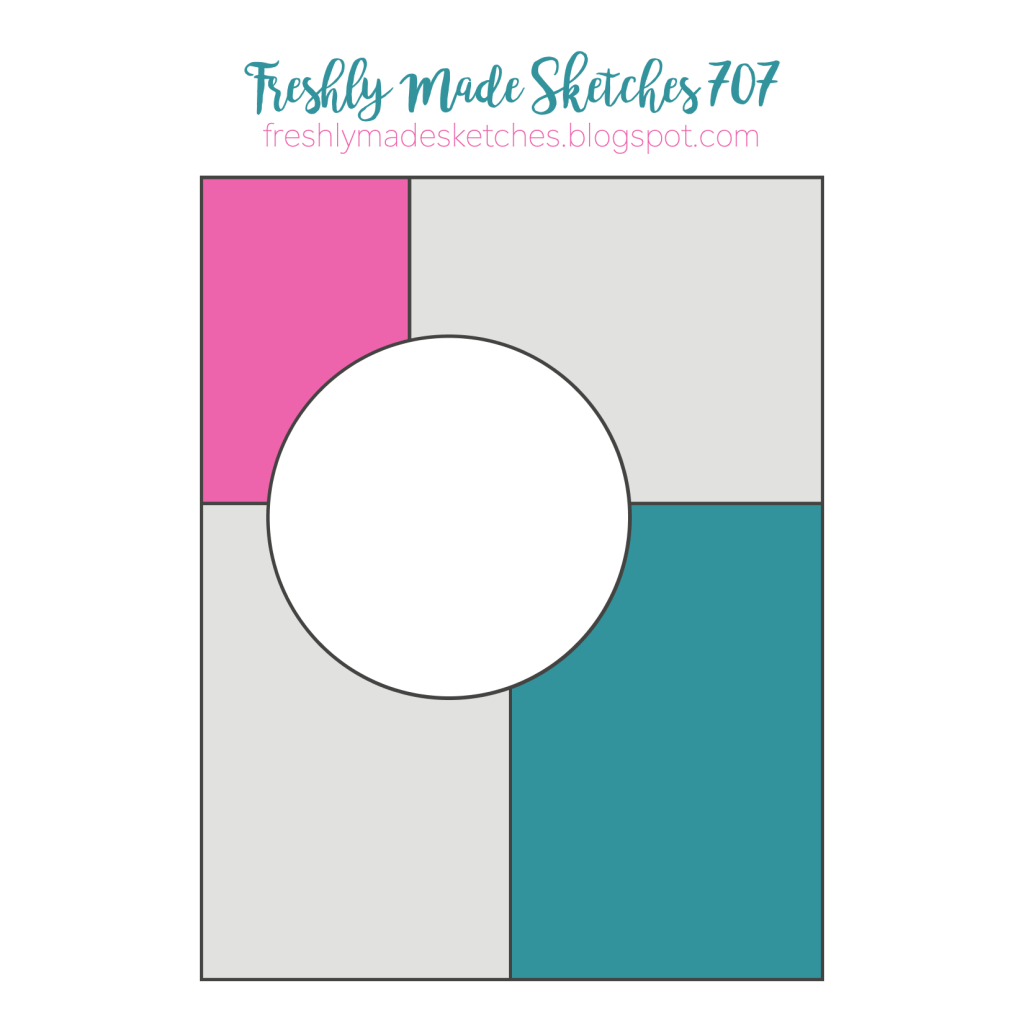
Some punny jokes begin with “What do you get when you mix a ____ with a ____?” but in paper crafting, MAGIC happens when you are given two different starting points, like a color palette and a sketch!
This card was born by marrying the Global Design Project Color Challenge #gdp517 with the Freshly Made Sketch Challenge #FMS707 …AND combining the Abundant Joy Paper Pumpkin Add-On dies with with the Traditions of Christmas Specialty Designer Series Paper! No stamping required for this project 😉
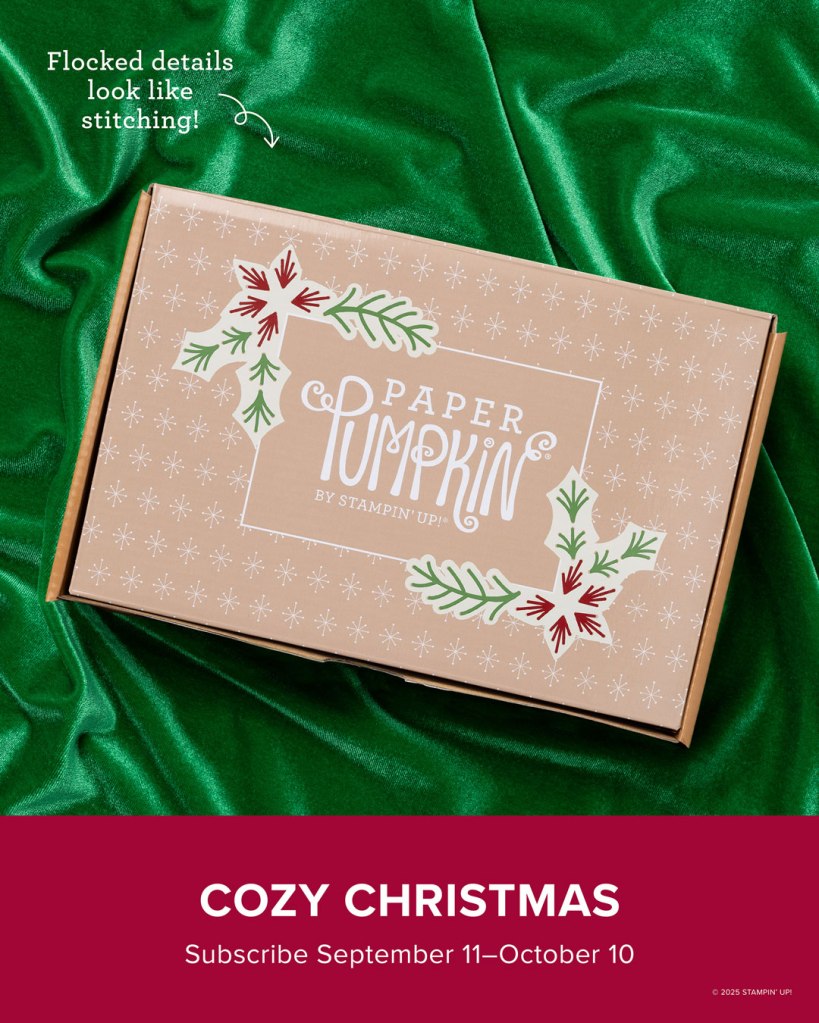
October 10th is the last day to subscribe for the Cozy Christmas card kit, and the dies are darling on their own, with just a bit of pretty paper, and using a bit of glimmer paper for the JOY makes the season sparkle:
Next time you are needing some creative inspiration to strike, pick a color palette and card sketch and make your own mash-up!
There was one piece of Silent Snowfall Specialty Designer Series Paper left on my desk after cutting and mailing all the September paper shares, then I saw the Global Design Project sketch for the week, and imagined looking out a window on a quiet winter afternoon…
Here’s the prompt for the #gdp514 sketch:
Rummaged through more patterned paper for some worthy “wallpaper” and found the back side of one of the Autumn Toile papers would be perfect (isn’t the “front” or “back” irrelevant? The FRONT is whichever you want to use!).
Once it was adhered to the front, I cut the smaller arch from both layers, then added a dark wood window casing by cutting out two nested arches. In this picture you can really see the detail through the window:
The Silent Snowfall paper has a snowflake pattern dry embossed into it, so I heat embossed some random snowflake dots from the Branching Out stamp set over the debossed side to break up the repeating pattern and help it feel more natural and random. Once it was dry, I used a brayer to roll Cloud Cover ink over the top – the inlaid snowflakes are deep enough they don’t get any ink inside. I know that we don’t have a large Cloud Cover ink pad: You can use the refill to ink up an empty stampin’ spot, or use a piece of felt as the ink pad by squeezing some ink onto it.
Once the branches were stamped over the snowflakes, that layer was adhered to a 4″ x 5.25″ Cloud Cover card inside (8″ x 10.5″ when open), with the fold on the right:
This “card-in-a-card” design allows you to catch a few snowflakes on your tongue as you continue to unfold the greeting!
Finally, you open the inside to find a large area to write all the details a friend would love to hear from you.
Tomorrow, I’ll be mashing up the Branching Out bundle (there is a set of dies that coordinate with the stamp set) with another new bundle from the 2025 Sept-Dec Mini Catalog, and you’ll want to add it to your cart when you see how essential it is.
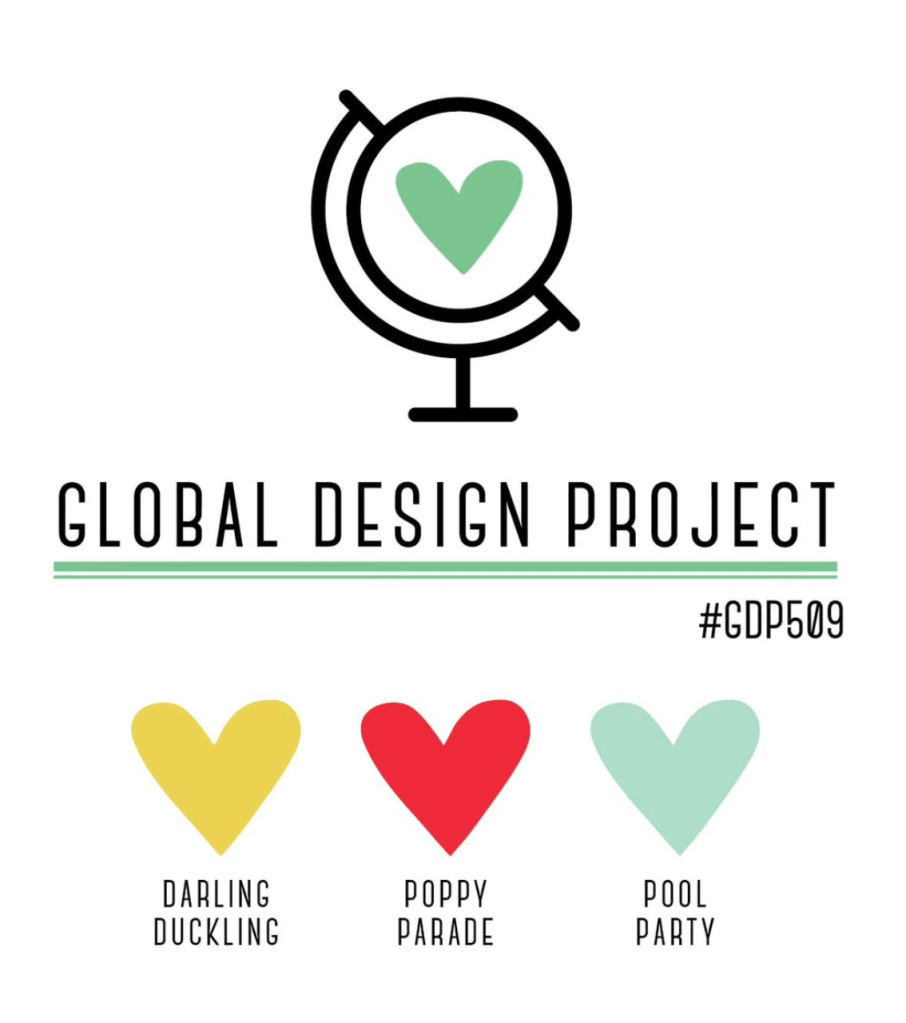
I’ve been making samples for Fall StampFest (spoiler alert!) and while I was doing some “research” on social media, these bright colors – Darling Duckling, Poppy Parade & Pool Party – scrolled by, and then I couldn’t really get any work done until I pulled the colors out and put it onto paper, so-to-speak.
Plaid, cornfields and tractors MUST go together, but I also love a peek of the torn leafy Darling Duckling Designer Series Paper, just beneath the farm vehicle.
But my FAVORITE detail is the blue ribbon! Can you tell what I used to make it?
The ribbon medallion is made with the TIRE DIES!
Pull in a sentiment from the “More than Autumn” stamp set and the card is worthy of grand prize at the county fair, don’t you think?
Another winning opportunity: Darling Duckling is a 2025-2027 IN COLOR, thus the ink, card stock and the patterned paper are all on sale for 15% off during August 2025!
When you are ready to make a tractor card of your own, you can add all the supplies you need to your cart here:
Today’s creation is proof that you don’t need a craft room full of supplies (or a time machine to the Cretaceous period) to make something “dino-mite.” This cheerful congratulations card came together in minutes using the Celebrations Expressions Memories & More card pack from Stampin’ Up! and the adorable Darling Dinos stamp & die bundle.
If you’ve been around my blog for a while, you know I love a good sketch challenge to get the creative juices flowing. This design was inspired by Freshly Made Sketches #698. When you’ve got a great sketch, half the work is already done for you!
The Recipe for Easy Cardmaking
Card Base: Balmy Blue cardstock, because the white background of the cards need a contrasting color to stand out.
Panels: I cut down three different cards from the Celebrations Expressions pack to fit the sketch—two with fun, hand-painted patterns and one with bright, festive banners. Pre-printed designs are the secret sauce for fast crafting: no stamping, coloring, or choosing a color palette required – it’s done for you!
Focal Point: That sweet brontosaurus is stamped in Memento Tuxedo Black ink directly onto Balmy Blue card stock and simply colored with Stampin’ Blends.
Finishing Touches: A few Starburst Sequins add sparkle, and a simple “CONGRATULATIONS” sentiment was trimmed from the card pack itself. Easy-peasy.
Leftover 1″ squares of the pre-printed cards pull the party all the way to the inside of the card:
Why Memories & More Packs Are a Game-Changer
If you’ve never crafted with Memories & More cards, think of them as your personal cardmaking shortcut. They’re designed for pocket scrapbooking, but their patterns, colors, and ready-to-use sentiments make them perfect for quick cards, too. In this project, I didn’t have to stamp the sentiment or create background layers from scratch—they were already there, waiting to be trimmed and glued in place.
Because I also have team members whose promotions I want to recognize, I created a second set of cards from the same card pack:
No stamping on this one! Just the Memories & More cards and coordinating card stock paired together so the celebration can get started quickly.
Give yourself the tools to create happy mail whenever the occasion pops up—because a handmade card always makes the celebration a little brighter.
Rifling through my specialty paper, the In Color 2024-2026 Glimmer Paper caught my eye (because it *is* very sparkly)! I wanted to use it, because these colors are on the last-chance list (and discounted), so the #tgifc536 color challenge gave me the perfect excuse:
Peach Pie brought to mind the popcorn I picked up at Costco earlier in the day, and the “Poppin’ By” stamp set was chosen for my stamping project.
The Shy Shamrock glimmer paper gives just the right amount of bling for the background layer, but I didn’t want to waste the part I covered up, so my tip is to use your Paper Trimmer (or a punch!) to cut a section out of the center to use on another project, and no one will be the wiser:
Here’s to being a bit “corny” and crafting a cute card of your own this weekend with the same color combo!
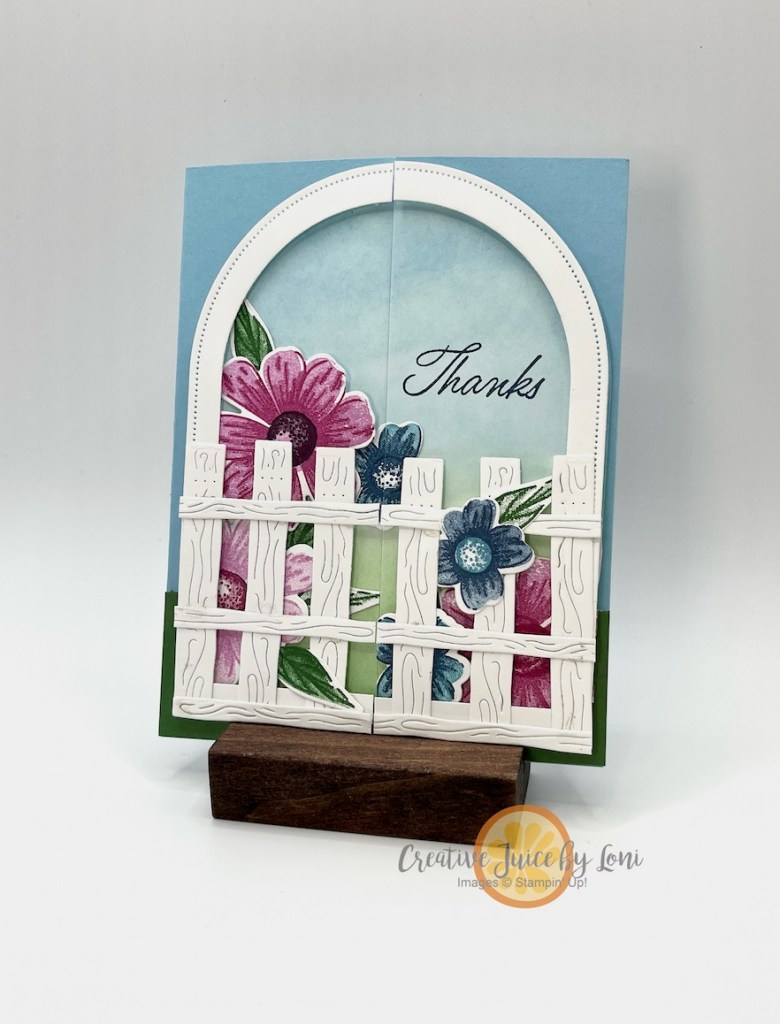
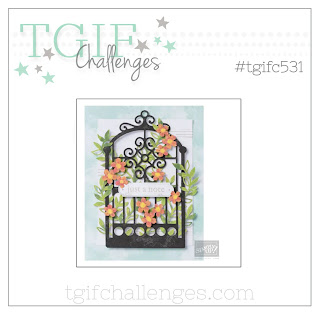
This week’s TGIF Challenge #tgifc531 is “Garden Gates” and I wanted to create a gratitude card that felt like you were walking into a Secret Garden:
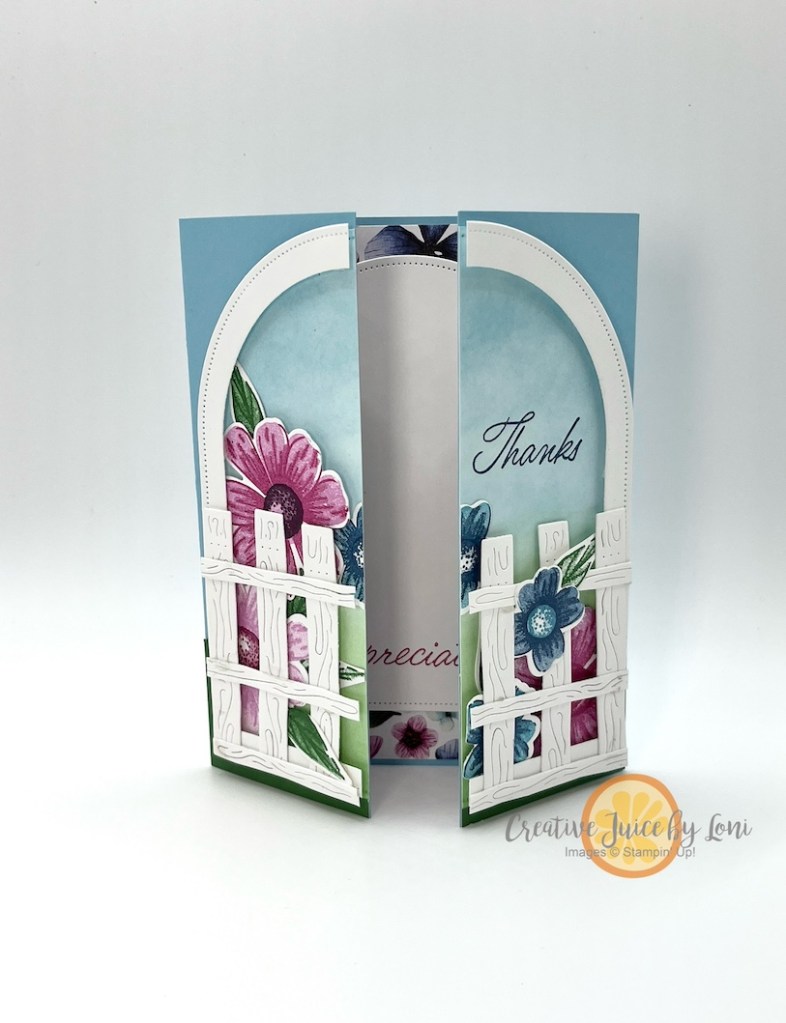
After I created my card, I went back to the TGIF post and realized Wendy Weixler and I both had a similar idea for building the gate, but how delightful that both are unique!
The first type of card I thought of was the appropriately named “Gate Fold” card, so I had to think it through. I ended up cutting my gate in half, so you could enter the garden:
There are only 3 days left of the Suite BOGO Sale, so I chose to use the Impressions Abloom bundle and Designer Series Paper from the Floral Impressions Suite. Each piece of our suites also qualify for the sale, just remember that the lowest price suite or suite product will get the 50% discount!
Now enter the secret garden:
I used the arch die cut from the larger gate (cut for the front) on the inside, and let the profusion of flowers bloom on all sides!
Fun fact: The Secret Garden classic children’s novel by Frances Hodgson Burnett was one of my favorite reads as a child, and though I’m a huge musical nerd, I DON’T really love the Secret Garden musical play. The book is definitely best (and there are a few decent movie adaptations).
This card just gives all the wonder of finding a secret garden behind a locked gate!
Now, if you’ve procrastinated, here’s your reminder to shop the SWEET Suite BOGO Sale.
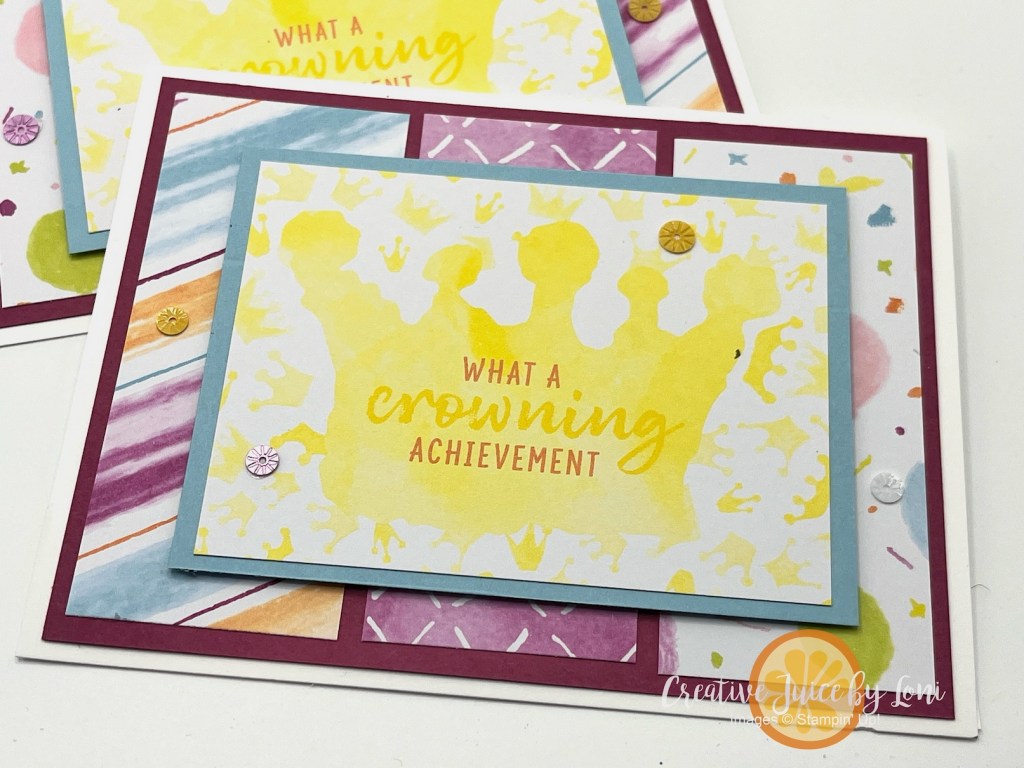
As I prepare for my annual Stampin’ Soiree & BOGO Sale this Saturday (featuring a NEW Stampin’ Up!®️ Catalog and Online Exclusives), I wanted to make a few samples with some of the fresh products coming tomorrow, May 6th! Since multi-tasking is the only way this one-woman show can get things done, I chose a simple sketch, which doubles as a way to show the color palette, and used it for my lunchtime live crafting video, too:
The first card I demonstrated was inspired by the #tgifc523 color challenge of Petnunia Pop, Balmy Blue and Daffodil Delight:
Starting simple – no mat on this card (though you certainly could add one), I stamped flowers from a new Online Exclusive bundle, Impressions Abloom on top of the 3-1/2″ x 4-1/2″ panel, then added 1-3/16″ squares of the colored card stock to the bottom:
When crafting from a sketch, give yourself some freedom to make changes! I didn’t add the palette to the Poppin’ By card, but used the darling filmstrip die to add the border at the bottom:
My favorite thing about this set is probably the tennis shoes you could add to the bucket of popcorn:
Moving along, let’s take that sketch and turn it SIDEWAYS, which is what I did for the Notes & Totes bundle from the new catalog, which I paired with the 2025-2027 In Colors (from bottom to top: Secret Sea, Timid Tiger, Cloud Cover, Darling Duckling & Strawberry Slush):
And finally, I used some Celebration Expressions Memories & More Cards to make this Happy Birthday card, and my friend Barb’s Million Dollar Stamp Set Layered Thoughts, this time putting the color palette below the main panel:
To see me create two of these cards (and share some tips), watch this:
If one of these new items or colors is something you must have, visit my Stampin’ Store starting on May 6th to make an order, or click on the Stampin’ Supplies link under any card you love.
See all these samples IN PERSON – and MORE – at the Stampin’ Soiree, Saturday May 10th in Hurricane, UT. It’s FREE and open-house style, so plan to drop in with a friend between 1-4 pm!
One more announcement: If your wish list is long, the best value for Saavy Stampin’ Shoppers is the STARTER KIT, and starting tomorrow, May 6th, you can choose MORE in your starter kit, with no strings attached!
Let me make you feel better about scrapbooking, as we gear up for National Scrapbook Day this Saturday, May 3, 2025! I’m working on photos from 2006 (I am indeed 20 years behind) and my style is “Git ‘er done!” Take a look:
The “On The Go” Suite Collection is a must have for memory keepers who also love to travel! It includes a cling stamp set, coordinating dies, Designer Series Paper, suitcase boxes, twine and puffy stickers (which I will be adding to my page, now that I remembered I have them 🤪). Of course, each product can be purchase individually, as well.
One more way to use your alphabet dies (and in the spirit of the #tgifc522 product challenge) is to use the negative section of the letters you’ve cut out:
Remember to save the centers of letters – like the O, R, P and A – and if you put an adhesive sheet on your paper before die cutting, your letters, the centers and your negative image will already be sticky to put on the page, just like a sticker.
I’m not a person who thinks every scrapbook page has to be a show-piece, or even have a bold title. Especially when creating multiple pages of one event, give yourself permission to make them simple. The people who are looking at your albums are there for the PHOTOS & MEMORIES, not the design and composition! Here’s my next page (another day of our Orlando adventure in 2006) and in case you were wondering, I prefer 8.5″ x 11″ pages because the albums I put them in fit easier on my bookshelf:
Seriously. Just get those photos on the page. Add a cute embellishment, then let your family flip through the walk down memory lane.
To start (or re-ignite) your passion for preserving your photos, Stampin’ Up!®️ is offering shoppers 2x times the reward points for 2 days on Friday & Saturday on orders over $20:
If you haven’t heard of our new Rewards Program (or don’t have an account with Stampin’ Up!®️) here’s how they work:
In today’s live demonstration on the Creative Juice Facebook Page and YouTube channel, I showed how to create two sizes of scrapbook pages (8.5″ x 11″ and 12″ x 12″) you can mail memories with~ .
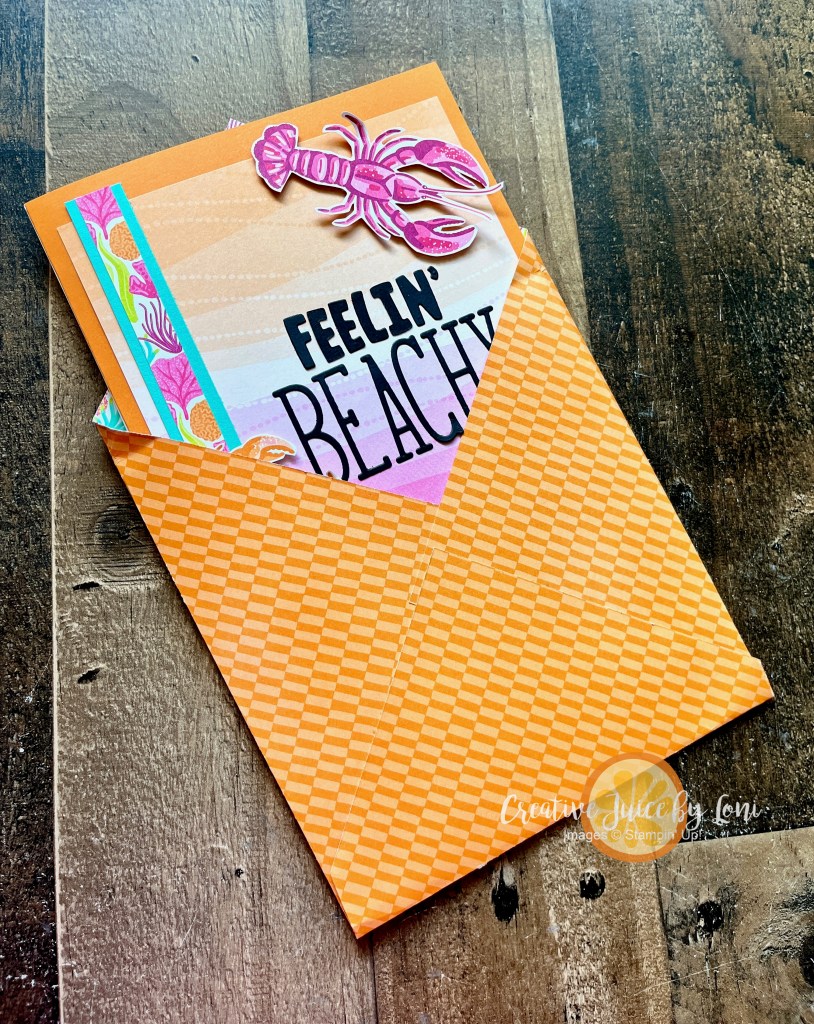
You’ll need a page layout that has quadrants, so you can fold it for mailing. This sketch features a long panel on the right and a cluster of photos on the left. Once you fold it up, it fits in a large envelope. I created the envelope from a 10″ x 10″ piece of the same Friends of the Ocean Designer Series Paper by Stampin’ Up! :
These beloved funny faces were the inspiration for this project:
INSTRUCTIONS: Start by taking the card stock for your page and scoring it in half one direction, then in half the other way. You’ll cut along one of the score lines in to the middle – on my “Funny Faces” page, I cut it along the lower center score line, but if I were to do it again, I’d cut along the horizontal line on right or left, as I did for the “Feeling Beachy” 12×12 page.
Once folded, the 8.5″ x 11″ page fits into a Basic White Medium Envelope:
TIP for mailing in 2025: If it weighs more than 1 oz. you’ll need a two ounce postage stamp, or one regular stamp and an additional ounce postage stamp. For the 12×12 page, you’ll need a Non-Machinable 1 ounce stamp ($1.19) PLUS an additional ounce stamp ($.28) for a total of $1.47.
Use the faces from the Meant to Bee and/or Bee My Valentine on Daffodil Delight card stock and punch them out with a 1/2″ circle punch to create the emoji buttons!
I’ll add this to the list of Mailable Gifts we’ve been building- bookmark that list HERE, then watch the video for more information on how to #mailamemory :


![Fluffy Squirrel Bundle (English) [ 165819 ]](https://assets1.tamsnetwork.com/images/EC042017NF/165819s.jpg "Fluffy Squirrel Bundle (English) [ 165819 ]")
![Real Red 8-1/2" X 11" Cardstock [ 102482 ]](https://assets1.tamsnetwork.com/images/EC042017NF/102482s.jpg "Real Red 8-1/2\" X 11\" Cardstock [ 102482 ]")
![Basic Beige 8 1/2" X 11" Cardstock [ 164511 ]](https://assets1.tamsnetwork.com/images/EC042017NF/164511s.jpg "Basic Beige 8 1/2\" X 11\" Cardstock [ 164511 ]")
![Cajun Craze 8-1/2" X 11" Cardstock [ 119684 ]](https://assets1.tamsnetwork.com/images/EC042017NF/119684s.jpg "Cajun Craze 8-1/2\" X 11\" Cardstock [ 119684 ]")
![Crushed Curry 8-1/2" X 11" Cardstock [ 131199 ]](https://assets1.tamsnetwork.com/images/EC042017NF/131199s.jpg "Crushed Curry 8-1/2\" X 11\" Cardstock [ 131199 ]")
![Real Red Classic Stampin' Pad [ 147084 ]](https://assets1.tamsnetwork.com/images/EC042017NF/147084s.jpg "Real Red Classic Stampin' Pad [ 147084 ]")
![Cajun Craze Classic Stampin' Pad [ 147085 ]](https://assets1.tamsnetwork.com/images/EC042017NF/147085s.jpg "Cajun Craze Classic Stampin' Pad [ 147085 ]")
![Crushed Curry Classic Stampin' Pad [ 147087 ]](https://assets1.tamsnetwork.com/images/EC042017NF/147087s.jpg "Crushed Curry Classic Stampin' Pad [ 147087 ]")
![Early Espresso Classic Stampin' Pad [ 147114 ]](https://assets1.tamsnetwork.com/images/EC042017NF/147114s.jpg "Early Espresso Classic Stampin' Pad [ 147114 ]")
![Paper Trimmer [ 152392 ]](https://assets1.tamsnetwork.com/images/EC042017NF/152392s.jpg "Paper Trimmer [ 152392 ]")
![Stampin' Seal [ 152813 ]](https://assets1.tamsnetwork.com/images/EC042017NF/152813s.jpg "Stampin' Seal [ 152813 ]")
![Stampin' Dimensionals [ 104430 ]](https://assets1.tamsnetwork.com/images/EC042017NF/104430s.jpg "Stampin' Dimensionals [ 104430 ]")


![Abundant Joy Dies [ 167855 ]](https://assets1.tamsnetwork.com/images/EC042017NF/167855s.jpg "Abundant Joy Dies [ 167855 ]")
![Mini Stampin' Cut & Emboss Machine [ 150673 ]](https://assets1.tamsnetwork.com/images/EC042017NF/150673s.jpg "Mini Stampin' Cut & Emboss Machine [ 150673 ]")
![Traditions Of Christmas 12" X 12" (30.5 X 30.5 Cm) Specialty Designer Series Paper [ 165853 ]](https://assets1.tamsnetwork.com/images/EC042017NF/165853s.jpg "Traditions Of Christmas 12\" X 12\" (30.5 X 30.5 Cm) Specialty Designer Series Paper [ 165853 ]")
![Peaceful Garden 12" X 12" (30.5 X 30.5 Cm) Glimmer Paper [ 165929 ]](https://assets1.tamsnetwork.com/images/EC042017NF/165929s.jpg "Peaceful Garden 12\" X 12\" (30.5 X 30.5 Cm) Glimmer Paper [ 165929 ]")
![Basic White 8 1/2" X 11" Thick Cardstock [ 159229 ]](https://assets1.tamsnetwork.com/images/EC042017NF/159229s.jpg "Basic White 8 1/2\" X 11\" Thick Cardstock [ 159229 ]")
![Crumb Cake 8-1/2" X 11" Cardstock [ 120953 ]](https://assets1.tamsnetwork.com/images/EC042017NF/120953s.jpg "Crumb Cake 8-1/2\" X 11\" Cardstock [ 120953 ]")
![Old Olive 8-1/2" X 11" Cardstock [ 100702 ]](https://assets1.tamsnetwork.com/images/EC042017NF/100702s.jpg "Old Olive 8-1/2\" X 11\" Cardstock [ 100702 ]")
![Cherry Cobbler 8-1/2" X 11" Cardstock [ 119685 ]](https://assets1.tamsnetwork.com/images/EC042017NF/119685s.jpg "Cherry Cobbler 8-1/2\" X 11\" Cardstock [ 119685 ]")
![Real Red & White Baker's Twine [ 164051 ]](https://assets1.tamsnetwork.com/images/EC042017NF/164051s.jpg "Real Red & White Baker's Twine [ 164051 ]")
![Mini Stampin' Dimensionals [ 144108 ]](https://assets1.tamsnetwork.com/images/EC042017NF/144108s.jpg "Mini Stampin' Dimensionals [ 144108 ]")


![Branching Out Photopolymer Stamp Set (English) [ 165771 ]](https://assets1.tamsnetwork.com/images/EC042017NF/165771s.jpg "Branching Out Photopolymer Stamp Set (English) [ 165771 ]")
![Everyday Arches Dies [ 164629 ]](https://assets1.tamsnetwork.com/images/EC042017NF/164629s.jpg "Everyday Arches Dies [ 164629 ]")
![Silent Snowfall 12" X 12" (30.5 X 30.5 Cm) Specialty Designer Series Paper [ 166062 ]](https://assets1.tamsnetwork.com/images/EC042017NF/166062s.jpg "Silent Snowfall 12\" X 12\" (30.5 X 30.5 Cm) Specialty Designer Series Paper [ 166062 ]")
![Autumn Toile 12" X 12" (30.5 X 30.5 Cm) Designer Series Paper [ 165882 ]](https://assets1.tamsnetwork.com/images/EC042017NF/165882s.jpg "Autumn Toile 12\" X 12\" (30.5 X 30.5 Cm) Designer Series Paper [ 165882 ]")
![Early Espresso 8-1/2" X 11" Cardstock [ 119686 ]](https://assets1.tamsnetwork.com/images/EC042017NF/119686s.jpg "Early Espresso 8-1/2\" X 11\" Cardstock [ 119686 ]")
![Cloud Cover 8 1/2" X 11" Cardstock [ 165621 ]](https://assets1.tamsnetwork.com/images/EC042017NF/165621s.jpg "Cloud Cover 8 1/2\" X 11\" Cardstock [ 165621 ]")
![Stampin' Cut & Emboss Machine [ 149653 ]](https://assets1.tamsnetwork.com/images/EC042017NF/149653s.jpg "Stampin' Cut & Emboss Machine [ 149653 ]")
![Stampin' Brayer [ 162936 ]](https://assets1.tamsnetwork.com/images/EC042017NF/162936s.jpg "Stampin' Brayer [ 162936 ]")
![Cloud Cover Classic Stampin' Ink Refill [ 165279 ]](https://assets1.tamsnetwork.com/images/EC042017NF/165279s.jpg "Cloud Cover Classic Stampin' Ink Refill [ 165279 ]")
![Shaded Spruce Classic Stampin' Pad [ 147088 ]](https://assets1.tamsnetwork.com/images/EC042017NF/147088s.jpg "Shaded Spruce Classic Stampin' Pad [ 147088 ]")
![Uninked Stampin’ Craft Pad & Whisper White Refill [ 147277 ]](https://assets1.tamsnetwork.com/images/EC042017NF/147277s.jpg "Uninked Stampin’ Craft Pad & Whisper White Refill [ 147277 ]")
![Basics Wow! Embossing Powder [ 165679 ]](https://assets1.tamsnetwork.com/images/EC042017NF/165679s.jpg "Basics Wow! Embossing Powder [ 165679 ]")
![Heat Tool (Us And Canada) [ 129053 ]](https://assets1.tamsnetwork.com/images/EC042017NF/129053s.jpg "Heat Tool (Us And Canada) [ 129053 ]")


![Tractor & Co Bundle (English) [ 166116 ]](https://assets1.tamsnetwork.com/images/EC042017NF/166116s.jpg "Tractor & Co Bundle (English) [ 166116 ]")
![More Than Autumn Photopolymer Stamp Set (English) [ 164228 ]](https://assets1.tamsnetwork.com/images/EC042017NF/164228s.jpg "More Than Autumn Photopolymer Stamp Set (English) [ 164228 ]")
![Darling Duckling 8 1/2" X 11" Cardstock [ 165622 ]](https://assets1.tamsnetwork.com/images/EC042017NF/165622s.jpg "Darling Duckling 8 1/2\" X 11\" Cardstock [ 165622 ]")
![Poppy Parade 8-1/2" X 11" Cardstock [ 119793 ]](https://assets1.tamsnetwork.com/images/EC042017NF/119793s.jpg "Poppy Parade 8-1/2\" X 11\" Cardstock [ 119793 ]")
![Pool Party 8-1/2" X 11" Cardstock [ 122924 ]](https://assets1.tamsnetwork.com/images/EC042017NF/122924s.jpg "Pool Party 8-1/2\" X 11\" Cardstock [ 122924 ]")
![Basic White 8 1/2" X 11" Cardstock [ 166780 ]](https://assets1.tamsnetwork.com/images/EC042017NF/166780s.jpg "Basic White 8 1/2\" X 11\" Cardstock [ 166780 ]")
![Basic Black 8-1/2" X 11" Cardstock [ 121045 ]](https://assets1.tamsnetwork.com/images/EC042017NF/121045s.jpg "Basic Black 8-1/2\" X 11\" Cardstock [ 121045 ]")
![2025–2027 In Color™ 6" X 6" (15.2 X 15.2 Cm) Designer Series Paper [ 165300 ]](https://assets1.tamsnetwork.com/images/EC042017NF/165300s.jpg "2025–2027 In Color™ 6\" X 6\" (15.2 X 15.2 Cm) Designer Series Paper [ 165300 ]")
![Silver Foil Sheets [ 132178 ]](https://assets1.tamsnetwork.com/images/EC042017NF/132178s.jpg "Silver Foil Sheets [ 132178 ]")
![Darling Duckling Classic Stampin' Pad [ 165277 ]](https://assets1.tamsnetwork.com/images/EC042017NF/165277s.jpg "Darling Duckling Classic Stampin' Pad [ 165277 ]")
![Old Olive Classic Stampin' Pad [ 147090 ]](https://assets1.tamsnetwork.com/images/EC042017NF/147090s.jpg "Old Olive Classic Stampin' Pad [ 147090 ]")
![Crumb Cake Classic Stampin' Pad [ 147116 ]](https://assets1.tamsnetwork.com/images/EC042017NF/147116s.jpg "Crumb Cake Classic Stampin' Pad [ 147116 ]")
![Tuxedo Black Memento Ink Pad [ 132708 ]](https://assets1.tamsnetwork.com/images/EC042017NF/132708s.jpg "Tuxedo Black Memento Ink Pad [ 132708 ]")
![Forever Plaid 3 D Embossing Folder [ 164049 ]](https://assets1.tamsnetwork.com/images/EC042017NF/164049s.jpg "Forever Plaid 3 D Embossing Folder [ 164049 ]")
![Adhesive Sheets [ 152334 ]](https://assets1.tamsnetwork.com/images/EC042017NF/152334s.jpg "Adhesive Sheets [ 152334 ]")
![Blending Brushes [ 153611 ]](https://assets1.tamsnetwork.com/images/EC042017NF/153611s.jpg "Blending Brushes [ 153611 ]")
![Two Tone Sparkle Gems [ 164633 ]](https://assets1.tamsnetwork.com/images/EC042017NF/164633s.jpg "Two Tone Sparkle Gems [ 164633 ]")


![Celebration Expressions Memories & More Card Pack [ 165307 ]](https://assets1.tamsnetwork.com/images/EC042017NF/165307s.jpg "Celebration Expressions Memories & More Card Pack [ 165307 ]")
![Darling Dinos Bundle (English) [ 164735 ]](https://assets1.tamsnetwork.com/images/EC042017NF/164735s.jpg "Darling Dinos Bundle (English) [ 164735 ]")
![Balmy Blue 8-1/2" X 11" Cardstock [ 146982 ]](https://assets1.tamsnetwork.com/images/EC042017NF/146982s.jpg "Balmy Blue 8-1/2\" X 11\" Cardstock [ 146982 ]")
![Timid Tiger 8 1/2" X 11" Cardstock [ 165626 ]](https://assets1.tamsnetwork.com/images/EC042017NF/165626s.jpg "Timid Tiger 8 1/2\" X 11\" Cardstock [ 165626 ]")
![Berry Burst 8-1/2" X 11" Cardstock [ 144243 ]](https://assets1.tamsnetwork.com/images/EC042017NF/144243s.jpg "Berry Burst 8-1/2\" X 11\" Cardstock [ 144243 ]")
![Balmy Blue Stampin' Blends Combo Pack [ 148544 ] (Retired)](https://assets1.tamsnetwork.com/images/EC042017NF/148544s.jpg "Balmy Blue Stampin' Blends Combo Pack [ 148544 ] (Retired)")
![Starburst Sequins [ 165539 ]](https://assets1.tamsnetwork.com/images/EC042017NF/165539s.jpg "Starburst Sequins [ 165539 ]")


![Poppin' By Bundle (English) [ 165489 ]](https://assets1.tamsnetwork.com/images/EC042017NF/165489s.jpg "Poppin' By Bundle (English) [ 165489 ]")
![2024–2026 In Color™ Glimmer 12" X 12" (30.5 X 30.5 Cm) Specialty Paper [ 163771 ]](https://assets1.tamsnetwork.com/images/EC042017NF/163771s.jpg "2024–2026 In Color™ Glimmer 12\" X 12\" (30.5 X 30.5 Cm) Specialty Paper [ 163771 ]")
![Peach Pie Classic Stampin Pad [ 163810 ]](https://assets1.tamsnetwork.com/images/EC042017NF/163810s.jpg "Peach Pie Classic Stampin Pad [ 163810 ]")
![Shy Shamrock Classic Stampin Pad [ 163808 ]](https://assets1.tamsnetwork.com/images/EC042017NF/163808s.jpg "Shy Shamrock Classic Stampin Pad [ 163808 ]")
![Multipurpose Liquid Glue [ 110755 ]](https://assets1.tamsnetwork.com/images/EC042017NF/110755s.jpg "Multipurpose Liquid Glue [ 110755 ]")
![2024 2026 In Color™ Flat Pearls [ 165266 ]](https://assets1.tamsnetwork.com/images/EC042017NF/165266s.jpg "2024 2026 In Color™ Flat Pearls [ 165266 ]")


![Impressions Abloom Bundle (English) [ 165611 ]](https://assets1.tamsnetwork.com/images/EC042017NF/165611s.jpg "Impressions Abloom Bundle (English) [ 165611 ]")
![Notes & Totes Dies [ 165240 ]](https://assets1.tamsnetwork.com/images/EC042017NF/165240s.jpg "Notes & Totes Dies [ 165240 ]")
![Floral Impressions 12" X 12" (30.5 X 30.5 Cm) Designer Series Paper [ 165603 ]](https://assets1.tamsnetwork.com/images/EC042017NF/165603s.jpg "Floral Impressions 12\" X 12\" (30.5 X 30.5 Cm) Designer Series Paper [ 165603 ]")
![Garden Green 12" X 12" (30.5 X 30.5 Cm) Two Tone Cardstock [ 166665 ]](https://assets1.tamsnetwork.com/images/EC042017NF/166665s.jpg "Garden Green 12\" X 12\" (30.5 X 30.5 Cm) Two Tone Cardstock [ 166665 ]")
![Balmy Blue Classic Stampin' Pad [ 147105 ]](https://assets1.tamsnetwork.com/images/EC042017NF/147105s.jpg "Balmy Blue Classic Stampin' Pad [ 147105 ]")
![Garden Green Classic Stampin' Pad [ 147089 ]](https://assets1.tamsnetwork.com/images/EC042017NF/147089s.jpg "Garden Green Classic Stampin' Pad [ 147089 ]")
![Misty Moonlight Classic Stampin' Pad [ 153118 ]](https://assets1.tamsnetwork.com/images/EC042017NF/153118s.jpg "Misty Moonlight Classic Stampin' Pad [ 153118 ]")
![Berry Burst Classic Stampin' Pad [ 147143 ]](https://assets1.tamsnetwork.com/images/EC042017NF/147143s.jpg "Berry Burst Classic Stampin' Pad [ 147143 ]")
![Fresh Freesia Classic Stampin' Pad [ 155611 ]](https://assets1.tamsnetwork.com/images/EC042017NF/155611s.jpg "Fresh Freesia Classic Stampin' Pad [ 155611 ]")


![On The Go Suite Collection (English) [ 165583 ]](https://assets1.tamsnetwork.com/images/EC042017NF/165583s.jpg "On The Go Suite Collection (English) [ 165583 ]")
![Shy Shamrock 8 1/2" X 11" Cardstock [ 163795 ]](https://assets1.tamsnetwork.com/images/EC042017NF/163795s.jpg "Shy Shamrock 8 1/2\" X 11\" Cardstock [ 163795 ]")
![Petunia Pop 8 1/2" X 11" Cardstock [ 163801 ]](https://assets1.tamsnetwork.com/images/EC042017NF/163801s.jpg "Petunia Pop 8 1/2\" X 11\" Cardstock [ 163801 ]")
![Pumpkin Pie 8-1/2" X 11" Cardstock [ 105117 ]](https://assets1.tamsnetwork.com/images/EC042017NF/105117s.jpg "Pumpkin Pie 8-1/2\" X 11\" Cardstock [ 105117 ]")
![Azure Afternoon 8 1/2" X 11" Cardstock [ 161719 ]](https://assets1.tamsnetwork.com/images/EC042017NF/161719s.jpg "Azure Afternoon 8 1/2\" X 11\" Cardstock [ 161719 ]")


![Friends Of The Ocean 12" X 12" (30.5 X 30.5 Cm) Designer Series Paper [ 164684 ]](https://assets1.tamsnetwork.com/images/EC042017NF/164684s.jpg "Friends Of The Ocean 12\" X 12\" (30.5 X 30.5 Cm) Designer Series Paper [ 164684 ]")
![Daffodil Delight 8-1/2" X 11" Cardstock [ 119683 ]](https://assets1.tamsnetwork.com/images/EC042017NF/119683s.jpg "Daffodil Delight 8-1/2\" X 11\" Cardstock [ 119683 ]")
![Summer Splash 8 1/2" X 11 Cardstock [ 163797 ]](https://assets1.tamsnetwork.com/images/EC042017NF/163797s.jpg "Summer Splash 8 1/2\" X 11 Cardstock [ 163797 ]")
![Alphabet à La Mode Dies [ 160750 ]](https://assets1.tamsnetwork.com/images/EC042017NF/160750s.jpg "Alphabet à La Mode Dies [ 160750 ]")
![Mini Alphabet Dies [ 162934 ]](https://assets1.tamsnetwork.com/images/EC042017NF/162934s.jpg "Mini Alphabet Dies [ 162934 ]")
![Meant To Bee Photopolymer Stamp Set (English) [ 166583 ]](https://assets1.tamsnetwork.com/images/EC042017NF/166583s.jpg "Meant To Bee Photopolymer Stamp Set (English) [ 166583 ]")
![Bee My Valentine Photopolymer Stamp Set (English) [ 162547 ]](https://assets1.tamsnetwork.com/images/EC042017NF/162547s.jpg "Bee My Valentine Photopolymer Stamp Set (English) [ 162547 ]")
![Basic White Medium Envelopes [ 159236 ]](https://assets1.tamsnetwork.com/images/EC042017NF/159236s.jpg "Basic White Medium Envelopes [ 159236 ]")
![Mini Glue Dots [ 103683 ]](https://assets1.tamsnetwork.com/images/EC042017NF/103683s.jpg "Mini Glue Dots [ 103683 ]")
