
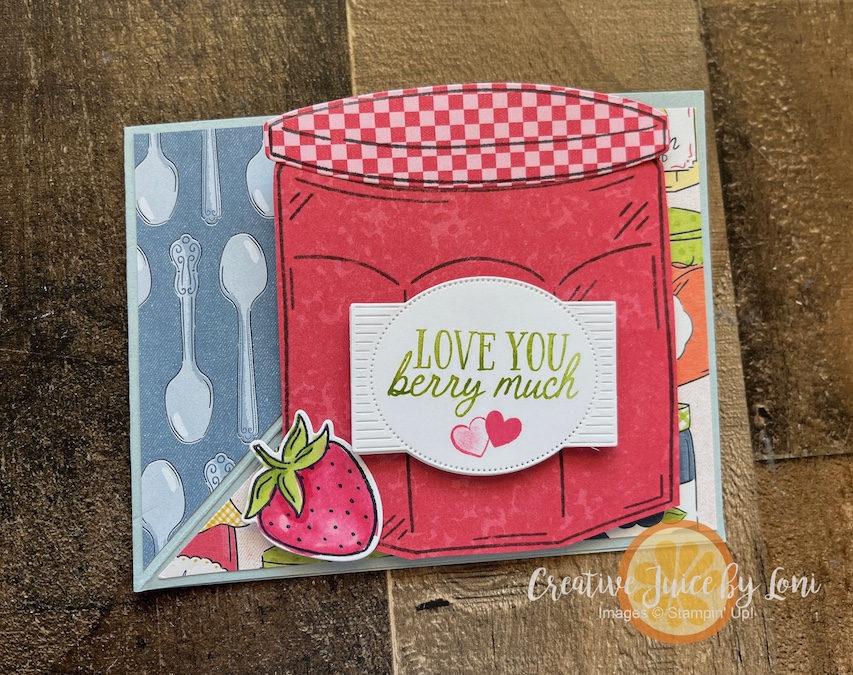
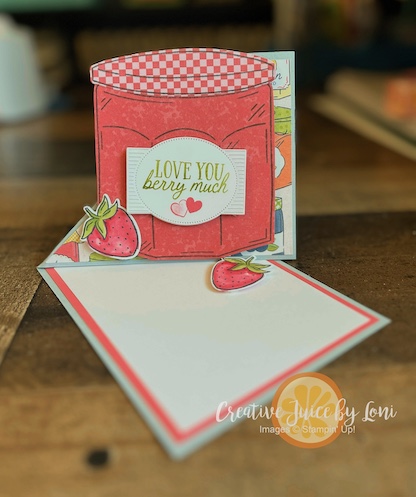
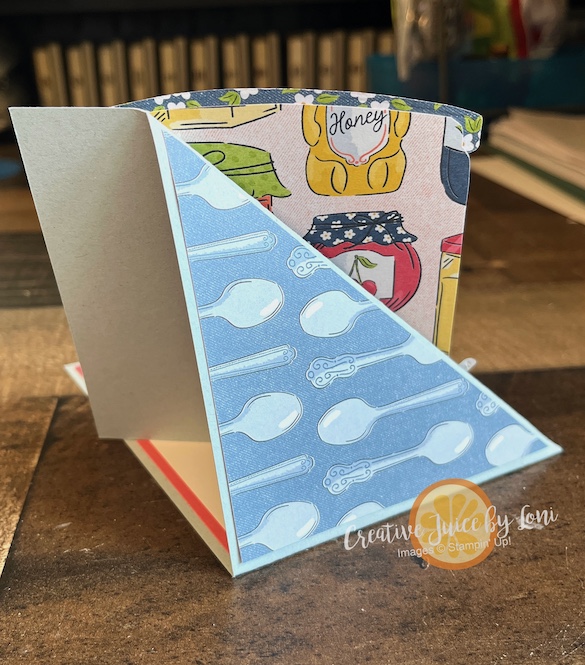
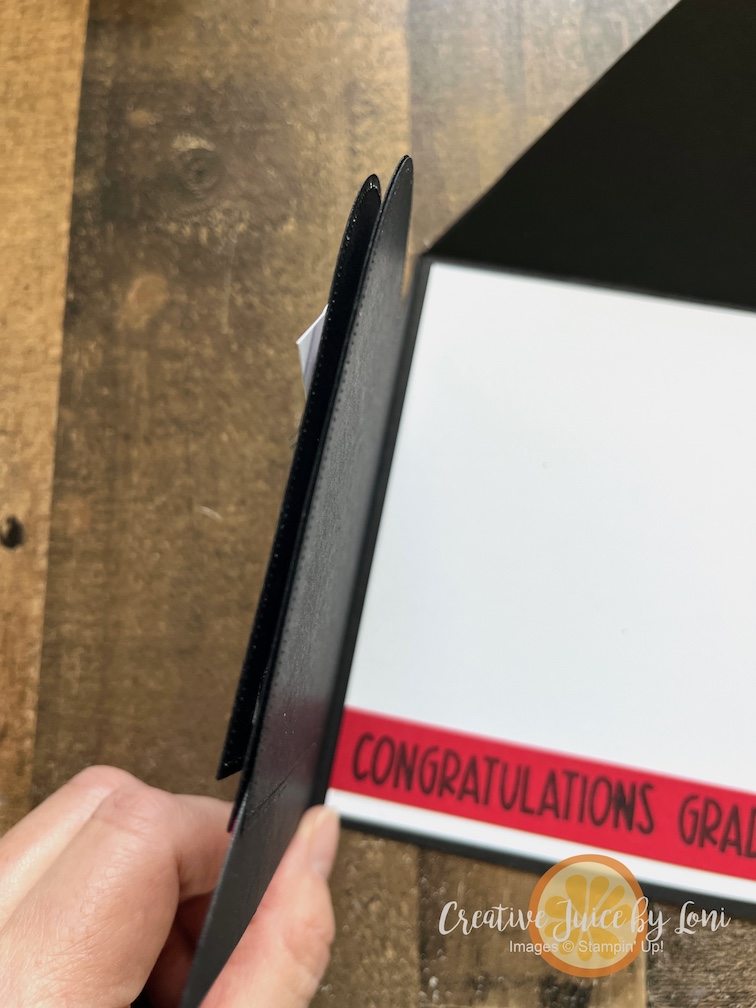
A card that pops up to say hello always brings a little extra fun to the mailbox. This one does just that with a playful twisted easel fold that lets the sweet strawberry jar take center stage. This is how it fits in the envelope as a flat card:
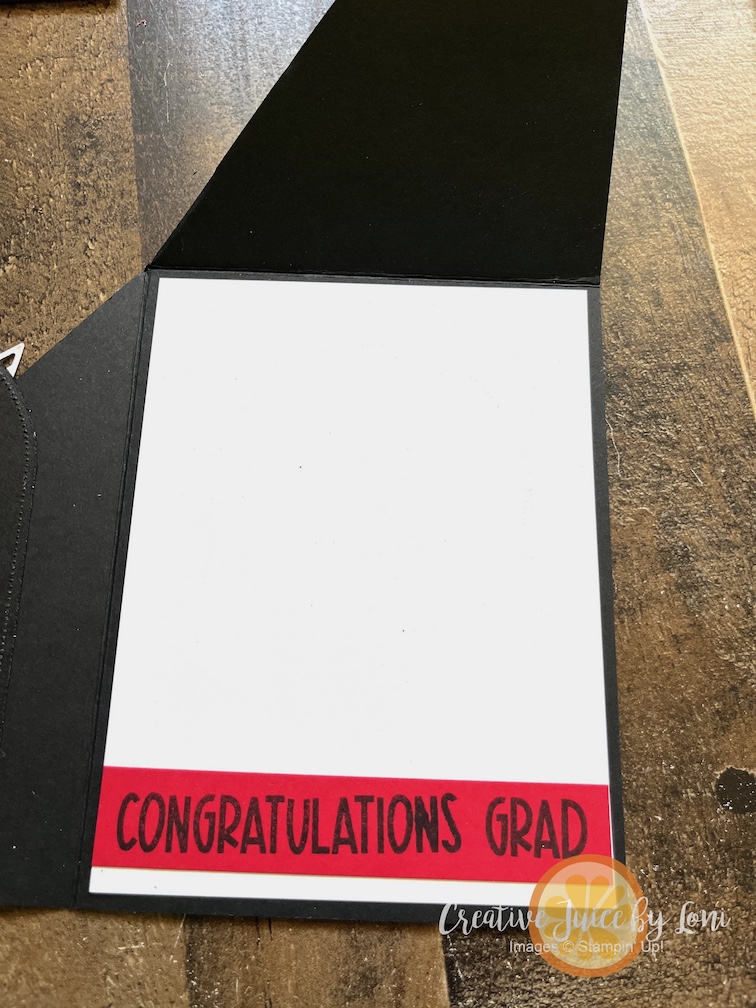
The trick is to fold your card base from the front lower left corner back along the fold as evenly as you can. If you’d like to score it, mark at 1-1/4″ in from the top right corner and score back to the fold on the opposite corner. As you open it, it twists and props against the raised strawberry on the inside of the card:
I created this card using the Filled with Sweetness Bundle from Stampin’ Up!®️ – which we are playing with for a few days on Creative Juice by Loni – and the little strawberries make it feel like you’ve captured sweetness in a jar! “Love you berry much” seemed like the perfect message for a grandchild. It’s the kind of happy mail that could arrive in a mailbox hundreds of miles away… and still feel like a hug.
This week inside my VIP Facebook Group, we’re having a fun brainstorming session about long-distance grandparenting through snail mail. Many grandparents can’t always be nearby for everyday moments, but a handmade card can travel where we can’t. Imagine a grandchild setting this card on their desk or dresser, the strawberry jar standing proudly like a tiny reminder that Grandma or Grandpa is thinking of them!
Make an order of $50+ (before tax & shipping) from my Stampin’ Store and you’ll receive a set of 19 exclusive papercrafting tutorials (including another great idea for the Filled with Sweetness bundle from me!), a handmade card AND you’ll be invited to join my private Facebook group for my VIP customers!
Handmade cards don’t just carry ink and paper. They carry love, encouragement, and a sweet connection across the miles. 🍓💌
Product List![Filled With Sweetness Bundle (English) [ 167475 ]](https://assets1.tamsnetwork.com/images/EC042017NF/167475s.jpg "Filled With Sweetness Bundle (English) [ 167475 ]")
![Homemade Sweetness 12" X 12" (30.5 X 30.5 Cm) Designer Series Paper [ 167467 ]](https://assets1.tamsnetwork.com/images/EC042017NF/167467s.jpg "Homemade Sweetness 12\" X 12\" (30.5 X 30.5 Cm) Designer Series Paper [ 167467 ]")
![Cloud Cover 8 1/2" X 11" Cardstock [ 165621 ]](https://assets1.tamsnetwork.com/images/EC042017NF/165621s.jpg "Cloud Cover 8 1/2\" X 11\" Cardstock [ 165621 ]")
![Strawberry Slush 8 1/2" X 11" Cardstock [ 165625 ]](https://assets1.tamsnetwork.com/images/EC042017NF/165625s.jpg "Strawberry Slush 8 1/2\" X 11\" Cardstock [ 165625 ]")
![Basic White 8 1/2" X 11" Cardstock [ 166780 ]](https://assets1.tamsnetwork.com/images/EC042017NF/166780s.jpg "Basic White 8 1/2\" X 11\" Cardstock [ 166780 ]")
![Strawberry Slush Classic Stampin' Pad [ 165286 ]](https://assets1.tamsnetwork.com/images/EC042017NF/165286s.jpg "Strawberry Slush Classic Stampin' Pad [ 165286 ]")
![Granny Apple Green Stampin' Pad [ 147095 ]](https://assets1.tamsnetwork.com/images/EC042017NF/147095s.jpg "Granny Apple Green Stampin' Pad [ 147095 ]")
![Stampin' Cut & Emboss Machine [ 149653 ]](https://assets1.tamsnetwork.com/images/EC042017NF/149653s.jpg "Stampin' Cut & Emboss Machine [ 149653 ]")
![Strawberry Slush Stampin’ Blends Combo Pack [ 165290 ]](https://assets1.tamsnetwork.com/images/EC042017NF/165290s.jpg "Strawberry Slush Stampin’ Blends Combo Pack [ 165290 ]")
![Pretty In Pink Stampin’ Blends Combo Pack [ 163824 ]](https://assets1.tamsnetwork.com/images/EC042017NF/163824s.jpg "Pretty In Pink Stampin’ Blends Combo Pack [ 163824 ]")
![Granny Apple Green Stampin' Blends Combo Pack [ 154885 ]](https://assets1.tamsnetwork.com/images/EC042017NF/154885s.jpg "Granny Apple Green Stampin' Blends Combo Pack [ 154885 ]")
![Stampin' Dimensionals [ 104430 ]](https://assets1.tamsnetwork.com/images/EC042017NF/104430s.jpg "Stampin' Dimensionals [ 104430 ]")


![Seasonal Celebrations Photopolymer Stamp Set [ 167225 ]](https://assets1.tamsnetwork.com/images/EC042017NF/167225s.jpg "Seasonal Celebrations Photopolymer Stamp Set [ 167225 ]")
![Reason To Celebrate Photopolymer Stamp Set (English) [ 166905 ]](https://assets1.tamsnetwork.com/images/EC042017NF/166905s.jpg "Reason To Celebrate Photopolymer Stamp Set (English) [ 166905 ]")
![Forever Plaid 3 D Embossing Folder [ 164049 ]](https://assets1.tamsnetwork.com/images/EC042017NF/164049s.jpg "Forever Plaid 3 D Embossing Folder [ 164049 ]")
![Swirled Designs Dies [ 167032 ]](https://assets1.tamsnetwork.com/images/EC042017NF/167032s.jpg "Swirled Designs Dies [ 167032 ]")
![Real Red 8-1/2" X 11" Cardstock [ 102482 ]](https://assets1.tamsnetwork.com/images/EC042017NF/102482s.jpg "Real Red 8-1/2\" X 11\" Cardstock [ 102482 ]")
![Silver 12" X 12" (30.5 X 30.5 Cm) Foil Sheets [ 163387 ]](https://assets1.tamsnetwork.com/images/EC042017NF/163387s.jpg "Silver 12\" X 12\" (30.5 X 30.5 Cm) Foil Sheets [ 163387 ]")
![Real Red Classic Stampin' Pad [ 147084 ]](https://assets1.tamsnetwork.com/images/EC042017NF/147084s.jpg "Real Red Classic Stampin' Pad [ 147084 ]")
![Tuxedo Black Memento Ink Pad [ 132708 ]](https://assets1.tamsnetwork.com/images/EC042017NF/132708s.jpg "Tuxedo Black Memento Ink Pad [ 132708 ]")
![Everyday Arches Dies [ 164629 ]](https://assets1.tamsnetwork.com/images/EC042017NF/164629s.jpg "Everyday Arches Dies [ 164629 ]")
![Adhesive Sheets [ 152334 ]](https://assets1.tamsnetwork.com/images/EC042017NF/152334s.jpg "Adhesive Sheets [ 152334 ]")
![Black Stampin' Dimensionals Combo Pack [ 150893 ]](https://assets1.tamsnetwork.com/images/EC042017NF/150893s.jpg "Black Stampin' Dimensionals Combo Pack [ 150893 ]")
![Paper Trimmer [ 152392 ]](https://assets1.tamsnetwork.com/images/EC042017NF/152392s.jpg "Paper Trimmer [ 152392 ]")


![Traditional Labels Bundle (English) [ 165865 ]](https://assets1.tamsnetwork.com/images/EC042017NF/165865s.jpg "Traditional Labels Bundle (English) [ 165865 ]")
![Basic Black 12" X 12" (30.5 X 30.5 Cm) Cardstock [ 166786 ]](https://assets1.tamsnetwork.com/images/EC042017NF/166786s.jpg "Basic Black 12\" X 12\" (30.5 X 30.5 Cm) Cardstock [ 166786 ]")
![Modern Christmas 12" X 12" (30.5 X 30.5 Cm) Specialty Designer Series Paper [ 165990 ]](https://assets1.tamsnetwork.com/images/EC042017NF/165990s.jpg "Modern Christmas 12\" X 12\" (30.5 X 30.5 Cm) Specialty Designer Series Paper [ 165990 ]")
![Gold Foil Sheets [ 132622 ]](https://assets1.tamsnetwork.com/images/EC042017NF/132622s.jpg "Gold Foil Sheets [ 132622 ]")
![Gold Striped 3/8" (1 Cm) Mesh Ribbon [ 165599 ]](https://assets1.tamsnetwork.com/images/EC042017NF/165599s.jpg "Gold Striped 3/8\" (1 Cm) Mesh Ribbon [ 165599 ]")
![Hole Punch Assortment [ 165409 ]](https://assets1.tamsnetwork.com/images/EC042017NF/165409s.jpg "Hole Punch Assortment [ 165409 ]")
![Tear & Tape Adhesive [ 154031 ]](https://assets1.tamsnetwork.com/images/EC042017NF/154031s.jpg "Tear & Tape Adhesive [ 154031 ]")
![Stampin' Seal [ 152813 ]](https://assets1.tamsnetwork.com/images/EC042017NF/152813s.jpg "Stampin' Seal [ 152813 ]")


![Fluffy Squirrel Bundle (English) [ 165819 ]](https://assets1.tamsnetwork.com/images/EC042017NF/165819s.jpg "Fluffy Squirrel Bundle (English) [ 165819 ]")
![Basic Beige 8 1/2" X 11" Cardstock [ 164511 ]](https://assets1.tamsnetwork.com/images/EC042017NF/164511s.jpg "Basic Beige 8 1/2\" X 11\" Cardstock [ 164511 ]")
![Cajun Craze 8-1/2" X 11" Cardstock [ 119684 ]](https://assets1.tamsnetwork.com/images/EC042017NF/119684s.jpg "Cajun Craze 8-1/2\" X 11\" Cardstock [ 119684 ]")
![Crushed Curry 8-1/2" X 11" Cardstock [ 131199 ]](https://assets1.tamsnetwork.com/images/EC042017NF/131199s.jpg "Crushed Curry 8-1/2\" X 11\" Cardstock [ 131199 ]")
![Cajun Craze Classic Stampin' Pad [ 147085 ]](https://assets1.tamsnetwork.com/images/EC042017NF/147085s.jpg "Cajun Craze Classic Stampin' Pad [ 147085 ]")
![Crushed Curry Classic Stampin' Pad [ 147087 ]](https://assets1.tamsnetwork.com/images/EC042017NF/147087s.jpg "Crushed Curry Classic Stampin' Pad [ 147087 ]")
![Early Espresso Classic Stampin' Pad [ 147114 ]](https://assets1.tamsnetwork.com/images/EC042017NF/147114s.jpg "Early Espresso Classic Stampin' Pad [ 147114 ]")


![Branching Out Bundle (English) [ 165776 ]](https://assets1.tamsnetwork.com/images/EC042017NF/165776s.jpg "Branching Out Bundle (English) [ 165776 ]")
![Lost Lagoon 8-1/2" X 11" Cardstock [ 133679 ]](https://assets1.tamsnetwork.com/images/EC042017NF/133679s.jpg "Lost Lagoon 8-1/2\" X 11\" Cardstock [ 133679 ]")
![Pecan Pie Classic Stampin' Pad [ 161665 ]](https://assets1.tamsnetwork.com/images/EC042017NF/161665s.jpg "Pecan Pie Classic Stampin' Pad [ 161665 ]")
![Lost Lagoon Classic Stampin' Pad [ 161678 ]](https://assets1.tamsnetwork.com/images/EC042017NF/161678s.jpg "Lost Lagoon Classic Stampin' Pad [ 161678 ]")
![Neutrals Stampin' Write Markers [ 161697 ]](https://assets1.tamsnetwork.com/images/EC042017NF/161697s.jpg "Neutrals Stampin' Write Markers [ 161697 ]")
![Birch Wood 3 D Embossing Folder [ 164069 ]](https://assets1.tamsnetwork.com/images/EC042017NF/164069s.jpg "Birch Wood 3 D Embossing Folder [ 164069 ]")


![Branching Out Photopolymer Stamp Set (English) [ 165771 ]](https://assets1.tamsnetwork.com/images/EC042017NF/165771s.jpg "Branching Out Photopolymer Stamp Set (English) [ 165771 ]")
![Silent Snowfall 12" X 12" (30.5 X 30.5 Cm) Specialty Designer Series Paper [ 166062 ]](https://assets1.tamsnetwork.com/images/EC042017NF/166062s.jpg "Silent Snowfall 12\" X 12\" (30.5 X 30.5 Cm) Specialty Designer Series Paper [ 166062 ]")
![Autumn Toile 12" X 12" (30.5 X 30.5 Cm) Designer Series Paper [ 165882 ]](https://assets1.tamsnetwork.com/images/EC042017NF/165882s.jpg "Autumn Toile 12\" X 12\" (30.5 X 30.5 Cm) Designer Series Paper [ 165882 ]")
![Early Espresso 8-1/2" X 11" Cardstock [ 119686 ]](https://assets1.tamsnetwork.com/images/EC042017NF/119686s.jpg "Early Espresso 8-1/2\" X 11\" Cardstock [ 119686 ]")
![Stampin' Brayer [ 162936 ]](https://assets1.tamsnetwork.com/images/EC042017NF/162936s.jpg "Stampin' Brayer [ 162936 ]")
![Cloud Cover Classic Stampin' Ink Refill [ 165279 ]](https://assets1.tamsnetwork.com/images/EC042017NF/165279s.jpg "Cloud Cover Classic Stampin' Ink Refill [ 165279 ]")
![Shaded Spruce Classic Stampin' Pad [ 147088 ]](https://assets1.tamsnetwork.com/images/EC042017NF/147088s.jpg "Shaded Spruce Classic Stampin' Pad [ 147088 ]")
![Uninked Stampin’ Craft Pad & Whisper White Refill [ 147277 ]](https://assets1.tamsnetwork.com/images/EC042017NF/147277s.jpg "Uninked Stampin’ Craft Pad & Whisper White Refill [ 147277 ]")
![Basics Wow! Embossing Powder [ 165679 ]](https://assets1.tamsnetwork.com/images/EC042017NF/165679s.jpg "Basics Wow! Embossing Powder [ 165679 ]")
![Heat Tool (Us And Canada) [ 129053 ]](https://assets1.tamsnetwork.com/images/EC042017NF/129053s.jpg "Heat Tool (Us And Canada) [ 129053 ]")


![Darling Dinos Bundle (English) [ 164735 ]](https://assets1.tamsnetwork.com/images/EC042017NF/164735s.jpg "Darling Dinos Bundle (English) [ 164735 ]")
![Secret Sea 8 1/2" X 11" Cardstock [ 165624 ]](https://assets1.tamsnetwork.com/images/EC042017NF/165624s.jpg "Secret Sea 8 1/2\" X 11\" Cardstock [ 165624 ]")
![Timid Tiger 8 1/2" X 11" Cardstock [ 165626 ]](https://assets1.tamsnetwork.com/images/EC042017NF/165626s.jpg "Timid Tiger 8 1/2\" X 11\" Cardstock [ 165626 ]")
![Old Olive 8-1/2" X 11" Cardstock [ 100702 ]](https://assets1.tamsnetwork.com/images/EC042017NF/100702s.jpg "Old Olive 8-1/2\" X 11\" Cardstock [ 100702 ]")
![Secret Sea Classic Stampin' Pad [ 165285 ]](https://assets1.tamsnetwork.com/images/EC042017NF/165285s.jpg "Secret Sea Classic Stampin' Pad [ 165285 ]")
![Timid Tiger Classic Stampin' Pad [ 165278 ]](https://assets1.tamsnetwork.com/images/EC042017NF/165278s.jpg "Timid Tiger Classic Stampin' Pad [ 165278 ]")
![Multipurpose Liquid Glue [ 110755 ]](https://assets1.tamsnetwork.com/images/EC042017NF/110755s.jpg "Multipurpose Liquid Glue [ 110755 ]")
