As you begin to think about gifting, don’t overlook the supplies you already have! Pair your stamps and patterned paper with a small wooden crate (found at 💲🌳) and create packaging so sweet:
The Take a Bow Designer Series Paper has candy cane vibes, and a few thin strips can be attached with a good coating of Liquid Glue to the slats on the box, then add a label with a sentiment. Finish it off with stamped adornments and embellishments (the tiny Peppermints will be back in stock mid-November) and fill your crate!
The More than Autumn bundle has truly been scrumptious to play with! Filled with mouth-watering treats for Fall AND BEYOND, you’d regret not having it in your stamping studio.
Here’s a treat for you: Download the .pdf tutorial for this project today 👇🏼
Did you know I also send exclusive tutorials in my email newsletters to customers? PLUS my Paper Pumpkin subscribers get their own special “Pumpkin Patch” email at the end of each month.
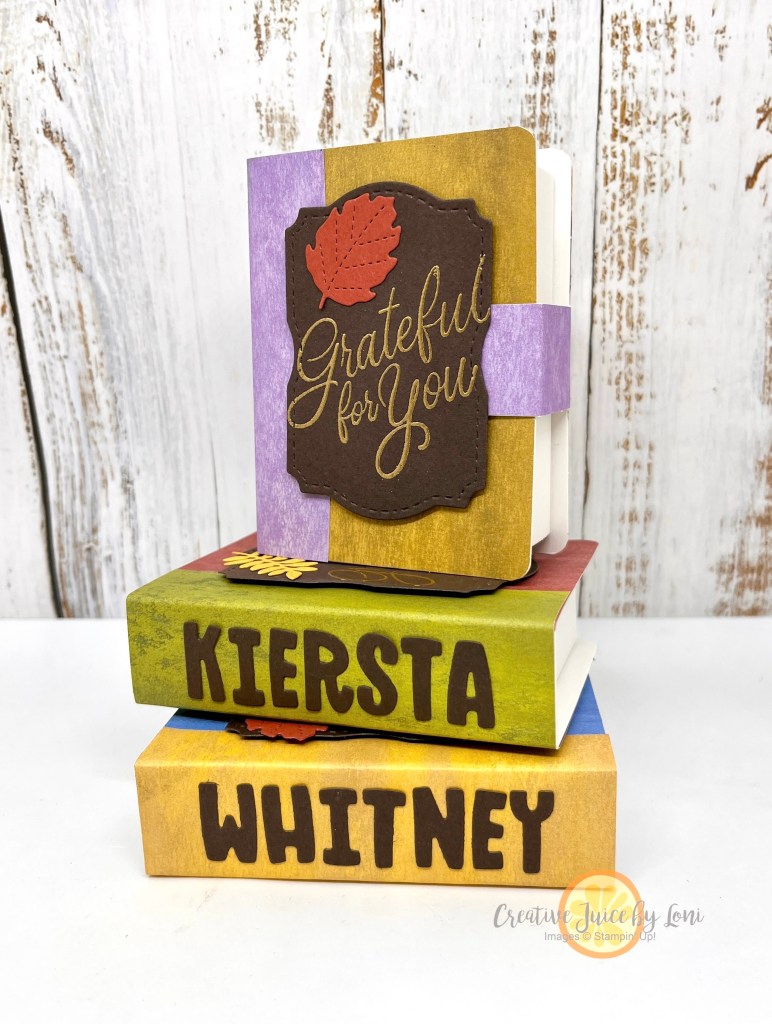
A great DIY is one that is prepared for you to put the finishing touches on, and these darling little book treat box accordion albums double as precious keepsakes, once you add photos and journaling of which blessings you are most grateful for.
The Book Treat Boxes give you the canvas to embellish, and I chose to use the back side of the lovely Splendid Autumn Designer Series Paper to cover my boxes, because it looks like colored leather or parchment, perfect for my vision of classic books:
Embossing the sentiment on the piece cut from the frame in the Splendid Autumn bundle adds a old-fashioned title to the album, and the Mini Alphabet dies personalizes the book.
You could fill these boxes with treats, but I chose to make a Gratitude album. Open it up and pull out the pages to add photos of who or what you are thankful for, and journal why they matter to you. You can add at least TWO strips of 3.25″ x 12″ card stock (scored every 2.5″) end-to-end to make long accordion pages, though this is just one strip:
Watch the video for tips and how to assemble, then add the supplies to your cart below:
If you can use scissors and glue, you have the ability to make pretty things with paper! All you need next is a kit: Lucky for you ~ the Stampin’ Up! Kit Collection is up to 30% off through October 31st:
Not only is a kit a wonderful starting point for any new paper crafter, they also give you ideas for further crafting, as I’m about to show you.
Playing with the Hello Hollyhocks kit (an all-inclusive, non-stamping kit), I demonstrated how to let the sketch for card #1 (on the left) inspire a future project (on the right):
Swapping out a hollyhocks for stamped and colored zinnias and creating your own splatter background made this “dupe” super simple.
Next, you can “step up” a card from the kit by cutting apart the card base and framing it on coordinating card stock:
Watch the video (below) to see what I did for the inside of the stepped-up version!
Finally, let a kit teach you a new technique to try, like this floating frame idea. The card on the left is from the kit, which inspired the Christmas card on the right:
Keep a few kits on hand for gift-giving occasions, too~ they are unique, thoughtful gifts!
Sketches are a Stamper’s secret design tool, and not only do they work for greeting cards and scrapbook pages, sketches also help you master a GIFT TAG…and a beautiful tag will level up any gift!
For our October New at SU! blog hop, I selected 3 tag sketches from page 16 of the September-December Mini catalog and combined those sketches with a set of products that evoke classic Christmas vibes.
The sketches gave me a starting point for my creativity, and a suite of Stampin’ Up! products helped limit my options, which actually makes it easier to be artistic. All supplies are listed at the end of this post.
The Joy/Candle tag mostly features stamping the images from the stamp set:
The stocking tag shows how you can cut some of the images from the Designer Series Paper with the dies, which also match the stamped images:
Finally, the Very Merry tag puts the focus on the sentiment:
The wonderful thing about tags is that they dress up any gift, along with a bit beautiful ribbon ~ see how they make a Kit Collection box fancy? Remember that all the kits are ON SALE this month (see below).
But that’s not all! Tags are adorable on a greeting card, as well:
Not only are tags a miniature piece of art, they are also a terrific way to use up scraps! Try cutting some of your smaller pieces of card stock into tag shapes, and have them ready to pair with a sketch.
Tell me what you think of these tags- leave a comment link at the top of the post!
Visit all the other posts to see how a sketch inspired their projects:
October 2024 New at SU! Hop: Sketches-Crafter’s Secret Design Tool
Being a paper crafter means always having supplies on hand to create anything you can dream of: From greeting cards to memory albums, or gifts to seasonal decorations, you’re prepared to MAKE IT!
Rummaging through my crafty closet, I found a few chargers left over from a previous project. I know my Creative Juice community has a lot of Halloween decor, but if you have a void between October 31st and Christmas, this may be a project to embrace:
Let’s be real. Who has time to make a balloon arch, a photo booth, hand-made party favors, personalized invitations PLUS the food & entertainment for a party by themselves? NOT ME.
However, there are a few details I CAN make quickly and simply to elevate a celebration. This one was inspired by my mother-in-law who always has seasonal “china dishes” (paper plates) and napkins. The dollar store makes this even more feasible and all you need to do is wrap them all together and add a tag!
To make it easy for your guests to grab & go, wrap the utensils, a fun straw and box of sparklers (or other small gift) together with a ribbon (no bows required, but a little bling goes a long way), add a simple tag and set them in a fun cup or basket. Your friends can easily hold on to the whole bundle while still filling their cups.
This striped tag was created using the Labeled with Love bundle- choose a coordinating punch or dies when you purchase this versatile crafting combination! I have a few tips in the short video tutorial for mass-producing these labels in minutes. Remember you can switch-up colors and sentiments for any party, too.
When you have the basics on hand (card stock, stamps, ink, ribbon and a punch), you are prepared to sprinkle a pinch of pizzazz onto a gathering of any type. Select the items you need to stock up on:
As we near the end of a Stampin’ Up! catalog year, it’s time to spotlight some of my favorite retiring products. These products are available while supplies last or until April 30, 2024 (download full retiring product list at end of this post).
Since the TGIF Bonus Challenge #tgifc466 was to create a “simple gift set” of cards, it gave me the opportunity to stretch outside my comfort zone of bright colors, and use some of the black & white designs from the Delightfully Eclectic Designer Series Paper. But you can’t take ALL the color out of my life, so I added Calypso Coral, which also shows up on some of the paper designs.
These cards use the paper, PLUS the Good Feelings stamp set and Rays of Light background stamp, all of which will NOT be returning to the new catalog premiering in May. The Rays of Light background is the one I will grieve over losing the most!
This simple fun-fold card style is strategically planned to make the most of your patterned paper! If you score a full 8.5″ x 11″ sheet of card stock along the long edge at 4.25″ and 9.75″…THEN cut it in half at 4.25″, you’ll have two 11″ x 4.25″ cards ready to fold, meeting on the front of the card,
Use a 4″ x 4″ piece of DSP on one side and a 4″ x 1″ piece on the smaller fold. This pattern can be used in landscape or portrait orientation.
Now, HOW should we “gift” all these simple co-ordinating cards?
A quick folio made from a 12″ tall x 10″ wide piece of the Designer Series Paper is just the thing, and can hold all the cards plus envelopes!
Score it at 4.75″ and 5.25″ to give a center binding back, then add a ribbon to tie closed:
What else is retiring? Click banners to download the lists of items from the ’23-’24 Annual Catalog AND the January-April Mini Catalog which will be retiring.
>>> NOTE THAT THE LAST CHANCE SALE STARTS APRIL 9th <<<
These are the supplies I used for my simple set of cards and the folio to gift them in. I appreciate your orders so much and will mail you a thank you card! THANK YOU.
Maybe it’s because we’ve searched for a good box previously to no avail, but I am of the age that it’s difficult for me to throw away the boxes from Stampin’ Up! kits, or the pretty Paper Pumpkin boxes! They are such a perfect size for a half batch of BROWNIES, that it *almost* makes me want to bake a pan of ooey-gooey goodness, but then I’d want to eat the other half…
But what can we DO with those wonderful Stampin’ Up! boxes (aside from delivering goodies)??
Turn them into STATIONERY GIFT SETS!
Begin by covering the top with a piece of card stock and/or Designer Series Paper and embellish as desired. The February Paper Pumpkin kit box was also one I kept to modify, and because it was pre-printed, it took a smaller piece of card stock that I embossed for the center:
Next, you’ll also re-cycle the cardboard backing from a package of Designer Series Paper by cutting it into two pieces:
12″ x 6 1/4″ – scored at 4 1/2″, 6″ and 7 1/2″
4 1/2″ x 9 1/8″ – scored at 2 1/2″, 4″ and 6 1/2″
Those two pieces will create the dividers for your box. These easily fit 6-8 cards & envelopes on the large sections, a small book of postage stamps in the smallest section and your could add tags, small gift enclosures, a pad of post-it notes or a treat in the medium section:
Here’s the video tutorial to discover how simple it is to make this handy project:
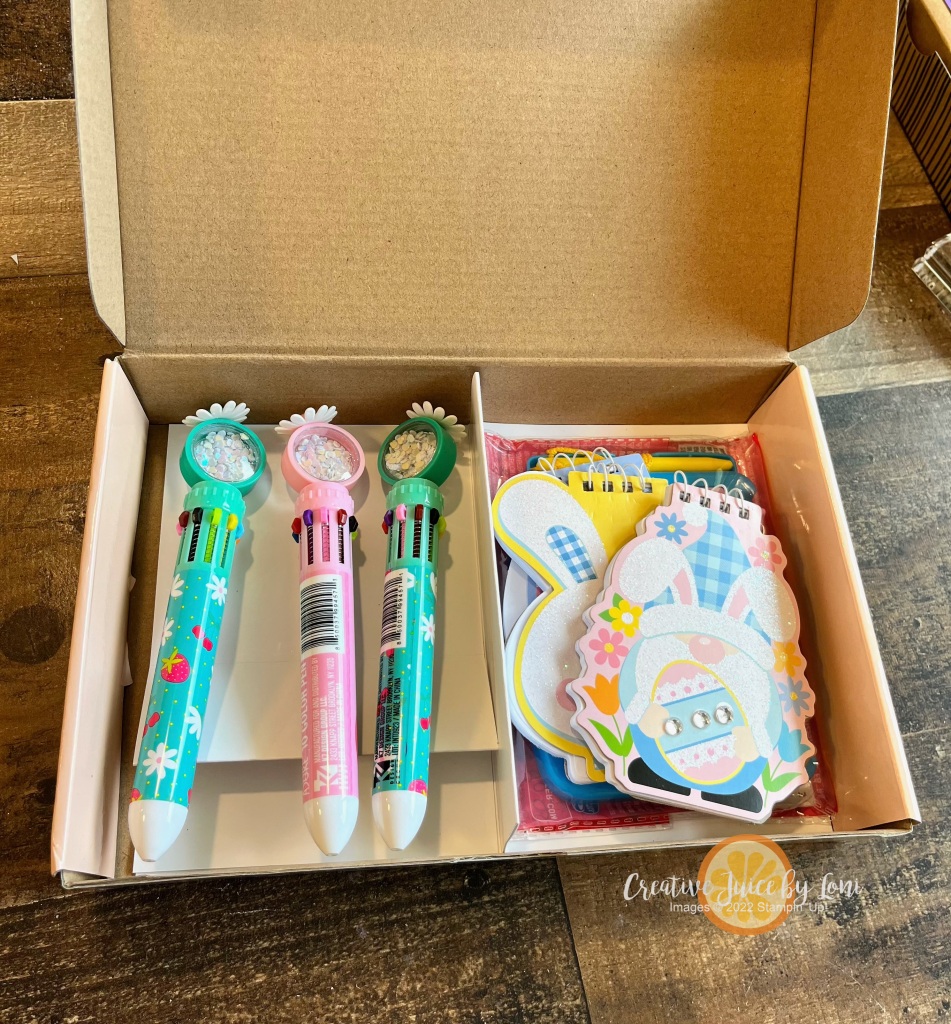
After the video, I remembered I had some Dollar Tree goodies to send to my grandkids, and lo-and-behold, they fit in a 2-section box… just leave out the second section divider and you could also put twice as many A2-sized cards inside:
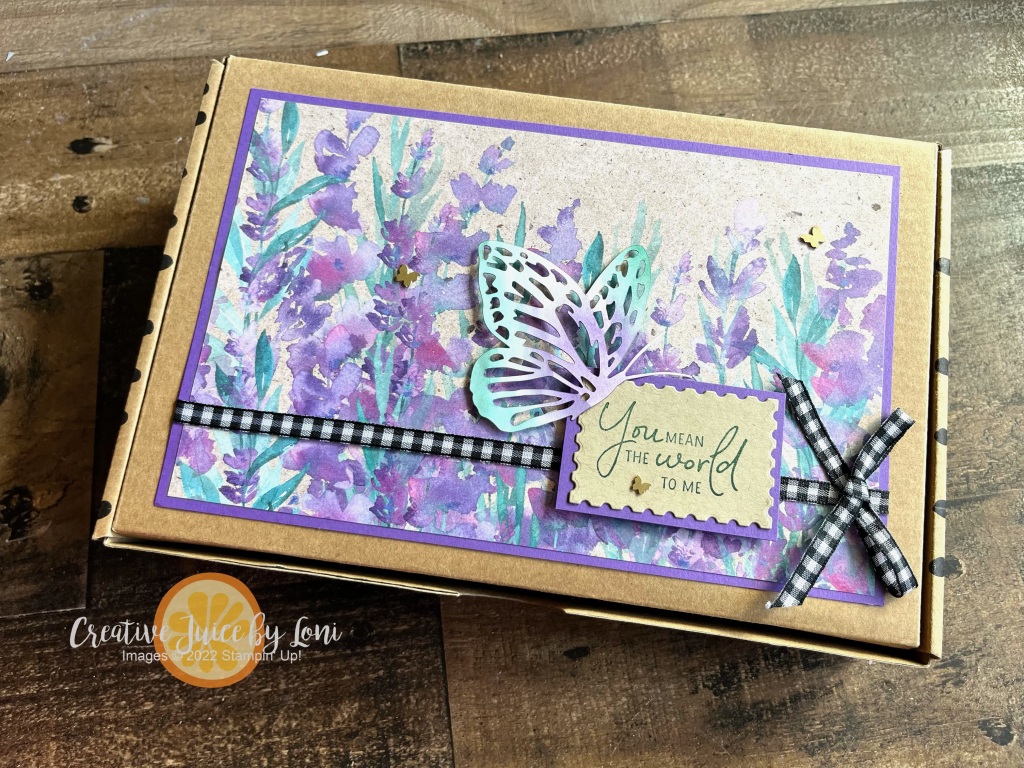
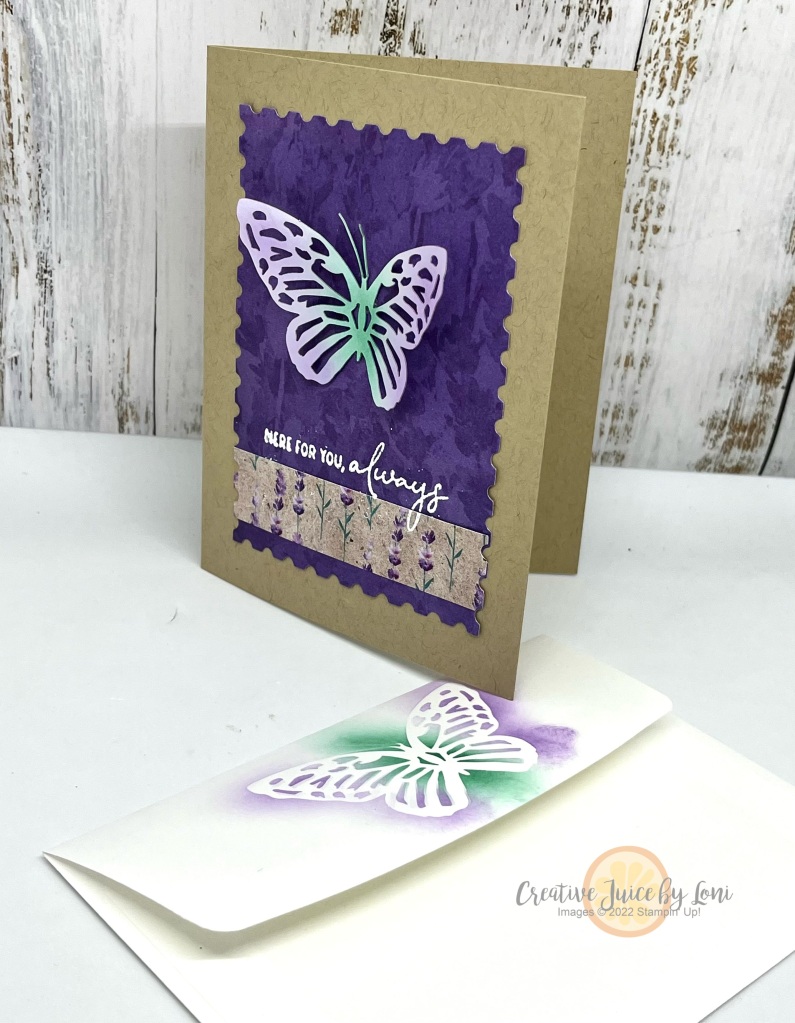
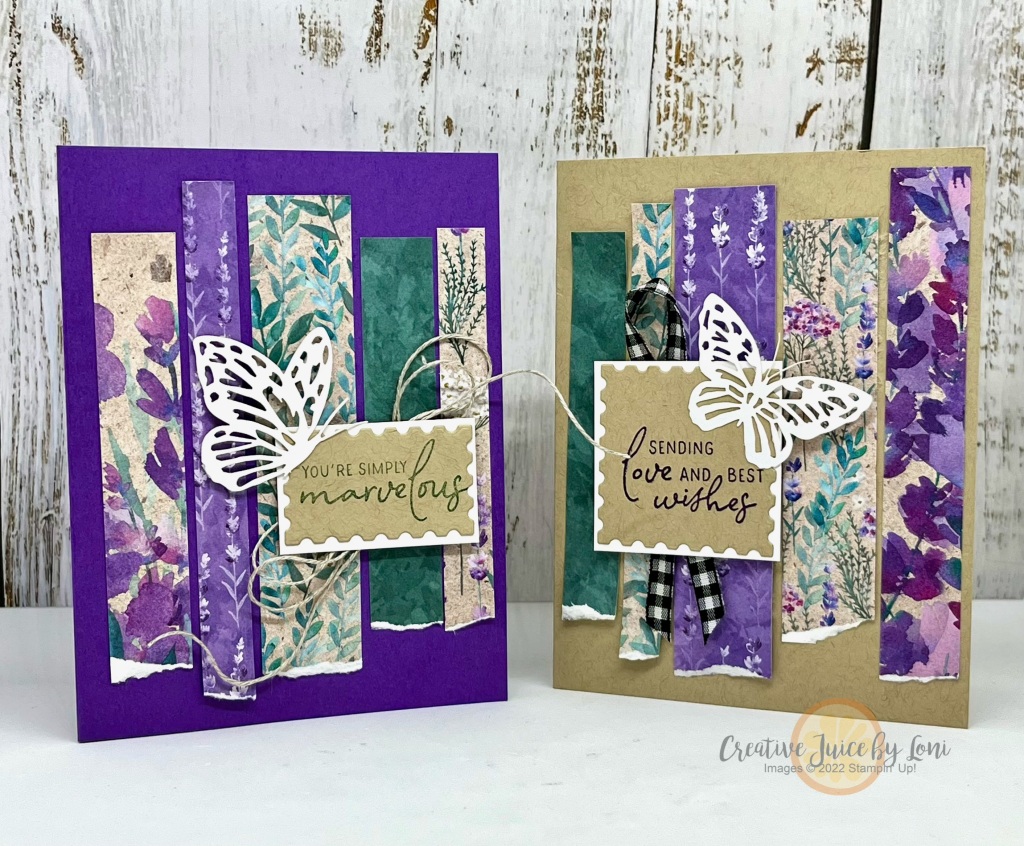
As demonstrated in the tutorial, I made a few simple cards using up the scraps from my pack of Perennial Lavender DSP and the Paper Butterfly Accents, along with the Perennial Postage bundle:
What are you going to put in your boxes? I’d love to see how *you* upcycle an empty kit box…share your creativity in my VIP Facebook Group!
Now that you’ve seen what you can make with the boxes, shop for more in the current Kit Collection:
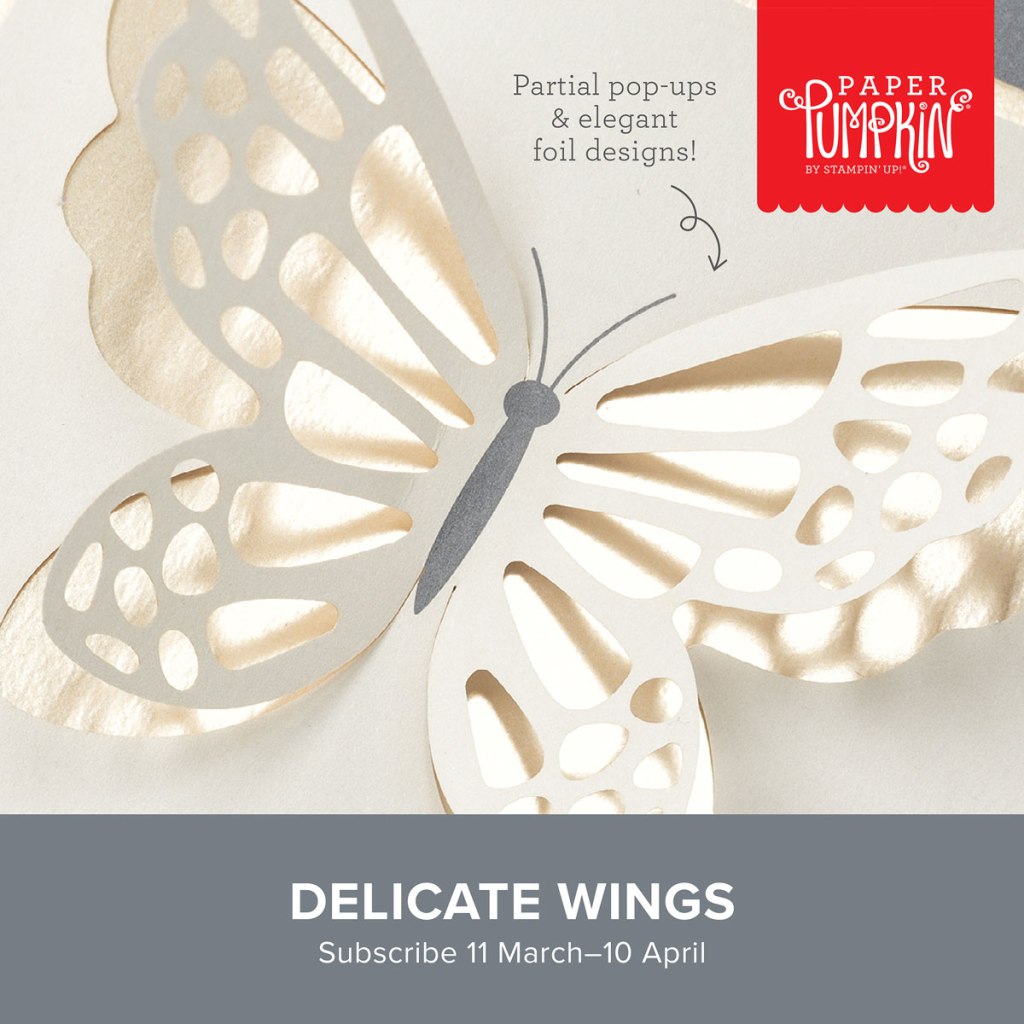
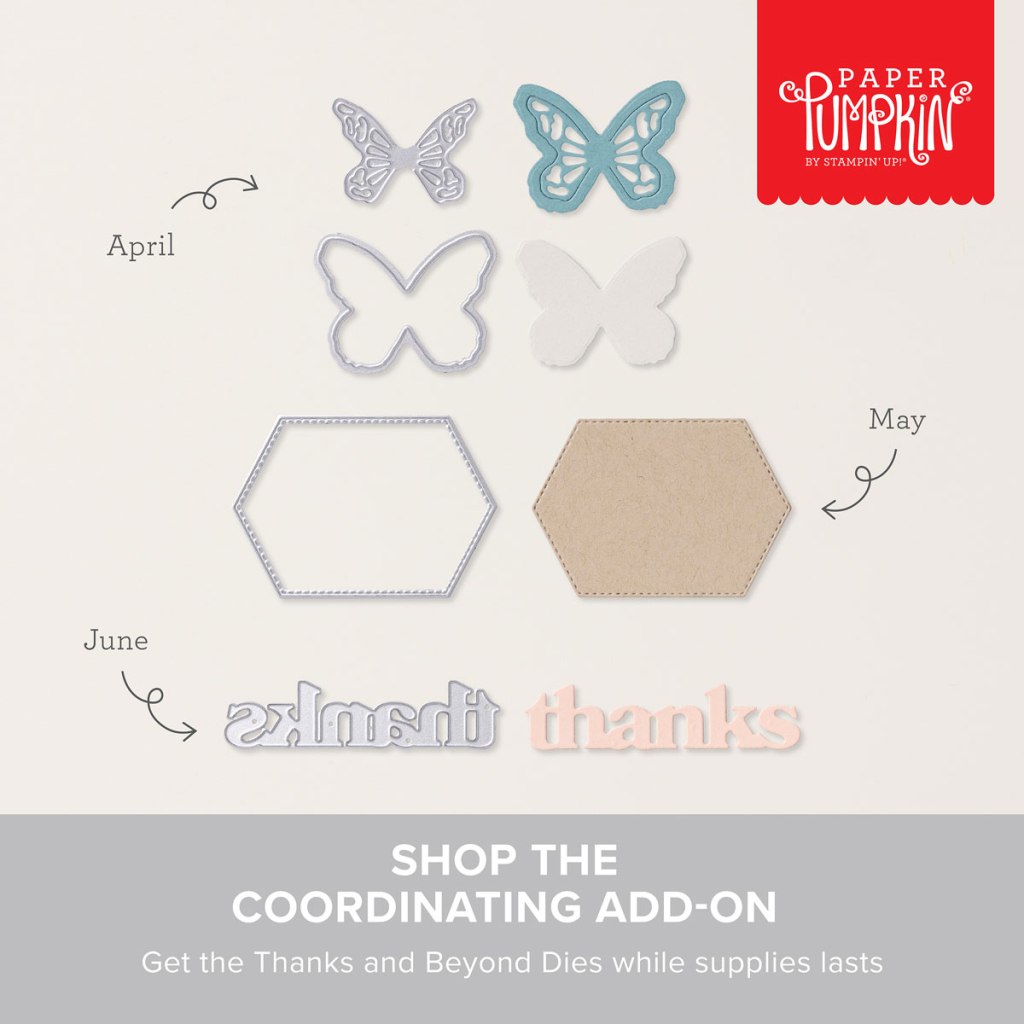
Don’t miss the chance to subscribe before April 10, 2024 for the Delicate Wings Paper Pumpkin Kit, and add the “Thanks & Beyond Dies” to coordinate with the April, May AND June Paper Pumpkin kits!
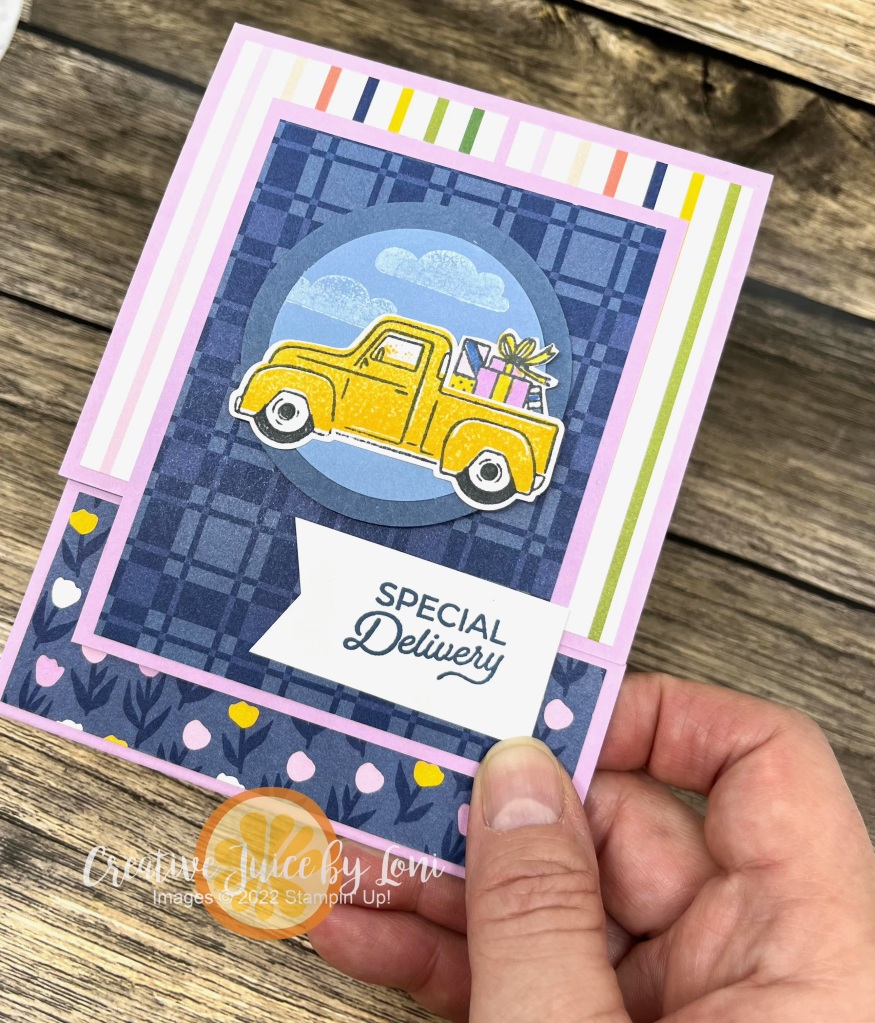
The Trucking Along bundle (an Online Exclusive in my Stampin’ Store) is an all-occasion crafting set of stamps and coordinating punch and today I’ll demonstrate how to make a slide-up gift card holder to present gift cards, money, gift certificates or other flat items for ANY occasion:
This is the outside of the holder and below you’ll see the holiday version we created at the Christmas Card Class in Cedar City a few weeks ago. When you open the card, the pocket slides up to show the gift inside!
You probably noticed the coordinating envelopes…as long as you are stamping the truck for the front of the card, you may as well stamp a second time on the envelope to make it festive!
Cutting and scoring instructions:
Card base (I used Fresh Freesia for the birthday version): 11″ x 4-1/4″ scored at 1-3/4″ and 7-1/4″, plus the same color card stock 3-1/4″ x 4-1/4″ for the mat on the top layer.
Sliding insert: THICK white card stock 6-3/4″ x 3-1/2″ scored at 1/2″, then flipped to the back side and scored at 5-1/4″ (I explain why in the video)
Designer Series Paper: 4″ x 3″ for top layer, 3-1/2″ x 4″ for top part of card and 1-1/2″ x 4″ for bottom section.
If your significant other starts asking what YOU WANT for Christmas (because it is now less than 2 weeks away 😆), did you know I offer gift certificates? They can be used on an order through me and/or toward one of my classes or events! Send them my way and I’ll take care of them (and you).
If they are really early, they could take advantage of a JUST ANNOUNCED one-day of FREE SHIPPING on December 14th (on orders over $75):
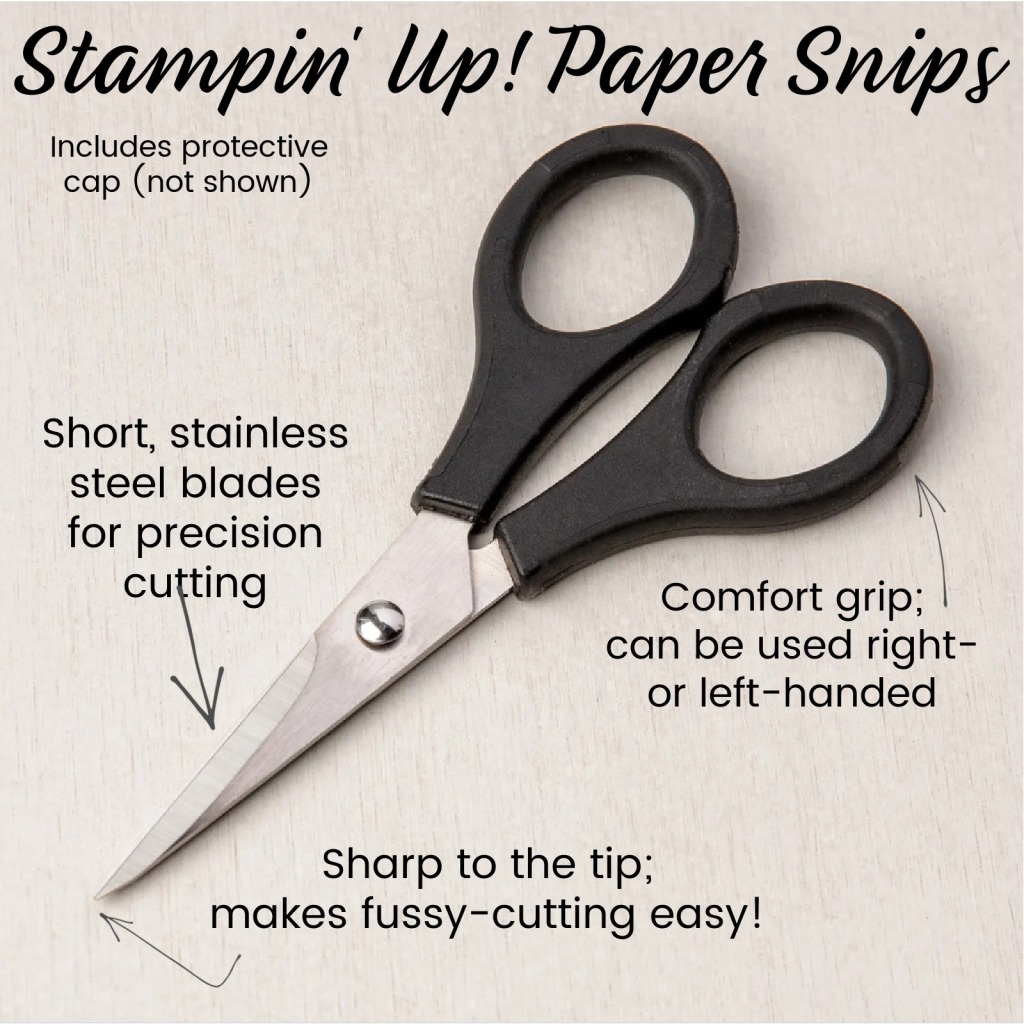
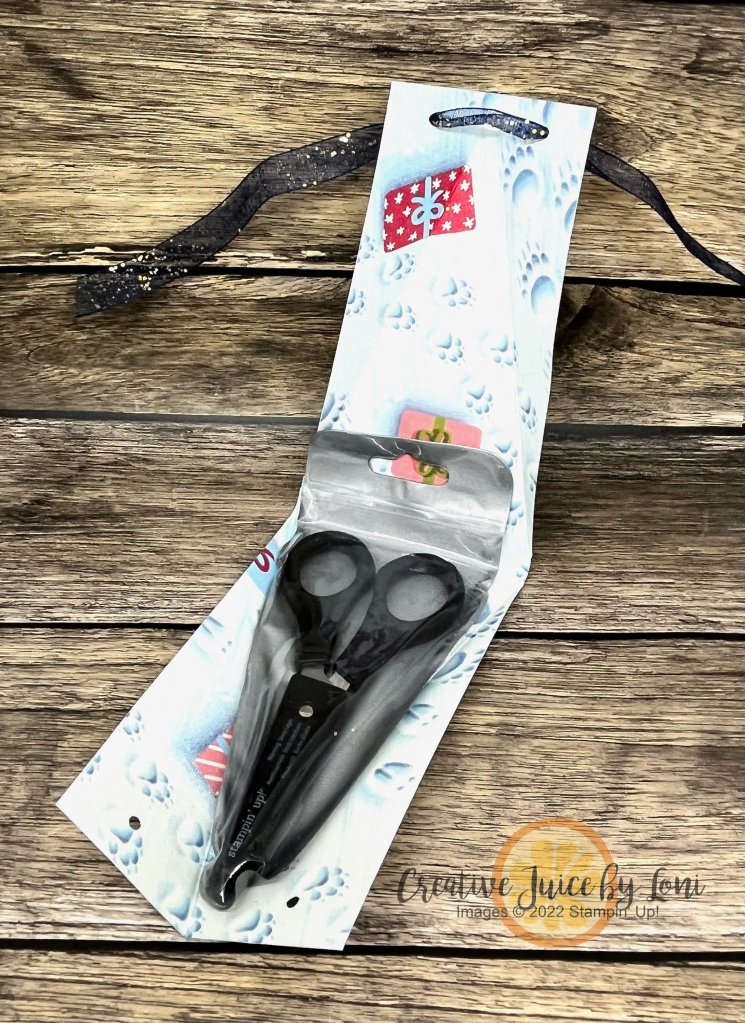
Just as bakers are always thrilled to receive a new spatula (my favorites are from Pampered Chef), CRAFTERS are delighted to add another set of scissors to their collection! The Paper Snips from Stampin’ Up! are essential for fussy cutting, plus you can make a second pair “ribbon only” scissors.
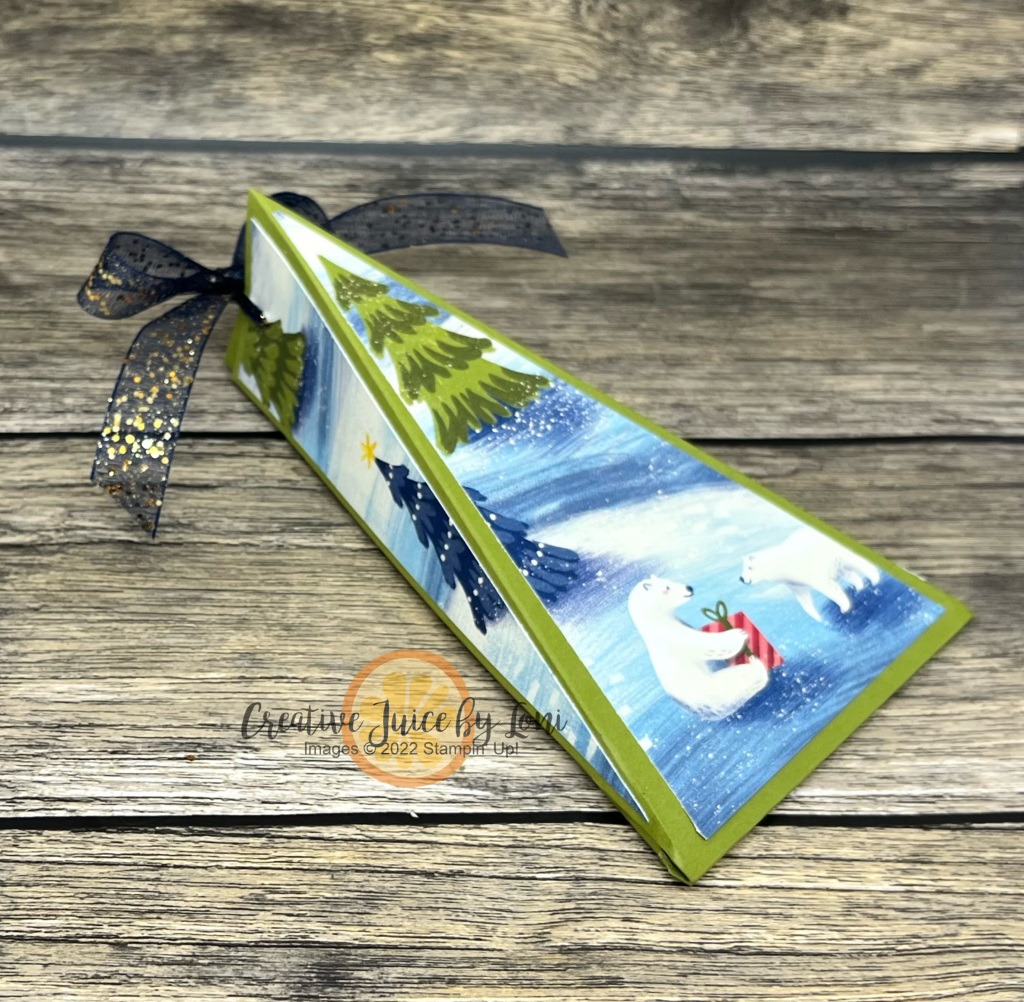
The trick is how to WRAP a gift that’s triangular shaped, and I have just the tutorial for you today!
This box is PERFECT for SNIPS and can be created for the holiday season OR any other time of gifting.
Start with a 12″ x 3.5″ piece of card stock OR Designer Series Paper, then follow the instructions here (warning: I make a mistake at the 6 minute mark, but quickly get back on track!). The layer starts with a 5.5″ x 3″ piece of card stock or Designer Series Paper.
Tip to make this box for any size: Measure the triangular object you want to wrap and add 1/2″ to the length and double it, then add 1/2″ to the width. That’s how I got the size of paper to begin my box with!
Here’s the box opened:
If you start with card stock and add Designer Series Paper, keep the two sides you trimmed off and layer them on the sides of the box- they fit perfectly and keep the “scene” wrapping around the edges:
I’d love to hear if you make these boxes- comment or tag me on social media @creativejuicebyloni on Facebook or Instagram.


![Book Treat Boxes [ 164048 ]](https://assets1.tamsnetwork.com/images/EC042017NF/164048s.jpg "Book Treat Boxes [ 164048 ]")
![Splendid Autumn 6" X 6" (15.2 X 15.2 Cm) Designer Series Paper [ 164173 ]](https://assets1.tamsnetwork.com/images/EC042017NF/164173s.jpg "Splendid Autumn 6\" X 6\" (15.2 X 15.2 Cm) Designer Series Paper [ 164173 ]")
![Autumn Expressions Bundle (English) [ 164056 ]](https://assets1.tamsnetwork.com/images/EC042017NF/164056s.jpg "Autumn Expressions Bundle (English) [ 164056 ]")
![Early Espresso 8-1/2" X 11" Cardstock [ 119686 ]](https://assets1.tamsnetwork.com/images/EC042017NF/119686s.jpg "Early Espresso 8-1/2\" X 11\" Cardstock [ 119686 ]")
![Adhesive Sheets [ 152334 ]](https://assets1.tamsnetwork.com/images/EC042017NF/152334s.jpg "Adhesive Sheets [ 152334 ]")
![Versamark Pad [ 102283 ]](https://assets1.tamsnetwork.com/images/EC042017NF/102283s.jpg "Versamark Pad [ 102283 ]")
![Metallics Wow! Embossing Powder [ 165678 ]](https://assets1.tamsnetwork.com/images/EC042017NF/165678s.jpg "Metallics Wow! Embossing Powder [ 165678 ]")
![Heat Tool (Us And Canada) [ 129053 ]](https://assets1.tamsnetwork.com/images/EC042017NF/129053s.jpg "Heat Tool (Us And Canada) [ 129053 ]")
![Multipurpose Liquid Glue [ 110755 ]](https://assets1.tamsnetwork.com/images/EC042017NF/110755s.jpg "Multipurpose Liquid Glue [ 110755 ]")
![Stampin' Dimensionals [ 104430 ]](https://assets1.tamsnetwork.com/images/EC042017NF/104430s.jpg "Stampin' Dimensionals [ 104430 ]")


![Hello Hollyhocks Kit [ 164458 ]](https://assets1.tamsnetwork.com/images/EC042017NF/164458s.jpg "Hello Hollyhocks Kit [ 164458 ]")
![Simply Zinnia Bundle (English) [ 163480 ]](https://assets1.tamsnetwork.com/images/EC042017NF/163480s.jpg "Simply Zinnia Bundle (English) [ 163480 ]")
![Tuxedo Black Memento Ink Pad [ 132708 ]](https://assets1.tamsnetwork.com/images/EC042017NF/132708s.jpg "Tuxedo Black Memento Ink Pad [ 132708 ]")
![Pumpkin Pie Stampin' Blends Markers Combo Pack [ 144599 ] (Retired)](https://assets1.tamsnetwork.com/images/EC042017NF/144599s.jpg "Pumpkin Pie Stampin' Blends Markers Combo Pack [ 144599 ] (Retired)")
![Copper Clay Stampin’ Blends Combo Pack [ 161662 ]](https://assets1.tamsnetwork.com/images/EC042017NF/161662s.jpg "Copper Clay Stampin’ Blends Combo Pack [ 161662 ]")
![Old Olive Stampin' Blends Combo Pack [ 154892 ]](https://assets1.tamsnetwork.com/images/EC042017NF/154892s.jpg "Old Olive Stampin' Blends Combo Pack [ 154892 ]")
![Very Vanilla 8-1/2" X 11" Thick Cardstock [ 144237 ]](https://assets1.tamsnetwork.com/images/EC042017NF/144237s.jpg "Very Vanilla 8-1/2\" X 11\" Thick Cardstock [ 144237 ]")
![Copper Clay 8 1/2" X 11" Cardstock [ 161721 ]](https://assets1.tamsnetwork.com/images/EC042017NF/161721s.jpg "Copper Clay 8 1/2\" X 11\" Cardstock [ 161721 ]")
![Mini Stampin' Cut & Emboss Machine [ 150673 ]](https://assets1.tamsnetwork.com/images/EC042017NF/150673s.jpg "Mini Stampin' Cut & Emboss Machine [ 150673 ]")
![Three Twine Combo Pack [ 160597 ]](https://assets1.tamsnetwork.com/images/EC042017NF/160597s.jpg "Three Twine Combo Pack [ 160597 ]")
![Everyday Details Dies [ 162864 ]](https://assets1.tamsnetwork.com/images/EC042017NF/162864s.jpg "Everyday Details Dies [ 162864 ]")
![Sentimental Wishes Bundle (English) [ 164220 ]](https://assets1.tamsnetwork.com/images/EC042017NF/164220s.jpg "Sentimental Wishes Bundle (English) [ 164220 ]")
![Take A Bow 6" X 6" (15.2 X 15.2 Cm) Designer Series Paper [ 164309 ]](https://assets1.tamsnetwork.com/images/EC042017NF/164309s.jpg "Take A Bow 6\" X 6\" (15.2 X 15.2 Cm) Designer Series Paper [ 164309 ]")
![Real Red Classic Stampin' Pad [ 147084 ]](https://assets1.tamsnetwork.com/images/EC042017NF/147084s.jpg "Real Red Classic Stampin' Pad [ 147084 ]")
![Basic White 8 1/2" X 11" Thick Cardstock [ 159229 ]](https://assets1.tamsnetwork.com/images/EC042017NF/159229s.jpg "Basic White 8 1/2\" X 11\" Thick Cardstock [ 159229 ]")
![Granny Apple Green 8-1/2" X 11" Cardstock [ 146990 ]](https://assets1.tamsnetwork.com/images/EC042017NF/146990s.jpg "Granny Apple Green 8-1/2\" X 11\" Cardstock [ 146990 ]")
![Garden Green 8-1/2" X 11" Cardstock [ 102584 ]](https://assets1.tamsnetwork.com/images/EC042017NF/102584s.jpg "Garden Green 8-1/2\" X 11\" Cardstock [ 102584 ]")
![Petal Pink 8-1/2" X 11" Cardstock [ 146985 ]](https://assets1.tamsnetwork.com/images/EC042017NF/146985s.jpg "Petal Pink 8-1/2\" X 11\" Cardstock [ 146985 ]")
![Mini Stampin' Dimensionals [ 144108 ]](https://assets1.tamsnetwork.com/images/EC042017NF/144108s.jpg "Mini Stampin' Dimensionals [ 144108 ]")


![Sentimental Christmas 12" X 12" (30.5 X 30.5 Cm) Designer Series Paper [ 164209 ]](https://assets1.tamsnetwork.com/images/EC042017NF/164209s.jpg "Sentimental Christmas 12\" X 12\" (30.5 X 30.5 Cm) Designer Series Paper [ 164209 ]")
![Greetings Of The Season Dies [ 164112 ]](https://assets1.tamsnetwork.com/images/EC042017NF/164112s.jpg "Greetings Of The Season Dies [ 164112 ]")
![Nested Essentials Dies [ 161597 ]](https://assets1.tamsnetwork.com/images/EC042017NF/161597s.jpg "Nested Essentials Dies [ 161597 ]")
![Pool Party 8-1/2" X 11" Cardstock [ 122924 ]](https://assets1.tamsnetwork.com/images/EC042017NF/122924s.jpg "Pool Party 8-1/2\" X 11\" Cardstock [ 122924 ]")
![Shaded Spruce 8-1/2" X 11" Cardstock [ 146981 ]](https://assets1.tamsnetwork.com/images/EC042017NF/146981s.jpg "Shaded Spruce 8-1/2\" X 11\" Cardstock [ 146981 ]")
![Real Red 8-1/2" X 11" Cardstock [ 102482 ]](https://assets1.tamsnetwork.com/images/EC042017NF/102482s.jpg "Real Red 8-1/2\" X 11\" Cardstock [ 102482 ]")
![Basic White 8 1/2" X 11" Cardstock [ 159276 ]](https://assets1.tamsnetwork.com/images/EC042017NF/159276s.jpg "Basic White 8 1/2\" X 11\" Cardstock [ 159276 ]")
![Shaded Spruce Classic Stampin' Pad [ 147088 ]](https://assets1.tamsnetwork.com/images/EC042017NF/147088s.jpg "Shaded Spruce Classic Stampin' Pad [ 147088 ]")
![Watercolor Pencils Assortment 1 [ 161700 ]](https://assets1.tamsnetwork.com/images/EC042017NF/161700s.jpg "Watercolor Pencils Assortment 1 [ 161700 ]")
![Blender Pens [ 102845 ]](https://assets1.tamsnetwork.com/images/EC042017NF/102845s.jpg "Blender Pens [ 102845 ]")
![Shaded Spruce 1/2" (1.3 Cm) Satin & Sheer Ribbon [ 164224 ]](https://assets1.tamsnetwork.com/images/EC042017NF/164224s.jpg "Shaded Spruce 1/2\" (1.3 Cm) Satin & Sheer Ribbon [ 164224 ]")
![Gold & Silver 1/8" (3.2 Mm) Trim Combo Pack [ 161633 ]](https://assets1.tamsnetwork.com/images/EC042017NF/161633s.jpg "Gold & Silver 1/8\" (3.2 Mm) Trim Combo Pack [ 161633 ]")
![Pool Party 5/8" (1.6 Cm) Pompom Ribbon [ 164129 ]](https://assets1.tamsnetwork.com/images/EC042017NF/164129s.jpg "Pool Party 5/8\" (1.6 Cm) Pompom Ribbon [ 164129 ]")


![Sweet Days Of Autumn 12" X 12" (30.5 X 30.5 Cm) Designer Series Paper & Sticker Sheet (English) [ 166609 ]](https://assets1.tamsnetwork.com/images/EC042017NF/166609s.jpg "Sweet Days Of Autumn 12\" X 12\" (30.5 X 30.5 Cm) Designer Series Paper & Sticker Sheet (English) [ 166609 ]")
![Wild Wheat 3/8" (1 Cm) Rustic Striped Ribbon [ 164061 ]](https://assets1.tamsnetwork.com/images/EC042017NF/164061s.jpg "Wild Wheat 3/8\" (1 Cm) Rustic Striped Ribbon [ 164061 ]")
![Woven Golden Leaves [ 164059 ]](https://assets1.tamsnetwork.com/images/EC042017NF/164059s.jpg "Woven Golden Leaves [ 164059 ]")
![Autumn Expressions Dies [ 164055 ]](https://assets1.tamsnetwork.com/images/EC042017NF/164055s.jpg "Autumn Expressions Dies [ 164055 ]")
![Old Olive 8-1/2" X 11" Cardstock [ 100702 ]](https://assets1.tamsnetwork.com/images/EC042017NF/100702s.jpg "Old Olive 8-1/2\" X 11\" Cardstock [ 100702 ]")
![Crushed Curry 8-1/2" X 11" Cardstock [ 131199 ]](https://assets1.tamsnetwork.com/images/EC042017NF/131199s.jpg "Crushed Curry 8-1/2\" X 11\" Cardstock [ 131199 ]")
![Tear & Tape Adhesive [ 154031 ]](https://assets1.tamsnetwork.com/images/EC042017NF/154031s.jpg "Tear & Tape Adhesive [ 154031 ]")


")


 Glittered Ribbon")


")

 Designer Series Paper")


 Gingham Ribbon")


")
 Designer Series Paper")


")


 Circle Punch")
 Circle Punch")


 Designer Series Paper")
 Cardstock")
 Glittered Ribbon")
")
")
 Specialty Paper")


