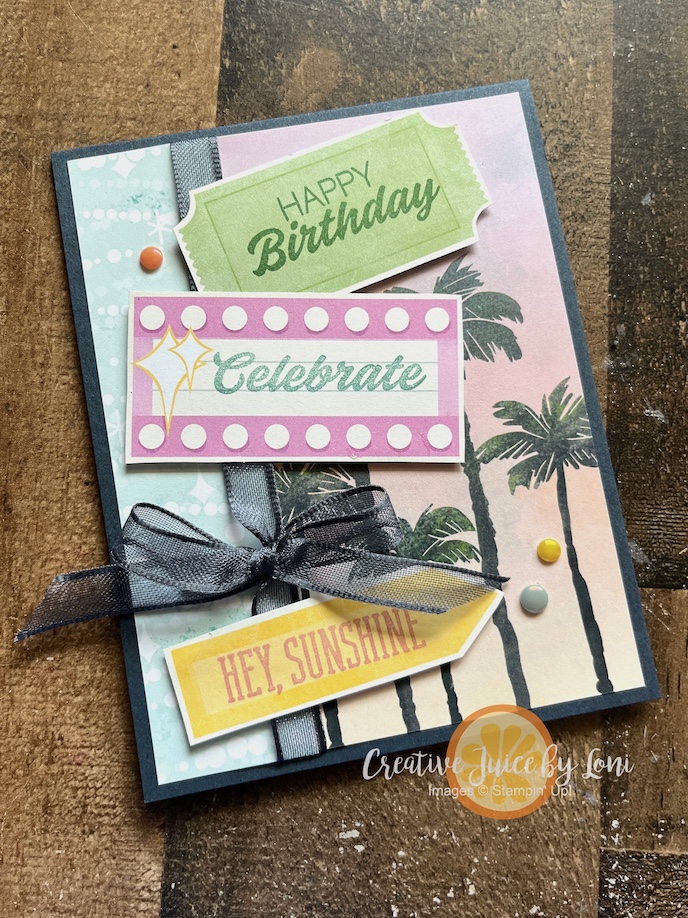
I’ve been sharing Sunshine & Smiles with the Beach Boardwalk Suite for a few days here AND on my social media (FB & IG) ~ today’s projects include a card, a scrapbook layout and announcements for upcoming EVENTS where I hope to see your face!
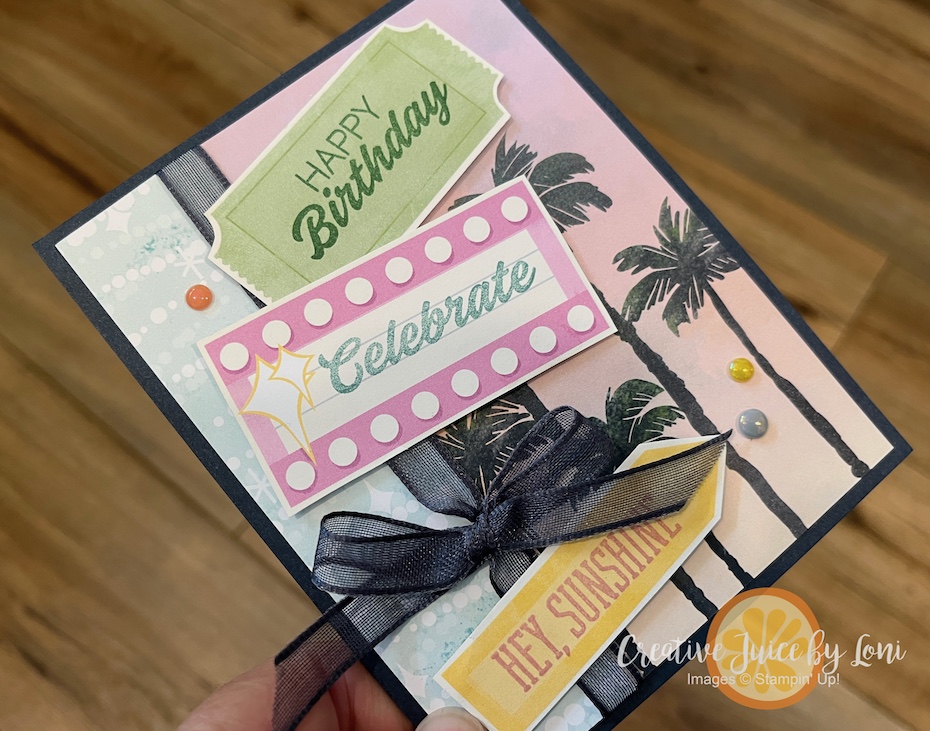
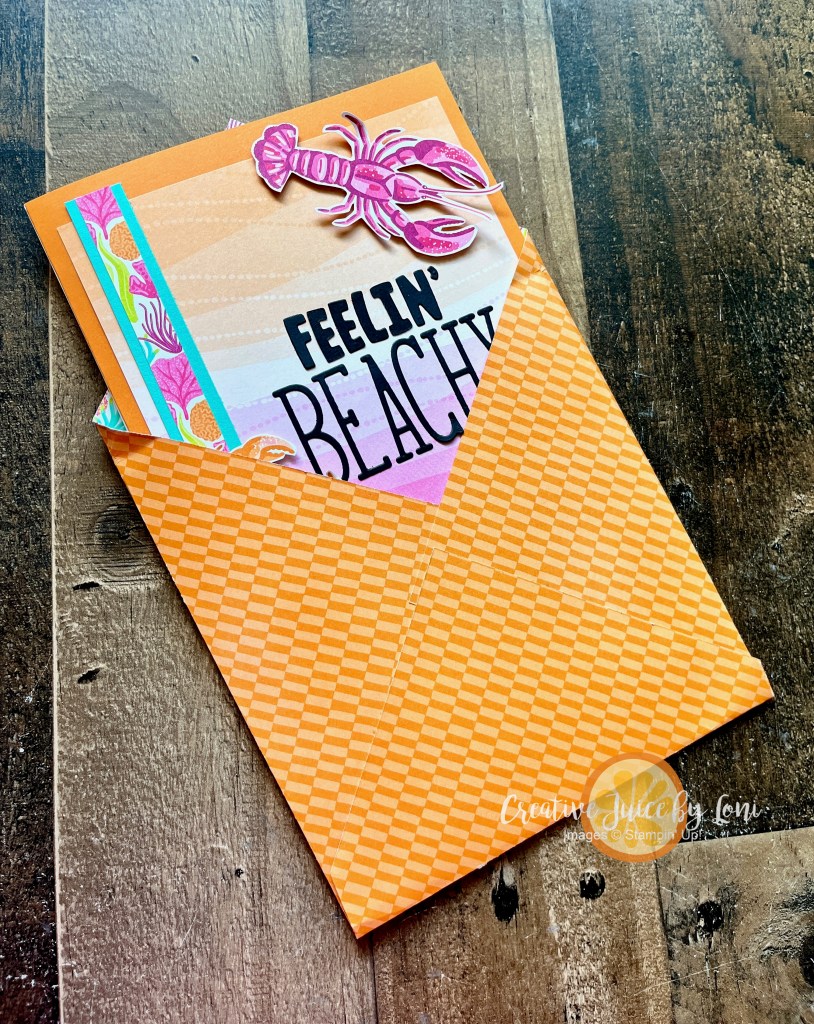
I love the sheet of tickets and tags included in the Beach Boardwalk Designer Series Paper because they can be stamped to evoke a “winning” feeling for any celebration, like you won a drawing 🎟️ or a stuffed animal in a boardwalk game! On the inside of this card, I added one more ticket to remind the recipient that life is quite the adventure:
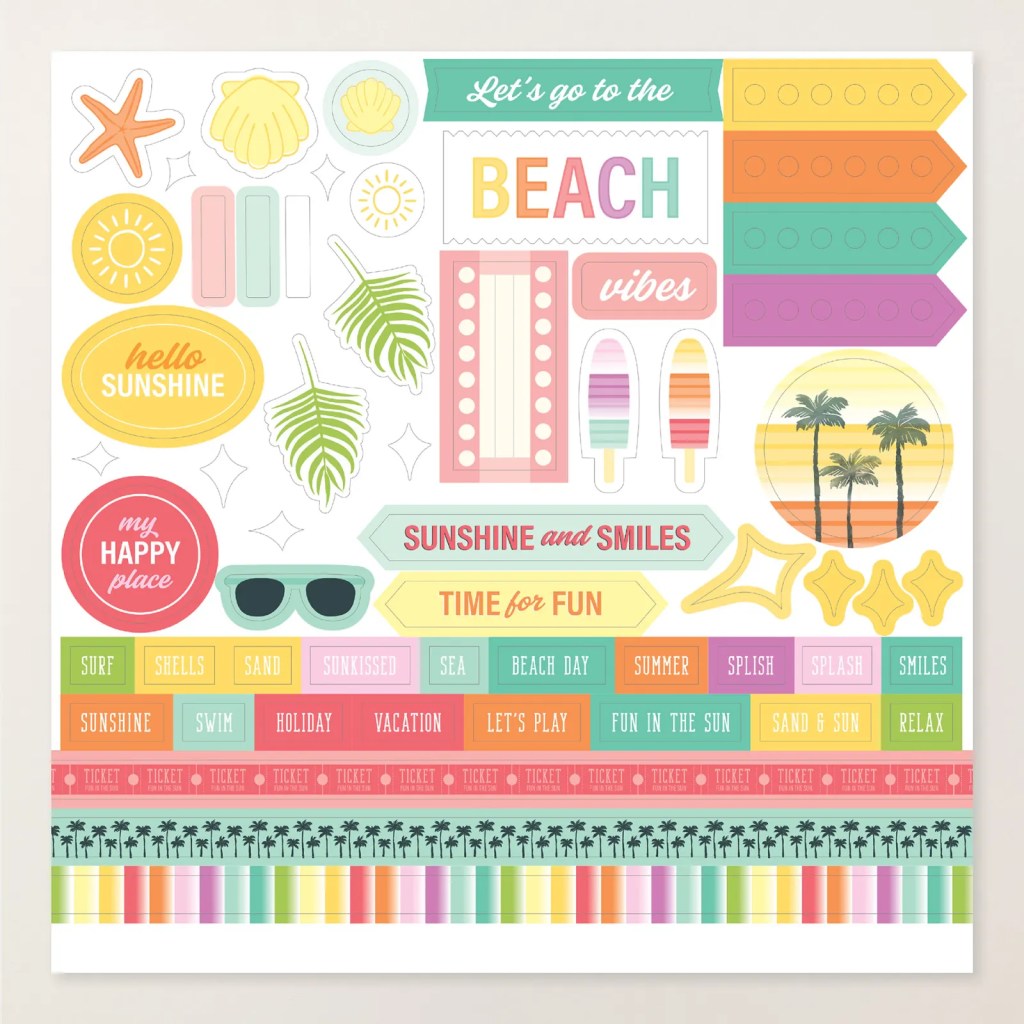
IN CASE YOU DIDN’T KNOW, this Beach Boardwalk paper also comes in a different package with a sticker sheet, all ready to preserve the memories of a day at the park, carnival, beach or fair on a scrapbook page or complete album:
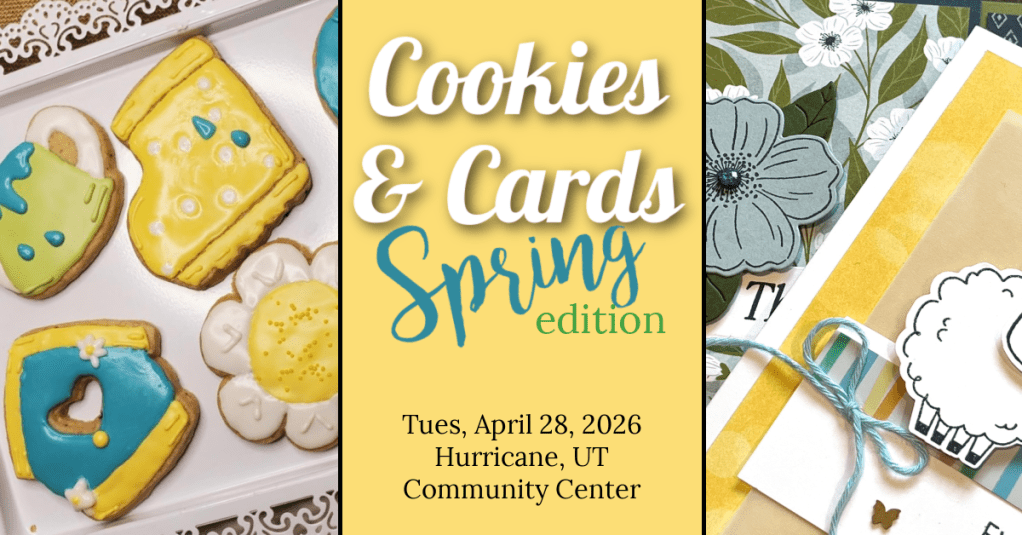
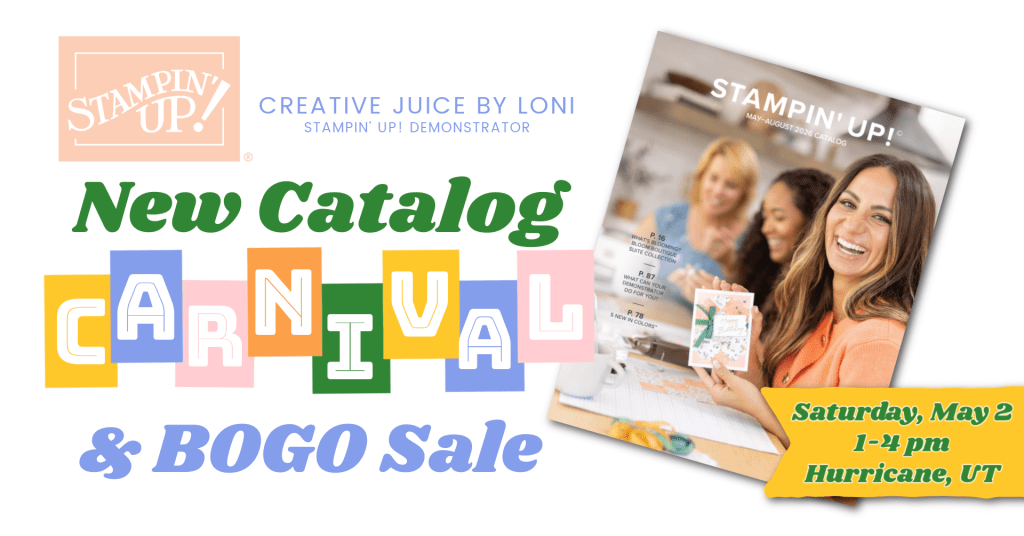
If you have a tropical vacation planned, a summer party or camp, pick up these products soon! And if you crave crafting adventures in southern Utah, here are the next few events I’m hosting ~ click on the images to learn more on the Facebook Events, or click the button to register!
The Catalog Carnival & BOGO SALE is Open House style, so just bring a friend and drop in for all sorts of fun freebies and snacks at 350 S 400 W ~ it’s a ticket to create!
VIEW UPCOMING EVENTS ANYTIME: CLICK THE “CLASSES & EVENTS” LINK IN PINK BAR ACROSS THE TOP
Scrapbooking is about telling your stories and getting the photos off your phone! Myself, I tend to keep it simple to get it done. As part of our “Sweet, Suite Summer” series (since it’s the last week of our Suite BOGO50 Sale) I wanted to use the Everyday Skies Suite to show you how these products can be fantastic for memory albums!
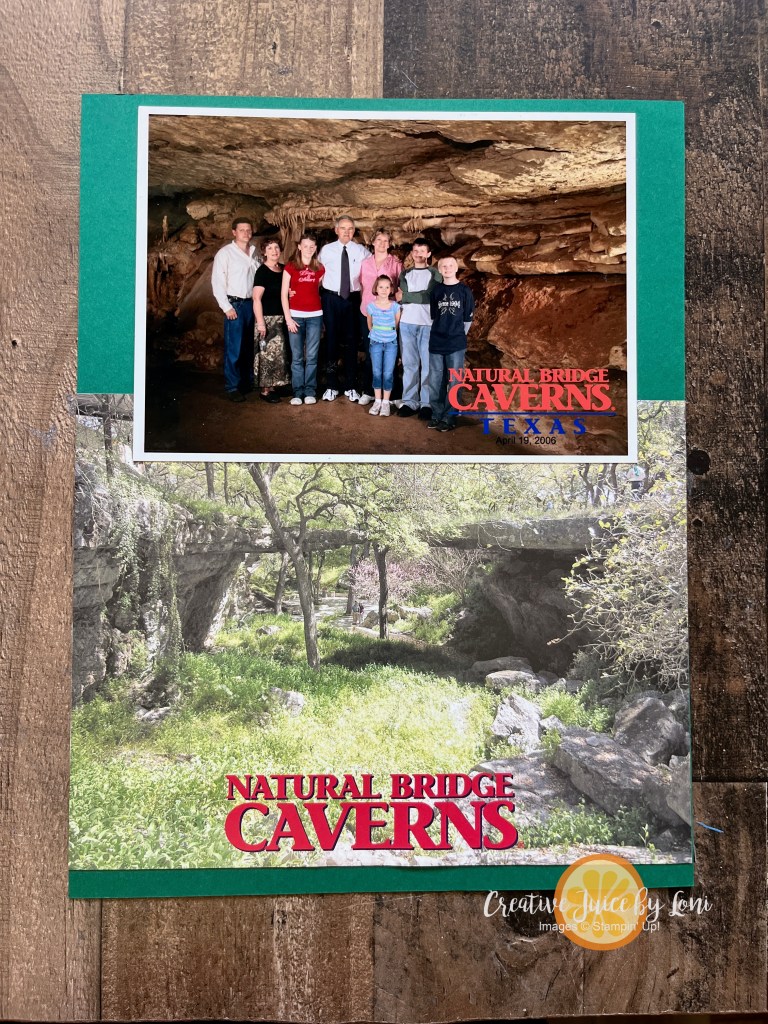
My first page capturing a trip to Texas (many years ago) could NOT be more simple because the photo has the date and the front of the folder that the picture came in tells where it is. There are no Everyday Skies products on this page, but hold on…
On the second page, I start using the Everyday Arches dies, which is part of the suite. Cutting photos with the arches gives them a unique look. While my preference is 8.5″ x 11″ pages, you can do the same thing on a 12″ x 12″ page:
The title uses a few of our alphabet dies (listed in complete supply list, below) and a strip of the Everyday Skies Designer Series Paper makes it feel separated.
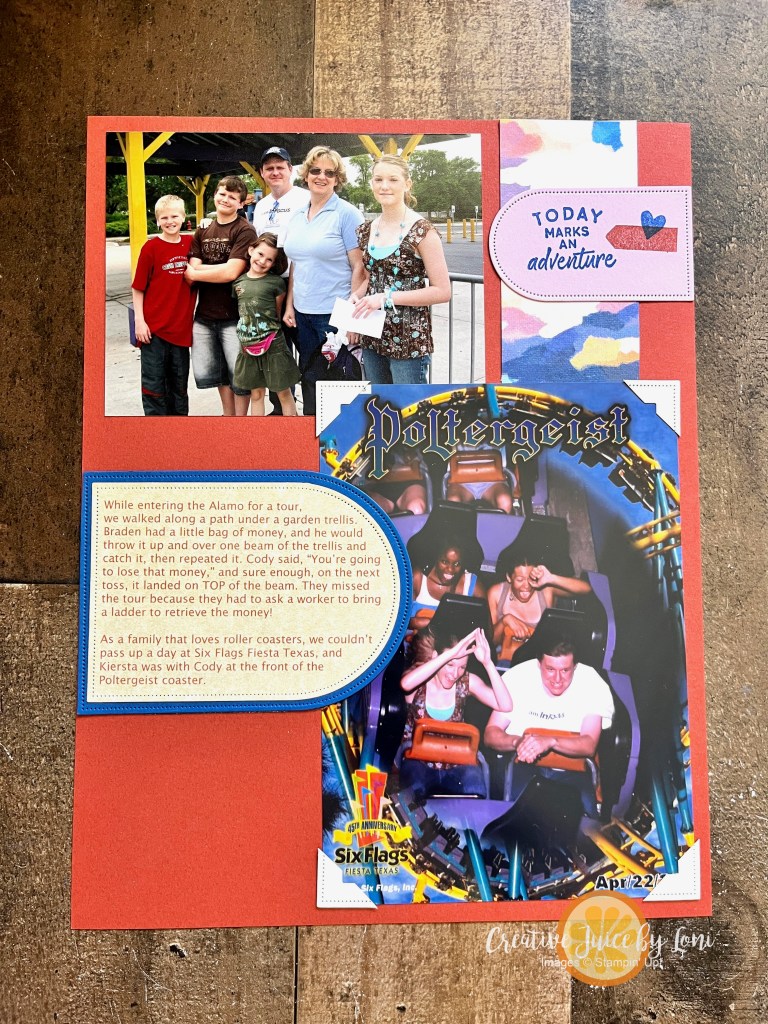
Moving to the third page (also the second page of the layout), I’ve added a whole 6″ x 6″ piece of the DSP to the lower corner to tie the colors together, and stamped the airplanes to indicate that we flew to Texas for this vacation:
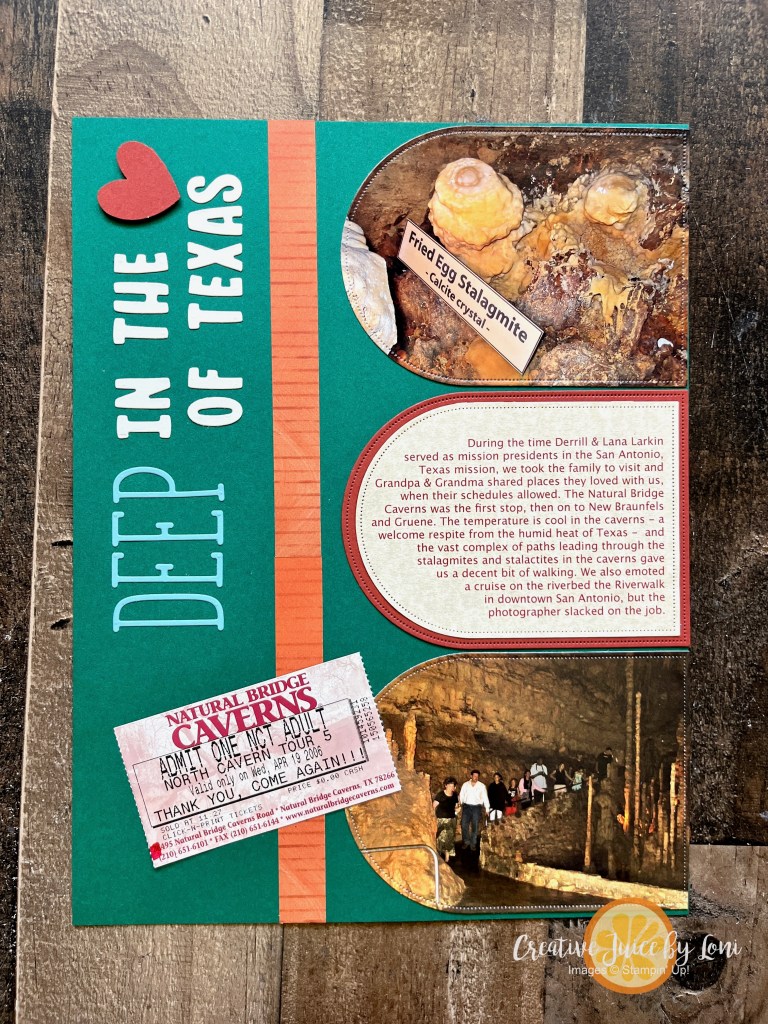
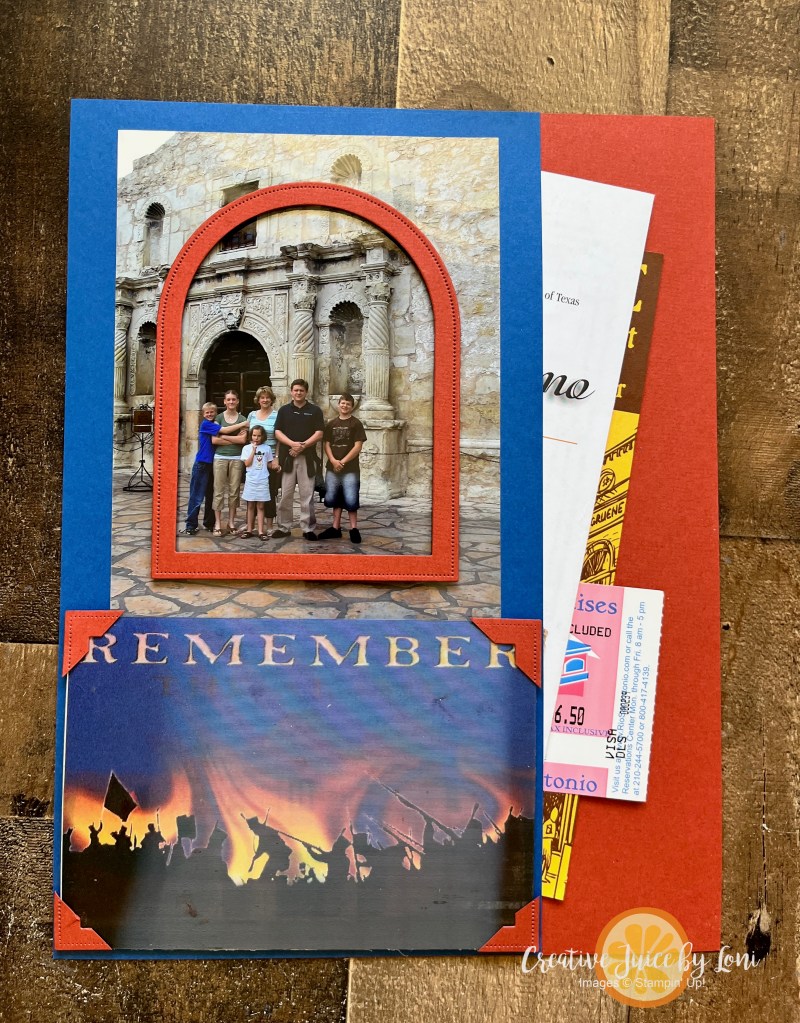
To keep all the maps, ticket stubs and brochures together, page #4 actually acts as a pocket:
Just for fun, the postcard from the Alamo in San Antonio that I used on the bottom of the pocket page is 3-D, so when you move the page, a different image appears:
Try “framing” a larger photo with an arch outline, and watch the demonstration video to learn how I made the photo corners 😉
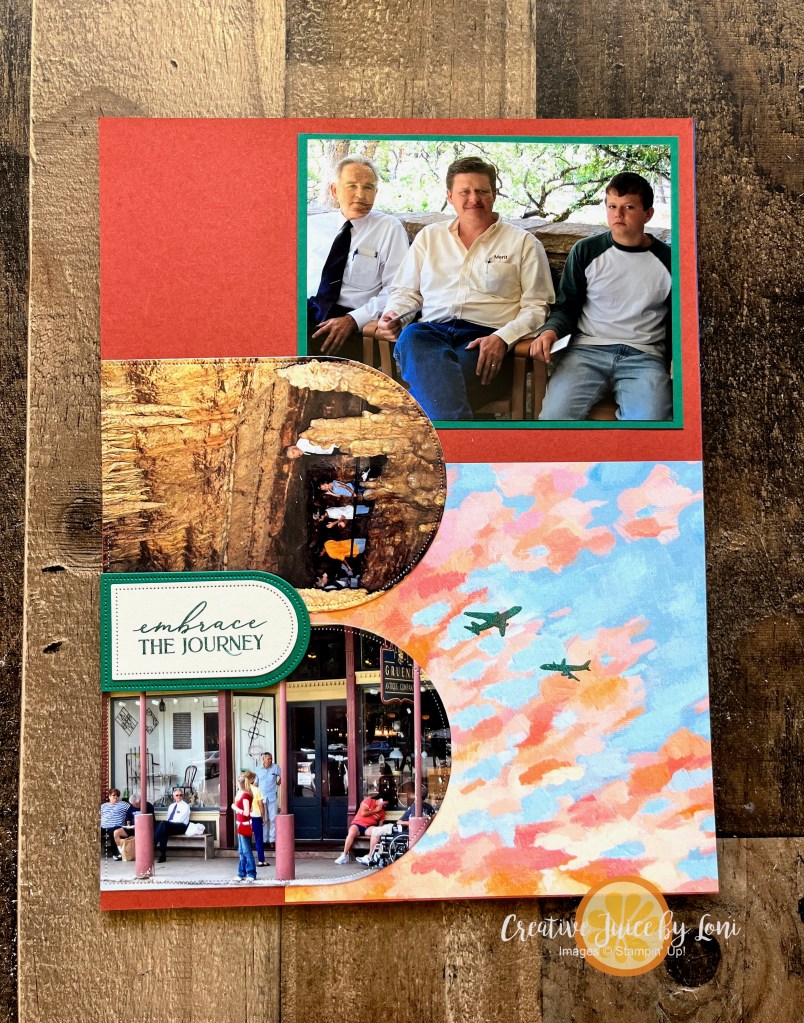
EXTRA! EXTRA! After the video, I made one more simple page to finish off my photos from that trip 21 years ago, and tie them together with the arches (and those photo corners show up again). This will face the Alamo page, completing the layout and telling the story:
The Everyday Skies suite was so popular when it launched a few months ago that it’s been out of stock. I’m super glad it is back in stock with time for you to get all of it (or just the parts you love most) before the BOGO50 Sale ends on June 30th!
If you are a scrapbooker, DON’T MISS the chance to join the VIRTUAL ALBUM RETREAT in July:
Don’t be put-off by the price: The kit includes FOUR stamp sets and 12 DOUBLE PAGE LAYOUTS (one pair for each month of the year) and the instruction you receive in the event will be worth the investment! Seriously….click to go check out the kit:
Once you purchase the kit, you’ll receive an email in early July to the exclusive Facebook Event page, so make sure your account has the best email for you! ALSO: When you purchase the kit, you earn $25 BACK in Stampin’ Rewards (if you’ve opted in) to use on your next purchase, or save up for a binder to put your pages in!
You’ll be so happy you joined the Virtual Album Retreat – order your kit today before they run out!
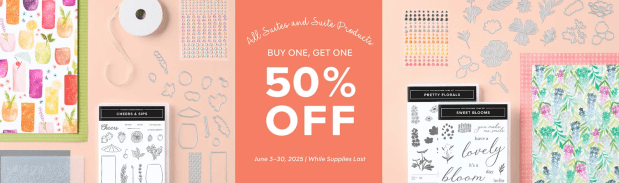
We are having a SUITE summer! I’m joining my international demonstrator friends to fill your cup to overflowing with ways to use Stampin’ Up!®️ SUITES to make your paper crafting projects truly SWEET (…while you can Buy One Get One Half Off in June!)
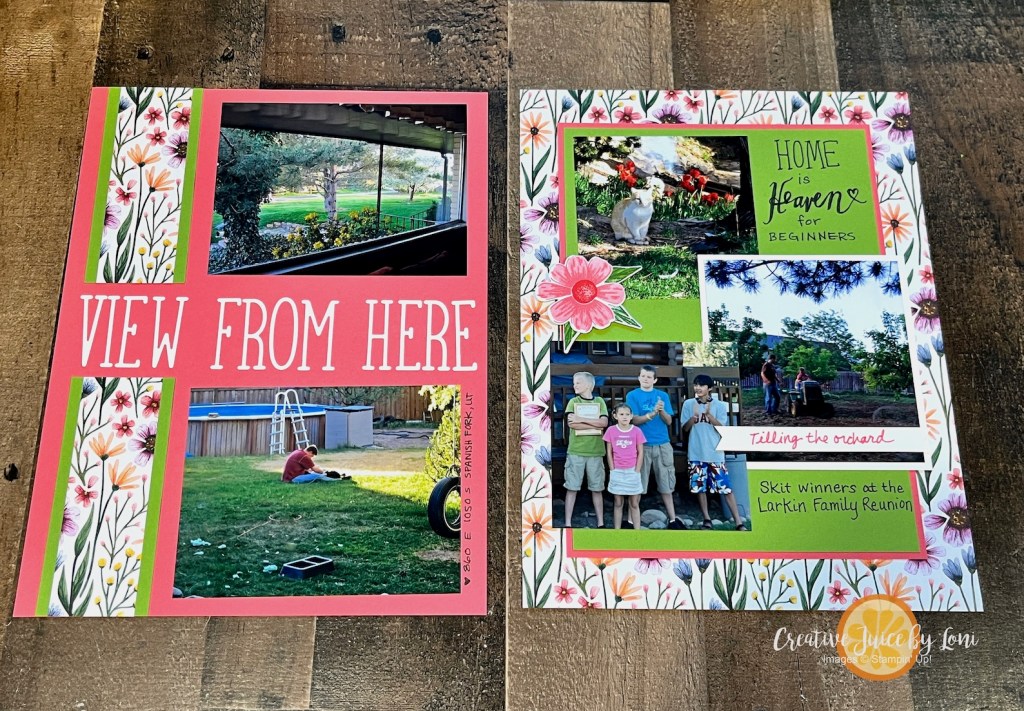
My project is a two-page 8.5″ x 11″ scrapbook layout using pieces of the Floral Impressions Suite! Florals are always popular for paper crafters, though I limit myself when it comes to flowers, I must say this suite is VERY versatile.
I used the Designer Series Paper, Impressions Abloom stamps and dies for my layout.
It began with a sketch for the second page and to counteract the busy pattern of the Designer Series Paper, I layered plain card stock on top:
These are actual pages from a personal family album I’m catching up on from 2006. Don’t judge me.
Every scrapbooker needs a letter die set for titles; I used the Alphabet a la Mode dies to caption this.
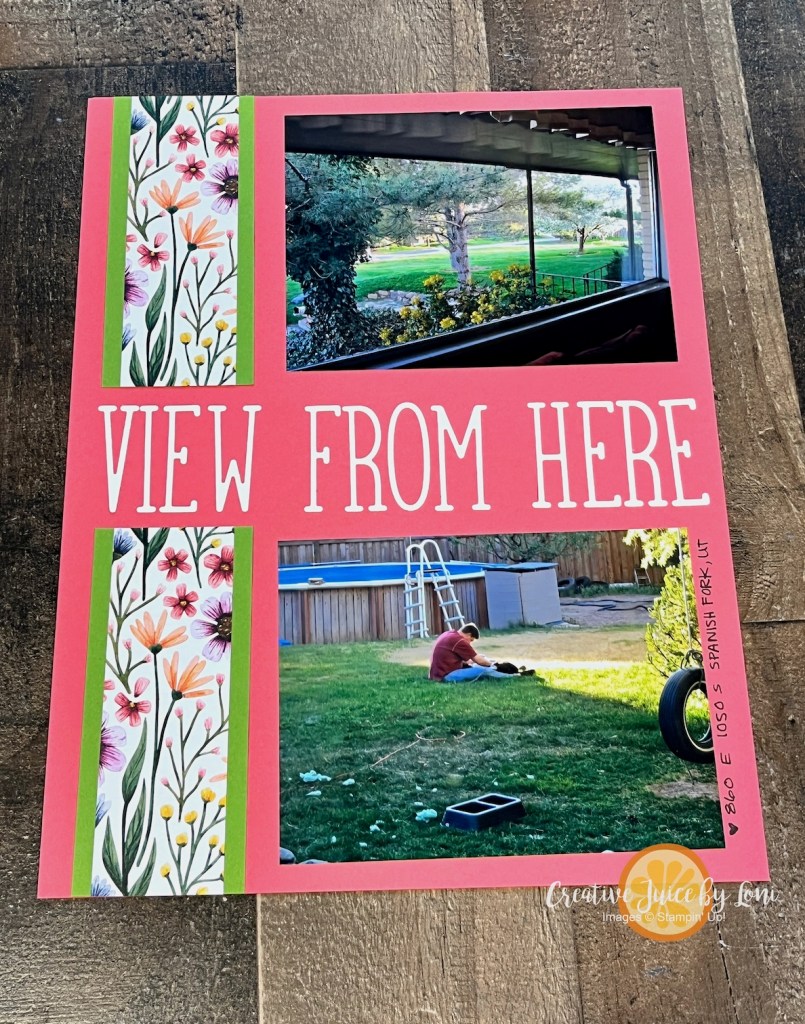
Remember to take a picture of the view out your front window or out the back door occasionally! These photos warm my heart each time I look at them because happy memories of this home rush back, though we don’t live there anymore.
While I don’t always love my handwriting, I cherish anything hand-written by my ancestors, so I force myself to write on some of my pages. Also, a single stamped flower was all the accent needed to finish this page:
Have you ever used a sketch for a scrapbook page? Leave me a comment (at the top of the post, by the posting date) and tell me what you like, before exploring all the other ideas we are sharing today:
June 2025 New at SU! Blog Hop: New Suite Collections
Whichever SUITE appeals to you, now is the time to add your favorite to your shopping cart…and get a second suite half off! This deal applies to individual suite products, as well, so I’ve shared some tips (below) for you. I’d be happy to serve your creative needs, if you don’t have another U.S. demonstrator serving you!
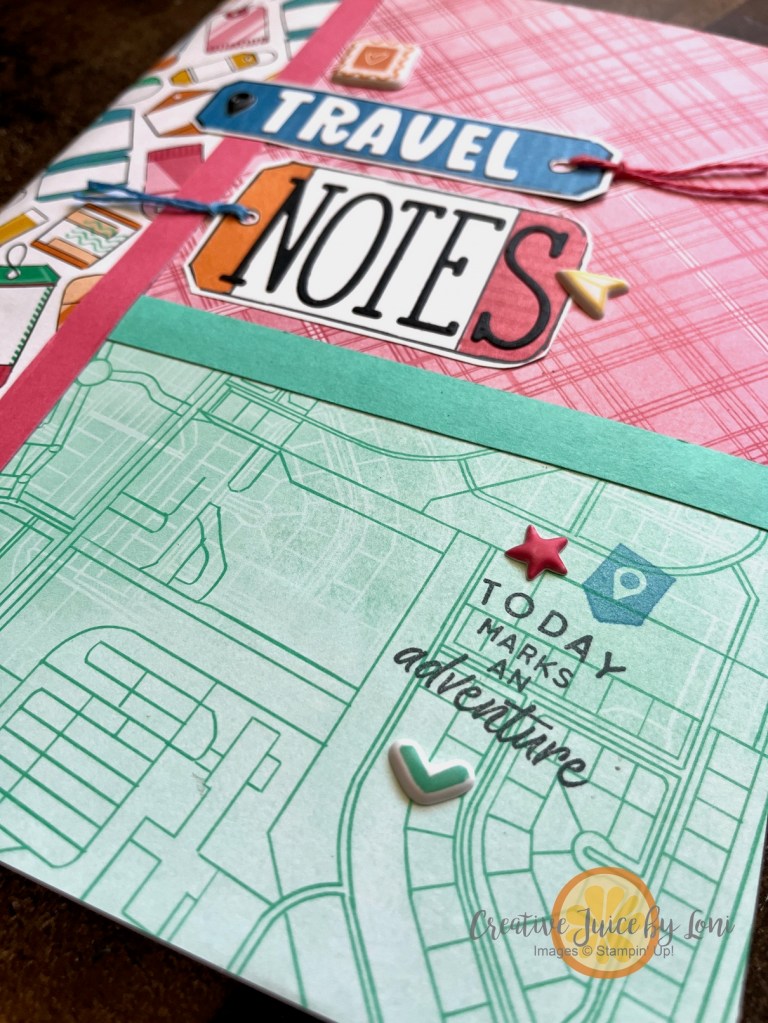
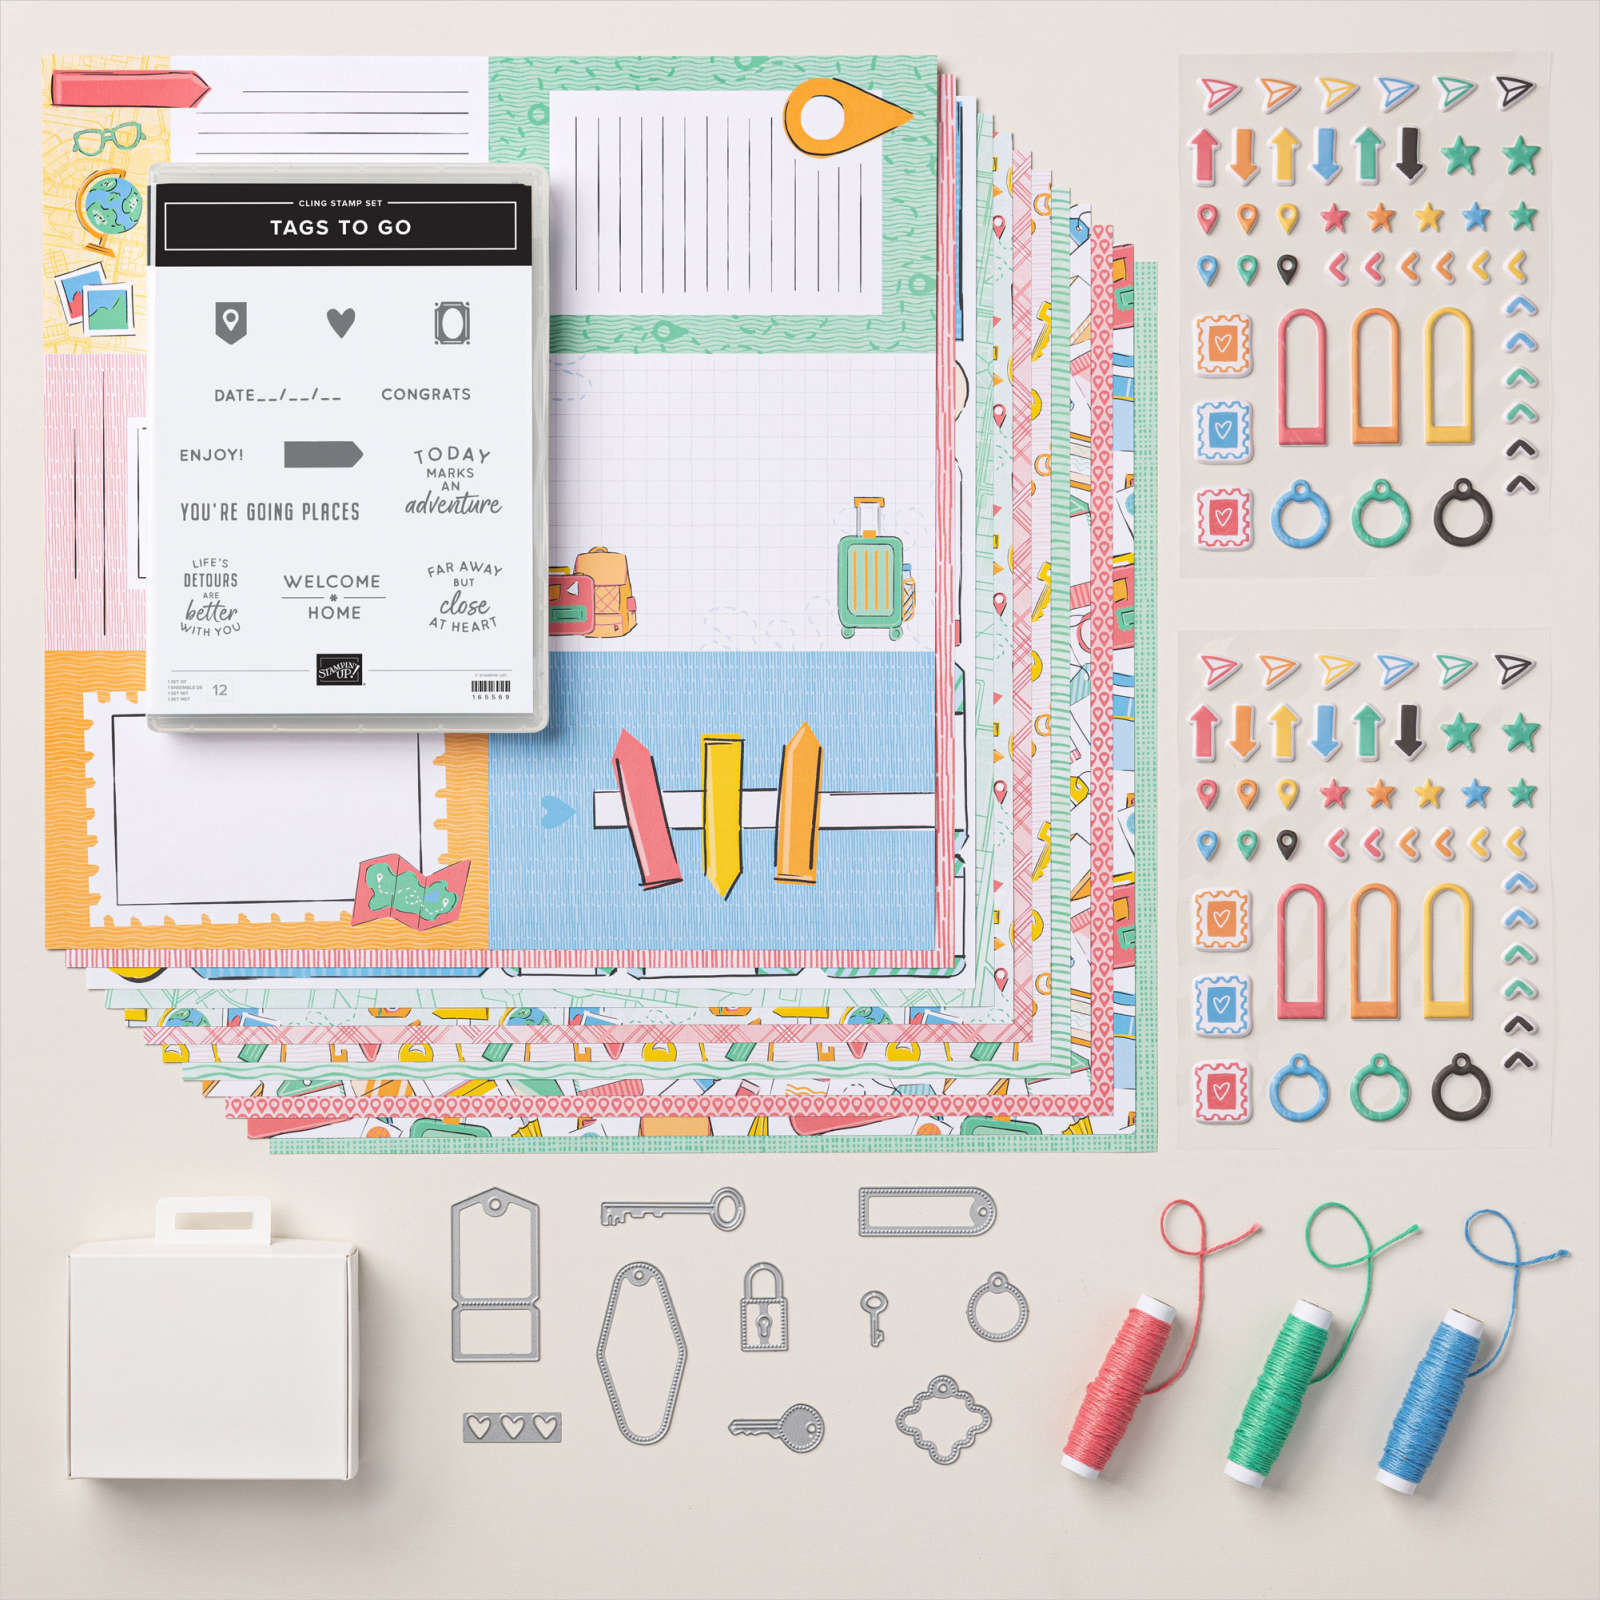
Welcome to another Sweet Suite SIMPLE Summer Stamping project: A D.I.Y. Travel Journal crafted with the Stampin’ Up!®️ On the Go Suite Collection!
This easy-peasy book began with an inexpensive composition notebook that I covered with the travel-themed On the Go Designer Series Paper by Stampin’ Up!®️
Crafting with a suite of products, like the On the Go suite takes the stress out of choosing colors or finding coordinating items, because it’s all done for you…even down to the matching puffy stickers and colored twine for the tags!
The puffy stickers really add a level of whimsy and fun!
Remember to stamp the top of each page with the date stamp, and your journal is ready for adventure:
I’ve got measurements and tips to make this project speedy and fun~ watch the tutorial:
Let me make you feel better about scrapbooking, as we gear up for National Scrapbook Day this Saturday, May 3, 2025! I’m working on photos from 2006 (I am indeed 20 years behind) and my style is “Git ‘er done!” Take a look:
The “On The Go” Suite Collection is a must have for memory keepers who also love to travel! It includes a cling stamp set, coordinating dies, Designer Series Paper, suitcase boxes, twine and puffy stickers (which I will be adding to my page, now that I remembered I have them 🤪). Of course, each product can be purchase individually, as well.
One more way to use your alphabet dies (and in the spirit of the #tgifc522 product challenge) is to use the negative section of the letters you’ve cut out:
Remember to save the centers of letters – like the O, R, P and A – and if you put an adhesive sheet on your paper before die cutting, your letters, the centers and your negative image will already be sticky to put on the page, just like a sticker.
I’m not a person who thinks every scrapbook page has to be a show-piece, or even have a bold title. Especially when creating multiple pages of one event, give yourself permission to make them simple. The people who are looking at your albums are there for the PHOTOS & MEMORIES, not the design and composition! Here’s my next page (another day of our Orlando adventure in 2006) and in case you were wondering, I prefer 8.5″ x 11″ pages because the albums I put them in fit easier on my bookshelf:
Seriously. Just get those photos on the page. Add a cute embellishment, then let your family flip through the walk down memory lane.
To start (or re-ignite) your passion for preserving your photos, Stampin’ Up!®️ is offering shoppers 2x times the reward points for 2 days on Friday & Saturday on orders over $20:
If you haven’t heard of our new Rewards Program (or don’t have an account with Stampin’ Up!®️) here’s how they work:
In today’s live demonstration on the Creative Juice Facebook Page and YouTube channel, I showed how to create two sizes of scrapbook pages (8.5″ x 11″ and 12″ x 12″) you can mail memories with~ .
You’ll need a page layout that has quadrants, so you can fold it for mailing. This sketch features a long panel on the right and a cluster of photos on the left. Once you fold it up, it fits in a large envelope. I created the envelope from a 10″ x 10″ piece of the same Friends of the Ocean Designer Series Paper by Stampin’ Up! :
These beloved funny faces were the inspiration for this project:
INSTRUCTIONS: Start by taking the card stock for your page and scoring it in half one direction, then in half the other way. You’ll cut along one of the score lines in to the middle – on my “Funny Faces” page, I cut it along the lower center score line, but if I were to do it again, I’d cut along the horizontal line on right or left, as I did for the “Feeling Beachy” 12×12 page.
Once folded, the 8.5″ x 11″ page fits into a Basic White Medium Envelope:
TIP for mailing in 2025: If it weighs more than 1 oz. you’ll need a two ounce postage stamp, or one regular stamp and an additional ounce postage stamp. For the 12×12 page, you’ll need a Non-Machinable 1 ounce stamp ($1.19) PLUS an additional ounce stamp ($.28) for a total of $1.47.
Use the faces from the Meant to Bee and/or Bee My Valentine on Daffodil Delight card stock and punch them out with a 1/2″ circle punch to create the emoji buttons!
I’ll add this to the list of Mailable Gifts we’ve been building- bookmark that list HERE, then watch the video for more information on how to #mailamemory :
Have you ever made a scrapbook page and thought, “I should frame this!”?
You’ve visited during our New at SU! April Blog hop, where we are encouraging you to MAKE MEMORIES LAST with Stampin’ Up! products. You’ll want to visit all the other posts, too!
This 12″ x 12″ page came together in minutes, using only a few pieces of card stock and the pack of patterned paper and stickers. While I don’t love my handwriting, I know how much I cherish keepsakes with my grandmother’s penmanship (it’s a piece of her that remains), so I took time to pen a few things I love about my granddaughter.
This was my favorite selfie we took when she spent a few days here last summer, so I put it into a 12×12 frame to hang up and enjoy a while longer, before it ends up in an album.
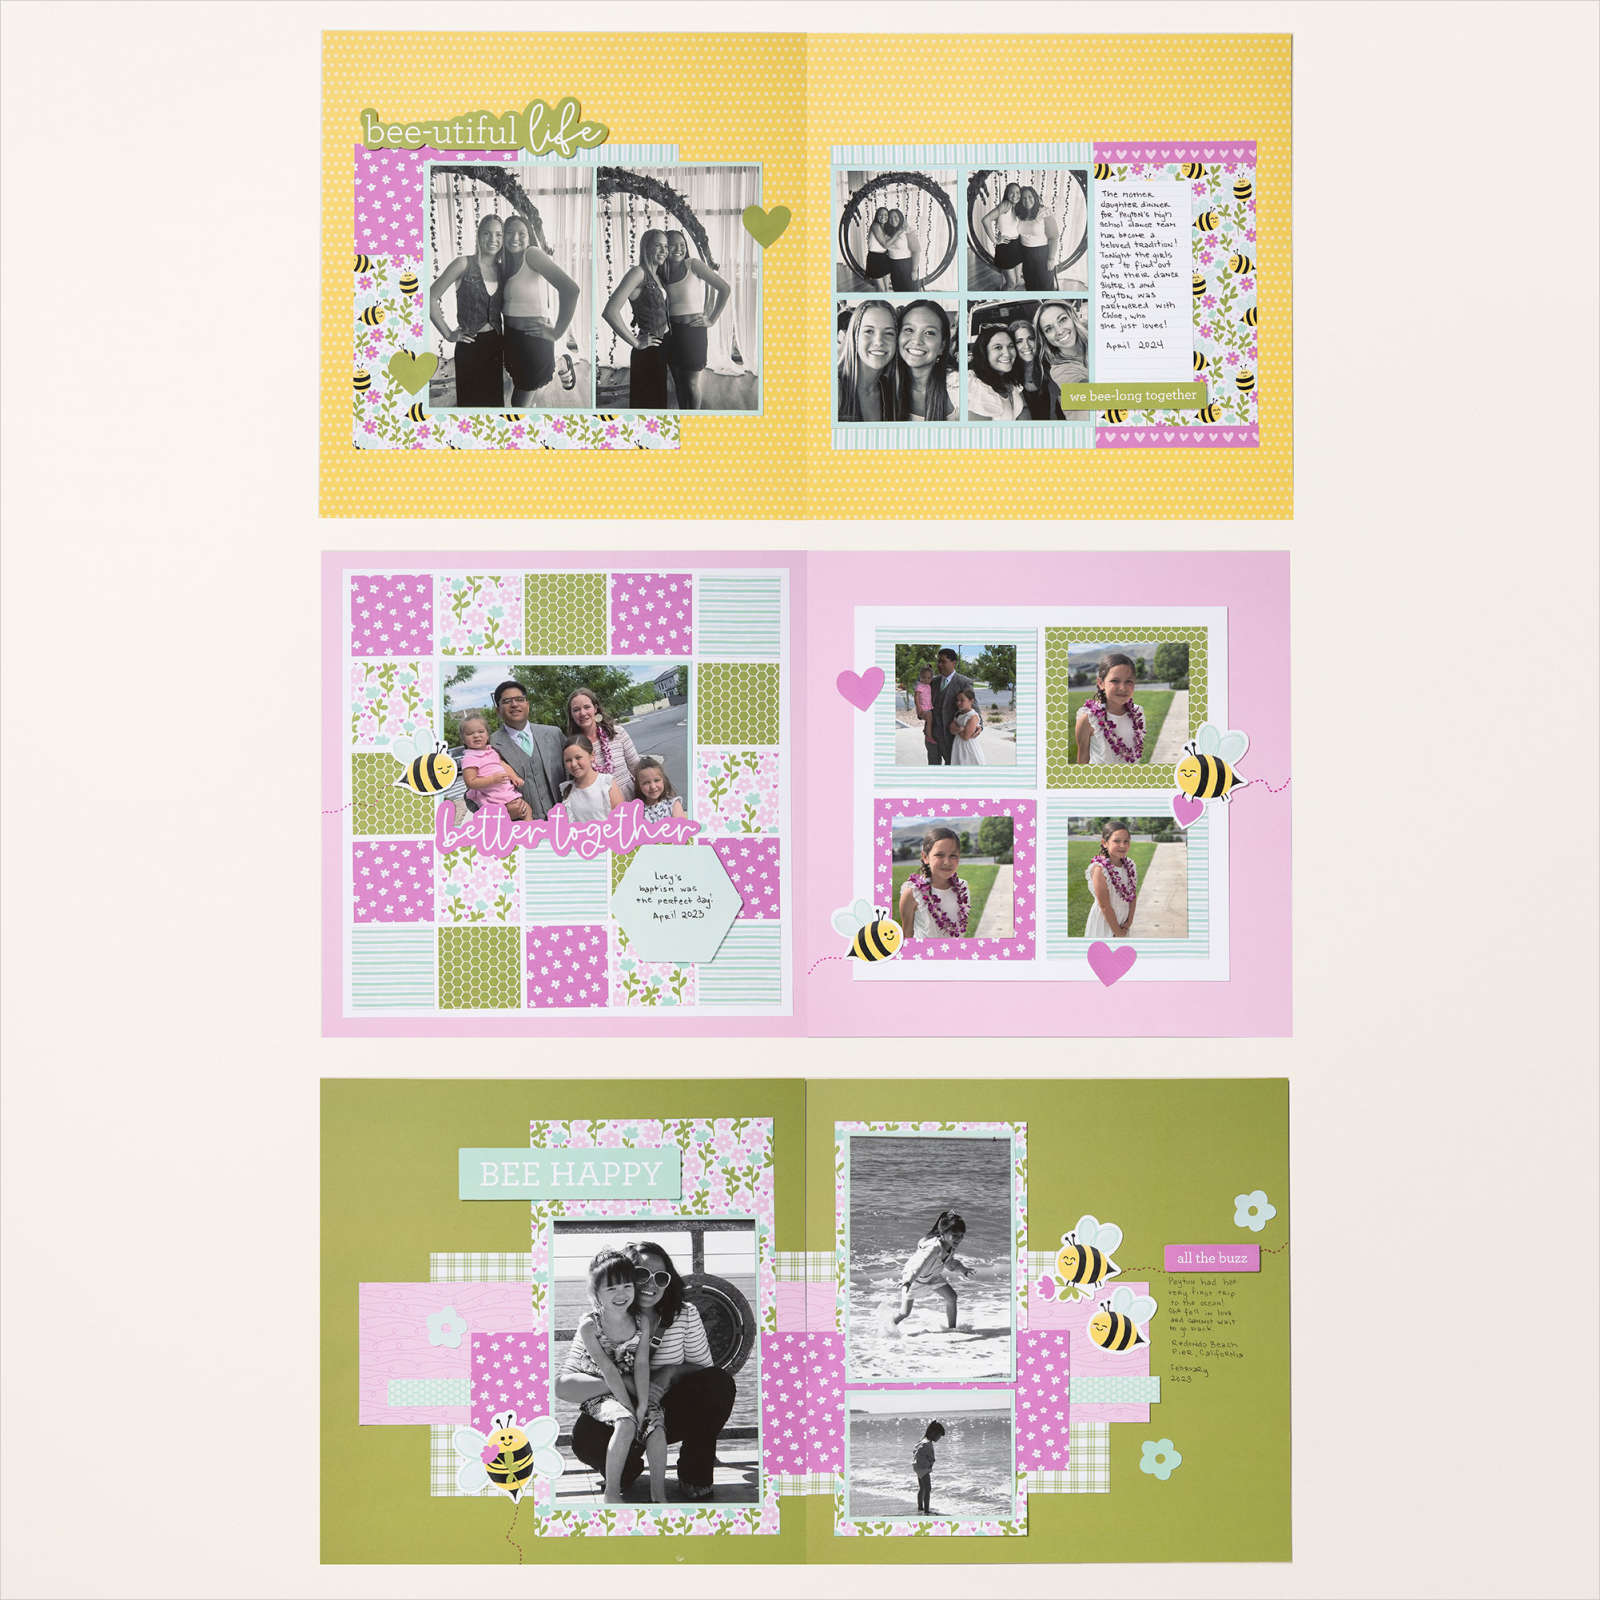
There are enough supplies leftover from the Paper & Sticker Sheet pack to create at least another 3-4 pages, or you could use them for other projects, PLUS Stampin’ Up! has a coordinating bundle of stamps and dies that you’ll enjoy incorporating into all your BEE-utiful projects: Meant to Bee bundle.
Don’t want to design a page yourself? You’ll appreciate the Meant to Bee Scrapbook Workshop Kit which creates three double-page layouts (shown above) with detailed instructions and plenty of product left over to make a few more!
Next, BUZZ on over to Heather’s contribution using a beautiful new online exclusive suite: Botanical Textures! She’s up next and you can collect every sweet memory-keeping idea like pollen on a bee 🐝
April 2025 New at SU! Blog Hop: Making Memories Last
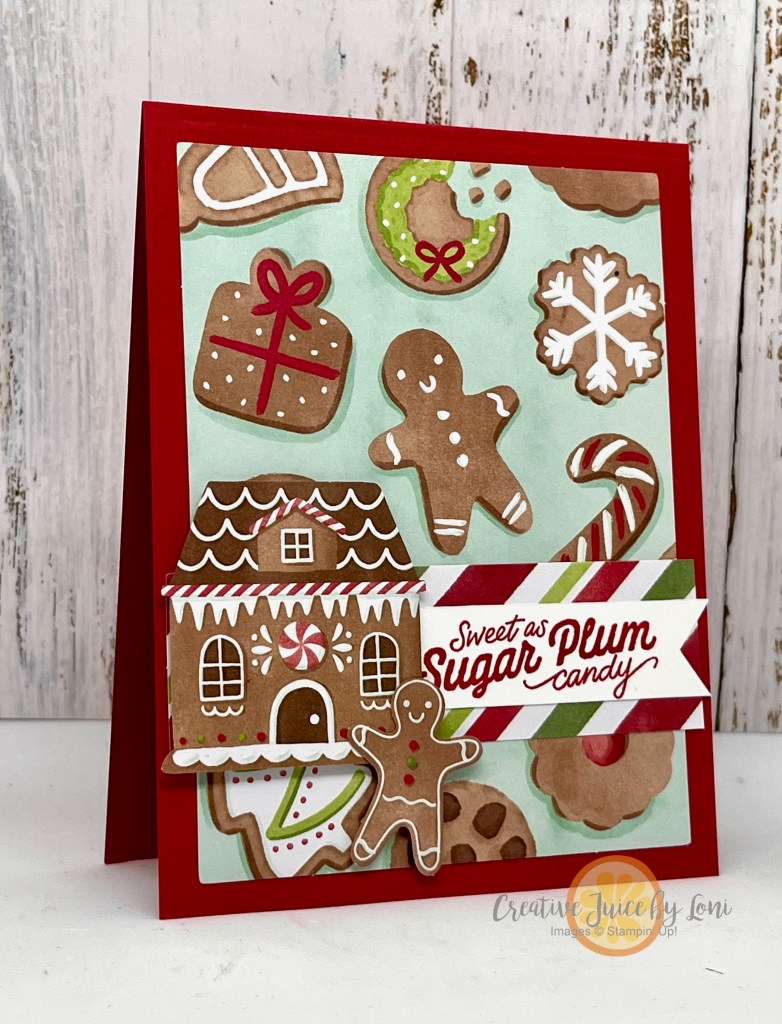
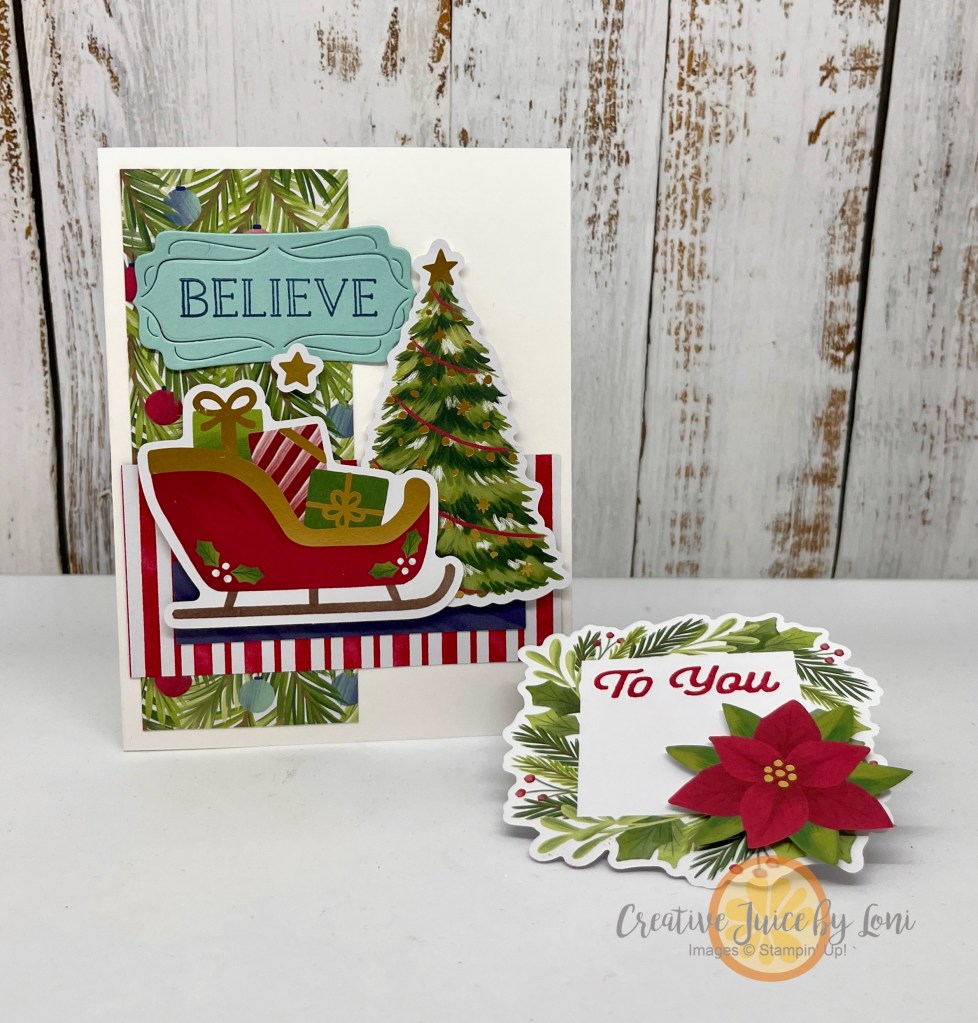
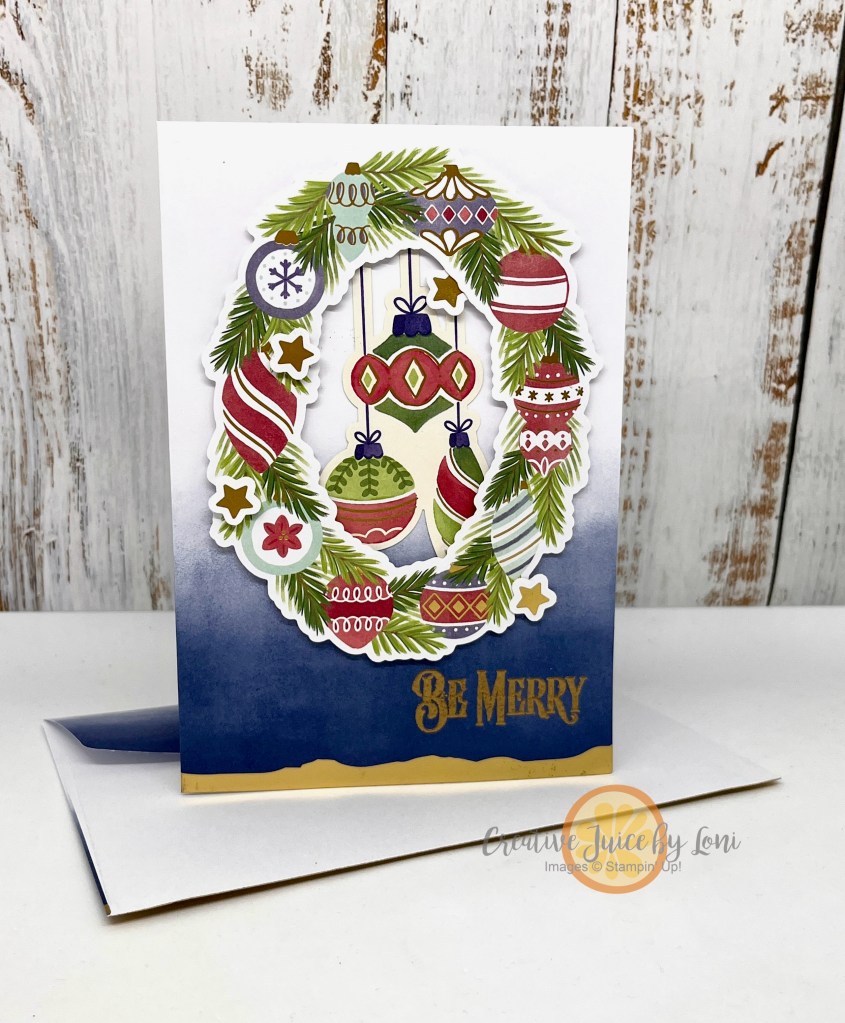
The holidays should be festive and fun, NOT stressful! These fast last-minute projects meet both requirements because the thoughtfully patterned paper AND ready-to-use elements are simply delightful to mix and match:
A Little Bit Festive Designer Series Paper pack is in the LAST CHANCE list and some folks claim to have created up to 30 Christmas cards from the pack, just by added card stock bases, as shown above. They will all be unique, as there are no duplicate images.
Step up your card creations with the Gold-Dipped Cards & Envelope pack: All you have to do is fold them in half and add your focal points! Heat embossing a greeting is one way to add more shine, and many of the Little Bit Festive ephemera pieces also have gold foil details:
Easier to see the shine in the demonstration video:
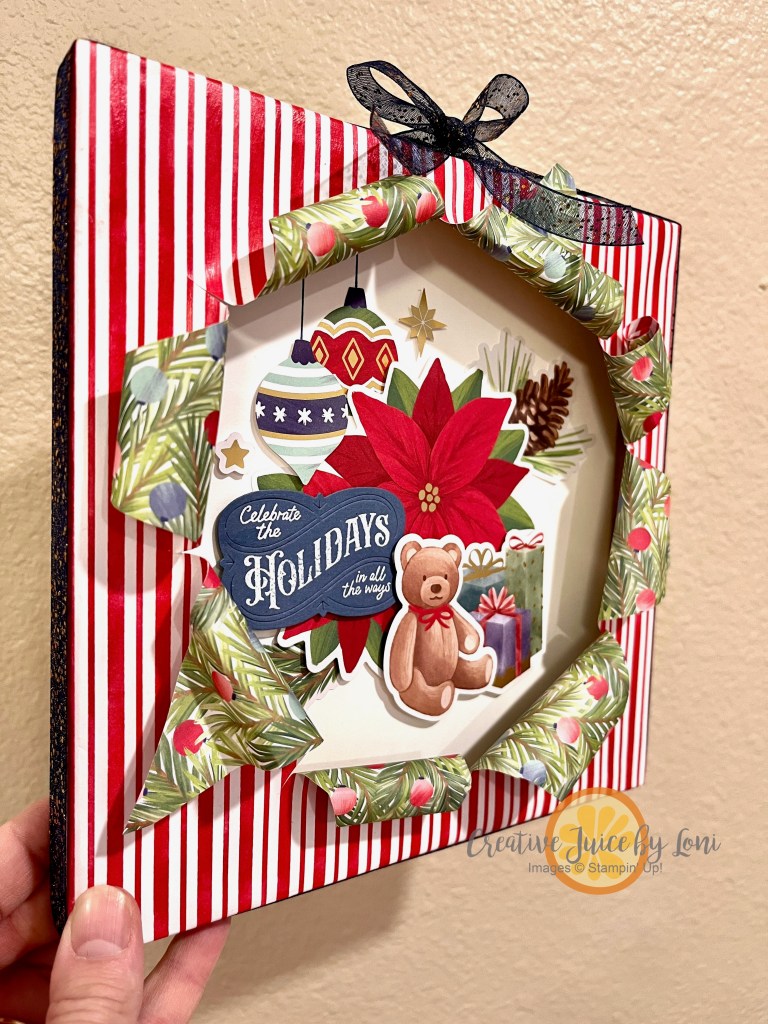
Two more projects I created with this pack were:
An 8.5″ x 11″ scrapbook page layout. This was still very simple to make, and I could write a whole journal about my hot cocoa obsession…just need to take a few photos and add them!
And finally, this true “Busted Canvas” home decor piece! While not quite as quick as the other projects, it really didn’t take much longer to create, once the Mod Podge was dried on the front.
Grouping a bunch of the die cuts together makes an adorable vignette of all things Christmas!
In a touching moment when two different girls connect as friends in the movie “WICKED”, Galinda makes the (grammatically incorrect) observation that “Pink goes good with green,” and it’s true not only because these two colors are part of a triad of colors that are proved to coordinate!
I met Cathy (and Janet, across the street from her) when I moved to Southern Utah in 1973 and we became dear friends and playmates. Something we ALWAYS looked forward to each year was the evening that the WIZARD OF OZ movie was shown on television, and since we had to watch it at the time it was scheduled to be broadcast (no “on demand video” back then), we made it a watch PARTY!
2024 was the 75th anniversary of the classic film, so we went to view it in the theater in January (with our friend Jolene, left, as Janet was out of town).
They have a poster from the Wizard of Oz hanging in the theater, as Cathy is pointing out. OBVIOUSLY, we had to repeat the party when WICKED arrived in theaters last month…however…guess who forgot to take a photo while 8 of us were gathered at the movie…
Never fear, we meet for lunch about once a month, and I’m going to snap a picture of us in December
This 2-page 8.5″ x 11″ layout was created in landscape orientation so you can imagine that it would make a terrific 12″ x 12″ layout as well. The teeny-tiny stars connect the pages from top to bottom, with a bit of sparkle. Isn’t it WONDERFUL that WICKED gave us a reason to use the Spells & Potions dies for more than Halloween? They may not last long, so don’t hesitate to grab them if you think you may want to use a broomstick or a witch hat for any memory keeping.
The titles on these pages come from the musical number “For Good” which will be in PART 2 of WICKED, coming to theaters in November 2025. This song really captures how a friend can make us better through their good influence, and I can say that Cathy has shaped who I’ve become. She is loyal, filled with faith, and truly good. BONUS: She has the world’s best MEMORY, so as friends, we rely on her to remember the things we don’t!
Some handy tips are shared in the “How-To” Video for laying out titles and extending an embossed design when the folder is small, among other things:
Being a paper crafter means always having supplies on hand to create anything you can dream of: From greeting cards to memory albums, or gifts to seasonal decorations, you’re prepared to MAKE IT!
Rummaging through my crafty closet, I found a few chargers left over from a previous project. I know my Creative Juice community has a lot of Halloween decor, but if you have a void between October 31st and Christmas, this may be a project to embrace:


![Boardwalk Fun Photopolymer Stamp Set (English) [ 166822 ]](https://assets1.tamsnetwork.com/images/EC042017NF/166822s.jpg "Boardwalk Fun Photopolymer Stamp Set (English) [ 166822 ]")
![Beach Boardwalk 12" X 12" (30.5 X 30.5 Cm) Designer Series Paper [ 166820 ]](https://assets1.tamsnetwork.com/images/EC042017NF/166820s.jpg "Beach Boardwalk 12\" X 12\" (30.5 X 30.5 Cm) Designer Series Paper [ 166820 ]")
![Secret Sea 8 1/2" X 11" Cardstock [ 165624 ]](https://assets1.tamsnetwork.com/images/EC042017NF/165624s.jpg "Secret Sea 8 1/2\" X 11\" Cardstock [ 165624 ]")
![2024 2026 In Color™ Flat Pearls [ 165266 ]](https://assets1.tamsnetwork.com/images/EC042017NF/165266s.jpg "2024 2026 In Color™ Flat Pearls [ 165266 ]")
![Secret Sea 3/8" (1 Cm) Bordered Open Weave Ribbon [ 166932 ]](https://assets1.tamsnetwork.com/images/EC042017NF/166932s.jpg "Secret Sea 3/8\" (1 Cm) Bordered Open Weave Ribbon [ 166932 ]")
![Garden Green Classic Stampin' Pad [ 147089 ]](https://assets1.tamsnetwork.com/images/EC042017NF/147089s.jpg "Garden Green Classic Stampin' Pad [ 147089 ]")
![Fresh Freesia Classic Stampin' Pad [ 155611 ]](https://assets1.tamsnetwork.com/images/EC042017NF/155611s.jpg "Fresh Freesia Classic Stampin' Pad [ 155611 ]")
![Lost Lagoon Classic Stampin' Pad [ 161678 ]](https://assets1.tamsnetwork.com/images/EC042017NF/161678s.jpg "Lost Lagoon Classic Stampin' Pad [ 161678 ]")
![Pretty Peacock Classic Stampin’ Pad [ 150083 ]](https://assets1.tamsnetwork.com/images/EC042017NF/150083s.jpg "Pretty Peacock Classic Stampin’ Pad [ 150083 ]")
![Stampin' Seal [ 152813 ]](https://assets1.tamsnetwork.com/images/EC042017NF/152813s.jpg "Stampin' Seal [ 152813 ]")
![Stampin' Dimensionals [ 104430 ]](https://assets1.tamsnetwork.com/images/EC042017NF/104430s.jpg "Stampin' Dimensionals [ 104430 ]")


![Everyday Skies Suite Collection (English) [ 164635 ]](https://assets1.tamsnetwork.com/images/EC042017NF/164635s.jpg "Everyday Skies Suite Collection (English) [ 164635 ]")
![Alphabet à La Mode Dies [ 160750 ]](https://assets1.tamsnetwork.com/images/EC042017NF/160750s.jpg "Alphabet à La Mode Dies [ 160750 ]")
![Mini Alphabet Dies [ 162934 ]](https://assets1.tamsnetwork.com/images/EC042017NF/162934s.jpg "Mini Alphabet Dies [ 162934 ]")
![Shaded Spruce 8-1/2" X 11" Cardstock [ 146981 ]](https://assets1.tamsnetwork.com/images/EC042017NF/146981s.jpg "Shaded Spruce 8-1/2\" X 11\" Cardstock [ 146981 ]")
![Cajun Craze 8-1/2" X 11" Cardstock [ 119684 ]](https://assets1.tamsnetwork.com/images/EC042017NF/119684s.jpg "Cajun Craze 8-1/2\" X 11\" Cardstock [ 119684 ]")
![Balmy Blue 8-1/2" X 11" Cardstock [ 146982 ]](https://assets1.tamsnetwork.com/images/EC042017NF/146982s.jpg "Balmy Blue 8-1/2\" X 11\" Cardstock [ 146982 ]")
![Blueberry Bushel 8-1/2" X 11" Cardstock [ 146968 ]](https://assets1.tamsnetwork.com/images/EC042017NF/146968s.jpg "Blueberry Bushel 8-1/2\" X 11\" Cardstock [ 146968 ]")
![Basic Beige 8 1/2" X 11" Cardstock [ 164511 ]](https://assets1.tamsnetwork.com/images/EC042017NF/164511s.jpg "Basic Beige 8 1/2\" X 11\" Cardstock [ 164511 ]")
![Adhesive Sheets [ 152334 ]](https://assets1.tamsnetwork.com/images/EC042017NF/152334s.jpg "Adhesive Sheets [ 152334 ]")
![Stampin' Cut & Emboss Machine [ 149653 ]](https://assets1.tamsnetwork.com/images/EC042017NF/149653s.jpg "Stampin' Cut & Emboss Machine [ 149653 ]")
![Bee Builder Punch [ 162553 ]](https://assets1.tamsnetwork.com/images/EC042017NF/162553s.jpg "Bee Builder Punch [ 162553 ]")
![Shaded Spruce Classic Stampin' Pad [ 147088 ]](https://assets1.tamsnetwork.com/images/EC042017NF/147088s.jpg "Shaded Spruce Classic Stampin' Pad [ 147088 ]")
![Blueberry Bushel Classic Stampin' Pad [ 147138 ]](https://assets1.tamsnetwork.com/images/EC042017NF/147138s.jpg "Blueberry Bushel Classic Stampin' Pad [ 147138 ]")
![Cajun Craze Classic Stampin' Pad [ 147085 ]](https://assets1.tamsnetwork.com/images/EC042017NF/147085s.jpg "Cajun Craze Classic Stampin' Pad [ 147085 ]")


![Floral Impressions 12" X 12" (30.5 X 30.5 Cm) Designer Series Paper [ 165603 ]](https://assets1.tamsnetwork.com/images/EC042017NF/165603s.jpg "Floral Impressions 12\" X 12\" (30.5 X 30.5 Cm) Designer Series Paper [ 165603 ]")
![Impressions Abloom Bundle (English) [ 165611 ]](https://assets1.tamsnetwork.com/images/EC042017NF/165611s.jpg "Impressions Abloom Bundle (English) [ 165611 ]")
![Strawberry Slush 8 1/2" X 11" Cardstock [ 165625 ]](https://assets1.tamsnetwork.com/images/EC042017NF/165625s.jpg "Strawberry Slush 8 1/2\" X 11\" Cardstock [ 165625 ]")
![Granny Apple Green 8-1/2" X 11" Cardstock [ 146990 ]](https://assets1.tamsnetwork.com/images/EC042017NF/146990s.jpg "Granny Apple Green 8-1/2\" X 11\" Cardstock [ 146990 ]")
![Basic White 8 1/2" X 11" Cardstock [ 166780 ]](https://assets1.tamsnetwork.com/images/EC042017NF/166780s.jpg "Basic White 8 1/2\" X 11\" Cardstock [ 166780 ]")
![Strawberry Slush Classic Stampin' Pad [ 165286 ]](https://assets1.tamsnetwork.com/images/EC042017NF/165286s.jpg "Strawberry Slush Classic Stampin' Pad [ 165286 ]")
![Poppy Parade Classic Stampin' Pad [ 147050 ]](https://assets1.tamsnetwork.com/images/EC042017NF/147050s.jpg "Poppy Parade Classic Stampin' Pad [ 147050 ]")
![Paper Trimmer [ 152392 ]](https://assets1.tamsnetwork.com/images/EC042017NF/152392s.jpg "Paper Trimmer [ 152392 ]")


![Tags To Go Cling Stamp Set (English) [ 165569 ]](https://assets1.tamsnetwork.com/images/EC042017NF/165569s.jpg "Tags To Go Cling Stamp Set (English) [ 165569 ]")
![On The Go 12" X 12" (30.5 X 30.5 Cm) Designer Series Paper [ 165566 ]](https://assets1.tamsnetwork.com/images/EC042017NF/165566s.jpg "On The Go 12\" X 12\" (30.5 X 30.5 Cm) Designer Series Paper [ 165566 ]")
![On The Go Puffy Stickers [ 165581 ]](https://assets1.tamsnetwork.com/images/EC042017NF/165581s.jpg "On The Go Puffy Stickers [ 165581 ]")
![Pack Your Bags Twine Three Pack [ 165582 ]](https://assets1.tamsnetwork.com/images/EC042017NF/165582s.jpg "Pack Your Bags Twine Three Pack [ 165582 ]")
![Tuxedo Black Memento Ink Pad [ 132708 ]](https://assets1.tamsnetwork.com/images/EC042017NF/132708s.jpg "Tuxedo Black Memento Ink Pad [ 132708 ]")
![Azure Afternoon Classic Stampin' Pad [ 161663 ]](https://assets1.tamsnetwork.com/images/EC042017NF/161663s.jpg "Azure Afternoon Classic Stampin' Pad [ 161663 ]")
![Summer Splash 8 1/2" X 11 Cardstock [ 163797 ]](https://assets1.tamsnetwork.com/images/EC042017NF/163797s.jpg "Summer Splash 8 1/2\" X 11 Cardstock [ 163797 ]")
![Basic Black 8-1/2" X 11" Cardstock [ 121045 ]](https://assets1.tamsnetwork.com/images/EC042017NF/121045s.jpg "Basic Black 8-1/2\" X 11\" Cardstock [ 121045 ]")
![Strawberry Slush 3/8" (1 Cm) Faux Linen Ribbon [ 165274 ]](https://assets1.tamsnetwork.com/images/EC042017NF/165274s.jpg "Strawberry Slush 3/8\" (1 Cm) Faux Linen Ribbon [ 165274 ]")
![Multipurpose Liquid Glue [ 110755 ]](https://assets1.tamsnetwork.com/images/EC042017NF/110755s.jpg "Multipurpose Liquid Glue [ 110755 ]")
![Mini Stampin' Cut & Emboss Machine [ 150673 ]](https://assets1.tamsnetwork.com/images/EC042017NF/150673s.jpg "Mini Stampin' Cut & Emboss Machine [ 150673 ]")


![On The Go Suite Collection (English) [ 165583 ]](https://assets1.tamsnetwork.com/images/EC042017NF/165583s.jpg "On The Go Suite Collection (English) [ 165583 ]")
![Shy Shamrock 8 1/2" X 11" Cardstock [ 163795 ]](https://assets1.tamsnetwork.com/images/EC042017NF/163795s.jpg "Shy Shamrock 8 1/2\" X 11\" Cardstock [ 163795 ]")
![Petunia Pop 8 1/2" X 11" Cardstock [ 163801 ]](https://assets1.tamsnetwork.com/images/EC042017NF/163801s.jpg "Petunia Pop 8 1/2\" X 11\" Cardstock [ 163801 ]")
![Pumpkin Pie 8-1/2" X 11" Cardstock [ 105117 ]](https://assets1.tamsnetwork.com/images/EC042017NF/105117s.jpg "Pumpkin Pie 8-1/2\" X 11\" Cardstock [ 105117 ]")
![Azure Afternoon 8 1/2" X 11" Cardstock [ 161719 ]](https://assets1.tamsnetwork.com/images/EC042017NF/161719s.jpg "Azure Afternoon 8 1/2\" X 11\" Cardstock [ 161719 ]")


![Friends Of The Ocean 12" X 12" (30.5 X 30.5 Cm) Designer Series Paper [ 164684 ]](https://assets1.tamsnetwork.com/images/EC042017NF/164684s.jpg "Friends Of The Ocean 12\" X 12\" (30.5 X 30.5 Cm) Designer Series Paper [ 164684 ]")
![Daffodil Delight 8-1/2" X 11" Cardstock [ 119683 ]](https://assets1.tamsnetwork.com/images/EC042017NF/119683s.jpg "Daffodil Delight 8-1/2\" X 11\" Cardstock [ 119683 ]")
![Meant To Bee Photopolymer Stamp Set (English) [ 166583 ]](https://assets1.tamsnetwork.com/images/EC042017NF/166583s.jpg "Meant To Bee Photopolymer Stamp Set (English) [ 166583 ]")
![Bee My Valentine Photopolymer Stamp Set (English) [ 162547 ]](https://assets1.tamsnetwork.com/images/EC042017NF/162547s.jpg "Bee My Valentine Photopolymer Stamp Set (English) [ 162547 ]")
![Basic White Medium Envelopes [ 159236 ]](https://assets1.tamsnetwork.com/images/EC042017NF/159236s.jpg "Basic White Medium Envelopes [ 159236 ]")
![Mini Glue Dots [ 103683 ]](https://assets1.tamsnetwork.com/images/EC042017NF/103683s.jpg "Mini Glue Dots [ 103683 ]")


![Cute As Can Bee 12" X 12" (30.5 X 30.5 Cm) Designer Series Paper & Sticker Sheet (English) [ 166618 ]](https://assets1.tamsnetwork.com/images/EC042017NF/166618s.jpg "Cute As Can Bee 12\" X 12\" (30.5 X 30.5 Cm) Designer Series Paper & Sticker Sheet (English) [ 166618 ]")
![Basic White 12 X12 (30.5 X 30.5 Cm) Cardstock [ 159231 ]](https://assets1.tamsnetwork.com/images/EC042017NF/159231s.jpg "Basic White 12 X12 (30.5 X 30.5 Cm) Cardstock [ 159231 ]")
![Petunia Pop 12" X 12" (30.5 X 30.5 Cm) Two Tone Cardstock [ 166690 ]](https://assets1.tamsnetwork.com/images/EC042017NF/166690s.jpg "Petunia Pop 12\" X 12\" (30.5 X 30.5 Cm) Two Tone Cardstock [ 166690 ]")
![Pool Party 8-1/2" X 11" Cardstock [ 122924 ]](https://assets1.tamsnetwork.com/images/EC042017NF/122924s.jpg "Pool Party 8-1/2\" X 11\" Cardstock [ 122924 ]")


![A Little Bit Festive 12" X 12" (30.5 X 30.5 Cm) Mix & Match Specialty Designer Series Paper [ 164107 ]](https://assets1.tamsnetwork.com/images/EC042017NF/164107s.jpg "A Little Bit Festive 12\" X 12\" (30.5 X 30.5 Cm) Mix & Match Specialty Designer Series Paper [ 164107 ]")
![Real Red 8-1/2" X 11" Cardstock [ 102482 ]](https://assets1.tamsnetwork.com/images/EC042017NF/102482s.jpg "Real Red 8-1/2\" X 11\" Cardstock [ 102482 ]")
![Basic White 8 1/2" X 11" Thick Cardstock [ 159229 ]](https://assets1.tamsnetwork.com/images/EC042017NF/159229s.jpg "Basic White 8 1/2\" X 11\" Thick Cardstock [ 159229 ]")
![Real Red Classic Stampin' Pad [ 147084 ]](https://assets1.tamsnetwork.com/images/EC042017NF/147084s.jpg "Real Red Classic Stampin' Pad [ 147084 ]")
![Gold Dipped Mix & Match Specialty Cards & Envelopes [ 164108 ]](https://assets1.tamsnetwork.com/images/EC042017NF/164108s.jpg "Gold Dipped Mix & Match Specialty Cards & Envelopes [ 164108 ]")
![Christmas Labels Bundle (English) [ 164101 ]](https://assets1.tamsnetwork.com/images/EC042017NF/164101s.jpg "Christmas Labels Bundle (English) [ 164101 ]")
![Versamark Pad [ 102283 ]](https://assets1.tamsnetwork.com/images/EC042017NF/102283s.jpg "Versamark Pad [ 102283 ]")
![Metallics Wow! Embossing Powder [ 165678 ]](https://assets1.tamsnetwork.com/images/EC042017NF/165678s.jpg "Metallics Wow! Embossing Powder [ 165678 ]")
![Heat Tool (Us And Canada) [ 129053 ]](https://assets1.tamsnetwork.com/images/EC042017NF/129053s.jpg "Heat Tool (Us And Canada) [ 129053 ]")
![Night Of Navy & Gold 1/2" (1.3 Cm) Glittered Ribbon [ 162011 ]](https://assets1.tamsnetwork.com/images/EC042017NF/162011s.jpg "Night Of Navy & Gold 1/2\" (1.3 Cm) Glittered Ribbon [ 162011 ]")


![Pretty In Pink 8 1/2" X 11" Cardstock [ 163793 ]](https://assets1.tamsnetwork.com/images/EC042017NF/163793s.jpg "Pretty In Pink 8 1/2\" X 11\" Cardstock [ 163793 ]")
![Old Olive 8-1/2" X 11" Cardstock [ 100702 ]](https://assets1.tamsnetwork.com/images/EC042017NF/100702s.jpg "Old Olive 8-1/2\" X 11\" Cardstock [ 100702 ]")
![Silver Foil 12" X 12" (30.5 X 30.5 Cm) Specialty Pack [ 163096 ]](https://assets1.tamsnetwork.com/images/EC042017NF/163096s.jpg "Silver Foil 12\" X 12\" (30.5 X 30.5 Cm) Specialty Pack [ 163096 ]")
![Eyelet 3 D Embossing Folder [ 163414 ]](https://assets1.tamsnetwork.com/images/EC042017NF/163414s.jpg "Eyelet 3 D Embossing Folder [ 163414 ]")
![Potions & Spells Dies [ 164141 ]](https://assets1.tamsnetwork.com/images/EC042017NF/164141s.jpg "Potions & Spells Dies [ 164141 ]")
![Stampin' Seal+ [ 149699 ]](https://assets1.tamsnetwork.com/images/EC042017NF/149699s.jpg "Stampin' Seal+ [ 149699 ]")


![Sweet Days Of Autumn 12" X 12" (30.5 X 30.5 Cm) Designer Series Paper & Sticker Sheet (English) [ 166609 ]](https://assets1.tamsnetwork.com/images/EC042017NF/166609s.jpg "Sweet Days Of Autumn 12\" X 12\" (30.5 X 30.5 Cm) Designer Series Paper & Sticker Sheet (English) [ 166609 ]")
![Wild Wheat 3/8" (1 Cm) Rustic Striped Ribbon [ 164061 ]](https://assets1.tamsnetwork.com/images/EC042017NF/164061s.jpg "Wild Wheat 3/8\" (1 Cm) Rustic Striped Ribbon [ 164061 ]")
![Woven Golden Leaves [ 164059 ]](https://assets1.tamsnetwork.com/images/EC042017NF/164059s.jpg "Woven Golden Leaves [ 164059 ]")
![Autumn Expressions Dies [ 164055 ]](https://assets1.tamsnetwork.com/images/EC042017NF/164055s.jpg "Autumn Expressions Dies [ 164055 ]")
![Crushed Curry 8-1/2" X 11" Cardstock [ 131199 ]](https://assets1.tamsnetwork.com/images/EC042017NF/131199s.jpg "Crushed Curry 8-1/2\" X 11\" Cardstock [ 131199 ]")
![Petal Pink 8-1/2" X 11" Cardstock [ 146985 ]](https://assets1.tamsnetwork.com/images/EC042017NF/146985s.jpg "Petal Pink 8-1/2\" X 11\" Cardstock [ 146985 ]")
![Tear & Tape Adhesive [ 154031 ]](https://assets1.tamsnetwork.com/images/EC042017NF/154031s.jpg "Tear & Tape Adhesive [ 154031 ]")

