Whenever I can craft smarter (not harder), it’s a win!
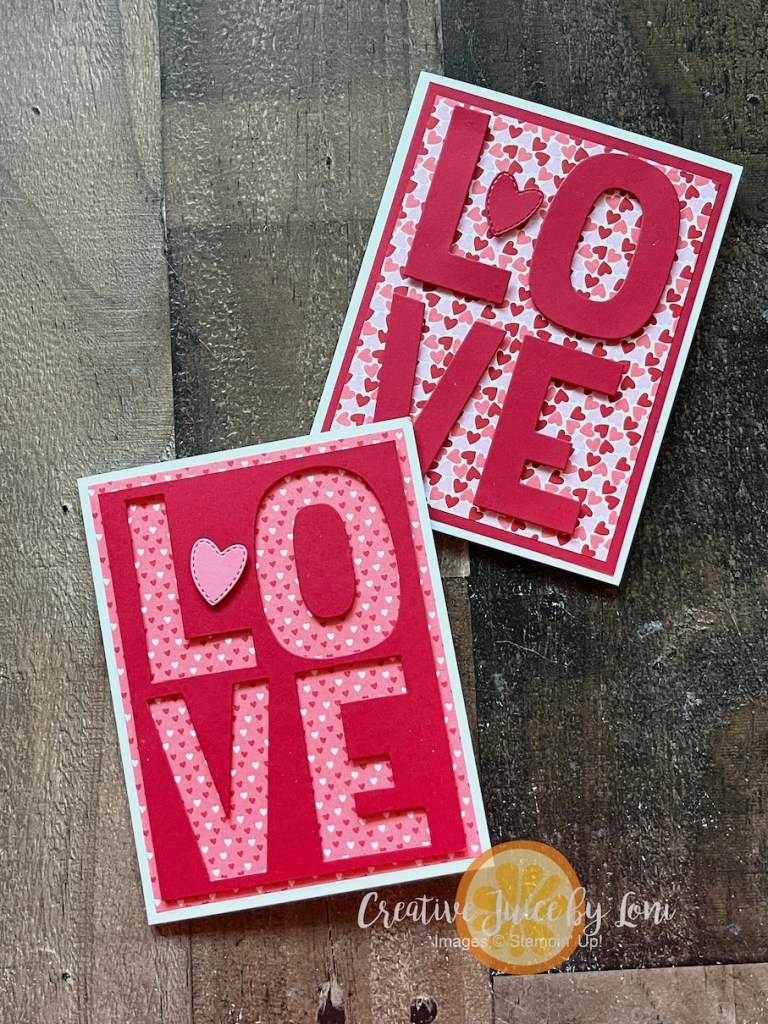
This Valentine card duo only requires ONE pass through the Stampin’ Cut & Emboss machine, and you’ll have letters and the negative space to create two LOVE LETTERS:
Cutting Guide (supplies listed at bottom for easy adding to cart!):
Two Basic White Thick card bases, 8.5″ x 5.5″ scored at 4.25″
Two Real Red card stock layers: One cut to 5.25″ x 4″ and one 5″ x 3.75″
Two pieces of Made with Love Designer Series Paper: One cut to 5.25″ x 4″ and one 5″ x 3.75″
Scraps of Real Red and Flirty Flamingo for heart embellishments.
It’s so simple to do, and you can follow along with a short video. ** Remember to die cut the letters from the smaller Real Red card stock (5″ x 3.75″)
Important note: There are just a few days left to earn BONUS DAYS coupons with each $50 ordered from my Stampin’ Store by February 2nd!
Collect all the coupon codes emailed to you after your order(s) and set a reminder to redeem them in February!
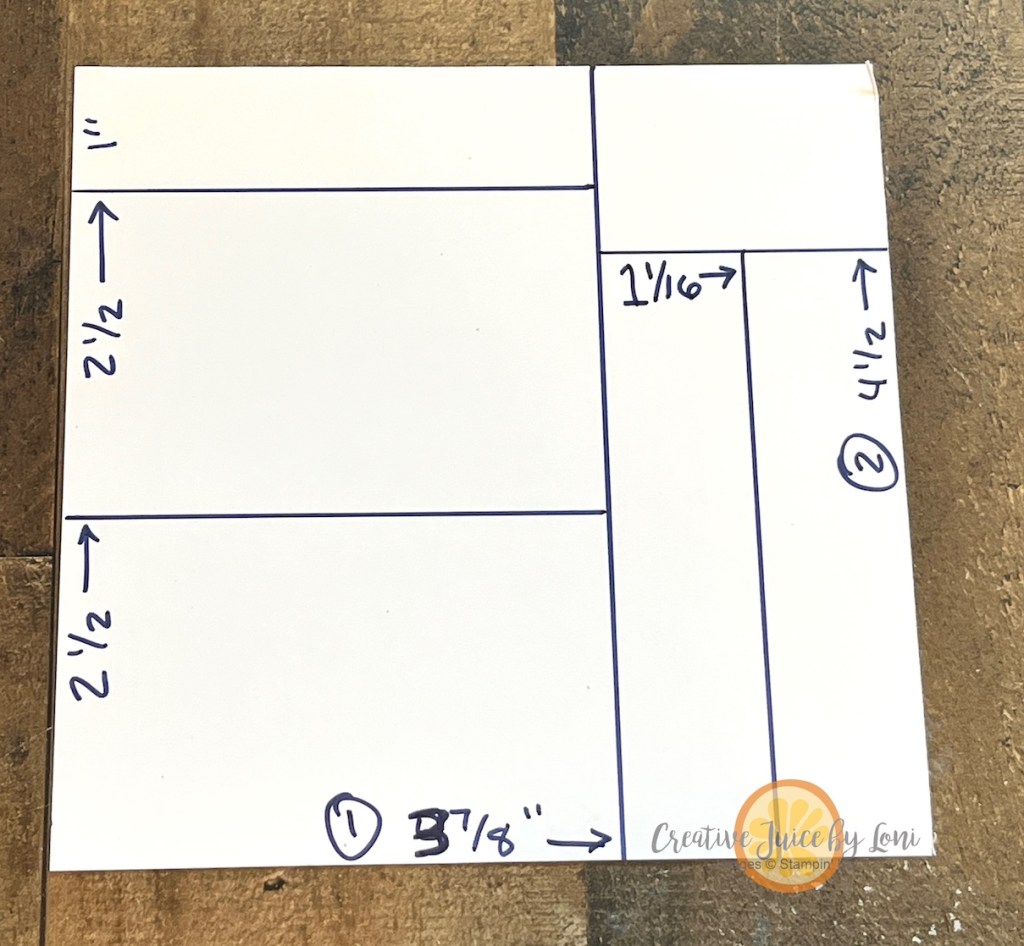
Have ever looked at a stack of pretty designer series paper and think, “It’s too pretty to cut”? I hear you—but here’s the good news: when you do cut it, you can get the most out of every single sheet! I created this cutting map that turns any 6” x 6” piece of designer paper into perfectly sized layers for the front of your cards:
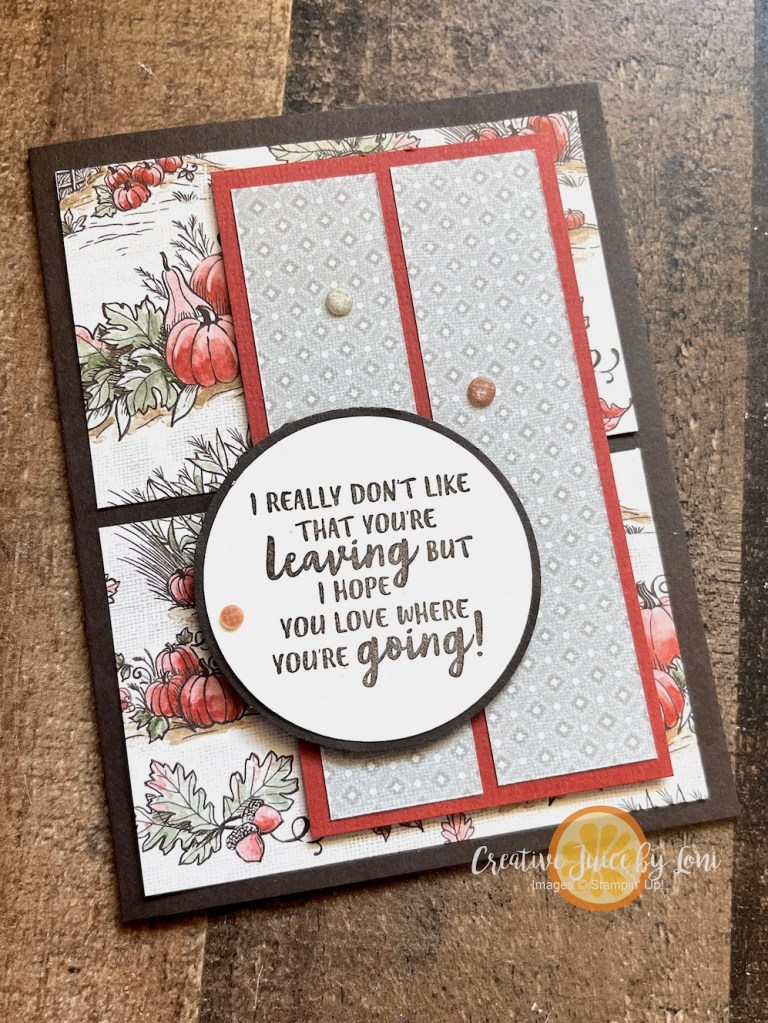
In my live video today, I walked through the process step by step and made the card shown here from the Autumn Toile pack of paper that will be available on September 2nd. (You’ll find the replay below if you want to craft along!) The cutting map is below so you can print it out, tuck it near your paper trimmer, and use it anytime you want to make lovely layers of backgrounds for your greeting cards.
The first cut you make (circled) will be 3-7/8″ into the square. The second cut will be to cut the leftover pattern down to 4-1/2″ tall, then other cuts as shown.
Layer the two large rectangles on a contrasting card stock base, and the two long strips go on a piece of card stock that is 2-1/2″ x 4-3/4″, which can be attached with dimensionals to either the left or right side of the front of the card.
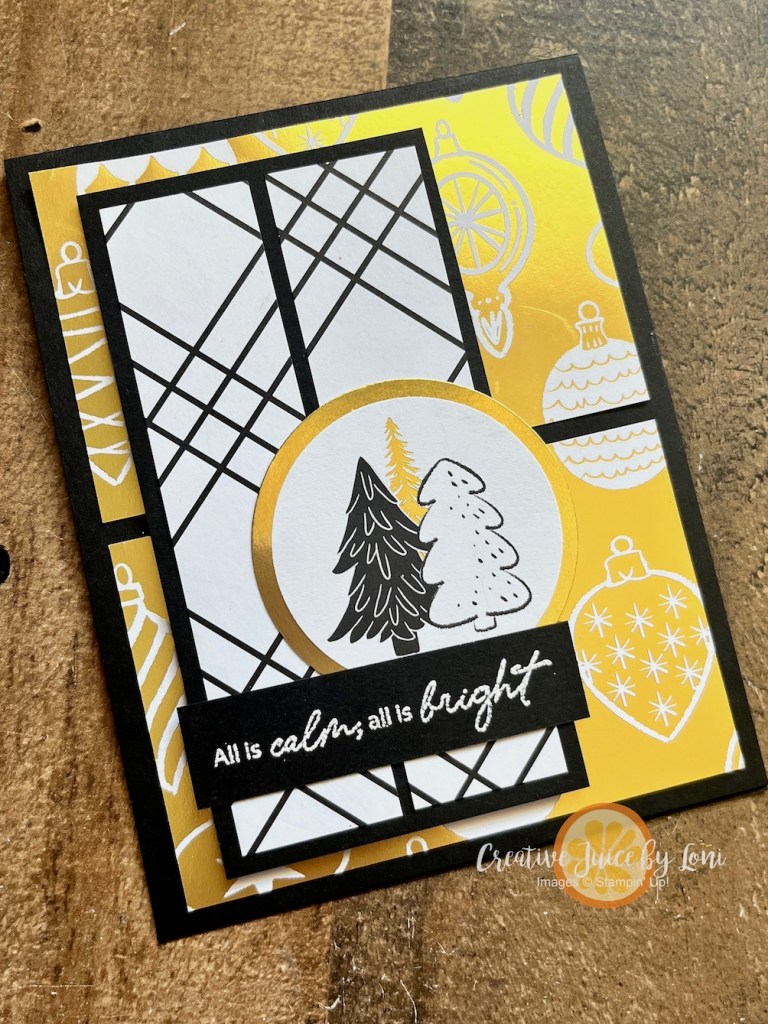
For my samples, I used a mix of Stampin’ Up! designer series paper. Four of the patterns come straight from the September Paper Share I’m offering — fifty-three 6″ x 6″ sheets of Stampin’ Up! Designer Series Paper, all cut down and ready for you to create with. It’s a perfect way to try every new design without committing to full packs, and it gives you plenty of variety for projects like this.
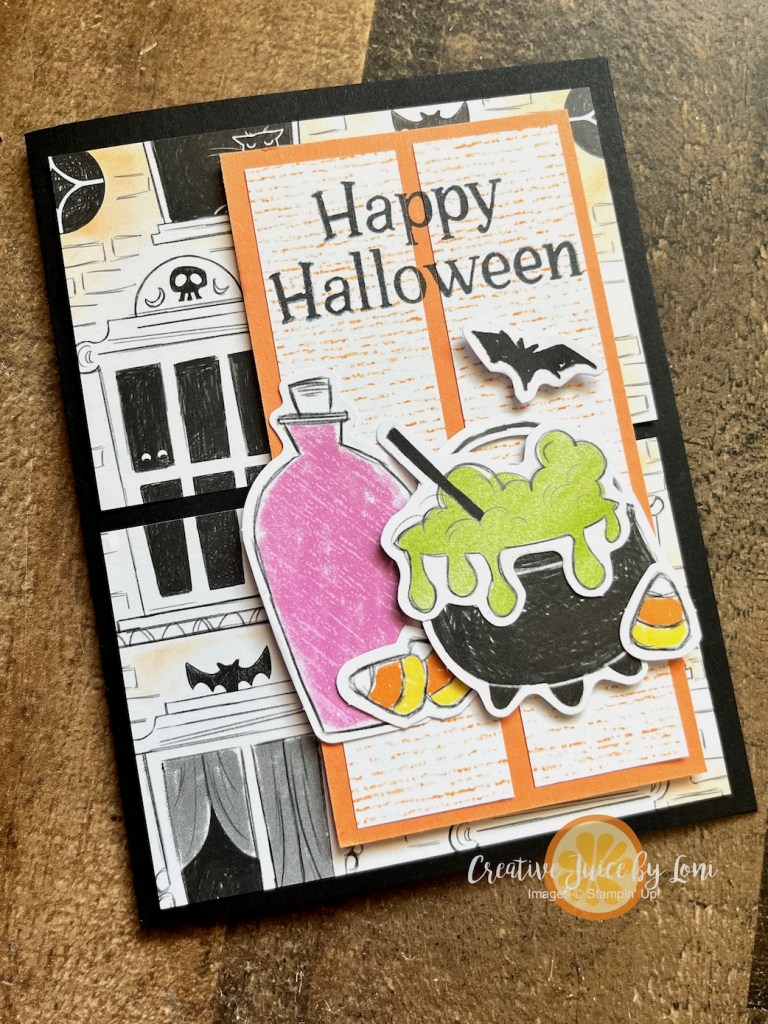
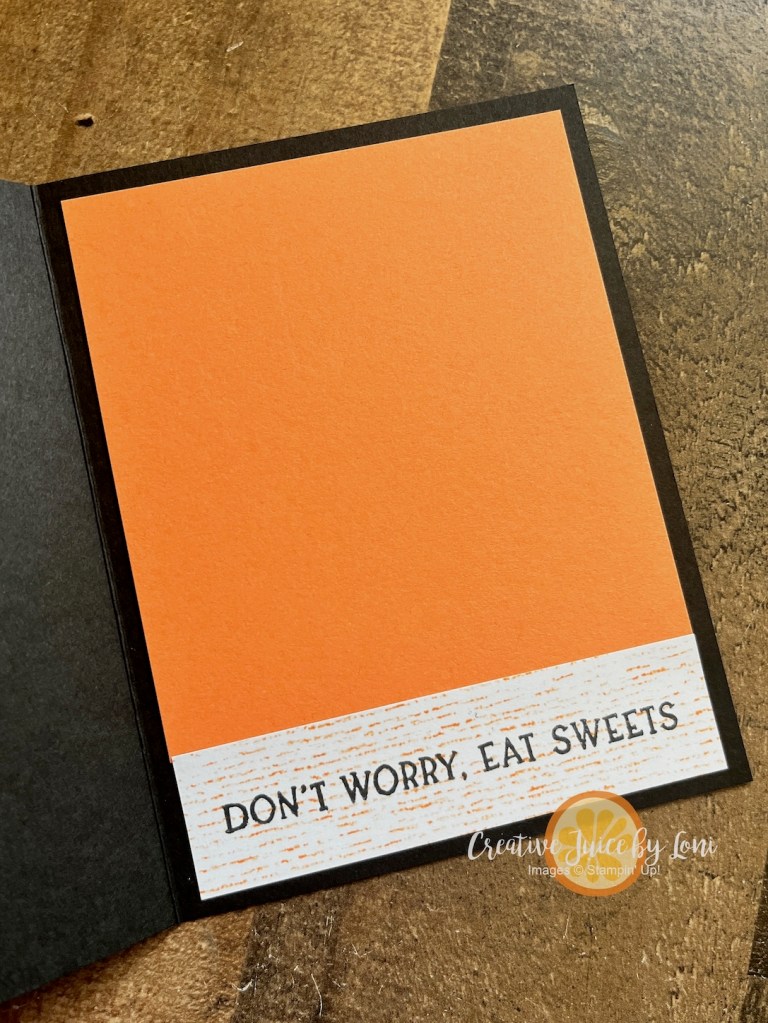
My last two examples of this sketch feature the Painterly Pears Suite and the Spooky Sweet Suite. Isn’t it terrific how the same cutting map works across completely different styles—fall-inspired pumpkins, happy holiday greetings, fresh pears, or playful Halloween motifs?! It’s proof that a simple template can stretch your supplies and spark new ideas.
Whether you’re making cards in bulk or just want a foolproof way to get more from your paper, this card design is one you’ll use again and again. Scroll down for the video, save all six card samples, and grab your trimmer—you’ll be amazed how quickly 6” x 6” papers can turn into a gallery of handmade cards.
The 1″ x 3-7/8″ piece from the cutting map goes INSIDE the cards, like this:
TWO more opportunities before you go:
The Autumn Toile paper (on the first card I demonstrated) coordinates with the September Paper Pumpkin kit, so if you adore autumn and those detailed designs, you will certainly want to subscribe by September 10th to receive a fall-filled box of coordinating crafting!
While the Spooky Sweet Suite paper is NOT included in the Paper Share, I *WILL* be teaching a Virtual Halloween class with the suite on October 2nd – Add the suite to your cart for an invitation to join the party, or visit the Facebook event page (link above) to find out how to register.
Keep your creative juices flowing! 🍊🧡– Loni Spendlove
Sometimes you have to invest in your hobby, and when you are ready to do so, may I suggest the Stampin’ Up! Party Banners Dies and Party Alphabet Dies? You’ll save 10% when you bundle them together in one purchase, and, as I mention in the instructional video below, you can claim them as “exercise equipment” 😅
A shaped card is as fun to create as it is to receive! The 5th largest banner die is just about 5.5″ x 4.25″, so these cards fit into the basic white Medium Envelopes:
We made the Pretty Peacock version (left) in the live crafting video, then when we were done, I looked at it and realized that the Damask Designs Embossing folder probably needed to be turned vertically, so created a second with the “Thanks” from a previous Paper Pumpkin kit Add-On die set called “Thanks & Beyond” (shoutout to my PP Craft Kit subscribers!).
This week is high school graduation in southern Utah, and I’m still making cards for grads! This Shy Shamrock card is the banner turned sideways, with letters cut from 2024-2026 In Color Glimmer Paper, and the lock/key/sentiments from Tags to Go.
Finally (for today, at least), I demonstrated this slimline card to remind you of the Eclipse Technique with alphabet dies:
A card for any cake-consumption celebration!
Learn how to make all these banner-themed cards in this video:
If I’ve inspired you to add the Party Die bundle to your list, please shop in my Stampin’ Store!
Better yet…choose these dies as part of a Starter Kit and only pay $99! The other perks of being a demonstrator are even better than the discount: A community of friendly crafters, the opportunity to create a business you love – or a hobby that brings you purpose and passion.
Keep your creative juices flowing! 🍊- Loni Spendlove
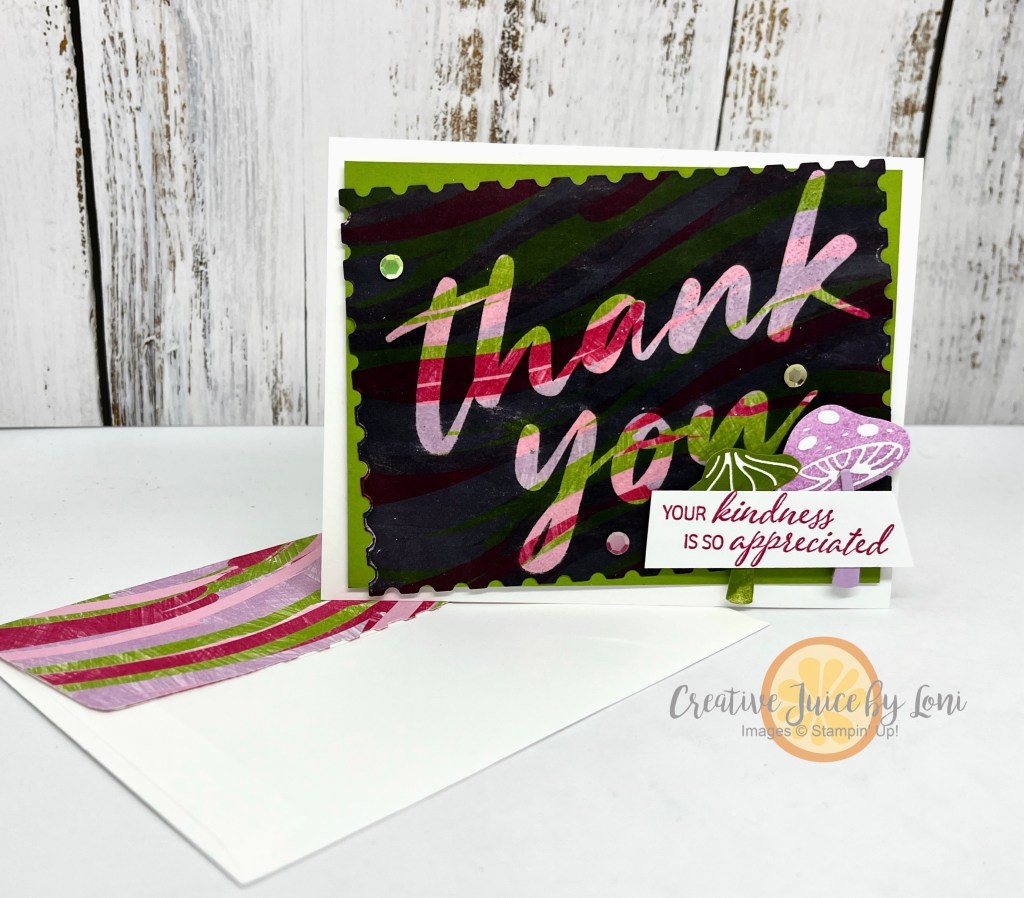
Last summer I taught you the Joseph’s Coat technique with Embossing Folders, so now it’s time to try this cool rubber stamping technique with Stampin’ Up! Designer Series Paper, plus I’ve included a bonus version using Stampin’ Write Markers!
The technique begins by clear embossing a bold image over a pattern, then adding black (or dark ink) over the embossed paper, while the ink “resists” sticking to the clear embossing powder:
I used the graphic designs from the Toadstool Gardens DSP (from Sale-a-Bration 2025), and used the largest Perennial Postage die to cut a unique shape from the pattern, leaving just enough of the paper to add to the flap of my envelope.
The Thanking You stamp is large and bold enough to allow the pattern to be seen well through the embossing once the black ink is smeared all over the Designer Series Paper. You’ll want to use a tissue to wipe off any residue from clear embossed words, and the colorful pattern emerges just like the magic of the famous coat of Joseph in Egypt!
As a BONUS, I showed that you could create a pattern with Stampin’ Write markers to make a custom design, like Red, White and Blue for Independence Day:
Why not try the starter kit and choose Option 1? You’ll get $216 worth of crafting supplies for just $99!
To learn exactly how to do the Joseph’s Coat Technique (and more about Stampin’ Write markers or the opportunity to join), watch this video:
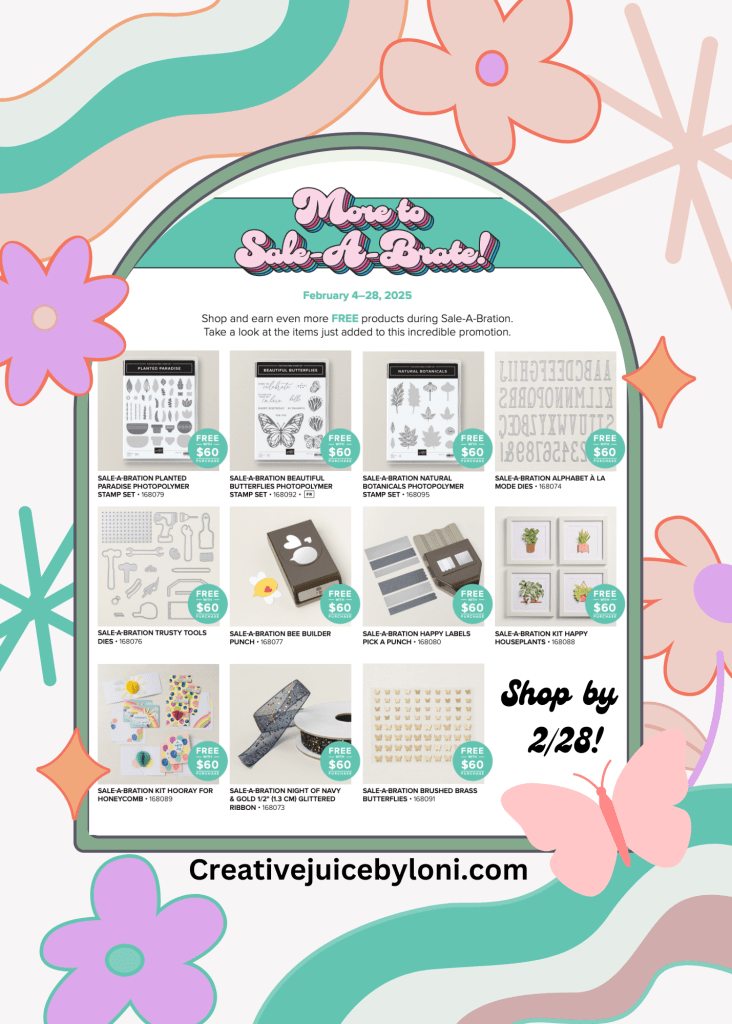
Just 10 days left to collect the Toadstool Garden Designer Series Paper (or another SAB product of your choice) for FREE during Stampin’ Up! Sale-a-Bration 2025! For each $60 you spend, you can choose a free product and many new items were added at the beginning of February.
Thank you for choosing me to serve your creative needs! These are the supplies for the first card, which I demonstrated in the video tutorial:
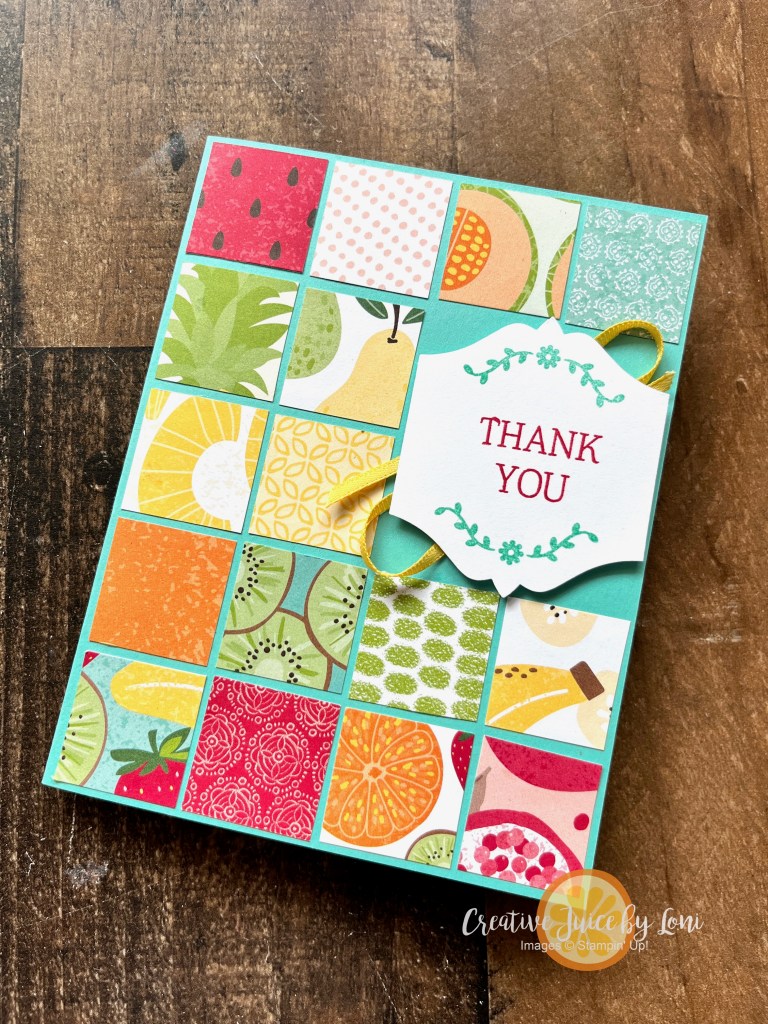
Welcome back! What can you do with scraps of Stampin’ Up! Designer Series Paper as small as 1″ square? Try this tiled card technique:
These are the Sale-a-Bration Fruit Salad DSP squares left over from using an entire piece of 6″ x 6″ paper yesterday to create 2 cards, and as promised, we’ve used EVERY PIECE! You might have to trim down the pieces on one side to fit them all across the front of a 4.25″ card, but no one will notice if they aren’t perfectly square.
The fun thing about the tiled card layout is that you can move your focal point around, or use larger squares like the 1-1/4″ Cute as Can Bee pieces here:
Hope you find this solution for small scraps to be helpful!
Guess what else? NEW products were added today for Sale-a-Bration freebies! Now is the time to collect products you’ll love free with each $60 order (ends 2/28/25)…including the Bee Builder punch I used on the card above! Click image or “Shop 24/7” from the menu at the top of this website.
If this was a contest, you would have OVERWHELMINGLY voted for the Fault Line Cards as BEST OF SHOW! Since they have been such a hit, I wanted to try an EMBOSSED version, and they are just as show-stopping as the originals, just take a look (watch the video tutorial)…
The Happy Hibiscus bundle includes a photopolymer stamp set, hybrid embossing folder and coordinating dies. With all that divine coordination, it was a lovely choice for this project! This time I started with a 4.25″ x 9″ card base and pulled a white craft ink pad across the embossed Melon Mambo card stock to make the flowers pop.
Next, I used the Eyelet 3D embossing folder to create a background in hues of purple for a few toadstools (arriving January 7th- just in time to add to your cart and qualify for a free Sale-a-Bration product, like the embellishments on the card):
Watch this “How-To” tutorial for making Fault-Line cards of all types:
This version gives you one more look at one of the Designer Series Papers that will be included in the Paper Share (reserve your share by 1/7/25) and it’s called Wildflower Birthday, which is part of a suite of coordinating products in the Stampin’ Up! 2025 Jan-April mini catalog.
It is destined for one of my team members who has a birthday in January, and I know she’ll love it!
This decorating trend is called a “fault line” cake, and after watching a few short videos (activating my sweet tooth), it occurred to me that the concept would translate into card making (minus the calories!).
Let’s try it using the December Paper Pumpkin“Notes from the Heart” stamp set from paired with card stock and Designer Series Paper to create these Fault Line greeting cards,starting with a thank you card:
I roughed-up the edges along the “fault line”, reminiscent of my Busted Canvas card, by rolling back the torn edges. It really gives the card character!
Next, a Basic Beige Birthday Card, with the Timeless Plaid Designer Series Paper (from the Stampin’ Up! 2025 January-April mini catalog) peeking through:
Since I hadn’t opened the Nature’s Sweetness Specialty DSP package, I ended my stamping spree with this shiny Congrats Card. The gold foil and embossing are gorgeous, so I’ll probably make a whole stack of these to have on hand! The Adhesive-Backed Heart Sequins will be available on January 7th:
Here are the materials needed for the Fault Line card:
4.25″ x 9.5″ card stock base, scored at 5.5″
4.25″ x 5.5″ card stock, same color (inside the front of the card to give it stability and cover DSP)
Designer Series Paper 4.25″ x 4″ -the main image showing through
Designer Series Paper -OR- card stock 4.25″ x 3″
Stamps, Ink pad, embellishments (as desired)
Learn how to make this fault line card (with a twist) on Monday 12/30 during Lunchtime Live Crafting on my Facebook Page and YouTube channel at 12:30 MT. The replay will be posted here on my website later that day.
Don’t miss a Paper Pumpkin kit! The January kit Hearts for You will be oh-so-loveable, and I always share exclusive alternate projects using just the stamp set and ink (similar to these) with my subscribers in my Paper Pumpkin Patch email. Subscribe NOW by clicking the image or link above:
Celebrating the 500th TGIF Challenge with a birthday card I made for a dear friend, and my longest team member. Ann, if you see this, just act surprised when you open your mail!
Tearing – or ripping – paper was one of the first techniques I remember being taught at an EARLY crafting convention I attended. It’s so simple, and adds terrific texture, and while many things have changed in paper crafting styles, this technique has just grown more sophisticated.
To be honest, there were a few times I almost threw out this card to begin again, but I persevered, and surprisingly, I think the end result is “tres shabby chic”!
With a whopping 6 (or more) layers of card stock, Designer Series Paper, ribbon, and the birds (also die cut from the patterned paper, so I didn’t have to color them), this was much more detailed than I usually do, but the card needed all the fussy stuff, and Ann deserves a very special card.
Luckily, most of the elements came from the Nests of Winter Suite, so all I had to add was the pretty pompom ribbon. These items can also be ordered individually, which I will include in the supply list below.
Added a few more torn patterns to the inside of the card and the envelope!
Next time you are crafting, give Torn Paper a try. #tgifc500
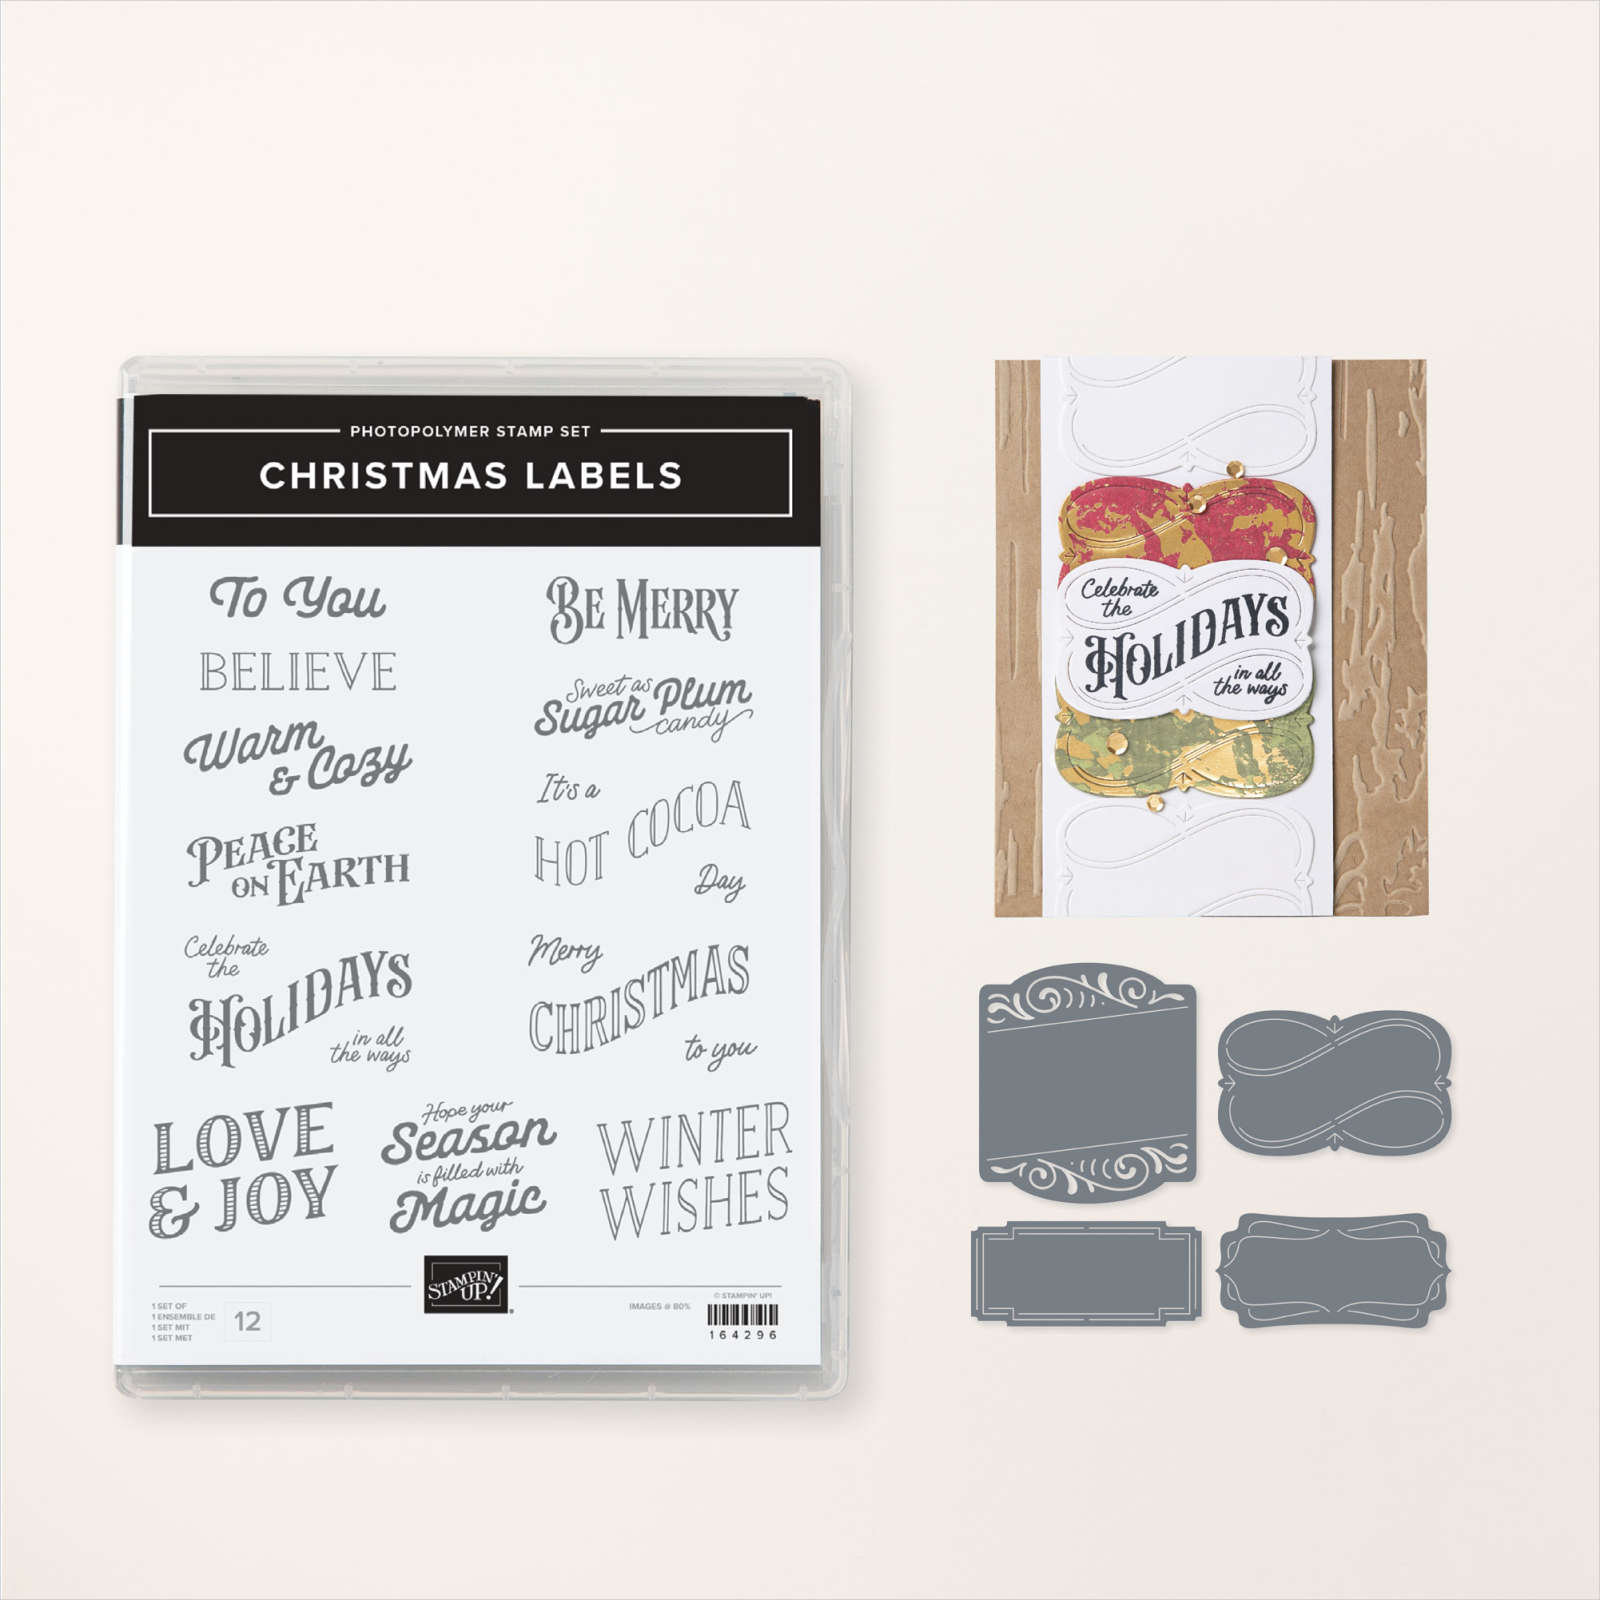
Perhaps it’s the reader in me, but I am a typophile (someone who appreciates a pretty FONT). Stampin’ Up! combined lovely label dies with the gorgeous typography in the Christmas Labels stamp set, and it was a must-have BUNDLE for me.
The way a label can elevate a simple card or gift is what I wanted to demonstrate in a video tutorial:
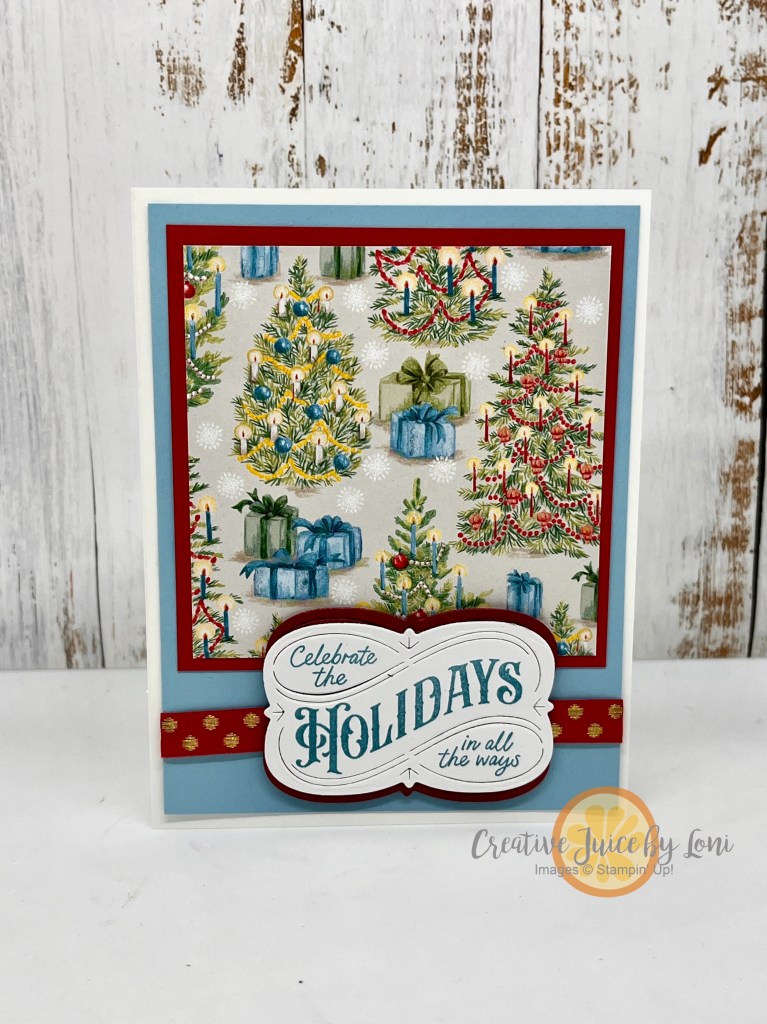
These were the projects made during the video. The first card features the Season of Green & Gold Specialty Designer Series Paper, and the shiny gold accents aren’t as visible in the picture, but can be seen in the video:
Next is another simple card layout spotlighting a piece of the Sentimental Christmas Designer Series Paper, and showed how to create a contrasting matte behind the label by cutting a second label in half:
I’m sharing easy cards to encourage you to keep your holiday crafting attainable! No need to overthink it, or add stress.
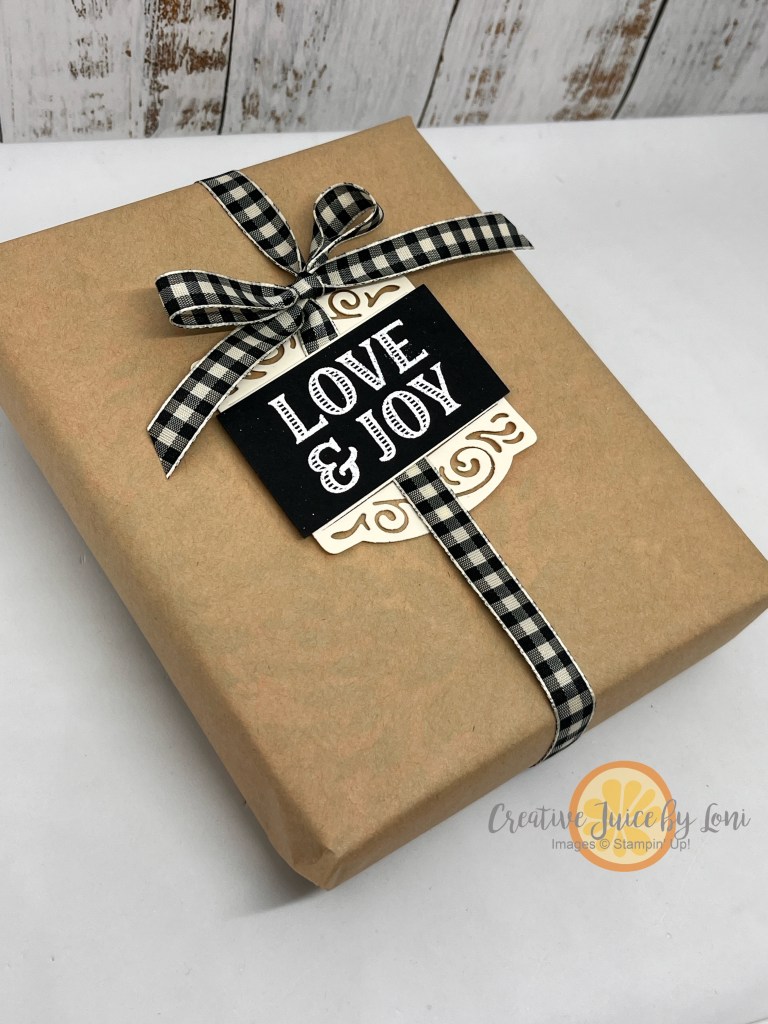
Layer a color over the center of the larger label for a striking contrast, add a coordinating ribbon and the tag makes a basic box beautiful:
When bundles (stamps + dies -OR- stamps + punches) are introduced to my Stampin’ Store, they are 10% off the price of purchasing each product individually.CLARIFICATION: In the video, we thought the Christmas Label bundle and Christmas DSP would be in Seasonal Sale that begins tomorrow (11/13/24), however we learned that only bundles and patterned paper in the Annual catalog are includedin the Seasonal sale, along with most ink and card stock:
If you can use scissors and glue, you have the ability to make pretty things with paper! All you need next is a kit: Lucky for you ~ the Stampin’ Up! Kit Collection is up to 30% off through October 31st:
Not only is a kit a wonderful starting point for any new paper crafter, they also give you ideas for further crafting, as I’m about to show you.
Playing with the Hello Hollyhocks kit (an all-inclusive, non-stamping kit), I demonstrated how to let the sketch for card #1 (on the left) inspire a future project (on the right):
Swapping out a hollyhocks for stamped and colored zinnias and creating your own splatter background made this “dupe” super simple.
Next, you can “step up” a card from the kit by cutting apart the card base and framing it on coordinating card stock:
Watch the video (below) to see what I did for the inside of the stepped-up version!
Finally, let a kit teach you a new technique to try, like this floating frame idea. The card on the left is from the kit, which inspired the Christmas card on the right:
Keep a few kits on hand for gift-giving occasions, too~ they are unique, thoughtful gifts!


![Made With Love 12" X 12" (30.5 X 30.5 Cm) Designer Series Paper [ 167054 ]](https://assets1.tamsnetwork.com/images/EC042017NF/167054s.jpg "Made With Love 12\" X 12\" (30.5 X 30.5 Cm) Designer Series Paper [ 167054 ]")
![Party Alphabet Dies [ 165263 ]](https://assets1.tamsnetwork.com/images/EC042017NF/165263s.jpg "Party Alphabet Dies [ 165263 ]")
![Real Red 8-1/2" X 11" Cardstock [ 102482 ]](https://assets1.tamsnetwork.com/images/EC042017NF/102482s.jpg "Real Red 8-1/2\" X 11\" Cardstock [ 102482 ]")
![Basic White 8 1/2" X 11" Thick Cardstock [ 159229 ]](https://assets1.tamsnetwork.com/images/EC042017NF/159229s.jpg "Basic White 8 1/2\" X 11\" Thick Cardstock [ 159229 ]")
![Flirty Flamingo 8-1/2" X 11" Cardstock [ 141416 ]](https://assets1.tamsnetwork.com/images/EC042017NF/141416s.jpg "Flirty Flamingo 8-1/2\" X 11\" Cardstock [ 141416 ]")
![Valentine Kisses Dies [ 167029 ]](https://assets1.tamsnetwork.com/images/EC042017NF/167029s.jpg "Valentine Kisses Dies [ 167029 ]")
![Stampin' Cut & Emboss Machine [ 149653 ]](https://assets1.tamsnetwork.com/images/EC042017NF/149653s.jpg "Stampin' Cut & Emboss Machine [ 149653 ]")
![Stampin' Dimensionals [ 104430 ]](https://assets1.tamsnetwork.com/images/EC042017NF/104430s.jpg "Stampin' Dimensionals [ 104430 ]")
![Stampin' Seal [ 152813 ]](https://assets1.tamsnetwork.com/images/EC042017NF/152813s.jpg "Stampin' Seal [ 152813 ]")


![Toadstool Gardens 6" X 6" (15.2 X 15.2 Cm) Designer Series Paper [ 164942 ]](https://assets1.tamsnetwork.com/images/EC042017NF/164942s.jpg "Toadstool Gardens 6\" X 6\" (15.2 X 15.2 Cm) Designer Series Paper [ 164942 ]")
![Thanking You Photopolymer Stamp Set (English) [ 163718 ]](https://assets1.tamsnetwork.com/images/EC042017NF/163718s.jpg "Thanking You Photopolymer Stamp Set (English) [ 163718 ]")
![Granny Apple Green 8-1/2" X 11" Cardstock [ 146990 ]](https://assets1.tamsnetwork.com/images/EC042017NF/146990s.jpg "Granny Apple Green 8-1/2\" X 11\" Cardstock [ 146990 ]")
![Perennial Postage Dies [ 162607 ]](https://assets1.tamsnetwork.com/images/EC042017NF/162607s.jpg "Perennial Postage Dies [ 162607 ]")
![Versamark Pad [ 102283 ]](https://assets1.tamsnetwork.com/images/EC042017NF/102283s.jpg "Versamark Pad [ 102283 ]")
![Tuxedo Black Memento Ink Pad [ 132708 ]](https://assets1.tamsnetwork.com/images/EC042017NF/132708s.jpg "Tuxedo Black Memento Ink Pad [ 132708 ]")
![Heat Tool (Us And Canada) [ 129053 ]](https://assets1.tamsnetwork.com/images/EC042017NF/129053s.jpg "Heat Tool (Us And Canada) [ 129053 ]")
![Basics Wow! Embossing Powder [ 165679 ]](https://assets1.tamsnetwork.com/images/EC042017NF/165679s.jpg "Basics Wow! Embossing Powder [ 165679 ]")
![Terrific Toadstools Bundle (English) [ 164790 ]](https://assets1.tamsnetwork.com/images/EC042017NF/164790s.jpg "Terrific Toadstools Bundle (English) [ 164790 ]")
![Melon Mambo Classic Stampin' Pad [ 147051 ]](https://assets1.tamsnetwork.com/images/EC042017NF/147051s.jpg "Melon Mambo Classic Stampin' Pad [ 147051 ]")
![Granny Apple Green Stampin' Pad [ 147095 ]](https://assets1.tamsnetwork.com/images/EC042017NF/147095s.jpg "Granny Apple Green Stampin' Pad [ 147095 ]")
![Fresh Freesia Classic Stampin' Pad [ 155611 ]](https://assets1.tamsnetwork.com/images/EC042017NF/155611s.jpg "Fresh Freesia Classic Stampin' Pad [ 155611 ]")


")


![Whisper White 8-1/2" X 11" Cardstock [ 100730 ]](https://assets1.tamsnetwork.com/images/EC042017NF/100730s.jpg "Whisper White 8-1/2\" X 11\" Cardstock [ 100730 ]")
![Cajun Craze 8-1/2" X 11" Cardstock [ 119684 ]](https://assets1.tamsnetwork.com/images/EC042017NF/119684s.jpg "Cajun Craze 8-1/2\" X 11\" Cardstock [ 119684 ]")
![Mediterranean Blooms 12" X 12" (30.5 X 30.5 Cm) Designer Series Paper [ 163284 ]](https://assets1.tamsnetwork.com/images/EC042017NF/163284s.jpg "Mediterranean Blooms 12\" X 12\" (30.5 X 30.5 Cm) Designer Series Paper [ 163284 ]")
![Nature's Sweetness 12" X 12" (30.5 X 30.5 Cm) Specialty Designer Series Paper [ 162616 ]](https://assets1.tamsnetwork.com/images/EC042017NF/162616s.jpg "Nature's Sweetness 12\" X 12\" (30.5 X 30.5 Cm) Specialty Designer Series Paper [ 162616 ]")
![Night Of Navy Classic Stampin' Pad [ 147110 ]](https://assets1.tamsnetwork.com/images/EC042017NF/147110s.jpg "Night Of Navy Classic Stampin' Pad [ 147110 ]")
![Cajun Craze Classic Stampin' Pad [ 147085 ]](https://assets1.tamsnetwork.com/images/EC042017NF/147085s.jpg "Cajun Craze Classic Stampin' Pad [ 147085 ]")
![Metallics Wow! Embossing Powder [ 165678 ]](https://assets1.tamsnetwork.com/images/EC042017NF/165678s.jpg "Metallics Wow! Embossing Powder [ 165678 ]")
![Faux Glass Dots [ 164060 ]](https://assets1.tamsnetwork.com/images/EC042017NF/164060s.jpg "Faux Glass Dots [ 164060 ]")


![Winterly Tree Tops Bundle (English) [ 164066 ]](https://assets1.tamsnetwork.com/images/EC042017NF/164066s.jpg "Winterly Tree Tops Bundle (English) [ 164066 ]")
![Nests Of Winter 12" X 12" (30.5 X 30.5 Cm) Designer Series Paper [ 164183 ]](https://assets1.tamsnetwork.com/images/EC042017NF/164183s.jpg "Nests Of Winter 12\" X 12\" (30.5 X 30.5 Cm) Designer Series Paper [ 164183 ]")
![Gray Granite 8-1/2" X 11" Cardstock [ 146983 ]](https://assets1.tamsnetwork.com/images/EC042017NF/146983s.jpg "Gray Granite 8-1/2\" X 11\" Cardstock [ 146983 ]")
![Garden Green 8-1/2" X 11" Cardstock [ 102584 ]](https://assets1.tamsnetwork.com/images/EC042017NF/102584s.jpg "Garden Green 8-1/2\" X 11\" Cardstock [ 102584 ]")
![Pool Party 8-1/2" X 11" Cardstock [ 122924 ]](https://assets1.tamsnetwork.com/images/EC042017NF/122924s.jpg "Pool Party 8-1/2\" X 11\" Cardstock [ 122924 ]")
![Garden Green Classic Stampin' Pad [ 147089 ]](https://assets1.tamsnetwork.com/images/EC042017NF/147089s.jpg "Garden Green Classic Stampin' Pad [ 147089 ]")
![Pool Party 5/8" (1.6 Cm) Pompom Ribbon [ 164129 ]](https://assets1.tamsnetwork.com/images/EC042017NF/164129s.jpg "Pool Party 5/8\" (1.6 Cm) Pompom Ribbon [ 164129 ]")
![Earth Tones Shimmer Gems [ 164070 ]](https://assets1.tamsnetwork.com/images/EC042017NF/164070s.jpg "Earth Tones Shimmer Gems [ 164070 ]")
![Multipurpose Liquid Glue [ 110755 ]](https://assets1.tamsnetwork.com/images/EC042017NF/110755s.jpg "Multipurpose Liquid Glue [ 110755 ]")


![Hello Hollyhocks Kit [ 164458 ]](https://assets1.tamsnetwork.com/images/EC042017NF/164458s.jpg "Hello Hollyhocks Kit [ 164458 ]")
![Simply Zinnia Bundle (English) [ 163480 ]](https://assets1.tamsnetwork.com/images/EC042017NF/163480s.jpg "Simply Zinnia Bundle (English) [ 163480 ]")
![Pumpkin Pie Stampin' Blends Markers Combo Pack [ 144599 ] (Retired)](https://assets1.tamsnetwork.com/images/EC042017NF/144599s.jpg "Pumpkin Pie Stampin' Blends Markers Combo Pack [ 144599 ] (Retired)")
![Copper Clay Stampin’ Blends Combo Pack [ 161662 ]](https://assets1.tamsnetwork.com/images/EC042017NF/161662s.jpg "Copper Clay Stampin’ Blends Combo Pack [ 161662 ]")
![Old Olive Stampin' Blends Combo Pack [ 154892 ]](https://assets1.tamsnetwork.com/images/EC042017NF/154892s.jpg "Old Olive Stampin' Blends Combo Pack [ 154892 ]")
![Very Vanilla 8-1/2" X 11" Thick Cardstock [ 144237 ]](https://assets1.tamsnetwork.com/images/EC042017NF/144237s.jpg "Very Vanilla 8-1/2\" X 11\" Thick Cardstock [ 144237 ]")
![Copper Clay 8 1/2" X 11" Cardstock [ 161721 ]](https://assets1.tamsnetwork.com/images/EC042017NF/161721s.jpg "Copper Clay 8 1/2\" X 11\" Cardstock [ 161721 ]")
![Mini Stampin' Cut & Emboss Machine [ 150673 ]](https://assets1.tamsnetwork.com/images/EC042017NF/150673s.jpg "Mini Stampin' Cut & Emboss Machine [ 150673 ]")
![Three Twine Combo Pack [ 160597 ]](https://assets1.tamsnetwork.com/images/EC042017NF/160597s.jpg "Three Twine Combo Pack [ 160597 ]")
![Everyday Details Dies [ 162864 ]](https://assets1.tamsnetwork.com/images/EC042017NF/162864s.jpg "Everyday Details Dies [ 162864 ]")
![Sentimental Wishes Bundle (English) [ 164220 ]](https://assets1.tamsnetwork.com/images/EC042017NF/164220s.jpg "Sentimental Wishes Bundle (English) [ 164220 ]")
![Take A Bow 6" X 6" (15.2 X 15.2 Cm) Designer Series Paper [ 164309 ]](https://assets1.tamsnetwork.com/images/EC042017NF/164309s.jpg "Take A Bow 6\" X 6\" (15.2 X 15.2 Cm) Designer Series Paper [ 164309 ]")
![Real Red Classic Stampin' Pad [ 147084 ]](https://assets1.tamsnetwork.com/images/EC042017NF/147084s.jpg "Real Red Classic Stampin' Pad [ 147084 ]")
![Petal Pink 8-1/2" X 11" Cardstock [ 146985 ]](https://assets1.tamsnetwork.com/images/EC042017NF/146985s.jpg "Petal Pink 8-1/2\" X 11\" Cardstock [ 146985 ]")
![Adhesive Sheets [ 152334 ]](https://assets1.tamsnetwork.com/images/EC042017NF/152334s.jpg "Adhesive Sheets [ 152334 ]")
![Mini Stampin' Dimensionals [ 144108 ]](https://assets1.tamsnetwork.com/images/EC042017NF/144108s.jpg "Mini Stampin' Dimensionals [ 144108 ]")
