New at SU! Elevated Embossing with Zinnias

Embossing folders add texture, dimension and visual interest to any paper crafting project, thus, the New at SU! Design Team is elevating your dry embossing techniques with our Blog Hop in August!

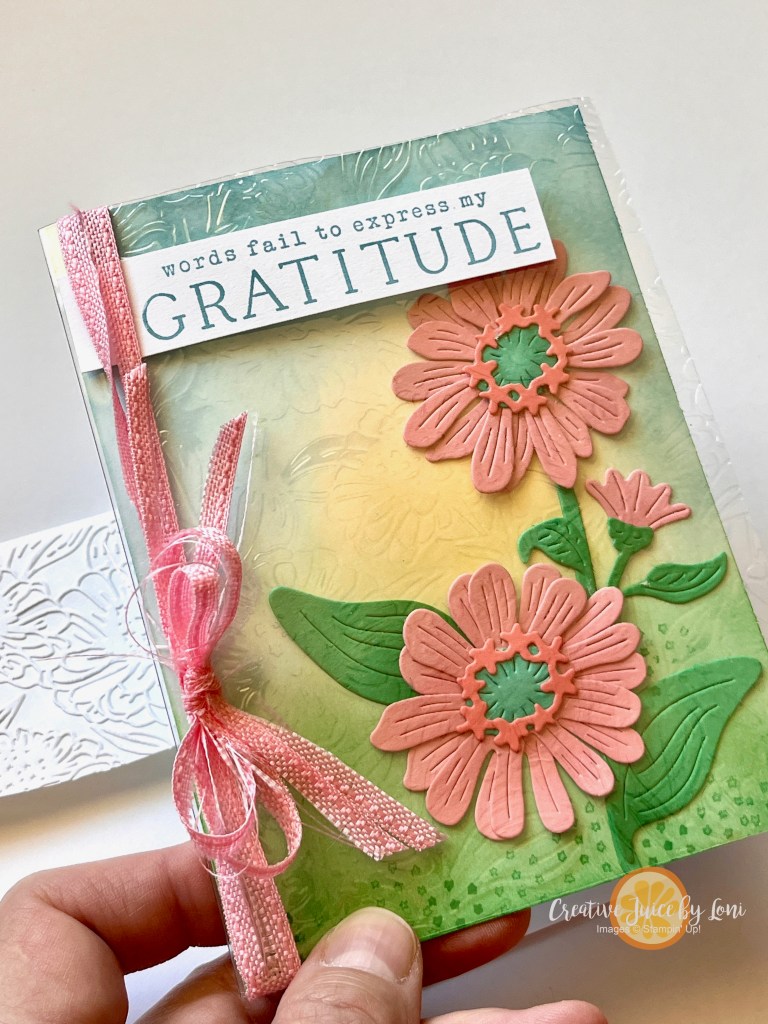
Have you ever used an embossing folder on a Window (acetate) sheet?

For this project, the Zinnia 3D Embossing folder gave a little pattern to the overlay that folds around the card, giving it two layers! TIP #1: Use your bone folder to give the window sheet a crisp fold in the center before AND after running it through the Cut & Emboss machine.

Because I adhered the back of the cardstock card to the inside of the window sheet on the back, I added a card stock layer on the back of the card so you can’t see the adhesive:

Carrying the theme through, I also embossed the flap of my envelope:

On the card inside the window sheet, I created a background with blending brushes and stamps from the Simply Zinnia stamp set, “built” Pretty in Pink flowers from the dies, then added a word strip to the top of the clear layer.

Tip #2: Cut a length of ribbon down the center, creating two thin ribbons and tie around the front layer for a double bow…let the loose strands add whimsy!

Explore other embossing folder ideas by hopping on over to Diane’s post featuring the Distressed Tile embossing folder, then catch the rest of the crafting crew’s exciting embossing projects:

August 2024 New at SU! Blog Hop: Elevated Embossing Folders

Previous BlogNext Blog
1.Studio Shabaz (AU) – Elevated Embossing
2.The Joy of Stampin’ with Rachael (USA)- Emboss Dry, Emboss Heat Techn
3.Stampinxime by Ximena Morales (DE) – Fantasievoll Verwirbelt
4.iHeartCards2 (US) – Elevated Embossing
5.Stamping Flair (AU) – Layered Florals
6.Furry Cat Designs (UK) – Embedding a layer in a design
7.De Kijkkast (NL)- Elevated Embossing with Cute Crochet
8.Creative Juice by Loni (US)- Elevated Embossing Zinnias Window Sheet
9.24-7 Inkspiration (US) – Distressed Tile
10.Tricia’s Stamping Creations (US) – Dashing Designs Elevated Embossing
11.Crafters Northwest (US) – Elevated Embossing
12.Nature’s INKspirations (US) – Eyelet Elevated Embossing

Powered by blogcarousel.com

Product List

Busted Canvas Card Technique

TREND ALERT! This technique was popping up in my social media, so I wanted to bring it to card-making: The Busted Canvas looks like the card is being unwrapped to reveal an image and sentiment, so while it’s not going to fit in a traditional envelope, it will look fabulous hanging out of a gift bag or handed to a friend personally.

The happy surprise behind the paper has an excited “feel”… like you were too thrilled to open the package to carefully undo the wrapping!

In the video tutorial, I share some tips and tricks, and one thing to note is that when you roll the Designer Series Paper out as tightly as you can, it doesn’t really *need* to be glued down, but if you choose to adhere it to the front, you’ll probably want to use hot glue. The pointed edges do adhere well flat using Tear & Tape, but the rolled pieces tend to pull away unless you use a glue gun.

While I stamped and colored in both my images with Stampin’ Blends, you could use a pre-printed image or more Designer Series Paper on the inside.

Before I share the video, here’s the second example using the Nests of Winter products coming in the September-December mini catalog:

The technique is too much fun to stop with one!

Okay, okay, here’s the tutorial! You’ll need an 11″ x 4-1/4″ card base, a 5-1/2″ x 4-1/4″ piece of white card stock and a 5-1/2″ x 4-1/4″ piece of Designer Series Paper, plus your stamps, ink and coloring tools to craft along:

It’s a timely technique for the Stampin’ Up! Designer Series Paper Sale during August 2024

Product List

Stack, Cut, Shuffle, STAMP

So many marvelous Designer Series Papers, so little time? This technique for cutting a stack of patterned paper will have you making multiple cards at ONE TIME!

Begin by selecting 4 patterns of Designer Series Paper- I suggest using a maximum of two busy or bold patterns and add a subtle design and a tiny or monochromatic print, in 4 different colors (or different shades of the same hue). This will give you the CONTRAST you need when piecing them back together.

You can adhere the shuffled pieces edge-to-edge (as on the card, left) or leave a small space between them, giving a window-pane look (card on right). You may find that a design on the BACK of your paper works well, so go ahead and flip it over, if needed.

I used the Unbounded Beauty 12″ x 12″ pack- it’s part of the Designer Series Paper SALE this month, August 2024 and showcases the 2024-2026 In Colors, which are lovely together. With the few scraps left over, I added a piece to the inside layer and to the flap of my envelope.

Grab your patterned paper and follow along with me here, as you practice your cardmaking:

If you paper is directional, you’ll need to decide if you are creating PORTRAIT cards (tall) or LANDSCAPE cards (wide) **before** you cut your paper, and make sure it’s oriented the correct way.

The Unbounded Beauty cards were landscape, but I also needed some sympathy cards, and the blues in the Countryside Inn Designer Series Paper (also 15% off in August) seemed fitting. These are portrait versions of the Stack, Cut, Shuffle technique:

Inside the cards:

I’ll list supplies for both versions, starting with the Unbounded Beauty demonstrated in the how-to video:

Product List

Supplies for the Countryside Inn Comfort card are below.

Product List

Joseph’s Coat Technique (with Embossing Folders)

Revisiting a classic stamping technique- this time with 3-D Embossing Folders!

The Joseph’s Coat technique has been done with heat embossing in the past, but Stampin’ Up!’s beautifully detailed and deep image embossing folders really make it easier than ever to create colors that seem to POP from a dark background.

This was the second card I created in the how-to video today using the Layered Florals embossing folder, and it shows the vibrancy of the colors you can achieve with this trick. I also made these cards into a Z-Fold style that stand up to display.

In a nutshell, the way to make this stunning background is to emboss a white or vanilla piece of card stock, then color in the RECESSED images using sponge daubers + Classic Ink Pads -OR- Stampin’ Write Markers. Once you’ve colored all the images, drag a dark ink across the top of the background. I used Night of Navy ink over my Petunia Pop water lilies on this version.

Watch to learn how:

Peek at the details from the Changing Leaves Hybrid Folder Joseph’s Coat card…amazing, eh?

For best results, make sure your dark ink pads are inked up well to achieve the dark “background” in one swipe of your pad.

Here are the supplies I used – order them today, then give this technique a try!

Product List

Just a few days left to earn BONUS DAYS coupons in July! Redemption for the codes you’ve earned this month will begin August 1st!

Hybrid Embossing Folder How-To

Curious about how a “Hybrid Embossing Folder” works? Allow me to demonstrate how-to using the new Online Exclusive Changing Leaves bundle.

The embossing folder creates amazingly detailed leaves which are beautiful both embossed (raised) and debossed (recessed). Here is a “raised” example in Granny Apple Green using the embossed design for a background on a card:

Flip the embossed paper over and paint into the recessed images using water painters and ink refills -OR- water painters with Metallic Enamel Effects for shine:

Simply stamping the images and die cutting them to use on your projects is also an option. Watch for the tip to lining up all three leaf images in the correct spot, making them easier to die cut at the beginning of this video, in which I also demonstrate all the techniques I’m sharing:

I used my stamped/die cut leaves on a floating frame card:

Finally – and this is the HYBRID VERSION – the dies snap into the embossing folder! All you have to do is add your paper, run it through the Stampin’ Cut & Emboss Machine, and out come die-cut, embossed accents! This is a bonus project that shows the detail:

I borrowed the sentiment from another Online Exclusive stamp set called Comforting Thoughts for an occasion when there are just no words to express what you are feeling for someone’s heartache.

Try dragging your ink pad across the top of an embossed/cut leaf to bring out the details (or use a brayer rolled in ink), like the Pretty Peacock leaf on the card:

The Changing Leaves bundle is $54 (US) so it qualifies for a $5 BONUS DAYS coupon when you purchase it during July 2024. Collect coupons July 3-31st, then redeem them during August!

Ice Cream, Adhesive Sheets and Last Chance Sale

When you have the right tools, any project becomes easier.

Adhesive sheets are a type of double-sided adhesive that make any piece of paper into a sticker, and they are indispensable for a project like PAPER PIECING. The Ice Cream Swirl dies are a perfect example of how you can create sweet cards to drool over, using adhesive sheets:

Start with a 5.5″ x 6.75″ card base (scored at 4.25″) and “build” layers with Designer Series Paper. The Lighter Than Air designs have creamy colors that I used to cut 3 swirls from, then built up my lemon-raspberry ice cream swirl. This is a card you’ll want to make triplets of at one time, just to use up all the pieces:

Today (April 9th) is the last day to register for my Crafting Happiness class on Friday, April 19th, where I’ll be featuring the Ice Cream Swirl Bundle (and you get a discount on the class if you purchase the bundle from my store)- OR you can use one of the stamp & die bundles you may already have.

A tutorial to teach how to use Adhesive Sheets:

Inside the card:

Today also begins the Stampin’ Up! Last Chance Sale– click image to shop!

I appreciate your order of genuine Stampin’ Up! products from my store! Your support give me the opportunity to continue sharing creativity with you. I’m always tickled to mail a hand-stamped card as a thank you for online orders!

Product List

Coloring with Masks (Enduring Beauty)

Masks (the fancy Stampin’ Up! term for stencils) make coloring stamped images speedy and simple!

I was truly WOWed with how quickly I was able to color the floral spray image from the Enduring Beauty bundle with the coordinating masks, blending brushes and ink pads. This is a technique you may embrace if you don’t love to color, OR if you are just getting started, you can stamp and color this image with just two ink pads! Watch & learn how:

Did you catch how to die cut just half the image so you can add a layer of Designer Series Paper as the background? For the video, I added a second fold that opens on the right:

But you can just add a 4 1/4″ x 5 1/2″ layer of Designer Series Paper behind the flowers to make it a regular card. I really like the look of the Poetic Expressions designs with the flowers, and used the colors of that paper for coloring the flowers, as well.

Turn the design sideways and try different colors, too.

It’s a beautiful stamp set to use for so many projects, and if you haven’t seen my two previous posts using this set this week, check out the Notebook Cover project HERE and the color challenge card HERE.

THANK YOU for shopping in my Stampin’ Store for GENUINE Stampin’ Up! products!!! It enables me to continue bringing you creative ideas and you are guaranteed high quality products with service from someone who cares about you.

Product List

New at SU!- Softly Sophisticated for SAB

Happy to see you hopping through here! Our New at SU! global group of demonstrators have ALL the Sale-a-Bration products here for you this month, and trust me: You want them ALL. Whether you are ending here, or just starting, don’t miss a single post!

I get to showcase the Softly Sophisticated bundle that you could choose free through February 29th with a qualifying order in your country (in the US, it’s free with a $100 order) and it comes with a stamp set AND an embossing folder:

It feels so elegant in Very Vanilla and I used the Perennial Postage dies for this first card to show how a simple layout can be “next level” when you add a little embossed texture.

Only one little problem: The small die with the postage cancellation wasn’t long enough! So here’s HOW TO STRETCH a die!

Leave me a comment and tell me what you think of this project, or which SAB item is next on your wish list, then visit these posts to help you celebrate creativity during Stampin’ Up! Sale-a-Bration – remember to save or PIN your favorites!

January New at SU! Hop: Sale-a-Bration
Previous BlogNext Blog
1.Joni in the Spotlight Stamping (US) SAB FLIGHT AND AIRY
2.scraphexe (DE) – SAB Schlichte Eleganz (Softly Sophisticated)
3.iHeartCards2 (US) – SAB Most adored
4.Tricia’s Stamping Creations (US) – SAB Heartfelt Hellos
5.Stamping Flair (AU) – Sunny Days DSP
6.Stampinxime (DE) – Detailed Dogwood
7.The Joy of Stampin’ with Rachael (USA)- SAB Cradled in Love
8.Playing with Papercrafting (CA) – Jungle Pals for New at SU
9.Carterie Plus (CA) Trusty Tools/Fidèles Outils
10.Attelyootje (NL)- SAB Watercolor Melon
11.Nature’s INKspirations (USA) – Softly Stippled DSP
12.Creative Juice by Loni (US) – Softly Sophisticated for SAB
13.My Flutterby Moments (USA)- Jungle Pals
14.24-7 Inkspiration (US) – Flight & Airy
15.De Kijkkast (NL) – Going “Wild” with Jungle Pals

I’ll be spotlighting the Sale-a-Bration Watercolor Melon stamp set on Saturday, January 20th, so drop in for another visit!

Powered by blogcarousel.com

Product List

Sent by Blueberry Post

Rooty-Tooty Fresh & Fruity! Tomorrow- Thursday, January 4th- the January-April Mini Catalog goes live AND 2024 Sale-a-Bration begins!

I admired the “Blueberry Bunches” stamp set (item #162692) the moment I saw it: It feels like a floral, but it’s a fruit, and that’s kinda my “jam” (see what I did there?).

I’ve paired the stamps with the Perennial Postage bundle (Item #162608) for the sentiment and postage stamp die (in various sizes).

This is the second largest die and after I cut a piece of basic white, I stamped the blueberries in the center, then used Masking Paper around the edges so I could blend Pool Party ink from the outside into the image- a technique called “Reverse Masking”. As you carefully peel off the masking paper, the background appears as a frame!

Once I colored the image with Stampin’ Blends alcohol markers, I “cancelled” the postage stamp with the cutest little detail of the cancellation mark, which I dipped into Memento Tuxedo black ink before running through the Stampin’ Cut & Emboss machine on top of my colored postage stamp.

Seemed fitting to share it with the #tgifc453 postal theme this week.

I’ll update the supply list once the catalog goes live, and hope you’ll try this technique and mail bunches of happy mail.

Need a Mini Catalog and Sale-a-Bration brochure? Shoot me a message and I’ll send it out to you.

Don’t want to miss a publication in the future? I mail mini catalogs to my customers who order $50 or more in the previous 6 months!

Product List

Copy the Catalog

Need paper crafting ideas? Look no further than any Stampin’ Up! catalog!

In today’s live video, I demonstrated how to use the So Very Merry stamp set to re-create cards made with the Circle Sayings bundle (if you have one, you *need* the other!).

The card on the left is found on page 147 of the annual catalog and the card on the right is the one I stamped:

Let me show another example. Card on left from catalog, card on right I created to show you how well these two sets interchange!

In my Angel version of the cupcake card from the catalog, the More Dazzle paper is truly heavenly, and I embossed the angel image on Vellum cardstock in gold embossing powder, then colored it from the back with Stampin’ Blends markers. TIP: To adhere the vellum to the white background, lightly sponge liquid glue to the back of the vellum for a no-show adhesive.

With two days left of our 35th Anniversary Starter Kit promotion, you may consider getting the starter kit for 35% off -OR- choosing 35% more in the starter kit ($168.75 product value) for the regular price of $99…and if you don’t know what to choose, these two interchangeable sets/bundles are a good place to begin, plus you can copy the cards I showed! More Starter Kit suggestions in the video:

Happy you stopped by! Have you ever copied an idea from the catalog and put your own “stamp” on it?