As we are brain-storming mailable gifts/items this month, here’s an adorable little project to make with your Stampin’ Up! line-art stamps: This mini coloring book is just 2.75″ x 4.25″ finished and all you need is an 8.5″ x 11″ sheet of copy paper, a black ink pad and your favorite stamp images.
If you can fold paper, you can make this! Let’s start with the how-to video, featuring a few unexpected (but very cute) guests:
While it’s very easy to stamp your own book, there are also folks who have created printable versions. This Spring version by Jennifer A. Bell was was one of my favorites, and is appropriate for all ages (adult artists included!)
Here’s a different visual tutorial (borrowed from the interwebs):
Enjoy the novelty of this simple project and tell me if you’ve tried it!
It’s easy to fall into the rut of sending gift cards as the only flat thing to include in a handmade card for a present, but I’ve been making a list (and collecting) a whole stack of mailable items to share as ideas!
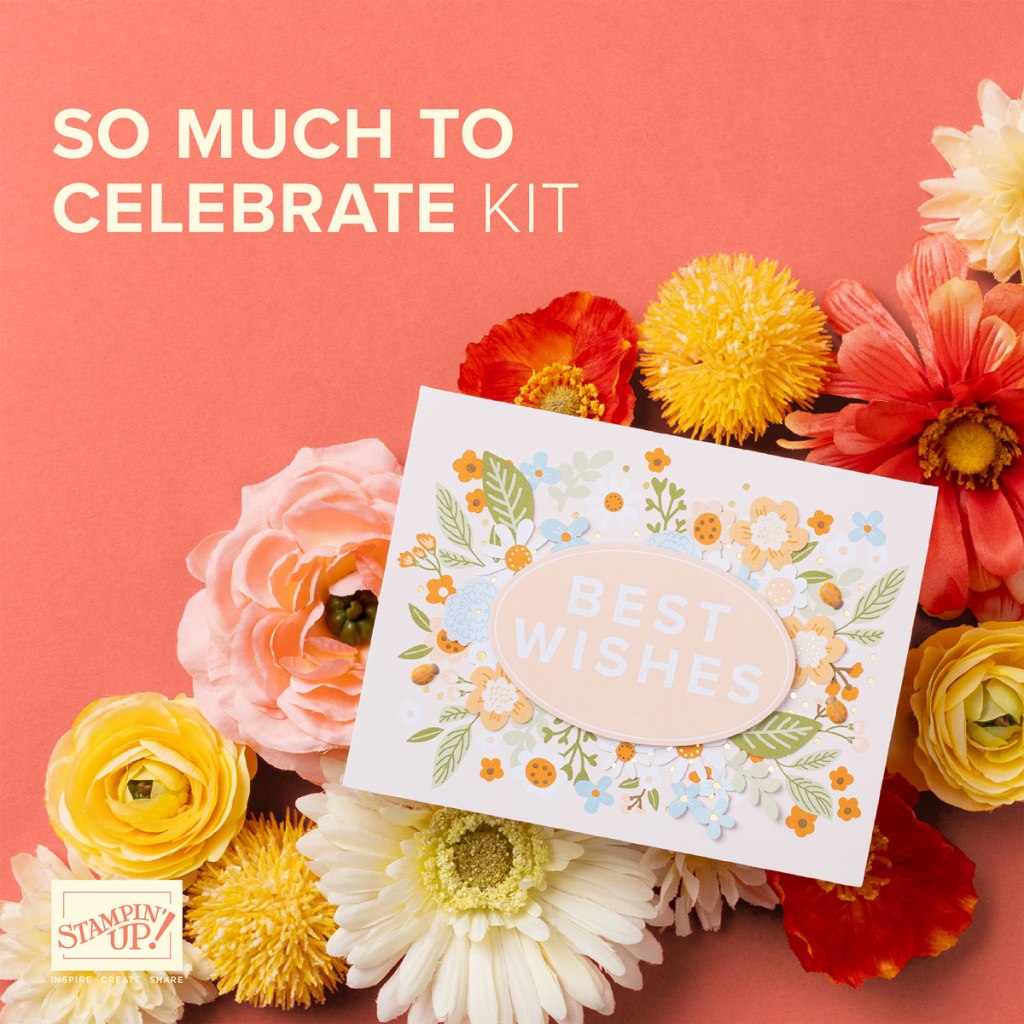
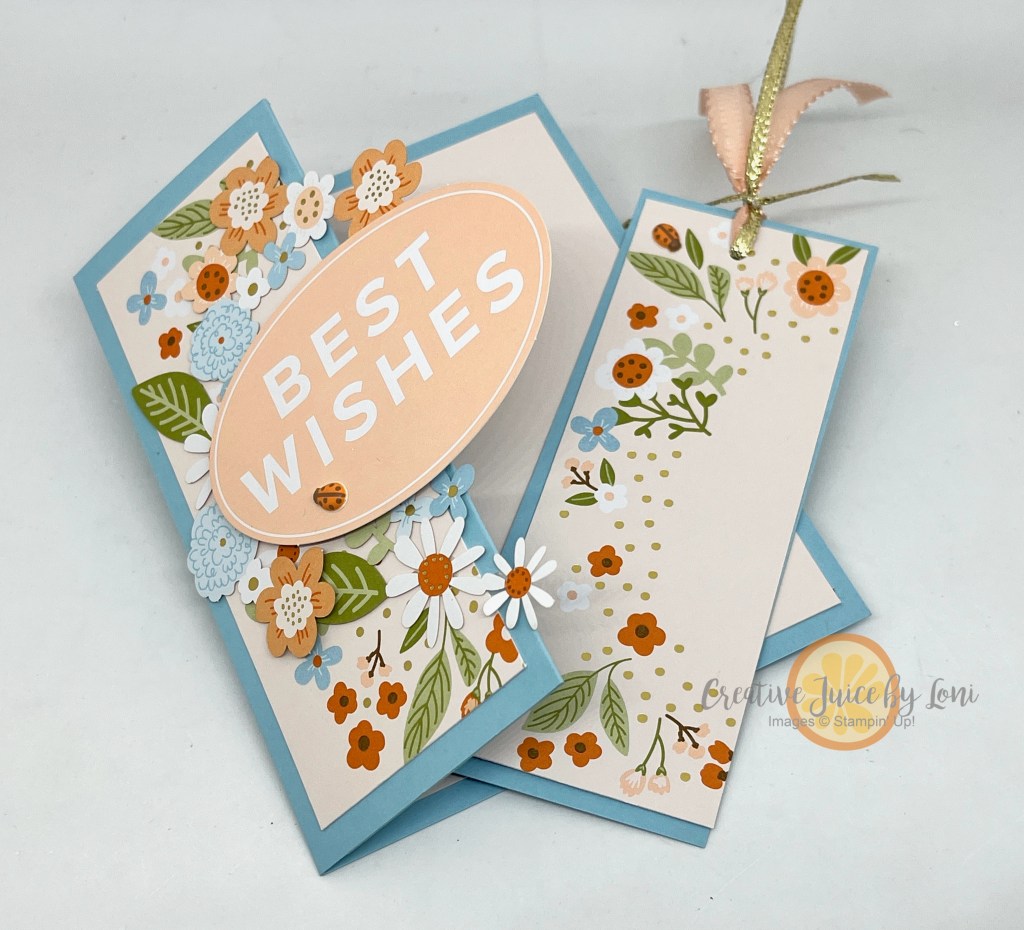
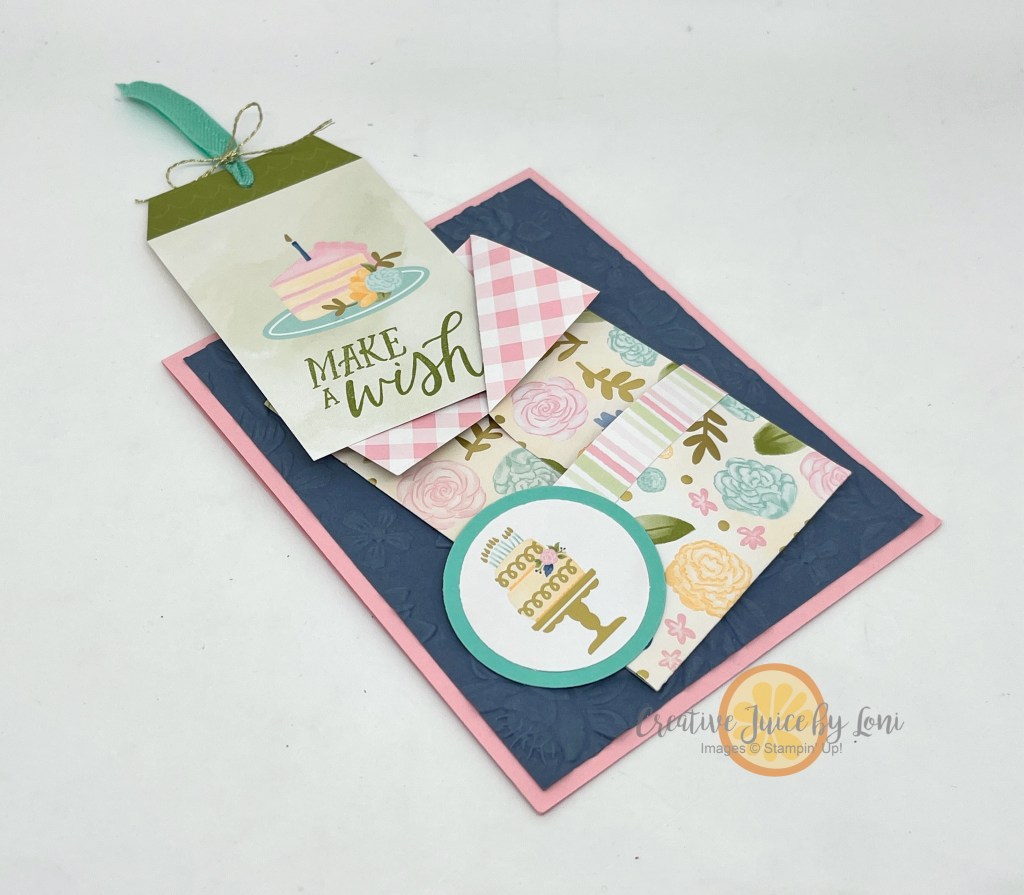
Let’s start with a gift you can make yourself: A bookmark tucked into the pocket of a card! Let’s allow the Stampin’ Up! “So Much to Celebrate” kit give us a place to begin.
This kit makes 9 cards, with all the supplies needed included in the box and no stamping required! However, you can always step-up a kit with coordinating card stock and ribbon, so I made it into this:
Watch how to quickly make this card and bookmark, then see all the mailable giftable ideas that I’ve linked below!
Now it’s time to think BEYOND a gift card as the first thing to send as a gift! Some items may have affiliate links, which means I would earn a small commission if you purchase.
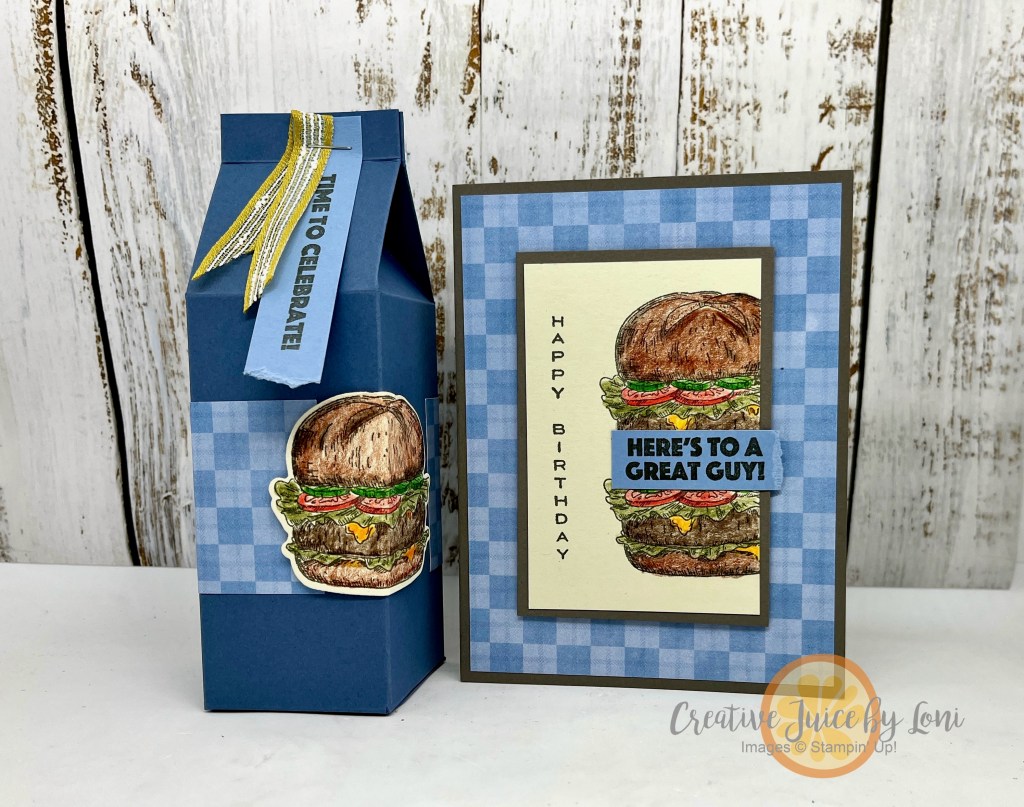
A double-patty burger is a satisfying meal for a birthday celebration AND makes a terrific card, thanks to Stampin’ Up!’s Burger Bistro bundle (stamps & dies). In particular, it also pairs well with the Timeless Plaid 6″ x 6″ Designer Series Paper, as you’ll see…
I like coloring this stamped image with our Watercolor Pencils, which you can use without water!
You can watch the tutorial for both card and gift box here:
It’s hard to stop with one card, when the plaid paper makes each card so unique!
A useful gift for the man who likes to grill burgers would be a shaker of hamburger seasoning, and this 2-4-6-8 box is just the right size. It’s speedy to make, starting with an 8-1/2″ square piece of card stock (instructions in the video).
SAVE/PIN this post, then give this card and gift box duo a try the next time you need a masculine birthday gift!
For our March New at SU! Blog Hop, we are bringing BACKGROUNDS to the front and center! You are sure to find unique ideas to save/remember as you hop through the projects our world-wide design team have created.
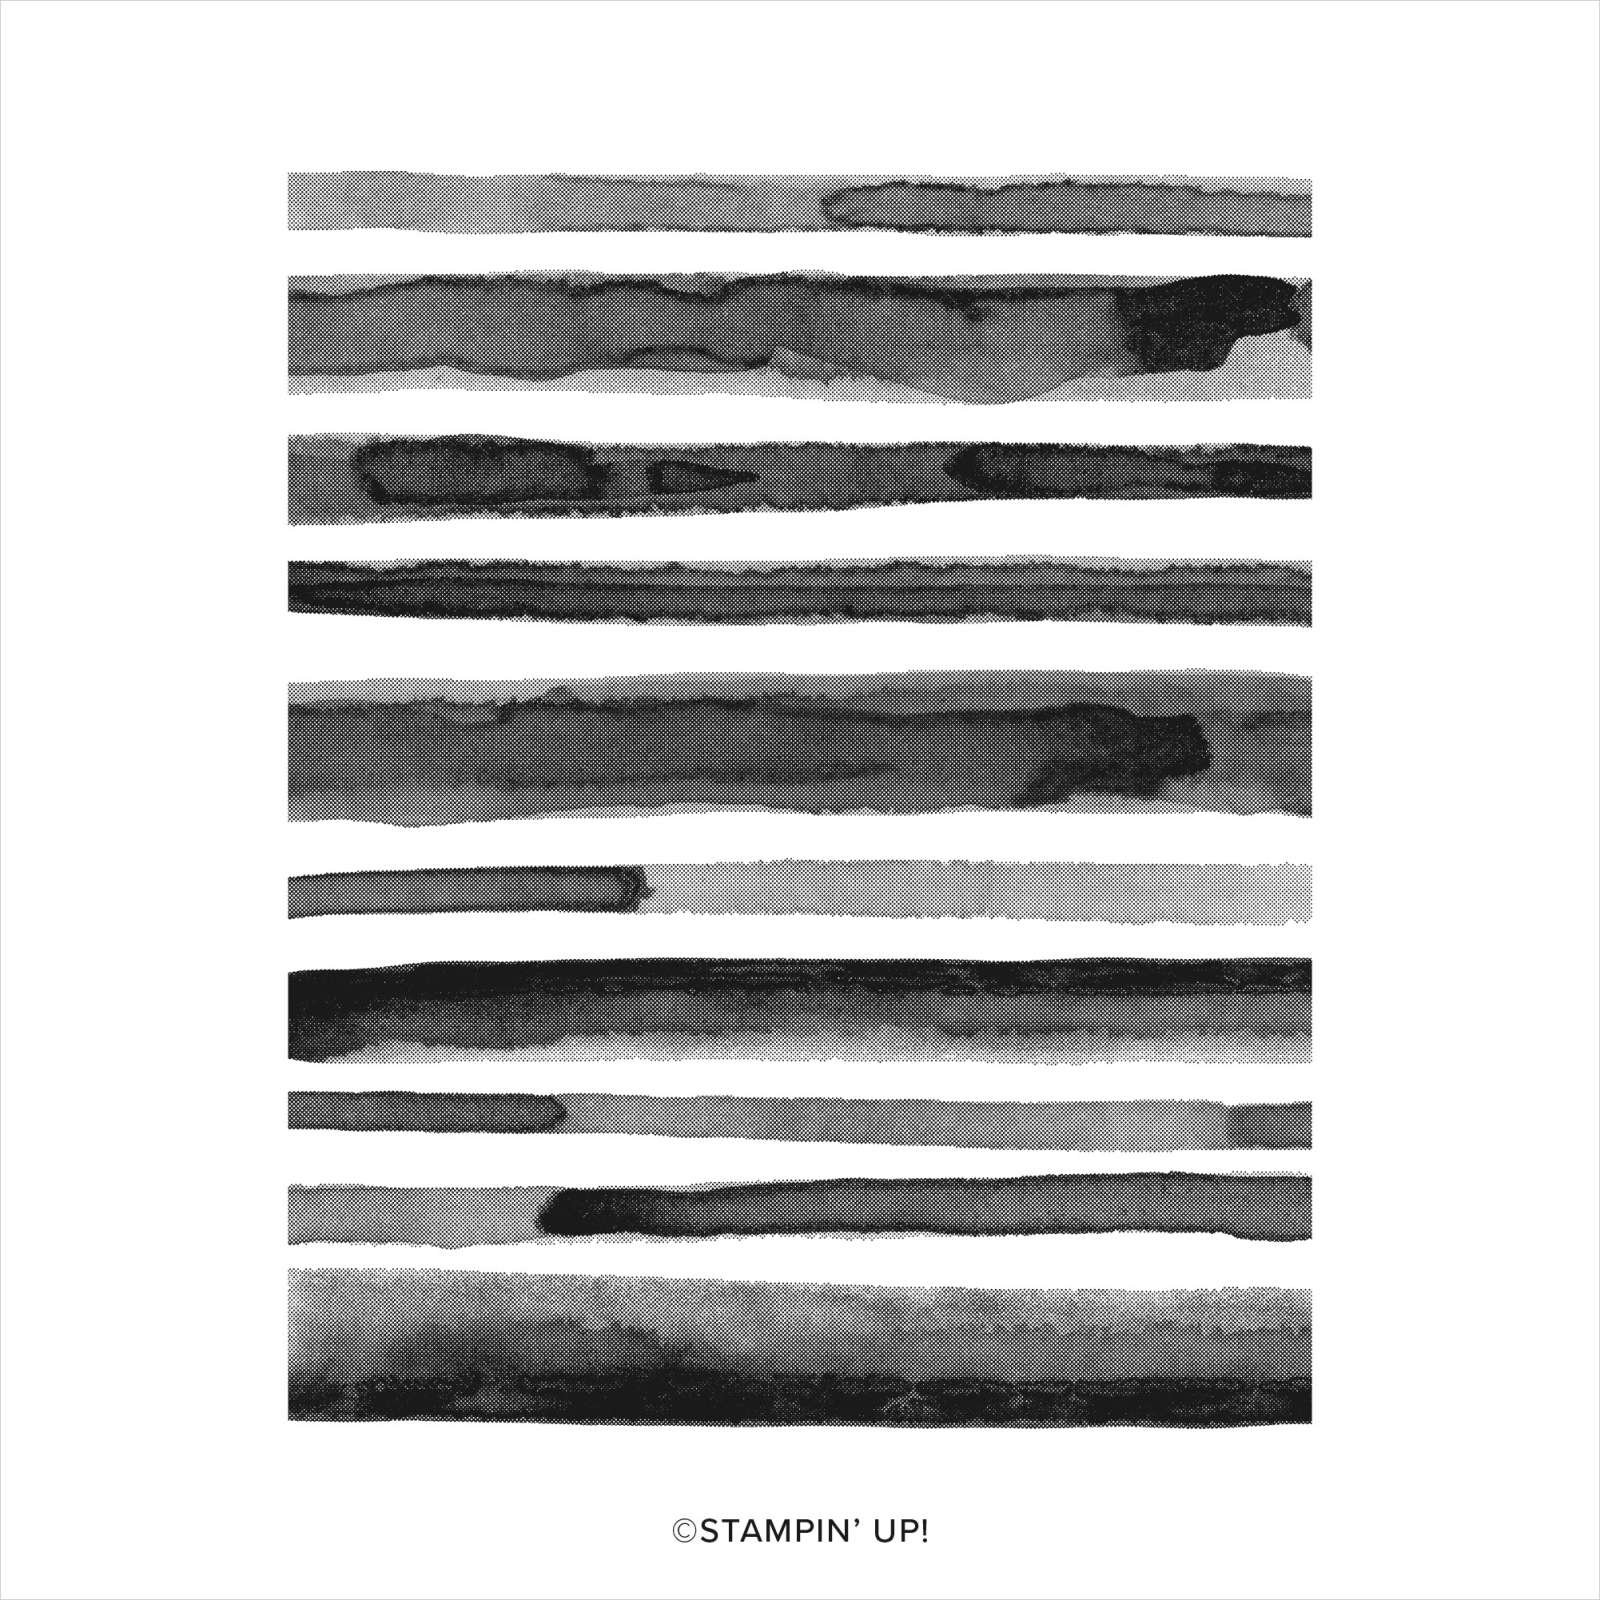
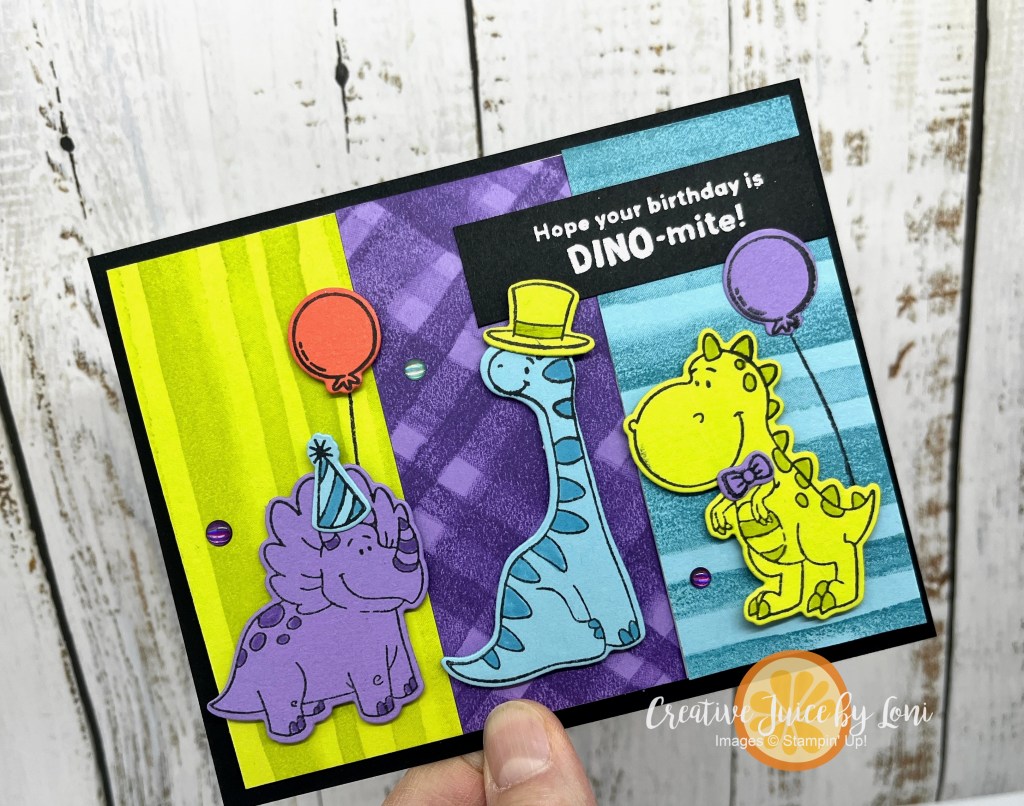
My card features a new Online Exclusive background stamp named Painted Stripes:
To show it’s versatility, I’m using this background to create THREE different patterns behind the dinosaurs on this birthday card any dino-obsessed kid would appreciate!
Painted Stripes can be used for vertical lines, horizontal stripes or stamped both directions to create a playful plaid pattern. I love that they are imperfect lines with variegated textures, because you can’t stamp it incorrectly! You can also use this large background stamp on the envelope to make it match (I masked off the address area with a post-it note, which you remove after stamping over it):
The Darling Dinos live up to their name, and are just as cute when stamped on colored card stock, for minimal effort in coloring. And hats on dinos? Cuteness factor x 1000!
I’ll list the supplies used below the roll-call, and am happy to serve you if you don’t have a U.S. demonstrator. Find MORE beautiful background ideas for your card creations at each of these places:
There is always creative treasure to discover at the dollar store, and when I saw this hexagon mirror, I knew just what to do with it!
Did you know StazOn ink will stamp on non-porous surfaces like plastic and GLASS? The flight trail of the bee traverses across the mirror, then I grouped a few of the hexagon Meant to Bee dies on the edge:
There are 5 sizes of hexagons in the die set, and each one cuts both a hexagon and a hexagon “frame”:
Remember that you SAVE 10% when you buy the dies and stamp set together in a bundle!
Such a cute (and quick) gift! I’m certain one of my granddaughters are going to love hanging it in their room. I may have to go back to look for more of the mirrors, so they each have one.
I did demonstrate this project, along with the Happy Bee-Day Loaded Envelope, in yesterday’s video – it starts at about 22:00
Tell me what you think of this project – my comment section is at the top by the posting date and I enjoy hearing from you!
As we continue with the BIRTHDAY theme for March, today’s project is a Happy B-Day LOADED ENVELOPE! You saw the mini version a few weeks ago, and this time we started with a 12″ x 12″ piece of Designer Series Paper to make pockets that hold all the goodies a crafter could want.
On the side of the paper that you want for the outside of your envelope, score on each side at 3-1/4″, then turn 90 degrees and score 3-3/4″ from the bottom edge. You can watch the video below for exactly how to do this.
NOTE: This project works best if the pattern on the outside of your envelope is non-directional, like the flowers on this paper, which don’t have a right-side-up. I did make sure the bee paper was vertical on the back side, so the inside of my envelope shows them the correct direction.
Fold both sides toward the center and press open the “collar” and connect the sides in the front with Tear & Tape. Next, fold up along the 3-3/4″ score line to create the lower pocket(s). You may choose to cut about 1-1/2″ along the right side score line before folding up the pocket, so you can fold it down, as I did on the sample above, which allows you to fold the right edge down, revealing the back side of the paper, and forming a 3rd pocket (where the sticker is inserted).
Add finishing touches to decorate the front of the envelope, like the smallest hexagon focal point above, with a bee, flowers and sentiment. Follow along as I demonstrate:
Stuff your gift with a handmade card, paper snips, adhesives, embellishments (like the Tiny Bee Trinkets!) and other crafting essentials…like chocolate (dressed up in a sleeve of matching paper)!
I hope you’ll have as much fun making one of these as I did! Which crafty friend would appreciate this gift?
Thank you for shopping for the supplies below ~ your support means the world to me as a creator.
Rubber stamps should come with a warning label. Once you get a bundle with a punch or set of dies, Stampin’ Up! releases ANOTHER stamp set that coordinates, and then you MUST have it, because it extends the use of the first bundle…and the addiction continues! That’s what happened to me, and look where I am now. 😂
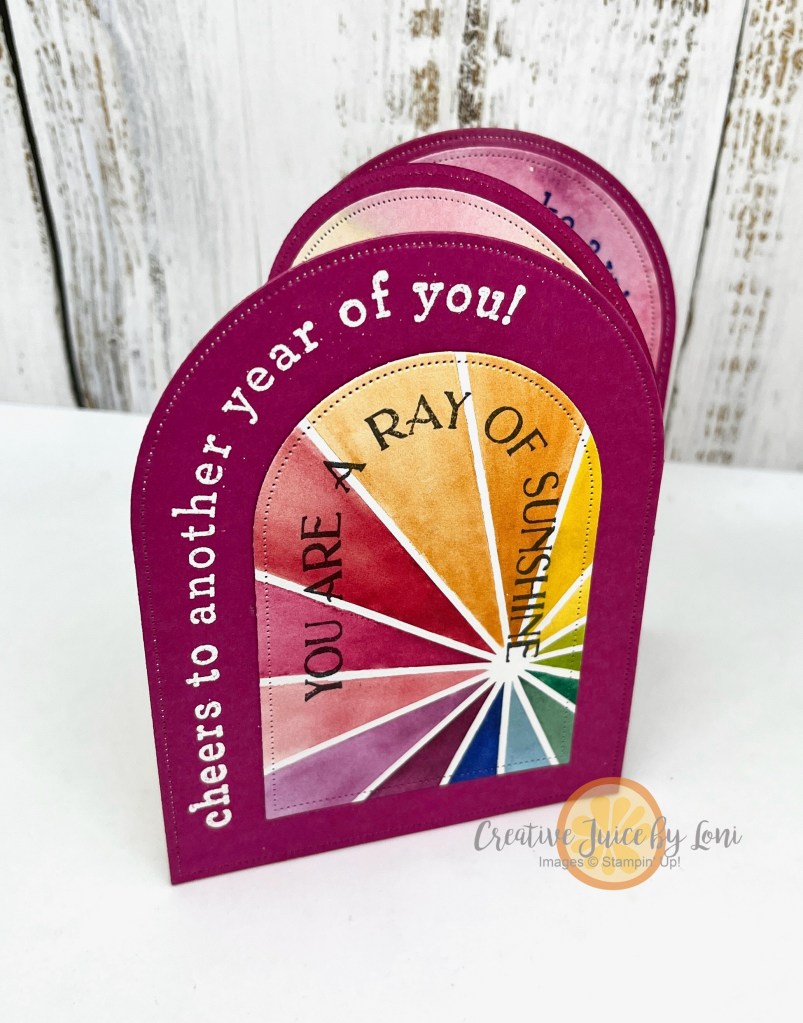
With new Online Exclusive products in my Stampin’ Up! store for March 2025, the Arched Wishes stamp set coordinates with the Everyday Arches Dies (which are essential for every paper crafter):
If you can see the bit of shimmer on the cupcake, it’s from the Wink of Stella pen, and I wanted to use the arch I cut out of the front panel on the inside of the card, so the party continues when you open it up!
The Mini Corrugated 3D embossing folder gave the background a bit of texture and added interest, and there are a few other tips I shared in the “How To” video:
Switch it up and stamp the balloons on the back, or add a “Happy Birthday” sentiment in black (an afterthought following my live video). If you prefer not to fussy-cut the sentiment, make it a banner!
Thank you for giving me the opportunity to serve your creative needs! Because of your orders, I am able to continue helping you squeeze the most from your paper crafting art.
The best friends are CRAFTY FRIENDS, and the best way to meet them is by stamping together at StampFest!
Twice a year (Spring & Fall), a group of Stampin’ Up! demonstrators plan and prepare an event in Utah County and Southern Utah where happy crafters can gather to create and connect. The first event in 2025 is in Mapleton, UT on March 22nd, and while registration is open until 3/15, the EARLY DISCOUNT ends today (3/8), save your spot HERE.
The following weekend, we do it all again in Hurricane, UT~ you’ll have a terrific time making many different paper crafting projects, filling up at the snack station, take home gifts and perhaps win a door prize…all while meeting people like you who love to create!
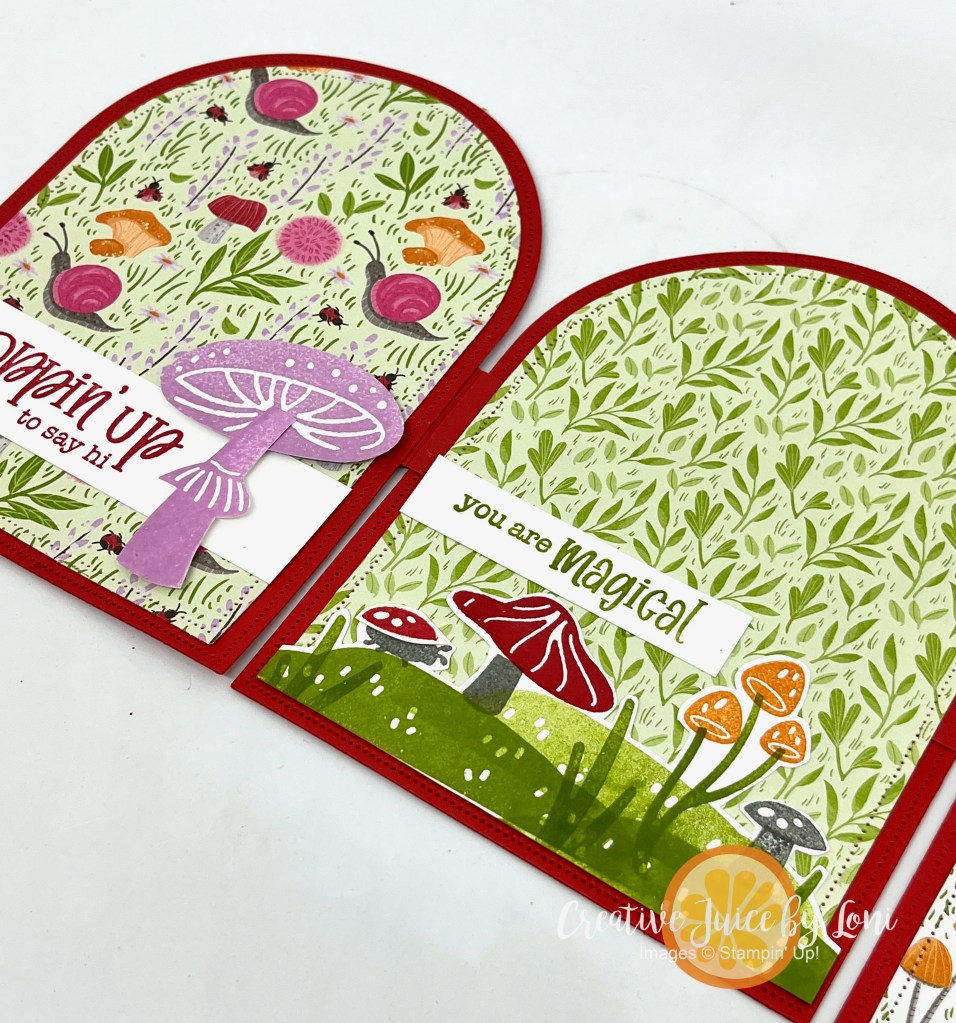
The month of March is a busy birthday month for my family, so you can expect to find a LOT of Birthday Inspo here for the next 4 weeks, starting with this fun pocket card, which fits one of the FIVE tags from the Designer Series Paper perfectly:
Yes, this is the SAME mini-loaded-envelope I created a few weeks ago using the Toadstool Gardens Designer Series Paper, and when I realized the tags fit perfectly, I had to make some birthday cards!
They come together quickly, and it would be easy to attach a gift card to the back of the tag with a strip of Stampin’ Seal! If you are handing it to the recipient in person, you could also slip a Ghiradelli square into the front pocket, as well.
Follow along with me in the video tutorial:
Instructions for POCKET: Start with a 6″ x 6″ piece of double-sided patterned paper, then score along two opposite sides at 1-5/8″. One the bottom, score at 1-7/8″. Fold paper in along both 1-5/8″ sides and on the top, fold out the corners in a “collar”, then adhere edges together in center. Next, fold up along 1-7/8″ score line and wrap a 1/2″ strip around the lower pocket edge (can adhere the lower pocket to the front, or along the sides, creating TWO smaller front pockets).
You really need to see this gorgeous paper in person to appreciate the gold foil accents, but here’s as close as I could get in a photo:
Thank you for purchasing the supplies from my Stampin’ Store to make your own~ watch for 30+ exclusive tutorials to be emailed to your inbox every month you order over $50 from my store AND a hand-stamped card to thank you for your business!
“and the 2025 winner in the Top Die-Cutting Tool category is……EVERYDAY ARCHES!”
Worthy of a standing ovation, the Stampin’ Up! Everyday Arches Dies (and coordinating stamp set) are truly a non-negotiable necessity in everyone’s craft room. Full stop.
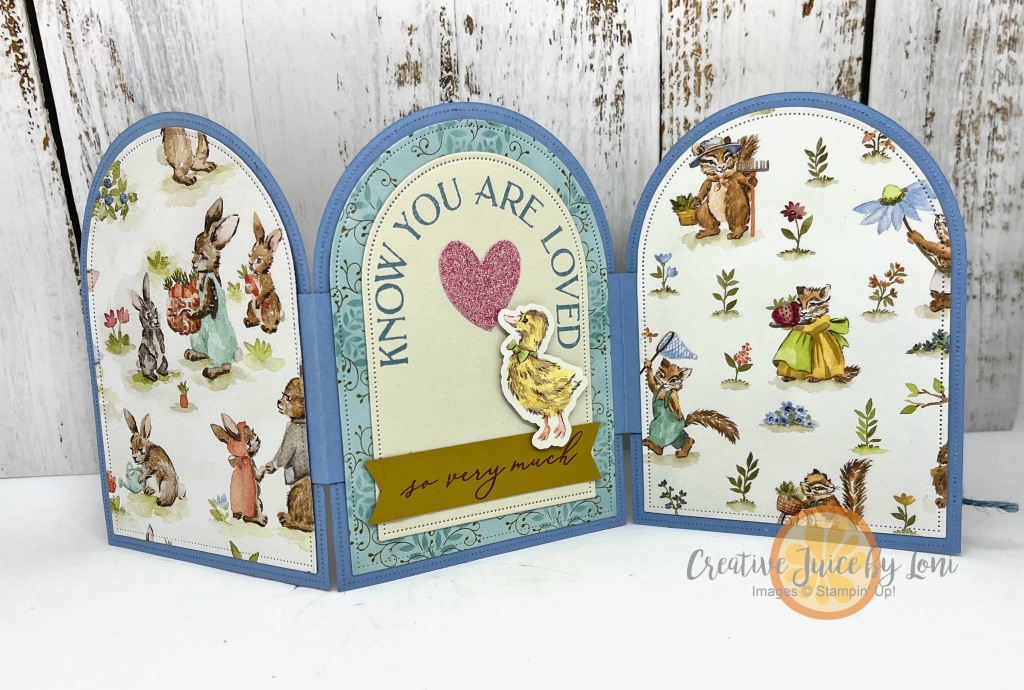
With 10 nesting dies (the largest die is 5-3/16″ x 3-15/16″), you’ll marvel at the full range of crafting abilities of such a basic shape. (In case they are “currently unavailable”, fear not, they’ll be back in stock soon!). I’m here to help you see their potential, starting with the Arched Screen Divider Card:
Don’t arch an eyebrow (ha-ha)…this is just the front. When you open it up, the STAGE IS SET:
As a baby card, you could put a photo of the newborn in the center panel -OR- list their name, birthdate, birth place and vitals (handwritten, if you have lovely writing or print from your computer, if you don’t).
The back side gives more space to add photos or love notes:
What I love best is that the Beatrix Potter vibes make it a perfect decoration on a nursery shelf, or the parents could use each piece in a scrapbook!
A few close ups:
The “Know You are Loved” panel was completed after my demonstration, and it is the perfect fit.
I’ve got different versions to share with you, but first, the instructions in video:
On to the other versions, starting with a birthday card using the Full of Life Designer Series Paper and a sneak peek of the Arched Wishes stamp set, coming in March:
Because there are only 5 days left of Stampin’ Up! Sale-a-Bration, I also had to make an Arched Screen Divider card with one of our freebies:


![Painted Stripes Cling Stamp Set [ 165437 ]](https://assets1.tamsnetwork.com/images/EC042017NF/165437s.jpg "Painted Stripes Cling Stamp Set [ 165437 ]")
![Darling Dinos Bundle (English) [ 164735 ]](https://assets1.tamsnetwork.com/images/EC042017NF/164735s.jpg "Darling Dinos Bundle (English) [ 164735 ]")
![Basic Black 8-1/2" X 11" Cardstock [ 121045 ]](https://assets1.tamsnetwork.com/images/EC042017NF/121045s.jpg "Basic Black 8-1/2\" X 11\" Cardstock [ 121045 ]")
![Basic White 8 1/2" X 11" Cardstock [ 159276 ]](https://assets1.tamsnetwork.com/images/EC042017NF/159276s.jpg "Basic White 8 1/2\" X 11\" Cardstock [ 159276 ]")
![Highland Heather 8-1/2" X 11" Cardstock [ 146986 ]](https://assets1.tamsnetwork.com/images/EC042017NF/146986s.jpg "Highland Heather 8-1/2\" X 11\" Cardstock [ 146986 ]")
![Balmy Blue 8-1/2" X 11" Cardstock [ 146982 ]](https://assets1.tamsnetwork.com/images/EC042017NF/146982s.jpg "Balmy Blue 8-1/2\" X 11\" Cardstock [ 146982 ]")
![Lemon Lime Twist 8-1/2" X 11" Cardstock [ 144245 ]](https://assets1.tamsnetwork.com/images/EC042017NF/144245s.jpg "Lemon Lime Twist 8-1/2\" X 11\" Cardstock [ 144245 ]")
![Calypso Coral 8-1/2" X 11" Cardstock [ 122925 ]](https://assets1.tamsnetwork.com/images/EC042017NF/122925s.jpg "Calypso Coral 8-1/2\" X 11\" Cardstock [ 122925 ]")
![Highland Heather Classic Stampin' Pad [ 147103 ]](https://assets1.tamsnetwork.com/images/EC042017NF/147103s.jpg "Highland Heather Classic Stampin' Pad [ 147103 ]")
![Balmy Blue Classic Stampin' Pad [ 147105 ]](https://assets1.tamsnetwork.com/images/EC042017NF/147105s.jpg "Balmy Blue Classic Stampin' Pad [ 147105 ]")
![Lemon Lime Twist Classic Stampin' Pad [ 147145 ]](https://assets1.tamsnetwork.com/images/EC042017NF/147145s.jpg "Lemon Lime Twist Classic Stampin' Pad [ 147145 ]")
![Tuxedo Black Memento Ink Pad [ 132708 ]](https://assets1.tamsnetwork.com/images/EC042017NF/132708s.jpg "Tuxedo Black Memento Ink Pad [ 132708 ]")
![Uninked Stampin’ Craft Pad & Whisper White Refill [ 147277 ]](https://assets1.tamsnetwork.com/images/EC042017NF/147277s.jpg "Uninked Stampin’ Craft Pad & Whisper White Refill [ 147277 ]")
![Basics Wow! Embossing Powder [ 165679 ]](https://assets1.tamsnetwork.com/images/EC042017NF/165679s.jpg "Basics Wow! Embossing Powder [ 165679 ]")
![Heat Tool (Us And Canada) [ 129053 ]](https://assets1.tamsnetwork.com/images/EC042017NF/129053s.jpg "Heat Tool (Us And Canada) [ 129053 ]")
![Highland Heather Stampin' Blends Combo Pack [ 154887 ]](https://assets1.tamsnetwork.com/images/EC042017NF/154887s.jpg "Highland Heather Stampin' Blends Combo Pack [ 154887 ]")
![Balmy Blue Stampin' Blends Combo Pack [ 154830 ]](https://assets1.tamsnetwork.com/images/EC042017NF/154830s.jpg "Balmy Blue Stampin' Blends Combo Pack [ 154830 ]")
![Lemon Lime Twist Stampin’ Blends Combo Pack [ 161682 ]](https://assets1.tamsnetwork.com/images/EC042017NF/161682s.jpg "Lemon Lime Twist Stampin’ Blends Combo Pack [ 161682 ]")
![Mini Stampin' Cut & Emboss Machine [ 150673 ]](https://assets1.tamsnetwork.com/images/EC042017NF/150673s.jpg "Mini Stampin' Cut & Emboss Machine [ 150673 ]")
![Paper Trimmer [ 152392 ]](https://assets1.tamsnetwork.com/images/EC042017NF/152392s.jpg "Paper Trimmer [ 152392 ]")
![Glossy Dots Assortment [ 158827 ]](https://assets1.tamsnetwork.com/images/EC042017NF/158827s.jpg "Glossy Dots Assortment [ 158827 ]")
![Stampin' Dimensionals [ 104430 ]](https://assets1.tamsnetwork.com/images/EC042017NF/104430s.jpg "Stampin' Dimensionals [ 104430 ]")


![Meant To Bee Bundle (English) [ 167243 ]](https://assets1.tamsnetwork.com/images/EC042017NF/167243s.jpg "Meant To Bee Bundle (English) [ 167243 ]")
![Bubble Bath 8 1/2" X 11" Cardstock [ 161718 ]](https://assets1.tamsnetwork.com/images/EC042017NF/161718s.jpg "Bubble Bath 8 1/2\" X 11\" Cardstock [ 161718 ]")
![Pool Party 8-1/2" X 11" Cardstock [ 122924 ]](https://assets1.tamsnetwork.com/images/EC042017NF/122924s.jpg "Pool Party 8-1/2\" X 11\" Cardstock [ 122924 ]")
![Basic White 8 1/2" X 11" Cardstock [ 166780 ]](https://assets1.tamsnetwork.com/images/EC042017NF/166780s.jpg "Basic White 8 1/2\" X 11\" Cardstock [ 166780 ]")

![Daffodil Delight Classic Stampin' Pad [ 147094 ]](https://assets1.tamsnetwork.com/images/EC042017NF/147094s.jpg "Daffodil Delight Classic Stampin' Pad [ 147094 ]")
![Petunia Pop Classic Stampin Pad [ 163811 ]](https://assets1.tamsnetwork.com/images/EC042017NF/163811s.jpg "Petunia Pop Classic Stampin Pad [ 163811 ]")
![Bubble Bath Classic Stampin' Pad [ 161664 ]](https://assets1.tamsnetwork.com/images/EC042017NF/161664s.jpg "Bubble Bath Classic Stampin' Pad [ 161664 ]")
![Old Olive Classic Stampin' Pad [ 147090 ]](https://assets1.tamsnetwork.com/images/EC042017NF/147090s.jpg "Old Olive Classic Stampin' Pad [ 147090 ]")
![Stampin' Cut & Emboss Machine [ 149653 ]](https://assets1.tamsnetwork.com/images/EC042017NF/149653s.jpg "Stampin' Cut & Emboss Machine [ 149653 ]")
![Tiny Bee Trinkets [ 164714 ]](https://assets1.tamsnetwork.com/images/EC042017NF/164714s.jpg "Tiny Bee Trinkets [ 164714 ]")
![Tear & Tape Adhesive [ 154031 ]](https://assets1.tamsnetwork.com/images/EC042017NF/154031s.jpg "Tear & Tape Adhesive [ 154031 ]")


![Cute As Can Bee 12" X 12" (30.5 X 30.5 Cm) Designer Series Paper [ 166621 ]](https://assets1.tamsnetwork.com/images/EC042017NF/166621s.jpg "Cute As Can Bee 12\" X 12\" (30.5 X 30.5 Cm) Designer Series Paper [ 166621 ]")
![Simply Scored [ 122334 ]](https://assets1.tamsnetwork.com/images/EC042017NF/122334s.jpg "Simply Scored [ 122334 ]")
![Petunia Pop 8 1/2" X 11" Cardstock [ 163801 ]](https://assets1.tamsnetwork.com/images/EC042017NF/163801s.jpg "Petunia Pop 8 1/2\" X 11\" Cardstock [ 163801 ]")
![Bone Folder [ 102300 ]](https://assets1.tamsnetwork.com/images/EC042017NF/102300s.jpg "Bone Folder [ 102300 ]")


![Arched Wishes Cling Stamp Set (English) [ 165428 ]](https://assets1.tamsnetwork.com/images/EC042017NF/165428s.jpg "Arched Wishes Cling Stamp Set (English) [ 165428 ]")
![Everyday Arches Dies [ 164629 ]](https://assets1.tamsnetwork.com/images/EC042017NF/164629s.jpg "Everyday Arches Dies [ 164629 ]")
![Summer Splash 8 1/2" X 11 Cardstock [ 163797 ]](https://assets1.tamsnetwork.com/images/EC042017NF/163797s.jpg "Summer Splash 8 1/2\" X 11 Cardstock [ 163797 ]")
![Summer Splash Classic Stampin Pad [ 163809 ]](https://assets1.tamsnetwork.com/images/EC042017NF/163809s.jpg "Summer Splash Classic Stampin Pad [ 163809 ]")
![Granny Apple Green Stampin' Pad [ 147095 ]](https://assets1.tamsnetwork.com/images/EC042017NF/147095s.jpg "Granny Apple Green Stampin' Pad [ 147095 ]")
![Fresh Freesia Classic Stampin' Pad [ 155611 ]](https://assets1.tamsnetwork.com/images/EC042017NF/155611s.jpg "Fresh Freesia Classic Stampin' Pad [ 155611 ]")
![Blending Brushes [ 153611 ]](https://assets1.tamsnetwork.com/images/EC042017NF/153611s.jpg "Blending Brushes [ 153611 ]")
![Embossing Additions Tool Kit [ 159971 ]](https://assets1.tamsnetwork.com/images/EC042017NF/159971s.jpg "Embossing Additions Tool Kit [ 159971 ]")
![Mini Corrugated 3 D Embossing Folder [ 165559 ]](https://assets1.tamsnetwork.com/images/EC042017NF/165559s.jpg "Mini Corrugated 3 D Embossing Folder [ 165559 ]")
![Summer Splash Stampin’ Blends Combo Pack [ 163826 ]](https://assets1.tamsnetwork.com/images/EC042017NF/163826s.jpg "Summer Splash Stampin’ Blends Combo Pack [ 163826 ]")
![Granny Apple Green Stampin' Blends Combo Pack [ 154885 ]](https://assets1.tamsnetwork.com/images/EC042017NF/154885s.jpg "Granny Apple Green Stampin' Blends Combo Pack [ 154885 ]")
![Fresh Freesia Stampin' Blends Combo Pack [ 155518 ]](https://assets1.tamsnetwork.com/images/EC042017NF/155518s.jpg "Fresh Freesia Stampin' Blends Combo Pack [ 155518 ]")
![Clear Wink Of Stella Glitter Brush [ 141897 ]](https://assets1.tamsnetwork.com/images/EC042017NF/141897s.jpg "Clear Wink Of Stella Glitter Brush [ 141897 ]")
![Iridescent Adhesive Backed Discs [ 161954 ]](https://assets1.tamsnetwork.com/images/EC042017NF/161954s.jpg "Iridescent Adhesive Backed Discs [ 161954 ]")
![Multipurpose Liquid Glue [ 110755 ]](https://assets1.tamsnetwork.com/images/EC042017NF/110755s.jpg "Multipurpose Liquid Glue [ 110755 ]")


![Wildflower Birthday 12" X 12" (30.5 X 30.5 Cm) Specialty Designer Series Paper [ 164591 ]](https://assets1.tamsnetwork.com/images/EC042017NF/164591s.jpg "Wildflower Birthday 12\" X 12\" (30.5 X 30.5 Cm) Specialty Designer Series Paper [ 164591 ]")
![Birthday Celebration Photopolymer Stamp Set (English) [ 164592 ]](https://assets1.tamsnetwork.com/images/EC042017NF/164592s.jpg "Birthday Celebration Photopolymer Stamp Set (English) [ 164592 ]")
![Pretty In Pink 8 1/2" X 11" Cardstock [ 163793 ]](https://assets1.tamsnetwork.com/images/EC042017NF/163793s.jpg "Pretty In Pink 8 1/2\" X 11\" Cardstock [ 163793 ]")
![Misty Moonlight 8-1/2" X 11" Cardstock [ 153081 ]](https://assets1.tamsnetwork.com/images/EC042017NF/153081s.jpg "Misty Moonlight 8-1/2\" X 11\" Cardstock [ 153081 ]")
![Coastal Cabana 8-1/2" X 11" Cardstock [ 131297 ]](https://assets1.tamsnetwork.com/images/EC042017NF/131297s.jpg "Coastal Cabana 8-1/2\" X 11\" Cardstock [ 131297 ]")
![Misty Moonlight Classic Stampin' Pad [ 153118 ]](https://assets1.tamsnetwork.com/images/EC042017NF/153118s.jpg "Misty Moonlight Classic Stampin' Pad [ 153118 ]")
![Pretty In Pink 3/8" (1 Cm) Bordered Ribbon [ 163784 ]](https://assets1.tamsnetwork.com/images/EC042017NF/163784s.jpg "Pretty In Pink 3/8\" (1 Cm) Bordered Ribbon [ 163784 ]")
![Gold Twisted Thread [ 164603 ]](https://assets1.tamsnetwork.com/images/EC042017NF/164603s.jpg "Gold Twisted Thread [ 164603 ]")
![1-3/4" (4.4 Cm) Circle Punch [ 119850 ]](https://assets1.tamsnetwork.com/images/EC042017NF/119850s.jpg "1-3/4\" (4.4 Cm) Circle Punch [ 119850 ]")
![Layered Florals 3 D Embossing Folder [ 162935 ]](https://assets1.tamsnetwork.com/images/EC042017NF/162935s.jpg "Layered Florals 3 D Embossing Folder [ 162935 ]")
![Stampin' Seal [ 152813 ]](https://assets1.tamsnetwork.com/images/EC042017NF/152813s.jpg "Stampin' Seal [ 152813 ]")
![Mini Glue Dots [ 103683 ]](https://assets1.tamsnetwork.com/images/EC042017NF/103683s.jpg "Mini Glue Dots [ 103683 ]")
![Basic White Medium Envelopes [ 159236 ]](https://assets1.tamsnetwork.com/images/EC042017NF/159236s.jpg "Basic White Medium Envelopes [ 159236 ]")


![Everyday Arches Bundle (English) [ 164630 ]](https://assets1.tamsnetwork.com/images/EC042017NF/164630s.jpg "Everyday Arches Bundle (English) [ 164630 ]")
![Storybook Moments 12" X 12" (30.5 X 30.5 Cm) Specialty Designer Series Paper [ 164662 ]](https://assets1.tamsnetwork.com/images/EC042017NF/164662s.jpg "Storybook Moments 12\" X 12\" (30.5 X 30.5 Cm) Specialty Designer Series Paper [ 164662 ]")
![Boho Blue 8 1/2" X 11" Cardstock [ 161724 ]](https://assets1.tamsnetwork.com/images/EC042017NF/161724s.jpg "Boho Blue 8 1/2\" X 11\" Cardstock [ 161724 ]")
![Copper Clay 8 1/2" X 11" Cardstock [ 161721 ]](https://assets1.tamsnetwork.com/images/EC042017NF/161721s.jpg "Copper Clay 8 1/2\" X 11\" Cardstock [ 161721 ]")
![Basic Beige 8 1/2" X 11" Cardstock [ 164511 ]](https://assets1.tamsnetwork.com/images/EC042017NF/164511s.jpg "Basic Beige 8 1/2\" X 11\" Cardstock [ 164511 ]")
![Wild Wheat 8 1/2" X 11" Cardstock [ 161725 ]](https://assets1.tamsnetwork.com/images/EC042017NF/161725s.jpg "Wild Wheat 8 1/2\" X 11\" Cardstock [ 161725 ]")
![2024–2026 In Color™ Glimmer 12" X 12" (30.5 X 30.5 Cm) Specialty Paper [ 163771 ]](https://assets1.tamsnetwork.com/images/EC042017NF/163771s.jpg "2024–2026 In Color™ Glimmer 12\" X 12\" (30.5 X 30.5 Cm) Specialty Paper [ 163771 ]")
![2022–2024 In Color Baker's Twine Pack [ 159195 ]](https://assets1.tamsnetwork.com/images/EC042017NF/159195s.jpg "2022–2024 In Color Baker's Twine Pack [ 159195 ]")
![Boho Blue Classic Stampin' Pad [ 161650 ]](https://assets1.tamsnetwork.com/images/EC042017NF/161650s.jpg "Boho Blue Classic Stampin' Pad [ 161650 ]")
![Copper Clay Classic Stampin' Pad [ 161647 ]](https://assets1.tamsnetwork.com/images/EC042017NF/161647s.jpg "Copper Clay Classic Stampin' Pad [ 161647 ]")
![Bee Builder Punch [ 162553 ]](https://assets1.tamsnetwork.com/images/EC042017NF/162553s.jpg "Bee Builder Punch [ 162553 ]")
![Stampin' Seal+ [ 149699 ]](https://assets1.tamsnetwork.com/images/EC042017NF/149699s.jpg "Stampin' Seal+ [ 149699 ]")
![Brushed Brass Butterflies [ 158136 ]](https://assets1.tamsnetwork.com/images/EC042017NF/158136s.jpg "Brushed Brass Butterflies [ 158136 ]")
