Remember the SQUASH CARD we made last week? We’re using the SAME fold, just starting smaller, and putting it inside a book-binding card for a POP-ular fun-fold for your favorite POP this Father’s Day (or ANY OCCASION)!
At first glance, this looks like a normal book-binding card. But wait until you open it up!
Watch this tutorial and give this a try, and you’ll be chopping all your Designer Series Paper to 6″ square to make more!
The silver foil pop top and bottom really make it look like an aluminum can:
The Simply Sparkling stamp set and dies are just a taste of many incredible products only found in my online store, so while you are adding them to your cart, check out the other Online Exclusives.
If there were a contest for the “most cheerful flower”, don’t you think ZINNIAS would take the prize?
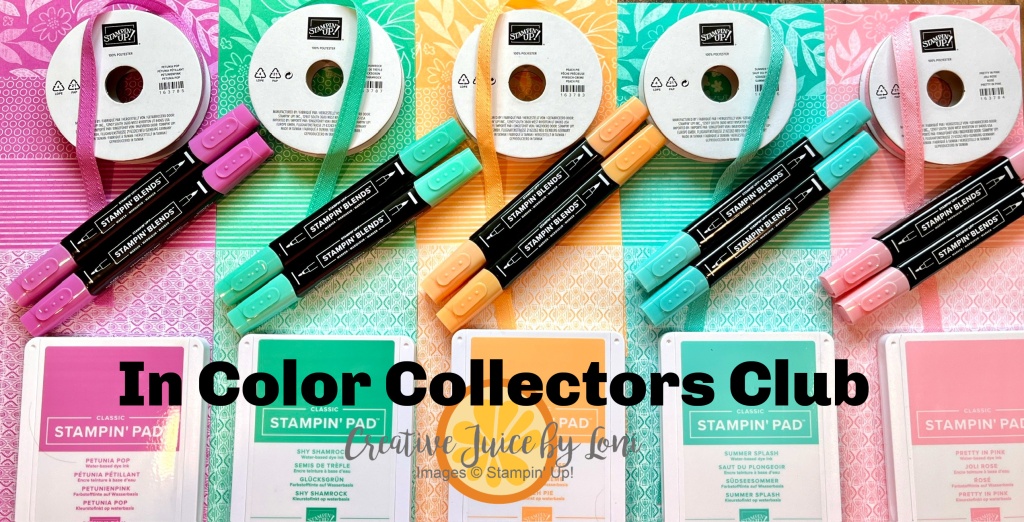
Today’s card(s) feature the Simply Zinnia bundle (an online exclusive available now in my Stampin’ Store) as well as the 2024-2026 In Color products that will be in my store on May 1st!
This slanted background is a handy template to remember (or PIN!) because you can create TWO cards in about the same time it takes to make just one!
It all starts with a 6″ x 3-3/4″ piece of In-Color Designer Series Paper. Mark it at 2″ on the bottom long edge (on the back side of the design you want to use) and at 4″ on the top long edge. Then cut it from the 2″ mark to the 4″ mark. Layer each of those pieces onto a 4″ x 5-1/4″ piece of Basic Black card stock and you are halfway done.
TIP: The leftover 6″ x 2-1/4″ piece of Designer Series Paper fits perfectly on the flap of your envelope, giving you terrific coordination!
Watch the tutorial (speed it up, if desired) to learn how to finish up the card:
And why stop at 2 cards when you can make 10? Two in each of the 2024-26 In Colors: Petunia Pop (shown above), Summer Splash, Peach Pie, Pretty In Pink and Shy Shamrock!
These colors coordinate beautifully, so you can even mix up the colors on the flowers- with the alcohol-based Stampin’ Blends markers, the colors bleed together smoothly:
Here are a few wonderful ways to collect the new IN COLORS:
Join my IN COLOR COLLECTORS CLUB and receive a package each month (May-September) filled with a sampling of ALL the products in each of the colors, including an exclusive projects each month…PLUS a FREE BASIC BEIGE BONUS the last month!
Too impatient to collect slowly? Purchase ALL the colors in May or June from my Stampin’ Store and earn the Basic Beige Bonus FREE!
As we near the end of a Stampin’ Up! catalog year, it’s time to spotlight some of my favorite retiring products. These products are available while supplies last or until April 30, 2024 (download full retiring product list at end of this post).
Since the TGIF Bonus Challenge #tgifc466 was to create a “simple gift set” of cards, it gave me the opportunity to stretch outside my comfort zone of bright colors, and use some of the black & white designs from the Delightfully Eclectic Designer Series Paper. But you can’t take ALL the color out of my life, so I added Calypso Coral, which also shows up on some of the paper designs.
These cards use the paper, PLUS the Good Feelings stamp set and Rays of Light background stamp, all of which will NOT be returning to the new catalog premiering in May. The Rays of Light background is the one I will grieve over losing the most!
This simple fun-fold card style is strategically planned to make the most of your patterned paper! If you score a full 8.5″ x 11″ sheet of card stock along the long edge at 4.25″ and 9.75″…THEN cut it in half at 4.25″, you’ll have two 11″ x 4.25″ cards ready to fold, meeting on the front of the card,
Use a 4″ x 4″ piece of DSP on one side and a 4″ x 1″ piece on the smaller fold. This pattern can be used in landscape or portrait orientation.
Now, HOW should we “gift” all these simple co-ordinating cards?
A quick folio made from a 12″ tall x 10″ wide piece of the Designer Series Paper is just the thing, and can hold all the cards plus envelopes!
Score it at 4.75″ and 5.25″ to give a center binding back, then add a ribbon to tie closed:
What else is retiring? Click banners to download the lists of items from the ’23-’24 Annual Catalog AND the January-April Mini Catalog which will be retiring.
>>> NOTE THAT THE LAST CHANCE SALE STARTS APRIL 9th <<<
These are the supplies I used for my simple set of cards and the folio to gift them in. I appreciate your orders so much and will mail you a thank you card! THANK YOU.
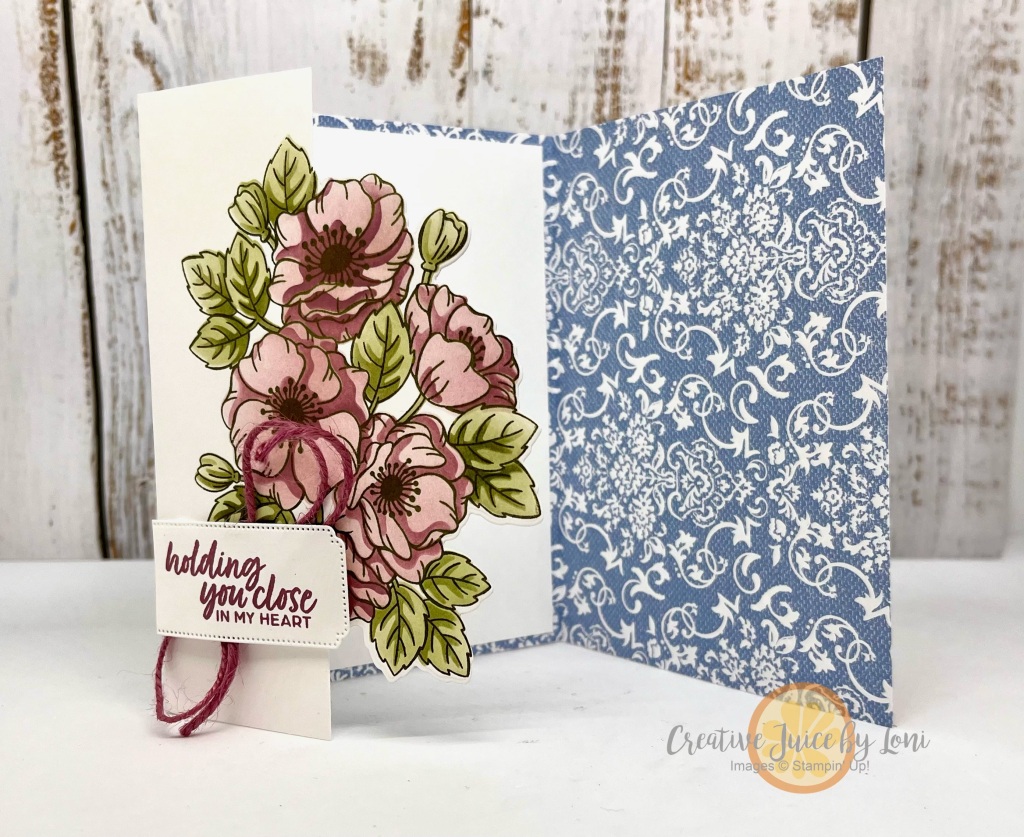
Masks (the fancy Stampin’ Up! term for stencils) make coloring stamped images speedy and simple!
I was truly WOWed with how quickly I was able to color the floral spray image from the Enduring Beauty bundle with the coordinating masks, blending brushes and ink pads. This is a technique you may embrace if you don’t love to color, OR if you are just getting started, you can stamp and color this image with just two ink pads! Watch & learn how:
Did you catch how to die cut just half the image so you can add a layer of Designer Series Paper as the background? For the video, I added a second fold that opens on the right:
But you can just add a 4 1/4″ x 5 1/2″ layer of Designer Series Paper behind the flowers to make it a regular card. I really like the look of the Poetic Expressions designs with the flowers, and used the colors of that paper for coloring the flowers, as well.
Turn the design sideways and try different colors, too.
It’s a beautiful stamp set to use for so many projects, and if you haven’t seen my two previous posts using this set this week, check out the Notebook Cover project HERE and the color challenge card HERE.
THANK YOU for shopping in my Stampin’ Store for GENUINE Stampin’ Up! products!!! It enables me to continue bringing you creative ideas and you are guaranteed high quality products with service from someone who cares about you.
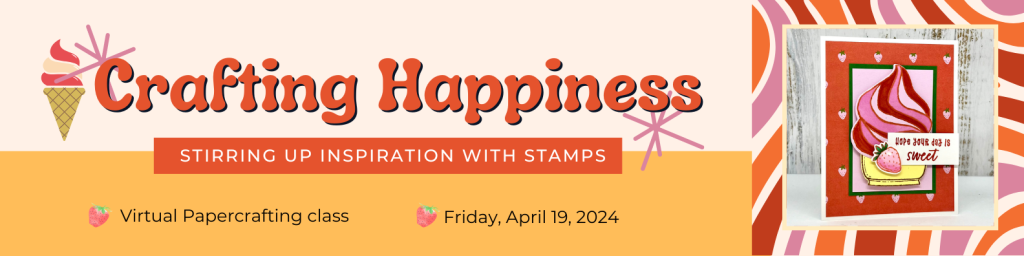
From a firm believer that you have the power to create your own joy, here’s an opportunity to *literally* craft things with rubber stamps, ink & paper that make you feel (and those you share them with) gleeful!
This class will spotlight the Ice Cream Swirl bundle (Item #162771-NOT included in the class fee)- OR you can complete the projects with the Simply Sparkling bundle (Item #162871), the Beautiful Balloons bundle (Item #161457), of the Share a Milkshake bundle (stamps and dies sold separately) – any of which can be ordered in my Stampin’ Store: http://bit.ly/lonistampinupstore. BONUS: When you order the Ice Cream Swirl from my store, I will email you a discount code for $7 off the class!
You can learn more about the class below the video, here’s a completely different card I made in my Monday Live Crafting today~
MORE CLASS DETAILS: Registered class members will receive a class packet with all the consumable supplies (card stock, envelopes, Designer Series Paper, etc) needed for 5 projects we create together during the class, PLUS two full sized accessories (2 embellishments we will use in class) and a color copy of the completed projects. Crafting Happiness Virtual Class fee: $37
Class packet includes*:
Tinsel Gems Four- Pack (Item #161623)
Iridescent Shaker Circles (Item #161625)
Card Stock, Designer Series Paper and accessories cut for projects
One sheet of Stampin’ Dimensionals
Envelopes and packaging
Sweet surprises!
(* while supplies last- if items sell out before packets are mailed, items of equal value may be substituted)
Also needed:
Stamps & Dies of your choice (suggested bundles listed above)
Stampin’ Cut & Emboss Machine (or Mini Machine) or similar die cutting machine for coordinating dies
The class will be privately streamed to YouTube and you’ll receive a link via Email on April 16thto watch and craft along with me on April 19th, or watch at your convenience anytime!
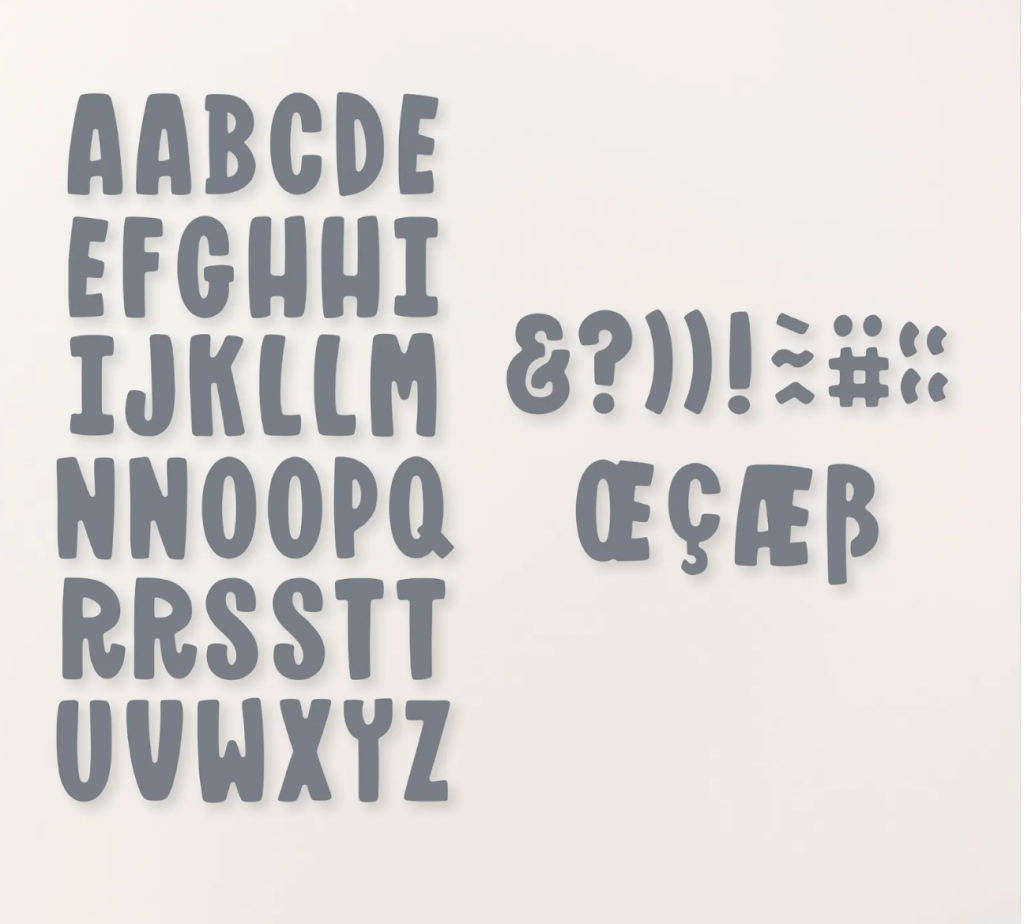
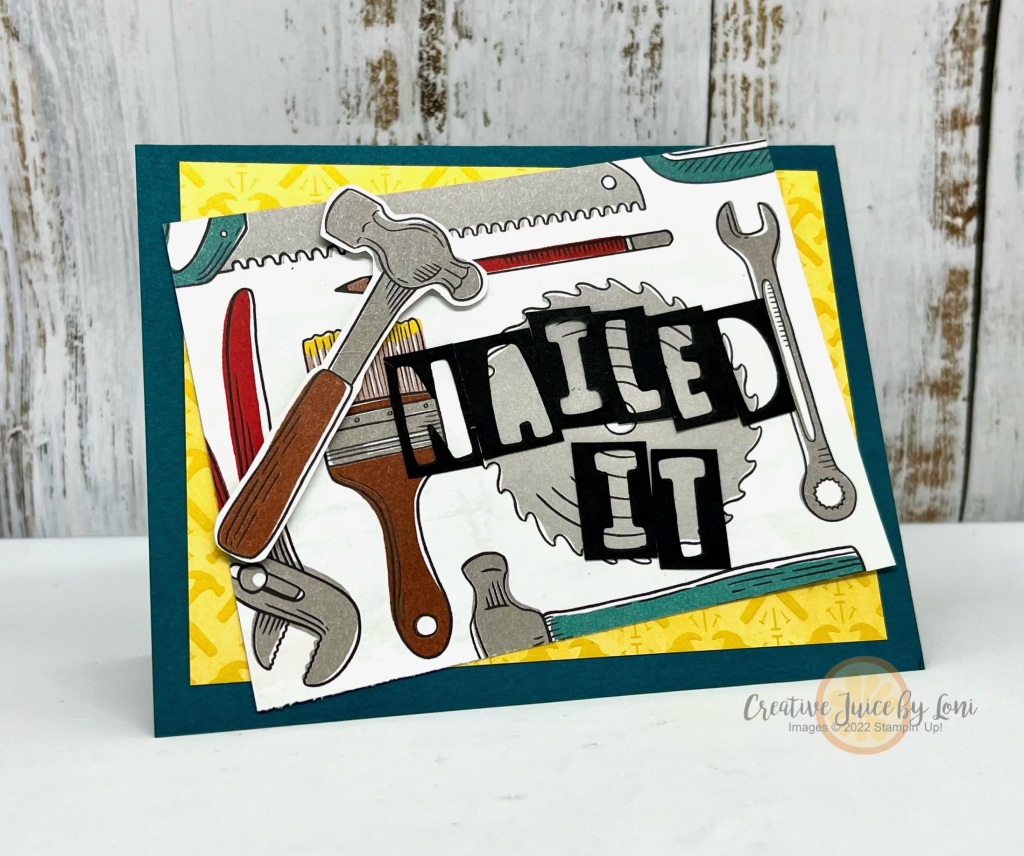
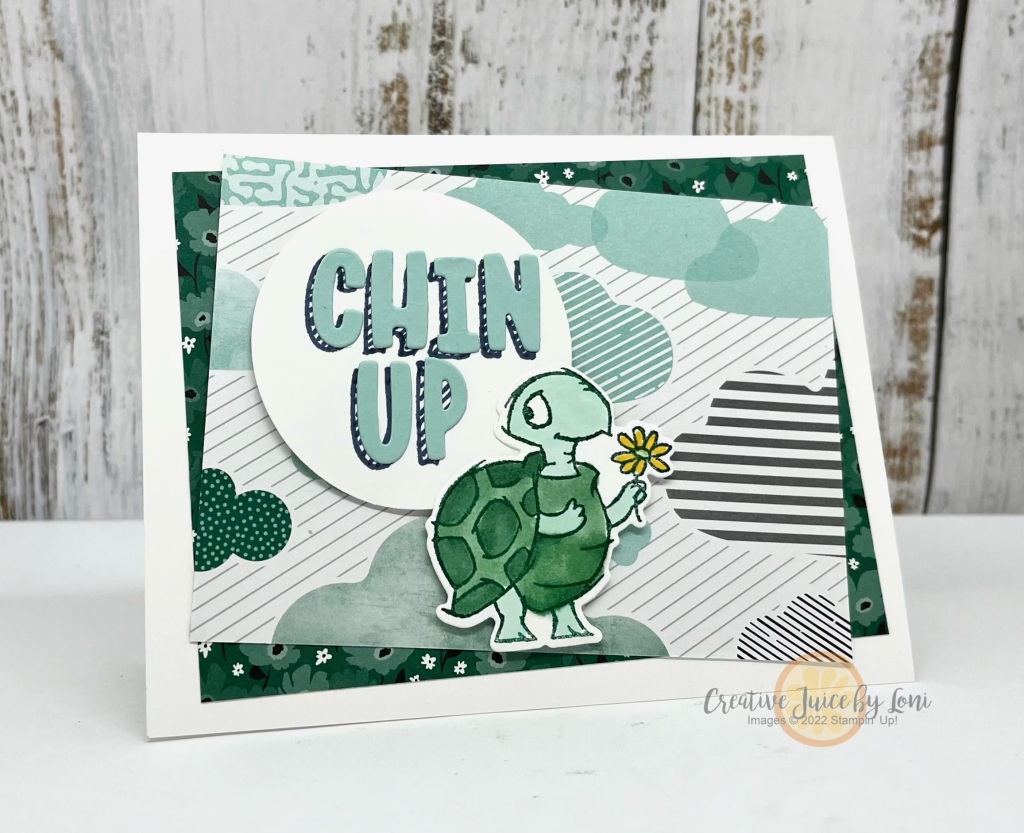
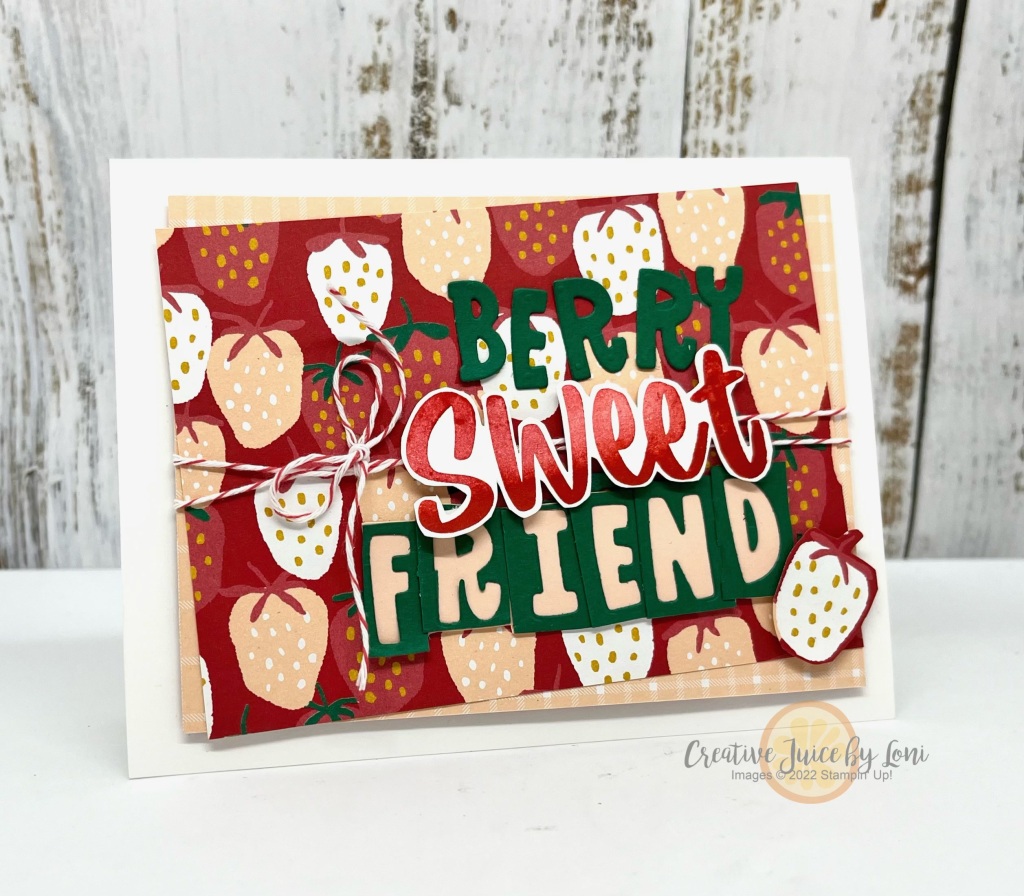
When you don’t have the right stamps to express yourself (or your quirky personality), reach for the Mini Alphabet Dies and spell it out (or make it personal)!
I demonstrated tips and tricks for using these very versatile letters to set you up for success in your crafting in a live video, and remember that while I used two Sale-a-Bration Designer Series Papers for my simple card designs (which papers are only available FREE with purchase for a few more days- through 2/29/24), you can use ANY patterned paper collections you have to make similar cards!
For the first card (above, top) I showed how to use Adhesive Sheets to cut a whole alphabet, for letters ready to adhere to a card anytime (plus how to store the leftover letters), but don’t throw away the negatives! Cut them into squares and use the outlines, too:
You can also make a master template with a window sheet to trace letters, add diagonal lines to create a shadow effect, then adhere die cut letters over the top of each letter:
Mix & Match them with other stamps you have, or use both letters and outlines:
If you’ve read this far, here’s a bonus card and tutorial to download!
It’s a pleasure to serve your creativity~ Share what you make with the Mini Alphabet Dies when you buy them from my Stampin’ Store, and I may spotlight your creativity in my VIP Facebook Group: Creative Juice Crafter’s Corner!
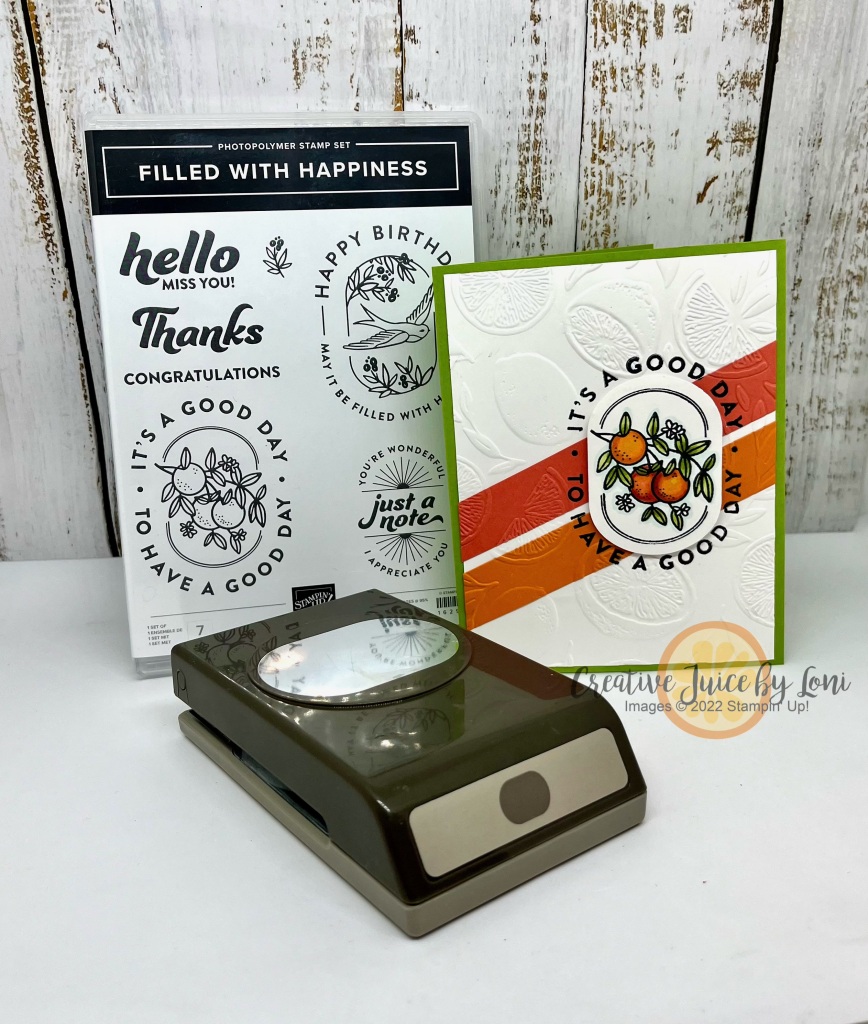
Many of our 2024 Sale-a-Bration freebies coordinate with a new product in the January-April mini catalog, so today I’m showing you how the Watercolor Melon SAB stamp set (an option you can choose free with a $50 order) coordinates with the Modern Oval punch, and that punch *also* matches the Filled with Happiness stamp set!
Let’s say you purchased the Modern Oval punch and Filled with Happiness stamp set and a set of Stampin’ Blends markers, NOW you qualify for a free Sale-a-Bration product…like the Watercolor Melon stamp set!
Hey look! They work interchangeably!
Let’s get a close-up look at these two similar-but-different cards:
Lay down your card stock strips and stamp the “It’s a Good Day” stamp on the white layer BEFORE you emboss it with the Sweet Citrus Hybrid 3-D Embossing Folder.
Stamp the same image again, color in with Stampin’ Blends and punch out the center with the Modern Oval punch to lift up in the center with dimensionals!
Moving on with a similar idea…
Use the slices and wedges of watermelon as your background, then turn your card stock stripes vertically. Use the full watermelon (punched with the Modern Oval) as the place to put your sentiment, which came from the Filled with Happiness set! Isn’t it nice how they all coordinate for bright and beautiful card making?
I guess you could call this one a “Thanks-a-Melon” card! Remember the inside- stamping a little slice of melon with seeds carries the theme through the card.
What are you waiting for? Choosing something free NOW with your qualifying order gives you time to order AGAIN before Sale-a-Bration ends on February 29th, and everyone loves a gift-with-purchase!
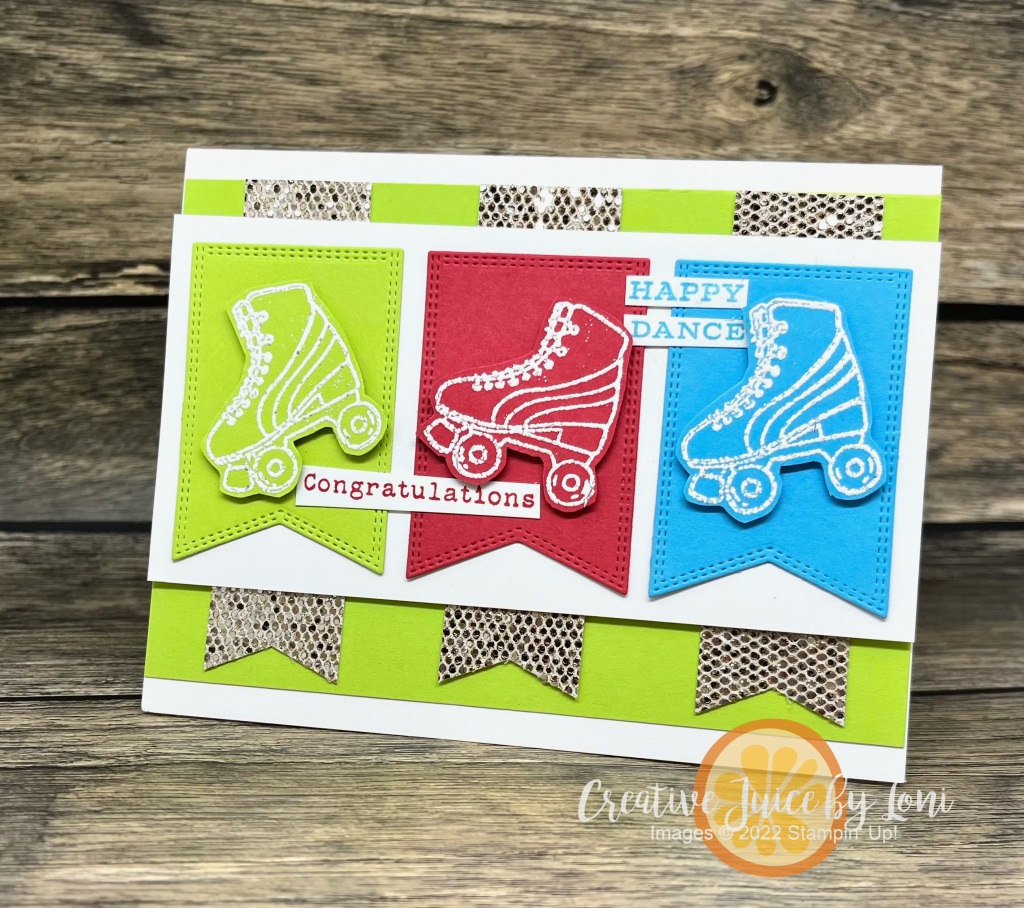
The Curved Occasions stamp set has been one of my favorite to design with, but it’s retiring SOON (AND it’s on sale!). I think it’s the playful images I enjoy using…while I can’t roller skate, I spent plenty of time in the roller rink growing up, so this congratulations card was plain FUN to create with all the memories of my pre-teen klutziness:
You can choose: If you want to color in the images, you could, or emboss and fussy cut them to place on the banners. Add a little eye-catching bling with the More Dazzle paper (a little goes a long way) and it makes you want to do a little happy dance!
I’m giddy that Stampin’ Up! has surprised us with a few FREE SHIPPING days this year, and the last one is tomorrow, Thursday, December 14th! If you order online, the free shipping is offered on orders over $75, or you may call/text/message me by 6 pm MT tomorrow to add your smaller order to mine…if you are willing to pick up your order from me in Hurricane, UT.
There is a good chance you’ll receive your order by Christmas when you order tomorrow during the Free Shipping event…especially if you order early! Don’t miss the LAST CHANCE SALE where many beloved items from the September-December mini catalog are on SALE (like the Curved Occasions stamp set)!
Welcome to all our Stampin’ friends from around the world to our October New at SU! blog hop where we are hoping you see how a SKETCH can get your creative juices flowing for card making. We’ll show you our version of the sketch…then YOU try it, too!
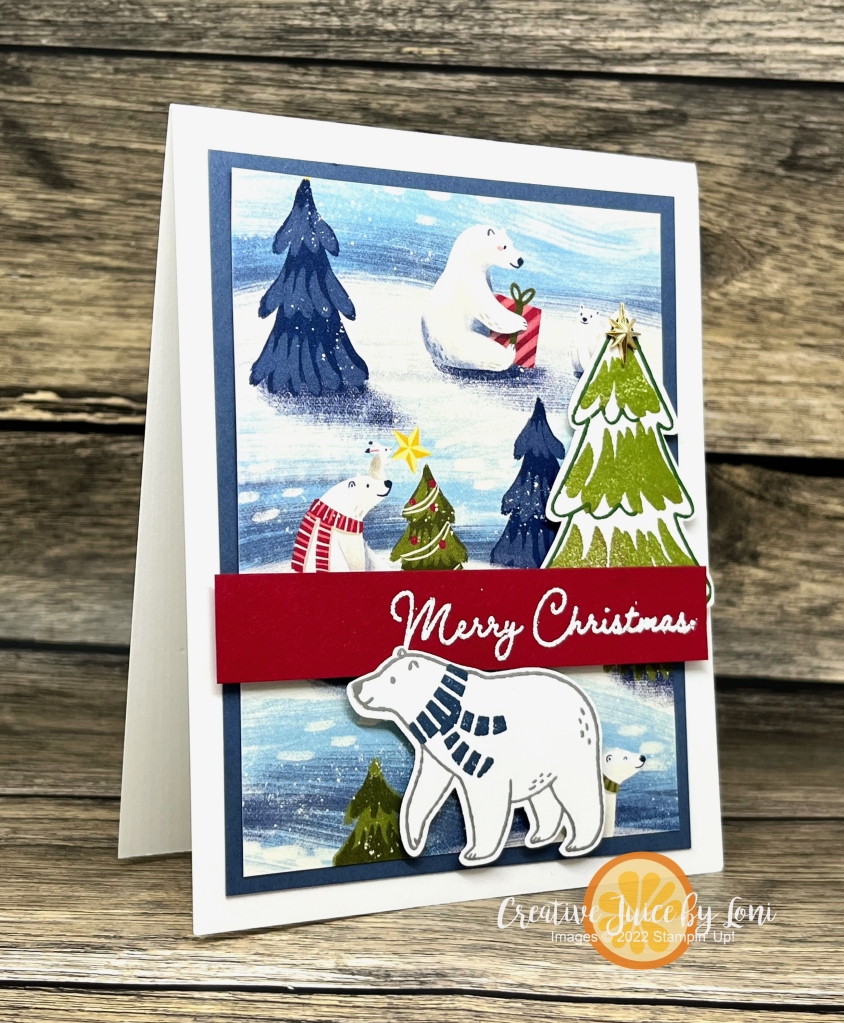
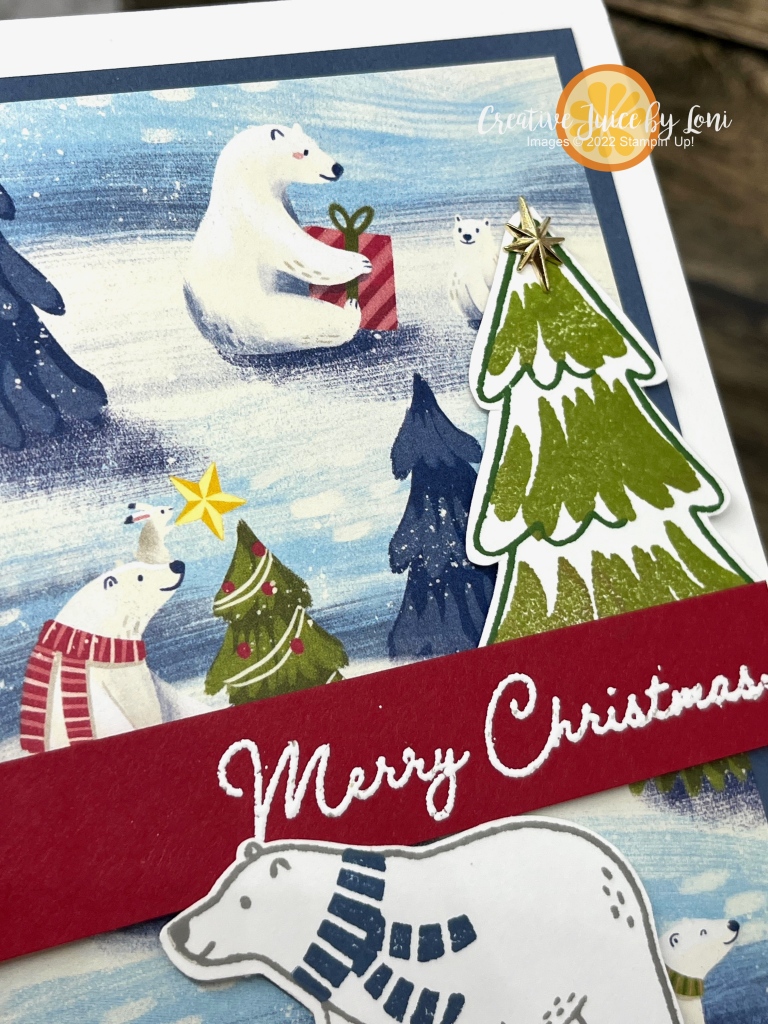
Don’t feel constrained to use the sketch in just one way. I turned it into landscape orientation for a second version, this time with a brown bear rather than a polar bear:
This landscape variation uses the same stamp set and punch with the “Walk in the Forest” Designer Series Paper, which is our MAKING A DIFFERENCE product. It coordinates with both the Beary Christmas suite AND the Merriest Trees bundle! For each package purchased in the USA*, Stampin’ Up! donates $3 to Marines Toys for Tots (*different amounts and charities are supported in different markets around the globe).
Even a simple card can have an unexpected bit of bling to catch the eye… each of my Beary Cute cards has a little sparkle! On the polar bear card, there is an gold star atop the tree (behind the sentiment) and on the brown bear card, it comes in the form of some glitter sequins (which are FLAT, so shouldn’t require extra postage) – both embellishments are included in the supply list below the Blog Hop links.
TIP: For the TREE with the brown bear, I turned my stamp upside down on my block and stamped off the Shaded Spruce ink one time before stamping the whole image over the dark details, like one of our Reversible stamp sets.
Have we inspired you to give this sketch a try? Tag us on social media with #newatsu so we can see your creativity!
If you haven’t seen all the other variations of this card sketch, click on any of our links for more inspiration:
October 2023 New at SU! Blog Hop: Sketch Challenge
I got all my paperwork caught up, so I’m rewarding myself with some stamping time and the Freshly Made Sketch 602 tempted me to give it a try:
Before I show you my card, let me ask a question: Do you look for a sketch to match the stamps you want to use -OR- do you find stamps to put into a sketch you found?
I’ve done both, but today it was sketch first, stamps next.
Wouldn’t this be a fun invitation for a New Year’s Eve Party? You can see how Amy O’Neill used the same sketch & stamps to make a birthday version here!
Bold stamps always appeal to me (no coloring required) and I thought the way you could “build” different party blowouts with the Year to Celebrate stamp set (NEW in the Sept-Dec mini catalog) was super cool:
I also love that the back side of many of the holiday Designer Series Papers are NON-HOLIDAY patterns, so they can be used all year long. The patterned paper I used on my card is the BACK SIDE of the Merry, Bold & Bright DSP that I GUARANTEE you are going to see a LOT of in the next few months!


")
 Designer Series Paper")


")

 Designer Series Paper")


 Gingham Ribbon")


")
 Designer Series Paper")


")


 Designer Series Paper")
 Designer Series Paper")


")


")


 Specialty Paper")


")


")
 Designer Series Paper")
 Designer Series Paper")


")
 Designer Series Paper")


 Metallic Woven Ribbon")


