New at SU! Sketch with Hobby Haven

Did you know that NEW PRODUCTS are added to the Stampin’ Up!® Store EVERY MONTH? No more waiting for a catalog launch…there is ALWAYS something NEW at SU!!

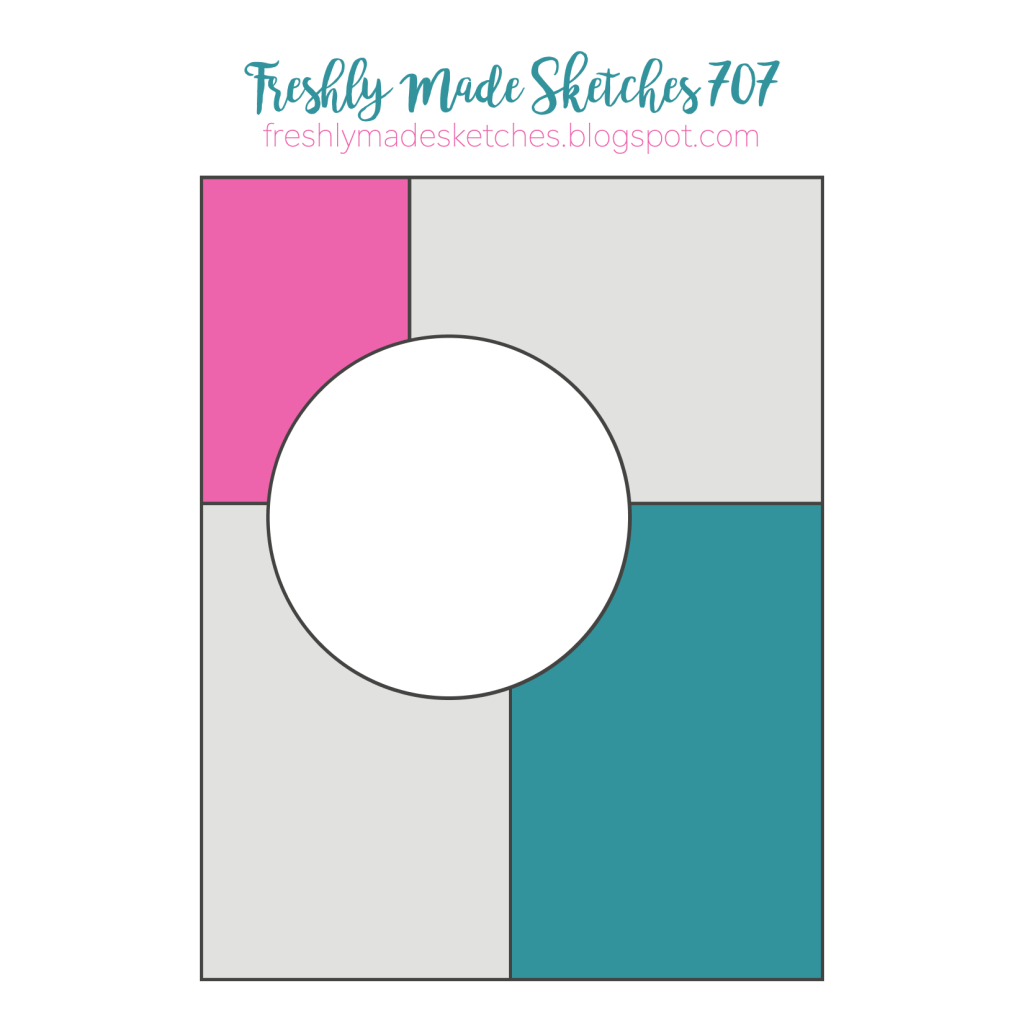
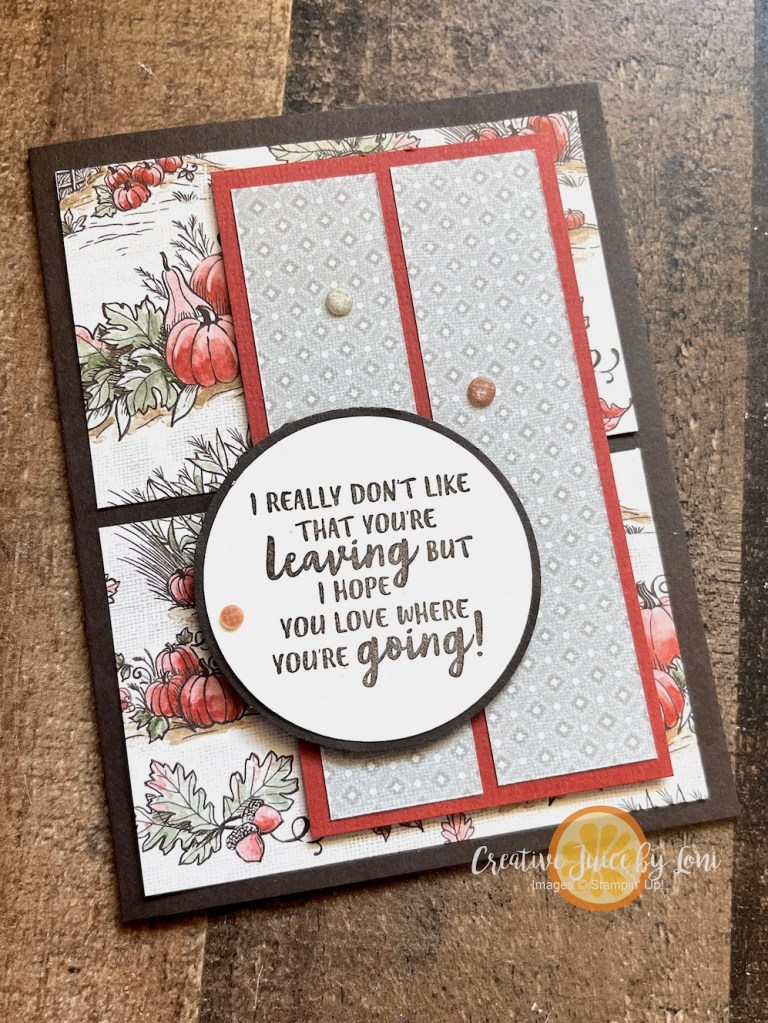
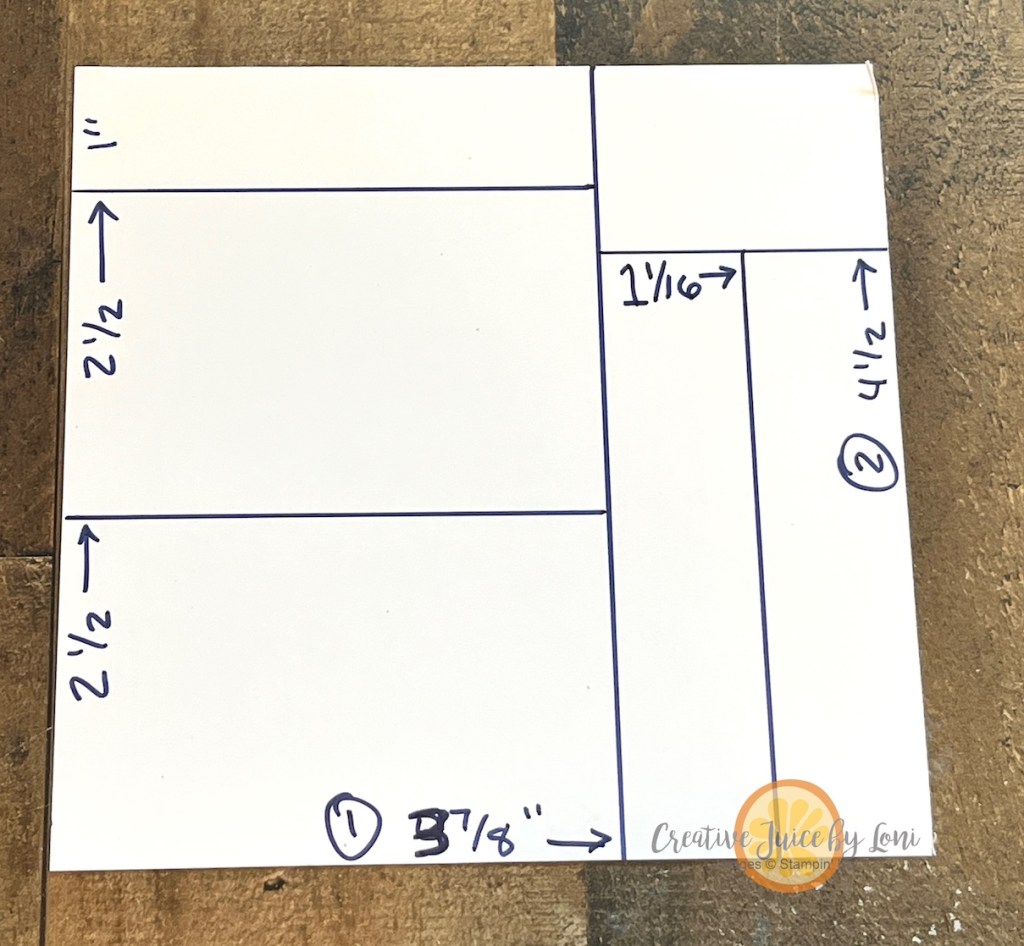
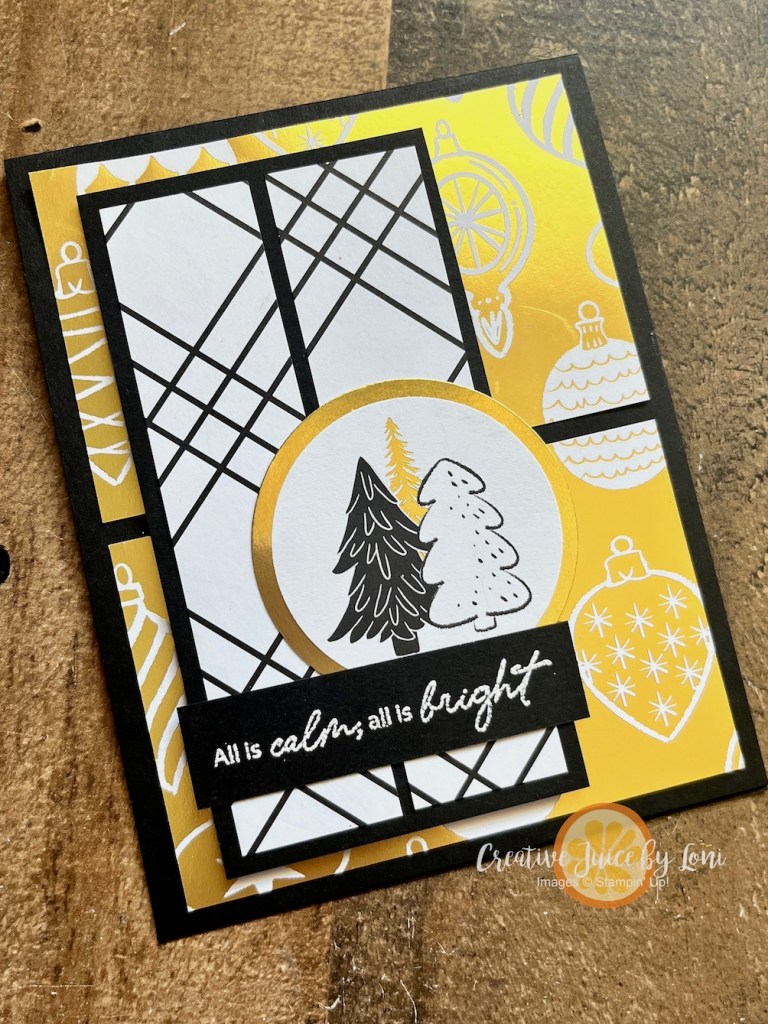
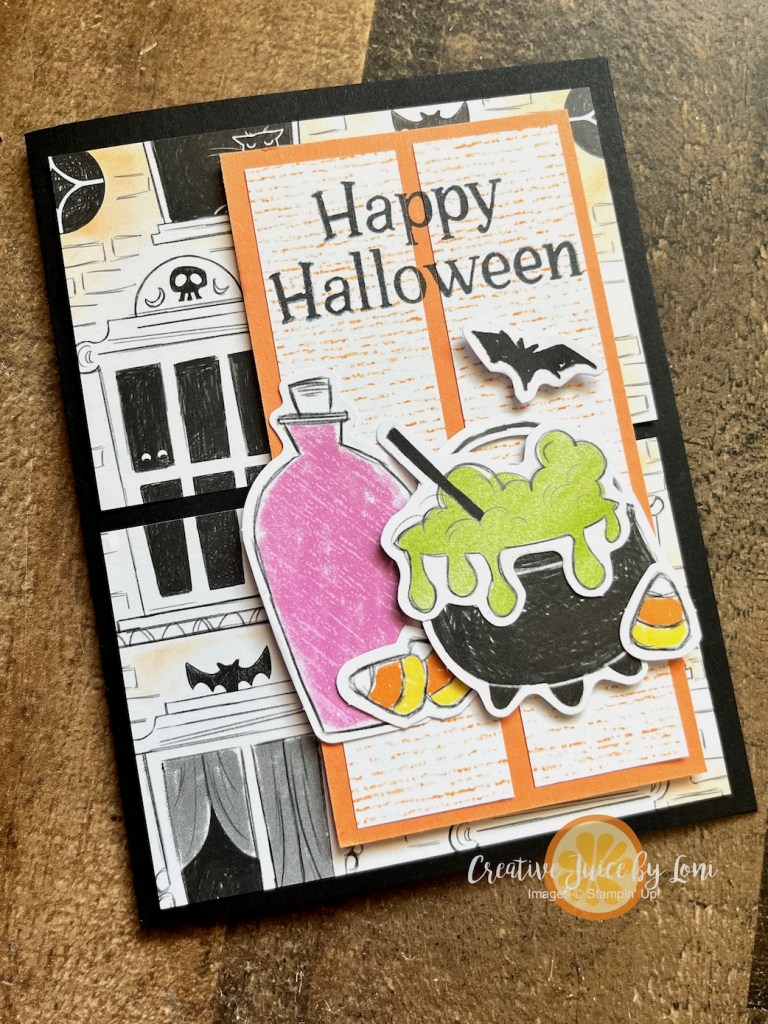
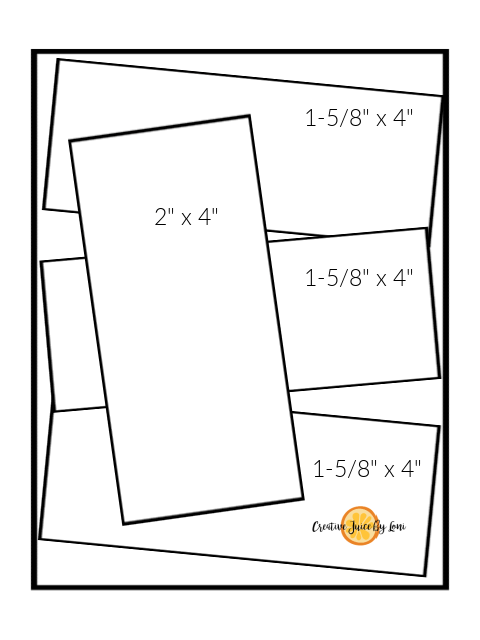
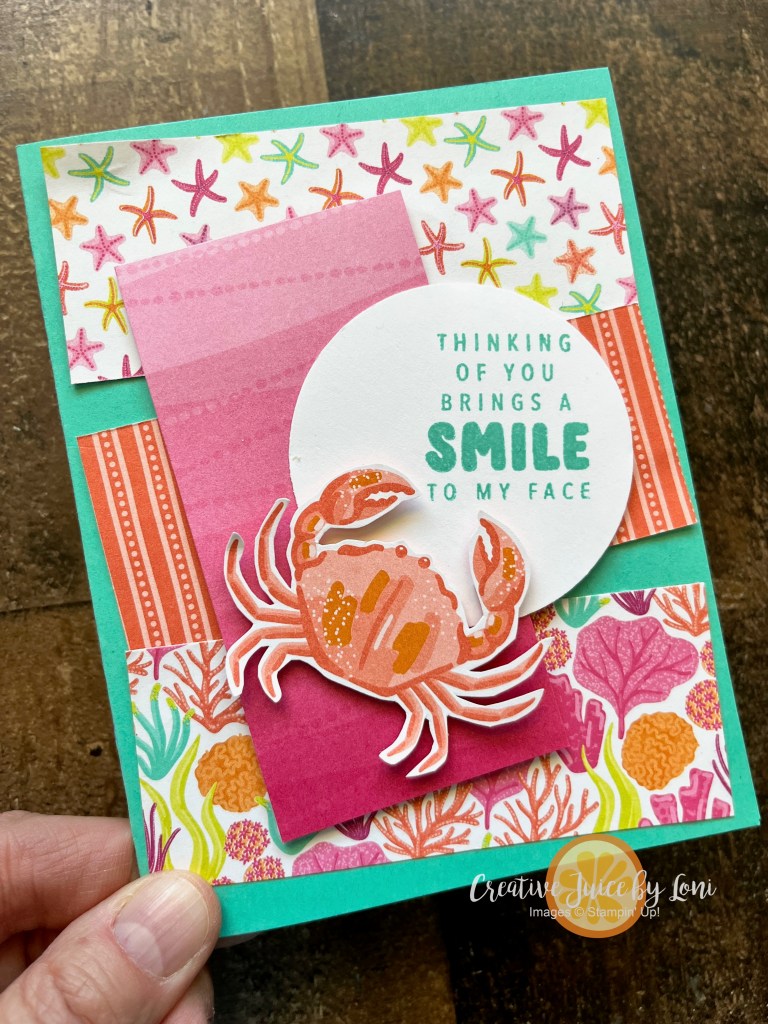
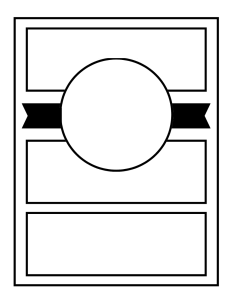
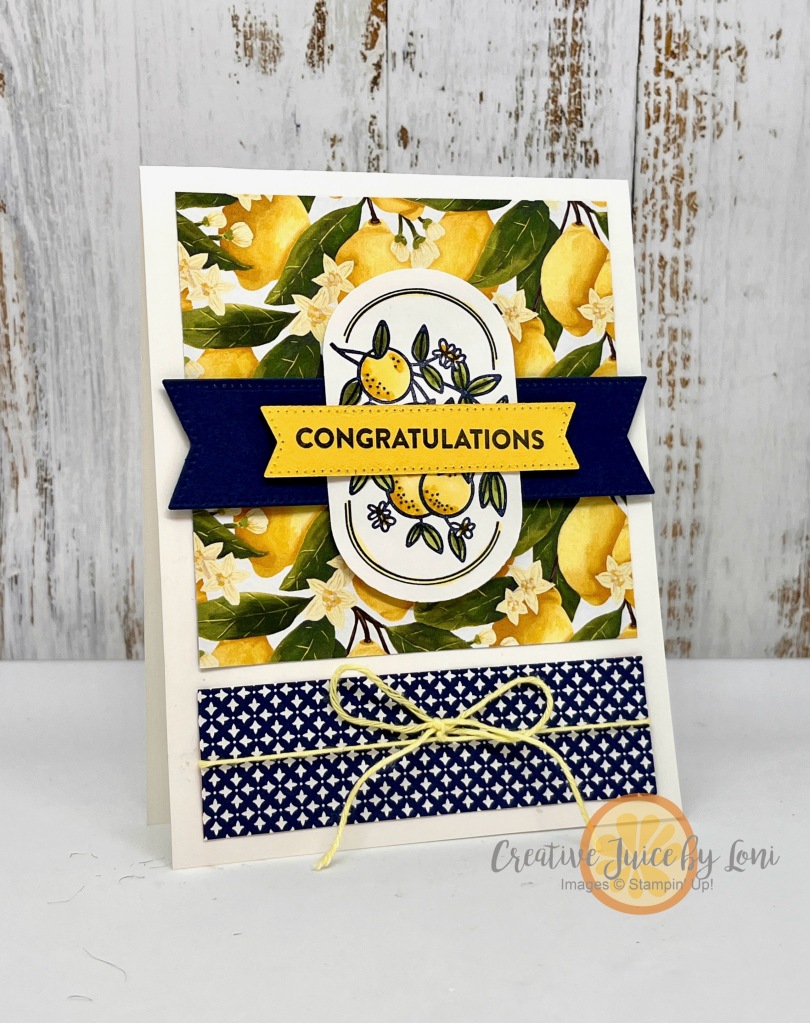
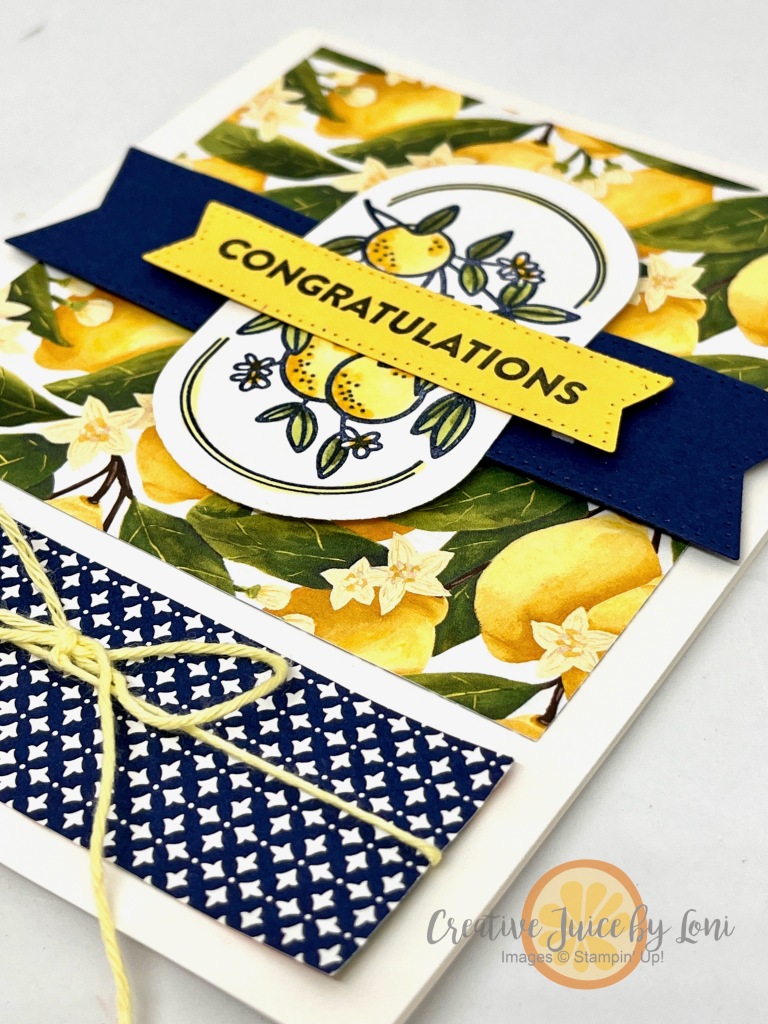
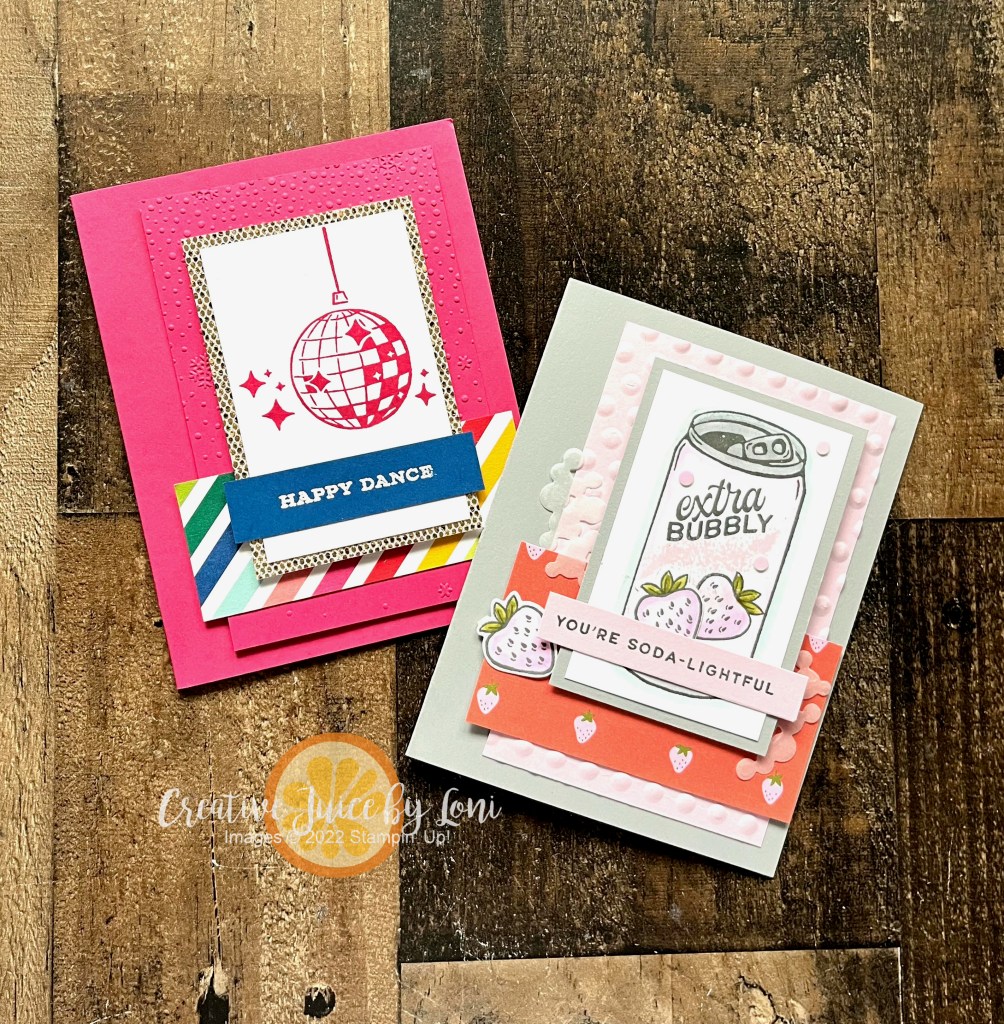
Speaking of that, I’m proud to be a part of a creative team of demonstrators from around the globe who share stamping ideas with you every month, focusing on the latest and greatest products from our wonderful company. For December, we’re all following the same CARD SKETCH, and will demonstrate how it can be used with many different Stampin’ Up! products:

This is one of the sketches included in the
2026 January-April Mini Catalog!

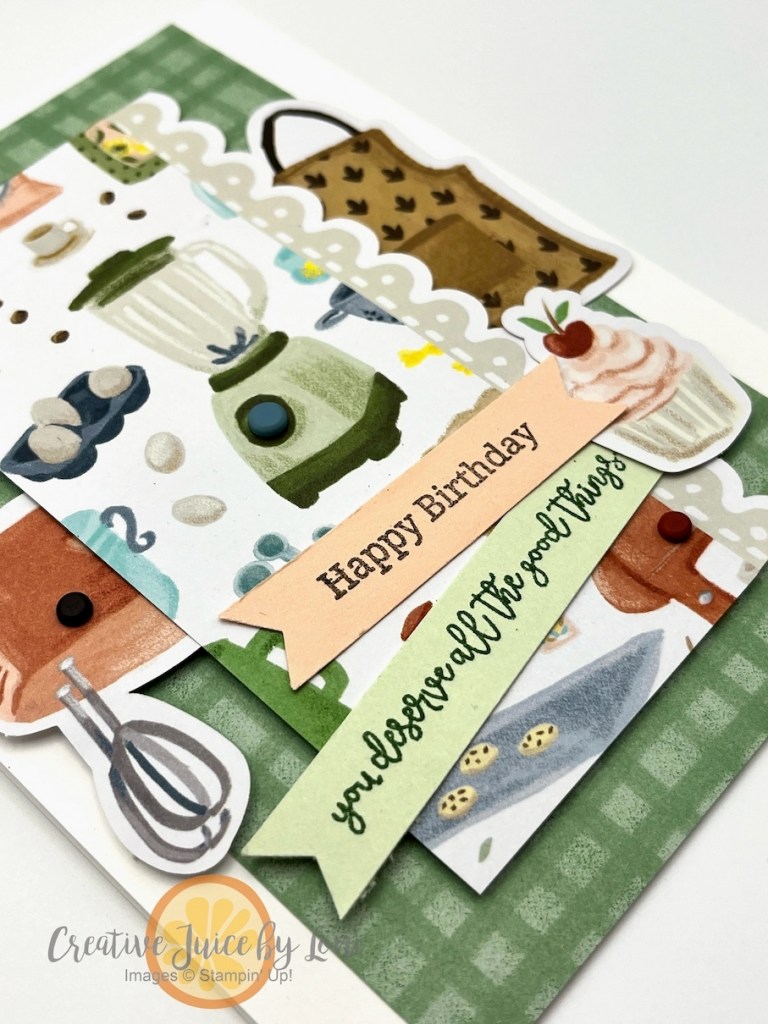
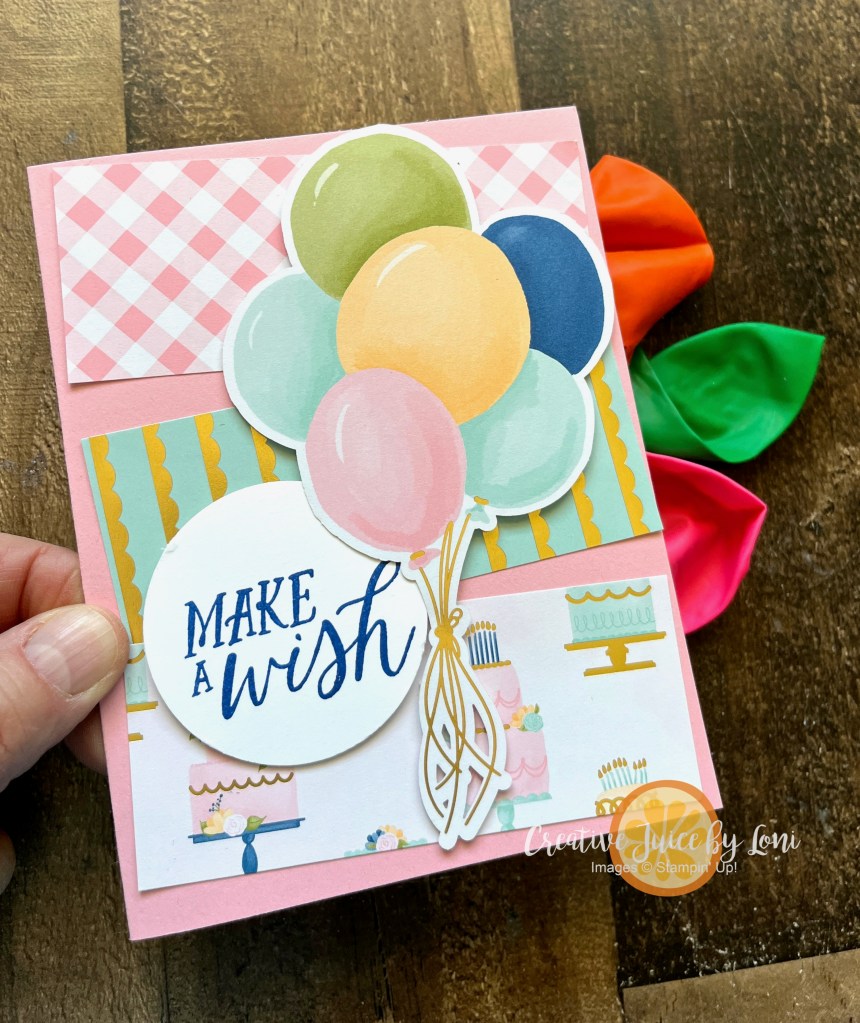
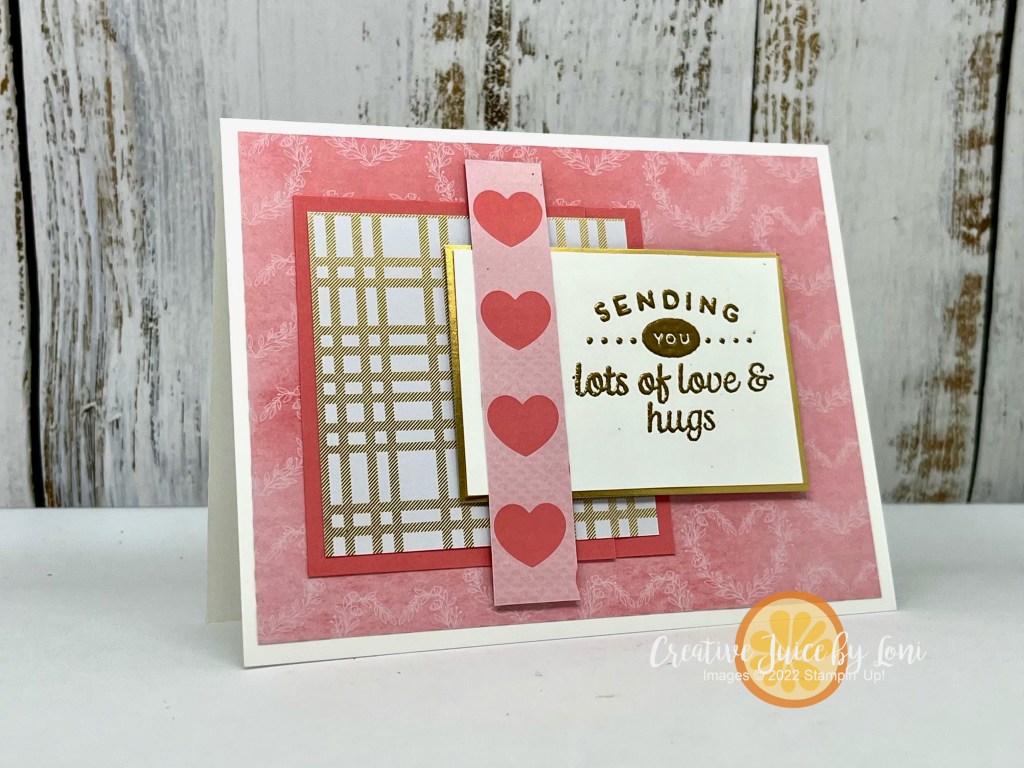
My birthday card combines the delightful Hobby Haven Designer Series Paper with the Banner Sayings Bundle (stamps + punch), both of which arrived last month. Apparently some of you knew to look for new items, for the Banner Sayings bundle is backordered until late January, but the good news is you can request an EMAIL NOTIFICATION to be sent to you when any item is back in stock: Just click on it to add to your cart, and enter your address in the pop-up box which alerts you that it’s out of stock.

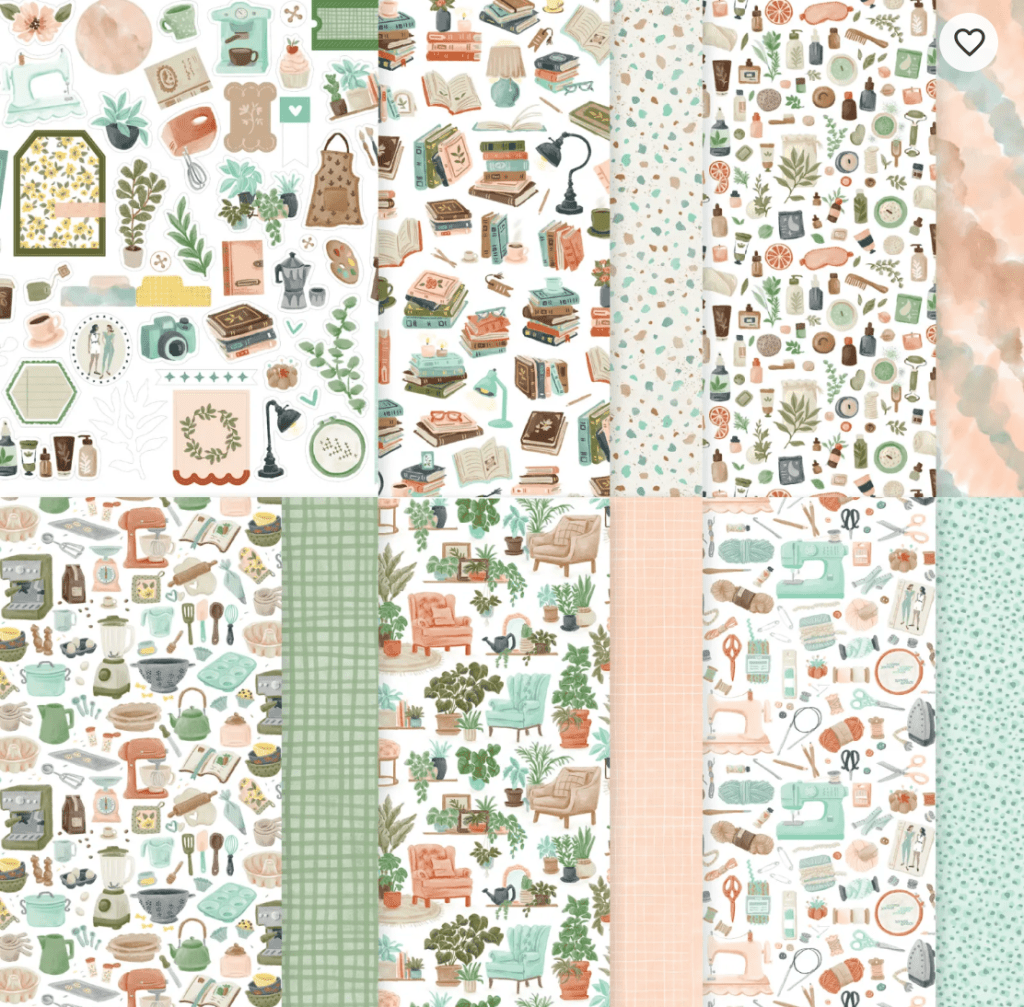
The Hobby Haven pack of Designer Series Paper includes 2 sheets of pre-cut images, so that made it easy to group all these kitchen/baking items together, along with the kitchen-themed patterned paper. In addition to BAKING, there are patterns and die cut images for SEWING, READING, SELF-CARE, GREEN-THUMBS/PLANTS… all the cozy hobbies!

This card already has a home to go to: It’s for my sister’s birthday in May! She’s an avid & generous baker, and my husband often says if there is such a thing as reincarnation, he wants to come back as her child, just to enjoy her baking 🧁

Drop me a message (comments at the top of post, under date) before moving along to see how Rachael interprets this card sketch!

December 2025 New at SU! Hop: Follow the Sketch

Previous BlogNext Blog
1.Did You Stamp Today? (US)- Beary Sweet Celebration
2.Creative Juice by Loni (US) – Sketch with Hobby Haven
3.The Joy of Stampin’ with Rachael (US)- Sketch This!
4.Astrids Papiereuphorie (AT) – Follow The Sketch
5.iHeartCards2 (US) – New At Su! Blog Hop – Peace On Earth
6.Anke Heim (DE) – Sketch & Gallery Blooms
7.De Kijkkast (NL)- Brushed with Beauty, following the sketch

Powered by blogcarousel.com

Thank you for supporting a demonstrator with your purchase!

Product List

Keep your creative juices flowing! 🍊🧡– Loni Spendlove


Joy-ful Color & Sketch Mash-up

Some punny jokes begin with “What do you get when you mix a ____ with a ____?” but in paper crafting, MAGIC happens when you are given two different starting points, like a color palette and a sketch!

This card was born by marrying the Global Design Project Color Challenge #gdp517 with the Freshly Made Sketch Challenge #FMS707 …AND combining the Abundant Joy Paper Pumpkin Add-On dies with with the Traditions of Christmas Specialty Designer Series Paper! No stamping required for this project 😉

Hang in there…even though the Traditions of Christmas DSP is backordered right now, Stampin’ Up!®️ is rushing to have it re-printed and re-stocked mid-November. Meanwhile, get your Christmas Cards started by subscribing TODAY for the October Cozy Christmas Paper Pumpkin kit AND remember to include the optional Abundant Joy Add-On Dies (which coordinate with the October/November/December kits) to your next order!

October 10th is the last day to subscribe for the Cozy Christmas card kit, and the dies are darling on their own, with just a bit of pretty paper, and using a bit of glimmer paper for the JOY makes the season sparkle:

Next time you are needing some creative inspiration to strike, pick a color palette and card sketch and make your own mash-up!

Product List

Keep your creative juices flowing! 🍊🧡– Loni Spendlove


Dynamic Backgrounds with 6×6 Patterned Paper

Have ever looked at a stack of pretty designer series paper and think, “It’s too pretty to cut”? I hear you—but here’s the good news: when you do cut it, you can get the most out of every single sheet! I created this cutting map that turns any 6” x 6” piece of designer paper into perfectly sized layers for the front of your cards:

In my live video today, I walked through the process step by step and made the card shown here from the Autumn Toile pack of paper that will be available on September 2nd. (You’ll find the replay below if you want to craft along!) The cutting map is below so you can print it out, tuck it near your paper trimmer, and use it anytime you want to make lovely layers of backgrounds for your greeting cards.

The first cut you make (circled) will be 3-7/8″ into the square. The second cut will be to cut the leftover pattern down to 4-1/2″ tall, then other cuts as shown.

Layer the two large rectangles on a contrasting card stock base, and the two long strips go on a piece of card stock that is 2-1/2″ x 4-3/4″, which can be attached with dimensionals to either the left or right side of the front of the card.

For my samples, I used a mix of Stampin’ Up! designer series paper. Four of the patterns come straight from the September Paper Share I’m offering — fifty-three 6″ x 6″ sheets of Stampin’ Up! Designer Series Paper, all cut down and ready for you to create with. It’s a perfect way to try every new design without committing to full packs, and it gives you plenty of variety for projects like this.

My last two examples of this sketch feature the Painterly Pears Suite and the Spooky Sweet Suite. Isn’t it terrific how the same cutting map works across completely different styles—fall-inspired pumpkins, happy holiday greetings, fresh pears, or playful Halloween motifs?! It’s proof that a simple template can stretch your supplies and spark new ideas.

Whether you’re making cards in bulk or just want a foolproof way to get more from your paper, this card design is one you’ll use again and again. Scroll down for the video, save all six card samples, and grab your trimmer—you’ll be amazed how quickly 6” x 6” papers can turn into a gallery of handmade cards.

The 1″ x 3-7/8″ piece from the cutting map goes INSIDE the cards, like this:

It’s my intent to return and show you why you may want to save the top right corner pieces (1-1/2″ x 2-1/8″)… hoping I remember to do it soon!

TWO more opportunities before you go:

  1. The Autumn Toile paper (on the first card I demonstrated) coordinates with the September Paper Pumpkin kit, so if you adore autumn and those detailed designs, you will certainly want to subscribe by September 10th to receive a fall-filled box of coordinating crafting!
  2. While the Spooky Sweet Suite paper is NOT included in the Paper Share, I *WILL* be teaching a Virtual Halloween class with the suite on October 2nd – Add the suite to your cart for an invitation to join the party, or visit the Facebook event page (link above) to find out how to register.

Keep your creative juices flowing! 🍊🧡– Loni Spendlove


A Sketch to Show a Palette

As I prepare for my annual Stampin’ Soiree & BOGO Sale this Saturday (featuring a NEW Stampin’ Up!®️ Catalog and Online Exclusives), I wanted to make a few samples with some of the fresh products coming tomorrow, May 6th! Since multi-tasking is the only way this one-woman show can get things done, I chose a simple sketch, which doubles as a way to show the color palette, and used it for my lunchtime live crafting video, too:

The first card I demonstrated was inspired by the #tgifc523 color challenge of Petnunia Pop, Balmy Blue and Daffodil Delight:

Starting simple – no mat on this card (though you certainly could add one), I stamped flowers from a new Online Exclusive bundle, Impressions Abloom on top of the 3-1/2″ x 4-1/2″ panel, then added 1-3/16″ squares of the colored card stock to the bottom:

When crafting from a sketch, give yourself some freedom to make changes! I didn’t add the palette to the Poppin’ By card, but used the darling filmstrip die to add the border at the bottom:

My favorite thing about this set is probably the tennis shoes you could add to the bucket of popcorn:

Moving along, let’s take that sketch and turn it SIDEWAYS, which is what I did for the Notes & Totes bundle from the new catalog, which I paired with the 2025-2027 In Colors (from bottom to top: Secret Sea, Timid Tiger, Cloud Cover, Darling Duckling & Strawberry Slush):

And finally, I used some Celebration Expressions Memories & More Cards to make this Happy Birthday card, and my friend Barb’s Million Dollar Stamp Set Layered Thoughts, this time putting the color palette below the main panel:

To see me create two of these cards (and share some tips), watch this:

If one of these new items or colors is something you must have, visit my Stampin’ Store starting on May 6th to make an order, or click on the Stampin’ Supplies link under any card you love.

See all these samples IN PERSON – and MORE – at the Stampin’ Soiree, Saturday May 10th in Hurricane, UT. It’s FREE and open-house style, so plan to drop in with a friend between 1-4 pm!

One more announcement: If your wish list is long, the best value for Saavy Stampin’ Shoppers is the STARTER KIT, and starting tomorrow, May 6th, you can choose MORE in your starter kit, with no strings attached!


Card Sketch & More Mailable Gifts

A sketch is a springboard for creativity, and today I dove into creating cards from my stash of Designer Series Paper using this sketch:

Card #1 was a sympathy card using some gilded botanical patterns that have been around Stampin’ Up! a long time, and I wanted to show it off! The Nature’s Sweetness Specialty Designer Series Paper only needed an embossed sentiment added to make this greeting card perfect:

It made me smile to combine something old and something new for Card #2! I used the retiring Friends of the Ocean Designer Series Paper with the new Online Exclusive Pattern of Friendship stamp set for this version of the sketch:

You’ll notice that circle shapes draw the eye when used with rectangles!

Card #3 brings us to another “mailable item” idea: BALLOONS!

In my demonstration video, I suggested blowing up a balloon and writing a message on it, then deflating it again to include inside the card. It’s double fun to have to blow it up to read the greeting! You could also “reveal” what experience you have planned to celebrate with (“I’ll pick you up for birthday lunch on me this Friday at noon!”) by writing it on the balloon.

The birthday card used the Wildflower Birthday Specialty Designer Series Paper and Birthday Celebration stamp set.

And finally, since Graduation season is imminent, Card #4 was created with the On the Go Suite Collection and includes a LUGGAGE TAG:

This will be for my niece who is graduating from High School this month and off on a grand European adventure to celebrate (remember when we were just happy to have cake & ice cream to mark a milestone like graduation 👩‍🎓 😂?)

I added the tassel after the demonstration in the video, and think the detail is adorable.

Missed the LONG LIST (and growing) OF MAILABLE GIFT ITEMS? Check it out HERE!

If you enjoy learning “how-to”, here’s today’s sketchy tutorial:

Thank you for choosing to shop with me. Most of the products used were linked throughout this post – just click on a product to add it to your cart…and watch for an exclusive tutorial bundle from me when you spend more than $50 in one month!

Connecting with you is a joy ~ Check out my upcoming events (in person AND online):

New at SU! A Lemony Sketch

You’re here to see how Stampin’ Up! card sketches from the 2024-2025 catalog (pg 22) can improve your cardmaking skills, and our International #NewAtSU design team is taking the assignment seriously!

This is the sketch I chose:

Here is how it inspired me:

You’ll notice that I didn’t use 3 panels, but allowed my banner to visually divide the lemon Designer Series Paper. That’s the thing about a sketch = it’s there to give you a place to start, then run in whichever direction your heart takes you!

Try mixing up products, too! I thought the Mediterannean Blooms lemon paper would make a fabulous backdrop for the image from the Filled with Happiness set, and it did. That Navy & Yellow combination is summery and sweet.

I cut both the navy banner and the lemon oval in half to stretch across the card and give room for the Congratulations sentiment. This would be a unique baby congrats card, or a wedding celebration! It’s just generic enough to fit any occasion.

Once you’ve left me a comment and have filled your cup with creative juice (and your cart with supplies), move along to see how all the other stampers used these wonderful sketches, then TRY ONE YOURSELF.

June 2024 New at SU! Blog Hop: Catalog Sketch Inspiration – Visit them all!

1.Merrick Makings (AUS) – Secret Sketches of SU!
2.Creative Juice by Loni (US) – A Lemony Sketch, Congrats
3.I Heart Cards 2 (US)- Catalog Sketch with Country Woods Collection
4.Stamping Flair (AU) – Flower Cart Stamp Set
5.Furry Cat Designs (UK) – Sketched Butterflies Sketch
6.Nature’s INKspirations (US) – A Sketch Inspired Thoughtful Journey
7.scraphexe (DE) – Sketch Layers of beauty | Liebenswerte Lagen
8.Stampinxime (DE) – Tune In – Geburtstagskarte nach S
9.Tricia’s Stamping Creations (USA) – Latte Love
10.247 Inkspiration (US) – Happy Little Things
11.De Kijkkast (NL) – Veggies and a sketch!
12.Joni in the Spotlight Stamping (USA)-New at SU-Catalog Sketch with La

Powered by blogcarousel.com

Product List

Did you know the Boho Blue Mini Cut & Emboss Machine is less expensive than the white mini machine, with the same performance? AND all the machines are 10% off through June 30th – don’t miss it!

Starting From A Sketch for SAB DSP

As we approach the half-way point of Sale-a-Bration (or SAB- the biggest party of the year for Stampin’ Up!), it’s time to show a little love for the Designer Series Paper (DSP) you could choose free with a qualifying order…and stick around for a late-January-ONLY offer!

Giving your creativity a few parameters makes it EASIER to use your imagination, and a SKETCH helps to narrow down your options.

Measurements for this sketch (you can adjust sizes to work for you):

  • Card Base: 8-1/2″ x 5-1/2″ scored at 4-1/4″
  • Layer One: 4″ x 5-1/4″
  • Layer Two: 2-3/4″ square on a 3″ square mat
  • Layer Three: 2″ x 3″ on a 2-1/8″ x 3-1/8″ mat
  • Layer Four: 3-1/2″ x 3/4″

Once you’ve found a fun template for a card, just plug in the pieces, and nothing could be easier than patterned paper!

You don’t need overalls to build this first card, just the Trusty Toolbox Designer Series Paper. Cut a tool from the paper for a focal point.

A version for mom using the Softly Stippled DSP. Substitute the strip on top with a length of lovely ribbon. The Brushed Brass Butterflies pull the gold thread from the bow to help catch mom’s eye.

Be BRAVE: Turn the sketch sideways or flip-flop it and it looks completely different! Flight & Airy DSP is delicate and delightful, the fluffy birds being my favorite! The sayings for the previous 3 cards all came from the Heartfelt Hellos stamp set, which is also a Sale-a-Bration option.

Next, the Sunny Days Designer Series Paper was delightful to pair with the “Playing in the Rain” bundle for a card to uplift and bring sunshine!

Finally, the Most Adored Specialty Designer Series Paper has Red & Pink patterns on one side, with gold foiled designs on the opposite sides: Use them for Valentines or Weddings! I embossed sentiments from the Heartfelt Hexagon stamp set on both cards.

I walked through making most of these cards with tips to help you choose patterns and layer nicely in this video tutorial:

SO WHAT’S THE SPECIAL OFFER??

While all of these papers are available through the end of February (while supplies last), for the next 3 days – through January 31, 2024 – place a $50+ order from my Stampin’ Store and you’ll receive a 4″ x 6″ piece of EVERY Sale-a-Bration Designer Series Paper as a thank you from me! That’s 30 pieces total.

Thanks for visiting and learning all about using a card sketch. Now get off the computer and get your fingers inky!

Copying MYSELF- Something Old, Something New

On Monday, I demonstrated how to use the catalog to find layouts (card sketches) to copy, but have you ever made a card you loved so much, you copied yourself?

This is a card I created for a swap at Stampin’ Up! BackStage (a leadership event) to swap with the New at SU! design team:

This isn’t all of the team, but these demonstrators come from all over the globe and we’ve been participating in blog hops once a month for a few years to bring you ideas (see previous post!). Those of us in Las Vegas in August met to swap cards and capture a picture, so I used the Curved Occasions stamp set to make a special card for them. We are each holding the cards we exchanged:

I liked the layout of that card, so when I opened the Simply Sparkling bundle (an online-exclusive product you can find in my store), it made sense to re-visit the same design:

The strawberry Designer Series Paper is a design in the Delighfully Eclectic Mega-pack and I’ve been wondering what it would coordinate with: Apparently it was in anticipation of this bundle 🍓

Card Measurements:

  • Card Base: 8-1/2″ x 5-1/2″
  • First layer: 3-1/4″ x 5″
  • DSP strip: 3-3/4″ wide by 1-1/2″ OR 2″
  • Stamped layer: 3-1/2″ x 2-1/4″
  • Mat behind stamped image: 3-3/4″ x 2-1/2″
  • Sentiment Strip: 2-3/4″ to 3″ wide and as tall as needed for sentiment

If you need a disco ball or roller skates in your stampin’ stash, collect the Curved Occasions stamp set – or bundle- before it retires (and on sale at 10% off). These are the supplies for the Happy Day Card:

Product List

Soda-lightful card:

Product List

If you visit, know that I adore hearing from you! Leave me a message/comment and tell me what you are stamping for!

Complementary Colors in Card-Making

Understanding a COLOR WHEEL a little bit will help you put together beautiful color palettes for your stamping projects, and today we are talking about COMPLEMENTARY colors, or colors directly across from each other on the color wheel:

When you choose complementary colors, you create HIGH ENERGY in a palette, like this turtle card made from the Playing in the Rain stamp set from Stampin’ Up! using Azure Afternoon (blue) and Pumpkin Pie (orange):

You can always add a bit of a third color (in this case, Granny Apple Green) and still keep the two main colors in focus!

One thing I love doing with a new catalog is to look for card layouts I can copy. Both of the cards I am sharing today were inspired by this card on page 152 of the annual catalog (154 in the digital version):

This next complementary color card follows the same pattern or card layout, but uses the LOVELY new Lemon Lolly color paired with Fresh Freesia, which I cannot get enough of:

This time I used the Sweet Citrus stamps and dies (my signature for creative juice) and embossed the front panel with the Raindrops embossing folder after I stamped the greeting.

All of this is shared in my weekly video, and if you are like me and want it to play faster, just speed up the playback by clicking on the gear at the bottom of the YouTube video!

Now you know a little more about complementary colors, try it yourself! Find a card design in the catalog (or use one of my previous samples here on CJBL) and re-create it with your own colors and stamps.

If you want to copy one of the cards I shared today, here are the supplies I used for both cards:

Product List

I appreciate the opportunity to serve your creative needs! Make time to stamp and find your happy place.

Seasons of Fun: Host with the Most!

When a stamp set works for more than one holiday, it’s a great investment…and when you can get it at a discount, that’s a no brainer!

The Seasons of Fun stamp set is one you can choose as part of your Stampin’ Rewards for just $12 when you host a party!

Did you know that an order of $150 or more COUNTS as a party? That’s right…you don’t have to invite people over to qualify for the benefits of hosting, you can just gather orders or place your own qualifying order in my Stampin’ Store.

With this set of cards, I used the SAME LAYOUT and made a card for Halloween, Fall and Christmas. Because the Seasons of Fun stamp set doesn’t have any words, I paired it with the very versatile Banner Year stamp set for the greetings:

Turn the layout and add strips of Designer Series Paper instead of just one piece:

Or swap sides:

Aren’t these kids the cutest? It’s fun to color them with Stampin’ Blends and easy to celebrate all the Fall-idays.

This host-exclusive set is only available during the current mini catalog period…one more reason to host a party (or place a qualifying order) before the Seasons of Fun stamp set retires on January 3, 2022. I’ll help you host an event online or in your home ~ let’s plan it!