Creative Juice LIVE Crafting (on YouTube & Facebook) IS BACK…with a twist! Going forward, I’ll be going live in my channels at 12:30 p.m. MT ON THE FIRST MONDAY OF EACH MONTH. As I *pop* back into your social feed, I have an a-maize-ing Faux Shaker Card tutorial to share with you in today’s video!
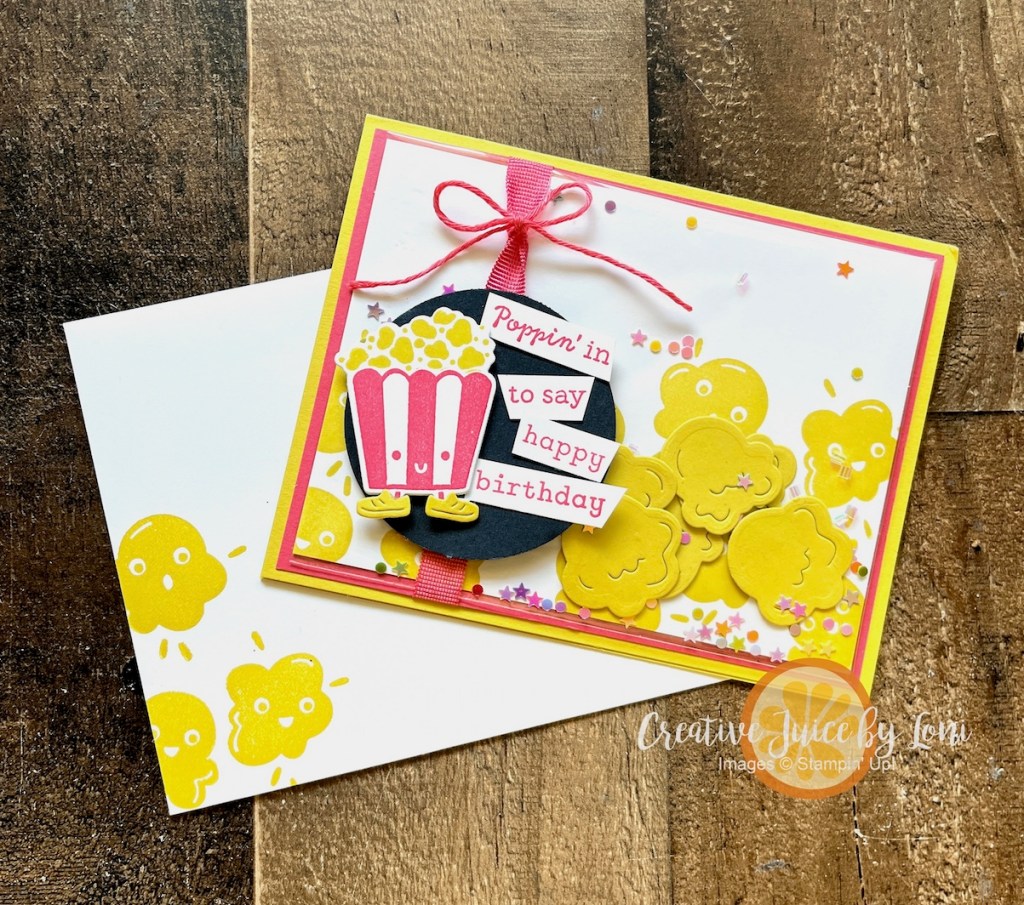
Traditional shaker cards are quite thick, so using a clear envelope to hold the shaker elements makes the card thinner to mail, and easy to make.
Colors used: Darling Duckling, Strawberry Slush and Secret Sea, which are all 2025-2027 In Colors, and an announcement you’ll appreciate is that tomorrow (August 5th) is the beginning of an IN COLOR SALE!
Many In Color products are 15% off through August 31st, and I need to remember to order refills for my ink pads…my shopping list is started.
Without further adieu, here is the VIDEO TUTORIAL for the Faux Shaker Popcorn Birthday card, and you may add the supplies to your cart with the list below the video:
Rifling through my specialty paper, the In Color 2024-2026 Glimmer Paper caught my eye (because it *is* very sparkly)! I wanted to use it, because these colors are on the last-chance list (and discounted), so the #tgifc536 color challenge gave me the perfect excuse:
Peach Pie brought to mind the popcorn I picked up at Costco earlier in the day, and the “Poppin’ By” stamp set was chosen for my stamping project.
The Shy Shamrock glimmer paper gives just the right amount of bling for the background layer, but I didn’t want to waste the part I covered up, so my tip is to use your Paper Trimmer (or a punch!) to cut a section out of the center to use on another project, and no one will be the wiser:
Here’s to being a bit “corny” and crafting a cute card of your own this weekend with the same color combo!
Pears have long held a place in the world of art~ they’ve been painted for centuries as a way to capture natural beauty and evoke a sense of calm and abundance. Let me share a handmade card inspired by that same timeless charm—created with the brand-new Painterly Pears Suite from Stampin’ Up!®️
This easy card layout is one you could use with practically every stamp set you own that matches some beautiful Stampin’ Up!®️ Designer Series Paper!
Have you ever added watercolor pencil OVER your stamped image? To shade the pears and flowers, that’s just what I did, no water added. They do blend better when the tip of the pencil is dull.
Use a strip of the same pattern on the inside of the card to carry the theme all the way through:
Isn’t this pretty? Sometimes simple is the loveliest, and the Painterly Pears will make you feel like a classic artist, without paying tuition or spending years learning painting techniques (which is why I love rubber stamping).
Cleaning off my stamping surface, I found pieces for a card I had started to make showing how lovely Secret Sea and Cloud Cover card stock pair together. Since I had already embossed the background with the Happy Hibiscus Hybrid Embossing folder and stamped the background on the large label, all I had to do was stamp some Hibiscus flowers in Strawberry Slush (also a Stampin’ Up!®️ 2025-2027 In Color).
You can get TWO shades of the same color by stamping off the bold flower filler stamp onto a scrap paper once before stamping it inside the outline (stamped in full strength ink of same color). Do the same for the leaves!
TIP: If you haven’t created an ink spot with a Cloud Cover Ink refill and uninked stampin’ spot (because the ink formula didn’t work correctly for a full-sized foam ink pad), YOU CAN STAMP OFF WITH SECRET SEA for an in-between color, as shown in the leaves on this card. I also used VERSAMARK ink on the Cloud Cover label, which turns the stamped images a shade darker.
To make the background pop a bit, I softly sponged some Whisper White craft ink over the raised images. Top off the card with an elegant Cloud Cover bow and some Rhinestone Jewels in the center of the flowers.
One more suggestion: Make four of the same cards at one time! Why four? For this card, you’ll use two full sheets of Cloud Cover for the card bases, one full sheet of Secret Sea card stock for the 4 backgrounds and almost a full additional sheet of cloud cover for the large label: It makes the best use of your supplies, and takes LESS time to create four of the same cards than to come back later and make the same card another time!
Thank you for ordering the supplies from my Stampin’ Store – you are supporting a home-based business and allowing me the time to bring you more creative ideas!
A simple card can be transformed by an easy fun-fold element, and in today’s free tutorial, I’ll show you how to make someone’s birthday brighter!
Behind this simple facade lies a fancy surprise as you open the card:
The Everyday Arches dies are the star of this card, and an essential set of paper crafting tools that belong in every stamper’s arsenal.
Let me know if you like this idea by leaving a comment (top of post, near posting date), order the supplies you need below the button, then download the tutorial and give it a go!
Do you make consistent appointments with the doctor or the dentist to stay healthy? Do you have an exercise schedule or beauty regimen? Those promises you make to yourself for your well-being are the most important ones to keep, so make a pact to improve your connection with friends and to nurture your creativity:
Say HELLO to your monthly creative date – one you can do on your own, or with a friend!
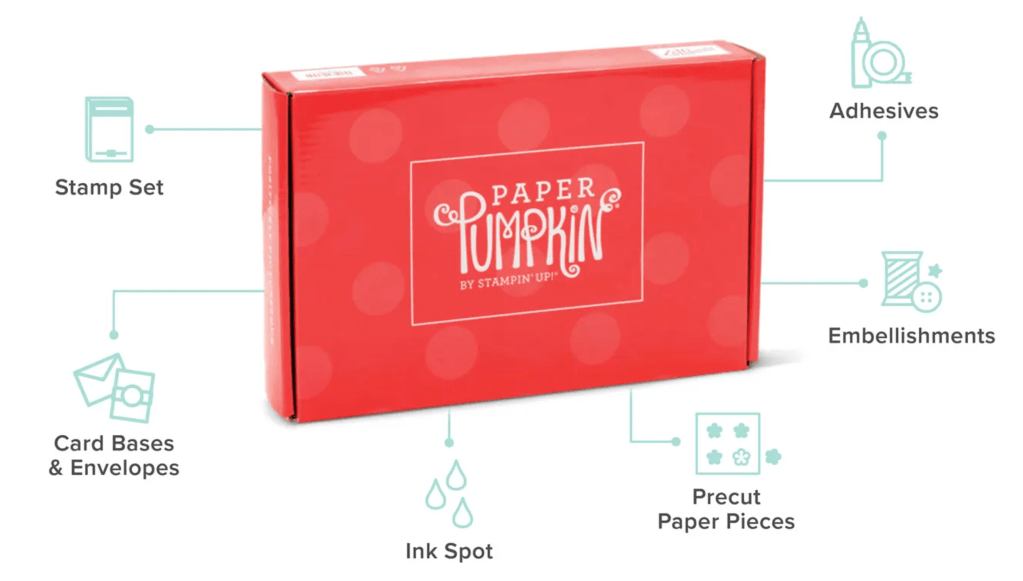
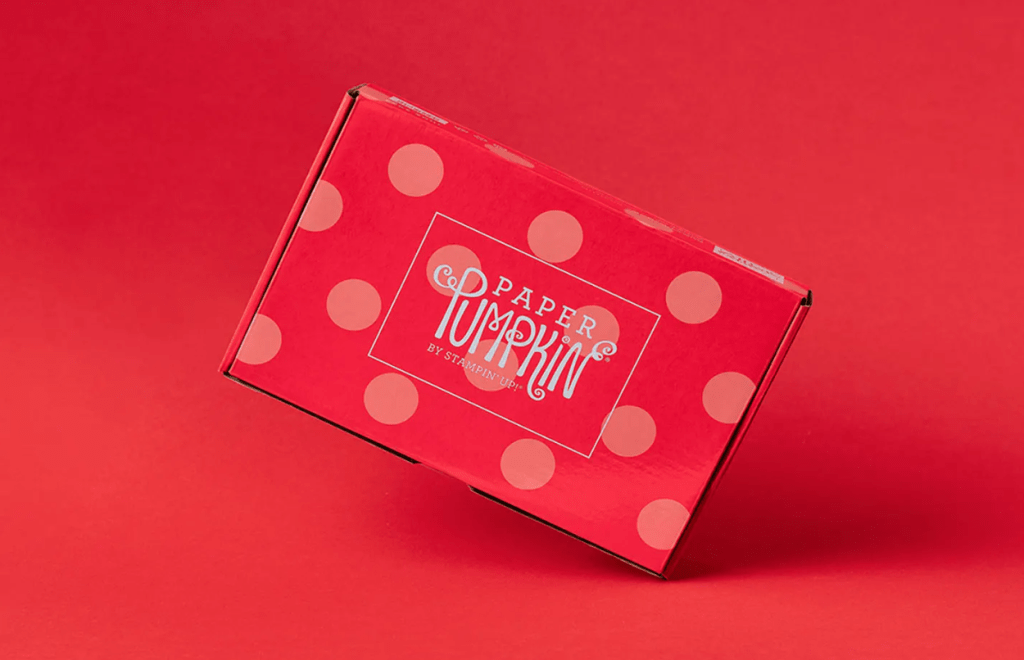
APaper Pumpkin craft box arrives in your mail on or before the 20th of each month filled with everything you need to make a paper-crafting project: Pre-cut paper, an ink spot in a Stampin’ Up!®️ color, adhesive and an exclusive stamp set. There are also step-by-step instructions in the box AND a how-to video on YouTube each month. Your FIRST kit includes a clear block – keep it handy for future kits!
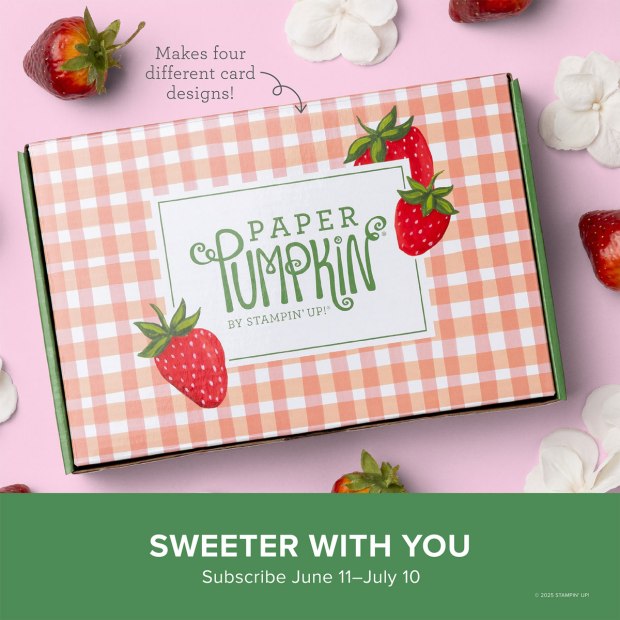
This is a sneak peek of the July kit – the deadline for this kit is July 10th, but you can subscribe anytime and get the next kit!
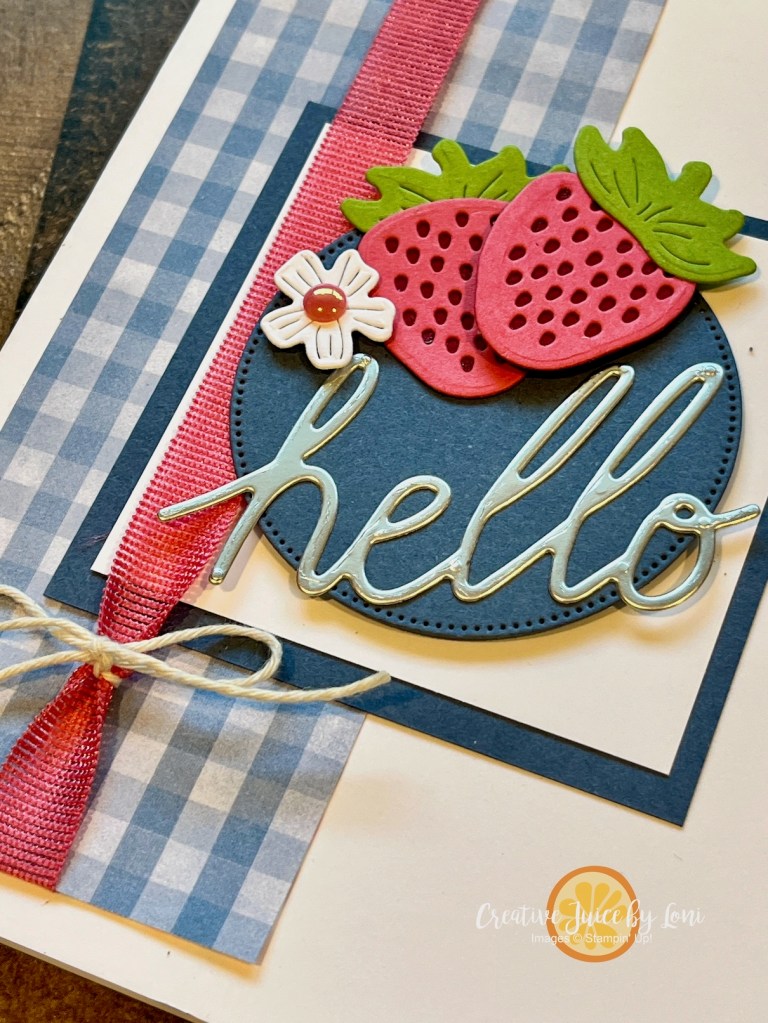
The Sweeter With You July Paper Pumpkin Kit will be a card kit that makes 8 cards: 4 each of 2 different designs featuring sun-kissed strawberries and gingham!
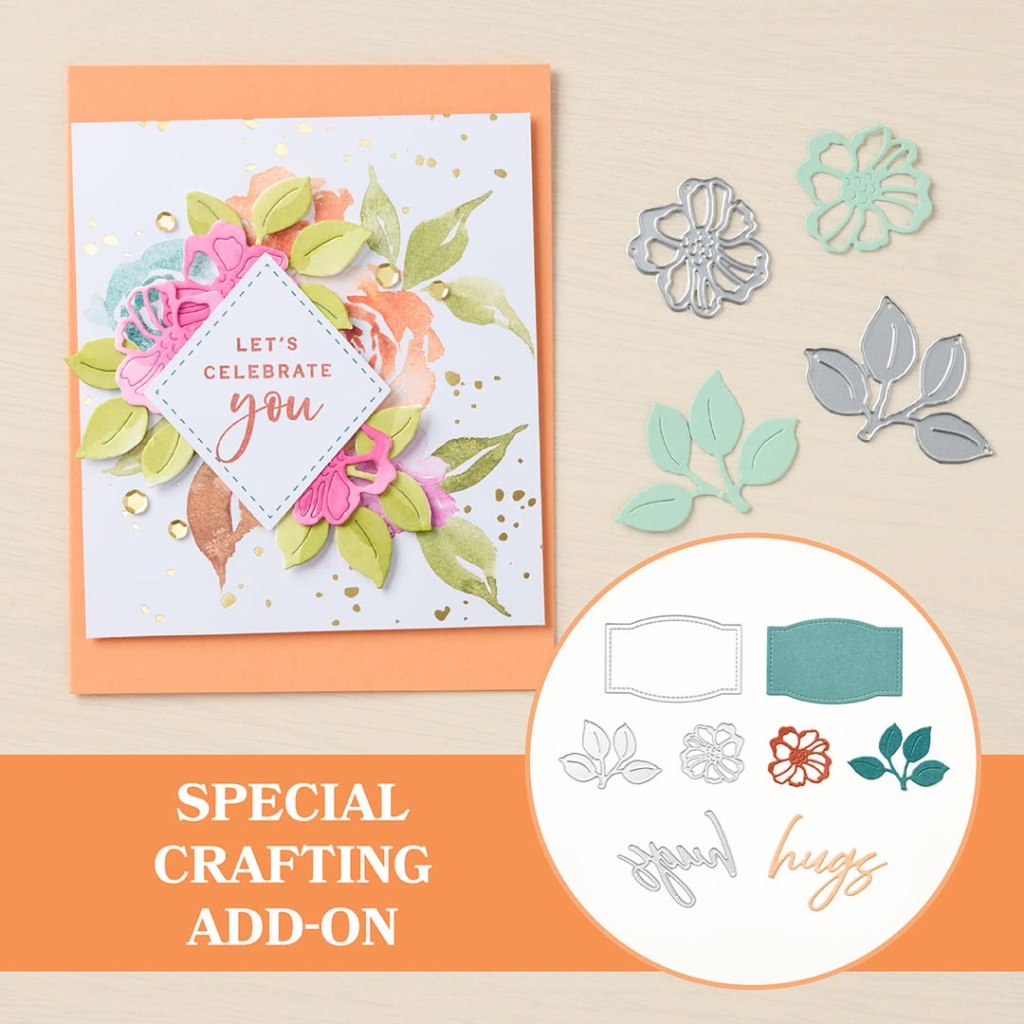
One other perk for subscribers is an optional Add-on die set each quarter that matches the kits for all three months. The July-September coordinating Add-on is the Circle of Seasons dies:
And here is a card I made with the Circle of Seasons Add-on dies to whet your appetite for a sweet crafting subscription!
From a silver foil “Hello” to the mouth-watering fruits, this card is quintessential summer! But that’s not all…the dies ALSO cut an ACORN (which will match the September kit!)
As a subscriber, you may add an extra kit for yourself or a gift, shop from extra kits or refills, skip a month, or cancel at any time. I send a Paper Pumpkin Patch newsletter to my subscribers the last week of every month with ways to continue to use their stamp set and ink spot after the kit is completed!
If you’ve ever wanted to attend a class, but couldn’t — if you need a happy hobby — or if you just love paper, ink and stamps– THIS SUBSCRIPTION is a way to show yourself (or a friend) a little love.
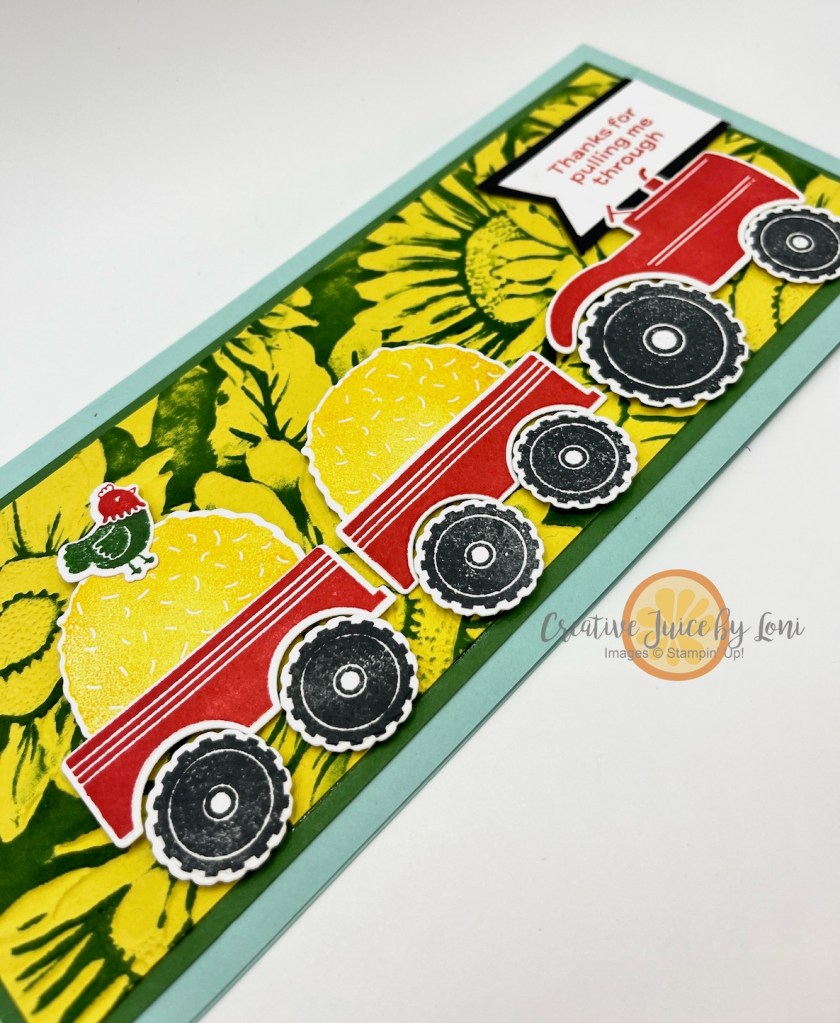
Did you know Stampin’ Up!®️ releases NEW products every other month? July is one of those months, and I wanted to mix two of the new items together for a large slimline card: The Tractor & Co. bundle (photopolymer stamps + dies) and the fabulous Sunflower 3D embossing folder!
To make the sunflowers pop, after you’ve embossed an 8.25″ x 3.25″ of Darling Duckling card stock with this extra-large embossing folder, drag the Garden Green ink pad across the flat side (where the flowers are pushed down, not up).
An 8.5″ x 3.5″ Garden Green Mat behind the sunflowers frames it nicely, and the tractor is popped up with Stampin’ Dimensionals.
The Pool Party card base is 9″ wide and 8″ tall, scored in half at 4″. This fits into a legal sized envelope.
Those are just two of the new products launched yesterday! Also check out the two new KITS for July (click on images to see the kits):
One more thing I’m looking forward to this month is the Sweeter With You Paper Pumpkin kit! In case you aren’t familiar with Paper Pumpkin, it’s a craft kit subscription by mail, and each kit includes an exclusive stamp set, ink spot and all the supplies prepared for you to enjoy a stress-free moment of creativity!
Each quarter, a coordinating set of dies is also offered to Paper Pumpkin subscribers, and they match all the kits released in those three months. The Circle of Seasons die set is only $12 and the strawberry die will also create an acorn (hint at the September kit!):
My Paper Pumpkin subscribers also receive a special email from me on the last week of the month, with ideas to use the stamp set, ink spot and add-on dies AFTER the kit is complete! I know you’d look forward to a kit in your mailbox each month, so give it a try!
Check out all the new products released this month HERE:
Keep your creative juices flowing! 🍊🧡– Loni Spendlove
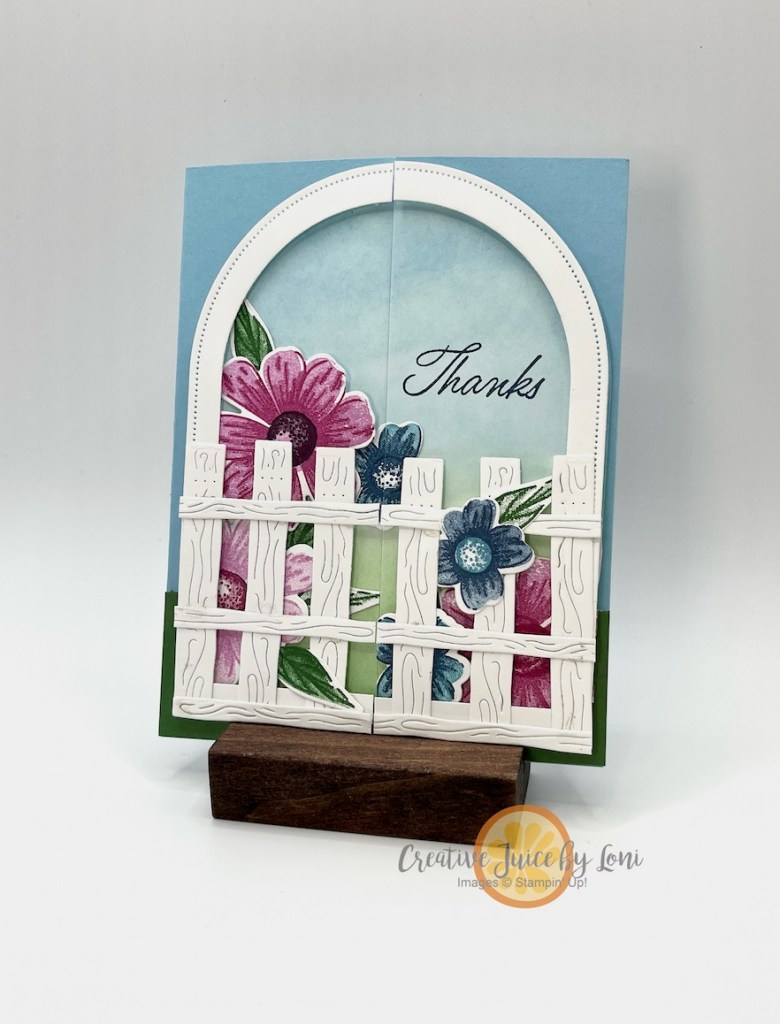
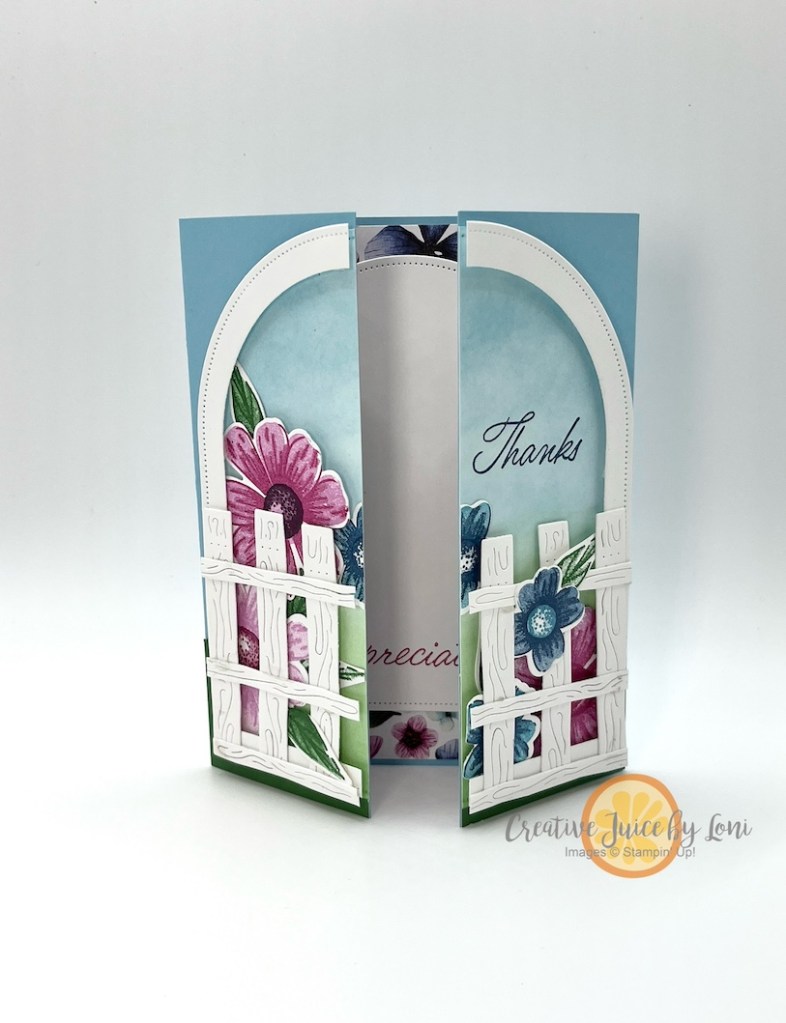
This week’s TGIF Challenge #tgifc531 is “Garden Gates” and I wanted to create a gratitude card that felt like you were walking into a Secret Garden:
After I created my card, I went back to the TGIF post and realized Wendy Weixler and I both had a similar idea for building the gate, but how delightful that both are unique!
The first type of card I thought of was the appropriately named “Gate Fold” card, so I had to think it through. I ended up cutting my gate in half, so you could enter the garden:
There are only 3 days left of the Suite BOGO Sale, so I chose to use the Impressions Abloom bundle and Designer Series Paper from the Floral Impressions Suite. Each piece of our suites also qualify for the sale, just remember that the lowest price suite or suite product will get the 50% discount!
Now enter the secret garden:
I used the arch die cut from the larger gate (cut for the front) on the inside, and let the profusion of flowers bloom on all sides!
Fun fact: The Secret Garden classic children’s novel by Frances Hodgson Burnett was one of my favorite reads as a child, and though I’m a huge musical nerd, I DON’T really love the Secret Garden musical play. The book is definitely best (and there are a few decent movie adaptations).
This card just gives all the wonder of finding a secret garden behind a locked gate!
Now, if you’ve procrastinated, here’s your reminder to shop the SWEET Suite BOGO Sale.
Adding to the growing “Mailable Gifts” list (you’ll want to PIN or bookmark that link) ~ this time it’s one a guy would appreciate!
Since it’s Father’s Day, I like to remember my sons and sons-in-love (I do the same for the girls on Mother’s Day). A gift card for a CAR WASH doesn’t break the bank (when you have many gifts to mail), and when I was at Quick Quack Car Wash purchasing gift cards, I saw that they also had AIR FRESHENERS for just $1!!
Of course, I had to come back to make a slimline card that would fit both the Duck Scent and the gift card! The Stampin’ Up!®️ Party Alphabet dies are large enough to show off the contrasting pattern on the front, and this is the inside of the card style:
I did have to cut off just a bit of the bottom of the “Duck Scents” to fit into a small envelope (as shown) – it’s a 6 3/4″ security envelope, like you can buy a box of at Dollar Tree. The card size is 3.5″ x 6.25″ when folded, and I’ll give you material measurements in just a moment.
One thing you will have to do is manipulate the sentiment on your clear block, so it will curve around the first letter, and fit on the Designer Series Paper. That’s easy to do with Stampin’ Up!®️ photopolymer stamps, like the Everyday Arches set I used for this card. Make sure to stamp this sentiment close to the left side of the patterned paper so you have room for the letters!
I’m here to make all the mistakes so you don’t have to- I had to make this card style 3 times before I got it right! Once I got it down, I made multiple versions. Here are the measurements:
11″ x 3.5″ cardstock for card base, scored at 6.25″ and 9.75″ (fold the smallest flap over and secure edges with Tear & Tape adhesive to create a pocket for a gift card).
Designer Series Paper for front layer: 6″ x 3.25″
Cardstock for inside of card: 5-7/8″ x 3-1/8″
Designer Series Paper AND card stock for 3 letters (and the shadow behind them): 2.5″ x 5″
Stamp any designs you want on your letters (like the birds) BEFORE you offset the card stock behind them for a shadow effect, then pop them up on the front of your card with dimensionals.
These cards turned out terrific with a combination of papers from the Everyday Skies 6″ x 6″ Designer Series Paper pack! Supplies listed below, and the SON card uses Cajun Craze, Blueberry Bushel and Cloud Cover (inside) card stock; the DAD card uses Azure Afternoon, Blackberry Bliss and Basic White (inside) card stock.
Would you give this card style a try? Leave me a comment (at top of post, next to the posting date) to let me know how you like it.
“Summertime! And the Stampin’ is Easy!” (if you sang that in your mind~ Greetings, fellow musical geek!)
Since Stampin’ Up!®️ Suites (and suite products) are BOGO50 during June, I’ll be sharing some SIMPLE ways to use our current Suites for sensational summer stamping projects. In today’s video, I’m also revealing a BEAUTY SECRET!
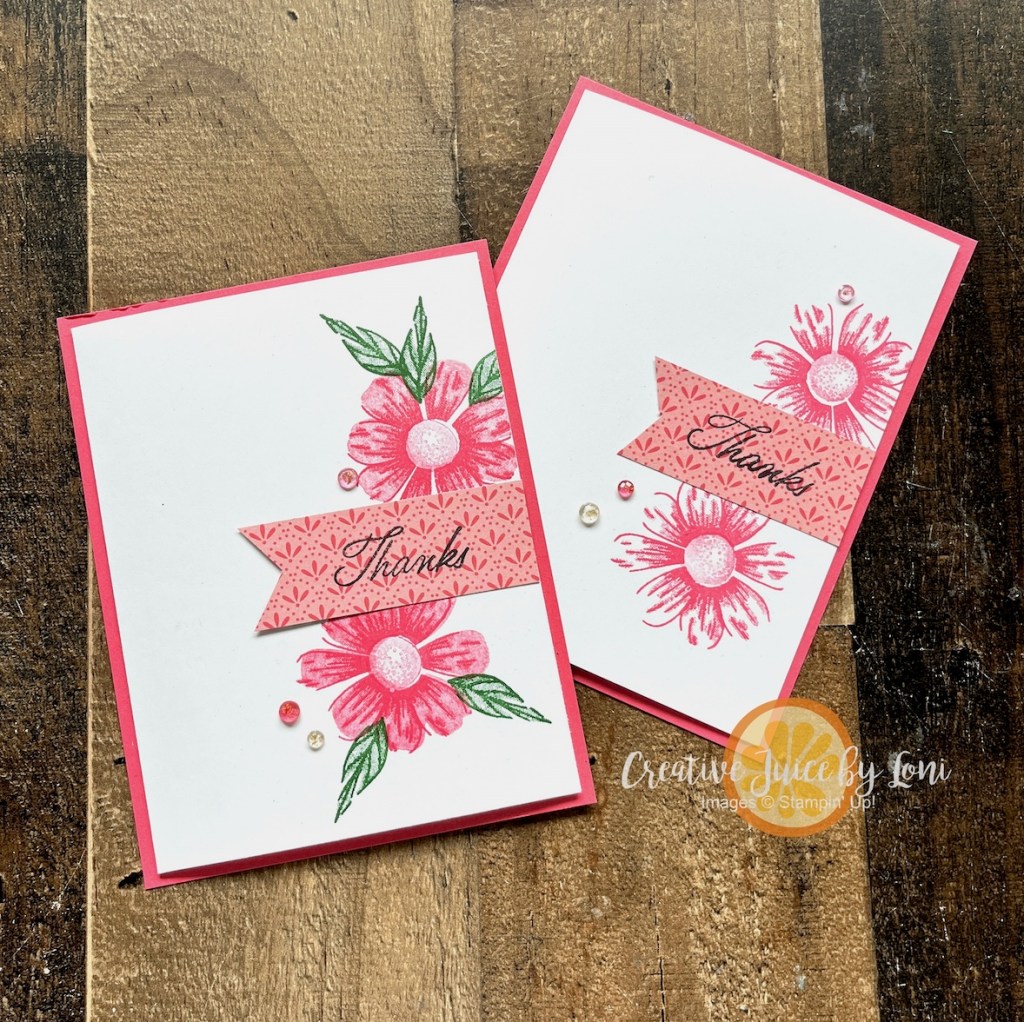
Crafting in June, July & August has to be easy & breezy, so coordinated products in a suite bring a speedy card together in moments. Using the Impressions Abloom stamp set, you can keep this Thanks card ultra simple, or add layers and leaves:
The only thing to stamp on the second card is the sentiment! If you die cut a few extra pieces while catching up on your favorite television episode, you’ll have all the pieces prepared to put an “I appreciate you” card together in seconds:
Embossing a piece of Stampin’ Up!®️ Two-Tone card stock with the Pressed Flowers embossing folder and rubbing it with an emery board to reveal the white center makes this background terrific and touchable.
Some of the Impressions Abloom Dies have detailed inserts, so you can die cut them from cardstock, or remove the details to cut out the stamped image.
TIP:Washi tape keeps both the outline and the details together while you run them through the Stampin’ Cut & Emboss machine.
All these products are part of the Floral Impressions Suite, and can be purchased as a complete collection or individually:
REMEMBER: For the Buy-One-Get-One-50% off special, the LOWEST priced items will receive the discount, so shop smart! Make separate orders and purchase 2 suites together in the first order (to get one suite half price), then use the *Stampin’ Rewards you earned on your first order for an additional discount on your second order, where you may order individual items from other suites (like more Designer Series Paper or embellishments).
*Stampin’ Rewards: Make sure you’ve OPTED IN to earn 10% back each time you shop! Save them or spend your rewards next time!
Scroll back up to the top to the comments (under the posting date) to tell me if you took the beauty secret and tried it!
One more day to SUBSCRIBE and receive the Floral Charm Paper Pumpkin kit in the mail!
Paper Pumpkin is a complete stamping experience in a box, and the June kit actually coordinates with a new Suite coming to my store in July: the Floral Charm Suite. If you are a current subscriber, you will also want to include the Hugs Abloom add-on die set to your next order, as it coordinates with the 2025 April-June kits:


![Poppin' By Bundle (English) [ 165489 ]](https://assets1.tamsnetwork.com/images/EC042017NF/165489s.jpg "Poppin' By Bundle (English) [ 165489 ]")
![Darling Duckling 8 1/2" X 11" Cardstock [ 165622 ]](https://assets1.tamsnetwork.com/images/EC042017NF/165622s.jpg "Darling Duckling 8 1/2\" X 11\" Cardstock [ 165622 ]")
![Strawberry Slush 8 1/2" X 11" Cardstock [ 165625 ]](https://assets1.tamsnetwork.com/images/EC042017NF/165625s.jpg "Strawberry Slush 8 1/2\" X 11\" Cardstock [ 165625 ]")
![Secret Sea 12" X 12" (30.5 X 30.5 Cm) Two Tone Cardstock [ 166709 ]](https://assets1.tamsnetwork.com/images/EC042017NF/166709s.jpg "Secret Sea 12\" X 12\" (30.5 X 30.5 Cm) Two Tone Cardstock [ 166709 ]")
![Basic White 8 1/2" X 11" Cardstock [ 166780 ]](https://assets1.tamsnetwork.com/images/EC042017NF/166780s.jpg "Basic White 8 1/2\" X 11\" Cardstock [ 166780 ]")
![Darling Duckling Classic Stampin' Pad [ 165277 ]](https://assets1.tamsnetwork.com/images/EC042017NF/165277s.jpg "Darling Duckling Classic Stampin' Pad [ 165277 ]")
![Strawberry Slush Classic Stampin' Pad [ 165286 ]](https://assets1.tamsnetwork.com/images/EC042017NF/165286s.jpg "Strawberry Slush Classic Stampin' Pad [ 165286 ]")
![Strawberry Slush 3/8" (1 Cm) Faux Linen Ribbon [ 165274 ]](https://assets1.tamsnetwork.com/images/EC042017NF/165274s.jpg "Strawberry Slush 3/8\" (1 Cm) Faux Linen Ribbon [ 165274 ]")
![Pack Your Bags Twine Three Pack [ 165582 ]](https://assets1.tamsnetwork.com/images/EC042017NF/165582s.jpg "Pack Your Bags Twine Three Pack [ 165582 ]")
![Clear Medium Envelopes [ 102619 ]](https://assets1.tamsnetwork.com/images/EC042017NF/102619s.jpg "Clear Medium Envelopes [ 102619 ]")
![Loose Shaker Elements [ 165268 ]](https://assets1.tamsnetwork.com/images/EC042017NF/165268s.jpg "Loose Shaker Elements [ 165268 ]")
![Mini Stampin' Cut & Emboss Machine [ 150673 ]](https://assets1.tamsnetwork.com/images/EC042017NF/150673s.jpg "Mini Stampin' Cut & Emboss Machine [ 150673 ]")
![Stampin' Seal+ [ 149699 ]](https://assets1.tamsnetwork.com/images/EC042017NF/149699s.jpg "Stampin' Seal+ [ 149699 ]")
![Stampin' Dimensionals [ 104430 ]](https://assets1.tamsnetwork.com/images/EC042017NF/104430s.jpg "Stampin' Dimensionals [ 104430 ]")


![2024–2026 In Color™ Glimmer 12" X 12" (30.5 X 30.5 Cm) Specialty Paper [ 163771 ]](https://assets1.tamsnetwork.com/images/EC042017NF/163771s.jpg "2024–2026 In Color™ Glimmer 12\" X 12\" (30.5 X 30.5 Cm) Specialty Paper [ 163771 ]")
![Crumb Cake 8-1/2" X 11" Cardstock [ 120953 ]](https://assets1.tamsnetwork.com/images/EC042017NF/120953s.jpg "Crumb Cake 8-1/2\" X 11\" Cardstock [ 120953 ]")
![Peach Pie Classic Stampin Pad [ 163810 ]](https://assets1.tamsnetwork.com/images/EC042017NF/163810s.jpg "Peach Pie Classic Stampin Pad [ 163810 ]")
![Shy Shamrock Classic Stampin Pad [ 163808 ]](https://assets1.tamsnetwork.com/images/EC042017NF/163808s.jpg "Shy Shamrock Classic Stampin Pad [ 163808 ]")
![Crumb Cake Classic Stampin' Pad [ 147116 ]](https://assets1.tamsnetwork.com/images/EC042017NF/147116s.jpg "Crumb Cake Classic Stampin' Pad [ 147116 ]")
![Paper Trimmer [ 152392 ]](https://assets1.tamsnetwork.com/images/EC042017NF/152392s.jpg "Paper Trimmer [ 152392 ]")
![Multipurpose Liquid Glue [ 110755 ]](https://assets1.tamsnetwork.com/images/EC042017NF/110755s.jpg "Multipurpose Liquid Glue [ 110755 ]")
![2024 2026 In Color™ Flat Pearls [ 165266 ]](https://assets1.tamsnetwork.com/images/EC042017NF/165266s.jpg "2024 2026 In Color™ Flat Pearls [ 165266 ]")


![Painterly Pears Suite Collection (English) [ 166159 ]](https://assets1.tamsnetwork.com/images/EC042017NF/166159s.jpg "Painterly Pears Suite Collection (English) [ 166159 ]")
![Misty Moonlight 8-1/2" X 11" Cardstock [ 153081 ]](https://assets1.tamsnetwork.com/images/EC042017NF/153081s.jpg "Misty Moonlight 8-1/2\" X 11\" Cardstock [ 153081 ]")
![Very Vanilla 8 1/2" X 11" Cardstock [ 166784 ]](https://assets1.tamsnetwork.com/images/EC042017NF/166784s.jpg "Very Vanilla 8 1/2\" X 11\" Cardstock [ 166784 ]")
![Misty Moonlight Classic Stampin' Pad [ 153118 ]](https://assets1.tamsnetwork.com/images/EC042017NF/153118s.jpg "Misty Moonlight Classic Stampin' Pad [ 153118 ]")
![Old Olive Classic Stampin' Pad [ 147090 ]](https://assets1.tamsnetwork.com/images/EC042017NF/147090s.jpg "Old Olive Classic Stampin' Pad [ 147090 ]")
![Petal Pink Classic Stampin' Pad [ 147108 ]](https://assets1.tamsnetwork.com/images/EC042017NF/147108s.jpg "Petal Pink Classic Stampin' Pad [ 147108 ]")
![Watercolor Pencils Assortment 2 [ 149014 ]](https://assets1.tamsnetwork.com/images/EC042017NF/149014s.jpg "Watercolor Pencils Assortment 2 [ 149014 ]")
![Perennial Postage Dies [ 162607 ]](https://assets1.tamsnetwork.com/images/EC042017NF/162607s.jpg "Perennial Postage Dies [ 162607 ]")
![Stampin' Cut & Emboss Machine [ 149653 ]](https://assets1.tamsnetwork.com/images/EC042017NF/149653s.jpg "Stampin' Cut & Emboss Machine [ 149653 ]")


![Happy Hibiscus Bundle (English) [ 164880 ]](https://assets1.tamsnetwork.com/images/EC042017NF/164880s.jpg "Happy Hibiscus Bundle (English) [ 164880 ]")
![Cloud Cover 8 1/2" X 11" Cardstock [ 165621 ]](https://assets1.tamsnetwork.com/images/EC042017NF/165621s.jpg "Cloud Cover 8 1/2\" X 11\" Cardstock [ 165621 ]")
![Secret Sea 8 1/2" X 11" Cardstock [ 165624 ]](https://assets1.tamsnetwork.com/images/EC042017NF/165624s.jpg "Secret Sea 8 1/2\" X 11\" Cardstock [ 165624 ]")
![Versamark Pad [ 102283 ]](https://assets1.tamsnetwork.com/images/EC042017NF/102283s.jpg "Versamark Pad [ 102283 ]")
![Secret Sea Classic Stampin' Pad [ 165285 ]](https://assets1.tamsnetwork.com/images/EC042017NF/165285s.jpg "Secret Sea Classic Stampin' Pad [ 165285 ]")
![Uninked Stampin’ Craft Pad & Whisper White Refill [ 147277 ]](https://assets1.tamsnetwork.com/images/EC042017NF/147277s.jpg "Uninked Stampin’ Craft Pad & Whisper White Refill [ 147277 ]")
![Sponge Daubers [ 133773 ]](https://assets1.tamsnetwork.com/images/EC042017NF/133773s.jpg "Sponge Daubers [ 133773 ]")
![Cloud Cover 3/8" (1 Cm) Faux Linen Ribbon [ 165271 ]](https://assets1.tamsnetwork.com/images/EC042017NF/165271s.jpg "Cloud Cover 3/8\" (1 Cm) Faux Linen Ribbon [ 165271 ]")
![Rhinestone Basic Jewels [ 144220 ]](https://assets1.tamsnetwork.com/images/EC042017NF/144220s.jpg "Rhinestone Basic Jewels [ 144220 ]")


![Arched Wishes Cling Stamp Set (English) [ 165428 ]](https://assets1.tamsnetwork.com/images/EC042017NF/165428s.jpg "Arched Wishes Cling Stamp Set (English) [ 165428 ]")
![Painted Stripes Cling Stamp Set [ 165437 ]](https://assets1.tamsnetwork.com/images/EC042017NF/165437s.jpg "Painted Stripes Cling Stamp Set [ 165437 ]")
![Everyday Arches Dies [ 164629 ]](https://assets1.tamsnetwork.com/images/EC042017NF/164629s.jpg "Everyday Arches Dies [ 164629 ]")
![Highland Heather 8-1/2" X 11" Cardstock [ 146986 ]](https://assets1.tamsnetwork.com/images/EC042017NF/146986s.jpg "Highland Heather 8-1/2\" X 11\" Cardstock [ 146986 ]")
![Summer Splash 8 1/2" X 11 Cardstock [ 163797 ]](https://assets1.tamsnetwork.com/images/EC042017NF/163797s.jpg "Summer Splash 8 1/2\" X 11 Cardstock [ 163797 ]")
![Daffodil Delight 8-1/2" X 11" Cardstock [ 119683 ]](https://assets1.tamsnetwork.com/images/EC042017NF/119683s.jpg "Daffodil Delight 8-1/2\" X 11\" Cardstock [ 119683 ]")
![Highland Heather Classic Stampin' Pad [ 147103 ]](https://assets1.tamsnetwork.com/images/EC042017NF/147103s.jpg "Highland Heather Classic Stampin' Pad [ 147103 ]")
![Daffodil Delight Classic Stampin' Pad [ 147094 ]](https://assets1.tamsnetwork.com/images/EC042017NF/147094s.jpg "Daffodil Delight Classic Stampin' Pad [ 147094 ]")
![Summer Splash Classic Stampin Pad [ 163809 ]](https://assets1.tamsnetwork.com/images/EC042017NF/163809s.jpg "Summer Splash Classic Stampin Pad [ 163809 ]")
![Tuxedo Black Memento Ink Pad [ 132708 ]](https://assets1.tamsnetwork.com/images/EC042017NF/132708s.jpg "Tuxedo Black Memento Ink Pad [ 132708 ]")
![Highland Heather Stampin' Blends Combo Pack [ 154887 ]](https://assets1.tamsnetwork.com/images/EC042017NF/154887s.jpg "Highland Heather Stampin' Blends Combo Pack [ 154887 ]")
![Flirty Flamingo Stampin' Blends Combo Pack [ 154884 ]](https://assets1.tamsnetwork.com/images/EC042017NF/154884s.jpg "Flirty Flamingo Stampin' Blends Combo Pack [ 154884 ]")
![Summer Splash Stampin’ Blends Combo Pack [ 163826 ]](https://assets1.tamsnetwork.com/images/EC042017NF/163826s.jpg "Summer Splash Stampin’ Blends Combo Pack [ 163826 ]")
![Clear Wink Of Stella Glitter Brush [ 141897 ]](https://assets1.tamsnetwork.com/images/EC042017NF/141897s.jpg "Clear Wink Of Stella Glitter Brush [ 141897 ]")
![Starburst Sequins [ 165539 ]](https://assets1.tamsnetwork.com/images/EC042017NF/165539s.jpg "Starburst Sequins [ 165539 ]")


![Circle Of Seasons Dies [ 167277 ]](https://assets1.tamsnetwork.com/images/EC042017NF/167277s.jpg "Circle Of Seasons Dies [ 167277 ]")
![Timeless Plaid 6" X 6" (15.2 X 15.2 Cm) Designer Series Paper [ 164678 ]](https://assets1.tamsnetwork.com/images/EC042017NF/164678s.jpg "Timeless Plaid 6\" X 6\" (15.2 X 15.2 Cm) Designer Series Paper [ 164678 ]")
![Basic White 8 1/2" X 11" Thick Cardstock [ 159229 ]](https://assets1.tamsnetwork.com/images/EC042017NF/159229s.jpg "Basic White 8 1/2\" X 11\" Thick Cardstock [ 159229 ]")
![Cherry Cobbler 8-1/2" X 11" Cardstock [ 119685 ]](https://assets1.tamsnetwork.com/images/EC042017NF/119685s.jpg "Cherry Cobbler 8-1/2\" X 11\" Cardstock [ 119685 ]")
![Granny Apple Green 8-1/2" X 11" Cardstock [ 146990 ]](https://assets1.tamsnetwork.com/images/EC042017NF/146990s.jpg "Granny Apple Green 8-1/2\" X 11\" Cardstock [ 146990 ]")
![Silver Foil Sheets [ 132178 ]](https://assets1.tamsnetwork.com/images/EC042017NF/132178s.jpg "Silver Foil Sheets [ 132178 ]")
![Adhesive Sheets [ 152334 ]](https://assets1.tamsnetwork.com/images/EC042017NF/152334s.jpg "Adhesive Sheets [ 152334 ]")
![2025–2027 In Color™ Flat Pearls [ 165192 ]](https://assets1.tamsnetwork.com/images/EC042017NF/165192s.jpg "2025–2027 In Color™ Flat Pearls [ 165192 ]")
![Baker's Twine Essentials Pack [ 155475 ]](https://assets1.tamsnetwork.com/images/EC042017NF/155475s.jpg "Baker's Twine Essentials Pack [ 155475 ]")


![Tractor & Co Bundle (English) [ 166116 ]](https://assets1.tamsnetwork.com/images/EC042017NF/166116s.jpg "Tractor & Co Bundle (English) [ 166116 ]")
![Sunflower 3 D Embossing Folder [ 166145 ]](https://assets1.tamsnetwork.com/images/EC042017NF/166145s.jpg "Sunflower 3 D Embossing Folder [ 166145 ]")
![Garden Green 8-1/2" X 11" Cardstock [ 102584 ]](https://assets1.tamsnetwork.com/images/EC042017NF/102584s.jpg "Garden Green 8-1/2\" X 11\" Cardstock [ 102584 ]")
![Pool Party 8-1/2" X 11" Cardstock [ 122924 ]](https://assets1.tamsnetwork.com/images/EC042017NF/122924s.jpg "Pool Party 8-1/2\" X 11\" Cardstock [ 122924 ]")
![Basic Black 8-1/2" X 11" Cardstock [ 121045 ]](https://assets1.tamsnetwork.com/images/EC042017NF/121045s.jpg "Basic Black 8-1/2\" X 11\" Cardstock [ 121045 ]")
![Garden Green Classic Stampin' Pad [ 147089 ]](https://assets1.tamsnetwork.com/images/EC042017NF/147089s.jpg "Garden Green Classic Stampin' Pad [ 147089 ]")
![Poppy Parade Classic Stampin' Pad [ 119782 ] (Retired)](https://assets1.tamsnetwork.com/images/EC042017NF/119782s.jpg "Poppy Parade Classic Stampin' Pad [ 119782 ] (Retired)")
![Crushed Curry Classic Stampin' Pad [ 147087 ]](https://assets1.tamsnetwork.com/images/EC042017NF/147087s.jpg "Crushed Curry Classic Stampin' Pad [ 147087 ]")


![Impressions Abloom Bundle (English) [ 165611 ]](https://assets1.tamsnetwork.com/images/EC042017NF/165611s.jpg "Impressions Abloom Bundle (English) [ 165611 ]")
![Notes & Totes Dies [ 165240 ]](https://assets1.tamsnetwork.com/images/EC042017NF/165240s.jpg "Notes & Totes Dies [ 165240 ]")
![Floral Impressions 12" X 12" (30.5 X 30.5 Cm) Designer Series Paper [ 165603 ]](https://assets1.tamsnetwork.com/images/EC042017NF/165603s.jpg "Floral Impressions 12\" X 12\" (30.5 X 30.5 Cm) Designer Series Paper [ 165603 ]")
![Balmy Blue 8-1/2" X 11" Cardstock [ 146982 ]](https://assets1.tamsnetwork.com/images/EC042017NF/146982s.jpg "Balmy Blue 8-1/2\" X 11\" Cardstock [ 146982 ]")
![Garden Green 12" X 12" (30.5 X 30.5 Cm) Two Tone Cardstock [ 166665 ]](https://assets1.tamsnetwork.com/images/EC042017NF/166665s.jpg "Garden Green 12\" X 12\" (30.5 X 30.5 Cm) Two Tone Cardstock [ 166665 ]")
![Balmy Blue Classic Stampin' Pad [ 147105 ]](https://assets1.tamsnetwork.com/images/EC042017NF/147105s.jpg "Balmy Blue Classic Stampin' Pad [ 147105 ]")
![Berry Burst Classic Stampin' Pad [ 147143 ]](https://assets1.tamsnetwork.com/images/EC042017NF/147143s.jpg "Berry Burst Classic Stampin' Pad [ 147143 ]")
![Fresh Freesia Classic Stampin' Pad [ 155611 ]](https://assets1.tamsnetwork.com/images/EC042017NF/155611s.jpg "Fresh Freesia Classic Stampin' Pad [ 155611 ]")
![Mini Stampin' Dimensionals [ 144108 ]](https://assets1.tamsnetwork.com/images/EC042017NF/144108s.jpg "Mini Stampin' Dimensionals [ 144108 ]")


![Party Alphabet Dies [ 165263 ]](https://assets1.tamsnetwork.com/images/EC042017NF/165263s.jpg "Party Alphabet Dies [ 165263 ]")
![Everyday Arches Photopolymer Stamp Set (English) [ 164623 ]](https://assets1.tamsnetwork.com/images/EC042017NF/164623s.jpg "Everyday Arches Photopolymer Stamp Set (English) [ 164623 ]")
![Everyday Skies 6" X 6" (15.2 X 15.2 Cm) Designer Series Paper [ 164622 ]](https://assets1.tamsnetwork.com/images/EC042017NF/164622s.jpg "Everyday Skies 6\" X 6\" (15.2 X 15.2 Cm) Designer Series Paper [ 164622 ]")
![Cajun Craze 8-1/2" X 11" Cardstock [ 119684 ]](https://assets1.tamsnetwork.com/images/EC042017NF/119684s.jpg "Cajun Craze 8-1/2\" X 11\" Cardstock [ 119684 ]")
![Azure Afternoon 8 1/2" X 11" Cardstock [ 161719 ]](https://assets1.tamsnetwork.com/images/EC042017NF/161719s.jpg "Azure Afternoon 8 1/2\" X 11\" Cardstock [ 161719 ]")
![Blackberry Bliss 8-1/2" X 11" Cardstock [ 133675 ]](https://assets1.tamsnetwork.com/images/EC042017NF/133675s.jpg "Blackberry Bliss 8-1/2\" X 11\" Cardstock [ 133675 ]")
![Blueberry Bushel 8-1/2" X 11" Cardstock [ 146968 ]](https://assets1.tamsnetwork.com/images/EC042017NF/146968s.jpg "Blueberry Bushel 8-1/2\" X 11\" Cardstock [ 146968 ]")
![Blueberry Bushel Classic Stampin' Pad [ 147138 ]](https://assets1.tamsnetwork.com/images/EC042017NF/147138s.jpg "Blueberry Bushel Classic Stampin' Pad [ 147138 ]")
![Azure Afternoon Classic Stampin' Pad [ 161663 ]](https://assets1.tamsnetwork.com/images/EC042017NF/161663s.jpg "Azure Afternoon Classic Stampin' Pad [ 161663 ]")
![Stampin' Seal [ 152813 ]](https://assets1.tamsnetwork.com/images/EC042017NF/152813s.jpg "Stampin' Seal [ 152813 ]")
![Tear & Tape Adhesive [ 154031 ]](https://assets1.tamsnetwork.com/images/EC042017NF/154031s.jpg "Tear & Tape Adhesive [ 154031 ]")


![Floral Impressions Suite Collection (English) [ 165617 ]](https://assets1.tamsnetwork.com/images/EC042017NF/165617s.jpg "Floral Impressions Suite Collection (English) [ 165617 ]")