Copy the Catalog

Need paper crafting ideas? Look no further than any Stampin’ Up! catalog!

In today’s live video, I demonstrated how to use the So Very Merry stamp set to re-create cards made with the Circle Sayings bundle (if you have one, you *need* the other!).

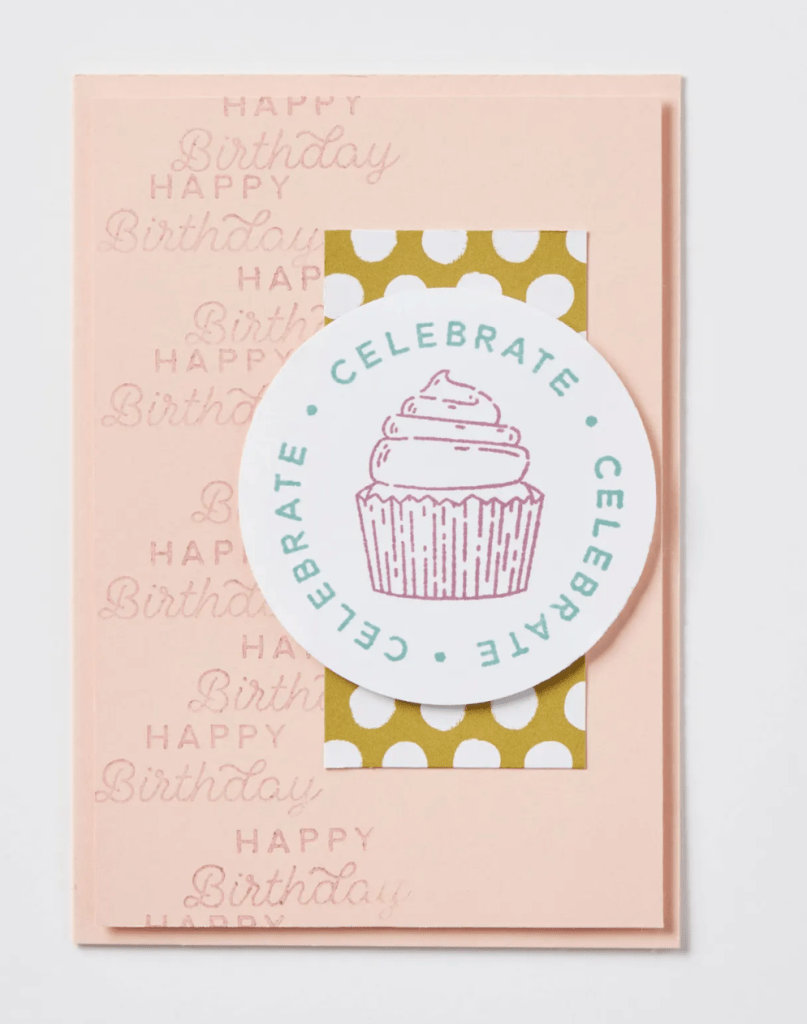
The card on the left is found on page 147 of the annual catalog and the card on the right is the one I stamped:

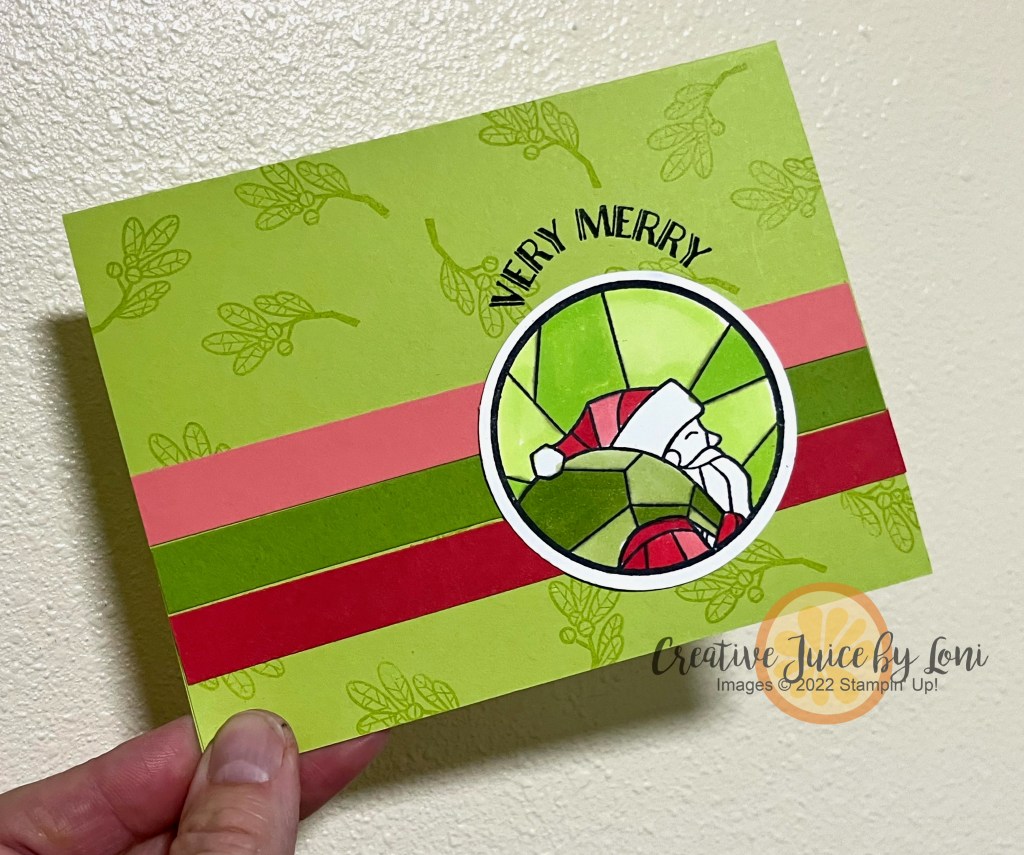
Let me show another example. Card on left from catalog, card on right I created to show you how well these two sets interchange!

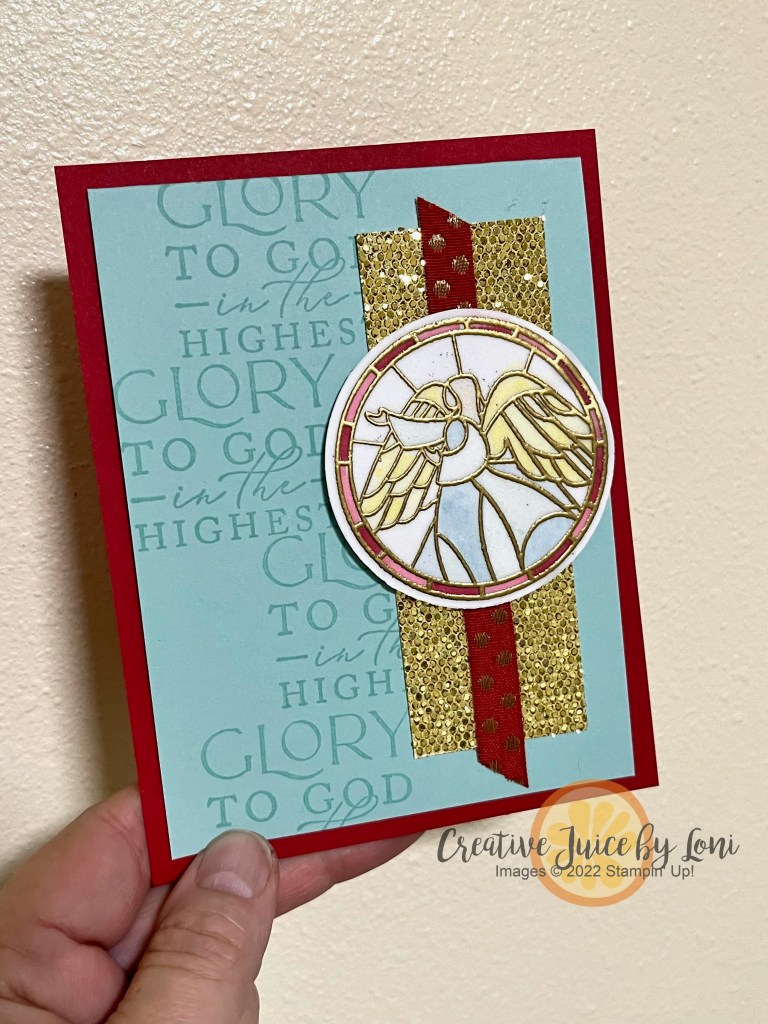
In my Angel version of the cupcake card from the catalog, the More Dazzle paper is truly heavenly, and I embossed the angel image on Vellum cardstock in gold embossing powder, then colored it from the back with Stampin’ Blends markers. TIP: To adhere the vellum to the white background, lightly sponge liquid glue to the back of the vellum for a no-show adhesive.

With two days left of our 35th Anniversary Starter Kit promotion, you may consider getting the starter kit for 35% off -OR- choosing 35% more in the starter kit ($168.75 product value) for the regular price of $99…and if you don’t know what to choose, these two interchangeable sets/bundles are a good place to begin, plus you can copy the cards I showed! More Starter Kit suggestions in the video:

Happy you stopped by! Have you ever copied an idea from the catalog and put your own “stamp” on it?

Diagonal Cut Card: Show BOTH Sides of the Paper!

Sometimes I obsess over WHICH SIDE of my pretty Designer Series Paper I should use, and if this dilemma sounds familiar, you will like today’s card design because it allows you to show BOTH sides of the paper!

This example features the Masterfully Made Designer Series Paper and a set of dies you may not have noticed yet. The Paper Florist dies will have you putting together breathtaking blooms that never wilt!

You’ll be seeing more of these flowers next Monday, but I also wanted to point out the incredible detail of the photographic style of the Masterfully Made DSP~ I did NOT tear any of the Lemon Lime Twist paper, that is just a flat layer, but it LOOKS 3-D!!

Next, I created this version with the patterns slightly separated, and used the Delightfully Eclectic Designer Series Paper:

When you watch the replay of my live demonstration, you’ll learn how this MEGAPACK of paper patterns gives expanded options for some of the newer products in our catalog, and offers versatile designs to enhance any project.

Final reminder that most of our Designer Series Papers are 15% off through the end of June, 2023! Don’t miss a chance to stock up with paper that has new colors and textures to keep you crafting through the summer…

Looking for the supply list? Simply click on the orange buttons!

Designer Series Paper Gift Box

Today’s project encourages you to USE THAT PRETTY PAPER- Don’t hoard it! This hinge-lidded gift box (3.5″ x 4″ x 1-1/4″ finished size) is speedy to make, and begins with a 6″ x 12″ piece of Designer Series Paper.

Score along each long size at 1-1/4″ in (or if you are using a Simply Scored board, put the short end at the top and score at 1-1/4″ and 4-3/4″)

Turn the 12″ side of the paper along the top of your trimmer or Simply Scored, then score at 4″, 5-1/4″, 9-1/4″ and 10-1/2″. You’ll trim at each of these score lines from the long edges just into the intersecting 1-1/4″ score line.

**If your paper is DIRECTIONAL (meaning there is a top and bottom to the pattern), watch the video to see instructions- or make sure that the top of your design is at the left when you make the first 4″ score along the long side.

This box is ideal for 2 bolts of Stampin’ Up! ribbon (or one large bolt, like the Boho Blue one I showed in the video), and it’s tight, but will work for 2 classic ink pads, or a myriad of other small gifts!

Three things to note if you are reading this in June 2023:

Most of the Designer Series Paper in the Stampin’ Up! Annual Catalog is 15% off during June only!

You CAN add discounted paper to the Starter Kit+ Special Offer in June! It’s the best VALUE for anyone with a long wishlist or who wants to try a new adventure- no obligation to try it out.

The Circle Sayings 3-for-Free offer ends June 15th!

When you purchase the Circle Sayings bundle from my Stampin’ Store by 6/15/23, I’ll email you a tutorial for 3 exclusive cards you won’t find anywhere else PLUS I send you the supplies (card stock, ribbon, paper, etc) to make those three cards with your new stamp set and coordinating punch! This is the bundle I used on my box today:

PIN or save this post to try soon, if not today!

Product List

Cupcakes, Pop Art & Free Projects to Make!

On our last trip to Washington, D. C. my husband and I decided to step into the Hirshhorn Art museum, as it was one of a handful of Smithsonian buildings we hadn’t yet visited. It was a short tour, as most of the modern art didn’t appeal to either of us AT ALL. My personal philosophy on art is that it should do one- if not both- of the following:

  1. Uplift and Inspire
  2. Make the viewer happy

Big talk coming from a person whose biggest art influence was the game “Masterpiece” (do you remember that??) however, that’s my opinion and I stand by it.

One exception to my ambivalence toward modern art is Pop Art. I am attracted by color (no surprise) and bold images of pretty (or in this case, yummy) everyday objects!

Since I have a special offer (see below) for customers who purchase the Circle Sayings bundle from my Stampin’ Store, I wanted to show a card using the stamp set WITHOUT a circle. The cupcake image is my “food spirit animal” so I channeled my inner-Andy-Warhol to give you an eyeful of BRIGHT sweets!

Each section alternates between being raised by black dimensionals or having just the cupcake raised on a color adhered flat to the card:

Good thing card stock isn’t as dangerous as the food coloring it would take to make frosting in that color! These are the Stampin’ Up! colors I used: Calypso Coral, Tahitian Tide, Daffodil Delight, Melon Mambo, Parakeet Party, Gorgeous Grape

Here’s a special just for you:

Purchase the bundle from my Stampin’ Store and you’ll receive 3 never-seen project tutorials PLUS the consumable supplies to create all three projects! You’ll get the tutorials via email and the supplies in the mail by June 30th. Offer valid for U.S. customers only.

The Circle Sayings bundle includes a photopolymer stamp set and a NEW coordinating 2-3/8″ circle punch.

While I’ll send you all the card stock, paper, ribbon, etc. to create the projects from my tutorials, you may also need these items (found in my store, as well):

  • Memento Tuxedo Black ink pad
  • Tahitian Tide OR Azure Afternoon ink pad
  • Lost Lagoon ink pad
  • Colored Pencils (I used Stampin’ Up! Watercolor Pencils)
  • Suggested Stampin’ Blends combos (could use colored pencils or Stampin’ Write Markers): Lemon Lolly, Tahitian Tide, Berry Burst, Medium combo
  • OPTIONAL: Wink of Stella pen
  • Scissors and adhesive, clear blocks B, C & D for the stamps

Circling Round to Monochromatic Colors (Plus 3 for FREE)

It’s been fun to teach color theory in May and I really hope you’ve learned some skills to help you choose palettes for your paper crafting and rubber stamping projects! Today, I “circled around” to MONOCHROMATIC schemes, which isn’t limited to only one color, but can include 2 or 3 variations of the same HUE. Here are a few examples:

Stampin’ Up! yellows are a exquisite example of how 3 different tints, tones or shades can harmonize well: Crushed Curry (card base), Daffodil Delight (sentiment and banner) and NEW Lemon Lolly (focal point) are different depths of the same sunny color and coordinate together!

We have a variety of purples, and not all of them start in the same corner of the color wheel, so this is where you need to learn to “see” harmonizing colors. The three I used for this card were Gorgeous Grape (card base), Highland Heather (larger banner and cupcake frosting) and Fresh Freesia (background and cupcake liner).

The tutorial for this card style includes further explanation:

I chose to use the Circle Sayings Bundle for our lesson on monochromatic color ideas because I have an exclusive opportunity through June 15th for you: Purchase the bundle from my Stampin’ Store and you’ll receive 3 never-seen project tutorials PLUS the consumable supplies to create all three projects! You’ll get the tutorials via email and the supplies in the mail by June 30th.

Let me share a few additional Stampin’ Up! color trios that work well as monochromatic combinations. These are NOT all the possible pairings, only a few I came up with to get your juices flowing:

Now it’s your turn to give a “monochromatic” card a try!

Product List

Inside the cards:

Using In Colors with Confidence

If choosing colors to use in your crafting is daunting, I have a tool for you!

The new 2023 In Color Coach will be going out with my email this week (if you aren’t subscribed yet, you will get it when you join my email list) and in Lunchtime Crafting LIVE today (video below), I showed a few examples using the page featuring the 2023-2025 In Colors.

Stampin’ Up! created Copper Clay, Wild Wheat, Boho Blue, Moody Mauve and Pebbled Path (in the order they are on my Classic Birthday Card) to set the TONE for the next two years as “In” colors. A tone is a pure color (HUE) with GREY added.

These colors feel “retro” and “earthy” when I look at them…what adjective would you choose?

While they look fabulous together, they can also be combined with other colors from our collections and I used the Color Coach to create two more examples:

When I combined Boho Blue with Lost Lagoon, Petal Pink and Misty Moonlight, it felt SEA-worthy, so I put them on a Crumb Cake beachy background and used the new Circle Sayings bundle for a summer “Thinking of You” card.

Next, I looked at Moody Mauve and the Color Coach suggested pairing it with Petal Pink again and Flirty Flamingo. It needed one more color, and the new CORE color of Bubble Bath felt just right. The Crafting with You bundle was ideal for this Handmade Hug card. All these new products are available MAY 2, 2023 from the new Stampin’ Up! Annual Catalog. Shopping links will be added at the bottom of this post on that day.

I “quilted” the background by running it through the Basics 3-D folder. This reminds me so much of a quilt I’ve snuggled under as a child!

Ready to add the 2023-25 In Colors to your studio? JOIN THE IN COLOR COLLECTORS CLUB!

Each month from May 2023 through September 2023, you will receive a package of one new IN COLOR products (May- Boho Blue, June- Copper Clay, July- Wild Wheat, August- Moody Mauve and September- Pebbled Path):

  • Classic Ink Pad
  • Classic Ink Refill
  • Stampin’ Blends Combo Pack
  • 5 sheets of Card Stock
  • Two 6″x6″ pieces of Designer Series Paper
  • 2 yards of ribbon

PLUS a bonus embellishment each month!

PLUS an exclusive project tutorial (supplies for the project will be included FREE, you’ll use your own ink and any stamp set to complete the project)

PLUS each month a member of the club will receive a set of the five 2023-2025 In Color Stampin’ Write Markers FREE until everyone has a set!

The Monthly Cost will be (plus $6 for shipping to you if you can’t pick up from Loni’s house in Hurricane, UT) and if you sign up, you are agreeing to all 5 months (worth it, I promise!).

Let me show you how to make the cards above and use the Color Coach to find a pretty palette:

Something Old, New & Blue for a Sketch

This is the great clean-out week in the Creative Juice Stampin’ Studio as I prepare for my New Catalog Carnival & BOGO Sale on May 6th!

As I was sorting through things, I found a few items that were retiring which I wanted to combine with a new bundle coming in the 2023-2025 Catalog: A piece of By the Bay Designer Series Paper and the Seashells 3-Dembossing folder. So when I saw the Freshly Made Sketch #FMS582 for the week, I knew exactly what to do!

Using a sponge dauber and my Whisper White Craft ink pad, I made the embossed background stand out a bit by rubbing the ink over the shells and seaweed, then pulled colors from the Designer Series Paper (Balmy Blue, Crumb Cake, Night of Navy and Soft Sea Foam) to use as my color palette.

If I had a “spirit shape” it would be a circle (I don’t like corners), so the Circle Saying stamp set – which coordinates with a new 2-3/8″ circle punch – was part of my first demonstrator pre-order from the new catalog, which you will be able to shop from starting May 2nd. HOWEVER, if you want to combine them with the embossing folder or pretty paper, you’ll need to snag them now in the LAST CHANCE SALE:

The Circle Sayings Bundle (photopolymer stamp set + 2-3/8″ circle punch) will be available on May 2nd, and here are the other supplies to collect NOW for this card:

Product List