Summer Sampler & Stamp Club

The forecast shows SUNSHINE and STAMPING are in your future!

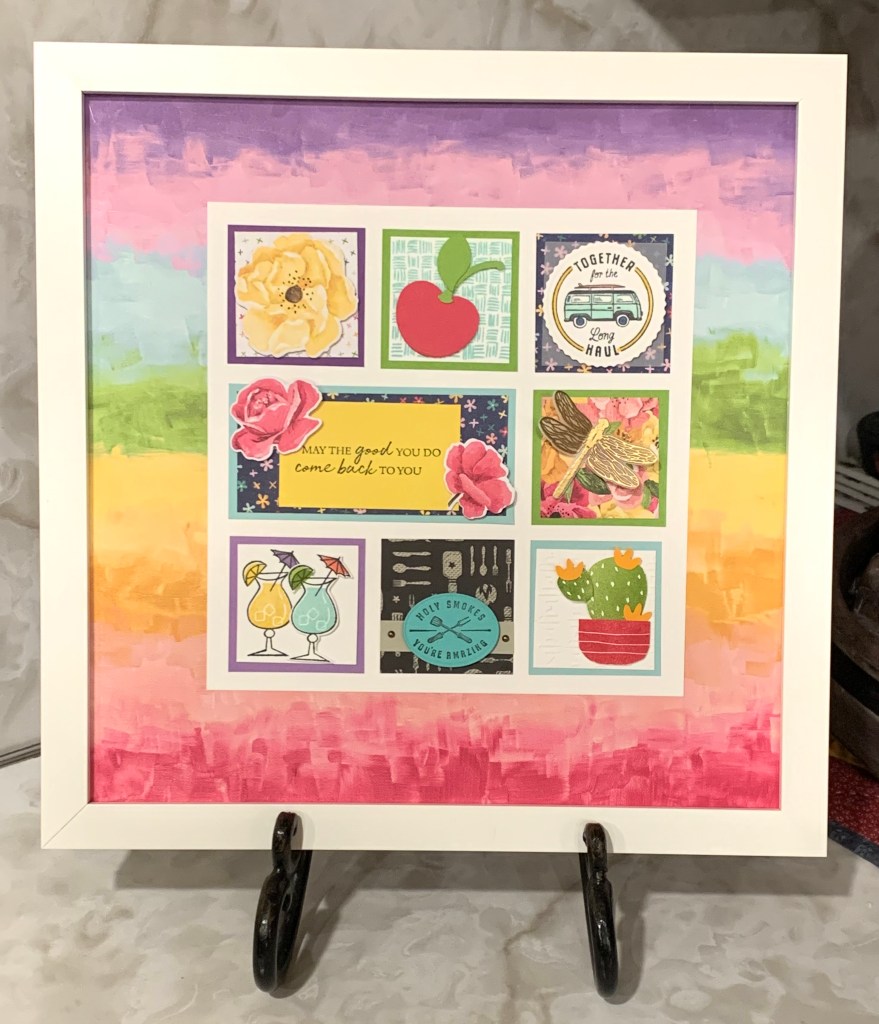
My friend Sue & I are hosting the next class for our year of seasonal home decor and the Summer Sampler one is sure to be a fun one! The class is just $12 and doesn’t include the frame.

Summer Sampler Class

Thursday, June 2nd –  10 am OR 7 pm

350 S. 400 W. Hurricane, UT

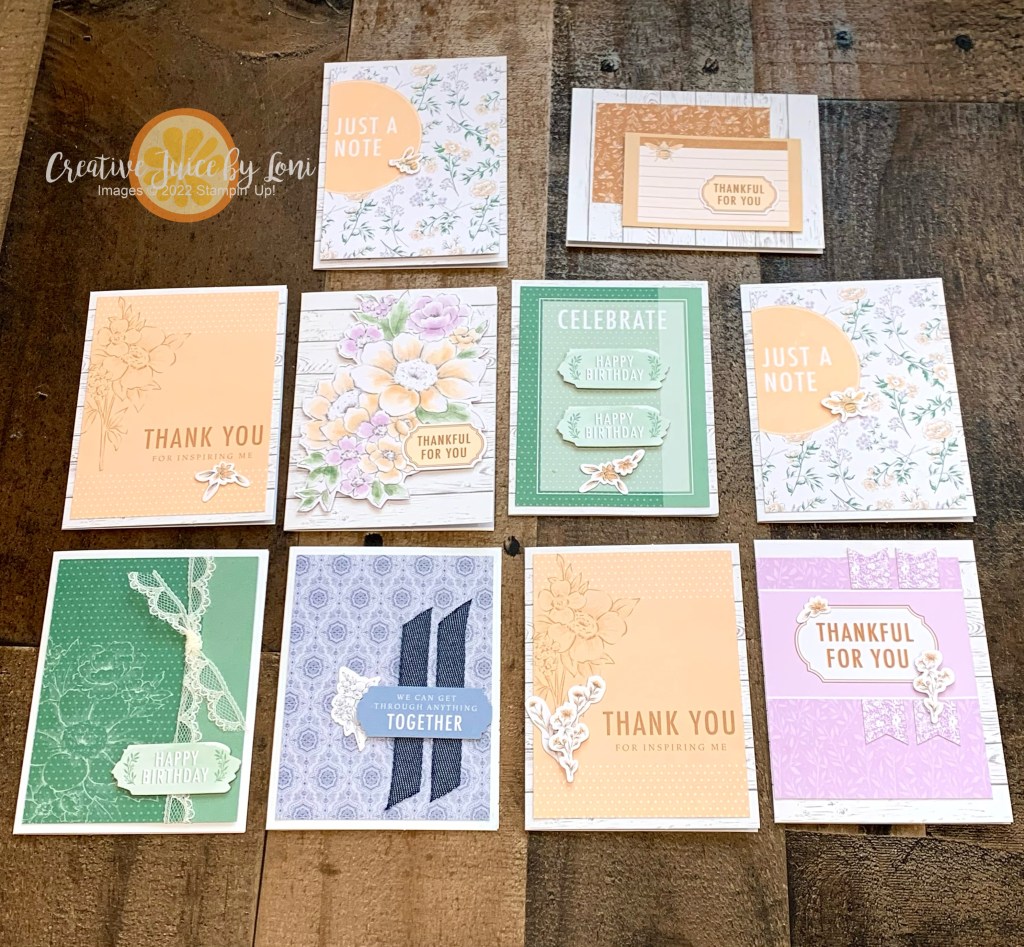
Since I’ve moved (back) to southern Utah, I’m starting a new stamp club that meets every other month, with each member taking turns to earn free products! The clubs will be held in my home (so you won’t have to clean your house!) and club members will make 2 projects for free. Wouldn’t it be nice to join with a friend so you had something creative to look forward to together? You could go to dinner before the club and make it a whole evening out!

The first club will be June 16th in Hurricane and is limited to 6 people, so learn more and join the club by clicking on the button below!

Heart & Home Quick Cards

While on vacation, I took the Heart & Home Memories & More Cards & Envelopes and the coordinating Card Pack along with a few pieces of ribbon to create 20 fast cards while visiting family. There is no stamping involved because the card pack has die cut stickers along with the sentiments on the cards!

There are 10 large striped cards (6-1/4″ x 4-1/4″) with coordinating envelopes and 10 small cards with a wood grain finish on the front and Cinnamon Cider envelopes (3-1/4″ x 4-1/4″ card size):

I turned some of the cards inside-out (patterns on the inside with an added panel of card stock to write on, in the case of the Misty Moonlight stripes) and here are my 10 large finished cards:

And the 10 smaller note cards, which I plan to keep in my purse and use to #CelebrateEverydayHeroes during May and June as we recognize and thank those who do simple kind acts each day…

Find out more about the Celebrate Everyday Heroes campaign, along with another quick card or tag idea, in this short video:

Share how you are recognizing the people who serve you in small and simple ways over in the Creative Juice Crafters Corner Facebook Group as well as your own social media with the hashtag #celebrateeverydayheroes – We want to see what thoughtful ways you are using to make a difference!

If you are in the Southern Utah area, set a reminder in your phone to come to my NEW CATALOG CARNIVAL and BOGO SALE this Saturday, May 21st from 1-3 pm at 350 S 400 W in Hurricane, Utah. It’s open house style and free, so bring a friend!

New at SU: Beautiful Day for Love

It’s the New at SU! Design Team “Moms, Dads, Brides and Grads” blog hop!

Our international design team wants to help YOU get ready for all the big events coming in the next few months, so visit all the posts and PIN your favorites to try. I had fun creating this card for brides (and grooms) on a wedding day using the Blessings of Home Bundle…and BONUS, it’s perfect for gifting money to the newlyweds as it’s a large slimline card that fits in our coordinating Slimline envelopes

For this size of card, start with a piece of 8.5″ x 7″ card stock and score it in half at 3.5″ (finished card is 8.5″ x 3.5″).

Have you ever tried Stampin’ Up! Watercolor Pencils? They are easier than you’d think to use and they give this card a soft effect, different than my usual preference for Stampin’ Blends. This is literally how I started…just by scribbling color onto my Watercolor Paper:

I do TRY to follow the lines and details of the image, then I use the Water Painters to blend the colors out, working from lightest to darkest. A tip for watercoloring: You will have MUCH better success when using Watercolor Paper or SU! Shimmery White paper, as they hold up to the moisture best and won’t “pill up” when you add water.

Once dry, use the dies to cut out the image for the front of your card. I’ve layered it onto some lovely Designer Series Paper.

I’m also practicing (but not proficient, yet) the art of the double bow, which I call “The Tammy” in honor of fellow demonstrator Tammy Wilson, whose cards are immediately identifiable by her lovely bows. Luckily for you AND me, she’s made a video, which I’ve watched and attempted numerous times on the Stampin’ Up! Facebook page. With enough practice, I’m confident my double bows will get better.

All the supplies I used are listed below, and you are ready to travel on to the next post in our Blog Hop:

Moms, Dads, Brides & Grads: New at SU! April 2022

Powered by blogcarousel.com

Product List
Blessings Of Home Bundle (English)
$51.25
Soft Succulent 8 1/2" X 11" Cardstock
$8.75
Fluid 100 Watercolor Paper
$9.00
Basic Black 8-1/2" X 11" Cardstock
$8.75
2021–2023 In Color 6" X 6" (15.2 X 15.2 Cm) Designer Series Paper
$11.50
Heart & Home 12" X 12" (30.5 X 30.5 Cm) Designer Series Paper
$11.50
Watercolor Pencils
$16.00
Watercolor Pencils Assortment 2
$12.50
Water Painters
$12.00
Basic Borders Dies
$29.00
Stampin' Cut & Emboss Machine
$120.00
Basics Embossing Powders
$18.00
Jet Black Stāzon Ink Pad
$10.00
Uninked Stampin’ Craft Pad & Whisper White Refill
$9.50
Heat Tool (Us And Canada)
$30.00
Tasteful Labels Dies
$31.00
Soft Succulent 3/8" (1 Cm) Open Weave Ribbon
$7.00
Baker's Twine Essentials Pack
$11.00
Stampin' Dimensionals
$4.00
Mini Glue Dots
$5.25
Slimline Envelopes
$10.00

Ladybug Wish Come True

I don’t enjoy bugs crawling on me, but there is a soft spot in my heart (and on my fingers) for ladybugs. They are just the friendliest little creatures, so I don’t mind walking them to the door (if they’ve found their way inside) and giving them a lift to the nearest plant outside. I may even talk to them and tell them how pretty they are.

This little ladybug is adorable on a card:

Here’s a tutorial to get started, and of course, all the supplies can be found in my Stampin’ store!

A Rainbow Through the Clouds

This unique card idea started with a color challenge and the piece of Vellum card stock sitting on my desk!

The #tgifc362 color challenge was vibrant and got me thinking about a rainbow:

Why not a rainbow through the clouds? The Vellum card stock gives the illusion of a rainy, cloudy day and the card almost put itself together!

It’s simple stamping anyone can succeed in creating, as you can see from my video tutorial:

Product List

Retirement Parade: So Long, Sweet Peach!

The New at SU! Design Team is bringing you a POP-UP PARADE featuring some of the products we have loved and are sad to see leave as the Retiring List for the Annual Catalog has been released. These items are only while supplies last, so don’t miss your opportunity to order them!

I chose to spotlight my beloved Sweet as a Peach Suite. The Designer Series Paper! The Stamps! The Dies! They have inspired so much creativity in my studio and this is actually the pop-up birthday card I made and sent my team members over the past 12 months:

It opens up to an EXPLOSION of peaches and birthday wishes:

It’s easy to make this explosion insert: Cut a piece of Designer Series Paper 6″ x 6″ and fold in half, then open it up and fold it in half DIAGONALLY in the opposite direction. Unfold it again, tuck the diagonal folds inside and glue the square pieces on the outside of the mechanism to the inside of the card. TIP: Observe the direction of your patterned paper and insert it into your card with the patterns going the right direction.

The best way it fits in your card is by making a binding on the top (or side, depending on orientation) of your card. For this card, I used a piece of 11″ x 4-1/4″ card stock scored at 5-1/2″ and 6-1/2″, then tied that shut with a piece of linen twine, with the second score on the top side of your card to help it open well. It makes the opening smaller than a traditional card and the explosion piece fits nicely inside.

The Sweet as a Peach Bundle (stamps + dies) is on sale through March 21st for 20% off in the Savings are In Bloom sale (along with the Mini Cut & Emboss Machine that the dies fit in), so now is the time to collect it for your craft stash! Retiring items are only while supplies last.

You are now ready to travel through the rest of the Retirement Parade! Hop through all the gorgeous retiring product projects below ~ you won’t want to miss any of the other “last chance” products we’ve loved and collect the fabulous ideas shared!

If you want to add these products to your craft studio before they are gone, you may order them from your demonstrator. Don’t have a demonstrator? Click the links below to shop from my Stampin’ Store!

Product List

Layers of Labels on Tulip Card

When I saw the retiring list of products, everything with “Sweet” in the title was being discontinued, and I had a little pity party. I use the Stitched So Sweetly Dies so often, it felt like my left hand was cut off! Once my heart recovered, I picked up and moved forward…there are some lovely things coming, but this is one product you may want to keep close at hand.

Thus, I combined the Stitched So Sweetly Dies in conjunction with the Timeless Tulips stamp set (also retiring) to create this cute patchwork card with layers of labels:

While we have some new tulip dies in the January-June 2022 Mini Catalog, if you are more of a punch person, you may want to grab the stamp set and Tulip Builder die in the Last Chance Sale (while supplies last).

Product List
Stitched So Sweetly Dies
$32.00
Timeless Tulips Photopolymer Stamp Set (English)
$18.00
Tulip Builder Punch
$18.00
Flowering Fields 12” X 12” (30.5 X 30.5 Cm) Designer Series Paper
$11.50
Vellum 8-1/2" X 11" Cardstock
$10.00
Basic White 8 1/2" X 11" Thick Cardstock
$8.25
Blushing Bride Classic Stampin' Pad
$7.50
Garden Green Classic Stampin' Pad
$7.50
Poppy Parade Classic Stampin' Pad
$7.50
Mini Stampin' Cut & Emboss Machine
$60.00

Peachy Cassette Gift Box

Are you old enough to remember the cases a cassette tape came in? For you youngsters, that was what we recorded and listened to music on before CD’s, which were before MP3 players, which were before cell phones and music streaming services.

Never mind how long ago that was…let’s just focus on how cute this gift box is:

While this project is easier with the Stampin’ Cut & Emboss machine, the Sweet as a Peach bundle is discounted 20% off in March 2022 during the Savings Are In Bloom promotion, and sadly, this personal favorite Peach bundle is retiring at the end of April, so don’t miss the chance to add it to your crafting collection.

When I make these boxes, I like to imagine what might fit inside: candy, earrings, money, gum, lipstick, a personalized rubber stamp, a deck of cards, etc. With a finished size of 2-1/2″ x 4-1/4″ and 1/2″ deep, tell me what you can think of to wrap in this retro-design-inspired box!

Now, if you are old enough to handle crafting tools, try your hand at crafting a few of these boxes with this printable tutorial, and thanks for choosing me to purchase your supplies from!

So Loved, Ladybug

Crafting can be so simple: Stamps, ink, card stock…and a punch!

This card took me less than 15 minutes to make, from start to finish.

Paper pieces you’ll need:

  • Magenta Madness card stock base 4-1/4′ x 8-1/4″ scored at 5-1/2″, plus a 4″ x 2-1/2″ for top
  • Basic Black card stock 2-3/4″ x 8-1/2″ scored at 4-1/4″
  • 2 pieces of Basic White card stock 3-3/4″ x 2-1/4″ to stamp on, plus 5-1/4″ x 4″ for inside card, plus a scrap to stamp the ladybug on.
  • Pattern Party Designer Series Paper (polka dot) 2-1/2″ x 4″

HOT TIP: Magenta Madness is retiring, so order extra card stock and ink pad refill TODAY!!

Inspired by the #tgifc360 #simplestamping challenge:

Product List
Hello Ladybug Bundle (English)
$32.25
A Grand Kid Cling Stamp Set (English)
$21.00
Magenta Madness 8-1/2" X 11" Cardstock
$8.75
Basic Black 8-1/2" X 11" Cardstock
$8.75
Basic White 8 1/2" X 11" Cardstock
$9.75
Pattern Party 12" X 12" (30.5 X 30.5 Cm) Host Designer Series Paper
$18.00
Magenta Madness Classic Stampin' Pad
$7.50
Granny Apple Green Stampin' Pad
$7.50
Tuxedo Black Memento Ink Pad
$6.00

Coloring On Vellum, the Easy Way

Vellum is beautiful, but a few of the challenges with it are:

  1. Stamping and coloring on it (because of the coating on the paper, it takes forever to dry), and
  2. Adhering it so you can’t see the adhesive.

For this card, I die cut a frame to adhere the vellum to and colored it on the back side with Stampin’ Blends, which don’t leave streaks and dry quickly because they are alcohol based:

As paper crafters, we hate wasting paper so I have another tip: Make TWO cards at a time to most effectively use your card stock. You can cut the frame from the center of one color and use the outside edge as a matte for your Designer Series Paper for the other card (watch video below):

The In the Moment stamp set works perfectly with the New Horizons Designer Series Paper and with these sentiments, I can imagine sending it to a friend to encourage them to take some time off from the hustle-and-grind. They are excellent reminders that self-care is also taking time to unwind!

Here’s a short HOW-TO video and you can order the supplies from my Stampin’ Store by clicking the links after that:

I’d love to hear how you liked this tutorial…leave me a comment below!

Product List
In The Moment Cling Stamp Set (English)
$24.00
New Horizons 6" X 6" (15.2 X 15.2 Cm) Designer Series Paper
$11.50
Sahara Sand 8-1/2" X 11" Cardstock
$8.75
Blackberry Bliss 8-1/2" X 11" Cardstock
$8.75
Night Of Navy 8-1/2" X 11" Cardstock
$8.75
Vellum 8-1/2" X 11" Cardstock
$10.00
Stitched Rectangles Dies
$35.00
Night Of Navy Classic Stampin' Pad
$7.50
Uninked Stampin’ Craft Pad & Whisper White Refill
$9.50
Basics Embossing Powders
$18.00
Heat Tool (Us And Canada)
$30.00
Stampin' Cut & Emboss Machine
$120.00
Natural Tones Stampin’ Blends Collection
$45.00
Polished Pink Stampin' Blends Combo Pack
$9.00
Night Of Navy Stampin' Blends Combo Pack
$9.00
Evening Evergreen Stampin' Blends Combo Pack
$9.00
Mini Stampin' Dimensionals
$4.00