
Whenever I can craft smarter (not harder), it’s a win!
This Valentine card duo only requires ONE pass through the Stampin’ Cut & Emboss machine, and you’ll have letters and the negative space to create two LOVE LETTERS:
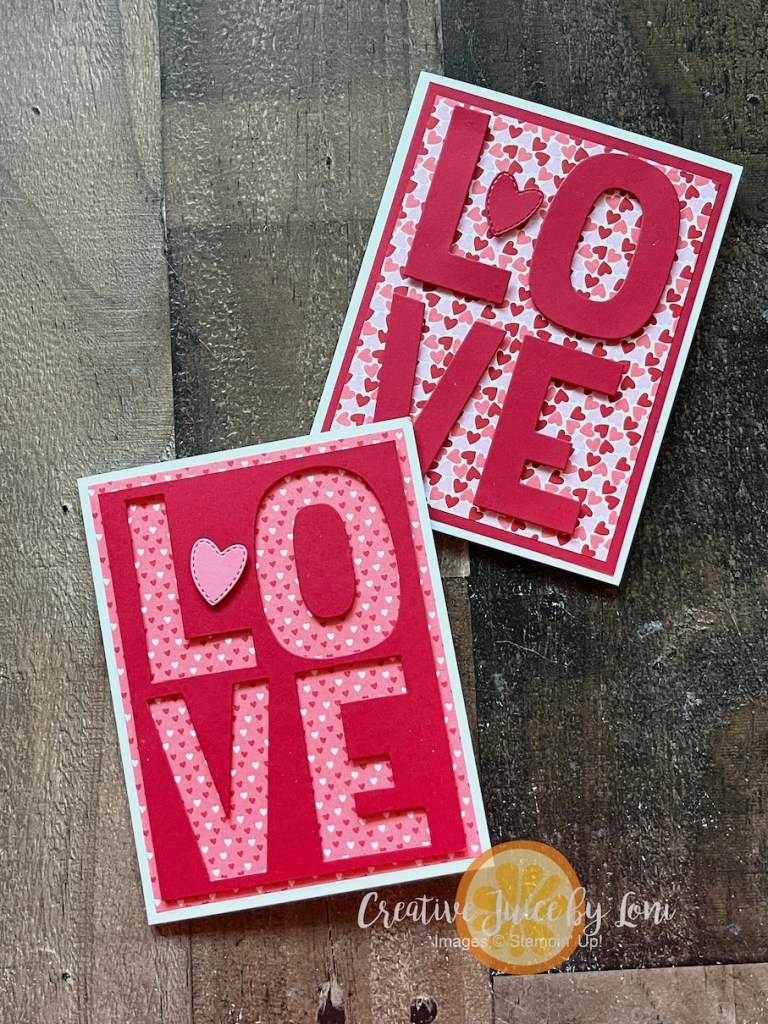
Cutting Guide (supplies listed at bottom for easy adding to cart!):
- Two Basic White Thick card bases, 8.5″ x 5.5″ scored at 4.25″
- Two Real Red card stock layers: One cut to 5.25″ x 4″ and one 5″ x 3.75″
- Two pieces of Made with Love Designer Series Paper: One cut to 5.25″ x 4″ and one 5″ x 3.75″
- Scraps of Real Red and Flirty Flamingo for heart embellishments.
It’s so simple to do, and you can follow along with a short video. ** Remember to die cut the letters from the smaller Real Red card stock (5″ x 3.75″)
Important note: There are just a few days left to earn BONUS DAYS coupons with each $50 ordered from my Stampin’ Store by February 2nd!


Collect all the coupon codes emailed to you after your order(s) and set a reminder to redeem them in February!
Product List![Made With Love 12" X 12" (30.5 X 30.5 Cm) Designer Series Paper [ 167054 ]](https://assets1.tamsnetwork.com/images/EC042017NF/167054s.jpg "Made With Love 12\" X 12\" (30.5 X 30.5 Cm) Designer Series Paper [ 167054 ]")
![Party Alphabet Dies [ 165263 ]](https://assets1.tamsnetwork.com/images/EC042017NF/165263s.jpg "Party Alphabet Dies [ 165263 ]")
![Real Red 8-1/2" X 11" Cardstock [ 102482 ]](https://assets1.tamsnetwork.com/images/EC042017NF/102482s.jpg "Real Red 8-1/2\" X 11\" Cardstock [ 102482 ]")
![Basic White 8 1/2" X 11" Thick Cardstock [ 159229 ]](https://assets1.tamsnetwork.com/images/EC042017NF/159229s.jpg "Basic White 8 1/2\" X 11\" Thick Cardstock [ 159229 ]")
![Flirty Flamingo 8-1/2" X 11" Cardstock [ 141416 ]](https://assets1.tamsnetwork.com/images/EC042017NF/141416s.jpg "Flirty Flamingo 8-1/2\" X 11\" Cardstock [ 141416 ]")
![Valentine Kisses Dies [ 167029 ]](https://assets1.tamsnetwork.com/images/EC042017NF/167029s.jpg "Valentine Kisses Dies [ 167029 ]")
![Stampin' Cut & Emboss Machine [ 149653 ]](https://assets1.tamsnetwork.com/images/EC042017NF/149653s.jpg "Stampin' Cut & Emboss Machine [ 149653 ]")
![Stampin' Dimensionals [ 104430 ]](https://assets1.tamsnetwork.com/images/EC042017NF/104430s.jpg "Stampin' Dimensionals [ 104430 ]")
![Stampin' Seal [ 152813 ]](https://assets1.tamsnetwork.com/images/EC042017NF/152813s.jpg "Stampin' Seal [ 152813 ]")


")
 Designer Series Paper")


 Glittered Ribbon")


")
 Designer Series Paper")


")


")


 Bordered Ribbon")


 Designer Series Paper")


 Textured Ribbon")

