Obviously, I’m a citrus girl, but if I had to choose between lemons or limes, limes win!
Now that the color Lemon-Lime Twist is back in the Stampin’ Up! core color family, I used it to whip up a card recipe. And if you are looking for a recipe to DRINK, check out the Brazilian limeade recipe below.
If it looks good enough to drink and your mouth is watering, try this BRAZILIAN LIMEADE recipe to cool off with…you’ll come back to thank me, for it truly is SO REFRESHING.
Place sugar, limes, sweetened condensed milk, and 2 cups of water in a blender. Pulse for 5 seconds (until the limes are well incorporated) then pass through a strainer and add remaining 4 cups of water.
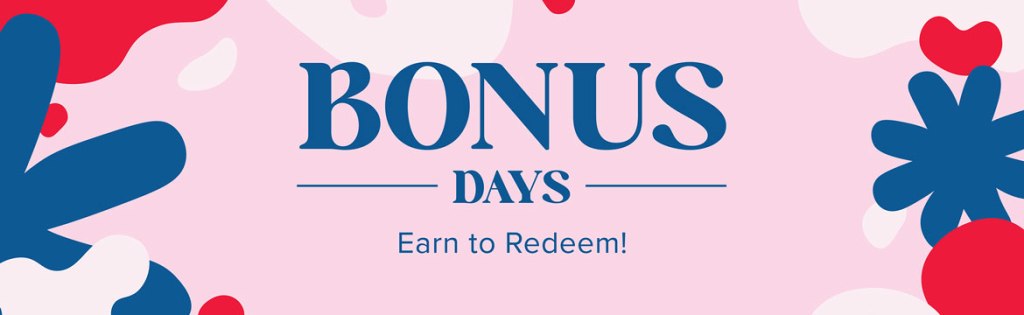
Just a few more days to earn BONUS DAYS coupons (ends July 31st) then you may begin redeeming your coupons in August!
DO YOU HAVE A FAVORITE CITRUS FRUIT? Tell me in the comments!
Hey! It’s good to see you here and know you’ll like the next 3-D embossed card idea. Are you pinning these ideas for inspiration when you want some texture on your cards and paper crafts?!
Stampin’ Up! has an embossing folder that matches the Countryside Inn Designer Series Paper – The Countryside Blossoms E.F. matches one of the patterns perfectly! – but you don’t have to have a matching design to emboss on Designer Series Paper. For this card, I debossed the 3-D Dots into a striped citrus pattern from the Delightfully Eclectic mega-pack:
You CAN combine dots & stripes!
I appreciate that the pattern on the paper hearkens back to my signature “Sweet Citrus” bundle, and in my Tips & Technique video, I used the HYBRID 3-D embossing folder to show you how that one CUTS & EMBOSSES at the SAME TIME!
That’s the third embossing folder from the Basics 3-D Embossing Folder Trio in the Online Exclusives section of my store, but I do have another card to share with you tomorrow.
Make your own ZESTY birthday card with the supplies listed below, and remember to save your BONUS DAYS coupons from July in a folder in your email so you can easily find them to SPEND in August!
I’d reckon you didn’t see thePaper Florist dies that are new to the Stampin’ Up! catalog, did you?
You’ll have them on your radar now~ they’ll make you into a flower arranger extraordinaire!
This project started with a wood cut-out from Dollar Tree and layered Designer Series Paper, spelled out m motto and adorned it with these gorgeous card stock blooms.
Enjoy a how-to video with a few helpful hints:
July is my birthday month! It always feels like a party, and I am content with all that I’ve been blessed with, so it’s an opportunity to glorify God by sharing my bounty. That’s why I’m supporting my personal charitable passion, Operation Underground Railroad by donating 10% of my sales in July (plus 10% to another organization chosen by YOU).
With more than 40 million victims of human trafficking worldwide (25% reported to be children), my heart hurts for every child who doesn’t have the freedom to be innocent. And it’s happening here.
You are welcome to add to my #riseupforfreedom fundraiser. Family and friends- in lieu of birthday gifts, please consider a donation!
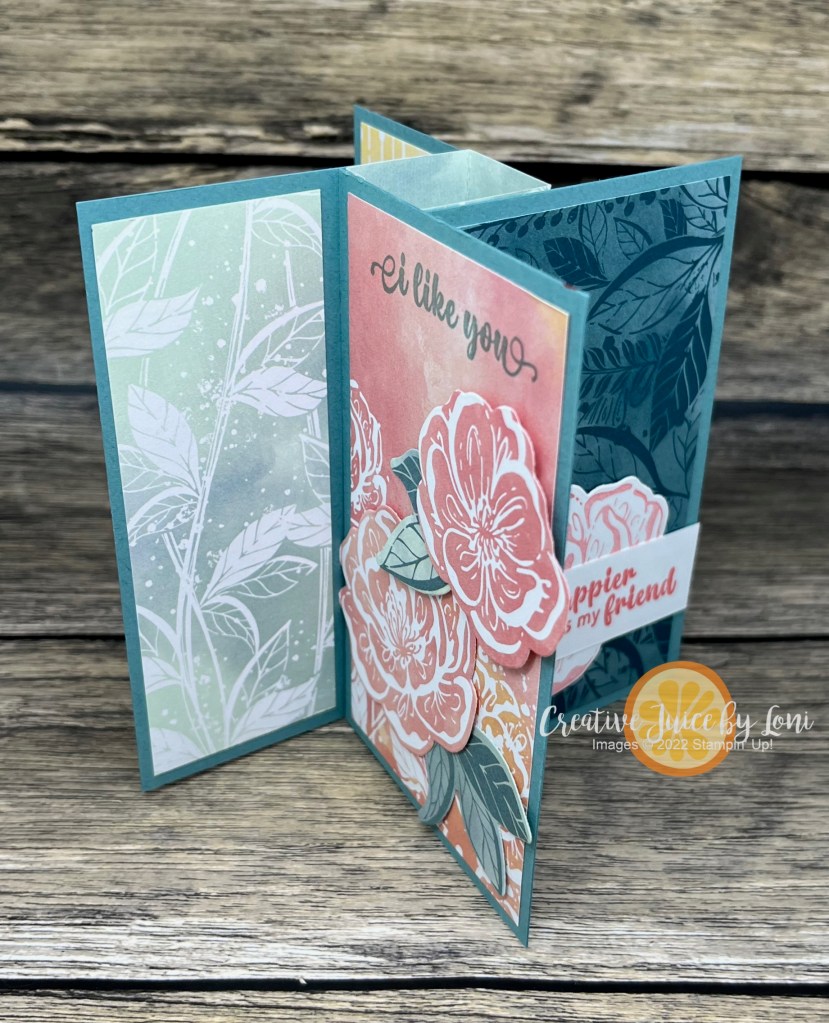
Sometimes I obsess over WHICH SIDE of my pretty Designer Series Paper I should use, and if this dilemma sounds familiar, you will like today’s card design because it allows you to show BOTH sides of the paper!
You’ll be seeing more of these flowers next Monday, but I also wanted to point out the incredible detail of the photographic style of the Masterfully Made DSP~ I did NOT tear any of the Lemon Lime Twist paper, that is just a flat layer, but it LOOKS 3-D!!
When you watch the replay of my live demonstration, you’ll learn how this MEGAPACK of paper patterns gives expanded options for some of the newer products in our catalog, and offers versatile designs to enhance any project.
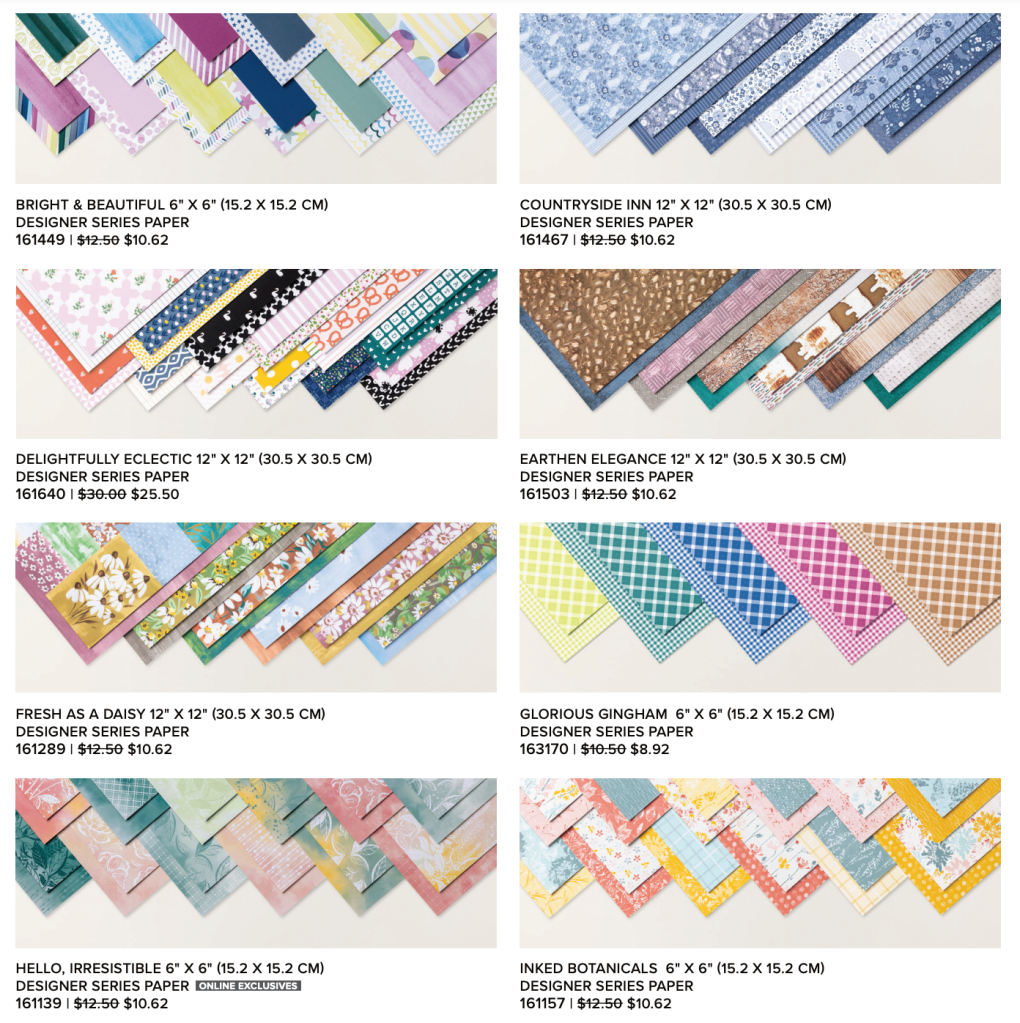
Final reminder that most of our Designer Series Papers are 15% off through the end of June, 2023! Don’t miss a chance to stock up with paper that has new colors and textures to keep you crafting through the summer…
Looking for the supply list?Simply click on the orange buttons!
BREAKING NEWS: FREE SHIPPING day just announced! Set an alarm for Wednesday, June 21st and earn free shipping on your orders over $75 that day only!
Paper crafters pride themselves on using scraps, so when we find a way to NOT WASTE A PIECE of pretty paper, we must give it a try!
I appreciated this idea from fellow demonstrator Rachel Tessman, and with the Glorious Gingham Designer Series Paper ON SALE through June, knew it was time to share it with you! It’s a fabulous way to get 4 angled corner backgrounds from one 6″ x 6″ piece of Designer Series Paper, and you’ll love how simple it is.
Lay a ruler down and mark 1-1/2″ on each bottom right corner as you rotate the paper 90-degrees four times. Mark it on the BACK SIDE of the paper you want to use, then you don’t have to worry about erasing lines! Then connect the marks across from each other like this:
Use your Paper Trimmer to cut along each of your lines and you’ll have 4 angled pieces to put in the corners of your card fronts:
My card base is Thick Basic White Card stock: 5-1/2″ x 8-1/2″, scored in half at 4-1/4″
Pretty Peacock card stock: 5-1/8″ x 3-7/8″
Basic White card stock: 5″ x 3-3/4″
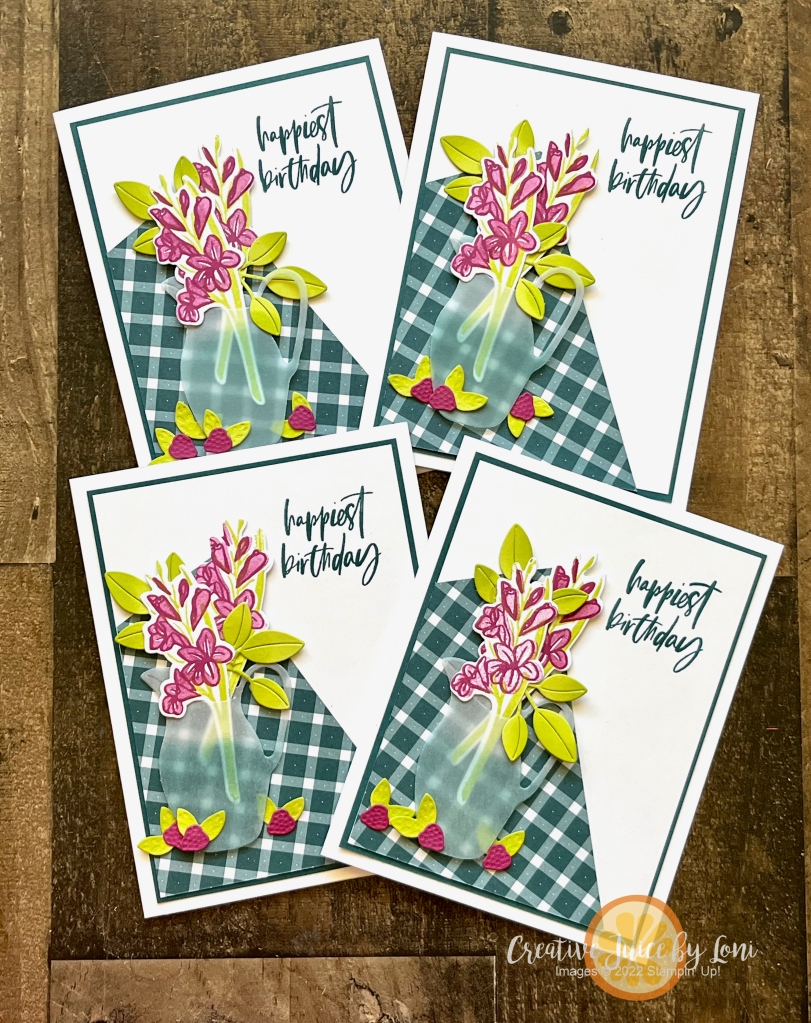
I used the So Refreshing Bundle to complete my cards, and here’s a video to watch & learn how to:
Filled my pitcher with “water” and stuck in the flowers:
Let me know if you try it, or share your version in my Creative Corner Facebook Group for my V.I.C.’s (Very Important Crafters). Now turn up the alarm to remind you to order on Free Shipping Day and add these supplies to your cart:
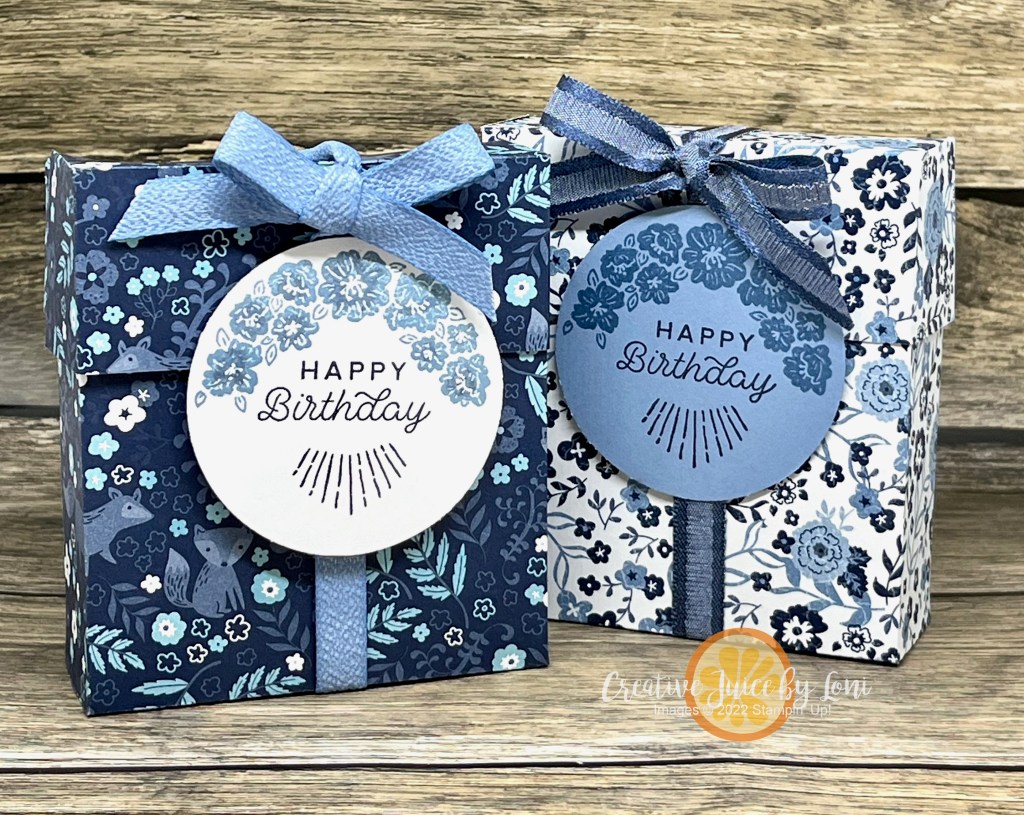
Today’s project encourages you to USE THAT PRETTY PAPER- Don’t hoard it! This hinge-lidded gift box (3.5″ x 4″ x 1-1/4″ finished size) is speedy to make, and begins with a 6″ x 12″ piece of Designer Series Paper.
Score along each long size at 1-1/4″ in (or if you are using a Simply Scored board, put the short end at the top and score at 1-1/4″ and 4-3/4″)
Turn the 12″ side of the paper along the top of your trimmer or Simply Scored, then score at 4″, 5-1/4″, 9-1/4″ and 10-1/2″. You’ll trim at each of these score lines from the long edges just into the intersecting 1-1/4″ score line.
**If your paper is DIRECTIONAL (meaning there is a top and bottom to the pattern), watch the video to see instructions- or make sure that the top of your design is at the left when you make the first 4″ score along the long side.
This box is ideal for 2 bolts of Stampin’ Up! ribbon (or one large bolt, like the Boho Blue one I showed in the video), and it’s tight, but will work for 2 classic ink pads, or a myriad of other small gifts!
Three things to note if you are reading this in June 2023:
Most of the Designer Series Paper in the Stampin’ Up! Annual Catalog is 15% off during June only!
You CAN add discounted paper to the Starter Kit+ Special Offer in June! It’s the best VALUE for anyone with a long wishlist or who wants to try a new adventure- no obligation to try it out.
The Circle Sayings 3-for-Free offer ends June 15th!
When you purchase the Circle Sayings bundle from my Stampin’ Store by 6/15/23, I’ll email you a tutorial for 3 exclusive cards you won’t find anywhere else PLUS I send you the supplies (card stock, ribbon, paper, etc) to make those three cards with your new stamp set and coordinating punch! This is the bundle I used on my box today:
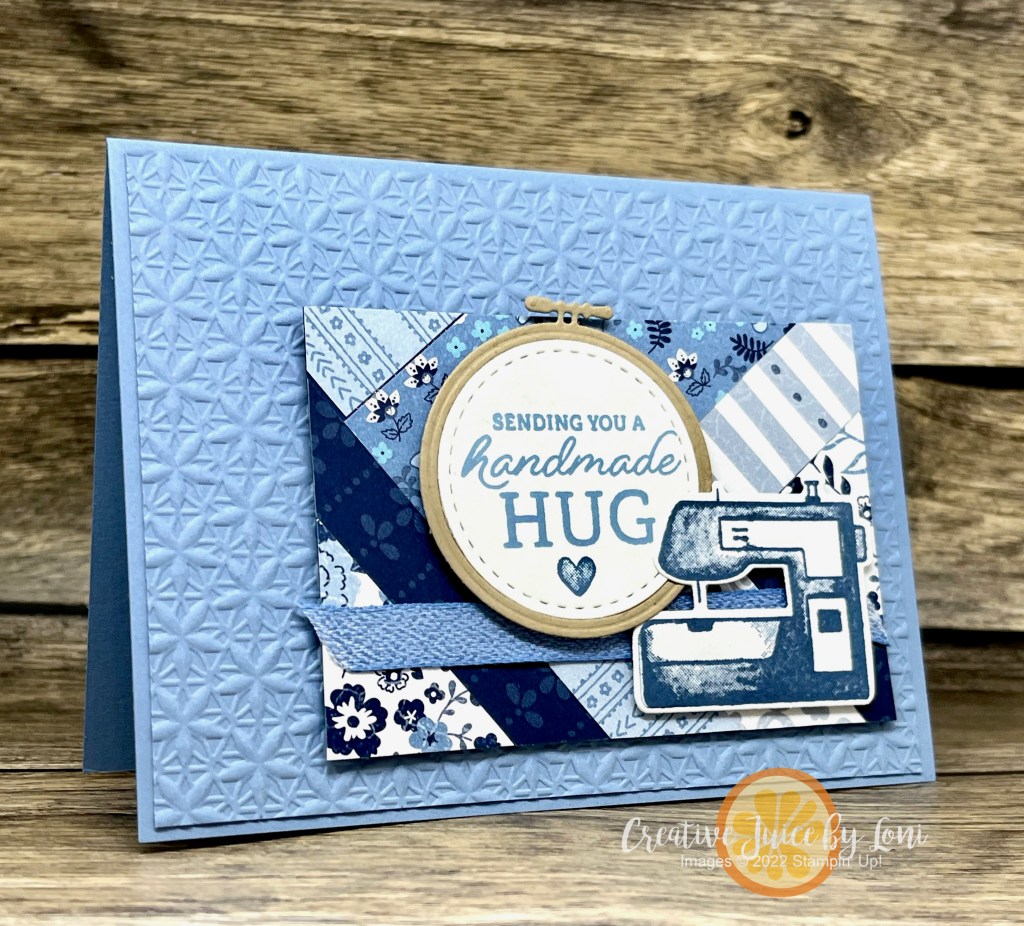
And because I couldn’t decide which I liked best, I made TWO versions, one for “paper-piecers” and the other for “fabric-piecers”!
Which version do you like best? I really want to know!
I can see a quilter including the second card with a comforter they would gift to a loved one!
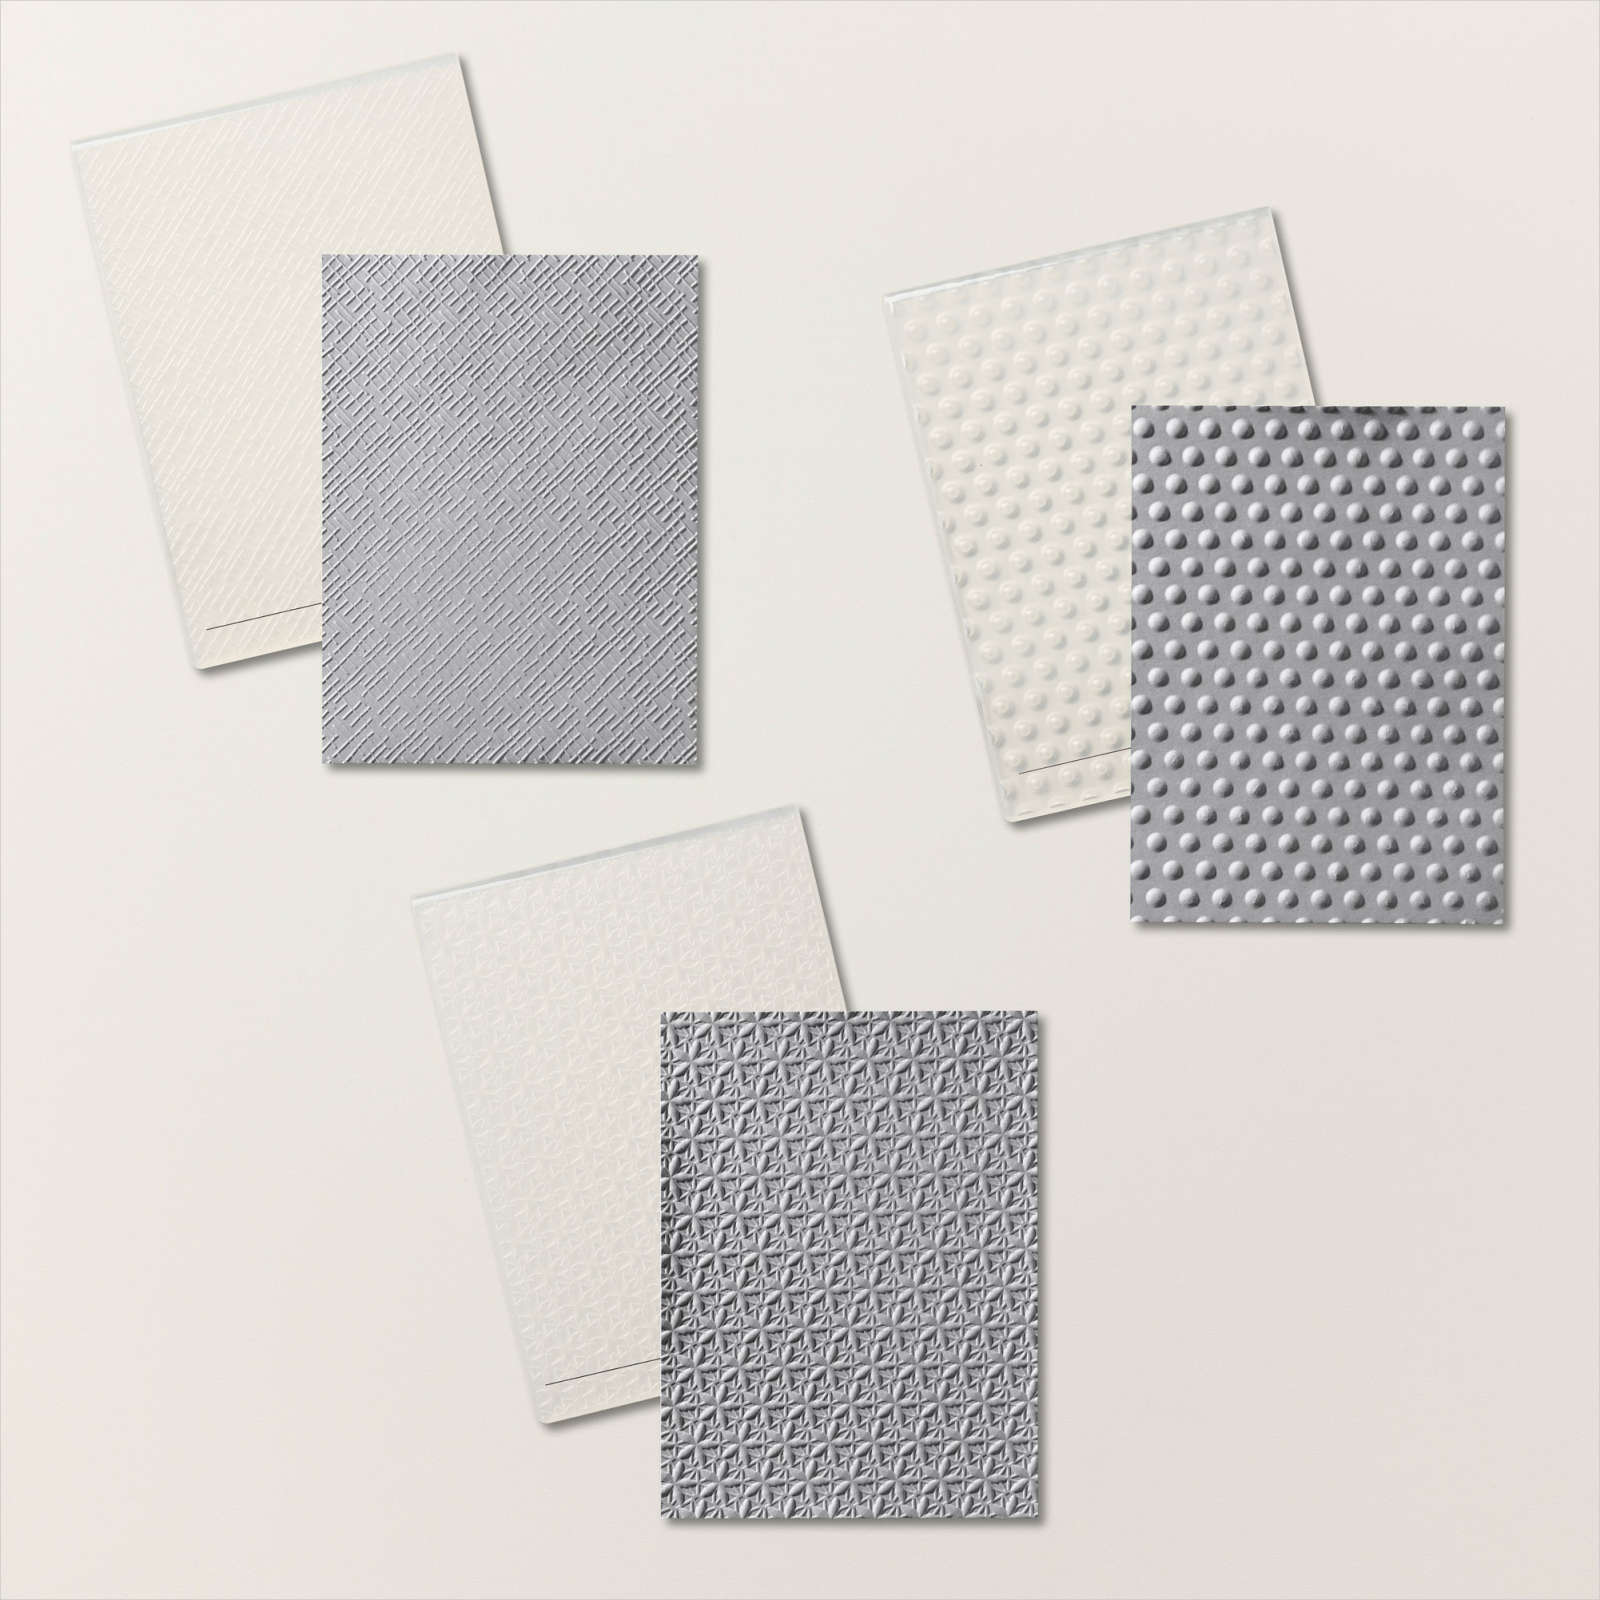
My scraps were pieces of the Countryside Inn Designer Series Paper (15% off during June!) and I paired my paper quilts with the Basics Floral 3D Embossing Folder…have you seen this bundle of *indispensible* textures? Only available in my online store, they are the ones I reach for the most because one of them will go with [almost] anything I’m creating!
And can we take a minute to admire the Boho Blue Limited Edition Mini Cut & Emboss Machine I stamped on my card and the actual one in my Stampin’ Store? I really did stamp it in Boho Blue for my card, but the lighting at night doesn’t look quite right. I love the mini machine for quick cutting and it’s the one that sits on my desk, but remember; the regular size embossing folders only fit in the regular Cut & Emboss Machine.
Use up your Designer Series Paper scraps with this technique: Glue pieces next to each other on a piece of card stock (in line or randomly), then cut to desired size and use it like you would a regular piece of patterned paper!
You are going to want to make this card, believe me!
Since most of our Designer Series Paper is discounted through June 30th, I’ll be demonstrating some projects to inspire you to pull out your patterned paper and use every last scrap. You can set an alarm for Mondays and join me live on my Facebook Page or YouTube Channel at 12:30 pm MT, or watch the replay at your convenience.
Without further adieu, here is the fabulous Pinwheel Tower Card I taught today:
It opens up to stand and displays 4 panels! This card is best created in landscape orientation, giving you plenty of area on each panel to decorate or write a message. The finished size of this card (laying flat) is 4.25″ x 5.5″, so it fits into our Basic Medium Stampin’ Up! envelopes perfectly.
You’ll be delighted at how EASY this fancy card is to create and if you want to craft along with my video below, gather these supplies:
One 4-1/4″ x 4-1/4″ piece of Designer Series Paper
Four pieces of 2-1/2″ x 4″ Designer Series Paper that coordinate (don’t have to be the same pattern, but from the same pack) with another four 1-1/2″ x 4″ pieces of Designer Series Paper.
Four 2-3/4″ x 4-1/4″ panels of card stock that match one of the colors from your Designer Series Paper
Simply Scored Board (or paper trimmer with scoring blade)
Adhesive
Once you’ve made a Pinwheel Tower Card, you may want to make a larger version in a slimline card, which could also be a “mini album” if you add photos to some of the panels!
This version is 9″ x 4″ when flat, so it fits into a legal envelope (don’t forget to stamp your envelope, too).
For this larger version, here are the supplies you’ll need (and adjusted measurements):
One 4″ x 4-1/4″ piece of Designer Series Paper (still score along the longest side at each inch)
Four pieces of 3-3/4″ x 4-1/4″ Designer Series Paper (or cardstock) with another four 3-1/4″ x 3-3/4″ pieces of Designer Series Paper (or cardstock and scraps of Designer Series Paper, as shown)
Four 4-1/2″ x 4″ panels of card stock that match one of the colors from your Designer Series Paper
Simply Scored Board (or paper trimmer with scoring blade)
Rounding up all the JUNE 2023 Stampin’ Up! goodness you need to know about in one place!
Let’s start with a story.
While other teenagers were taking the ACT for college prep and planning out their lives, my goal as a Junior in High School was to work at Disneyland or fly the Millennial Falcon. When my career counselor dashed the dreams of flying the falcon, I thought perhaps I’d drive an 18-wheeler—the closest comparable for a girl with terrible vision who knew she wouldn’t legally be allowed to fly a plane.
When I eventually had to choose a major in college, I chose Travel & Tourism for the adventure it promised, then I got married just before my senior year and ended up at a different university that didn’t offer Travel as a major, so I switched to (and graduated in) Music Education.
Fast forward a few years and with two babies to take care of, I gave up teaching piano lessons for a season to be a mom. It was wonderful, but I needed adult conversation and affirmation (funny how no one gives you kudos for a clean bathroom or balanced meal). It was at that time I “discovered” rubber stamping and what a fabulously flexible and comfortingly creative career that has been!
While I started for the fun and joy it brought (and a reason to “play” in the evenings at workshops with women who connected through creativity), I’ve STAYED for the relationships…many of them gathered into the Sprinkled Ink Team. Supporting my creative community makes me thrilled to get up in the morning, and Monday is my favorite day of the week, for I get to “see” you on my YouTube/Facebook lunchtime crafting!
NOW is the time to begin **YOUR** Stampin’ Up! Story – or just take advantage of the best shopping deal – with the Starter Kit+
There is NO OBLIGATION when purchasing the Starter Kit+ and if you have a wish list over $100, give it a try! You’ll get to peek behind the Stampin’ Up! demonstrator curtain (and my Sprinkled Ink Team support) for 3 full months to see if it’s a path you’d like to continue, all while getting a discount on your own purchases as you make up your mind.
Having some of this pretty patterned paper on hand helps you flow into your “Maker Mode” when you are in the zone! Which will you order first?
ADDED VALUE: Choose Designer Series Paper at the discounted price to add to the Starter Kit+ this month, stretching the value that you can add even more amazing!
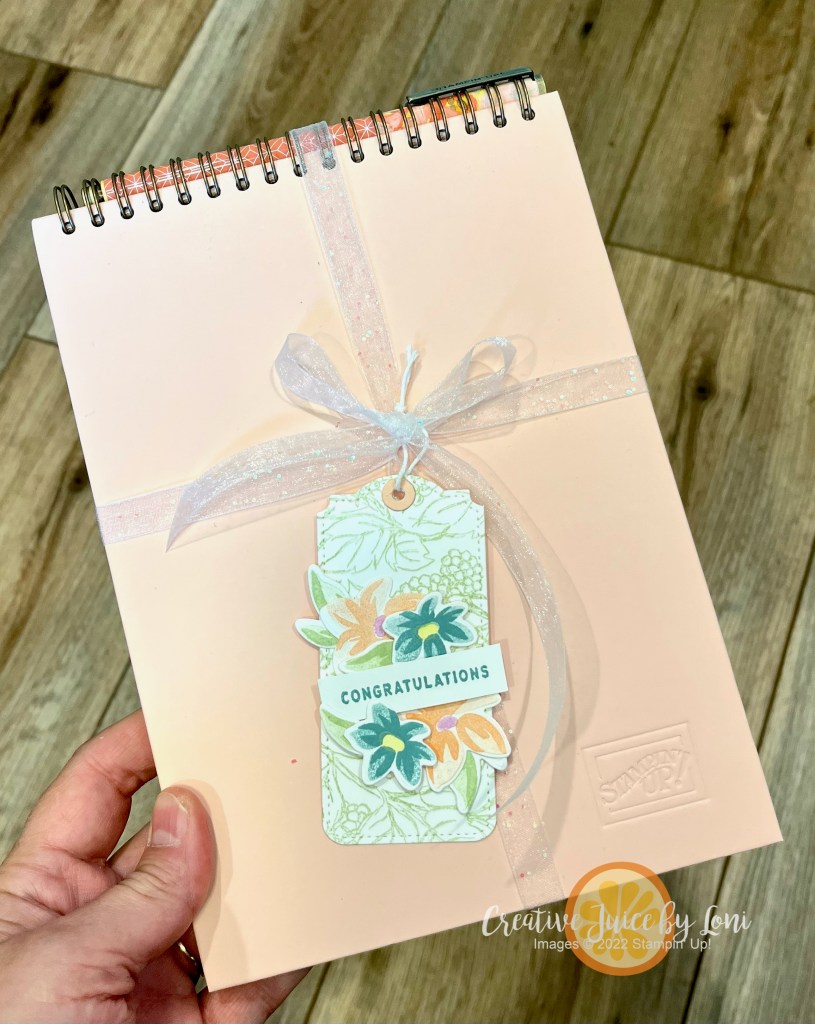
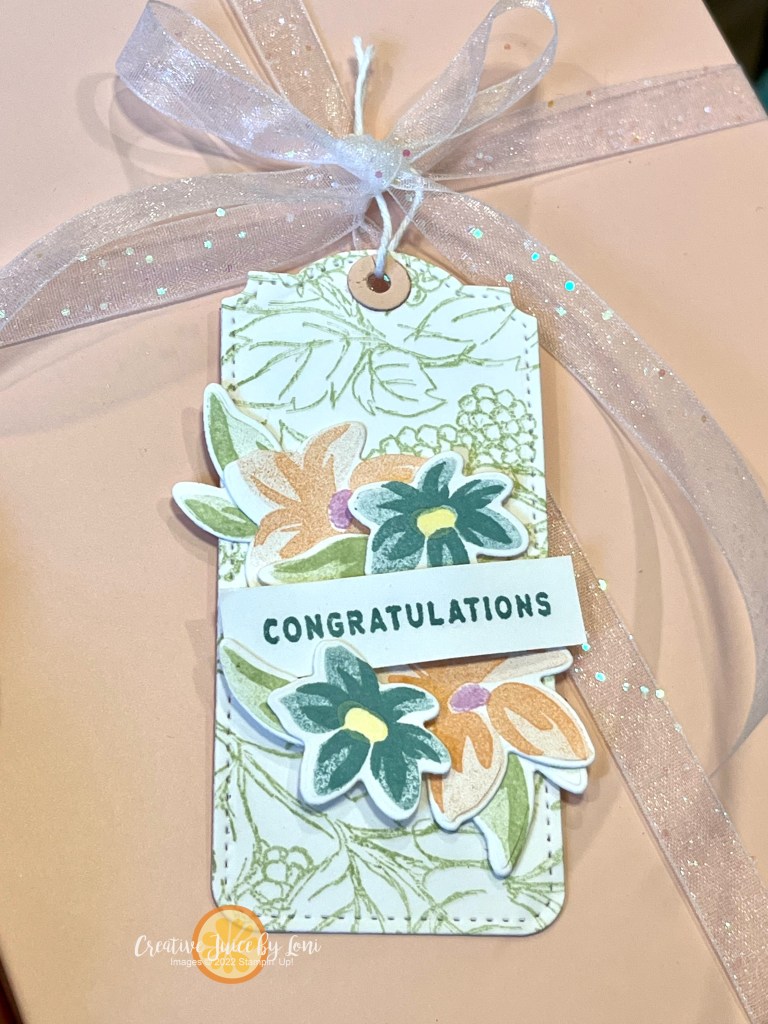
Something that makes my heart swell is when a member of my Sprinkled Ink team promotes to a new level, and I get to celebrate their accomplishment! I’m like a proud mama! If it’s one of my own direct demonstrators, I send a gift to reward their hard work. Today I got to drop off a special notebook & pen with a one-of-a-kind tag created just for Paula’s promotion to Bronze Elite Demonstrator, and look forward to cheering her on as her business/her way just gets better!
Welcome to the May 2023 New at SU! blog hop! As is our tradition with a new annual Stampin’ Up! catalog and the 2023-2025 IN COLORS (shown under our updated banner, above), we are here to help you fall in love with these hues!
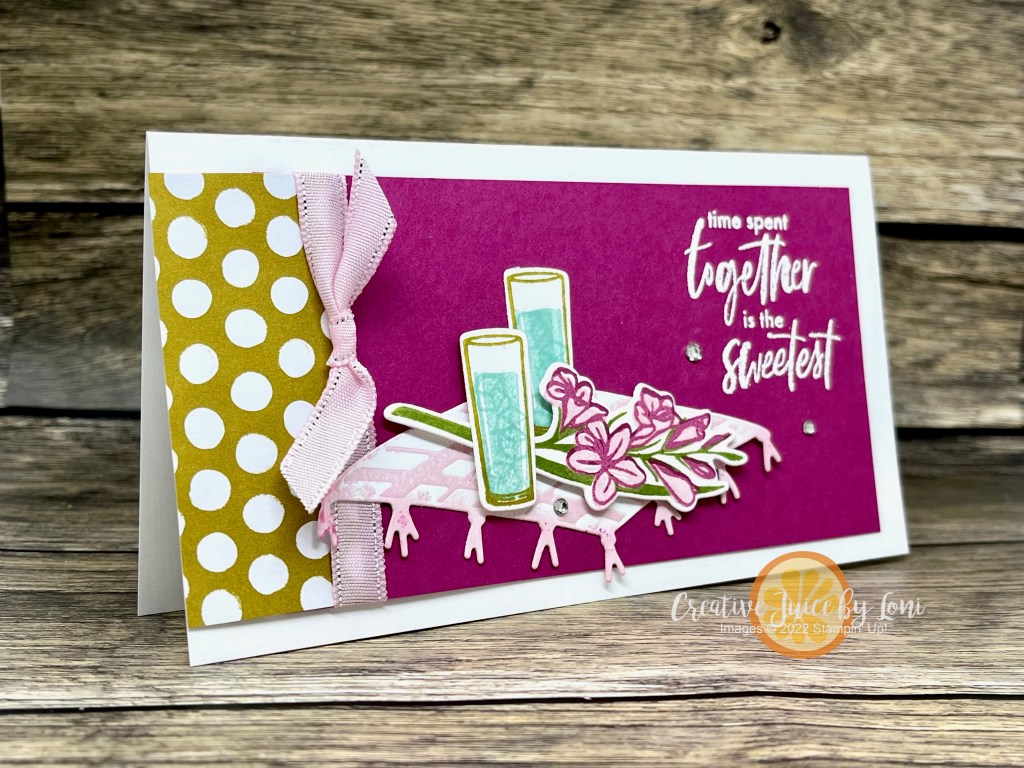
I chose to use the In Color I liked **the least** to show you that it really can create a beautiful color scheme. Wild Wheat contrasts beautifully with Berry Burst (a returning core color I adore) and Bubble Bath (a NEW core color!).
My mini slimline card – finished size 6.25″ x 3.5″- uses the So Refreshing bundle that I had to collect to show off my creative juice (literally). It’s a clean card design accented by silver sparkles in the edge of the ribbon and rhinestone accents.
To get the plaid on the picnic blanket, I lightly tapped my Bubble Bath ink pad over the blanket die (included in the bundle) before running it through the Cut & Emboss Machine, then sponged the same color onto the tassels when it was cut out.
Wild Wheat is a GLUTEN-FREE color, so don’t be afraid to try it! I found my color palette in the 2023-2025 In Color Chart below, which you can download and print for reference.
Next, discover another lovely In Color + Core Color combination from our international design team and PIN your favorite color combinations onto your Pinterest boards! Click on any link below
Join my IN COLOR COLLECTORS CLUB and receive one set of all-new In Color products each month from May-September 2023! May is BOHO BLUE and club membership includes an exclusive project with prepared pieces and instructions in addition to all the Boho Blue products. Click image below to learn more or join.


")

 Designer Series Paper")


 Designer Series Paper")


 Designer Series Paper")


")


 Bordered Ribbon")


")


 Textured Ribbon")


 Designer Series Paper")
")


 Designer Series Paper")


")

 Sheer Ribbon Combo Pack")


