A Thank-You Faux Step Card

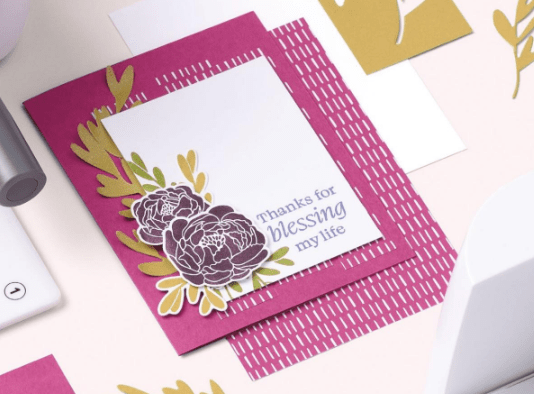
Have you explored the Online Exclusive products in my Stampin’ Up! Store? One of the ones I’ve been loving is the Hello, Irresistible Suite and this Faux Step Card is a snap to put together using the products in the suite!

This is a Portrait (tall) version of the Rain or Shine card I created a few months ago (watch the tutorial HERE) and the card base measurements are:

  • Card Base is 11″ x 4.25″ (scored at 2″, 4″ and 7.5″)
  • Designer Series Paper: 4″ x 1.75″ (Pretty Peacock lattice piece) and 4″ x 3.25″ (leaves).
  • Tall panel is 2.25″ x 11″, scored at 5.5″
  • Designer Series Paper is 2″ x 5.25″ (Flirty Flamingo pink piece)

Emboss the greeting in white embossing powder on Basic Black card stock and fussy cut for the front. I did use the now-retired white seam binding ribbon around the bottom step panel, but you can substitute any that you have in your collection.

The coordinating dies cut the flowers from both the stamp set AND the Designer Series Paper, as I’ve done here, and then I embellished with a few of the Frosted Dots (also in the suite) using mini glue dots to adhere to the center of the flowers, or scattered across the front.

Once you make this card, you’ll want to make many more just like it, so cut your paper accordingly! Shop the supplies here:

Product List

Complementary Colors in Card-Making

Understanding a COLOR WHEEL a little bit will help you put together beautiful color palettes for your stamping projects, and today we are talking about COMPLEMENTARY colors, or colors directly across from each other on the color wheel:

When you choose complementary colors, you create HIGH ENERGY in a palette, like this turtle card made from the Playing in the Rain stamp set from Stampin’ Up! using Azure Afternoon (blue) and Pumpkin Pie (orange):

You can always add a bit of a third color (in this case, Granny Apple Green) and still keep the two main colors in focus!

One thing I love doing with a new catalog is to look for card layouts I can copy. Both of the cards I am sharing today were inspired by this card on page 152 of the annual catalog (154 in the digital version):

This next complementary color card follows the same pattern or card layout, but uses the LOVELY new Lemon Lolly color paired with Fresh Freesia, which I cannot get enough of:

This time I used the Sweet Citrus stamps and dies (my signature for creative juice) and embossed the front panel with the Raindrops embossing folder after I stamped the greeting.

All of this is shared in my weekly video, and if you are like me and want it to play faster, just speed up the playback by clicking on the gear at the bottom of the YouTube video!

Now you know a little more about complementary colors, try it yourself! Find a card design in the catalog (or use one of my previous samples here on CJBL) and re-create it with your own colors and stamps.

If you want to copy one of the cards I shared today, here are the supplies I used for both cards:

Product List

I appreciate the opportunity to serve your creative needs! Make time to stamp and find your happy place.

Home Decor SU! Dollar Tree Style (+ Stamp Clubs!)

It’s hard to resist wandering the aisles of the dollar store…it’s a treasure hunt, and the find of these decor pieces stirred up my creative juice:

You can paint them -or leave them natural- and use your favorite Designer Series Paper to put inside the circle! My version is painted white and I used the Hues of Happiness paper (now sold out on the Last Chance Sale).

Then I used the Alphabet a la Mode Dies to spell out a favorite quote (or ” ________’s Stampin’ Studio” if you are decorating your craft space). If you adhere Adhesive Sheets to the back of a piece of black craft foam, you’ll be able to cut out the letters on your Cut & Emboss machine and attach them to your sign easier. Foam doesn’t keep as rigid a shape as paper, but a TIP is to lay a ruler or straight edge down on your paper to line the letters up on BEFORE you adhere the paper inside the frame!

It’s nice to have dimensional letters that are black on all edges with the craft foam.

This was a project we made at our last Stamp Club in April– We start a NEW CLUB in June (meeting every other month) and if you are in Southern Utah, you can sign up to be part of the club or learn more here:

NOT IN SOUTHERN UTAH? I’ve got you!

You can host your own virtual party, join my team and start your own club OR be a part of my IN COLOR CLUB from ANYWHERE!

Each month from May 2023 through September 2023, you will receive one of the new IN COLOR:

  • Classic Ink Pad
  • Classic Ink Refill
  • Stampin’ Blends Combo Pack
  • 5 sheets of Card Stock
  • Two 6″x6″ pieces of Designer Series Paper
  • 2 yards of ribbon

PLUS a bonus embellishment each month!

PLUS an exclusive project tutorial (supplies for the project will be included FREE, you’ll use your own ink and any stamp set to complete the project)

PLUS each month a member of the club will receive a set of the five 2023-2025 In Color Stampin’ Write Markers FREE until everyone has a set!

This will be the order in which the colors will arrive: May- Boho Blue, June- Copper Clay, July- Wild Wheat, August- Moody Mauve and September- Pebbled Path

Monthly Cost: $35 each month (plus $6 for shipping to you if you can’t pick up from Loni’s house in Hurricane, UT).

Click the image above to join the In Color Club by May 15th!

Yes, you can be a member of BOTH CLUBS

Something Old, New & Blue for a Sketch

This is the great clean-out week in the Creative Juice Stampin’ Studio as I prepare for my New Catalog Carnival & BOGO Sale on May 6th!

As I was sorting through things, I found a few items that were retiring which I wanted to combine with a new bundle coming in the 2023-2025 Catalog: A piece of By the Bay Designer Series Paper and the Seashells 3-Dembossing folder. So when I saw the Freshly Made Sketch #FMS582 for the week, I knew exactly what to do!

Using a sponge dauber and my Whisper White Craft ink pad, I made the embossed background stand out a bit by rubbing the ink over the shells and seaweed, then pulled colors from the Designer Series Paper (Balmy Blue, Crumb Cake, Night of Navy and Soft Sea Foam) to use as my color palette.

If I had a “spirit shape” it would be a circle (I don’t like corners), so the Circle Saying stamp set – which coordinates with a new 2-3/8″ circle punch – was part of my first demonstrator pre-order from the new catalog, which you will be able to shop from starting May 2nd. HOWEVER, if you want to combine them with the embossing folder or pretty paper, you’ll need to snag them now in the LAST CHANCE SALE:

The Circle Sayings Bundle (photopolymer stamp set + 2-3/8″ circle punch) will be available on May 2nd, and here are the other supplies to collect NOW for this card:

Product List

Peek-a-Boo Pocket Card

Every crafter loves the feeling of using up *every*scrap* of pretty paper. It’s a magical feat of unparalleled proportions! That’s how I feel today, after successfully finishing off a whole pack of Favored Flowers Designer Series Paper from Sale-a-Bration.

After using up a bunch of this pretty paper for cards to swap at StampFest, I had just a few long strips and edges left that seemed a shame to waste, so I came up with the Peek-a-Boo Pocket card:

Starting with a Basic White Envelope, I cut off one end to create a pocket, then punched a shape for my greeting to peek out of. To finish it off, I embellished with pieces fussy cut from the Designer Series Paper. I demonstrated this for my Monday Lunchtime Live project today:

While the Favored Flowers paper is only available through February 28, 2023 as a free gift option with qualifying order, you could create the Peek-a-Boo Pocket with any Designer Series Paper and punch, like I did with the Hues of Happiness and Heart Punch:

Try this in your craft room and you’ll feel fancy, fast!

Product List

PSSST! Sale-a-Bration ENDS TOMORROW, FEBRUARY 28th! Click below to shop & earn today!

Sweet Songbird Nest Treat Favor

With only 8 more days of our ONLY Sale-a-Bration of 2023, and with the sun shining today, I chose to show you a project fit for SPRING!

This Sweet Songbird next was inspired by some that I had seen previously, and was reminded of when I discovered the Junior Mint Eggs at Dollar Tree! The green is a perfect Mint Macaron color and I wanted to put a next into a Mint Macaron tree.

Because Stampin’ Up! added a few catalog products to the choices for Sale-a-Bration, the Songbird Builder Punch is on the list you could choose free with your $50 US order before February 28, 2023, and while you don’t need the stamp set to create cute birds with the Country Gingham Designer Series Paper, the Sweet Songbirds stamp set does give you options for sentiments, nests and branches.

This would be a sweet favor at Easter dinner or, with the “Welcome” sentiment, at a baby shower, or Spring craft day with friends!

Measurements for the papers:

  • Mint Macaron: 2-1/4″ x 3-1/2″
  • Soft Suede: 3″ x 1-1/2″, scored at 1/4″ along the long sides, and at 1″ and 2″ from end to end to create the “nest”
  • Soft Suede scrap to stamp a nest on and cut out.
  • Scrap of Crumb Cake for sign
  • Country Gingham DSP: 2-1/4″ x 2-1/4″ to punch out bird

Here’s a how-to video (from my Lunchtime LIVE crafting video on YouTube & Facebook 2/20/23):

I had to use up the scraps of gingham paper on my desk, so I also made a slimline card…not a very “little” note of thanks when the finished card is 8-1/2″ x 3-1/2″!

IF YOU CHOOSE THE SONGBIRD BUILDER PUNCH AS A FREE GIFT before the end of February 2023, use item #164422 and order the Sweet Songbird stamp set #158721 as part of your $50 order to qualify for the free punch!

Product List

Pick Your Freebie Fast and Sale-a-Bration Challenge

As Stampin’ Up!’s biggest sale of the year winds down, things start to sell out… yesterday the Dainty Flowers Designer Series Paper Sale-a-Bration exclusive product was the first to go. Have YOU picked your freebie yet? Don’t forget that you get to choose a product with each $50 purchase through the end of the month!

Thanks GOODNESS it’s Friday! The #tgifc408 challenge was to use a Sale-a-Bration product, but it’s too difficult to choose just one, so I chose TWO: the Thanks a Bunch stamp set (free choice with $50) and the Dandy Designs Designer Series Paper (a mega-pack that you could choose with a $100 order). TIP: When you order $150, you can choose both PLUS earn $15 Stampin’ Rewards! It’s a good time to stock up on adhesive, envelopes, card stock and don’t forget to check the clearance rack.

The Tailor-Made Tag was a terrific piece for my garden of carrots! Makes me want to pick one.

Have you noticed that long carrots are sweeter and tastier than baby carrots? You can argue, but it’s true.

Since I loved the layout of this card, I had to try it with a different piece of the Dandy Designs paper and another favorite new set… Sweet Citrus:

Two of the colors I used (Pale Papaya on the carrot card base and Fresh Freesia on the grapefruit card layer) are RETIRING in April. These popular In Colors are known to sell out quickly once the retiring list is released in March (if not before), so remember to add an ink refill for your ink pads and stock up on card stock or coordinating accessories now, while you can take advantage of free products during Sale-a-Bration, and before they are sold out, too.

While some of our Sale-a-Bration products are dwindling, there are additional items to choose from the annual catalog:

Product List

New at SU! Legendary Ride

We took the challenge to show you our favorite bundles from the newest January-April Mini catalog…without using Basic White card stock!

Thanks for pausing along the path of our February New at SU! hop- I’m so glad you’re visiting and hope all the ideas you save or PIN will give you inspiration for your next stamping project.

Basic white is a wonderfully smooth paper to stamp on, but did you know it has a lovely cousin, VERY VANILLA? I’m rarely without a full backup package of either of these stamping staple card stocks, but Vanilla is often overlooked, so I think you’ll see a lot of her today:

The Legendary Ride bundle is part elegant, a bit retro and all high adventure! The glossy black “Ready to Ride” Designer Series Paper that coordinates with the bundle captures it all.

For this card, I embossed the shorter (top) side of a Vanilla card (5-1/4″ x 7-3/4″, scored at 4″) with the Thanks embossing folder, then scored a 5-1/4″ x 4-1/2″ piece of the checkered Designer Series Paper at 1/2″ on the bottom of the directional side (so the images face up when you open it). Next, cut the top with a die from the Basic Borders and adhere it behind the Vanilla card before mounting it to the basic black card stock mat.

Before I cut my letters out, I adhered an adhesive sheet behind a piece of 4″ x 1-3/4″ Very Vanilla card stock and lined up my letters as close as I could. TIP: Hold them in place with a strip of washi tape. Adding the letters to my motorcycle card was easy: Just peel off the adhesive backing and they stick like STICKERS!

BONUS PROJECT:

Then I was left with the negative, which I adhered to a piece of the Sale-a-Bration Favored Flowers Designer Series Paper (a choice free with $50 order before 2/28/23) and cut with the same Basic Borders Die. I added a piece of Gorgeous Grape ribbon (currently in the Clearance Rack in my Stampin’ Store) before attaching it to a Very Vanilla card base:

Die cut once and get two cards!

Now on to more stamping adventures with our design team around the world…click on each one and save your favorites:

February 2023 New at SU! Blog Hop: J-A Mini Catalog Bundles, Without Basic White Cardstock

Powered by blogcarousel.com

If you are in the U.S. and don’t have a demonstrator currently serving you, I’m happy to act as your craft supplier and have listed the items needed for the Legendary Ride card here:

Product List

Valentines Day on Taco Tuesday

An opportunity such as this won’t happen again for 12 more years- the next time Valentine’s day is on a Taco Tuesday isn’t until 2034!

Our family has a classic comfort meal…and yes, it’s TACOS. We’ve eaten tacos for Thanksgiving and Christmas Eve. It’s time to bring them to the day of LOVE & affection. Luckily, my husband shares our obsession, because this card will be for him:

This Double-Z fold card was fun to make at Stamp Club last night, too! The crafters didn’t even complain about fussy cutting or “stuffing” the taco with lettuce, cheese and tomatoes:

A scalloped circle die, a standard hole punch and a few scraps of paper make it easy to create the taco toppings: Scrunch up a few scalloped wedges of Granny Apple Green card stock and glue it behind the taco, then stuff in the other pieces with a dot of liquid glue.

A sheet of craft foam with an adhesive sheet adhered to the back can be cut out on the Cut & Emboss Machine and adhered to the front to give it a chunky texture!

If you haven’t made this type of card before, here are the measurements for this one:

  • Card base: 4-1/4″ x 11″, scored at 2-3/4″ and 5-1/2″
  • Smaller Z-Fold: 2-3/4′ x 10″, scored at 4-1/2″ and 7-1/4″
  • Designer Series Paper: 4″ x 2-1/2″ and 4″ x 5-1/4″
  • I added a piece of 3″ x 3″ Basic Black card stock

Want to create your own version? Here are the supplies I used for my Spec-Taco-Lar Valentine:

Product List

Cute as a Carrot Could Be

Have you earned free products from Sale-a-Bration yet? Today’s project features two SAB exclusives: the Thanks a Bunch stamp set (free choice with a $50 order) and the Dandy Designs Designer Series Paper (free choice with a $100 order). The card design would work beautifully with other stamps and supplies as well.

If you count ink on your fingers, then I am a green-thumb…and these carrots prove it, right?

Here’s a quick video tutorial:

Along with the special products created just for this time of the year, SU! has released MORE products you could choose from our current offerings as free products with qualifying orders through February 28, 2023:

Product List