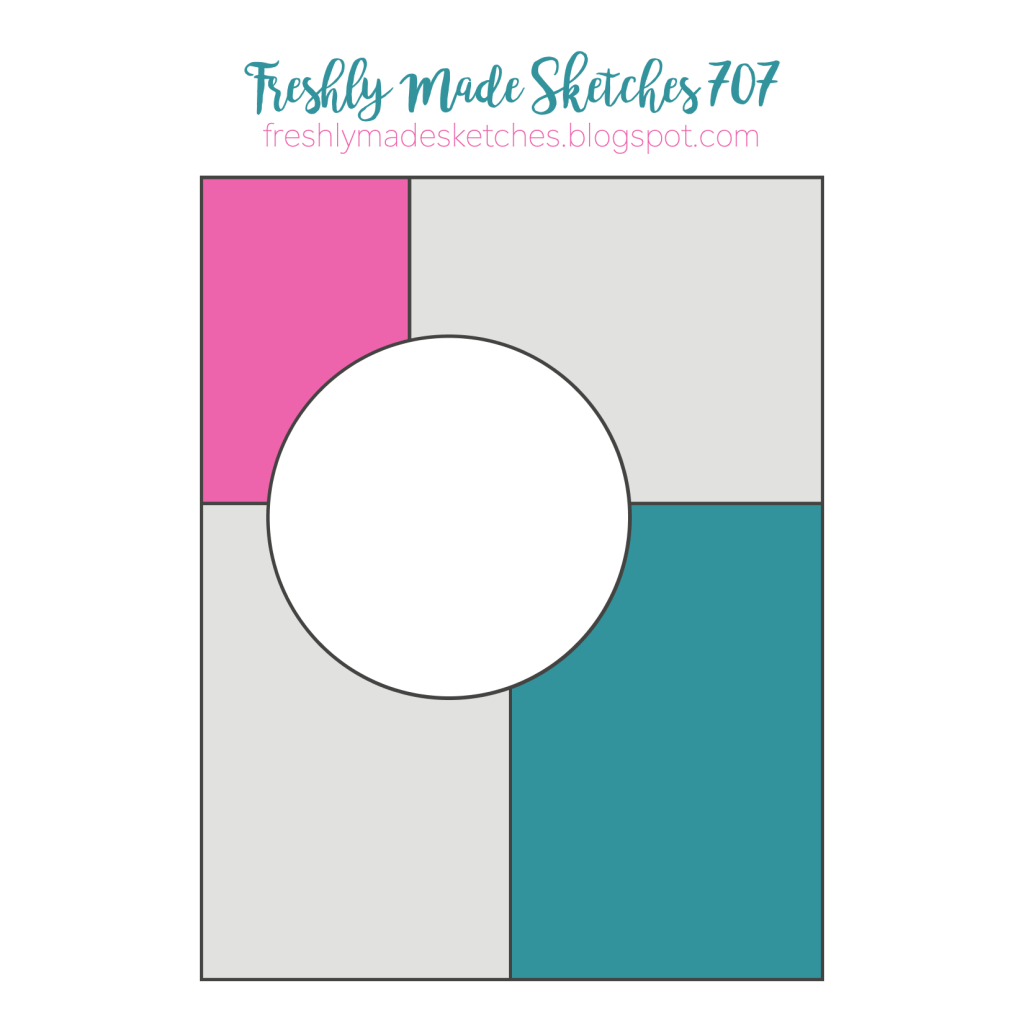
Some punny jokes begin with “What do you get when you mix a ____ with a ____?” but in paper crafting, MAGIC happens when you are given two different starting points, like a color palette and a sketch!
This card was born by marrying the Global Design Project Color Challenge #gdp517 with the Freshly Made Sketch Challenge #FMS707 …AND combining the Abundant Joy Paper Pumpkin Add-On dies with with the Traditions of Christmas Specialty Designer Series Paper! No stamping required for this project 😉
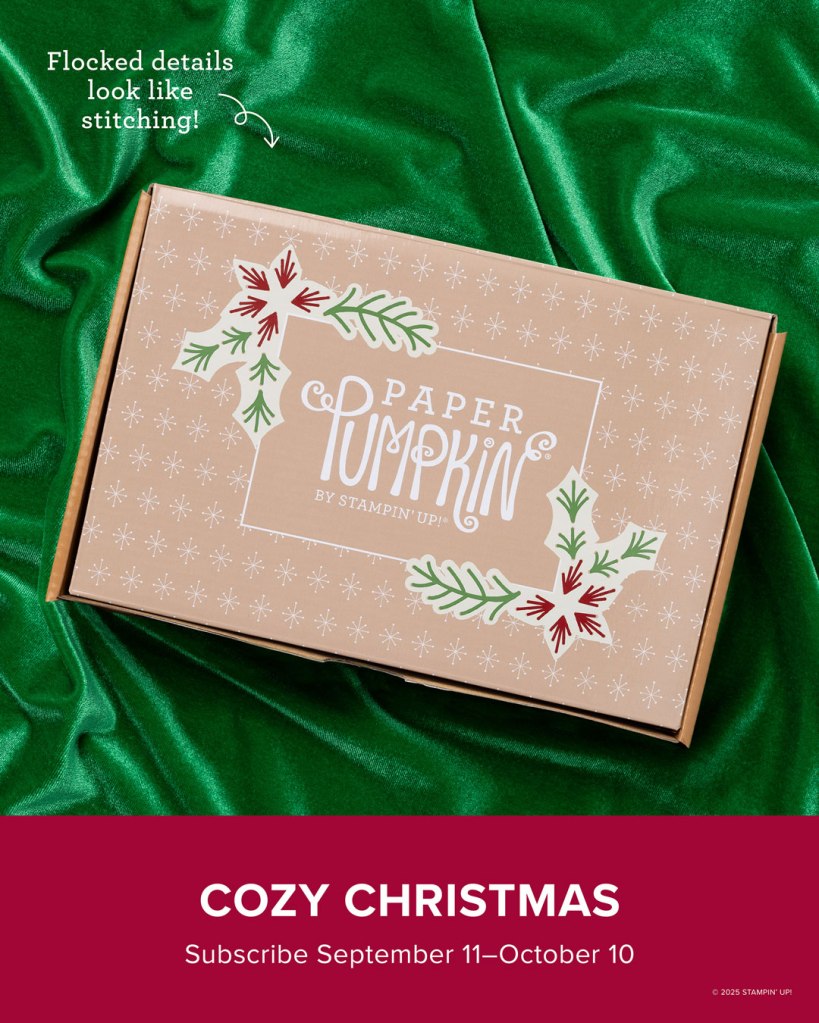
October 10th is the last day to subscribe for the Cozy Christmas card kit, and the dies are darling on their own, with just a bit of pretty paper, and using a bit of glimmer paper for the JOY makes the season sparkle:
Next time you are needing some creative inspiration to strike, pick a color palette and card sketch and make your own mash-up!
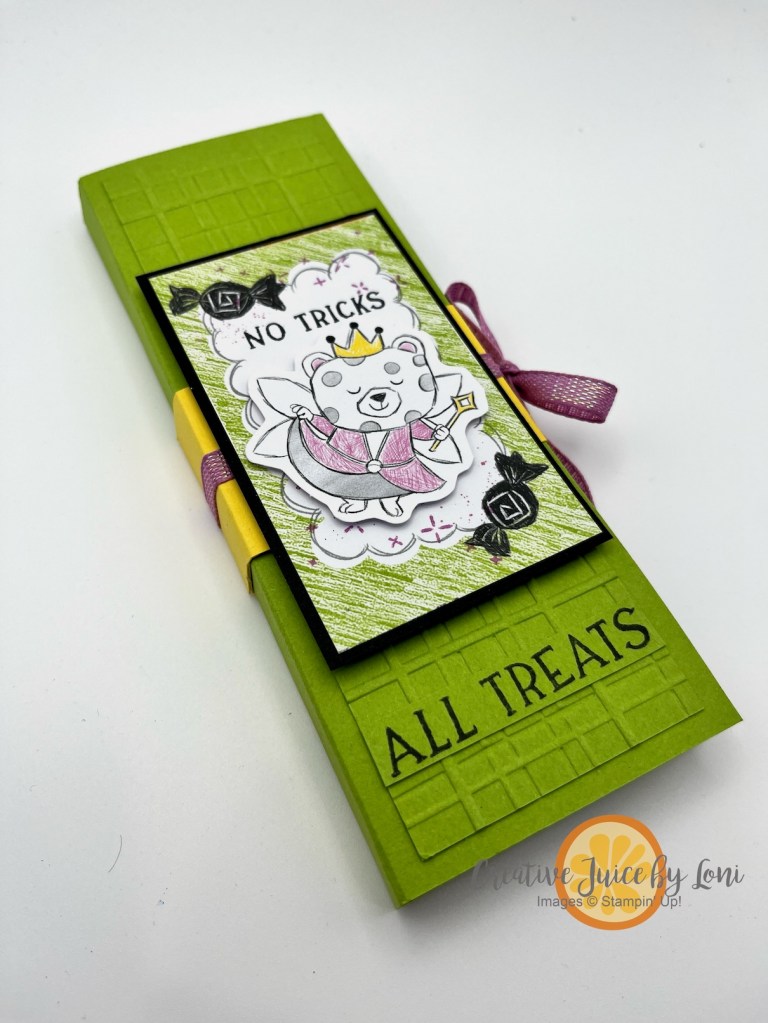
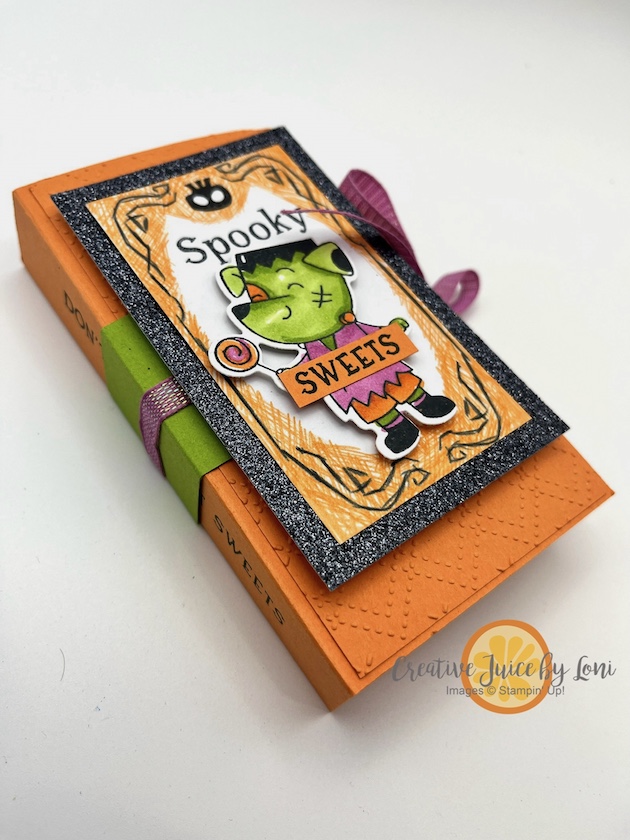
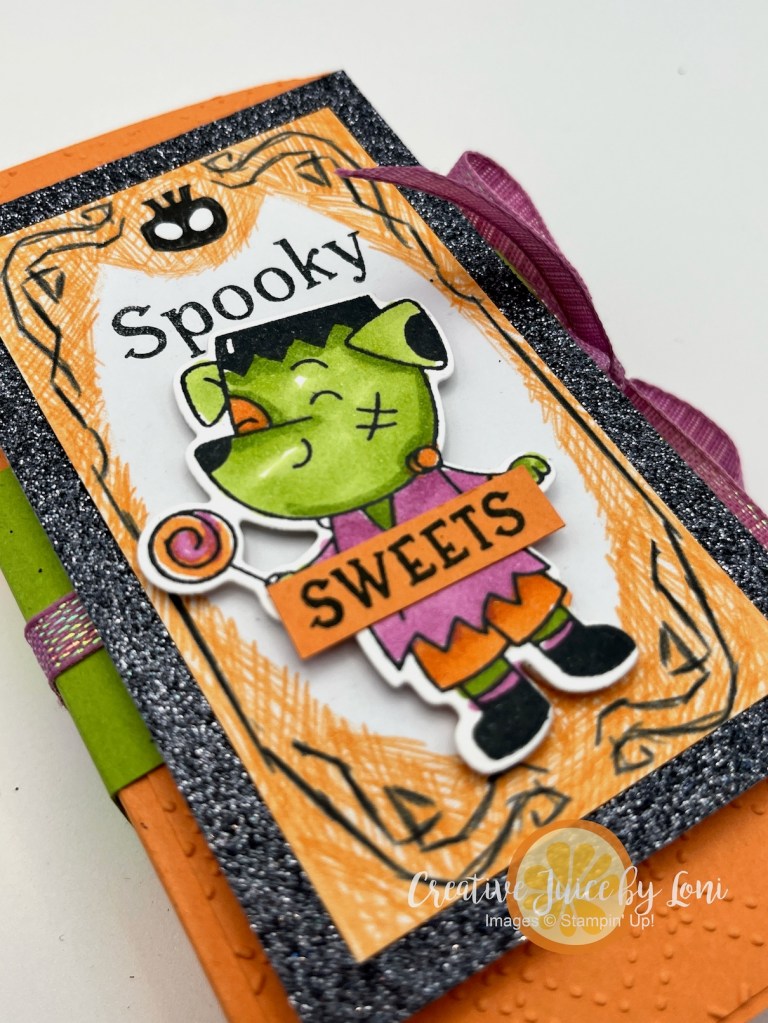
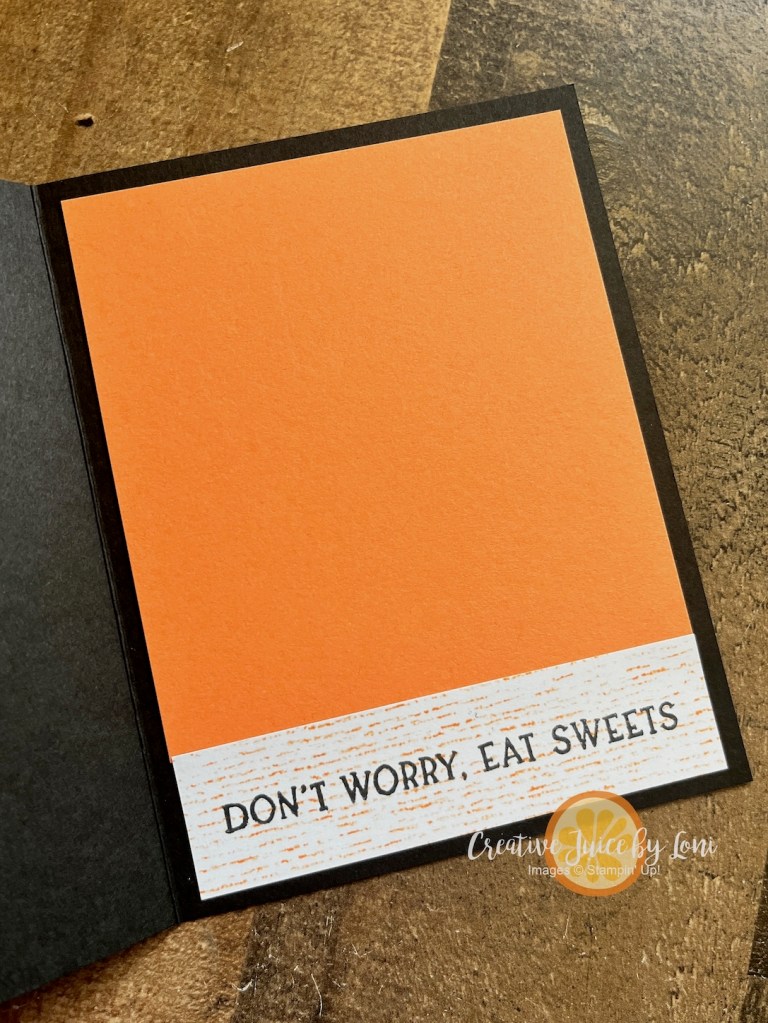
If your Halloween crafting stash is calling your name louder than a ghost in a graveyard, grab your Stampin’ Up!® Spooky Sweet Suite and conjure up something boo-tiful! Don’t worry, eat sweets with these dang cute CANDY BAR BOOKS:
I’ve brewed up two fun versions of this project. The Granny Apple Green “All Treats” Candy Bar Book holds two classic Hershey bars, while the Timid Tiger “Spooky Sweets” version was made to fit two Ghost Toast KitKats. Each one ties up neatly with ribbon to keep your candy secure until it’s time for a delicious reveal. Whether you’re giving these as gifts, party favors, or adding them to a Halloween goodie basket, they’re sure to get more “oohs” and “aahs” than a haunted house on October 31st.
These projects are surprisingly easy to assemble—no hocus pocus required! I’ve included an instructional video below, AND a printable .pdf with measurements.
Note that the belly band measurements are shown on white card stock, but the project uses Granny Apple Green card stock.
I embossed the covers to add some textured dimension (because even monsters like stampin’ style), then decorated with die cuts, stamped images, and a touch of sparkle. Isn’t it Franken-fun?
Here are the key measurements for both versions:
Green “All Treats” Book (fits two Hershey bars):
Cardstock base: 5 1/4″ x 6 1/2″ scored along shorter end at 2 3/8″and 2 7/8″
Belly Band: 1 1/2″ x 6 3/8″ scored at 1/2″, 2 7/8″, 3 3/8″ and 5 7/8″
Ribbon: 16″
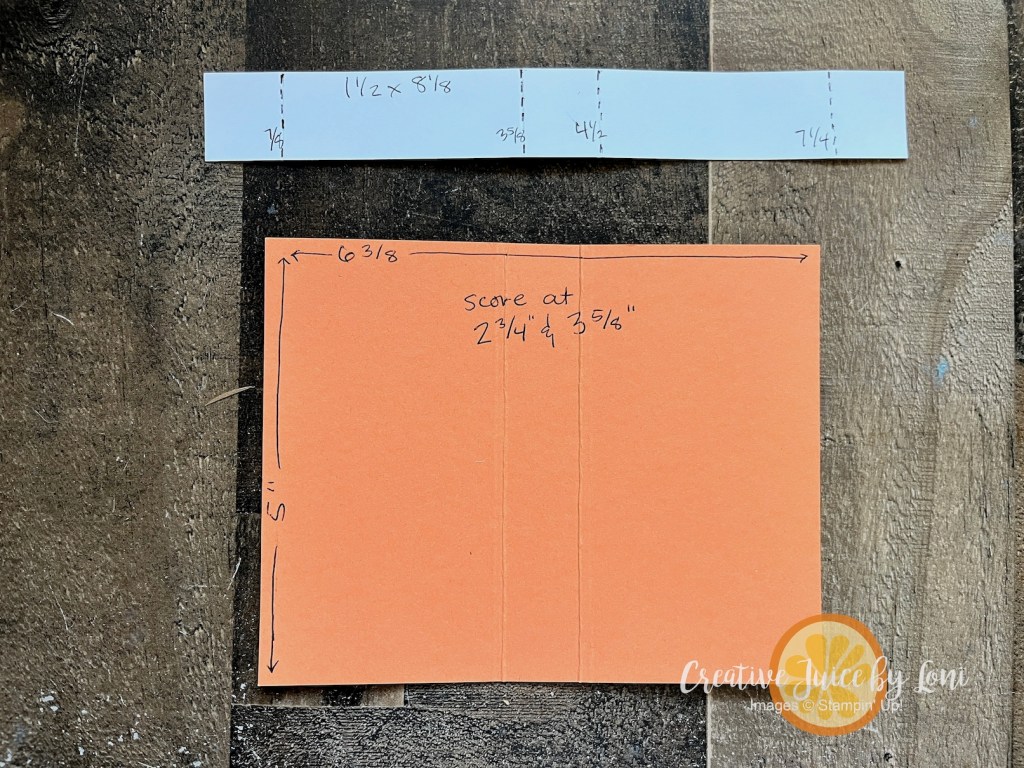
Orange “Spooky Sweets” Book (fits two KitKats):
Cardstock base: 5″ x 6 3/8″ scored along the longer side at 2 3/4″ and 3 5/8″
Belly Band: 1 1/2″ x 8 1/8″ scored at 7/8″, 3 5/8″, 4 1/2″ and 7 1/4″
Ribbon: 16″
Want to see the whole project come to life? Watch my full step-by-step tutorial on YouTube here:
What else did we talk about today? The 3-day KIT SALE (through October 8th):
AND we discussed FAQs on the Starter Kit Special! Bottom line: If you are planning to order more than $35 in crafting supplies from my Stampin’ Store this month, you may as well choose the Starter Kit!
To make your shopping Spooky Sweet, I’ll list the supplies for these projects below and THANK YOU for choosing me to serve your creativity!
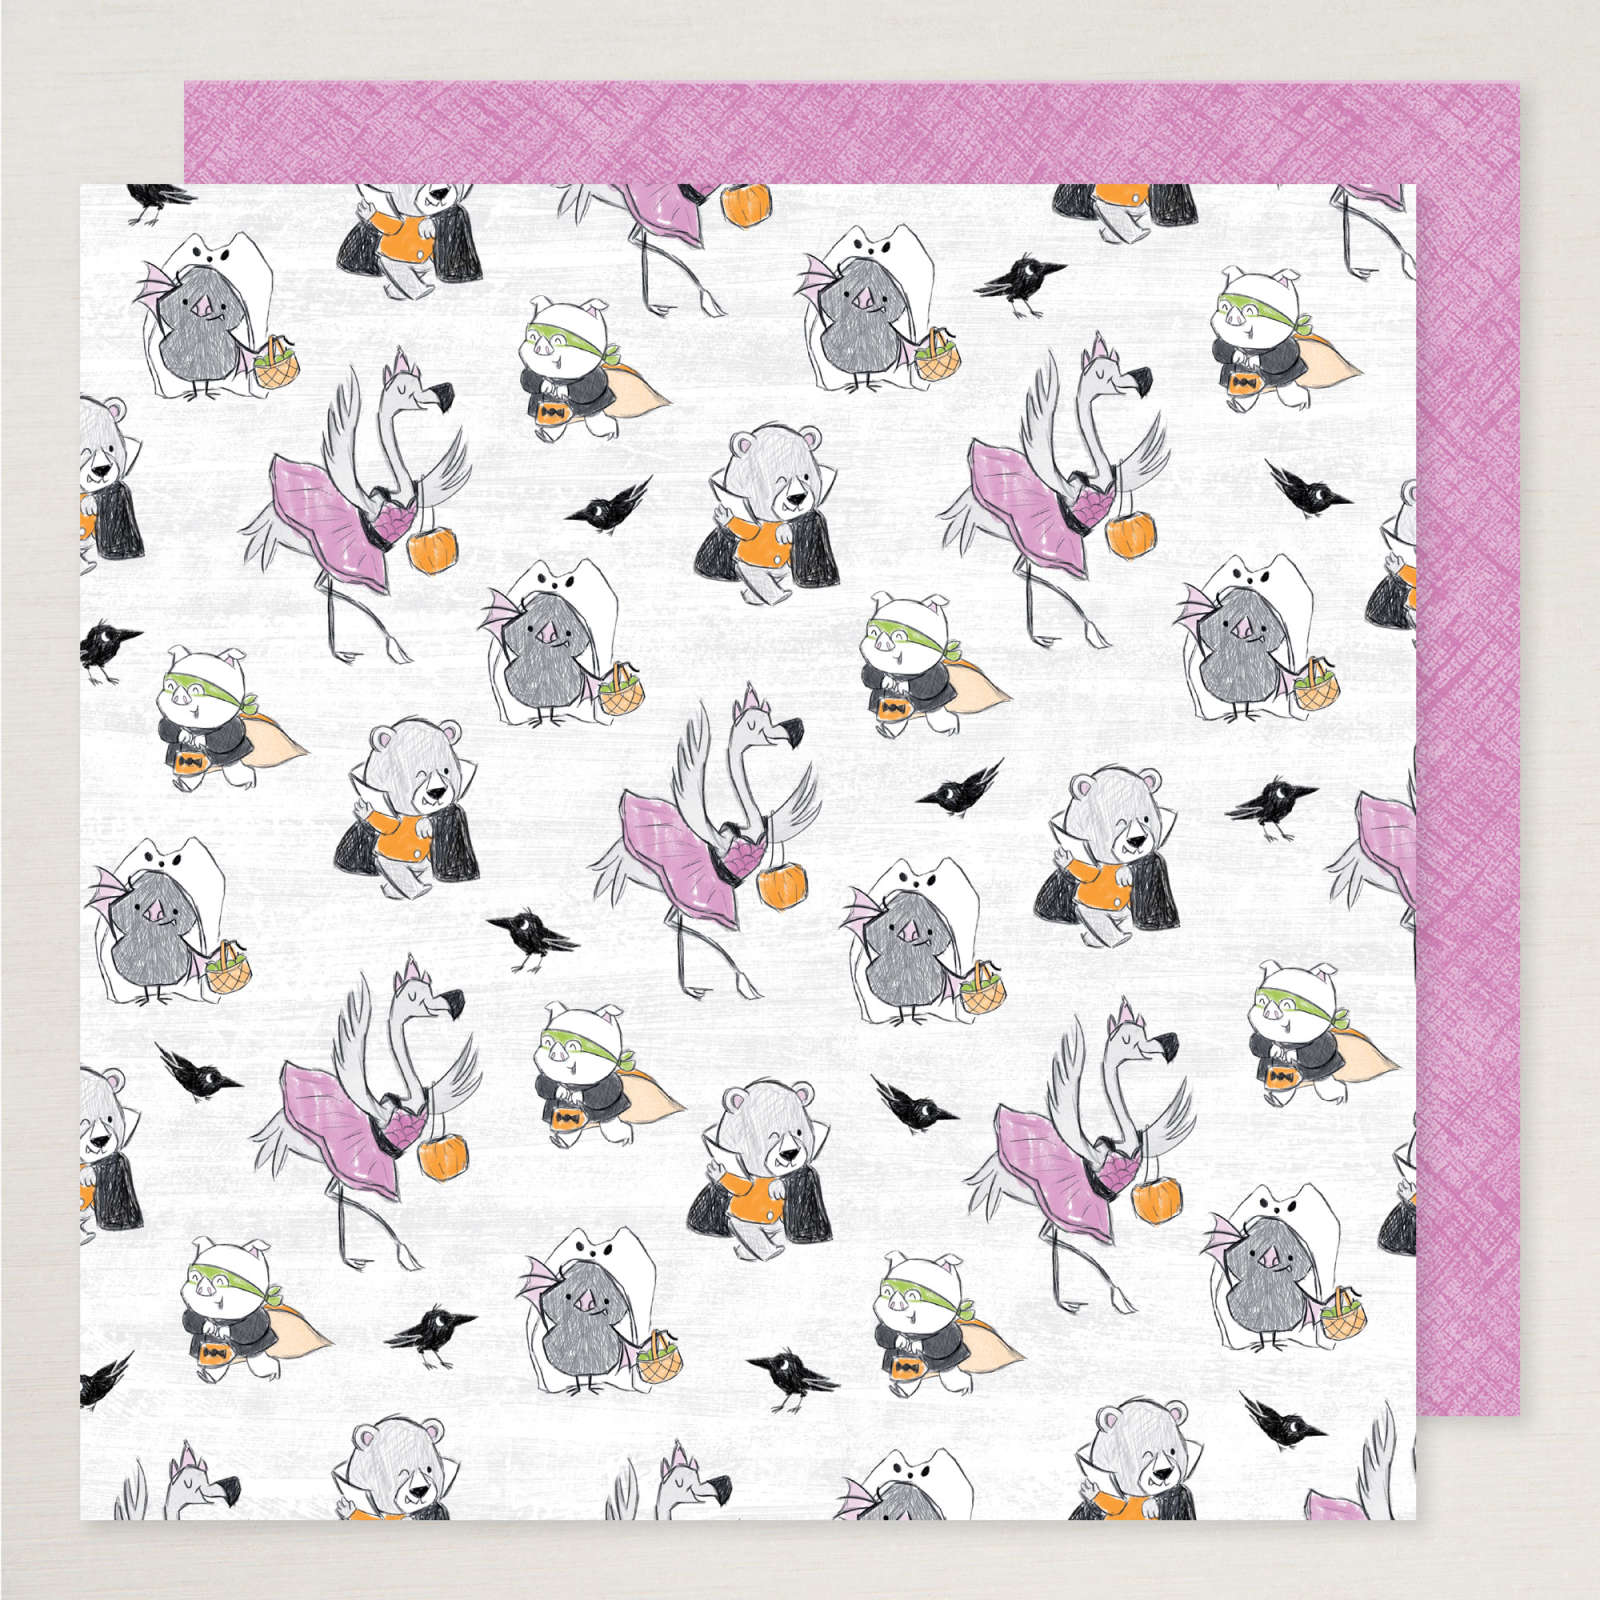
Halloween is around the corner, but you don’t need to be limited to the Trick or Treat season when crafting with the Stampin’ Up!®️ Spooky Sweet products, and particularly the Designer Series Paper. This sheet has a flamingo dressed in a tutu that I’m going to use on a birthday card:
It’s TOO TOO cute when paired with the Not 29 Anymore stamp set for a card you can send to “THAT FRIEND” who is fiesty & fabulous:
This card is called a “Missing Middle” card, and is easier than it looks: Start with a 4-1/4″ x 8 1/2″ piece of card stock (mine is Granny Apple Green) and score it at 5-1/2″ and cut it at 7″… leaving you a 1-1/2″ x 4-1/4″ piece of card stock for the bottom of the card. (All the supplies I used are listed at the bottom)
Fold the top 1-1/2″ down and add a layer of Designer Series Paper, if desired. Lay the section you cut off at the bottom edge of the card, and attach a 2-1/4″ x 4-1/4″ piece of card stock to the top section and bottom section only. Then it will open like this and you can add a white layer inside to write or stamp on:
My flamingo is layered over a piece of retired Be Dazzling specialty paper, but any of our current Glimmer Paper brings the bling when you need it.
Heading into the Halloween season, there are a few events (online and in-person) you’ll want to know about:
First: The VIRTUAL Spooky Sweet Class happens Thursday, October 2nd, and the last day you can order the suite and be invited to join the class is September 24th! This gives me time to prepare and mail the supplies you’ll need, and for you to have the suite ready to use. Learn more at the event description on Facebook by clicking the image below, or on my event calendar HERE.
Second: Stamping is the best medicine to make you feel good, and you’ll stamp 3 FALL paper crafting projects at ourStamp Therapy sessions in Hurricane, UT on October 9th. Choose to attend the 10 am session or the 6 pm session, but register early, because these seem to fill up quickly. Class fee: $15.
Southern Utah crafters: Here’s another tasty opportunity for more Spooky Sweet crafting at the Cookies, Cards & Cocoa class on Oct. 16th at 6:30 PM at the Strap Tank Restaurant in St. George, UT.
Decorate 4 Halloween sugar cookies and stamp two paper crafting projects, while enjoying a beverage from the restaurant. Class fee: $35 ALL SUPPLIES PROVIDED! Click HERE to register by Oct. 9th
There was one piece of Silent Snowfall Specialty Designer Series Paper left on my desk after cutting and mailing all the September paper shares, then I saw the Global Design Project sketch for the week, and imagined looking out a window on a quiet winter afternoon…
Here’s the prompt for the #gdp514 sketch:
Rummaged through more patterned paper for some worthy “wallpaper” and found the back side of one of the Autumn Toile papers would be perfect (isn’t the “front” or “back” irrelevant? The FRONT is whichever you want to use!).
Once it was adhered to the front, I cut the smaller arch from both layers, then added a dark wood window casing by cutting out two nested arches. In this picture you can really see the detail through the window:
The Silent Snowfall paper has a snowflake pattern dry embossed into it, so I heat embossed some random snowflake dots from the Branching Out stamp set over the debossed side to break up the repeating pattern and help it feel more natural and random. Once it was dry, I used a brayer to roll Cloud Cover ink over the top – the inlaid snowflakes are deep enough they don’t get any ink inside. I know that we don’t have a large Cloud Cover ink pad: You can use the refill to ink up an empty stampin’ spot, or use a piece of felt as the ink pad by squeezing some ink onto it.
Once the branches were stamped over the snowflakes, that layer was adhered to a 4″ x 5.25″ Cloud Cover card inside (8″ x 10.5″ when open), with the fold on the right:
This “card-in-a-card” design allows you to catch a few snowflakes on your tongue as you continue to unfold the greeting!
Finally, you open the inside to find a large area to write all the details a friend would love to hear from you.
Tomorrow, I’ll be mashing up the Branching Out bundle (there is a set of dies that coordinate with the stamp set) with another new bundle from the 2025 Sept-Dec Mini Catalog, and you’ll want to add it to your cart when you see how essential it is.
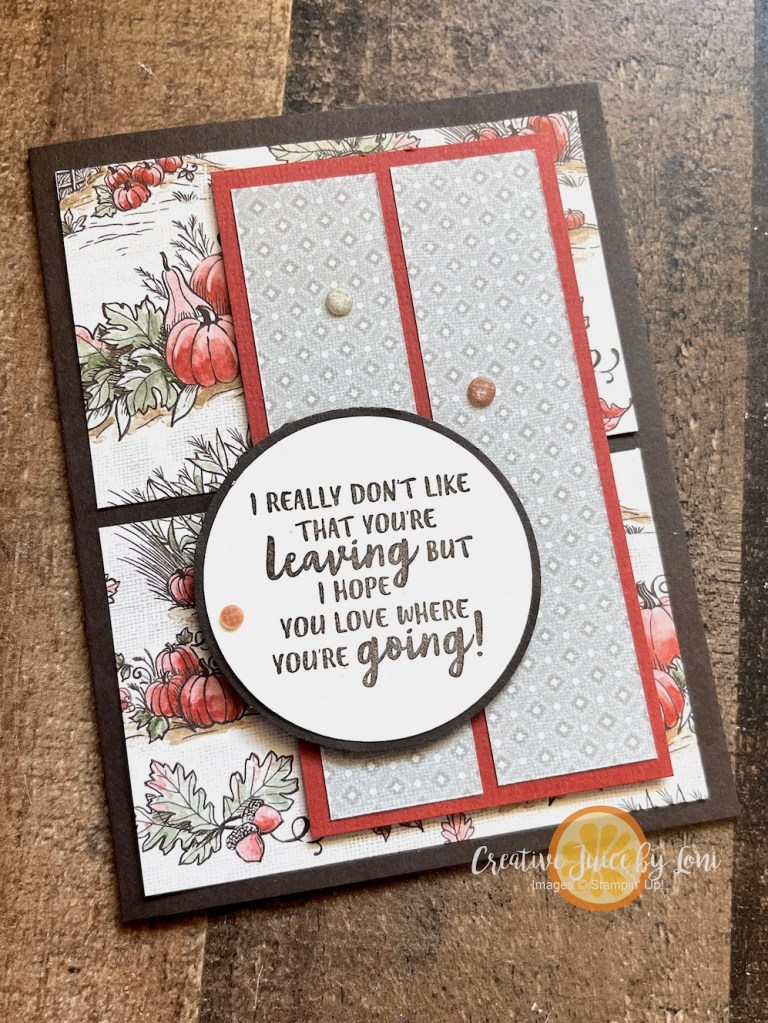
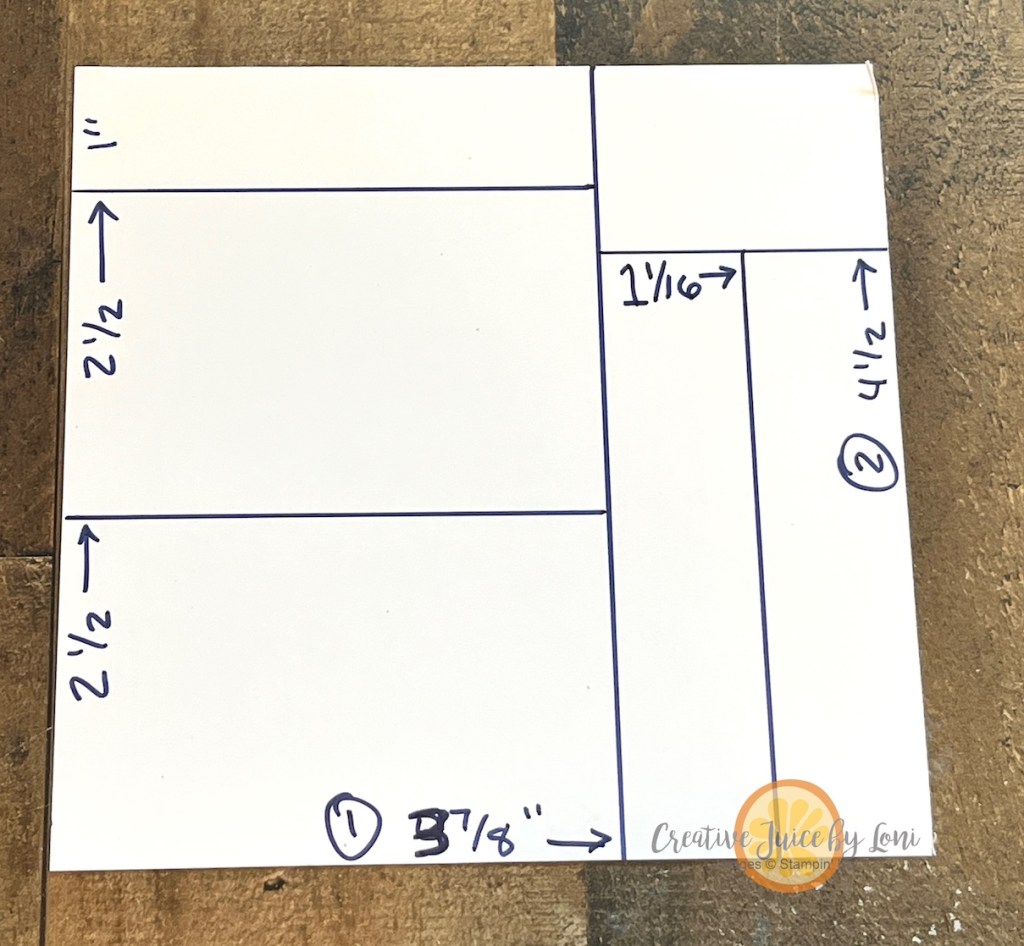
Have ever looked at a stack of pretty designer series paper and think, “It’s too pretty to cut”? I hear you—but here’s the good news: when you do cut it, you can get the most out of every single sheet! I created this cutting map that turns any 6” x 6” piece of designer paper into perfectly sized layers for the front of your cards:
In my live video today, I walked through the process step by step and made the card shown here from the Autumn Toile pack of paper that will be available on September 2nd. (You’ll find the replay below if you want to craft along!) The cutting map is below so you can print it out, tuck it near your paper trimmer, and use it anytime you want to make lovely layers of backgrounds for your greeting cards.
The first cut you make (circled) will be 3-7/8″ into the square. The second cut will be to cut the leftover pattern down to 4-1/2″ tall, then other cuts as shown.
Layer the two large rectangles on a contrasting card stock base, and the two long strips go on a piece of card stock that is 2-1/2″ x 4-3/4″, which can be attached with dimensionals to either the left or right side of the front of the card.
For my samples, I used a mix of Stampin’ Up! designer series paper. Four of the patterns come straight from the September Paper Share I’m offering — fifty-three 6″ x 6″ sheets of Stampin’ Up! Designer Series Paper, all cut down and ready for you to create with. It’s a perfect way to try every new design without committing to full packs, and it gives you plenty of variety for projects like this.
My last two examples of this sketch feature the Painterly Pears Suite and the Spooky Sweet Suite. Isn’t it terrific how the same cutting map works across completely different styles—fall-inspired pumpkins, happy holiday greetings, fresh pears, or playful Halloween motifs?! It’s proof that a simple template can stretch your supplies and spark new ideas.
Whether you’re making cards in bulk or just want a foolproof way to get more from your paper, this card design is one you’ll use again and again. Scroll down for the video, save all six card samples, and grab your trimmer—you’ll be amazed how quickly 6” x 6” papers can turn into a gallery of handmade cards.
The 1″ x 3-7/8″ piece from the cutting map goes INSIDE the cards, like this:
TWO more opportunities before you go:
The Autumn Toile paper (on the first card I demonstrated) coordinates with the September Paper Pumpkin kit, so if you adore autumn and those detailed designs, you will certainly want to subscribe by September 10th to receive a fall-filled box of coordinating crafting!
While the Spooky Sweet Suite paper is NOT included in the Paper Share, I *WILL* be teaching a Virtual Halloween class with the suite on October 2nd – Add the suite to your cart for an invitation to join the party, or visit the Facebook event page (link above) to find out how to register.
Keep your creative juices flowing! 🍊🧡– Loni Spendlove
With so many brilliant crafters in our New at SU! design team, the inspiration is always at our fingertips and this month I’m CASE-ing (Copy and Share Everything) the very artistic Annette Elias (De Kijkkast) with my Sunflower card:
I admired the unusual square shape of the card (mine is 5-1/4″ square), and all the amazing layers and details, though my version is simplified. The torn Designer Series Paper across the front was really beautiful! You can compare our cards side-by-side:
You can tell I prefer quick and easy crafting while Annette is an AVID crafter, but we can be inspired by each other!
The Sunflower 3-D embossing folder has been pretty popular this summer, and the sunflower paper (from Floral Impressions Designer Series Paper) lays over embossed and stamped sunflowers. I cut out one of the flowers and leaves to become my focal point. By using a sponge dauber and Pecan Pie ink pad, I make the center darker, and defined the petals.
Use the corners torn from the DSP to embellish the front of an envelope to let the recipient know they are about to open a delightfully sunny surprise!
Now you can hop over the Annette’s post to see how she copied Rochelle (of Stampinflair.com) and remember to PIN your favorite finds from our blog hop!
August 2025 New at SU! Hop: CASE a Design Team Member
I’ve been making samples for Fall StampFest (spoiler alert!) and while I was doing some “research” on social media, these bright colors – Darling Duckling, Poppy Parade & Pool Party – scrolled by, and then I couldn’t really get any work done until I pulled the colors out and put it onto paper, so-to-speak.
Plaid, cornfields and tractors MUST go together, but I also love a peek of the torn leafy Darling Duckling Designer Series Paper, just beneath the farm vehicle.
But my FAVORITE detail is the blue ribbon! Can you tell what I used to make it?
The ribbon medallion is made with the TIRE DIES!
Pull in a sentiment from the “More than Autumn” stamp set and the card is worthy of grand prize at the county fair, don’t you think?
Another winning opportunity: Darling Duckling is a 2025-2027 IN COLOR, thus the ink, card stock and the patterned paper are all on sale for 15% off during August 2025!
When you are ready to make a tractor card of your own, you can add all the supplies you need to your cart here:
Pears have long held a place in the world of art~ they’ve been painted for centuries as a way to capture natural beauty and evoke a sense of calm and abundance. Let me share a handmade card inspired by that same timeless charm—created with the brand-new Painterly Pears Suite from Stampin’ Up!®️
This easy card layout is one you could use with practically every stamp set you own that matches some beautiful Stampin’ Up!®️ Designer Series Paper!
Have you ever added watercolor pencil OVER your stamped image? To shade the pears and flowers, that’s just what I did, no water added. They do blend better when the tip of the pencil is dull.
Use a strip of the same pattern on the inside of the card to carry the theme all the way through:
Isn’t this pretty? Sometimes simple is the loveliest, and the Painterly Pears will make you feel like a classic artist, without paying tuition or spending years learning painting techniques (which is why I love rubber stamping).
It’s a Birthday Bash for our July New at SU! Blog Hop, and our demonstrator design team from around the globe will inspire you to create a personalized birthday celebration using your Stampin’ Up! supplies!
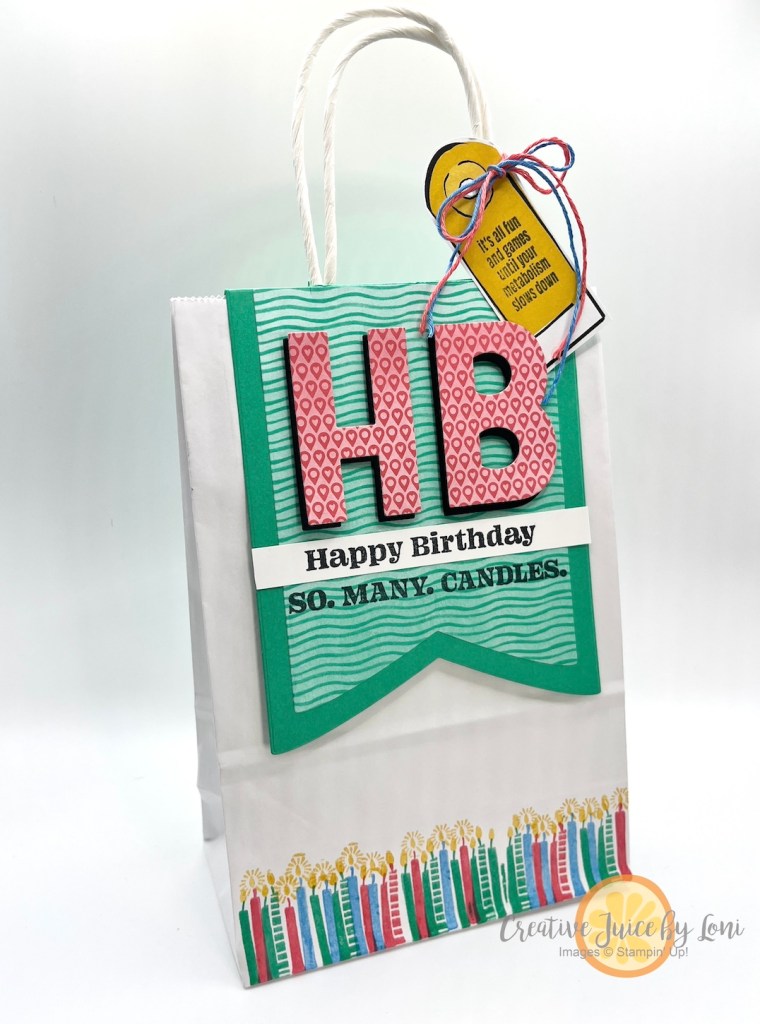
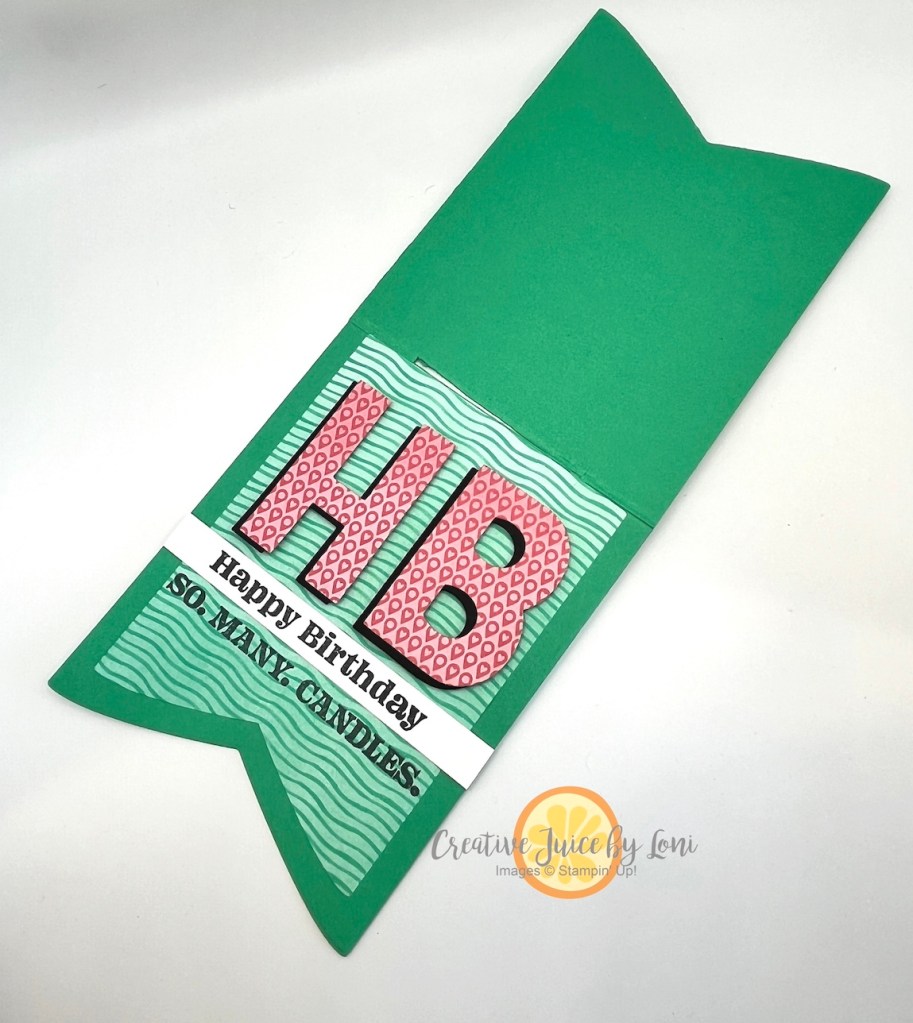
Remember the classic handled-gift-bag topper? I’m giving it a fresh look with the fabulous Party Dies Bundle (banners + big alphabet)!
Stampin’ Up!’s Sweet Jar stamp set has the perfect candles to stamp along the bottom edge of the bag in colors to match your theme!
The largest banner die is approx. 5″ x 7″ so you could create a topper for various sizes of bags. The plain white bag I used is about 5″ wide by 8.5″ tall, so I used the 4th largest banner die on a 4.5″ x 11″ piece of Shy Shamrock card stock (folded in half) for this topper:
Make sure the top of the banner die lays just off the folded edge as you cut through both layers with the bottom part of the die, so you don’t cut this piece into two pieces! Once you’ve die cut the banner, hold the fold up to the top of the bag and mark just outside the edges of the handles, then use a paper trimmer or snips to cut along the folded edge BETWEEN the two marks. This gives you a slit to slide over the handles (after decorating the topper and inserting your gift into the bag)
The On the Go Designer Series Paper gave me the color palette and the patterned paper for this project, and has a full page of adorable luggage tags that make perfect gift tags, too! Sentiments come from the hilarious new stamp set in my Online Exclusives called “Not 29 Anymore” and I also cut a second set of letters from Basic Black card stock to give it a shadow behind the DSP:
I’ll be making more of these to wrap birthday presents in, giving someone a laugh when I gift it! Would it make you giggle?Give me your thoughts in the comments at the top of the post, next to posting date.
Be sure to visit the other party-people participating in sharing birthday ideas this month:
Do you make consistent appointments with the doctor or the dentist to stay healthy? Do you have an exercise schedule or beauty regimen? Those promises you make to yourself for your well-being are the most important ones to keep, so make a pact to improve your connection with friends and to nurture your creativity:
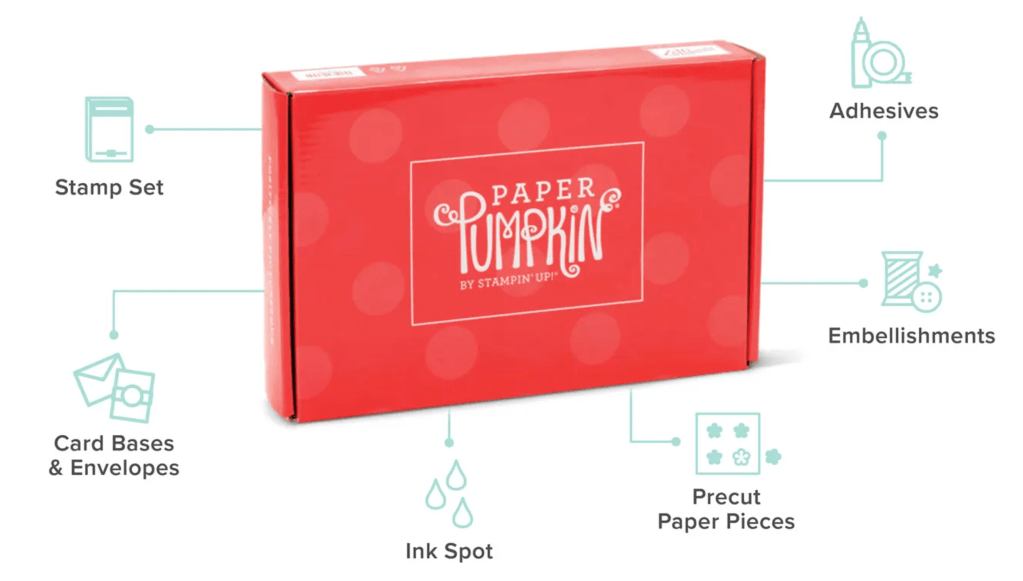
Say HELLO to your monthly creative date – one you can do on your own, or with a friend!
APaper Pumpkin craft box arrives in your mail on or before the 20th of each month filled with everything you need to make a paper-crafting project: Pre-cut paper, an ink spot in a Stampin’ Up!®️ color, adhesive and an exclusive stamp set. There are also step-by-step instructions in the box AND a how-to video on YouTube each month. Your FIRST kit includes a clear block – keep it handy for future kits!
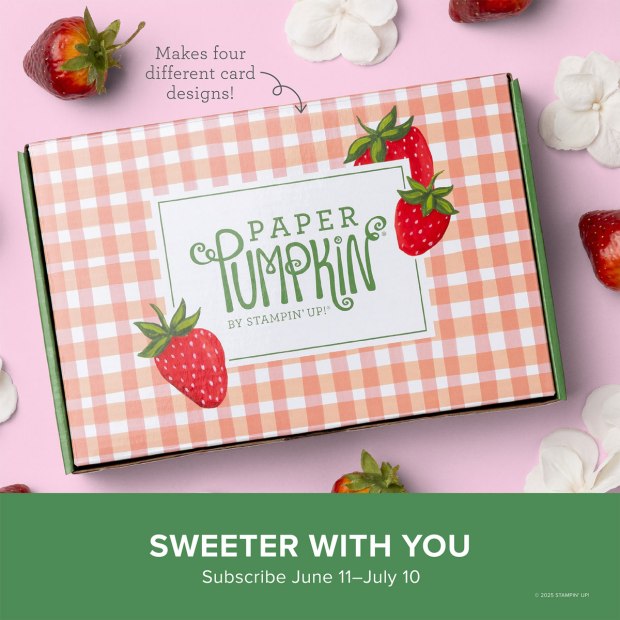
This is a sneak peek of the July kit – the deadline for this kit is July 10th, but you can subscribe anytime and get the next kit!
The Sweeter With You July Paper Pumpkin Kit will be a card kit that makes 8 cards: 4 each of 2 different designs featuring sun-kissed strawberries and gingham!
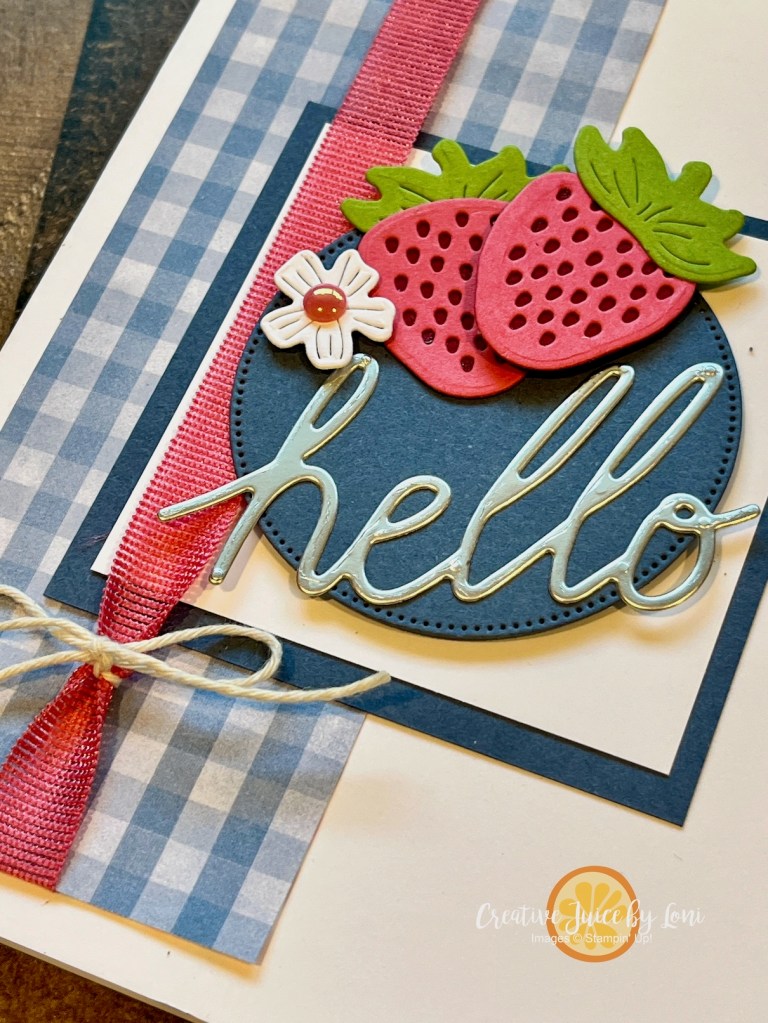
One other perk for subscribers is an optional Add-on die set each quarter that matches the kits for all three months. The July-September coordinating Add-on is the Circle of Seasons dies:
And here is a card I made with the Circle of Seasons Add-on dies to whet your appetite for a sweet crafting subscription!
From a silver foil “Hello” to the mouth-watering fruits, this card is quintessential summer! But that’s not all…the dies ALSO cut an ACORN (which will match the September kit!)
As a subscriber, you may add an extra kit for yourself or a gift, shop from extra kits or refills, skip a month, or cancel at any time. I send a Paper Pumpkin Patch newsletter to my subscribers the last week of every month with ways to continue to use their stamp set and ink spot after the kit is completed!
If you’ve ever wanted to attend a class, but couldn’t — if you need a happy hobby — or if you just love paper, ink and stamps– THIS SUBSCRIPTION is a way to show yourself (or a friend) a little love.


![Abundant Joy Dies [ 167855 ]](https://assets1.tamsnetwork.com/images/EC042017NF/167855s.jpg "Abundant Joy Dies [ 167855 ]")
![Mini Stampin' Cut & Emboss Machine [ 150673 ]](https://assets1.tamsnetwork.com/images/EC042017NF/150673s.jpg "Mini Stampin' Cut & Emboss Machine [ 150673 ]")
![Traditions Of Christmas 12" X 12" (30.5 X 30.5 Cm) Specialty Designer Series Paper [ 165853 ]](https://assets1.tamsnetwork.com/images/EC042017NF/165853s.jpg "Traditions Of Christmas 12\" X 12\" (30.5 X 30.5 Cm) Specialty Designer Series Paper [ 165853 ]")
![Peaceful Garden 12" X 12" (30.5 X 30.5 Cm) Glimmer Paper [ 165929 ]](https://assets1.tamsnetwork.com/images/EC042017NF/165929s.jpg "Peaceful Garden 12\" X 12\" (30.5 X 30.5 Cm) Glimmer Paper [ 165929 ]")
![Basic White 8 1/2" X 11" Thick Cardstock [ 159229 ]](https://assets1.tamsnetwork.com/images/EC042017NF/159229s.jpg "Basic White 8 1/2\" X 11\" Thick Cardstock [ 159229 ]")
![Crumb Cake 8-1/2" X 11" Cardstock [ 120953 ]](https://assets1.tamsnetwork.com/images/EC042017NF/120953s.jpg "Crumb Cake 8-1/2\" X 11\" Cardstock [ 120953 ]")
![Old Olive 8-1/2" X 11" Cardstock [ 100702 ]](https://assets1.tamsnetwork.com/images/EC042017NF/100702s.jpg "Old Olive 8-1/2\" X 11\" Cardstock [ 100702 ]")
![Cherry Cobbler 8-1/2" X 11" Cardstock [ 119685 ]](https://assets1.tamsnetwork.com/images/EC042017NF/119685s.jpg "Cherry Cobbler 8-1/2\" X 11\" Cardstock [ 119685 ]")
![Real Red & White Baker's Twine [ 164051 ]](https://assets1.tamsnetwork.com/images/EC042017NF/164051s.jpg "Real Red & White Baker's Twine [ 164051 ]")
![Mini Stampin' Dimensionals [ 144108 ]](https://assets1.tamsnetwork.com/images/EC042017NF/144108s.jpg "Mini Stampin' Dimensionals [ 144108 ]")


![Spooky Sweet Suite Collection (English) [ 166205 ]](https://assets1.tamsnetwork.com/images/EC042017NF/166205s.jpg "Spooky Sweet Suite Collection (English) [ 166205 ]")
![Timid Tiger 8 1/2" X 11" Cardstock [ 165626 ]](https://assets1.tamsnetwork.com/images/EC042017NF/165626s.jpg "Timid Tiger 8 1/2\" X 11\" Cardstock [ 165626 ]")
![Granny Apple Green 8-1/2" X 11" Cardstock [ 146990 ]](https://assets1.tamsnetwork.com/images/EC042017NF/146990s.jpg "Granny Apple Green 8-1/2\" X 11\" Cardstock [ 146990 ]")
![Basic White 8 1/2" X 11" Cardstock [ 166780 ]](https://assets1.tamsnetwork.com/images/EC042017NF/166780s.jpg "Basic White 8 1/2\" X 11\" Cardstock [ 166780 ]")
![Timid Tiger Stampin’ Blends Combo Pack [ 165291 ]](https://assets1.tamsnetwork.com/images/EC042017NF/165291s.jpg "Timid Tiger Stampin’ Blends Combo Pack [ 165291 ]")
![Granny Apple Green Stampin' Blends Combo Pack [ 154885 ]](https://assets1.tamsnetwork.com/images/EC042017NF/154885s.jpg "Granny Apple Green Stampin' Blends Combo Pack [ 154885 ]")
![Petunia Pop Stampin’ Blends Combo Pack [ 163828 ]](https://assets1.tamsnetwork.com/images/EC042017NF/163828s.jpg "Petunia Pop Stampin’ Blends Combo Pack [ 163828 ]")
![Stampin' Cut & Emboss Machine [ 149653 ]](https://assets1.tamsnetwork.com/images/EC042017NF/149653s.jpg "Stampin' Cut & Emboss Machine [ 149653 ]")
![Mini Glue Dots [ 103683 ]](https://assets1.tamsnetwork.com/images/EC042017NF/103683s.jpg "Mini Glue Dots [ 103683 ]")
![Stampin' Dimensionals [ 104430 ]](https://assets1.tamsnetwork.com/images/EC042017NF/104430s.jpg "Stampin' Dimensionals [ 104430 ]")


![Spooky Sweet 12" X 12" (30.5 X 30.5 Cm) Specialty Designer Series Paper [ 166191 ]](https://assets1.tamsnetwork.com/images/EC042017NF/166191s.jpg "Spooky Sweet 12\" X 12\" (30.5 X 30.5 Cm) Specialty Designer Series Paper [ 166191 ]")
![Not 29 Anymore Photopolymer Stamp Set (English) [ 166182 ]](https://assets1.tamsnetwork.com/images/EC042017NF/166182s.jpg "Not 29 Anymore Photopolymer Stamp Set (English) [ 166182 ]")
![Petunia Pop 8 1/2" X 11" Cardstock [ 163801 ]](https://assets1.tamsnetwork.com/images/EC042017NF/163801s.jpg "Petunia Pop 8 1/2\" X 11\" Cardstock [ 163801 ]")
![Granny Apple Green Stampin' Pad [ 147095 ]](https://assets1.tamsnetwork.com/images/EC042017NF/147095s.jpg "Granny Apple Green Stampin' Pad [ 147095 ]")
![Petunia Pop Classic Stampin Pad [ 163811 ]](https://assets1.tamsnetwork.com/images/EC042017NF/163811s.jpg "Petunia Pop Classic Stampin Pad [ 163811 ]")
![Tuxedo Black Memento Ink Pad [ 132708 ]](https://assets1.tamsnetwork.com/images/EC042017NF/132708s.jpg "Tuxedo Black Memento Ink Pad [ 132708 ]")
![Paper Trimmer [ 152392 ]](https://assets1.tamsnetwork.com/images/EC042017NF/152392s.jpg "Paper Trimmer [ 152392 ]")
![More Dazzle 6" X 6" (15.2 X 15.2 Cm) Specialty Paper [ 161749 ]](https://assets1.tamsnetwork.com/images/EC042017NF/161749s.jpg "More Dazzle 6\" X 6\" (15.2 X 15.2 Cm) Specialty Paper [ 161749 ]")
![Stampin' Seal+ [ 149699 ]](https://assets1.tamsnetwork.com/images/EC042017NF/149699s.jpg "Stampin' Seal+ [ 149699 ]")


![Branching Out Photopolymer Stamp Set (English) [ 165771 ]](https://assets1.tamsnetwork.com/images/EC042017NF/165771s.jpg "Branching Out Photopolymer Stamp Set (English) [ 165771 ]")
![Everyday Arches Dies [ 164629 ]](https://assets1.tamsnetwork.com/images/EC042017NF/164629s.jpg "Everyday Arches Dies [ 164629 ]")
![Silent Snowfall 12" X 12" (30.5 X 30.5 Cm) Specialty Designer Series Paper [ 166062 ]](https://assets1.tamsnetwork.com/images/EC042017NF/166062s.jpg "Silent Snowfall 12\" X 12\" (30.5 X 30.5 Cm) Specialty Designer Series Paper [ 166062 ]")
![Autumn Toile 12" X 12" (30.5 X 30.5 Cm) Designer Series Paper [ 165882 ]](https://assets1.tamsnetwork.com/images/EC042017NF/165882s.jpg "Autumn Toile 12\" X 12\" (30.5 X 30.5 Cm) Designer Series Paper [ 165882 ]")
![Early Espresso 8-1/2" X 11" Cardstock [ 119686 ]](https://assets1.tamsnetwork.com/images/EC042017NF/119686s.jpg "Early Espresso 8-1/2\" X 11\" Cardstock [ 119686 ]")
![Cloud Cover 8 1/2" X 11" Cardstock [ 165621 ]](https://assets1.tamsnetwork.com/images/EC042017NF/165621s.jpg "Cloud Cover 8 1/2\" X 11\" Cardstock [ 165621 ]")
![Stampin' Brayer [ 162936 ]](https://assets1.tamsnetwork.com/images/EC042017NF/162936s.jpg "Stampin' Brayer [ 162936 ]")
![Cloud Cover Classic Stampin' Ink Refill [ 165279 ]](https://assets1.tamsnetwork.com/images/EC042017NF/165279s.jpg "Cloud Cover Classic Stampin' Ink Refill [ 165279 ]")
![Early Espresso Classic Stampin' Pad [ 147114 ]](https://assets1.tamsnetwork.com/images/EC042017NF/147114s.jpg "Early Espresso Classic Stampin' Pad [ 147114 ]")
![Shaded Spruce Classic Stampin' Pad [ 147088 ]](https://assets1.tamsnetwork.com/images/EC042017NF/147088s.jpg "Shaded Spruce Classic Stampin' Pad [ 147088 ]")
![Uninked Stampin’ Craft Pad & Whisper White Refill [ 147277 ]](https://assets1.tamsnetwork.com/images/EC042017NF/147277s.jpg "Uninked Stampin’ Craft Pad & Whisper White Refill [ 147277 ]")
![Basics Wow! Embossing Powder [ 165679 ]](https://assets1.tamsnetwork.com/images/EC042017NF/165679s.jpg "Basics Wow! Embossing Powder [ 165679 ]")
![Heat Tool (Us And Canada) [ 129053 ]](https://assets1.tamsnetwork.com/images/EC042017NF/129053s.jpg "Heat Tool (Us And Canada) [ 129053 ]")


![Sunflower 3 D Embossing Folder [ 166145 ]](https://assets1.tamsnetwork.com/images/EC042017NF/166145s.jpg "Sunflower 3 D Embossing Folder [ 166145 ]")
![Floral Impressions 12" X 12" (30.5 X 30.5 Cm) Designer Series Paper [ 165603 ]](https://assets1.tamsnetwork.com/images/EC042017NF/165603s.jpg "Floral Impressions 12\" X 12\" (30.5 X 30.5 Cm) Designer Series Paper [ 165603 ]")
![The Right Words Cling Stamp Set (English) [ 165316 ]](https://assets1.tamsnetwork.com/images/EC042017NF/165316s.jpg "The Right Words Cling Stamp Set (English) [ 165316 ]")
![Elements Of Text Cling Stamp Set [ 164774 ]](https://assets1.tamsnetwork.com/images/EC042017NF/164774s.jpg "Elements Of Text Cling Stamp Set [ 164774 ]")
![Pecan Pie 8 1/2" X 11" Cardstock [ 161717 ]](https://assets1.tamsnetwork.com/images/EC042017NF/161717s.jpg "Pecan Pie 8 1/2\" X 11\" Cardstock [ 161717 ]")
![Darling Duckling 8 1/2" X 11" Cardstock [ 165622 ]](https://assets1.tamsnetwork.com/images/EC042017NF/165622s.jpg "Darling Duckling 8 1/2\" X 11\" Cardstock [ 165622 ]")
![Mossy Meadow 8-1/2" X 11" Cardstock [ 133676 ]](https://assets1.tamsnetwork.com/images/EC042017NF/133676s.jpg "Mossy Meadow 8-1/2\" X 11\" Cardstock [ 133676 ]")
![Garden Green Classic Stampin' Pad [ 147089 ]](https://assets1.tamsnetwork.com/images/EC042017NF/147089s.jpg "Garden Green Classic Stampin' Pad [ 147089 ]")
![Pecan Pie Classic Stampin' Pad [ 161665 ]](https://assets1.tamsnetwork.com/images/EC042017NF/161665s.jpg "Pecan Pie Classic Stampin' Pad [ 161665 ]")
![Sponge Daubers [ 133773 ]](https://assets1.tamsnetwork.com/images/EC042017NF/133773s.jpg "Sponge Daubers [ 133773 ]")
![Perennial Postage Dies [ 162607 ]](https://assets1.tamsnetwork.com/images/EC042017NF/162607s.jpg "Perennial Postage Dies [ 162607 ]")
![Mossy Meadow & Gold 1/4" (6.4 Mm) [ 166158 ]](https://assets1.tamsnetwork.com/images/EC042017NF/166158s.jpg "Mossy Meadow & Gold 1/4\" (6.4 Mm) [ 166158 ]")
![Low Profile Sparkle Dots [ 166157 ]](https://assets1.tamsnetwork.com/images/EC042017NF/166157s.jpg "Low Profile Sparkle Dots [ 166157 ]")


![Tractor & Co Bundle (English) [ 166116 ]](https://assets1.tamsnetwork.com/images/EC042017NF/166116s.jpg "Tractor & Co Bundle (English) [ 166116 ]")
![More Than Autumn Photopolymer Stamp Set (English) [ 164228 ]](https://assets1.tamsnetwork.com/images/EC042017NF/164228s.jpg "More Than Autumn Photopolymer Stamp Set (English) [ 164228 ]")
![Poppy Parade 8-1/2" X 11" Cardstock [ 119793 ]](https://assets1.tamsnetwork.com/images/EC042017NF/119793s.jpg "Poppy Parade 8-1/2\" X 11\" Cardstock [ 119793 ]")
![Pool Party 8-1/2" X 11" Cardstock [ 122924 ]](https://assets1.tamsnetwork.com/images/EC042017NF/122924s.jpg "Pool Party 8-1/2\" X 11\" Cardstock [ 122924 ]")
![Basic Black 8-1/2" X 11" Cardstock [ 121045 ]](https://assets1.tamsnetwork.com/images/EC042017NF/121045s.jpg "Basic Black 8-1/2\" X 11\" Cardstock [ 121045 ]")
![2025–2027 In Color™ 6" X 6" (15.2 X 15.2 Cm) Designer Series Paper [ 165300 ]](https://assets1.tamsnetwork.com/images/EC042017NF/165300s.jpg "2025–2027 In Color™ 6\" X 6\" (15.2 X 15.2 Cm) Designer Series Paper [ 165300 ]")
![Silver Foil Sheets [ 132178 ]](https://assets1.tamsnetwork.com/images/EC042017NF/132178s.jpg "Silver Foil Sheets [ 132178 ]")
![Darling Duckling Classic Stampin' Pad [ 165277 ]](https://assets1.tamsnetwork.com/images/EC042017NF/165277s.jpg "Darling Duckling Classic Stampin' Pad [ 165277 ]")
![Old Olive Classic Stampin' Pad [ 147090 ]](https://assets1.tamsnetwork.com/images/EC042017NF/147090s.jpg "Old Olive Classic Stampin' Pad [ 147090 ]")
![Crumb Cake Classic Stampin' Pad [ 147116 ]](https://assets1.tamsnetwork.com/images/EC042017NF/147116s.jpg "Crumb Cake Classic Stampin' Pad [ 147116 ]")
![Forever Plaid 3 D Embossing Folder [ 164049 ]](https://assets1.tamsnetwork.com/images/EC042017NF/164049s.jpg "Forever Plaid 3 D Embossing Folder [ 164049 ]")
![Adhesive Sheets [ 152334 ]](https://assets1.tamsnetwork.com/images/EC042017NF/152334s.jpg "Adhesive Sheets [ 152334 ]")
![Blending Brushes [ 153611 ]](https://assets1.tamsnetwork.com/images/EC042017NF/153611s.jpg "Blending Brushes [ 153611 ]")
![Two Tone Sparkle Gems [ 164633 ]](https://assets1.tamsnetwork.com/images/EC042017NF/164633s.jpg "Two Tone Sparkle Gems [ 164633 ]")


![Painterly Pears Suite Collection (English) [ 166159 ]](https://assets1.tamsnetwork.com/images/EC042017NF/166159s.jpg "Painterly Pears Suite Collection (English) [ 166159 ]")
![Misty Moonlight 8-1/2" X 11" Cardstock [ 153081 ]](https://assets1.tamsnetwork.com/images/EC042017NF/153081s.jpg "Misty Moonlight 8-1/2\" X 11\" Cardstock [ 153081 ]")
![Very Vanilla 8 1/2" X 11" Cardstock [ 166784 ]](https://assets1.tamsnetwork.com/images/EC042017NF/166784s.jpg "Very Vanilla 8 1/2\" X 11\" Cardstock [ 166784 ]")
![Misty Moonlight Classic Stampin' Pad [ 153118 ]](https://assets1.tamsnetwork.com/images/EC042017NF/153118s.jpg "Misty Moonlight Classic Stampin' Pad [ 153118 ]")
![Petal Pink Classic Stampin' Pad [ 147108 ]](https://assets1.tamsnetwork.com/images/EC042017NF/147108s.jpg "Petal Pink Classic Stampin' Pad [ 147108 ]")
![Watercolor Pencils Assortment 2 [ 149014 ]](https://assets1.tamsnetwork.com/images/EC042017NF/149014s.jpg "Watercolor Pencils Assortment 2 [ 149014 ]")


![Sweet Jar Photopolymer Stamp Set (English) [ 165501 ]](https://assets1.tamsnetwork.com/images/EC042017NF/165501s.jpg "Sweet Jar Photopolymer Stamp Set (English) [ 165501 ]")
![Party Dies Bundle [ 165265 ]](https://assets1.tamsnetwork.com/images/EC042017NF/165265s.jpg "Party Dies Bundle [ 165265 ]")
![On The Go 12" X 12" (30.5 X 30.5 Cm) Designer Series Paper [ 165566 ]](https://assets1.tamsnetwork.com/images/EC042017NF/165566s.jpg "On The Go 12\" X 12\" (30.5 X 30.5 Cm) Designer Series Paper [ 165566 ]")
![Pack Your Bags Twine Three Pack [ 165582 ]](https://assets1.tamsnetwork.com/images/EC042017NF/165582s.jpg "Pack Your Bags Twine Three Pack [ 165582 ]")
![Shy Shamrock Classic Stampin Pad [ 163808 ]](https://assets1.tamsnetwork.com/images/EC042017NF/163808s.jpg "Shy Shamrock Classic Stampin Pad [ 163808 ]")
![Azure Afternoon Classic Stampin' Pad [ 161663 ]](https://assets1.tamsnetwork.com/images/EC042017NF/161663s.jpg "Azure Afternoon Classic Stampin' Pad [ 161663 ]")
![Strawberry Slush Classic Stampin' Pad [ 165286 ]](https://assets1.tamsnetwork.com/images/EC042017NF/165286s.jpg "Strawberry Slush Classic Stampin' Pad [ 165286 ]")
![Shy Shamrock 8 1/2" X 11" Cardstock [ 163795 ]](https://assets1.tamsnetwork.com/images/EC042017NF/163795s.jpg "Shy Shamrock 8 1/2\" X 11\" Cardstock [ 163795 ]")


![Circle Of Seasons Dies [ 167277 ]](https://assets1.tamsnetwork.com/images/EC042017NF/167277s.jpg "Circle Of Seasons Dies [ 167277 ]")
![Timeless Plaid 6" X 6" (15.2 X 15.2 Cm) Designer Series Paper [ 164678 ]](https://assets1.tamsnetwork.com/images/EC042017NF/164678s.jpg "Timeless Plaid 6\" X 6\" (15.2 X 15.2 Cm) Designer Series Paper [ 164678 ]")
![Strawberry Slush 8 1/2" X 11" Cardstock [ 165625 ]](https://assets1.tamsnetwork.com/images/EC042017NF/165625s.jpg "Strawberry Slush 8 1/2\" X 11\" Cardstock [ 165625 ]")
![Strawberry Slush 3/8" (1 Cm) Faux Linen Ribbon [ 165274 ]](https://assets1.tamsnetwork.com/images/EC042017NF/165274s.jpg "Strawberry Slush 3/8\" (1 Cm) Faux Linen Ribbon [ 165274 ]")
![2025–2027 In Color™ Flat Pearls [ 165192 ]](https://assets1.tamsnetwork.com/images/EC042017NF/165192s.jpg "2025–2027 In Color™ Flat Pearls [ 165192 ]")
![Baker's Twine Essentials Pack [ 155475 ]](https://assets1.tamsnetwork.com/images/EC042017NF/155475s.jpg "Baker's Twine Essentials Pack [ 155475 ]")
