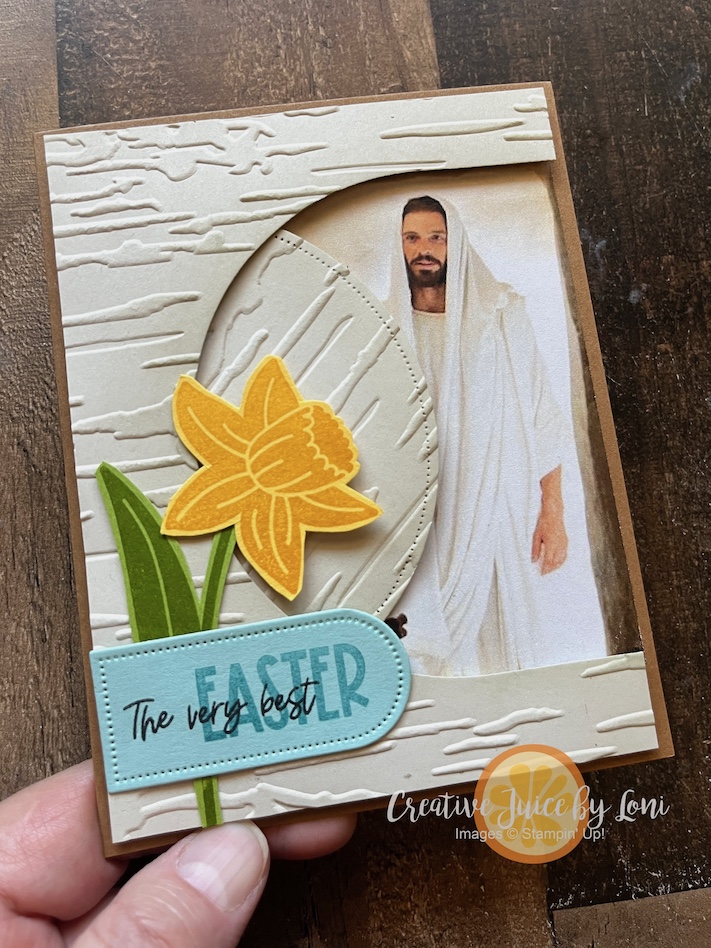
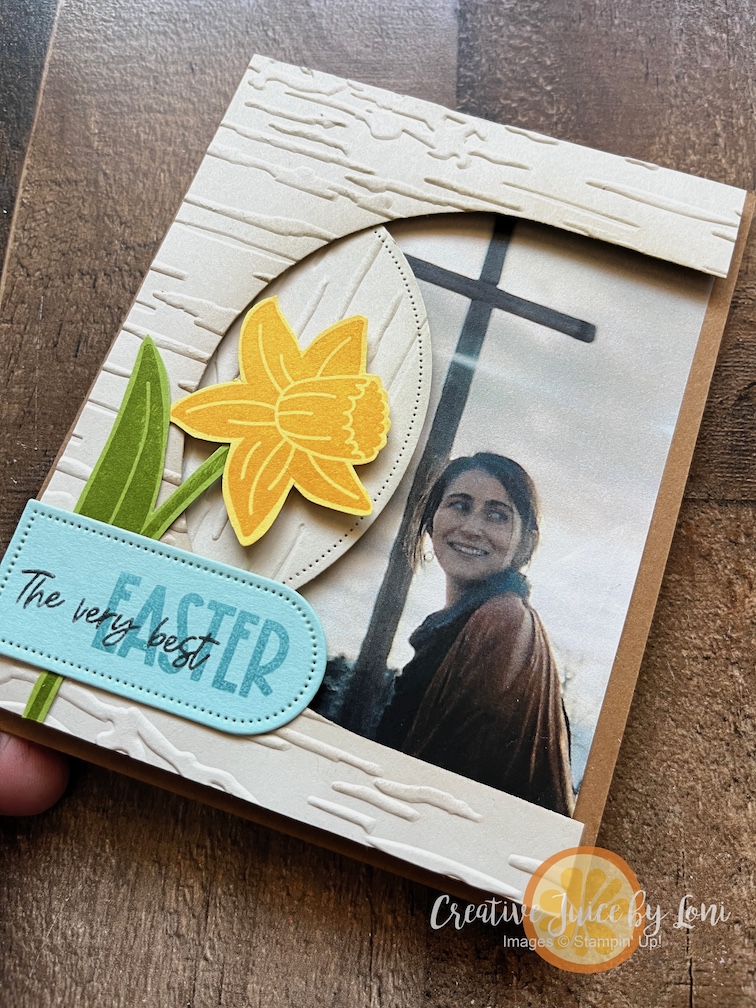
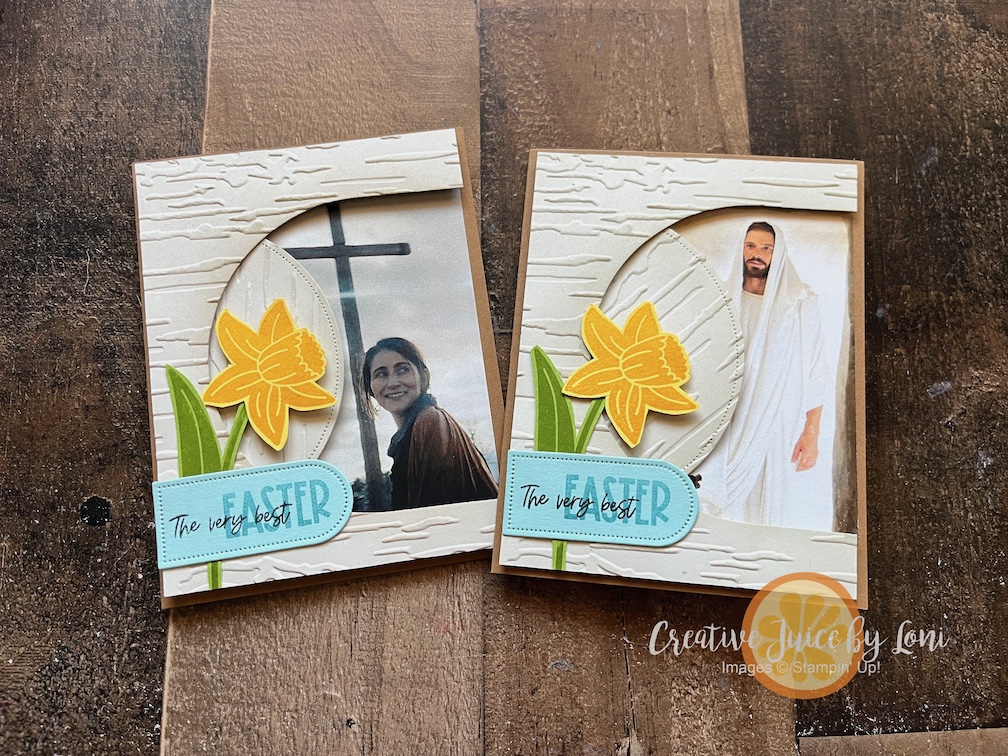
As we come to the end of our Reasons & Season week, I have one ultimate #celebrationcombination card for you, and it’s the VERY BEST REASON to celebrate: The Life, Atonement and Resurrection of the Savior of the World!
In my first-Monday-of-the-Month LIVE crafting video, I demonstrated this “Empty-Tomb” card which testifies of the greatest gift we have ever received:
I am grateful to combine more than just two stamp sets, but also my love of paper crafting with my testimony of Jesus Christ. Because of His life, sacrifice and resurrection, we can have HOPE for better things to come! We can repent of our sins and strive to become the person He wants each of us to be. Without Easter, there would be NO joy at Christmas!
For this card, you can use any picture that shows your gratitude for Christ’s atonement. This is the picture I printed depicting a risen Christ speaking to Mary which I used in the first card, but perhaps you have another illustration that strikes your heart-strings. Obviously, there were no cameras to mark this event most central to the history of all creation, but I appreciate those who attempt to capture the awe and reverence of the moment.
In this video, I share tips and tricks to make this card simple to prepare, stamp and assemble:
Thank you for visiting, for saving your favorite project of the past week (scroll through to see them all), and for supporting my Stampin’ Up!®️ business in many ways.
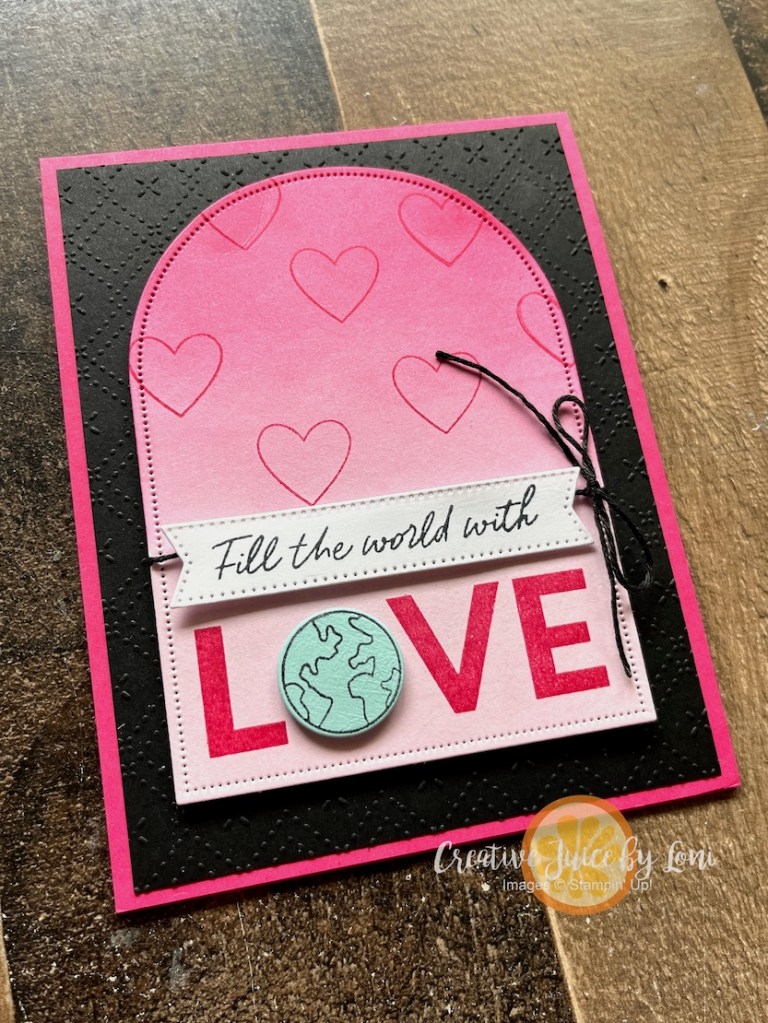
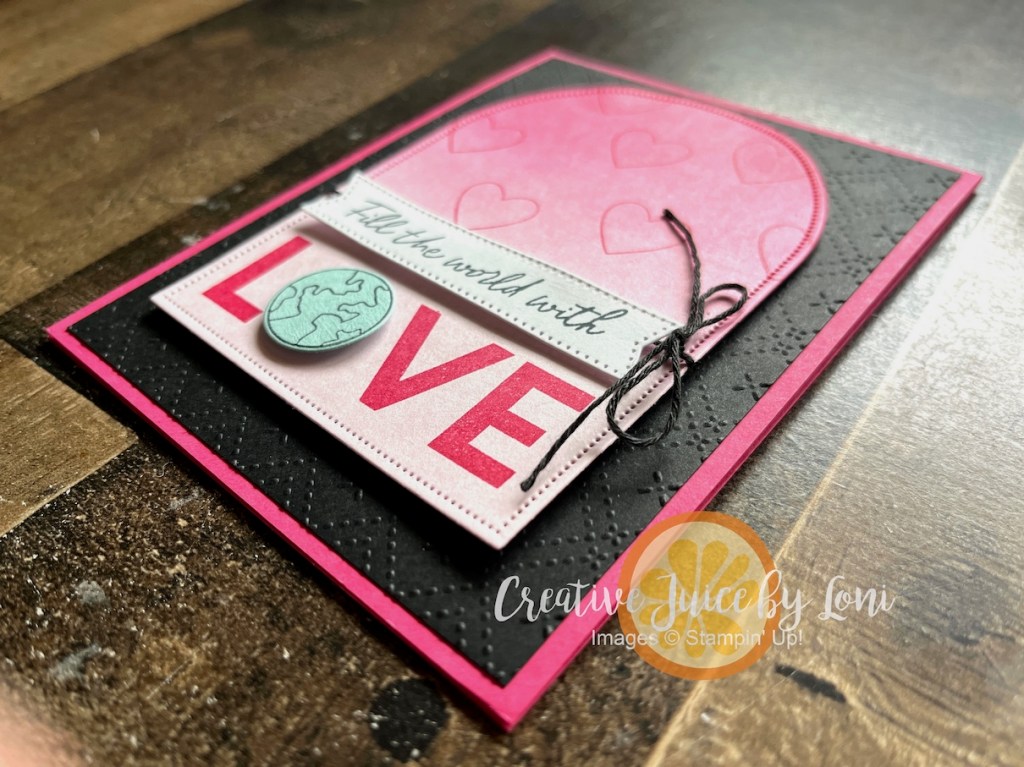
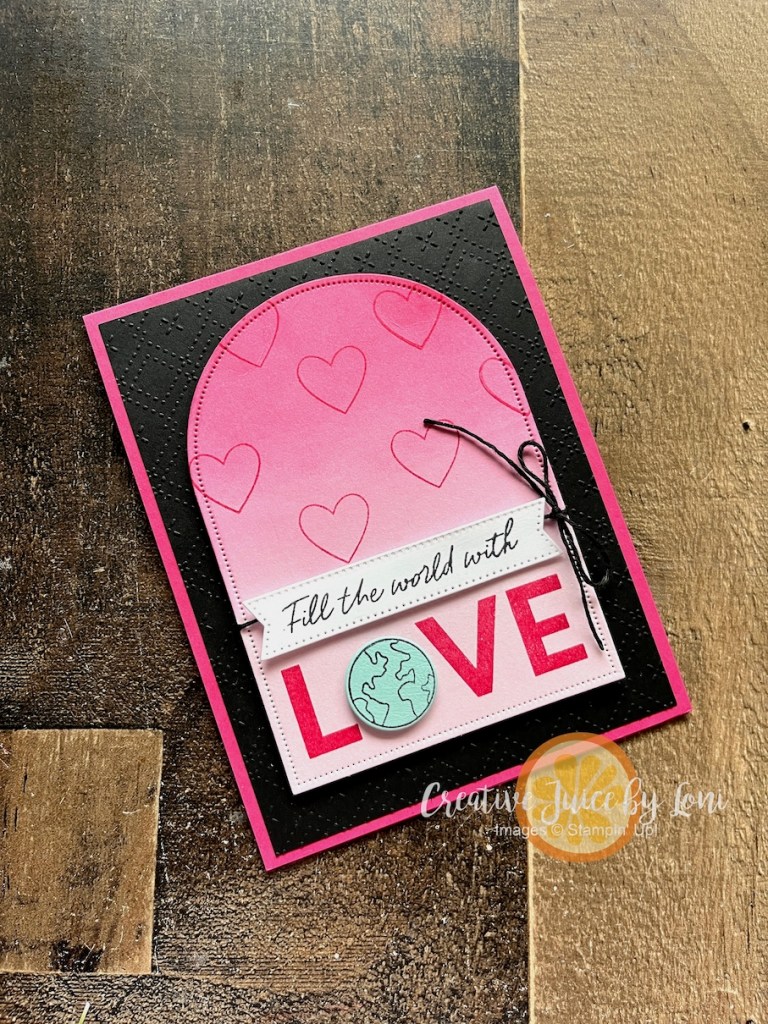
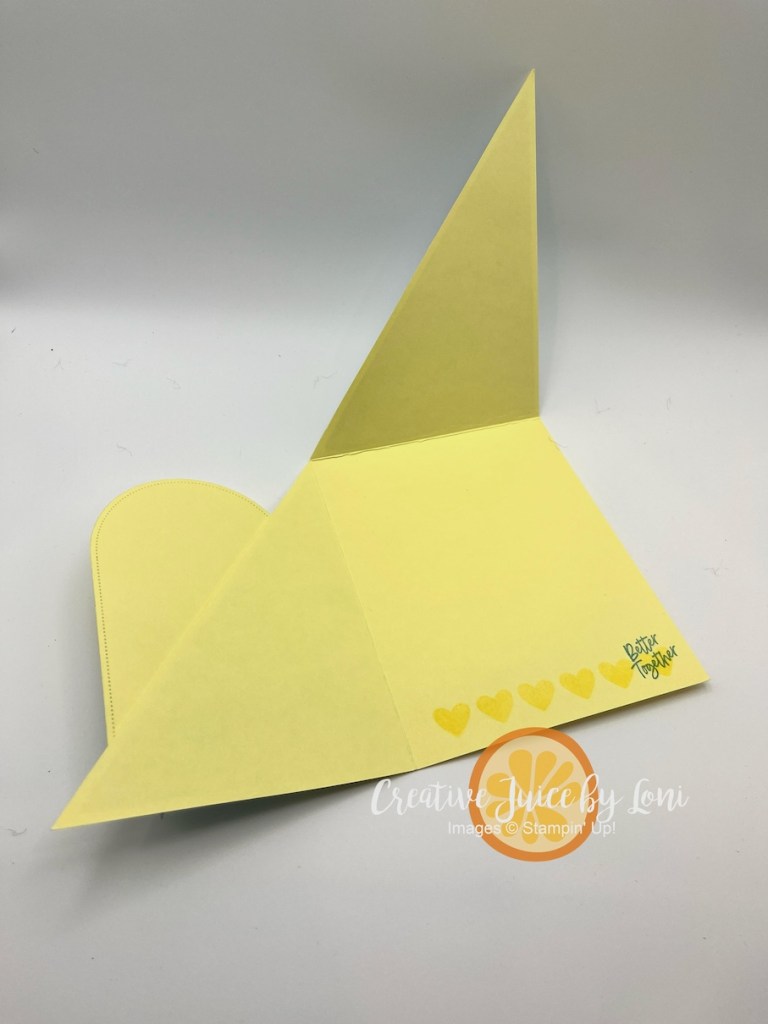
After making and mailing over 200 Valentine cards through the last two weeks, I had to pause and have a nap today! I thought I was done with the season of Love, then I saw the #tgifc563 color challenge from TGIF Challenges and the Sketch Challenge #gdp534 from Global Design Project, and knew there was one more to make.
Blending these two challenges with the Stampin’ Up!®️ Hope, Love & Joy bundle and here’s the result:
This card reminds me that a few simple layers of card stock and ink can be beautiful, and MORE THAN EVER, what the world needs is kindness, respect, charity, tolerance and LOVE.
I’ve watched as we’ve been (intentionally) polarized, and many dear friends jump on the bandwagon of one side or another before finding out where the wagon is heading. Often, what we believe is proven wrong when we have all the facts…or at least more nuanced, as life is. My choice is to flood the earth with as much GOODNESS as possible, one piece of art at a time, because that is what I have immediate control over.
Stepping off my soapbox and returning to stamping, I was pleasantly surprised at how embossing the black card stock added the subtle details needed for the background, and by using a blending brush to add Melon Mambo ink from the top of the arch fading downwards, it gives the feeling of love falling from heaven, when we love one another.
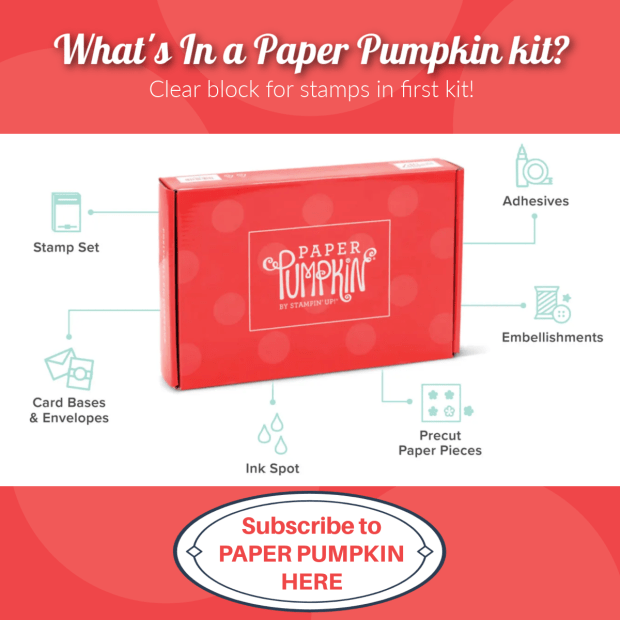
If you don’t know where to begin creating LOVEly things with stamps, ink and paper, may I suggest a monthly craft kit? Our Paper Pumpkin kit is a box that arrives each month with everything you need to make multiple projects! Pieces are pre-cut, adhesives & embellishments are included, and while the instructions are in the box, you can also watch a video on the Paper Pumpkin YouTube channel for each kit!
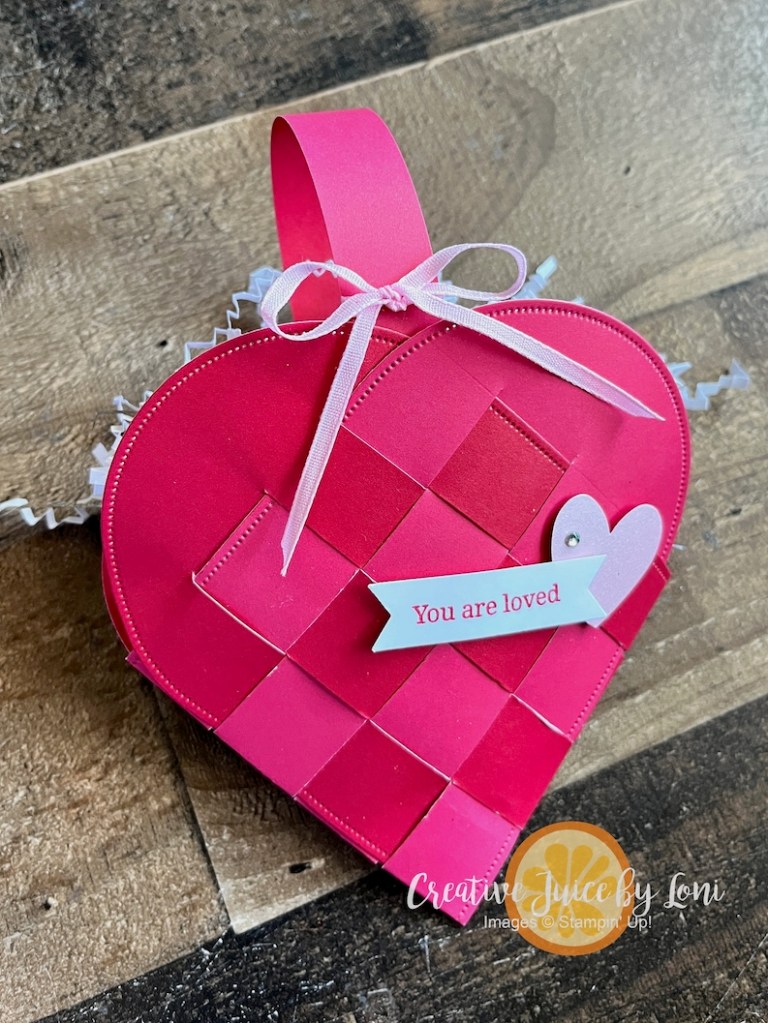
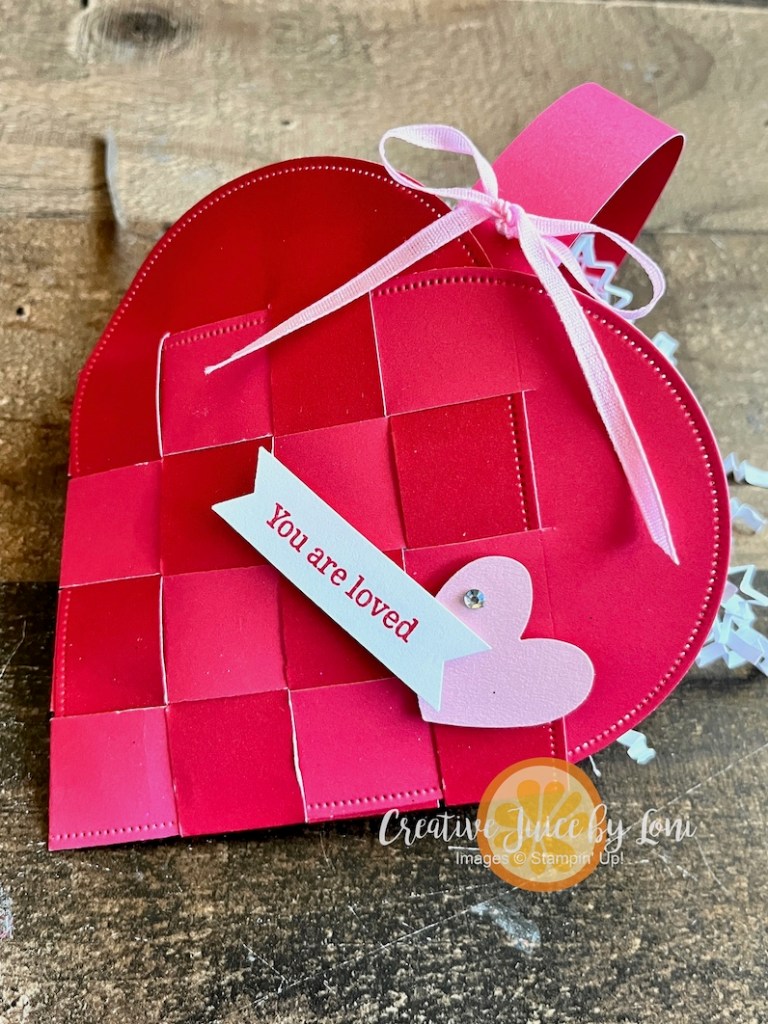
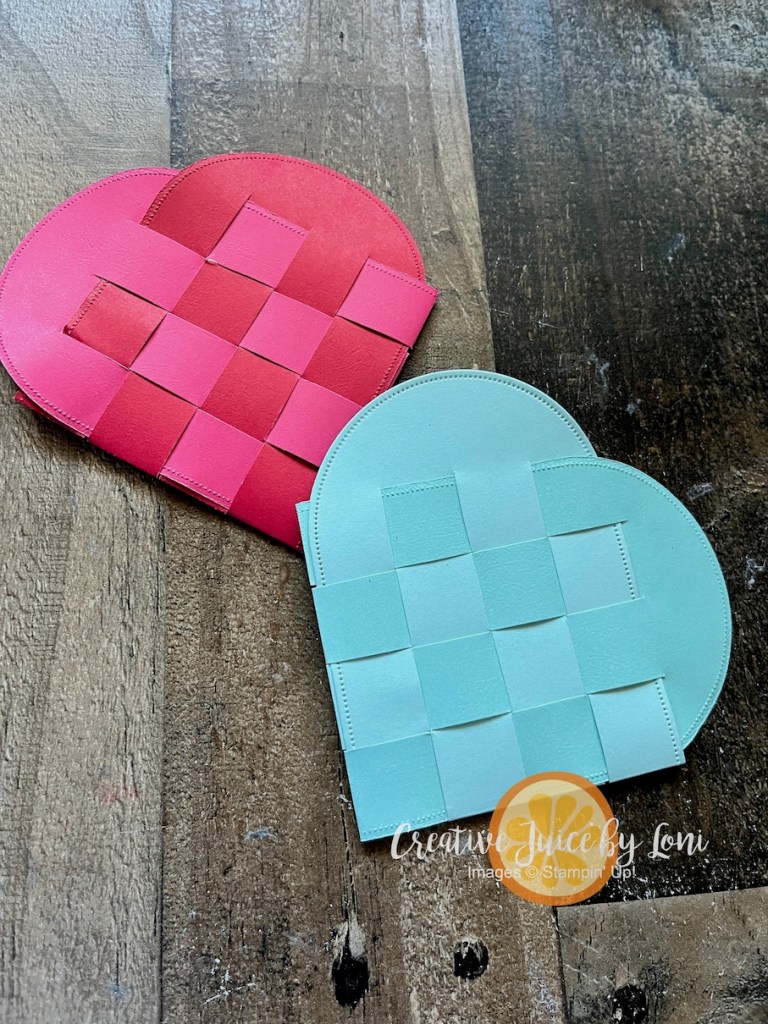
Our worldwide New at SU! design team is back to inspire you with new stamping ideas for 2026 and we’re starting off with the theme of “Handcrafted Hearts” 💕 I’ve been wanting to make these adorable “danish woven heart baskets” with the Everyday Arches dies, so this is the moment:
My mom taught me to make these when I was a young girl, and truthfully, I never really got the hang of them until NOW. To help YOU, I’ve created a short How-To video:
The woven pattern is so lovely with the two-tone card stock that I didn’t want anything covering it, so opted for a small heart punched from the new Pastels Shimmer paper and a mini-banner with the message that matches.
You’ll have all the heart eyes 😍 when you see more works of heart made by the other folks, and remember to PIN or SAVE your favorites:
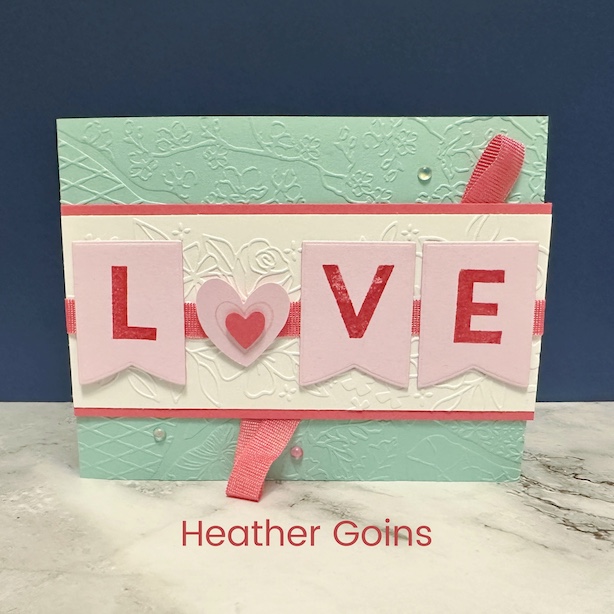
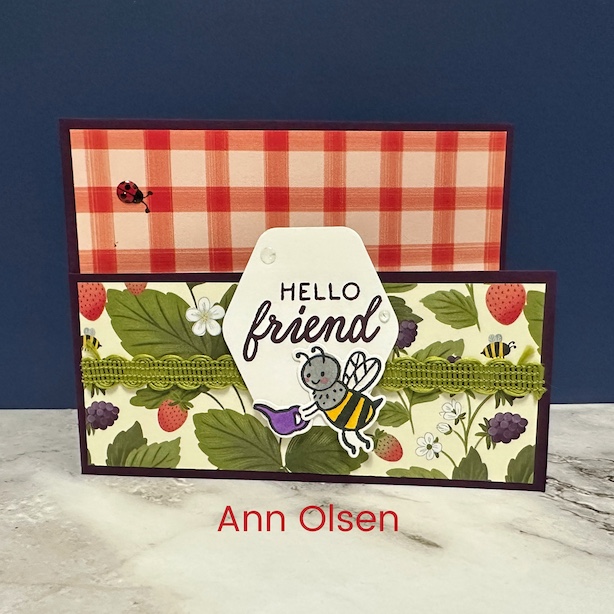
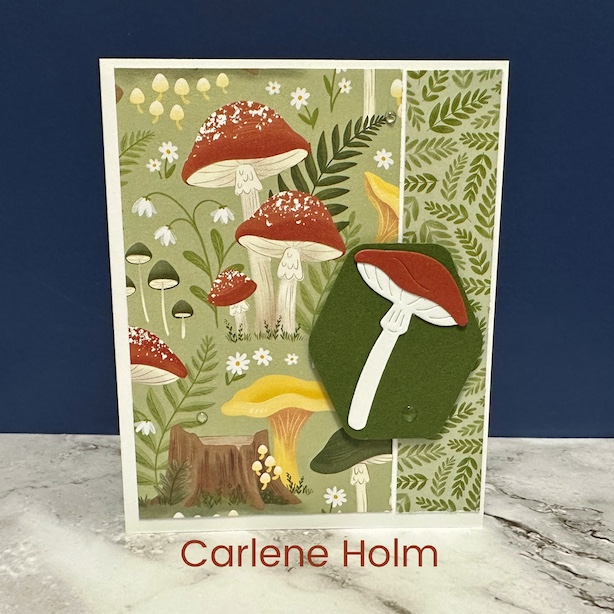
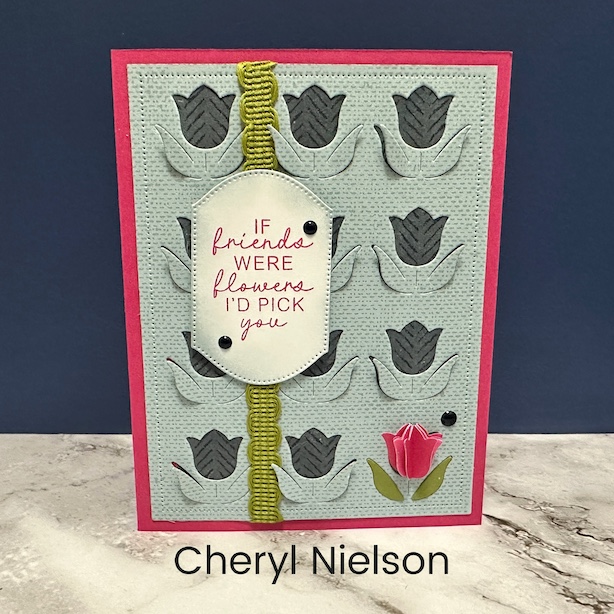
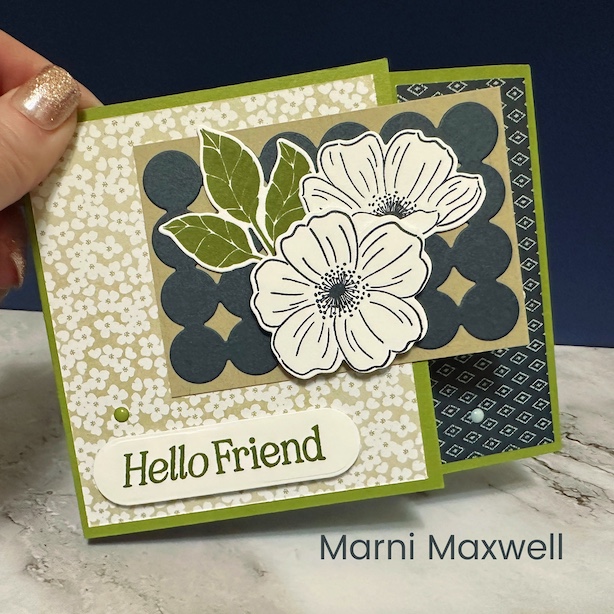
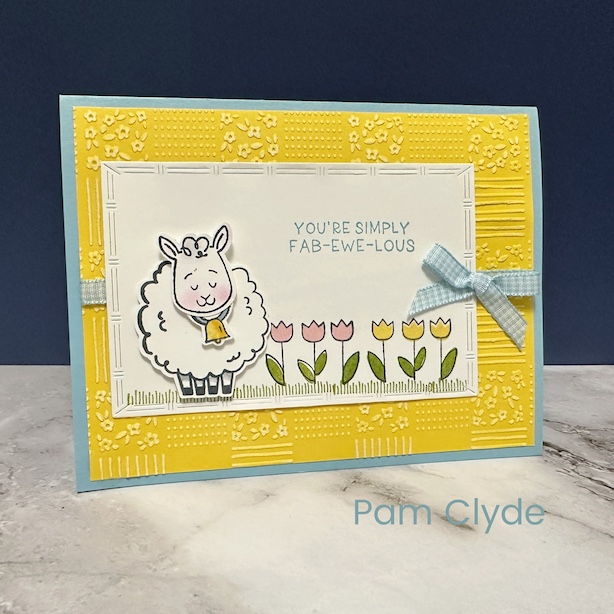
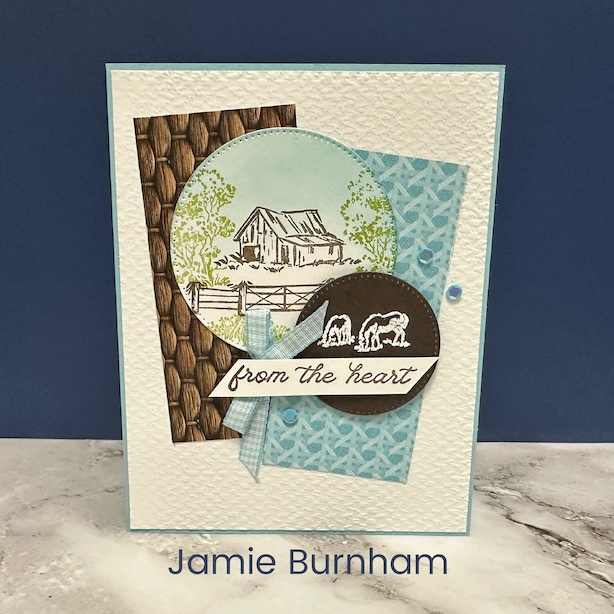
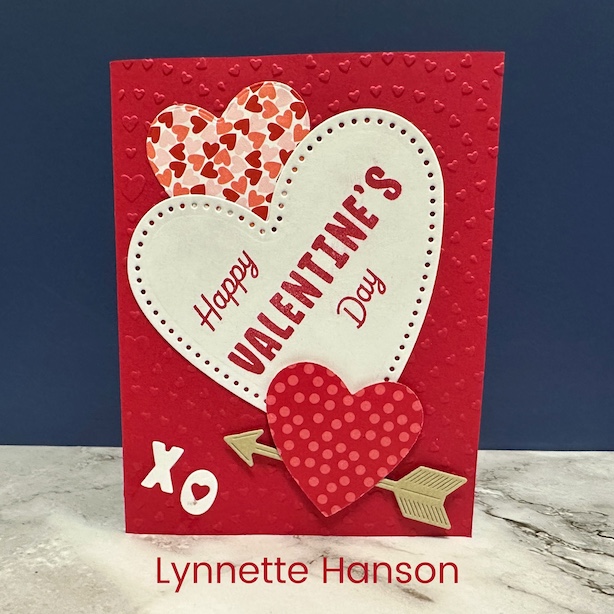
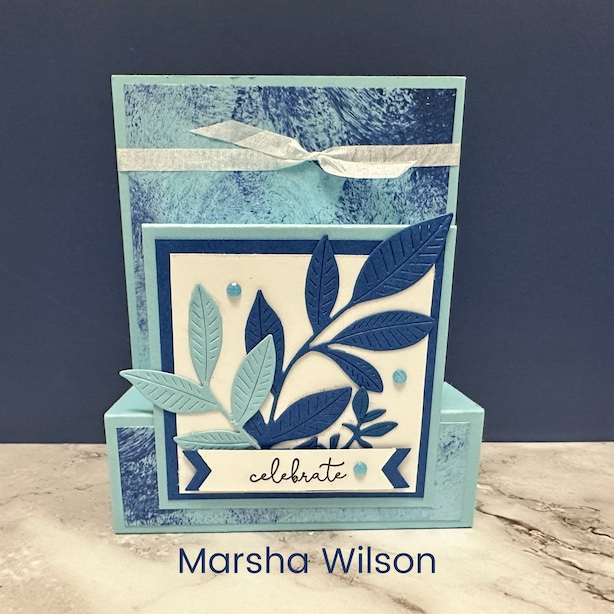
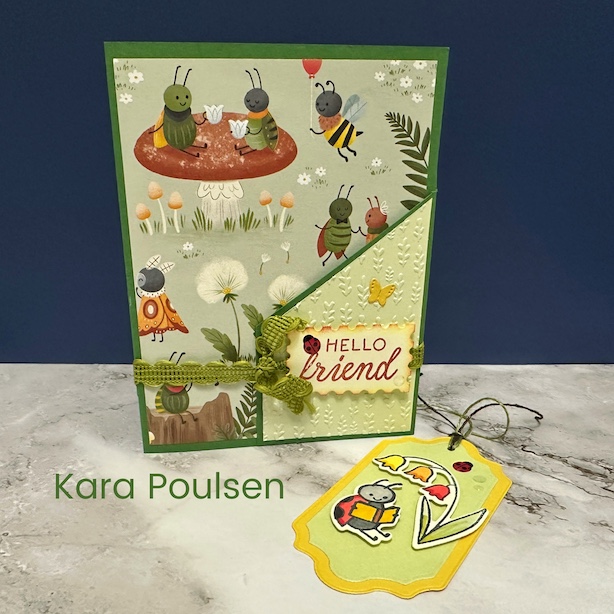
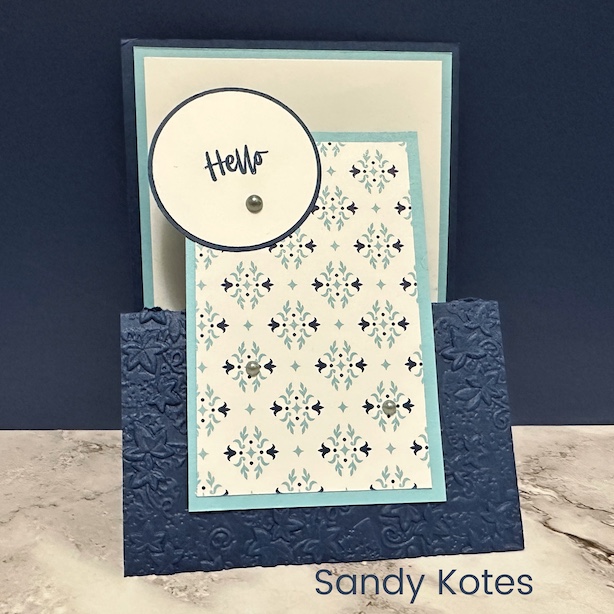
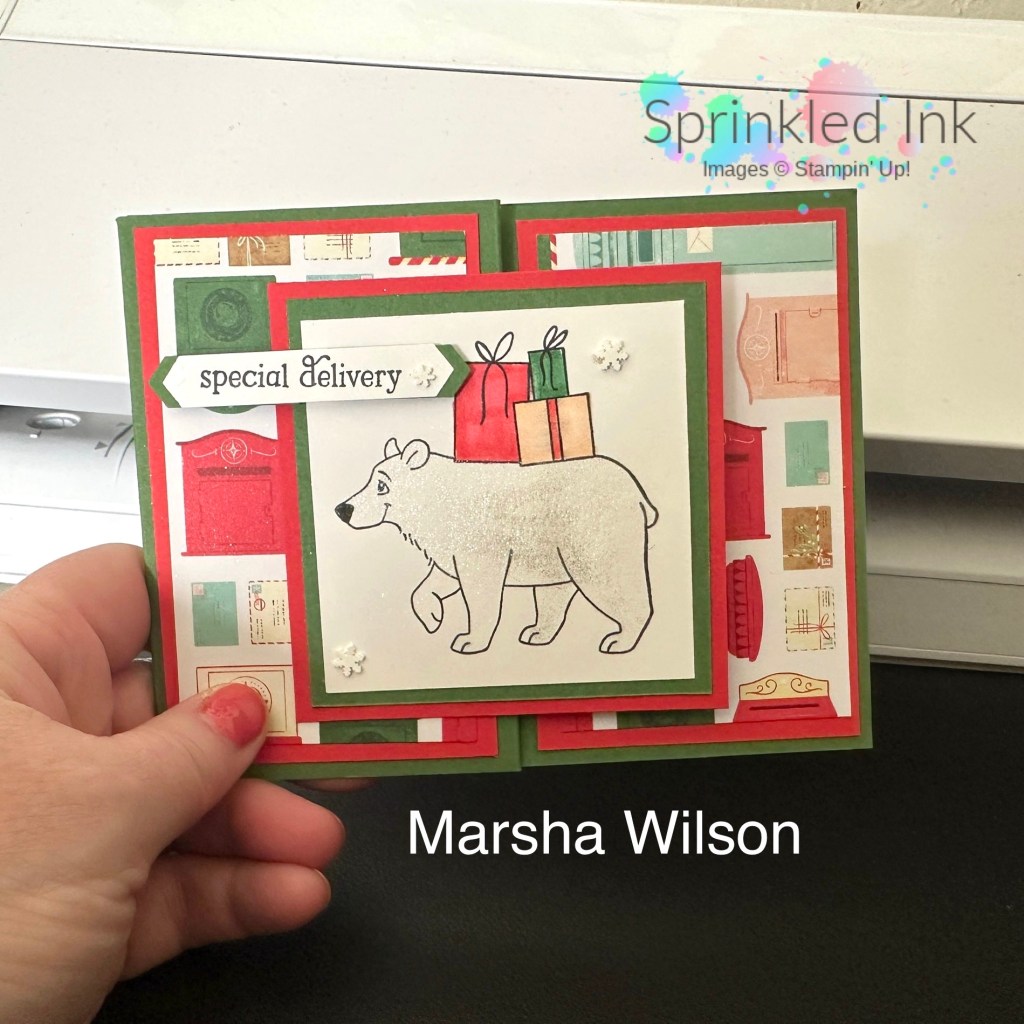
I have the BSF’s (Best Stampin’ Friends) and we held an exchange for cards created using new products from the Stampin Up!®️ January 2026 Online Exclusives and January-April mini catalog: The cards we received from each other were AWESOME, so I had to share them with you!
THANKS to Michelle Scott for taking photos of all the cards
This is one of the fun things we do as a Sprinkled Ink team with each new print publication, and it makes us happy to see all the terrific stamping ideas. We’d love to welcome you to our family: Join Here!
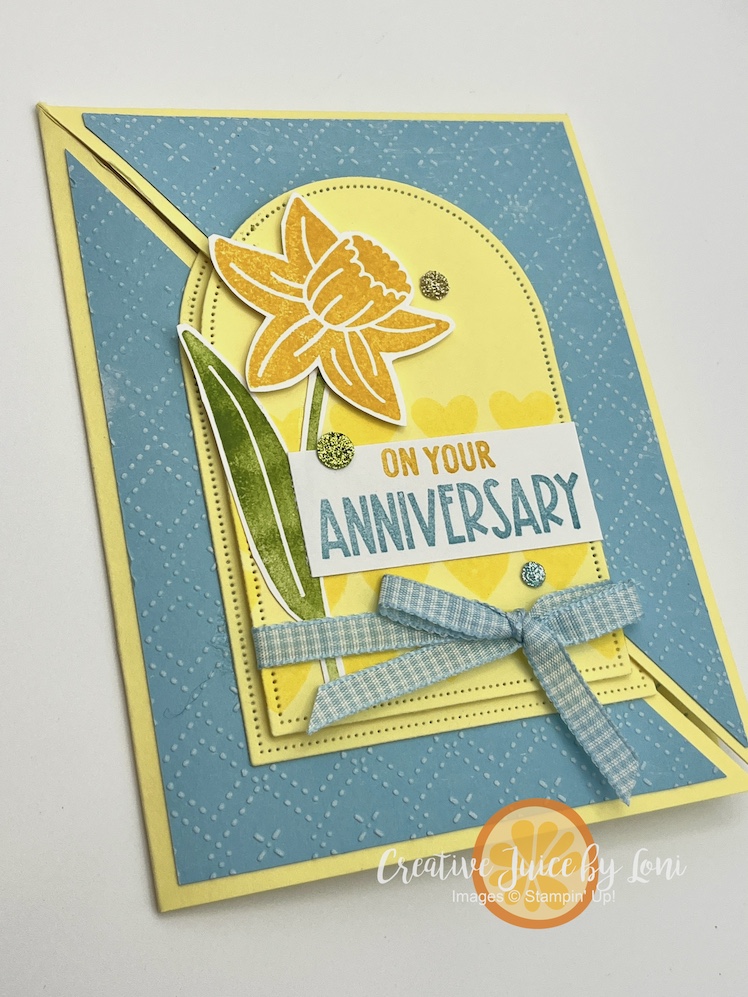
My bright Anniversary card featured two new coordinating sets: Reason to Celebrate and Seasonal Celebrations…I love how the sentiments and images can be mixed & matched! The two arches also create a slide-in-lock to keep the card closed.
The art my teammates create is astounding! The Sprinkled Inkers (and friends) host a card swap for each new print publication, including new Online Exclusives. Michelle snapped these photos and I wanted to brag on the creators:
There were fun folds we learned in a virtual team meeting, gift card holders, tags, layers, specialty paper, ornaments, fun folds, embossing… all the creative ideas you collect by being a stamper! I’m so proud of these demonstrators, and there is ROOM IN OUR FAMILY FOR YOU!
For 31 days in October, there are two fabulous starter kit offers, and there is no reason you shouldn’t give take advantage of one of these two unbelievable deals:
As part of my team, you’ll have the opportunity to participate in the best card swaps EVER, and be embraced by a community of creatives you didn’t know you needed.
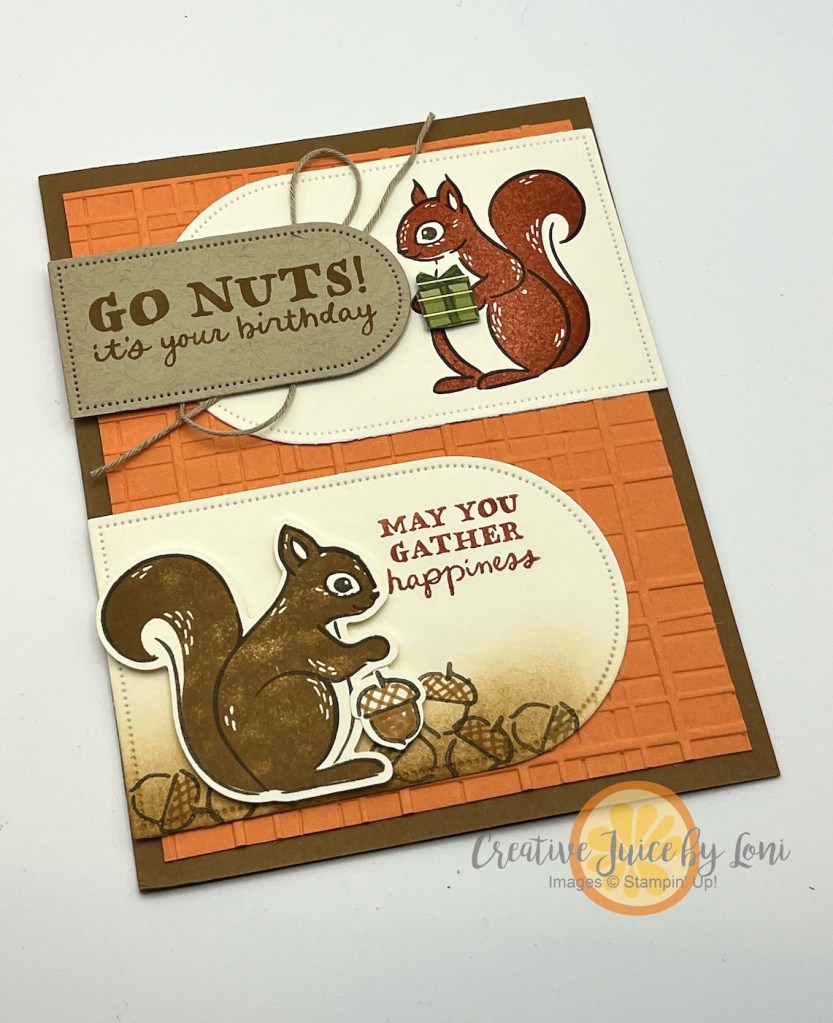
This was my card for the swap – just in time for Fall birthdays!
This playful card pairs the Stampin’ Up!®️ Fluffy Squirrel bundle (stamps & punch) with the Everyday Arches dies for an autumnal birthday greeting. The embossed background adds texture behind the sweet squirrels—one bringing a gift and the other gathering acorns. Turning the arches sideways adds to their versatility! A touch of twine and soft ink blending finish it off, making this card a charming way to celebrate someone’s day of birth in October or November.
There was one piece of Silent Snowfall Specialty Designer Series Paper left on my desk after cutting and mailing all the September paper shares, then I saw the Global Design Project sketch for the week, and imagined looking out a window on a quiet winter afternoon…
Here’s the prompt for the #gdp514 sketch:
Rummaged through more patterned paper for some worthy “wallpaper” and found the back side of one of the Autumn Toile papers would be perfect (isn’t the “front” or “back” irrelevant? The FRONT is whichever you want to use!).
Once it was adhered to the front, I cut the smaller arch from both layers, then added a dark wood window casing by cutting out two nested arches. In this picture you can really see the detail through the window:
The Silent Snowfall paper has a snowflake pattern dry embossed into it, so I heat embossed some random snowflake dots from the Branching Out stamp set over the debossed side to break up the repeating pattern and help it feel more natural and random. Once it was dry, I used a brayer to roll Cloud Cover ink over the top – the inlaid snowflakes are deep enough they don’t get any ink inside. I know that we don’t have a large Cloud Cover ink pad: You can use the refill to ink up an empty stampin’ spot, or use a piece of felt as the ink pad by squeezing some ink onto it.
Once the branches were stamped over the snowflakes, that layer was adhered to a 4″ x 5.25″ Cloud Cover card inside (8″ x 10.5″ when open), with the fold on the right:
This “card-in-a-card” design allows you to catch a few snowflakes on your tongue as you continue to unfold the greeting!
Finally, you open the inside to find a large area to write all the details a friend would love to hear from you.
Tomorrow, I’ll be mashing up the Branching Out bundle (there is a set of dies that coordinate with the stamp set) with another new bundle from the 2025 Sept-Dec Mini Catalog, and you’ll want to add it to your cart when you see how essential it is.
A simple card can be transformed by an easy fun-fold element, and in today’s free tutorial, I’ll show you how to make someone’s birthday brighter!
Behind this simple facade lies a fancy surprise as you open the card:
The Everyday Arches dies are the star of this card, and an essential set of paper crafting tools that belong in every stamper’s arsenal.
Let me know if you like this idea by leaving a comment (top of post, near posting date), order the supplies you need below the button, then download the tutorial and give it a go!
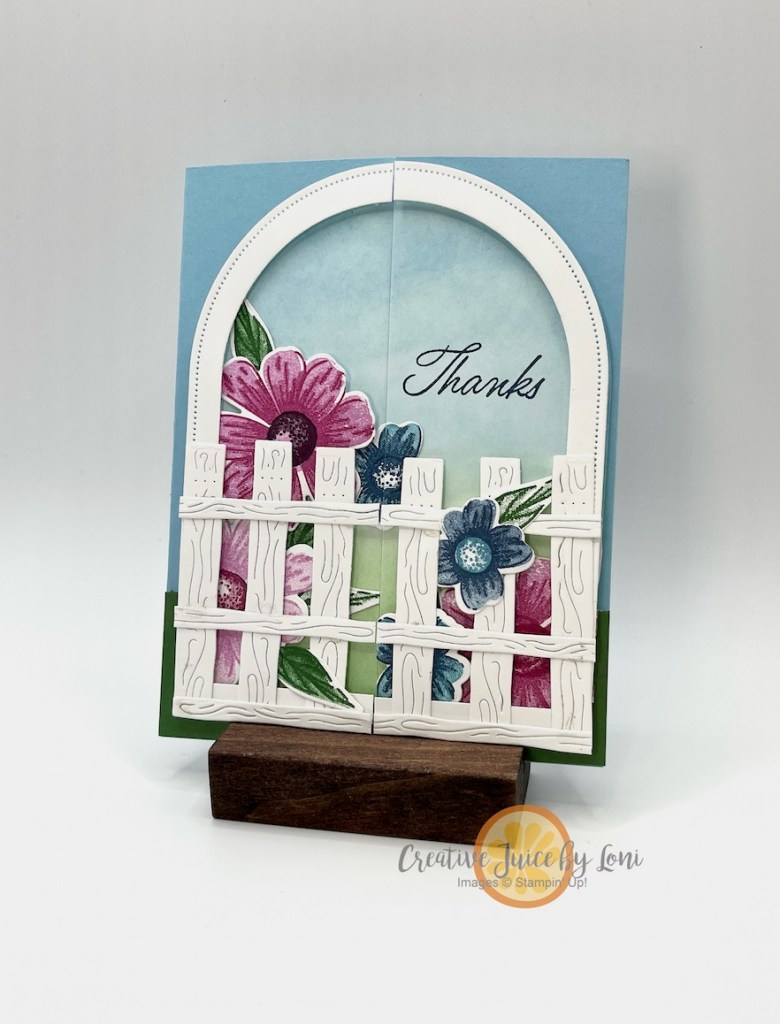
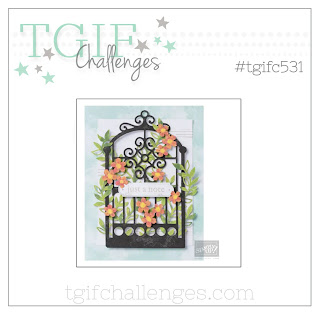
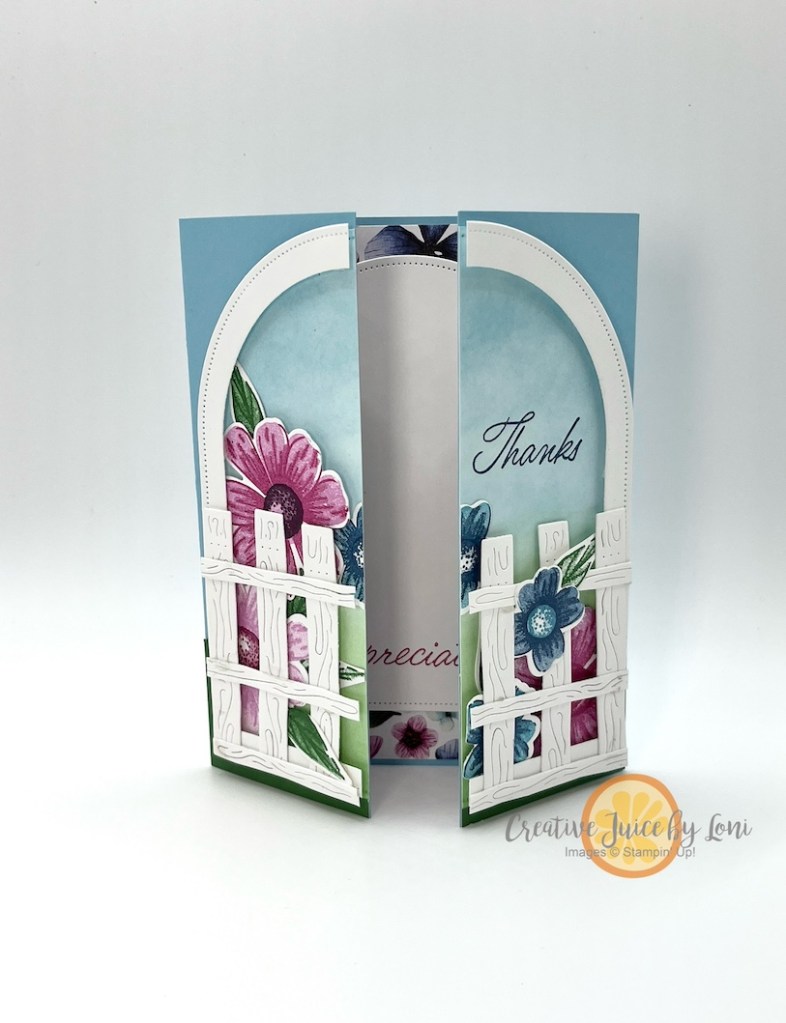
This week’s TGIF Challenge #tgifc531 is “Garden Gates” and I wanted to create a gratitude card that felt like you were walking into a Secret Garden:
After I created my card, I went back to the TGIF post and realized Wendy Weixler and I both had a similar idea for building the gate, but how delightful that both are unique!
The first type of card I thought of was the appropriately named “Gate Fold” card, so I had to think it through. I ended up cutting my gate in half, so you could enter the garden:
There are only 3 days left of the Suite BOGO Sale, so I chose to use the Impressions Abloom bundle and Designer Series Paper from the Floral Impressions Suite. Each piece of our suites also qualify for the sale, just remember that the lowest price suite or suite product will get the 50% discount!
Now enter the secret garden:
I used the arch die cut from the larger gate (cut for the front) on the inside, and let the profusion of flowers bloom on all sides!
Fun fact: The Secret Garden classic children’s novel by Frances Hodgson Burnett was one of my favorite reads as a child, and though I’m a huge musical nerd, I DON’T really love the Secret Garden musical play. The book is definitely best (and there are a few decent movie adaptations).
This card just gives all the wonder of finding a secret garden behind a locked gate!
Now, if you’ve procrastinated, here’s your reminder to shop the SWEET Suite BOGO Sale.
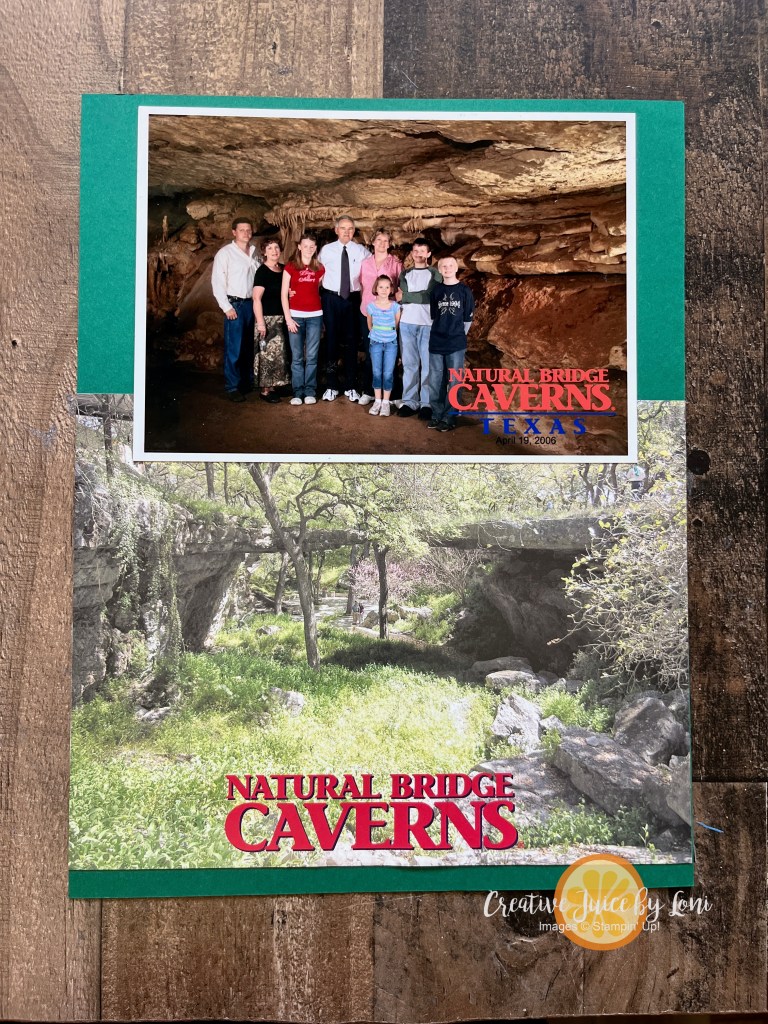
Scrapbooking is about telling your stories and getting the photos off your phone! Myself, I tend to keep it simple to get it done. As part of our “Sweet, Suite Summer” series (since it’s the last week of our Suite BOGO50 Sale) I wanted to use the Everyday Skies Suite to show you how these products can be fantastic for memory albums!
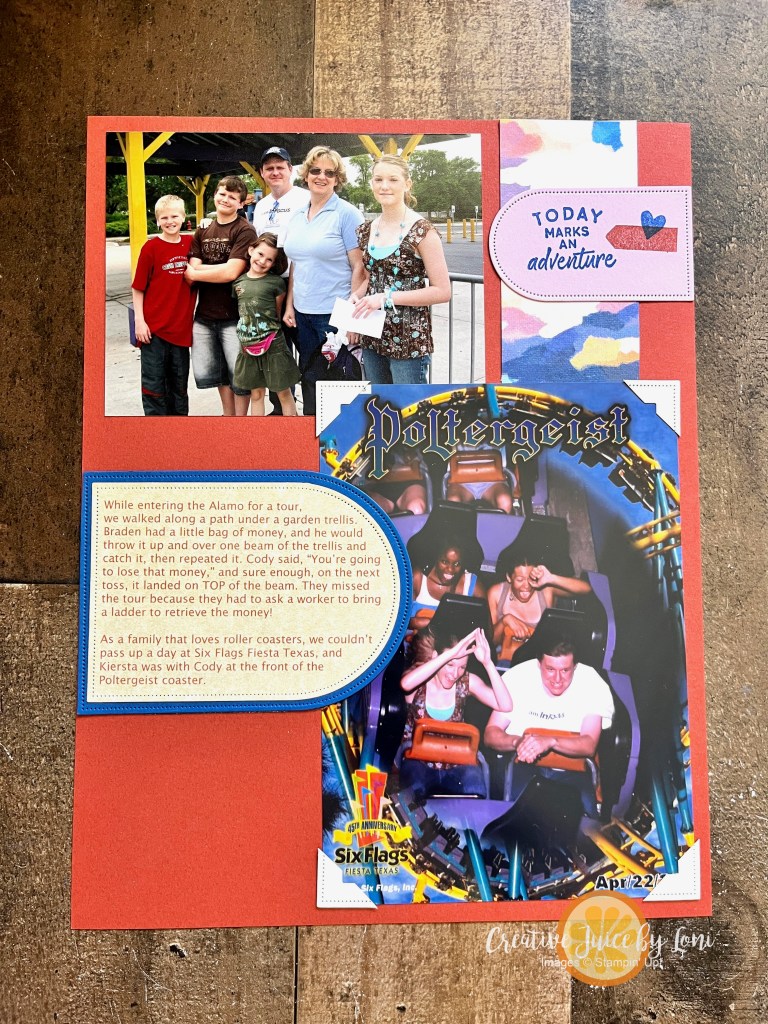
My first page capturing a trip to Texas (many years ago) could NOT be more simple because the photo has the date and the front of the folder that the picture came in tells where it is. There are no Everyday Skies products on this page, but hold on…
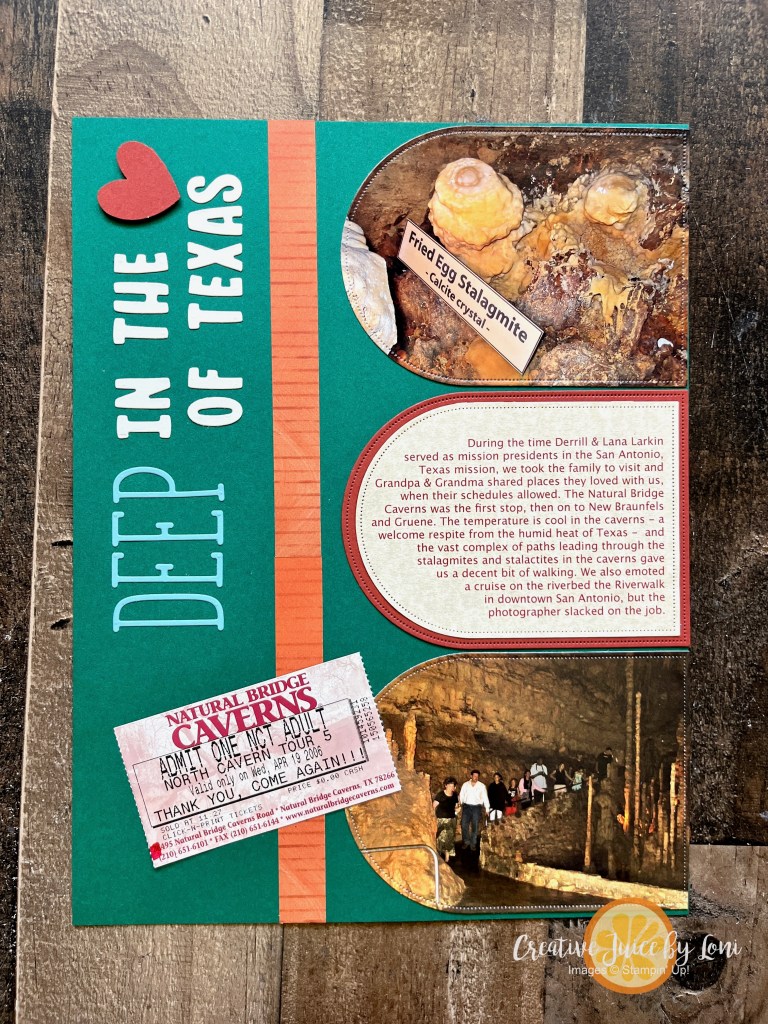
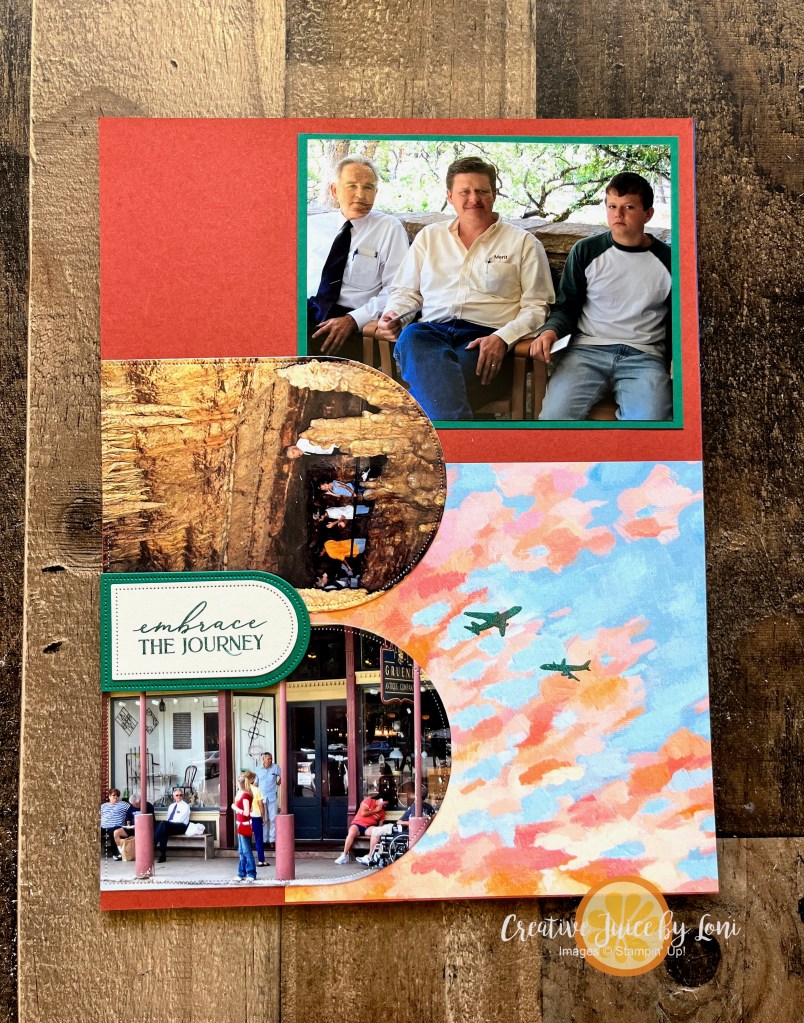
On the second page, I start using the Everyday Arches dies, which is part of the suite. Cutting photos with the arches gives them a unique look. While my preference is 8.5″ x 11″ pages, you can do the same thing on a 12″ x 12″ page:
The title uses a few of our alphabet dies (listed in complete supply list, below) and a strip of the Everyday Skies Designer Series Paper makes it feel separated.
Moving to the third page (also the second page of the layout), I’ve added a whole 6″ x 6″ piece of the DSP to the lower corner to tie the colors together, and stamped the airplanes to indicate that we flew to Texas for this vacation:
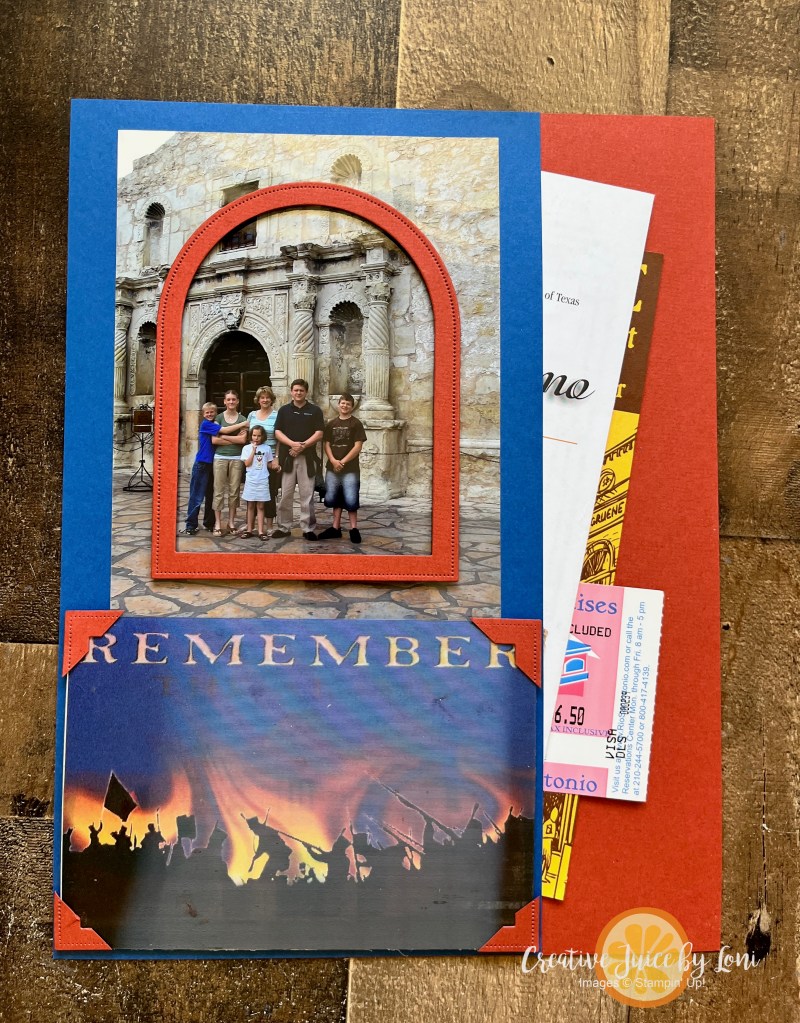
To keep all the maps, ticket stubs and brochures together, page #4 actually acts as a pocket:
Just for fun, the postcard from the Alamo in San Antonio that I used on the bottom of the pocket page is 3-D, so when you move the page, a different image appears:
Try “framing” a larger photo with an arch outline, and watch the demonstration video to learn how I made the photo corners 😉
EXTRA! EXTRA! After the video, I made one more simple page to finish off my photos from that trip 21 years ago, and tie them together with the arches (and those photo corners show up again). This will face the Alamo page, completing the layout and telling the story:
The Everyday Skies suite was so popular when it launched a few months ago that it’s been out of stock. I’m super glad it is back in stock with time for you to get all of it (or just the parts you love most) before the BOGO50 Sale ends on June 30th!
If you are a scrapbooker, DON’T MISS the chance to join the VIRTUAL ALBUM RETREAT in July:
Don’t be put-off by the price: The kit includes FOUR stamp sets and 12 DOUBLE PAGE LAYOUTS (one pair for each month of the year) and the instruction you receive in the event will be worth the investment! Seriously….click to go check out the kit:
Once you purchase the kit, you’ll receive an email in early July to the exclusive Facebook Event page, so make sure your account has the best email for you! ALSO: When you purchase the kit, you earn $25 BACK in Stampin’ Rewards (if you’ve opted in) to use on your next purchase, or save up for a binder to put your pages in!
You’ll be so happy you joined the Virtual Album Retreat – order your kit today before they run out!
Adding to the growing “Mailable Gifts” list (you’ll want to PIN or bookmark that link) ~ this time it’s one a guy would appreciate!
Since it’s Father’s Day, I like to remember my sons and sons-in-love (I do the same for the girls on Mother’s Day). A gift card for a CAR WASH doesn’t break the bank (when you have many gifts to mail), and when I was at Quick Quack Car Wash purchasing gift cards, I saw that they also had AIR FRESHENERS for just $1!!
Of course, I had to come back to make a slimline card that would fit both the Duck Scent and the gift card! The Stampin’ Up!®️ Party Alphabet dies are large enough to show off the contrasting pattern on the front, and this is the inside of the card style:
I did have to cut off just a bit of the bottom of the “Duck Scents” to fit into a small envelope (as shown) – it’s a 6 3/4″ security envelope, like you can buy a box of at Dollar Tree. The card size is 3.5″ x 6.25″ when folded, and I’ll give you material measurements in just a moment.
One thing you will have to do is manipulate the sentiment on your clear block, so it will curve around the first letter, and fit on the Designer Series Paper. That’s easy to do with Stampin’ Up!®️ photopolymer stamps, like the Everyday Arches set I used for this card. Make sure to stamp this sentiment close to the left side of the patterned paper so you have room for the letters!
I’m here to make all the mistakes so you don’t have to- I had to make this card style 3 times before I got it right! Once I got it down, I made multiple versions. Here are the measurements:
11″ x 3.5″ cardstock for card base, scored at 6.25″ and 9.75″ (fold the smallest flap over and secure edges with Tear & Tape adhesive to create a pocket for a gift card).
Designer Series Paper for front layer: 6″ x 3.25″
Cardstock for inside of card: 5-7/8″ x 3-1/8″
Designer Series Paper AND card stock for 3 letters (and the shadow behind them): 2.5″ x 5″
Stamp any designs you want on your letters (like the birds) BEFORE you offset the card stock behind them for a shadow effect, then pop them up on the front of your card with dimensionals.
These cards turned out terrific with a combination of papers from the Everyday Skies 6″ x 6″ Designer Series Paper pack! Supplies listed below, and the SON card uses Cajun Craze, Blueberry Bushel and Cloud Cover (inside) card stock; the DAD card uses Azure Afternoon, Blackberry Bliss and Basic White (inside) card stock.
Would you give this card style a try? Leave me a comment (at top of post, next to the posting date) to let me know how you like it.

![Seasonal Celebrations Photopolymer Stamp Set [ 167225 ]](https://assets1.tamsnetwork.com/images/EC042017NF/167225s.jpg "Seasonal Celebrations Photopolymer Stamp Set [ 167225 ]")
![Reason To Celebrate Photopolymer Stamp Set (English) [ 166905 ]](https://assets1.tamsnetwork.com/images/EC042017NF/166905s.jpg "Reason To Celebrate Photopolymer Stamp Set (English) [ 166905 ]")
![Basic Beige 8 1/2" X 11" Cardstock [ 164511 ]](https://assets1.tamsnetwork.com/images/EC042017NF/164511s.jpg "Basic Beige 8 1/2\" X 11\" Cardstock [ 164511 ]")
![Pecan Pie 8 1/2" X 11" Cardstock [ 161717 ]](https://assets1.tamsnetwork.com/images/EC042017NF/161717s.jpg "Pecan Pie 8 1/2\" X 11\" Cardstock [ 161717 ]")
![Pool Party 8-1/2" X 11" Cardstock [ 122924 ]](https://assets1.tamsnetwork.com/images/EC042017NF/122924s.jpg "Pool Party 8-1/2\" X 11\" Cardstock [ 122924 ]")
![Daffodil Delight 8-1/2" X 11" Cardstock [ 119683 ]](https://assets1.tamsnetwork.com/images/EC042017NF/119683s.jpg "Daffodil Delight 8-1/2\" X 11\" Cardstock [ 119683 ]")
![Granny Apple Green 8-1/2" X 11" Cardstock [ 146990 ]](https://assets1.tamsnetwork.com/images/EC042017NF/146990s.jpg "Granny Apple Green 8-1/2\" X 11\" Cardstock [ 146990 ]")
![Basic Beige Classic Stampin Pad [ 163806 ]](https://assets1.tamsnetwork.com/images/EC042017NF/163806s.jpg "Basic Beige Classic Stampin Pad [ 163806 ]")
![Daffodil Delight Classic Stampin' Pad [ 147094 ]](https://assets1.tamsnetwork.com/images/EC042017NF/147094s.jpg "Daffodil Delight Classic Stampin' Pad [ 147094 ]")
![Granny Apple Green Stampin' Pad [ 147095 ]](https://assets1.tamsnetwork.com/images/EC042017NF/147095s.jpg "Granny Apple Green Stampin' Pad [ 147095 ]")
![Pool Party Classic Stampin' Pad [ 147107 ]](https://assets1.tamsnetwork.com/images/EC042017NF/147107s.jpg "Pool Party Classic Stampin' Pad [ 147107 ]")
![Tuxedo Black Memento Ink Pad [ 132708 ]](https://assets1.tamsnetwork.com/images/EC042017NF/132708s.jpg "Tuxedo Black Memento Ink Pad [ 132708 ]")
![Blending Brushes [ 153611 ]](https://assets1.tamsnetwork.com/images/EC042017NF/153611s.jpg "Blending Brushes [ 153611 ]")
![Stampin' Cut & Emboss Machine [ 149653 ]](https://assets1.tamsnetwork.com/images/EC042017NF/149653s.jpg "Stampin' Cut & Emboss Machine [ 149653 ]")
![Everyday Arches Dies [ 164629 ]](https://assets1.tamsnetwork.com/images/EC042017NF/164629s.jpg "Everyday Arches Dies [ 164629 ]")
![Birch Wood 3 D Embossing Folder [ 164069 ]](https://assets1.tamsnetwork.com/images/EC042017NF/164069s.jpg "Birch Wood 3 D Embossing Folder [ 164069 ]")
![Stampin' Seal [ 152813 ]](https://assets1.tamsnetwork.com/images/EC042017NF/152813s.jpg "Stampin' Seal [ 152813 ]")
![Stampin' Dimensionals [ 104430 ]](https://assets1.tamsnetwork.com/images/EC042017NF/104430s.jpg "Stampin' Dimensionals [ 104430 ]")


![Hope Love & Joy Bundle (English) [ 166858 ]](https://assets1.tamsnetwork.com/images/EC042017NF/166858s.jpg "Hope Love & Joy Bundle (English) [ 166858 ]")
![Melon Mambo 8-1/2" X 11" Cardstock [ 115320 ]](https://assets1.tamsnetwork.com/images/EC042017NF/115320s.jpg "Melon Mambo 8-1/2\" X 11\" Cardstock [ 115320 ]")
![Bubble Bath 8 1/2" X 11" Cardstock [ 161718 ]](https://assets1.tamsnetwork.com/images/EC042017NF/161718s.jpg "Bubble Bath 8 1/2\" X 11\" Cardstock [ 161718 ]")
![Basic White 8 1/2" X 11" Cardstock [ 166780 ]](https://assets1.tamsnetwork.com/images/EC042017NF/166780s.jpg "Basic White 8 1/2\" X 11\" Cardstock [ 166780 ]")
![Stylish Shapes Dies [ 159183 ]](https://assets1.tamsnetwork.com/images/EC042017NF/159183s.jpg "Stylish Shapes Dies [ 159183 ]")
![Beautiful Pattern 3 D Embossing Folder [ 167097 ]](https://assets1.tamsnetwork.com/images/EC042017NF/167097s.jpg "Beautiful Pattern 3 D Embossing Folder [ 167097 ]")
![Melon Mambo Classic Stampin' Pad [ 147051 ]](https://assets1.tamsnetwork.com/images/EC042017NF/147051s.jpg "Melon Mambo Classic Stampin' Pad [ 147051 ]")
![Baker's Twine Essentials Pack [ 155475 ]](https://assets1.tamsnetwork.com/images/EC042017NF/155475s.jpg "Baker's Twine Essentials Pack [ 155475 ]")
![Black Stampin' Dimensionals Combo Pack [ 150893 ]](https://assets1.tamsnetwork.com/images/EC042017NF/150893s.jpg "Black Stampin' Dimensionals Combo Pack [ 150893 ]")


![Real Red 12" X 12" (30.5 X 30.5 Cm) Two Tone Cardstock [ 166696 ]](https://assets1.tamsnetwork.com/images/EC042017NF/166696s.jpg "Real Red 12\" X 12\" (30.5 X 30.5 Cm) Two Tone Cardstock [ 166696 ]")
![Banner Sayings Bundle (English) [ 167051 ]](https://assets1.tamsnetwork.com/images/EC042017NF/167051s.jpg "Banner Sayings Bundle (English) [ 167051 ]")
![Pastels Shimmer 12" X 12" (30.5 X 30.5 Cm) Specialty Paper [ 167198 ]](https://assets1.tamsnetwork.com/images/EC042017NF/167198s.jpg "Pastels Shimmer 12\" X 12\" (30.5 X 30.5 Cm) Specialty Paper [ 167198 ]")
![Bee Builder Punch [ 162553 ]](https://assets1.tamsnetwork.com/images/EC042017NF/162553s.jpg "Bee Builder Punch [ 162553 ]")
![Bubble Bath 1/8" (3.2 Mm) Faux Linen Ribbon [ 167075 ]](https://assets1.tamsnetwork.com/images/EC042017NF/167075s.jpg "Bubble Bath 1/8\" (3.2 Mm) Faux Linen Ribbon [ 167075 ]")
![Rhinestone Basic Jewels [ 144220 ]](https://assets1.tamsnetwork.com/images/EC042017NF/144220s.jpg "Rhinestone Basic Jewels [ 144220 ]")
![Multipurpose Liquid Glue [ 110755 ]](https://assets1.tamsnetwork.com/images/EC042017NF/110755s.jpg "Multipurpose Liquid Glue [ 110755 ]")


![Lemon Lolly 8 1/2" X 11" Cardstock [ 161720 ]](https://assets1.tamsnetwork.com/images/EC042017NF/161720s.jpg "Lemon Lolly 8 1/2\" X 11\" Cardstock [ 161720 ]")
![Balmy Blue 8-1/2" X 11" Cardstock [ 146982 ]](https://assets1.tamsnetwork.com/images/EC042017NF/146982s.jpg "Balmy Blue 8-1/2\" X 11\" Cardstock [ 146982 ]")
![Lemon Lolly Classic Stampin' Pad [ 161666 ]](https://assets1.tamsnetwork.com/images/EC042017NF/161666s.jpg "Lemon Lolly Classic Stampin' Pad [ 161666 ]")
![Balmy Blue Classic Stampin' Pad [ 147105 ]](https://assets1.tamsnetwork.com/images/EC042017NF/147105s.jpg "Balmy Blue Classic Stampin' Pad [ 147105 ]")
![Balmy Blue 1/4" (6.4 Mm) Gingham Ribbon [ 166952 ]](https://assets1.tamsnetwork.com/images/EC042017NF/166952s.jpg "Balmy Blue 1/4\" (6.4 Mm) Gingham Ribbon [ 166952 ]")
![Traditional Sparkling Sequins [ 165875 ]](https://assets1.tamsnetwork.com/images/EC042017NF/165875s.jpg "Traditional Sparkling Sequins [ 165875 ]")


![Fluffy Squirrel Bundle (English) [ 165819 ]](https://assets1.tamsnetwork.com/images/EC042017NF/165819s.jpg "Fluffy Squirrel Bundle (English) [ 165819 ]")
![Timid Tiger 8 1/2" X 11" Cardstock [ 165626 ]](https://assets1.tamsnetwork.com/images/EC042017NF/165626s.jpg "Timid Tiger 8 1/2\" X 11\" Cardstock [ 165626 ]")
![Crumb Cake 8-1/2" X 11" Cardstock [ 120953 ]](https://assets1.tamsnetwork.com/images/EC042017NF/120953s.jpg "Crumb Cake 8-1/2\" X 11\" Cardstock [ 120953 ]")
![Very Vanilla 8-1/2" X 11" Cardstock [ 101650 ]](https://assets1.tamsnetwork.com/images/EC042017NF/101650s.jpg "Very Vanilla 8-1/2\" X 11\" Cardstock [ 101650 ]")
![Early Espresso Classic Stampin' Pad [ 147114 ]](https://assets1.tamsnetwork.com/images/EC042017NF/147114s.jpg "Early Espresso Classic Stampin' Pad [ 147114 ]")
![Pecan Pie Classic Stampin' Pad [ 161665 ]](https://assets1.tamsnetwork.com/images/EC042017NF/161665s.jpg "Pecan Pie Classic Stampin' Pad [ 161665 ]")
![Cajun Craze Classic Stampin' Pad [ 147085 ]](https://assets1.tamsnetwork.com/images/EC042017NF/147085s.jpg "Cajun Craze Classic Stampin' Pad [ 147085 ]")
![Forever Plaid 3 D Embossing Folder [ 164049 ]](https://assets1.tamsnetwork.com/images/EC042017NF/164049s.jpg "Forever Plaid 3 D Embossing Folder [ 164049 ]")
![Small Blending Brushes [ 160518 ]](https://assets1.tamsnetwork.com/images/EC042017NF/160518s.jpg "Small Blending Brushes [ 160518 ]")


![Branching Out Photopolymer Stamp Set (English) [ 165771 ]](https://assets1.tamsnetwork.com/images/EC042017NF/165771s.jpg "Branching Out Photopolymer Stamp Set (English) [ 165771 ]")
![Silent Snowfall 12" X 12" (30.5 X 30.5 Cm) Specialty Designer Series Paper [ 166062 ]](https://assets1.tamsnetwork.com/images/EC042017NF/166062s.jpg "Silent Snowfall 12\" X 12\" (30.5 X 30.5 Cm) Specialty Designer Series Paper [ 166062 ]")
![Autumn Toile 12" X 12" (30.5 X 30.5 Cm) Designer Series Paper [ 165882 ]](https://assets1.tamsnetwork.com/images/EC042017NF/165882s.jpg "Autumn Toile 12\" X 12\" (30.5 X 30.5 Cm) Designer Series Paper [ 165882 ]")
![Early Espresso 8-1/2" X 11" Cardstock [ 119686 ]](https://assets1.tamsnetwork.com/images/EC042017NF/119686s.jpg "Early Espresso 8-1/2\" X 11\" Cardstock [ 119686 ]")
![Cloud Cover 8 1/2" X 11" Cardstock [ 165621 ]](https://assets1.tamsnetwork.com/images/EC042017NF/165621s.jpg "Cloud Cover 8 1/2\" X 11\" Cardstock [ 165621 ]")
![Stampin' Brayer [ 162936 ]](https://assets1.tamsnetwork.com/images/EC042017NF/162936s.jpg "Stampin' Brayer [ 162936 ]")
![Cloud Cover Classic Stampin' Ink Refill [ 165279 ]](https://assets1.tamsnetwork.com/images/EC042017NF/165279s.jpg "Cloud Cover Classic Stampin' Ink Refill [ 165279 ]")
![Shaded Spruce Classic Stampin' Pad [ 147088 ]](https://assets1.tamsnetwork.com/images/EC042017NF/147088s.jpg "Shaded Spruce Classic Stampin' Pad [ 147088 ]")
![Uninked Stampin’ Craft Pad & Whisper White Refill [ 147277 ]](https://assets1.tamsnetwork.com/images/EC042017NF/147277s.jpg "Uninked Stampin’ Craft Pad & Whisper White Refill [ 147277 ]")
![Basics Wow! Embossing Powder [ 165679 ]](https://assets1.tamsnetwork.com/images/EC042017NF/165679s.jpg "Basics Wow! Embossing Powder [ 165679 ]")
![Heat Tool (Us And Canada) [ 129053 ]](https://assets1.tamsnetwork.com/images/EC042017NF/129053s.jpg "Heat Tool (Us And Canada) [ 129053 ]")


![Arched Wishes Cling Stamp Set (English) [ 165428 ]](https://assets1.tamsnetwork.com/images/EC042017NF/165428s.jpg "Arched Wishes Cling Stamp Set (English) [ 165428 ]")
![Painted Stripes Cling Stamp Set [ 165437 ]](https://assets1.tamsnetwork.com/images/EC042017NF/165437s.jpg "Painted Stripes Cling Stamp Set [ 165437 ]")
![Highland Heather 8-1/2" X 11" Cardstock [ 146986 ]](https://assets1.tamsnetwork.com/images/EC042017NF/146986s.jpg "Highland Heather 8-1/2\" X 11\" Cardstock [ 146986 ]")
![Summer Splash 8 1/2" X 11 Cardstock [ 163797 ]](https://assets1.tamsnetwork.com/images/EC042017NF/163797s.jpg "Summer Splash 8 1/2\" X 11 Cardstock [ 163797 ]")
![Highland Heather Classic Stampin' Pad [ 147103 ]](https://assets1.tamsnetwork.com/images/EC042017NF/147103s.jpg "Highland Heather Classic Stampin' Pad [ 147103 ]")
![Summer Splash Classic Stampin Pad [ 163809 ]](https://assets1.tamsnetwork.com/images/EC042017NF/163809s.jpg "Summer Splash Classic Stampin Pad [ 163809 ]")
![Highland Heather Stampin' Blends Combo Pack [ 154887 ]](https://assets1.tamsnetwork.com/images/EC042017NF/154887s.jpg "Highland Heather Stampin' Blends Combo Pack [ 154887 ]")
![Flirty Flamingo Stampin' Blends Combo Pack [ 154884 ]](https://assets1.tamsnetwork.com/images/EC042017NF/154884s.jpg "Flirty Flamingo Stampin' Blends Combo Pack [ 154884 ]")
![Summer Splash Stampin’ Blends Combo Pack [ 163826 ]](https://assets1.tamsnetwork.com/images/EC042017NF/163826s.jpg "Summer Splash Stampin’ Blends Combo Pack [ 163826 ]")
![Clear Wink Of Stella Glitter Brush [ 141897 ]](https://assets1.tamsnetwork.com/images/EC042017NF/141897s.jpg "Clear Wink Of Stella Glitter Brush [ 141897 ]")
![Starburst Sequins [ 165539 ]](https://assets1.tamsnetwork.com/images/EC042017NF/165539s.jpg "Starburst Sequins [ 165539 ]")


![Impressions Abloom Bundle (English) [ 165611 ]](https://assets1.tamsnetwork.com/images/EC042017NF/165611s.jpg "Impressions Abloom Bundle (English) [ 165611 ]")
![Notes & Totes Dies [ 165240 ]](https://assets1.tamsnetwork.com/images/EC042017NF/165240s.jpg "Notes & Totes Dies [ 165240 ]")
![Floral Impressions 12" X 12" (30.5 X 30.5 Cm) Designer Series Paper [ 165603 ]](https://assets1.tamsnetwork.com/images/EC042017NF/165603s.jpg "Floral Impressions 12\" X 12\" (30.5 X 30.5 Cm) Designer Series Paper [ 165603 ]")
![Garden Green 12" X 12" (30.5 X 30.5 Cm) Two Tone Cardstock [ 166665 ]](https://assets1.tamsnetwork.com/images/EC042017NF/166665s.jpg "Garden Green 12\" X 12\" (30.5 X 30.5 Cm) Two Tone Cardstock [ 166665 ]")
![Garden Green Classic Stampin' Pad [ 147089 ]](https://assets1.tamsnetwork.com/images/EC042017NF/147089s.jpg "Garden Green Classic Stampin' Pad [ 147089 ]")
![Misty Moonlight Classic Stampin' Pad [ 153118 ]](https://assets1.tamsnetwork.com/images/EC042017NF/153118s.jpg "Misty Moonlight Classic Stampin' Pad [ 153118 ]")
![Berry Burst Classic Stampin' Pad [ 147143 ]](https://assets1.tamsnetwork.com/images/EC042017NF/147143s.jpg "Berry Burst Classic Stampin' Pad [ 147143 ]")
![Fresh Freesia Classic Stampin' Pad [ 155611 ]](https://assets1.tamsnetwork.com/images/EC042017NF/155611s.jpg "Fresh Freesia Classic Stampin' Pad [ 155611 ]")
![Mini Stampin' Dimensionals [ 144108 ]](https://assets1.tamsnetwork.com/images/EC042017NF/144108s.jpg "Mini Stampin' Dimensionals [ 144108 ]")


![Everyday Skies Suite Collection (English) [ 164635 ]](https://assets1.tamsnetwork.com/images/EC042017NF/164635s.jpg "Everyday Skies Suite Collection (English) [ 164635 ]")
![Alphabet à La Mode Dies [ 160750 ]](https://assets1.tamsnetwork.com/images/EC042017NF/160750s.jpg "Alphabet à La Mode Dies [ 160750 ]")
![Mini Alphabet Dies [ 162934 ]](https://assets1.tamsnetwork.com/images/EC042017NF/162934s.jpg "Mini Alphabet Dies [ 162934 ]")
![Shaded Spruce 8-1/2" X 11" Cardstock [ 146981 ]](https://assets1.tamsnetwork.com/images/EC042017NF/146981s.jpg "Shaded Spruce 8-1/2\" X 11\" Cardstock [ 146981 ]")
![Cajun Craze 8-1/2" X 11" Cardstock [ 119684 ]](https://assets1.tamsnetwork.com/images/EC042017NF/119684s.jpg "Cajun Craze 8-1/2\" X 11\" Cardstock [ 119684 ]")
![Blueberry Bushel 8-1/2" X 11" Cardstock [ 146968 ]](https://assets1.tamsnetwork.com/images/EC042017NF/146968s.jpg "Blueberry Bushel 8-1/2\" X 11\" Cardstock [ 146968 ]")
![Adhesive Sheets [ 152334 ]](https://assets1.tamsnetwork.com/images/EC042017NF/152334s.jpg "Adhesive Sheets [ 152334 ]")
![Blueberry Bushel Classic Stampin' Pad [ 147138 ]](https://assets1.tamsnetwork.com/images/EC042017NF/147138s.jpg "Blueberry Bushel Classic Stampin' Pad [ 147138 ]")


![Party Alphabet Dies [ 165263 ]](https://assets1.tamsnetwork.com/images/EC042017NF/165263s.jpg "Party Alphabet Dies [ 165263 ]")
![Everyday Arches Photopolymer Stamp Set (English) [ 164623 ]](https://assets1.tamsnetwork.com/images/EC042017NF/164623s.jpg "Everyday Arches Photopolymer Stamp Set (English) [ 164623 ]")
![Everyday Skies 6" X 6" (15.2 X 15.2 Cm) Designer Series Paper [ 164622 ]](https://assets1.tamsnetwork.com/images/EC042017NF/164622s.jpg "Everyday Skies 6\" X 6\" (15.2 X 15.2 Cm) Designer Series Paper [ 164622 ]")
![Azure Afternoon 8 1/2" X 11" Cardstock [ 161719 ]](https://assets1.tamsnetwork.com/images/EC042017NF/161719s.jpg "Azure Afternoon 8 1/2\" X 11\" Cardstock [ 161719 ]")
![Blackberry Bliss 8-1/2" X 11" Cardstock [ 133675 ]](https://assets1.tamsnetwork.com/images/EC042017NF/133675s.jpg "Blackberry Bliss 8-1/2\" X 11\" Cardstock [ 133675 ]")
![Azure Afternoon Classic Stampin' Pad [ 161663 ]](https://assets1.tamsnetwork.com/images/EC042017NF/161663s.jpg "Azure Afternoon Classic Stampin' Pad [ 161663 ]")
![Mini Stampin' Cut & Emboss Machine [ 150673 ]](https://assets1.tamsnetwork.com/images/EC042017NF/150673s.jpg "Mini Stampin' Cut & Emboss Machine [ 150673 ]")
![Tear & Tape Adhesive [ 154031 ]](https://assets1.tamsnetwork.com/images/EC042017NF/154031s.jpg "Tear & Tape Adhesive [ 154031 ]")

