If your Halloween crafting stash is calling your name louder than a ghost in a graveyard, grab your Stampin’ Up!® Spooky Sweet Suite and conjure up something boo-tiful! Don’t worry, eat sweets with these dang cute CANDY BAR BOOKS:
I’ve brewed up two fun versions of this project. The Granny Apple Green “All Treats” Candy Bar Book holds two classic Hershey bars, while the Timid Tiger “Spooky Sweets” version was made to fit two Ghost Toast KitKats. Each one ties up neatly with ribbon to keep your candy secure until it’s time for a delicious reveal. Whether you’re giving these as gifts, party favors, or adding them to a Halloween goodie basket, they’re sure to get more “oohs” and “aahs” than a haunted house on October 31st.
These projects are surprisingly easy to assemble—no hocus pocus required! I’ve included an instructional video below, AND a printable .pdf with measurements.
Note that the belly band measurements are shown on white card stock, but the project uses Granny Apple Green card stock.
I embossed the covers to add some textured dimension (because even monsters like stampin’ style), then decorated with die cuts, stamped images, and a touch of sparkle. Isn’t it Franken-fun?
Here are the key measurements for both versions:
Green “All Treats” Book (fits two Hershey bars):
Cardstock base: 5 1/4″ x 6 1/2″ scored along shorter end at 2 3/8″and 2 7/8″
Belly Band: 1 1/2″ x 6 3/8″ scored at 1/2″, 2 7/8″, 3 3/8″ and 5 7/8″
Ribbon: 16″
Orange “Spooky Sweets” Book (fits two KitKats):
Cardstock base: 5″ x 6 3/8″ scored along the longer side at 2 3/4″ and 3 5/8″
Belly Band: 1 1/2″ x 8 1/8″ scored at 7/8″, 3 5/8″, 4 1/2″ and 7 1/4″
Ribbon: 16″
Want to see the whole project come to life? Watch my full step-by-step tutorial on YouTube here:
What else did we talk about today? The 3-day KIT SALE (through October 8th):
AND we discussed FAQs on the Starter Kit Special! Bottom line: If you are planning to order more than $35 in crafting supplies from my Stampin’ Store this month, you may as well choose the Starter Kit!
To make your shopping Spooky Sweet, I’ll list the supplies for these projects below and THANK YOU for choosing me to serve your creativity!
Halloween is around the corner, but you don’t need to be limited to the Trick or Treat season when crafting with the Stampin’ Up!®️ Spooky Sweet products, and particularly the Designer Series Paper. This sheet has a flamingo dressed in a tutu that I’m going to use on a birthday card:
It’s TOO TOO cute when paired with the Not 29 Anymore stamp set for a card you can send to “THAT FRIEND” who is fiesty & fabulous:
This card is called a “Missing Middle” card, and is easier than it looks: Start with a 4-1/4″ x 8 1/2″ piece of card stock (mine is Granny Apple Green) and score it at 5-1/2″ and cut it at 7″… leaving you a 1-1/2″ x 4-1/4″ piece of card stock for the bottom of the card. (All the supplies I used are listed at the bottom)
Fold the top 1-1/2″ down and add a layer of Designer Series Paper, if desired. Lay the section you cut off at the bottom edge of the card, and attach a 2-1/4″ x 4-1/4″ piece of card stock to the top section and bottom section only. Then it will open like this and you can add a white layer inside to write or stamp on:
My flamingo is layered over a piece of retired Be Dazzling specialty paper, but any of our current Glimmer Paper brings the bling when you need it.
Heading into the Halloween season, there are a few events (online and in-person) you’ll want to know about:
First: The VIRTUAL Spooky Sweet Class happens Thursday, October 2nd, and the last day you can order the suite and be invited to join the class is September 24th! This gives me time to prepare and mail the supplies you’ll need, and for you to have the suite ready to use. Learn more at the event description on Facebook by clicking the image below, or on my event calendar HERE.
Second: Stamping is the best medicine to make you feel good, and you’ll stamp 3 FALL paper crafting projects at ourStamp Therapy sessions in Hurricane, UT on October 9th. Choose to attend the 10 am session or the 6 pm session, but register early, because these seem to fill up quickly. Class fee: $15.
Southern Utah crafters: Here’s another tasty opportunity for more Spooky Sweet crafting at the Cookies, Cards & Cocoa class on Oct. 16th at 6:30 PM at the Strap Tank Restaurant in St. George, UT.
Decorate 4 Halloween sugar cookies and stamp two paper crafting projects, while enjoying a beverage from the restaurant. Class fee: $35 ALL SUPPLIES PROVIDED! Click HERE to register by Oct. 9th
Annabelle Broom is a non-conformist witch who would rather help than hinder, and is the protagonist of a children’s musical play = one source of inspiration for this cute Halloween card! The other prompt for my color choices was the #tgifc541 color challenge of Strawberry Slush, Timid Tiger and Secret Sea:
Secret Sea is a deep, dark navy blue, which is really lovely in real life, and a perfect substitute for black in Halloween cards. Using Basic Beige as my neutral background gave my card a bewitching-hour feel.
As Annabelle would rather wear PINK than black, this fantastic feline witch asserts her fashion sense with a pink (Strawberry Slush) tutu and is ready to fly to help lost children on her trusty broom!
If Spooky Season is your favorite, here are two opportunities to craft with me virtually, or in person:
The video craft-along instructions will be broadcast on a private YouTube for those who register AND purchase the Spooky Sweet Suite Collection (an Online Exclusive). If you order the Suite from my store, the class is just $10 (includes shipping to you) and I’ll email asking if you’d like to join the class. Craft along LIVE with me -OR- watch later at your convenience.
Class kit includes card stock and envelopes, dimensionals, cutting guide and goodies for creating 5 projects SO CUTE, THEY ARE SPOOKY! ALSO NEEDED (not included): Adhesive, Paper Trimmer, Memento Tuxedo Black ink pad and the following Stampin’ Blends: Granny Apple Green, Petunia Pop, Pumpkin Pie, Smoky Slate.
If you have purchased the suite collection from another demonstrator (or as a demonstrator), the fee is $20 – contact me to register before September 22nd!
If you live in the Southern Utah area, you’ll want to come to the Cookies, Cards & Cocoa class at the Strap Tank Restaurant on October 16th, where you’ll learn to decorate 4 sugar cookies with LoveCookies Bakery and 2 paper crafting projects with me (DIFFERENT than the ones at the virtual class).
You can watch a lot of videos, but nothing compares to getting your fingers IN THE INK! If you are like most people, you learn best by DOING, and there are so many exciting stamping events coming up, so choose the one(s) that work best for you:
Coming first is the “Remember the Adventure” Travel Journal class that is one week away in Hurricane, UT, so register quickly to ensure your seat! Bring 20-35 photos of a recent adventure and you can complete the album to show off your last adventure. Class Fee: $20 (a STEAL!) Find class details on the Facebook event HERE.
Twice a year I offer a 6″ x 6″ sampler of all the new Designer Series Paper released by Stampin’ Up! in a mini catalog. With the September-December mini catalog coming (AND the September Online Exclusive release), there are 53 pieces of gorgeous papers that span through autumn and the holidays, and you can get a piece of each one to play with! Learn more HERE and reserve a share by September 1st!
The Southern Utah Fall StampFest will be Saturday, September 13th and you will want to bring a friend to this cozy crafternoon event! Save $10 when you register by August 30th!.
We’ll be offering the same projects to happy crafters in Utah County just a few weeks later (on September 27th). Grab your spot early before someone schedules your day for you!
Spooky Sweet Suite Class: October 2nd at 4 pm MT
The creativity continues into October, this time in a VIRTUAL CLASS for all those who love Halloween! The Spooky Sweet class will be one you can participate in while in your pajamas, as it will be broadcast on a private YouTube video for those who register and purchase the Spooky Sweet Suite Collection. If you order the Suite from my store, the class is just $10 (includes shipping to you) and I’ll email asking if you’d like to join the class, once you’ve checked out with the suite in your cart!
If you have purchased the suite collection from another demonstrator (or as a demonstrator), the fee is $20 – contact me to register.
Craft along LIVE with me -OR- watch later at your convenience.
Class kit includes card stock and envelopes, dimensionals, cutting guide and goodies for creating 5 projects SO CUTE, THEY ARE SPOOKY!
You will also need: Spooky Sweet Suite Collection, Adhesive, Paper Trimmer, Memento Tuxedo Black ink pad and the following Stampin’ Blends: Granny Apple Green, Petunia Pop, Pumpkin Pie, Smoky Slate.
Finally, put these events in your calendar and watch for details coming soon:
Stamp Therapy Class – October 9th (Hurricane, UT)
Christmas Cards & Cocoa Class – November 20th (Hurricane, UT)
Keep your creative juices flowing at a class! 🍊🧡– Loni Spendlove
Humans have basic needs: Air, water, food…and NEED connection with other people! This is why I offer an in-person crafting event every month: to help you have social interaction, adult conversation and laughter and healthy relationships with other makers.
So what’s coming up? Here’s the IN-PERSON event schedule, in calendar order – carve out time to create with me:
Twice a year, I work with a few demonstrators to plan a fabulous “crafternoon” experience where you will make multiple paper-crafting projects, snack and visit, swap greeting cards, learn new techniques/ideas, win prizes, and connect with other crafters.
WHEN: Saturday, September 21st beginning at 1:00 PM (Mountain Time) WHERE: Hurricane Community Center, 63 S 100 W (SOUTH SIDE), Hurricane, Utah
Registration: $65 (LOWER PRICE!) **Save $10** if you register by September 7th- $55 for early birds!
While we provide (almost) all the supplies at the event, you’ll need to bring scissors and adhesive (also available to purchase at the event). A Paper Trimmer would also be helpful, but not required. Please label your items with your name.
Optional CARD SWAP: Create 12-16 cards using any current SU! products (no envelopes required) and trade with other crafters.
WHERE: RK Creative Studio, 55 E 100 N, Spanish Fork, UT WHEN: Saturday, September 28th, beginning at 1:00 PM (Mountain Time)
Registration: $65 **Save $10** if you register by September 14th- just $55 for early birds!
Optional CARD SWAP: Create 8-12 cards using any current SU! products (no envelopes required) and trade with other crafters at the beginning of the event!
EVENT CANCELLATION POLICY: You may request a refund if cancellation is received 2 weeks prior to event. Registrations may be transferred to another personal at any time.
We’ll cue the monster mash and stir up a cauldron of spooky treats as we assemble a haunted home using a fabulous kit from Stampin’ Up! – You’ll have the coolest Halloween decor on the block, and have a blast making it with other crafters in Hurricane, UT on October 1st at 7 p.m.
Class fee: $26. All supplies (and snacks) are provided, but we ONLY HAVE have 9 kits available, so don’t hesitate to claim your spot by finalizing your registration (link below) and you can join & share the event with friends on Facebook HERE.
Returning for the 3 year, I’ll be teaching two classes at CraftConUSA in Kanab, UT on October 25-26, 2024! This growing event is a wonderful weekend to work on your own crafts alongside other creators, choose the classes that interest you and enjoy a beautiful part of the world!
Use promo code TEACHERSPET30 to save 30% on event registration
Here are the two classes I’ll be teaching with my teammate Sue-don’t miss them!
1. Christmas Charm: Holiday Packaging Masterclass
A simple gift is transformed by creating a charming package! Create 4 pretty packages ready to make the season bright, AND take home supplies to create many more. Class includes a full package of Stampin’ Up! Designer Series Paper, plus Ephemera tags, packaging and ribbon. CLASS FEE: $37Bring: Scissors and adhesive, Paper Trimmer (optional, but helpful)
2. Take the Scenic Route: Memories that Matter
Remember your summer vacation (or plan ahead for the next one): Complete an entire mini album highlighting where you’ve been, or where you want to go!
Includes: A Travel Journal, pages & pockets for photos & memorabilia, sticky die cuts and alphabets to capture your adventures. BONUS: You’ll also use the kit box to create a gift box (or a place to store more treasures). Bring: 20-40 photos/memorabilia of a vacation to remember. All other supplies will be provided. CLASS FEE: $37
CLASS REGISTRATION OPENS SOON- Meanwhile, register for the event below – Use Promo Code TEACHERSPET30 to save 30% on event registration!
There are TWO Christmas Card class times to choose from: 1 pm or 7 pm on Thursday, November 14th in Hurricane, Utah.
Create 8 fabulous holiday cards (2 each of 4 different designs) to make the season VeRy MeRrY! These cards could be the gift themselves, and tucking a gift card inside would bring magic to a mailbox. Bring: adhesive and scissors (also available to purchase at class). Everything else will be provided for you- including snacks! Class fee: $22
The “Sour Cream” package favor has been around for a while, but it’s a classic project to craft because it’s fast and adorable!
Obviously, they don’t usually stand up, but I wanted you to see how they “twist”!
It all starts with a 6″ x 6″ piece of Designer Series Paper and adhesive, then I added tags to coordinate using the Tailor Made Tags dies.
You can craft along with me in this video tutorial:
I wore my skeleton earrings to match the favor I demonstrated in the video! My Stampin’ Mama Sherrill Graff made them for me with the Bag of Bones bundle, black StazOn ink and shrink plastic:
Through October, Stampin’ Up! has an outstanding opportunity for the Starter Kit:
The Starter Kit is always the best value, but in honor of Stampin’ Up!s 35th anniversary this month, it’s absolutely irresistible!
35% OFF= Select $125 in product (including early release items only for demonstrators) for only $64.35, free shipping on the kit, PLUS a free ticket to our virtual OnStage event in November!
35% MORE= Select $168.75 worth of product and only pay $99 with free shipping, PLUS a free ticket to our virtual OnStage event!
With either Starter Kit, you’ll have the opportunity to see if the demonstrator life is for you! You’ll get to purchase your own supplies at a 20% discount through January 2024, get early access to new products and mingle with my Sprinkled Ink team. If you love it, you can keep going! I’m here to help you along the path and guide you as you explore the possibilities.
There are NO STRINGS ATTACHED…just a wonderful discount and a chance to try being a demonstrator with a warm & friendly group of creative people, and a peek behind the curtain at Stampin’ Up!
The Starter Kit is available to everyone, as many times as you’d like to take advantage of it, so click the image or Choose One button above to get started!
When there is a “scene” printed on Stampin’ Up! Designer Series Paper, it’s perfect for creating a framed picture that pops up inside your card!
For this one, I used the A Walk in the Forest DSP, which is part of our “Making A Difference” Campaign ($3 from each pack purchased is donated to the “Toys for Tots” program). This paper coordinates with both the Beary Christmas Suite and the Merriest trees bundle!
Here’s a slightly different version of the same card using the Beary Christmas paper included in the Beary Christmas Suite:
Because it was so much fun -and simple- to make (I’ll share a how-to video below), I had to make multiple versions with different Designer Series Paper from the September-December Mini Catalog. It’s like the One Card, Two Ways challenge from the #tgifc438 WWYD? Challenge:
The design is roomy enough to sneak a treat inside (not a mailable option, obviously) and for this one I used Them Bones Designer Series Paper:
Sharp eyes may notice that the skeletons are smaller than those in the coordinating suite of Halloween products…because the stamp set I used was from the September 2019 Paper Pumpkin kit called “Bone Appetit”!
Before we get to the last version of the Interior Diorama card, here is the video tutorial:
The finished card (closed) is 4″ x 5-1/4″.
Begin with a 12″ x 5.25″ strip of Designer Series Paper and score at 1/2″, 4″, 4.5″ and 8″
Crafters always want to know where to get an embossing tray like mine, and now you can! The Embossing Additions Tool Kit is available again (for a limited time?) in the July-December mini catalog, and I showcased it today under a little heat…um, I mean heat embossing.
Actually, the air conditioning converter at my house went out, so I was sweating and stamping at the same time! Not to worry, the repairman came after my video and fixed it. But not before I forgot to show you how to use the Reverse Tweezers in the kit. Oh well, the magic of editing helps.
And not only did we emboss, but I showed how to create a mask from the Dots & Spots die for the background! Keep the mask you create in the envelope with the die and I promise, you’ll find excuses to use it often with your blending brushes. The die is one of the products added to Sale-a-Bration in August and you can see the rest of the freebies-with-qualifying purchase HERE.
Just remember that there are two item numbers for the die: Item #159164 for PURCHASING the die, and item #163098 if you want to redeem it free with a $100 purchase during August 2022.
Watch the how-to video, then get shopping to get your Embossing Addition kit while it’s back in the catalog:
When a stamp set works for more than one holiday, it’s a great investment…and when you can get it at a discount, that’s a no brainer!
The Seasons of Fun stamp set is one you can choose as part of your Stampin’ Rewards for just $12 when you host a party!
Did you know that an order of $150 or more COUNTS as a party? That’s right…you don’t have to invite people over to qualify for the benefits of hosting, you can just gather orders or place your own qualifying order in my Stampin’ Store.
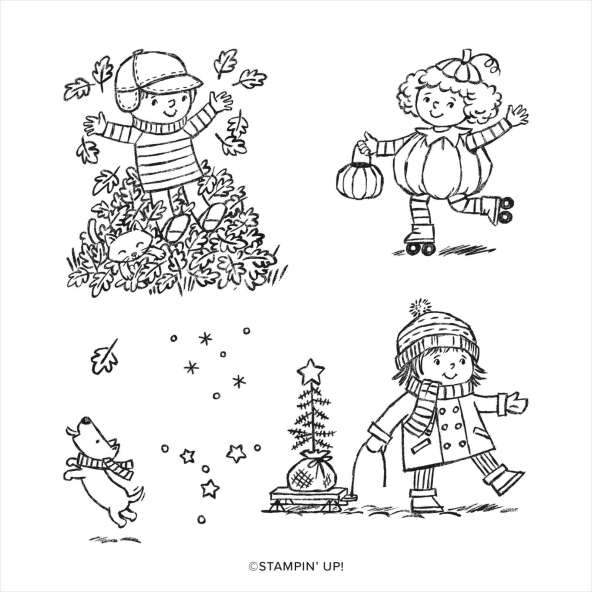
With this set of cards, I used the SAME LAYOUT and made a card for Halloween, Fall and Christmas. Because the Seasons of Fun stamp set doesn’t have any words, I paired it with the very versatile Banner Year stamp set for the greetings:
Turn the layout and add strips of Designer Series Paper instead of just one piece:
Or swap sides:
Aren’t these kids the cutest? It’s fun to color them with Stampin’ Blends and easy to celebrate all the Fall-idays.
This host-exclusive set is only available during the current mini catalog period…one more reason to host a party (or place a qualifying order) before the Seasons of Fun stamp set retires on January 3, 2022. I’ll help you host an event online or in your home ~ let’s plan it!
We are back to celebrate the Fall-idays with more festive projects from our international group of Stampin’ Up! Demonstrators~ Take a moment to hop through and tell us what you like, and pin your favorites to your boards to remember later.
My project turns Halloween upside down by LEAVING a treat instead of taking one!
To create this door hanger, you’ll need a sheet of 8.5″ x 11″ card stock. Score from the short side at 2.5″ and 3.25″, then rotate the sheet 90 degrees and score at 1.75″, 2.5″, 6″ and 6.75″. Cut off the largest rectangles on both sides and fold along the score (dotted) lines and cut along the solid lines as shown:
It’s easiest to do any stamping you wish at this point while it’s flat, then fold the sides in, then up and adhere the lower outside rectangles to the front of the largest rectangle, creating a pocket. Punch a large circle at the top, embellish and fill with treats!
I used the circle I punched out at the top for the moon behind the cat:
I’ll post my supply list below, but if you are ready to skip to the next blog, here’s the button to take you to Heather’s blog where you’ll Have a Hoot!


![Spooky Sweet Suite Collection (English) [ 166205 ]](https://i0.wp.com/assets1.tamsnetwork.com/images/EC042017NF/166205s.jpg?w=100&ssl=1 "Spooky Sweet Suite Collection (English) [ 166205 ]")
![Timid Tiger 8 1/2" X 11" Cardstock [ 165626 ]](https://i0.wp.com/assets1.tamsnetwork.com/images/EC042017NF/165626s.jpg?w=100&ssl=1 "Timid Tiger 8 1/2\" X 11\" Cardstock [ 165626 ]")
![Granny Apple Green 8-1/2" X 11" Cardstock [ 146990 ]](https://i0.wp.com/assets1.tamsnetwork.com/images/EC042017NF/146990s.jpg?w=100&ssl=1 "Granny Apple Green 8-1/2\" X 11\" Cardstock [ 146990 ]")
![Basic White 8 1/2" X 11" Cardstock [ 166780 ]](https://i0.wp.com/assets1.tamsnetwork.com/images/EC042017NF/166780s.jpg?w=100&ssl=1 "Basic White 8 1/2\" X 11\" Cardstock [ 166780 ]")
![Timid Tiger Stampin’ Blends Combo Pack [ 165291 ]](https://i0.wp.com/assets1.tamsnetwork.com/images/EC042017NF/165291s.jpg?w=100&ssl=1 "Timid Tiger Stampin’ Blends Combo Pack [ 165291 ]")
![Granny Apple Green Stampin' Blends Combo Pack [ 154885 ]](https://i0.wp.com/assets1.tamsnetwork.com/images/EC042017NF/154885s.jpg?w=100&ssl=1 "Granny Apple Green Stampin' Blends Combo Pack [ 154885 ]")
![Petunia Pop Stampin’ Blends Combo Pack [ 163828 ]](https://i0.wp.com/assets1.tamsnetwork.com/images/EC042017NF/163828s.jpg?w=100&ssl=1 "Petunia Pop Stampin’ Blends Combo Pack [ 163828 ]")
![Peaceful Garden 12" X 12" (30.5 X 30.5 Cm) Glimmer Paper [ 165929 ]](https://i0.wp.com/assets1.tamsnetwork.com/images/EC042017NF/165929s.jpg?w=100&ssl=1 "Peaceful Garden 12\" X 12\" (30.5 X 30.5 Cm) Glimmer Paper [ 165929 ]")
![Stampin' Cut & Emboss Machine [ 149653 ]](https://i0.wp.com/assets1.tamsnetwork.com/images/EC042017NF/149653s.jpg?w=100&ssl=1 "Stampin' Cut & Emboss Machine [ 149653 ]")
![Mini Glue Dots [ 103683 ]](https://i0.wp.com/assets1.tamsnetwork.com/images/EC042017NF/103683s.jpg?w=100&ssl=1 "Mini Glue Dots [ 103683 ]")
![Stampin' Dimensionals [ 104430 ]](https://i0.wp.com/assets1.tamsnetwork.com/images/EC042017NF/104430s.jpg?w=100&ssl=1 "Stampin' Dimensionals [ 104430 ]")


![Spooky Sweet 12" X 12" (30.5 X 30.5 Cm) Specialty Designer Series Paper [ 166191 ]](https://i0.wp.com/assets1.tamsnetwork.com/images/EC042017NF/166191s.jpg?w=100&ssl=1 "Spooky Sweet 12\" X 12\" (30.5 X 30.5 Cm) Specialty Designer Series Paper [ 166191 ]")
![Not 29 Anymore Photopolymer Stamp Set (English) [ 166182 ]](https://i0.wp.com/assets1.tamsnetwork.com/images/EC042017NF/166182s.jpg?w=100&ssl=1 "Not 29 Anymore Photopolymer Stamp Set (English) [ 166182 ]")
![Petunia Pop 8 1/2" X 11" Cardstock [ 163801 ]](https://i0.wp.com/assets1.tamsnetwork.com/images/EC042017NF/163801s.jpg?w=100&ssl=1 "Petunia Pop 8 1/2\" X 11\" Cardstock [ 163801 ]")
![Granny Apple Green Stampin' Pad [ 147095 ]](https://i0.wp.com/assets1.tamsnetwork.com/images/EC042017NF/147095s.jpg?w=100&ssl=1 "Granny Apple Green Stampin' Pad [ 147095 ]")
![Petunia Pop Classic Stampin Pad [ 163811 ]](https://i0.wp.com/assets1.tamsnetwork.com/images/EC042017NF/163811s.jpg?w=100&ssl=1 "Petunia Pop Classic Stampin Pad [ 163811 ]")
![Tuxedo Black Memento Ink Pad [ 132708 ]](https://i0.wp.com/assets1.tamsnetwork.com/images/EC042017NF/132708s.jpg?w=100&ssl=1 "Tuxedo Black Memento Ink Pad [ 132708 ]")
![Paper Trimmer [ 152392 ]](https://i0.wp.com/assets1.tamsnetwork.com/images/EC042017NF/152392s.jpg?w=100&ssl=1 "Paper Trimmer [ 152392 ]")
![More Dazzle 6" X 6" (15.2 X 15.2 Cm) Specialty Paper [ 161749 ]](https://i0.wp.com/assets1.tamsnetwork.com/images/EC042017NF/161749s.jpg?w=100&ssl=1 "More Dazzle 6\" X 6\" (15.2 X 15.2 Cm) Specialty Paper [ 161749 ]")
![Stampin' Seal+ [ 149699 ]](https://i0.wp.com/assets1.tamsnetwork.com/images/EC042017NF/149699s.jpg?w=100&ssl=1 "Stampin' Seal+ [ 149699 ]")


![Spooky Halloween Bundle (English) [ 166199 ]](https://i0.wp.com/assets1.tamsnetwork.com/images/EC042017NF/166199s.jpg?w=100&ssl=1 "Spooky Halloween Bundle (English) [ 166199 ]")
![Secret Sea 8 1/2" X 11" Cardstock [ 165624 ]](https://i0.wp.com/assets1.tamsnetwork.com/images/EC042017NF/165624s.jpg?w=100&ssl=1 "Secret Sea 8 1/2\" X 11\" Cardstock [ 165624 ]")
![Basic Beige 8 1/2" X 11" Cardstock [ 164511 ]](https://i0.wp.com/assets1.tamsnetwork.com/images/EC042017NF/164511s.jpg?w=100&ssl=1 "Basic Beige 8 1/2\" X 11\" Cardstock [ 164511 ]")
![Strawberry Slush 8 1/2" X 11" Cardstock [ 165625 ]](https://i0.wp.com/assets1.tamsnetwork.com/images/EC042017NF/165625s.jpg?w=100&ssl=1 "Strawberry Slush 8 1/2\" X 11\" Cardstock [ 165625 ]")
![Secret Sea Classic Stampin' Pad [ 165285 ]](https://i0.wp.com/assets1.tamsnetwork.com/images/EC042017NF/165285s.jpg?w=100&ssl=1 "Secret Sea Classic Stampin' Pad [ 165285 ]")
![Strawberry Slush Classic Stampin' Pad [ 165286 ]](https://i0.wp.com/assets1.tamsnetwork.com/images/EC042017NF/165286s.jpg?w=100&ssl=1 "Strawberry Slush Classic Stampin' Pad [ 165286 ]")
![Strawberry Slush Stampin’ Blends Combo Pack [ 165290 ]](https://i0.wp.com/assets1.tamsnetwork.com/images/EC042017NF/165290s.jpg?w=100&ssl=1 "Strawberry Slush Stampin’ Blends Combo Pack [ 165290 ]")
![Blending Brushes [ 153611 ]](https://i0.wp.com/assets1.tamsnetwork.com/images/EC042017NF/153611s.jpg?w=100&ssl=1 "Blending Brushes [ 153611 ]")
![2025–2027 In Color™ Flat Pearls [ 165192 ]](https://i0.wp.com/assets1.tamsnetwork.com/images/EC042017NF/165192s.jpg?w=100&ssl=1 "2025–2027 In Color™ Flat Pearls [ 165192 ]")
![Mini Stampin' Cut & Emboss Machine [ 150673 ]](https://i0.wp.com/assets1.tamsnetwork.com/images/EC042017NF/150673s.jpg?w=100&ssl=1 "Mini Stampin' Cut & Emboss Machine [ 150673 ]")


 Designer Series Paper")
")


")


")


 Specialty Designer Series Paper")


")
 Circle Punch")


