Adding Ribbon to a Handmade Card & Paper Share!

Are you in a rut of tying a ribbon around a card in the SAME WAY all the time? With so many unique ways to use ribbon on your hand-stamped creations, let’s explore just a few ideas! VIDEO TUTORIAL BELOW

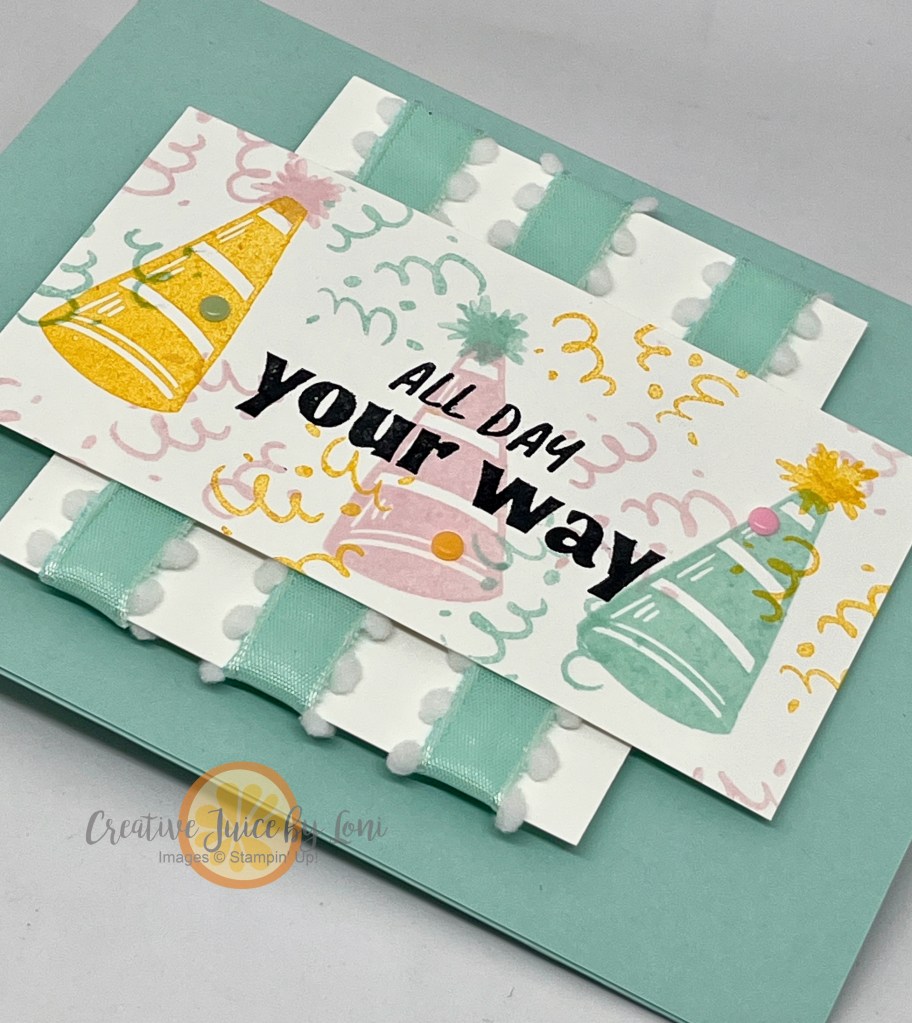
First, try using your ribbon as a background: This Pool Party pompom ribbon is in the “Last Chance” section of my Stampin’ Store, and I’ve paired it with a Sale-a-Bration 2025 stamp set “Day to Celebrate” for this celebratory card. Consider planning ahead, because you’ll want some of this ribbon on hand once you can select this stamp set free (with a $60 order) in January!

Next, there are plenty of crafters who despise having to tie a bow! Weird, but true. So this one is a FAUX BOW and so easy to do (see video). NO BOW TYING REQUIRED. This non-traditional valentine is a second peek at a bundle coming in the January-April 2025 mini catalog called “Hugs for Love” and comes with the To The Point Label punch. The Cherry Cobbler & Gold ribbon looks lovely on Wild Wheat card stock, and gives it a use beyond Christmas:

Next up, not only is it pretty to have two different ribbon types, when you use twine to tie the second bow, it is less bumpy to mail! However, this project may get a little bumpy when you add a package of flower seeds to the pocket:

Another preview of some products coming soon…and the good news is that the Storybook Moments Specialty Designer Series Paper, Timeless Plaid Designer Series Paper AND the Petal Pink 3/8″ Scalloped Ribbon are all part of my Designer Series Paper & Ribbon Share

You’ll receive SIXTY-ONE 6″ x 6″ pieces of every Designer Series Paper in the Jan-Apr Mini Catalog AND January Online Exclusive products (not all paper is shown, just a sample). BONUS: Add a sampler of the 4 new ribbons (2.5 yards each), and you’ll have plenty of coordinating products to play with.

But wait! I have two more ribbon ideas for you!

Have you ever created a gathered edge with a ribbon? Let it peek out from below a sentiment like this Black & Vanilla Large Check RIbbon ruffle on a piece of home-sweet-camper framed decor:

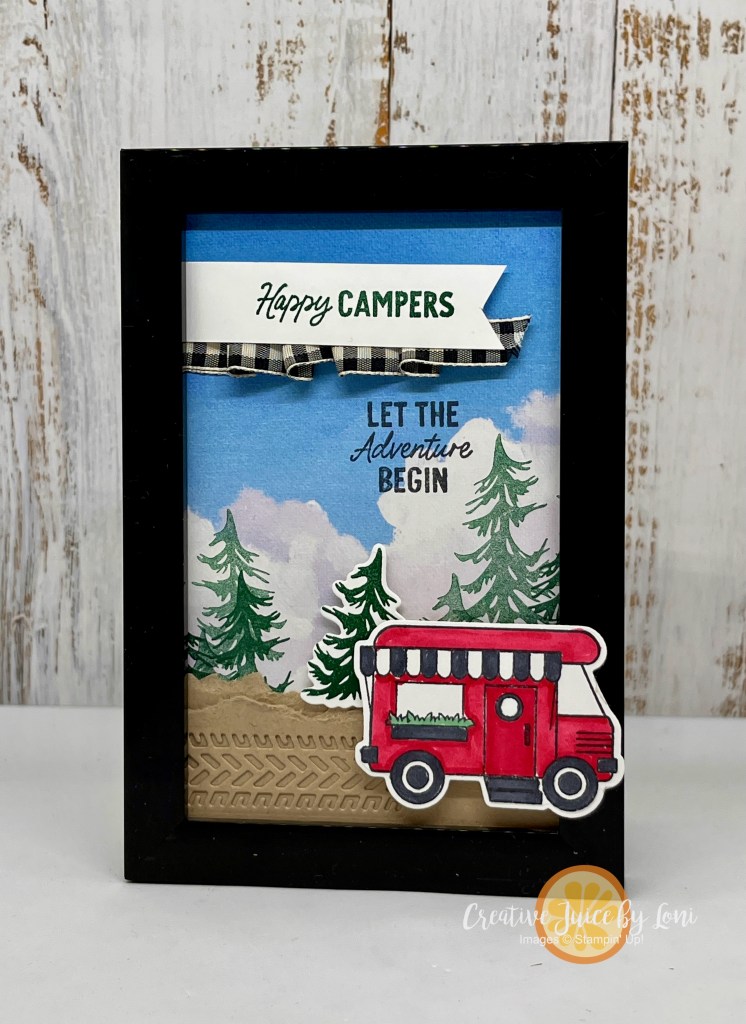
Yep- that’s another “first look” at the Adventure Together bundle (a January Online Exclusive) AND the Everyday Skies Designer Series Paper (included in the Paper Share).

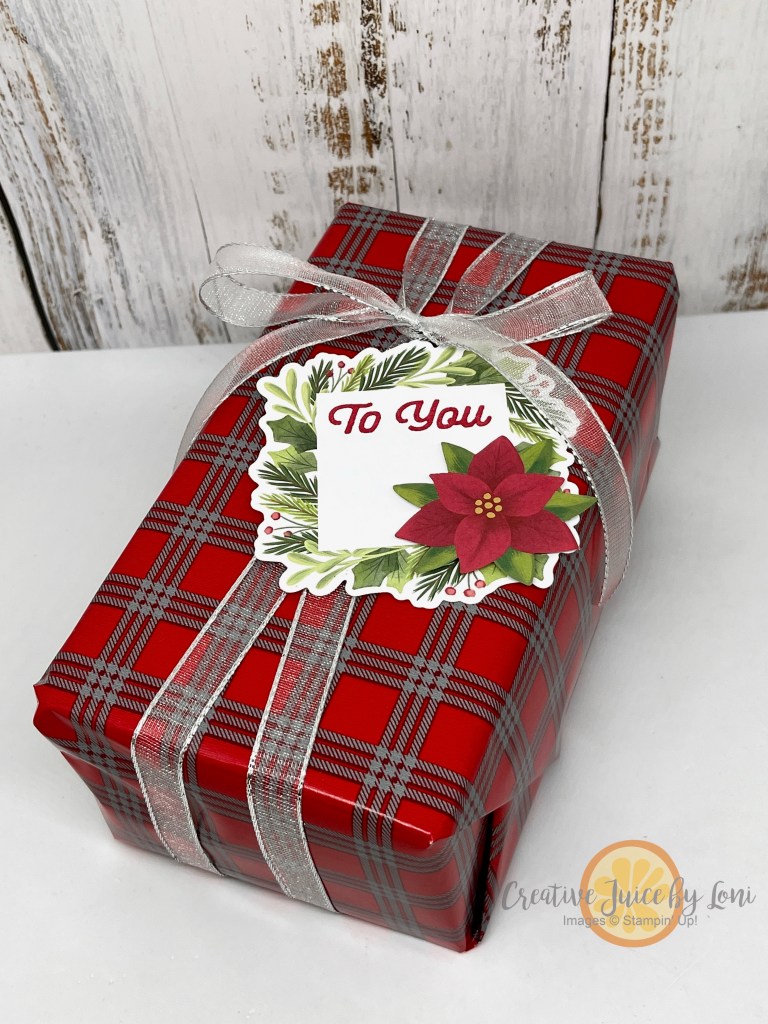
And finally (or at first in the demonstration video), a unique way to tie a bow on a gift box- FAST. Just wait until you see how the bow keeps the ribbon in place! I used the Silver & White Sheer Ribbon:

AT LAST! Here’s the tutorial to watch:

Really looking forward to hearing what you think of these ideas of ways to use Stampin’ Up! ribbon on handmade greeting cards, gifts and more.

Starting the Holiday Season Now!

August-December 2020 Mini Catalog

It’s hard to imagine the crisp air of Autumn or the warm cocoa that warms you in winter, but Fall is just around the corner and the first sign of the change in seasons is the arrival of the August-December 2020 Mini Catalog!

This not-so-mini is packed with festive goodies and inspiration you can view it online now. Contact me if you haven’t received your personal copy yet!

Enjoy the new and improved store as you are shopping, and don’t forget to use any Bonus Day Coupons you may have earned in July!


VIEW ONLINE

August December Mini Catalog

DOWNLOAD DIGITAL COPY
Download Digital Copy of Current Catalog

BUNDLE & SAVE 10%

Did you know that Bundles of stamps and punches or dies are available at a 10% discount? Here’s an important tip: Look for coordinating stamps and tools bundled together!

Holiday Wreath Class

It’s important for me to recognize Thanksgiving BEFORE Christmas, so I’m owning that season in my home decor currently, but as there are not a lot of Thanksgiving songs, I do have the Christmas tunes playing on repeat.

Soon I’ll put up a tree and switch out my fall wreath, and I thought it would be fun to make a Holiday Hoop Wreath for my front door, so let’s make them together:

IMG_9274

There is sparkle and shimmer, grazing deer and fir trees! You can choose “Happy Holidays” or “Merry Christmas” as your greeting, too:

IMG_9275

You could certainly order all the supplies to create this yourself, or you can come to the class and make it for just $15!

Christmas Hoop Wreath Class

Thursday, November 29th 7 pm

195 N 200 E, Spanish Fork, UT

Reserve your spot with Paypal HERE

View event on Facebook HERE

Back in Action with Holiday Sale

It’s fitting that today is “Name Your Computer” day! After eking everything I could out of my (very) old but well-loved Imac, I took the plunge and invested in a MacBook Pro last Saturday. I’m still getting the hang of things, but I can already tell we are in for a long and adoring relationship. However, that change took me away from posting and so I’m trying to catch up. (BTW, I’ve named it MacBeth)

Did you know there are only 35 days until Christmas? Because Thanksgiving is so late this year, we are really going to have to cram a lot of holiday into just a few short weeks…so don’t wait for Black Friday to start shopping! Stampin’ Up! just started our Holiday Sale this morning:

While the doorbuster sales are good for one day only (November 20th), the rest of the sale extends through December 2nd, so click below to download the sale flyer, grab a highlighter and your Christmas Gift List 🙂 Or print it off, highlight what you want and hand it to your husband with my website in CAPITAL LETTERS 😀     (www.loni.stampinup.net)

As long as you are shopping, here are the weekly deals too:


 Ready to shop? Pull up a cup of cocoa, put on your comfy house slippers and click here
post signature

Sensational Seasonal Samplers

My Stitched Stamper family of SU! demonstrators held a “Sampler Square” Swap for the upcoming holidays. Each of us created a 2″ square to trade using a set color palette and here are the finished projects, mounted on Designer Series Paper for a 12×12 frame.

Halloween (using Witches’ Brew DSP from the Holiday Catalog):

Fall/Thanksgiving (using Sweater Weather DSP from the Holiday Catalog):

Christmas (using Season of Style DSP from the Holiday Catalog): 
Wouldn’t this be fun to do with your friends? To order supplies to make your own, visit my Stampin’ Up! store!
If you are swapping with friends, invite everyone to participate, because it’s great to have “leftover” squares…see what I did with them here 🙂

post signature

September Stamp Soiree: St. George, Utah

Get your fingers inky, Southern Utah! Come get crafty for the holidays on Saturday, September 28th at the clubhouse on Lion’s Head Drive in Washington (near Green Springs Golf Course). We have TWO fun events you won’t want to miss~together we are calling it a “Stampin’ Soiree”~and I’m sharing a few samples!

Card Buffet (10 a.m.): Create 8 gorgeous greeting cards (2 each of birthday and thank you and 4 christmas) Bring your scissors and adhesive, everything else is provided for you, including envelopes. Cost: $15

Holiday Stamp Camp (1:30 p.m.):  Make a Halloween Sampler to frame as well as Christmas boxes, bags and tags for dressing up the perfect gift! As always, bring scissors and adhesives. Cost: $25

BEST VALUE: Attend BOTH events for just $35 (save $5). You can leave for lunch or stay and visit over a Durango’s Salad (optional). 

REGISTER BY SEPTEMBER 23rd by selecting Paypal Options below or call me at 801.376.8685 to register by phone! It’s going to be a fun day of papercrafting nirvana!

Stamp Soiree Options
Card Buffet Class 10 a.m. $15.00 USD Holiday Stamp Camp 1:30 p.m. $25.00 USD All Day (both events~Save $5!) $35.00 USD +Lunch (Durango’s Salad + drink) $8.00 USD

Dress Up a Holiday Gift Card

The sketch over at Create with Connie & Mary this week gave me an idea: A hidden gift card pouch! Here’s my card for the CCMC 229 sketch:

 But here is the fun little twist: It swings on the Rhinestone Brad!

 And here is the back closure:

When you untie it, surprise! A pocket to put a gift card in!

I created the pocket/envelope using the Simply Scored tool and Diagonal plate from Stampin’ Up!: Cut a piece of Designer Series Paper (from the Candlelight Christmas pack in the Holiday catalog) to 6 1/2″, then score on two sides at 3 1/4″ and on the other two sides at 2 3/8″.

Curled Paper Bows

Welcome back to my creative wrapping week! If you’ve missed some of the posts this week, make sure to catch up so you can get your Christmas Gifts wrapped in style 🙂 And I’d love to have you join me for the TP Tube Challenge I posted yesterday!

Years ago my mom started a wrapping paper business where she sold industrial-sized rolls of gift wrap, the metal cutters and oodles of ribbon. As a paper-addict, I was in heaven! Eventually I followed in her footsteps and worked the business for a while until I found Stampin’ Up! Anywhooo…that’s where I learned this lovely little technique to make a curled paper bow from your gift wrap:

Wrapping paper is super-easy to curl because it is light-weight paper, but I am teaching you the technique using SU! Designer Series Paper (Be Of Good Cheer~126896)

1. Start with a piece of wrapping paper or DSP. This is a 12×12 piece of DSP and you begin by folding it in half. If using a rectangle, fold it in half the long way, or “hot dog” fold. My favorite size is about 18″ x 12″ for a large package, but don’t worry about the measurements…just grab a piece of paper from your printer and follow along!!

2. Take the open edge and fold it up toward the folded edge, leaving about 1″ along the folded edge.

3. Cut from the bottom fold up toward the center fold, just through the open end edge, all the way across, about 3/4″ to 1″ wide. No need to measure, just start cutting 🙂

4. Once you are finished, unfold the whole paper and you will have “spider legs” on both sides with a fold down the middle, like this:

5. Now the fun begins! Use your scissors and “curl” the paper as you would a ribbon, with the pattern you want to show the most of on the opposite side of your scissors. As you are curling, you may pull off one of the “legs” (see the one in the background of the picture?) No worries: You will never notice it when it is finished!

 6. When you are done curling, your paper or gift wrap will look like this:

 7. If you are using gift wrap, just SCRUNCH it together up the middle fold to gather it. Using DSP (which is a little heavier) you may find it easier to fan fold it as you go along. The cuts you made make it pretty simple to do quickly. Again, this isn’t rocket science, so you don’t have to be exact, just fold it and go! Then grab an old bread twist tie (doesn’t matter what color…mine is BLUE!) and wrap it around the gathers/folds and twist to secure.

8. Once your bow is secure, just mush it around until looks like a big fluffy bow and tape it to your gift and add a tag! This tag was stamped in Cherry Cobbler Ink (126966) with the Dec. 25 image from the Tags ’til Christmas stamp set (wood~120847 or clear~121169), punched with the Decorative Label Punch (120907) and adorned with Champagne Glass Glitter (120997), all of which can be ordered from my website

It’s an Ornament! It’s a Gift! It’s a Kit!

The ornament on the cover of the SU! holiday catalog is such a hit that we are making it available to you–just in time to deck the halls with terrific trimmings you’ve made yourself! We’ve simplified this fun project so that you can quickly and easily achieve the same results. Each kit makes TEN (10) ornaments…what a great deal!!! In addition to the kit, all you need is a glue gun, scissors, and adhesive. (Our Anywhere Glue Sticks [104045] are perfect for assembly.) Want greeting or place cards to go with those ornaments? The Ornament Keepsakes Stamp Set (W 128048 C 128051) gives you perfect coordination. Fancy a little sparkle and shine? Sprinkle on our Dazzling Diamonds Stampin’ Glitter (102023)!

The Ornamental Elegance Kit (132832) is $14.95 and includes:

  • Die-Cut Cardstock Elements
  • Cherry Cobbler 3-1/2″ Scalloped Tulle Ribbon
  • Natural Linen Thread
  • Vintage Faceted Designer Buttons 
  • Large Pearl Basic Jewels

These are available WHILE SUPPLIES LAST, so get yours today by calling to place your order or online in my Stampin’ Store!

Up-cycled Treat Tubes & Luminaries

You know these little plastic containers that Stampin’ Up! buttons and brads come in?

Have you ever hesitated before throwing an empty one away thinking, “There must be some way to use this…” or, if you are like me, you just save them knowing that inspiration will strike and you’ll find a way to Up-Cycle them 🙂 Then you’ll love this idea!

This is a container I made by cutting an 8.5″ x 4″ strip of the flocked window sheet from the Candlelight Christmas Specialty Designer Series Paper (126901) and making it into a tube with Sticky Strip. Fit the tube into the bottom piece of the plastic button/brad container and then decorate as desired:

The top of the button/brad container makes a perfect lid for your tube! I created a Real Red paper flower for this one using a few scallop circle punches and added a little bling with our Rhinestone Jewels (119246):

While my tube was 4″ tall, you could create any height tube, keeping the width 8.5″ to make your tube, which is the perfect size to create a tube to fit into the containers you are up-cycling. Depending on how close to the edge you glue your tube, it may fit perfectly inside the bottom of the brad/button container OR if it is too large, slide it over the outside of the container. Then decorate it as desired and fill with something delicious, like home-made fudge!!

I also created a luminary by punching out a shape before making the tube and covering the opening with vellum and a stamped image. I left off the lid on this one…just drop in a battery operated tea light and you are good to go! This one has a ribbon handle so I can hang it somewhere:

 See you tomorrow for more fun Holiday packaging and gifts from your Stampin’ Up! stash!