
The month of March is a busy birthday month for my family, so you can expect to find a LOT of Birthday Inspo here for the next 4 weeks, starting with this fun pocket card, which fits one of the FIVE tags from the Designer Series Paper perfectly:
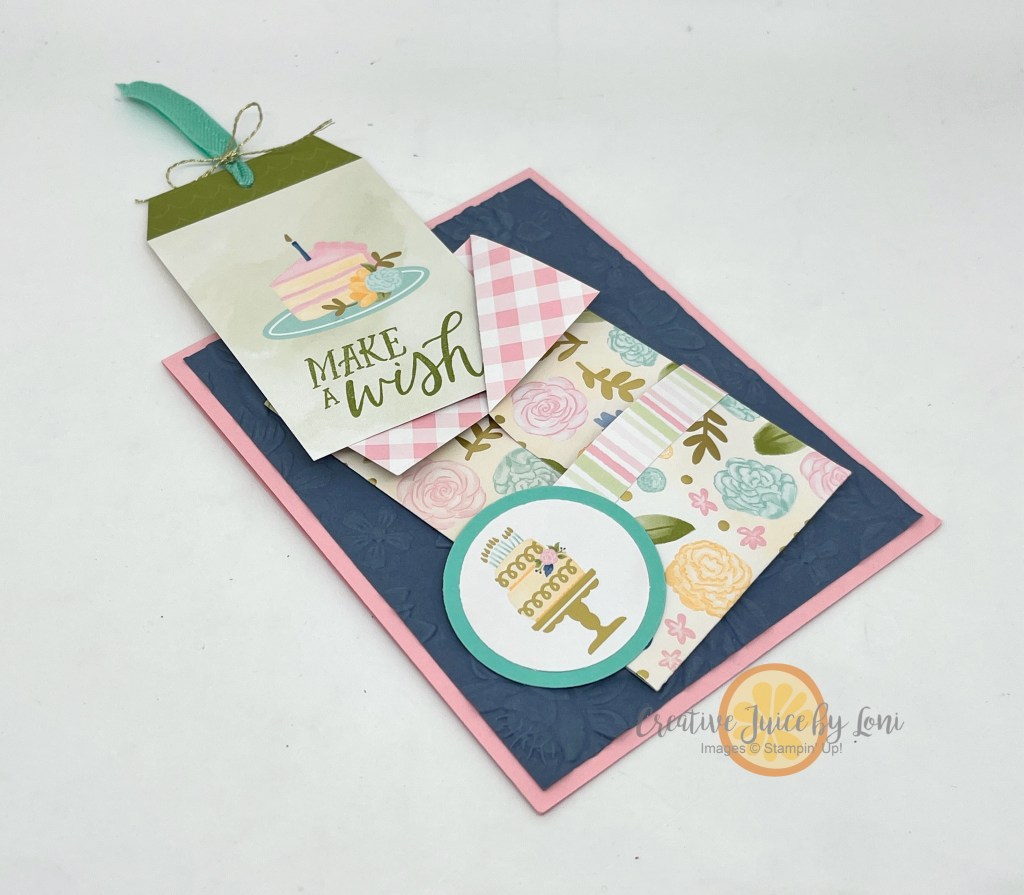
Yes, this is the SAME mini-loaded-envelope I created a few weeks ago using the Toadstool Gardens Designer Series Paper, and when I realized the tags fit perfectly, I had to make some birthday cards!

They come together quickly, and it would be easy to attach a gift card to the back of the tag with a strip of Stampin’ Seal! If you are handing it to the recipient in person, you could also slip a Ghiradelli square into the front pocket, as well.
Follow along with me in the video tutorial:
Instructions for POCKET: Start with a 6″ x 6″ piece of double-sided patterned paper, then score along two opposite sides at 1-5/8″. One the bottom, score at 1-7/8″. Fold paper in along both 1-5/8″ sides and on the top, fold out the corners in a “collar”, then adhere edges together in center. Next, fold up along 1-7/8″ score line and wrap a 1/2″ strip around the lower pocket edge (can adhere the lower pocket to the front, or along the sides, creating TWO smaller front pockets).
You really need to see this gorgeous paper in person to appreciate the gold foil accents, but here’s as close as I could get in a photo:

Thank you for purchasing the supplies from my Stampin’ Store to make your own~ watch for 30+ exclusive tutorials to be emailed to your inbox every month you order over $50 from my store AND a hand-stamped card to thank you for your business!
Product List![Wildflower Birthday 12" X 12" (30.5 X 30.5 Cm) Specialty Designer Series Paper [ 164591 ]](https://assets1.tamsnetwork.com/images/EC042017NF/164591s.jpg "Wildflower Birthday 12\" X 12\" (30.5 X 30.5 Cm) Specialty Designer Series Paper [ 164591 ]")
![Birthday Celebration Photopolymer Stamp Set (English) [ 164592 ]](https://assets1.tamsnetwork.com/images/EC042017NF/164592s.jpg "Birthday Celebration Photopolymer Stamp Set (English) [ 164592 ]")
![Paper Trimmer [ 152392 ]](https://assets1.tamsnetwork.com/images/EC042017NF/152392s.jpg "Paper Trimmer [ 152392 ]")
![Pretty In Pink 8 1/2" X 11" Cardstock [ 163793 ]](https://assets1.tamsnetwork.com/images/EC042017NF/163793s.jpg "Pretty In Pink 8 1/2\" X 11\" Cardstock [ 163793 ]")
![Misty Moonlight 8-1/2" X 11" Cardstock [ 153081 ]](https://assets1.tamsnetwork.com/images/EC042017NF/153081s.jpg "Misty Moonlight 8-1/2\" X 11\" Cardstock [ 153081 ]")
![Coastal Cabana 8-1/2" X 11" Cardstock [ 131297 ]](https://assets1.tamsnetwork.com/images/EC042017NF/131297s.jpg "Coastal Cabana 8-1/2\" X 11\" Cardstock [ 131297 ]")
![Misty Moonlight Classic Stampin' Pad [ 153118 ]](https://assets1.tamsnetwork.com/images/EC042017NF/153118s.jpg "Misty Moonlight Classic Stampin' Pad [ 153118 ]")
![Pretty In Pink 3/8" (1 Cm) Bordered Ribbon [ 163784 ]](https://assets1.tamsnetwork.com/images/EC042017NF/163784s.jpg "Pretty In Pink 3/8\" (1 Cm) Bordered Ribbon [ 163784 ]")
![Gold Twisted Thread [ 164603 ]](https://assets1.tamsnetwork.com/images/EC042017NF/164603s.jpg "Gold Twisted Thread [ 164603 ]")
![1-3/4" (4.4 Cm) Circle Punch [ 119850 ]](https://assets1.tamsnetwork.com/images/EC042017NF/119850s.jpg "1-3/4\" (4.4 Cm) Circle Punch [ 119850 ]")
![Layered Florals 3 D Embossing Folder [ 162935 ]](https://assets1.tamsnetwork.com/images/EC042017NF/162935s.jpg "Layered Florals 3 D Embossing Folder [ 162935 ]")
![Stampin' Cut & Emboss Machine [ 149653 ]](https://assets1.tamsnetwork.com/images/EC042017NF/149653s.jpg "Stampin' Cut & Emboss Machine [ 149653 ]")
![Multipurpose Liquid Glue [ 110755 ]](https://assets1.tamsnetwork.com/images/EC042017NF/110755s.jpg "Multipurpose Liquid Glue [ 110755 ]")
![Stampin' Seal [ 152813 ]](https://assets1.tamsnetwork.com/images/EC042017NF/152813s.jpg "Stampin' Seal [ 152813 ]")
![Stampin' Dimensionals [ 104430 ]](https://assets1.tamsnetwork.com/images/EC042017NF/104430s.jpg "Stampin' Dimensionals [ 104430 ]")
![Mini Glue Dots [ 103683 ]](https://assets1.tamsnetwork.com/images/EC042017NF/103683s.jpg "Mini Glue Dots [ 103683 ]")
![Basic White Medium Envelopes [ 159236 ]](https://assets1.tamsnetwork.com/images/EC042017NF/159236s.jpg "Basic White Medium Envelopes [ 159236 ]")


")


 Bordered Ribbon")


