
Have ever looked at a stack of pretty designer series paper and think, “It’s too pretty to cut”? I hear you—but here’s the good news: when you do cut it, you can get the most out of every single sheet! I created this cutting map that turns any 6” x 6” piece of designer paper into perfectly sized layers for the front of your cards:

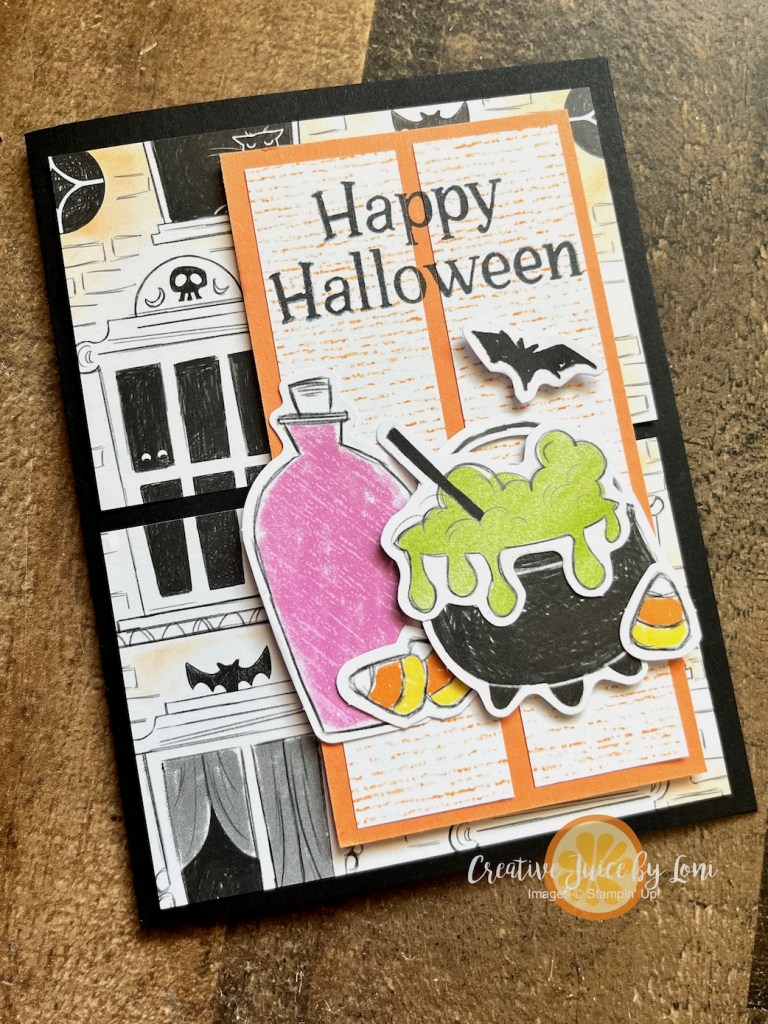
In my live video today, I walked through the process step by step and made the card shown here from the Autumn Toile pack of paper that will be available on September 2nd. (You’ll find the replay below if you want to craft along!) The cutting map is below so you can print it out, tuck it near your paper trimmer, and use it anytime you want to make lovely layers of backgrounds for your greeting cards.
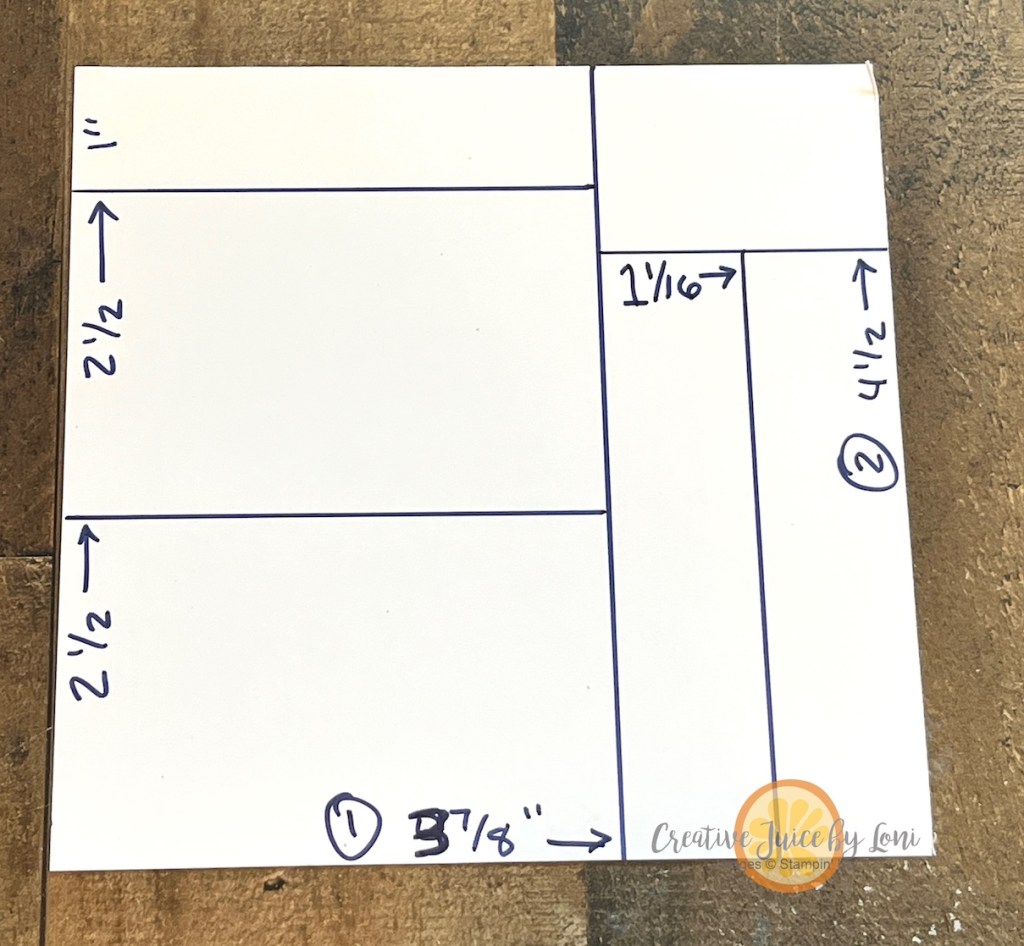
The first cut you make (circled) will be 3-7/8″ into the square. The second cut will be to cut the leftover pattern down to 4-1/2″ tall, then other cuts as shown.
Layer the two large rectangles on a contrasting card stock base, and the two long strips go on a piece of card stock that is 2-1/2″ x 4-3/4″, which can be attached with dimensionals to either the left or right side of the front of the card.


For my samples, I used a mix of Stampin’ Up! designer series paper. Four of the patterns come straight from the September Paper Share I’m offering — fifty-three 6″ x 6″ sheets of Stampin’ Up! Designer Series Paper, all cut down and ready for you to create with. It’s a perfect way to try every new design without committing to full packs, and it gives you plenty of variety for projects like this.

My last two examples of this sketch feature the Painterly Pears Suite and the Spooky Sweet Suite. Isn’t it terrific how the same cutting map works across completely different styles—fall-inspired pumpkins, happy holiday greetings, fresh pears, or playful Halloween motifs?! It’s proof that a simple template can stretch your supplies and spark new ideas.

Whether you’re making cards in bulk or just want a foolproof way to get more from your paper, this card design is one you’ll use again and again. Scroll down for the video, save all six card samples, and grab your trimmer—you’ll be amazed how quickly 6” x 6” papers can turn into a gallery of handmade cards.
The 1″ x 3-7/8″ piece from the cutting map goes INSIDE the cards, like this:


TWO more opportunities before you go:
- The Autumn Toile paper (on the first card I demonstrated) coordinates with the September Paper Pumpkin kit, so if you adore autumn and those detailed designs, you will certainly want to subscribe by September 10th to receive a fall-filled box of coordinating crafting!
- While the Spooky Sweet Suite paper is NOT included in the Paper Share, I *WILL* be teaching a Virtual Halloween class with the suite on October 2nd – Add the suite to your cart for an invitation to join the party, or visit the Facebook event page (link above) to find out how to register.


![Painterly Pears Suite Collection (English) [ 166159 ]](https://assets1.tamsnetwork.com/images/EC042017NF/166159s.jpg "Painterly Pears Suite Collection (English) [ 166159 ]")
![Misty Moonlight 8-1/2" X 11" Cardstock [ 153081 ]](https://assets1.tamsnetwork.com/images/EC042017NF/153081s.jpg "Misty Moonlight 8-1/2\" X 11\" Cardstock [ 153081 ]")
![Very Vanilla 8 1/2" X 11" Cardstock [ 166784 ]](https://assets1.tamsnetwork.com/images/EC042017NF/166784s.jpg "Very Vanilla 8 1/2\" X 11\" Cardstock [ 166784 ]")
![Misty Moonlight Classic Stampin' Pad [ 153118 ]](https://assets1.tamsnetwork.com/images/EC042017NF/153118s.jpg "Misty Moonlight Classic Stampin' Pad [ 153118 ]")
![Old Olive Classic Stampin' Pad [ 147090 ]](https://assets1.tamsnetwork.com/images/EC042017NF/147090s.jpg "Old Olive Classic Stampin' Pad [ 147090 ]")
![Petal Pink Classic Stampin' Pad [ 147108 ]](https://assets1.tamsnetwork.com/images/EC042017NF/147108s.jpg "Petal Pink Classic Stampin' Pad [ 147108 ]")
![Watercolor Pencils Assortment 2 [ 149014 ]](https://assets1.tamsnetwork.com/images/EC042017NF/149014s.jpg "Watercolor Pencils Assortment 2 [ 149014 ]")
![Perennial Postage Dies [ 162607 ]](https://assets1.tamsnetwork.com/images/EC042017NF/162607s.jpg "Perennial Postage Dies [ 162607 ]")
![Stampin' Cut & Emboss Machine [ 149653 ]](https://assets1.tamsnetwork.com/images/EC042017NF/149653s.jpg "Stampin' Cut & Emboss Machine [ 149653 ]")
