Come to Gather Suite Spotlight

The 2019 Holiday Catalog Inspiration

Come To Gather Suite Spotlight

The Come To Gather Suite evokes all the warmth, texture, and colors of autumn with leaves, plaids, pumpkins, and feathers. Like cinnamon, nutmeg, and cloves they combine to make the perfect flavor of fall. This suite is ideal for cards, decor, memory keeping and gift giving.

Need a hostess gift or a touch of decor? Create this gorgeous tag and add it to a real mini pumpkin or make it last from year to year by adding it to a ceramic or fabric pumpkin. It’s a sure way to share your gratitude in style.

I’ll be sharing instructions for the project below with my email subscribers so
sign-up to receive my emails today

————————————————–

Season of Thanks Tag

Come To Gather Suite Spotlight

VIEW SUITE ONLINE

COME TO GATHER DESIGNER SERIES PAPER VIDEO

DOWNLOAD THE CATALOG

MORE COME TO GATHER SUITE INSPIRATION

Come To Gather Suite Spotlight

What’s New at SU!- Harvest Hellos

Whats new (2)

Falling leaves, pumpkin spice, cool weather, apple cider and a Fall-Themed Blog Hop with Stampin’ Up! demonstrators from around the globe who love sharing ideas with you: Does it get better than this?

I’m using the Harvest Hellos bundle from the 2019 Holiday Catalog today, with a twist on traditional Halloween colors: I like the CUTE part of the holiday, so Granny Apple Green, Highland Heather and Calypso Coral comprise my basic color palette:

IMG_2948-(W)

Betcha can’t look at that pumpkin without smiling!

If you think all white card stock is the same, you haven’t tried our ULTRASMOOTH card stock!! I stamped the pumpkin on that amazing Whisper White card stock in Calypso Coral ink, then used a blender pen to add more of the ink to color him in.

IMG_2942-(W)The Stitched Rectangle Dies make the layers on this card in a snap, add a little vinery by way of the Sprig Punch, and you’ve got a pumpkin patch!

I love it when you say “Hi” and leave me a comment, then hop on over to Diane’s blog for another happy fall project or back to Judi’s Country Home project page:

PREVIOUS

NEXT

Product List


The Complete September Blog Hop Roll Call:
Margriet Siekman – Creatiefmarsie
Pat Ertman – Gifted Hands, Ink!
Tricia Butts – Triciastampingcreations
Terry Montgomery – Terryficcards
Judi Anderson – Judistamps
Loni Spendlove – Creative Juice by Loni
Diane Browning – 24-7 Inkspiration
Anke Heim – Scraphexe
Sharon Burkert – As the Ink Dries

Plaid Tidings for Christmas

Starting your holiday greeting cards? Create cozy when you use the Wrapped in Plaid  suite to create cards, gifts, tags and holiday decorations that evoke all the comfort of being snowed into a cabin in the woods! 2019_HOL_P12_A.jpg

Here’s a quick and easy card that you could create from all of the Wrapped In Plaid Designer Series Paper and some foil sheets, and the trick is to punch out the gold tree before you adhere the DSP to the gold layer!

IMG_2938-(W)

You can even use the plaid tree you punch out for the inside of the card:

IMG_2939-(W)

I’ve created a tutorial for you: Download it below and order the supplies from my Stampin’ Store.

Plaid North Pole Delivery Card

MAKE your holiday merry by getting an early start!

Start with DSP for Creativity

Designer Series Paper Sale

I’ll share a secret – Designer Series Papers (DSP) are one of my top time saving and creative resources.

Need a quick card? Start with Designer Series Paper, add a stamped greeting and a bit of embellishment you can create a lovely card in a snap!
Need a new color combination? Look at the colors used in a Designer Series Paper and use them as your palette!

Purchase three Designer Series Paper (from the flyer) in September and choose one free!

Whatever you are creating, Designer Series Paper makes any project pop. Download the promotional flyer and take advantage of this amazing Buy 3 – Get 1 FREE sale September 4th – 30th!

Stampin' Up! Designer Series Paper

Just a few DESIGNER SERIES PAPER project samples: 

Designer Series Paper Sale

Designer Series Paper Sale

Designer Series Paper Sale

Designer Series Paper Sale

Designer Series Paper Sale

Designer Series Paper Sale

SHOP SALE

Birthday Bash with the (big) Girls

Who said getting older isn’t fun?

IMG_2850

This group of my long-time crafty friends know how to party! It was Sarajane’s birthday and she wanted to spend time creating with her friends, so I was pleased to oblige and planned a celebration that centered on CAKE!

“Those who craft together, stay together” and these ladies prove it: They have stamped, scrapbooked, quilted and crafted for MANY years.

IMG_2855-(W)

All their projects used the Piece of Cake stamp set and Cake Builder Punch…I think the piece de resistance was the cake push pop: It was a show stopper!

IMG_2857

Thanks for letting me celebrate your SWEET LIFE, Sarajane!

If you want to plan a birthday party with me, contact me the month before your big day and let’s make it FUN!

IMG_2851

Stampin’ Spotlight: Follow Your Art Suite

The Annual Catalog Inspiration

Follow Your Art Suite Spotlight

We follow our hearts when we create handmade cards and gifts that bring us and those around us joy.

The Follow Your Art Suite is a celebration of tools and images from our stamping and paper craft hobbies and is stashed full of fun stamps, paper, dies, and an embossing folder. The Follow Your Art Embellishment Kit is an accessory lovers dream combination of stitched felt accents, linen thread, mini paper clips, and silver charms all packaged in a sturdy designer storage box.

It’s hard to choose, but my favorite part of the suite might just be the adorable custom Stampin’ Up! branded Washi Tape and mini Stampin’ Up! logo boxes. They are too cute to resist!

Check out the tutorial below for just one of many projects you can create. What will you create when you Follow Your Art?

VIEW SUITE ONLINE

Follow Your Art Suite Spotlight

PROJECT INSTRUCTIONS

  • Cut Whisper White cardstock to 3″ x 6″. Score at 3″ along 6″ side to create a 3″ x 3″ mini note card.
  • Cut yellow striped Follow Your Art Designer Series Paper to 3″ x 3″ and add to front of card.
  • Cut Coastal Cabana washed Follow Your Art paper to 2″ x 3-3/4″. Adhere across card diagonally from bottom left to top right. Trim off excess paper at edge of card.
  • Wrap Pacific Point Linen Linen Thread from the Follow Your Art Embellishment Kit around your fingers 4-5 times to create loops that are about 2-1/2″ across. Adhere to card with a few Glue Dots. Layers you’ll add on top will also help hold the thread in place.
  • Cut Vellum Cardstock 1-1/8″ x 4″. Adhere diagonally across the first diagonal strip with Stampin’ Dimensionals. Place Stampin’ Dimensionals near center of strip where they will be covered with other layers. Trim off excess vellum parallel to the edge of the card leaving about 1/4″ past each side.
  • Punch Calypso Coral scissor Follow Your Art paper with Starburst Punch. Add to card slightly right of center.
  • Stamp stacked ribbon image with Basic Gray ink on scrap Whisper White cardstock. Die cut with coordinating Arts & Crafts Die.
  • Watercolor image with an Aqua Painter using Calypso Coral, Coastal Cabana, and Crushed Curry ink pads. Adhere to starburst layer with Stampin’ Dimensionals.
  • Stamp greeting on scrap Whisper White with Pacific Point ink. Cut out around image and banner cut left edge with Paper Snips.
  • Adhere greeting overlapping the top edge of the Calypso Coral stitched, die-cut felt scallop from the Follow Your Art Embellishment Kit with Multipurpose Liquid Glue. Use just a bit to avoid running. Use the glue to adhere the greeting and felt embellishment to the card.
  • Add Gingham Gala Sequins. This adorable mini note is ready to share with any of your crafty friends!

Product List

Above the Clouds (+ 3 for Free)

Still on my bucket list: Ride in a Hot Air Balloon.

At least I can stamp some balloons with the Above the Clouds bundle from Stampin’ Up! until I can check the adventure off:

atc

On Monday I demonstrated this card during my Lunchtime Live broadcast from my Creative Juice Facebook Page:

IMG_2707 (W).jpg

I announced that during August 2019, anyone who ordered the Above the Clouds bundle from my Stampin’ Store will get 3 exclusive card tutorials via email PLUS I will mail them the paper goods to create those 3 cards at the end of the month!

Here’s a peek at the cards…and one of them is a fabulous fun fold:

Above the Clouds 3 for Free

While you can use any colors of ink you’d like, here are the ones I used in the tutorial (you can add them to your order if you don’t have them): Pacific Point, Melon Mambo,  Daffodil Delight, Coastal Cabana, Granny Apple Green and Seaside Spray. You will also need an Aquapainter OR Blender Pen and a Stampin’ Sponge.

Don’t miss the opportunity to get your 3 Above the Clouds card supplies and tutorial FREE: Order the bundle by August 31st from my Stampin’ Store!

Storage by Stampin’ Up!


Storage by Stampin' Up! - New Products

All our Storage by Stampin’ Up! products are currently back in stock just in time for Bonus Days!

Whether you have an entire room or a small corner in your home for stamping, your creative space should be tailored to you.

These simple, modular storage solutions are designed to keep your Stampin’ Up! supplies organized, at hand, easy to view, and perfect are for your space – big or small. From Classic Ink Pads, Stampin’ Write Markers, Stampin’ Blends, Watercolor Pencils, Ink Refills, and more you’ll love how you can organize and customize YOUR SPACE. YOUR WAY.

Here are some other features and benefits of Storage by Stampin’ Up!:

– Keeps products organized, tidy, visible, and trackable at all times.

– Ensures that your Stampin’ Pads, Stampin’ Write Markers, and Stampin’ Blends are all stored horizontally, as recommended.

– Designed to be stylish, durable, compact, stackable, and modular.

– This system grows with you and your collection.

– Blends in naturally with most home decor with its white neutral color.

– Stacks vertically and can be arranged to fit practically any flat workspace.

– Easily assembled and disassembled for rearrangement and/or cleaning.

SHOP ONLINE

Storage by Stampin' Up! - New Products

Download Flyer

Download Worksheet


Stop to Smell the Roses

Gardening is NOT a talent I possess. My husband is the green thumb and loves getting his hands in the dirt…and I let him. When it comes to the roses (and the last three homes we’ve lived in have multiple rosebushes), they are the exception: I do enjoy pruning and cultivating the bushes to keep them healthy and producing blossoms that grace my table as long as it’s blooming season.

To a Wild Rose stamp set was designed by Million Dollar Demonstrator Mary Ellen Byler and is a Distinktive 2- or 3-step stamp set, enabling you to get many different looks with one stamp set, so we can enjoy roses all year long!149452g

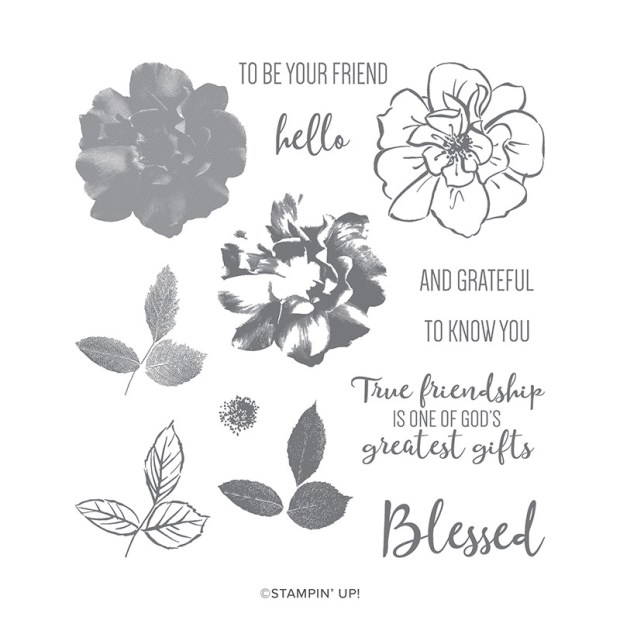
This set has a coordinating set of Wild Rose dies. Through June 2, 2020, you save 10% when you buy the bundle (stamps and dies together)

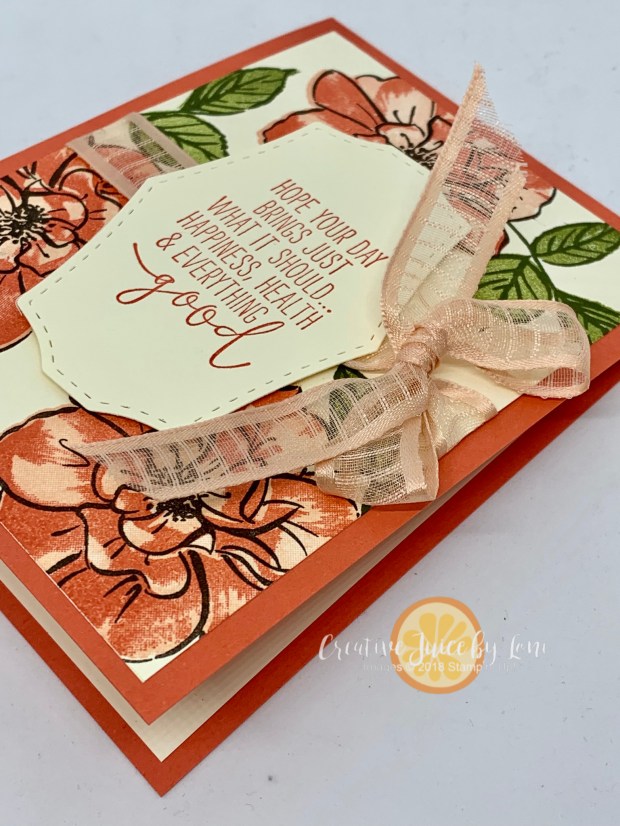
One night I played around with color combinations for these flowers: You can see that I stamped the boldest rose image in the lighter color with the highlights in a darker color over the top. When you add the outline image, it gives it a completely different look. Which do you like best: With or without the outline? savingPNG 5

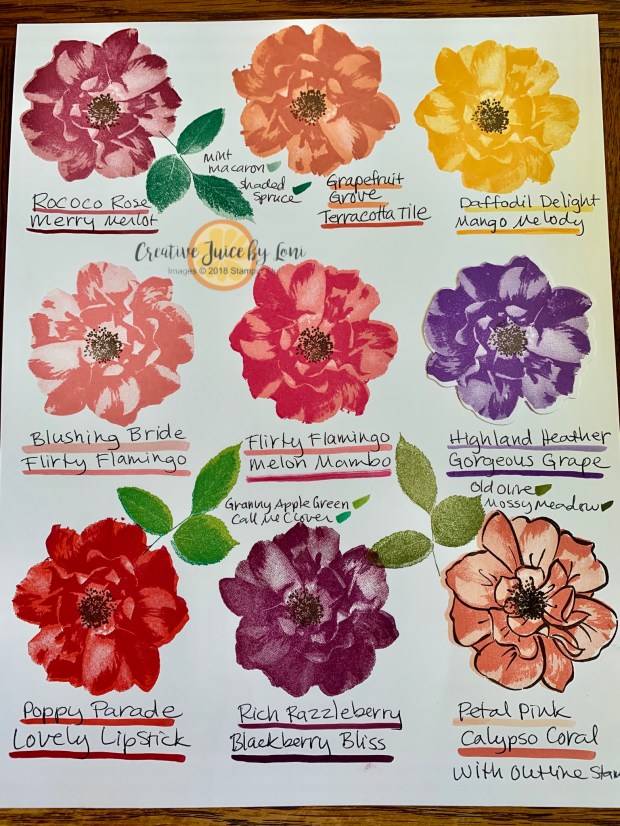
I needed some new birthday cards for my team, so I started with just the first two images and stamped these cards (added the outline on the envelope): savingPNG 6

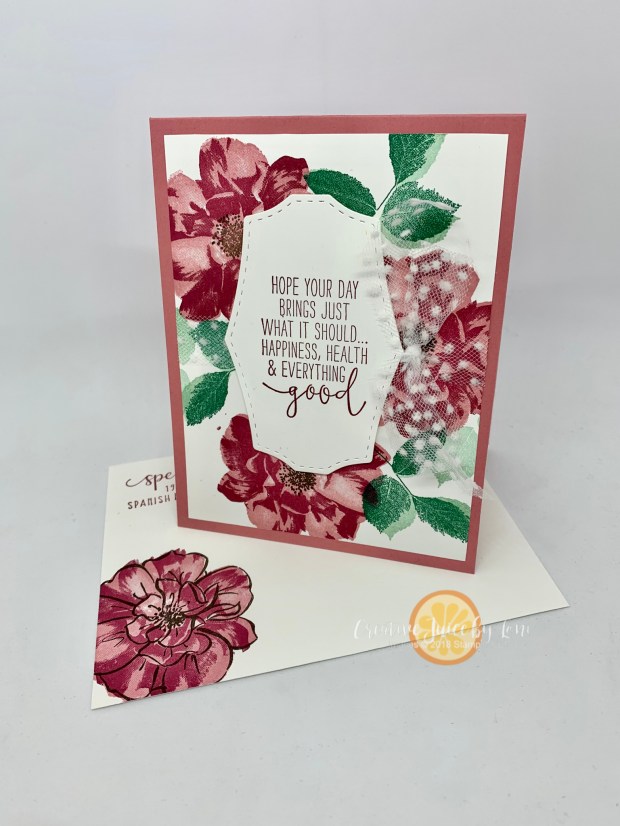
If you are part of my team…pretend to be surprised when your birthday card arrives!

Then I decided that it would look gorgeous on Very Vanilla card stock, too so I tried it with the detail image and they both are abso-bloomin’-lutely gorgeous cards:

savingPNG

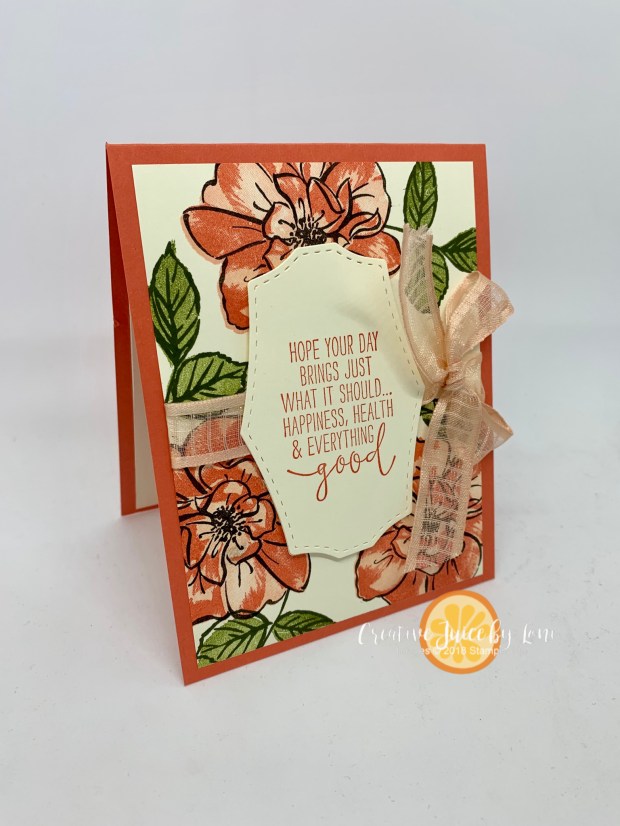
If you would like to make some of your own, I’ve got the instructions, supplies and measurements for you in a .pdf HERE

savingPNG 4

You can click either of the two photos above to download the tutorial! Thanks for shopping in my store for your supplies and keep some “fresh” flowers handy with this stamp set!

Wildly Happy to Craft!

It’s Fri-YAY because sketch challenges make me WILDLY HAPPY! It’s a creative exercise I look forward to as often as I have a moment to create. If you need to strengthen your imagination, sketch and color challenges are the best “strength training” you can do.fb_img_1560993860054

Something else that makes me WILDLY HAPPY is babies: Grandbabies, baby animals, whatever! And stamps make me giddy, of course, and the Wildly Happy stamp set is the first one that came to mind when I saw the #tgifc220 sketch.

IMG_2344 (W)

This was also a great excuse to use the Rectangle Stitched Framelit dies: What’s not to love about that adorable little detail? wildly happy

I added just a bit of light Flirty Flamingo Stampin’ Blend marker to the bunnies and grounded them with light Crumb Cake. If you don’t have the polka dot tulle ribbon, make sure it’s on your next order: It will be your favorite accessory for your cards, and you don’t even need much to give it a little pizzazz.

Product List