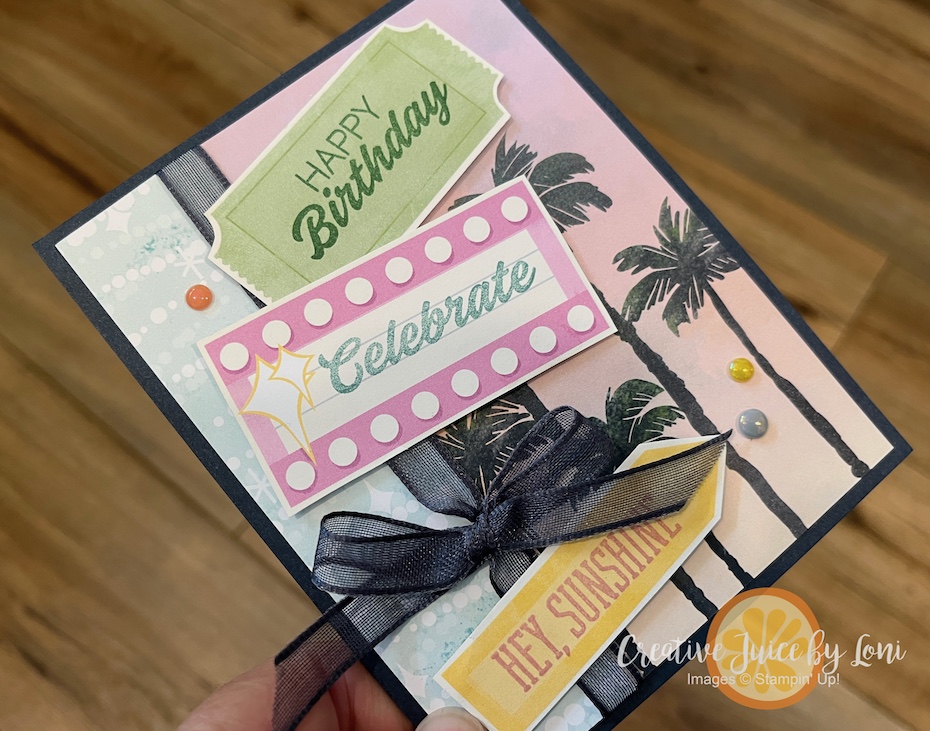
I’ve been sharing Sunshine & Smiles with the Beach Boardwalk Suite for a few days here AND on my social media (FB & IG) ~ today’s projects include a card, a scrapbook layout and announcements for upcoming EVENTS where I hope to see your face!
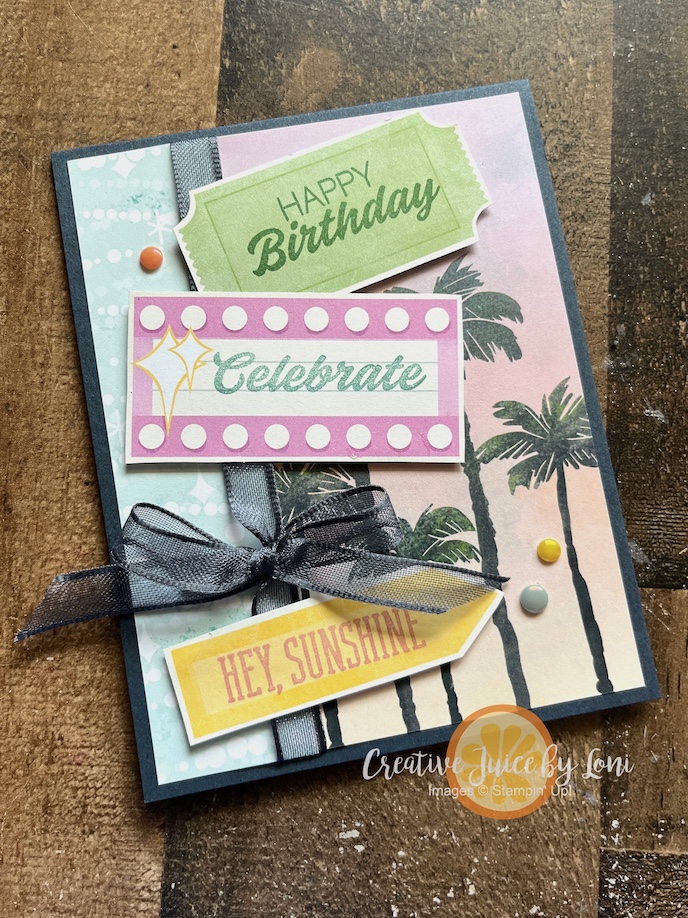
I love the sheet of tickets and tags included in the Beach Boardwalk Designer Series Paper because they can be stamped to evoke a “winning” feeling for any celebration, like you won a drawing 🎟️ or a stuffed animal in a boardwalk game! On the inside of this card, I added one more ticket to remind the recipient that life is quite the adventure:
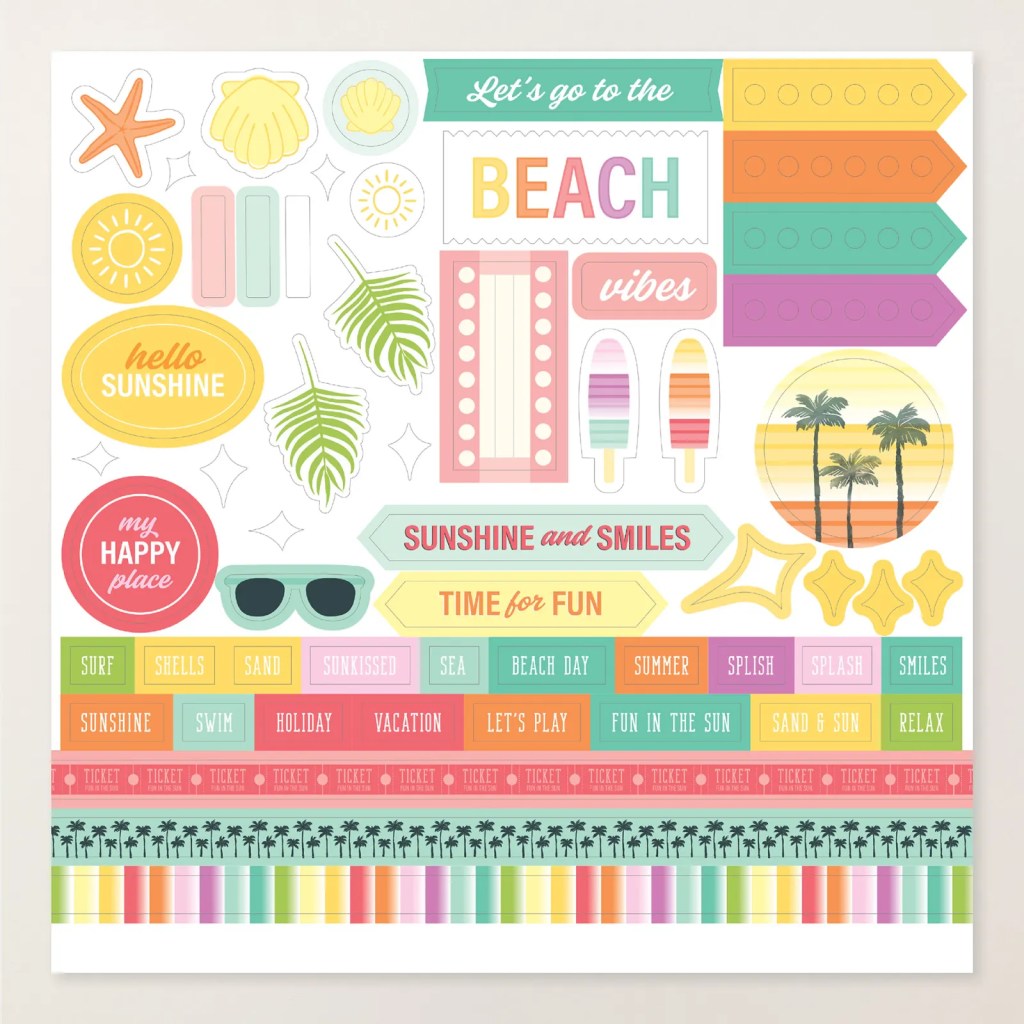
IN CASE YOU DIDN’T KNOW, this Beach Boardwalk paper also comes in a different package with a sticker sheet, all ready to preserve the memories of a day at the park, carnival, beach or fair on a scrapbook page or complete album:
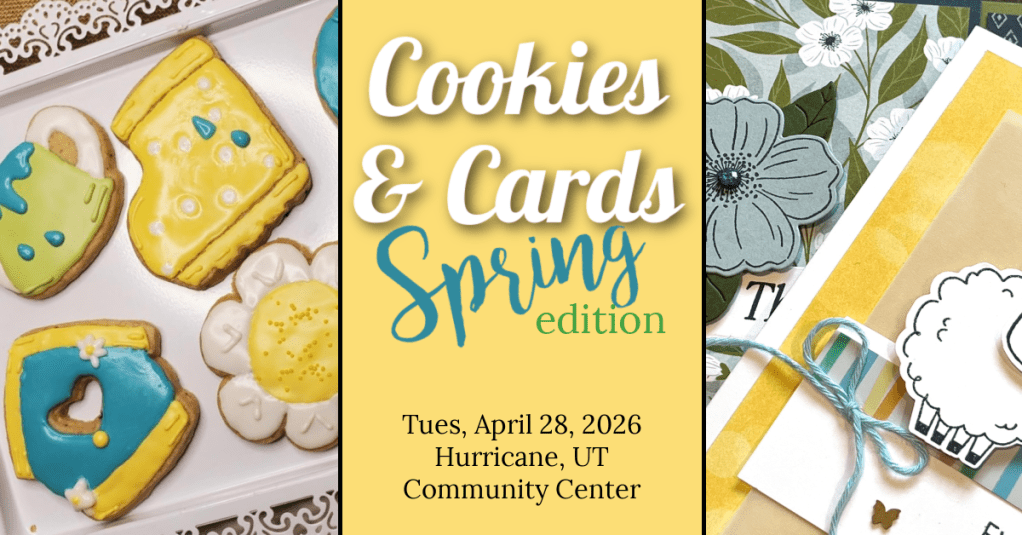
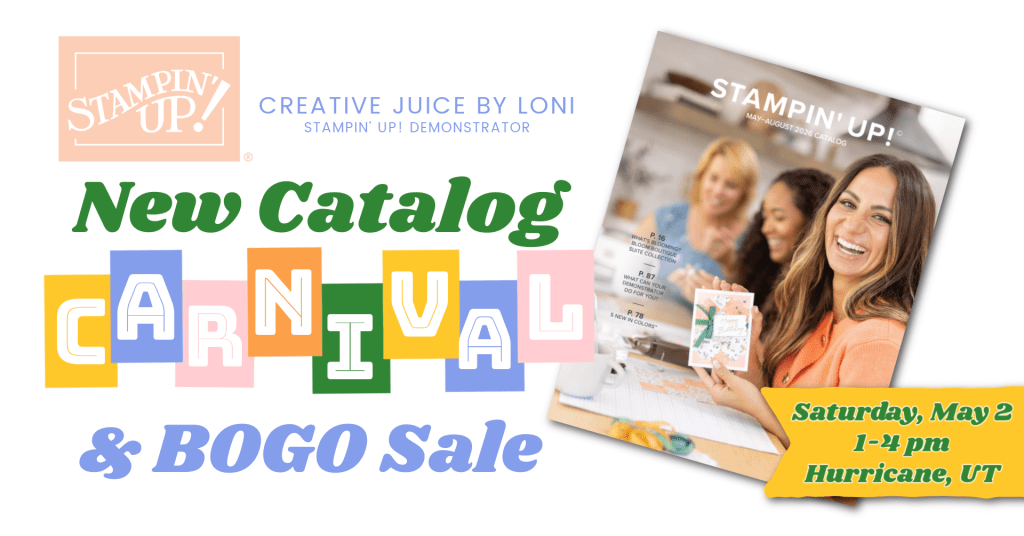
If you have a tropical vacation planned, a summer party or camp, pick up these products soon! And if you crave crafting adventures in southern Utah, here are the next few events I’m hosting ~ click on the images to learn more on the Facebook Events, or click the button to register!
The Catalog Carnival & BOGO SALE is Open House style, so just bring a friend and drop in for all sorts of fun freebies and snacks at 350 S 400 W ~ it’s a ticket to create!
VIEW UPCOMING EVENTS ANYTIME: CLICK THE “CLASSES & EVENTS” LINK IN PINK BAR ACROSS THE TOP
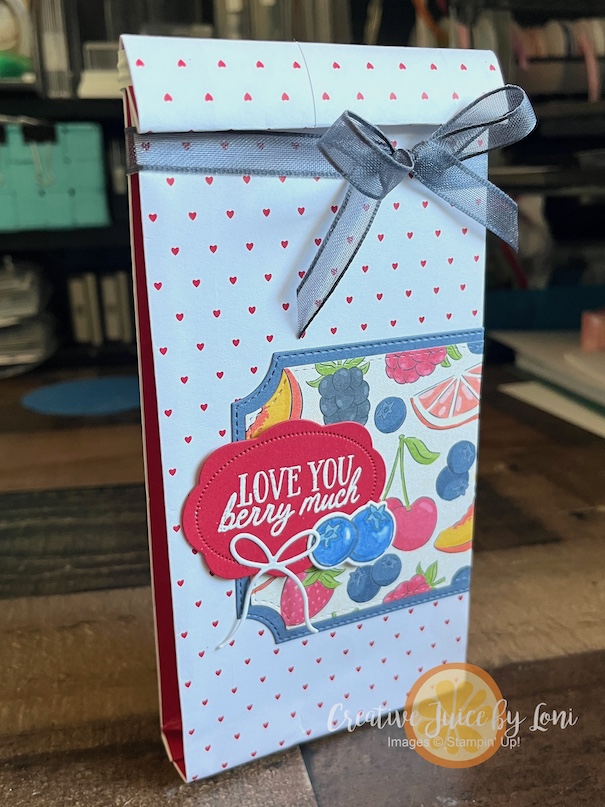
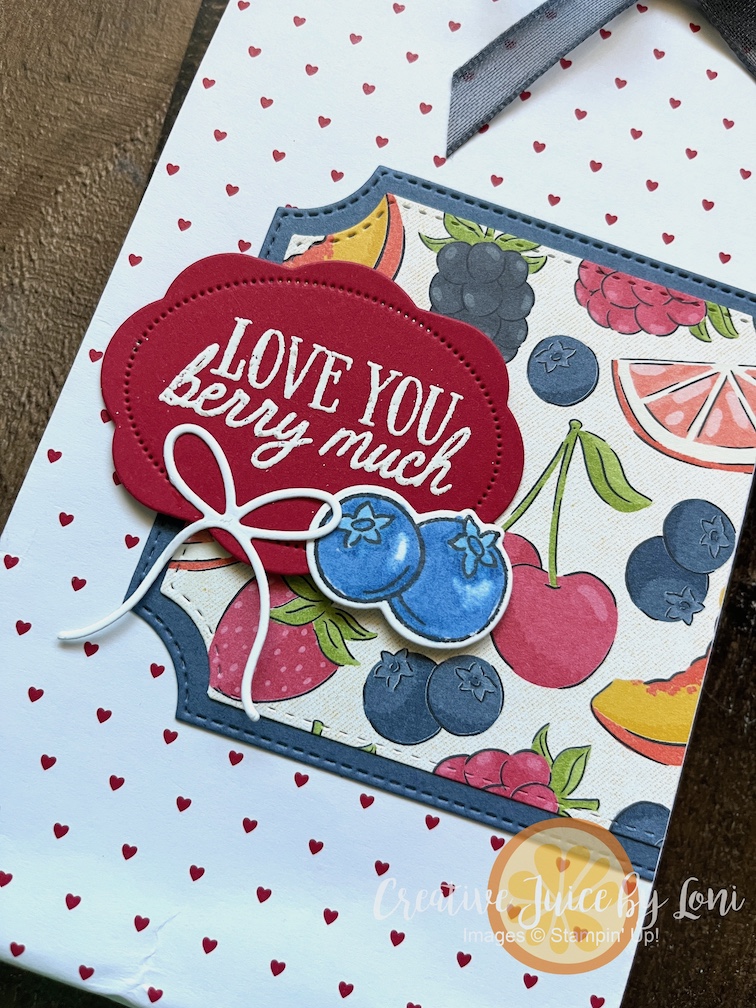
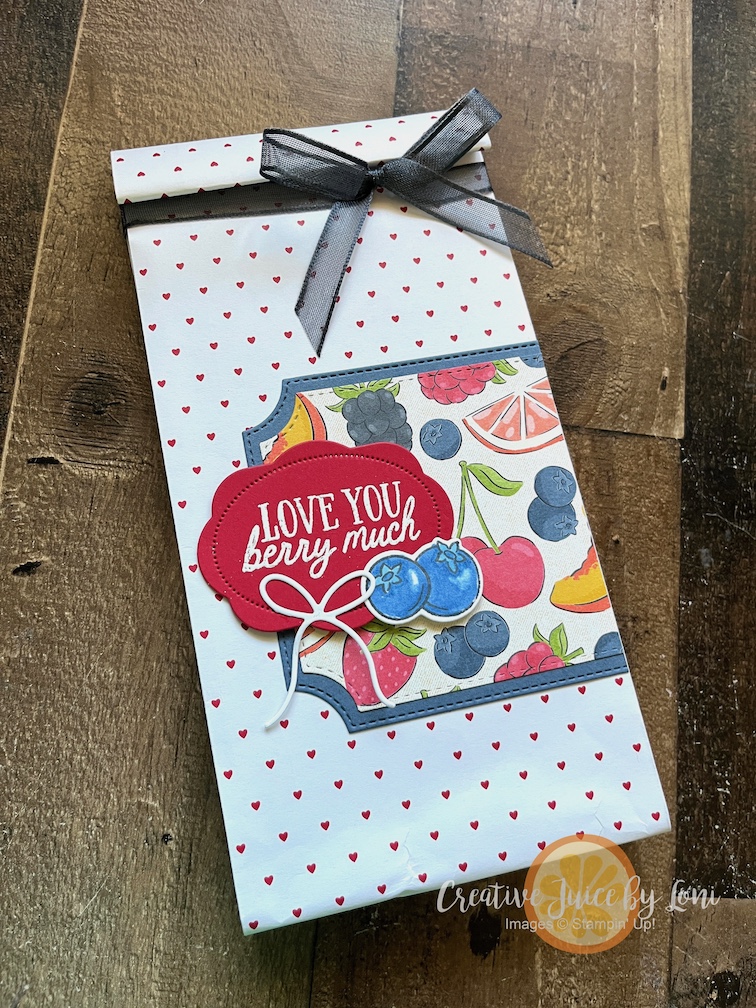
Let’s take a simple treat bag and give it a little glow-up… or should I say a gussie-up! 🍓
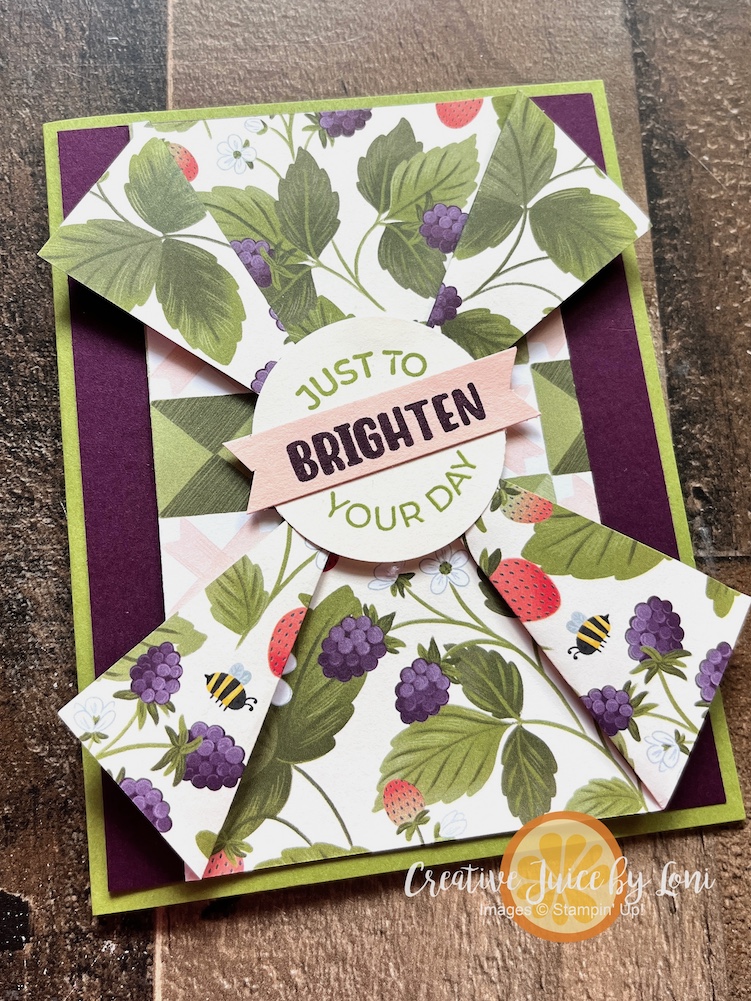
For our March New at SU! Hop, we are turning your attention to the Online Exclusive products that Stampin’ Up! releases every other month—including March! My project started with the Hearts Gusseted Treat Bag and I dressed it up with the Filled with Sweetness bundle and Homemade Sweetness Designer Series Paper, which I’ve been featuring for a few weeks (scroll back through for ideas when you have the time).
This bag is generously sized (4″ x 6″ x 1-1/4″) and could hold a sweet treat like Strawberry Pretzels, a berry cute kitchen towel, or a Berry Burst Ink Pad and spool of matching Ribbon! It’s proof that packaging can be just as meaningful as what’s inside.
The Stampin’ Up!®️ release of new products every other month feels a bit like opening a fresh batch of inspiration on a regular rhythm. If you haven’t already, it’s worth making a habit of browsing those new supplies. You never know when you’ll find a hidden gem that sparks your next project—just like this bundle did for me.
As you hop along, may this inspire you to look at your basics in a new way: The shelf-life of these treat bags extends beyond February with a little love shared anytime during the year in a fresh & fruity way!
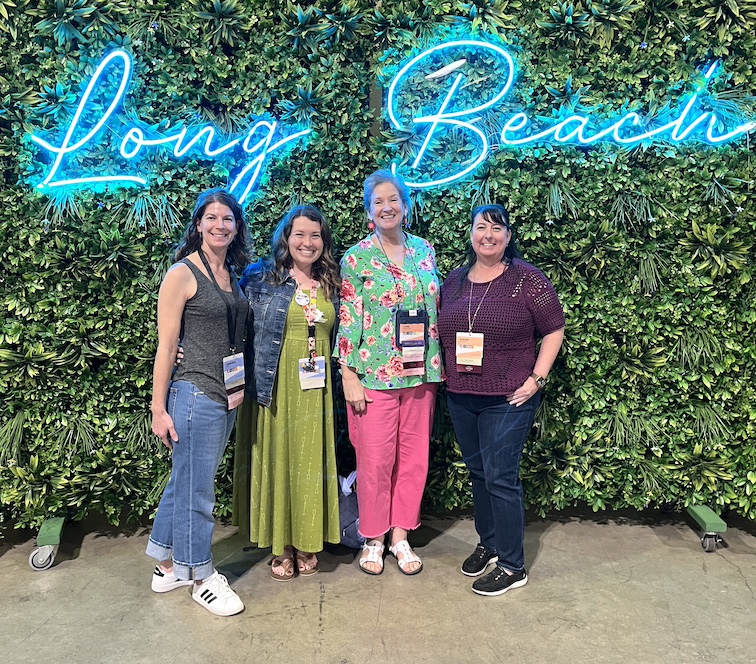
Here are the faces of a few of the New at SU! Design Team members from the U.S.A.~ L to R: Amanda (Did You Stamp Today?), Rachel (The Joy of Stampin’ with Rachel), Loni- ME! (Creative Juice by Loni) and Diane (24/7 Inkspiration). We met up at OnStage last week (Stampin’ Up!®️’s convention) to snap a quick photo to say Hi!
Keep hopping to see more Online Exclusive inspiration from those ladies and others… there’s plenty of sweetness ahead! 🍓✨
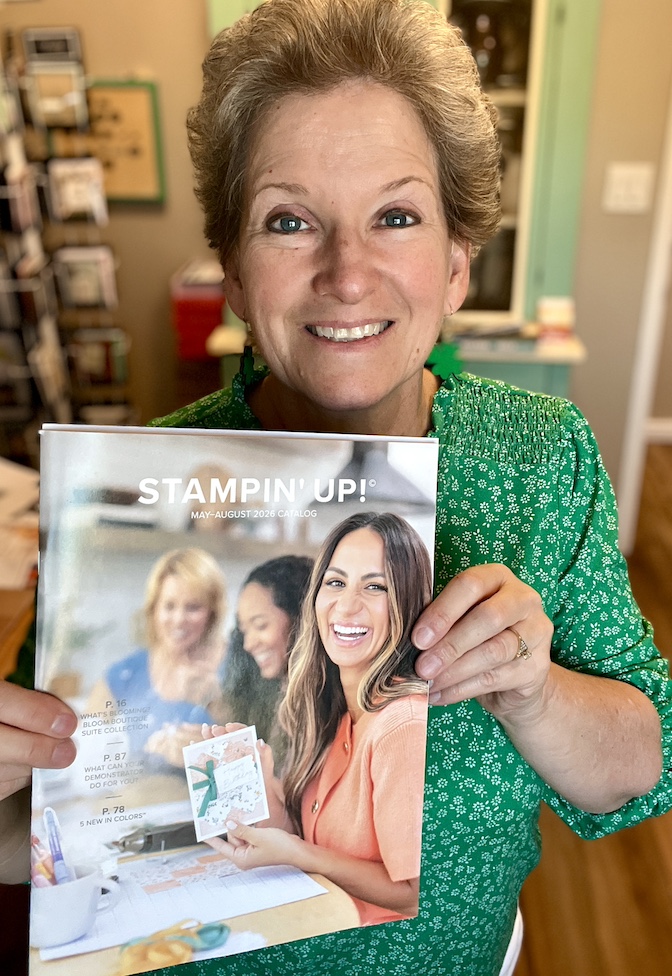
Stampin’ Up!®️ has been knocking our ONLINE EXCLUSIVE products OUT OF THE PARK, but we do still offer physical publications three times each year, and they make for wonderful reading material (and shopping lists)! My customers who have purchased recently will receive one of the new May-August catalogs in the mail, but if you don’t have a demonstrator serving you, send me a message with your mailing address and I’ll add you to the list!
Keep your creative juices flowing! 🍊🧡– Loni Spendlove
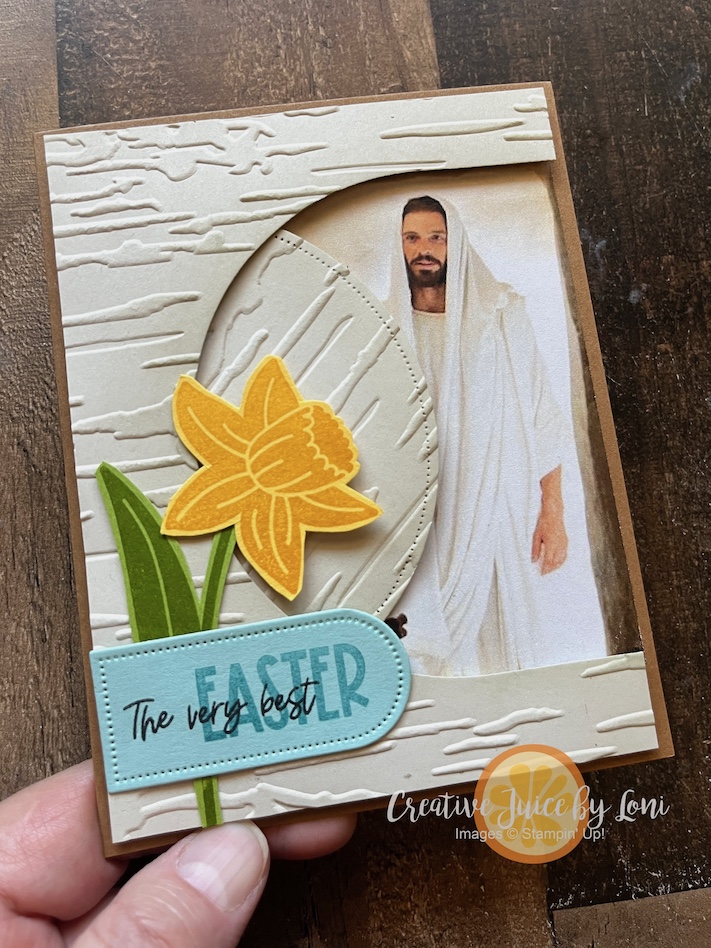
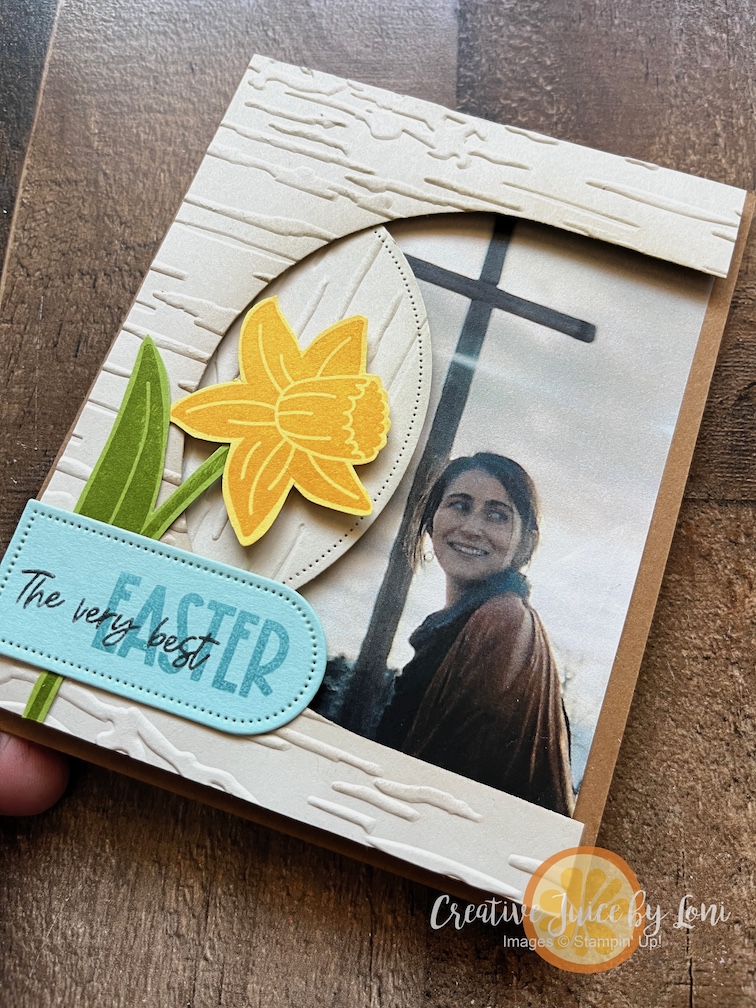
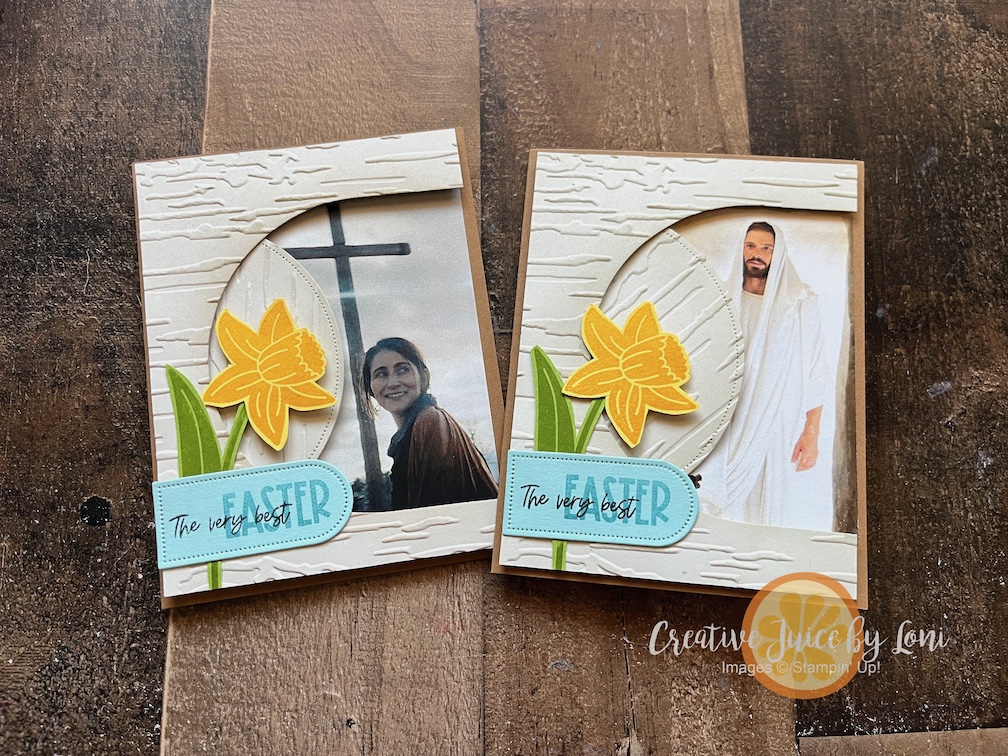
As we come to the end of our Reasons & Season week, I have one ultimate #celebrationcombination card for you, and it’s the VERY BEST REASON to celebrate: The Life, Atonement and Resurrection of the Savior of the World!
In my first-Monday-of-the-Month LIVE crafting video, I demonstrated this “Empty-Tomb” card which testifies of the greatest gift we have ever received:
I am grateful to combine more than just two stamp sets, but also my love of paper crafting with my testimony of Jesus Christ. Because of His life, sacrifice and resurrection, we can have HOPE for better things to come! We can repent of our sins and strive to become the person He wants each of us to be. Without Easter, there would be NO joy at Christmas!
For this card, you can use any picture that shows your gratitude for Christ’s atonement. This is the picture I printed depicting a risen Christ speaking to Mary which I used in the first card, but perhaps you have another illustration that strikes your heart-strings. Obviously, there were no cameras to mark this event most central to the history of all creation, but I appreciate those who attempt to capture the awe and reverence of the moment.
In this video, I share tips and tricks to make this card simple to prepare, stamp and assemble:
Thank you for visiting, for saving your favorite project of the past week (scroll through to see them all), and for supporting my Stampin’ Up!®️ business in many ways.
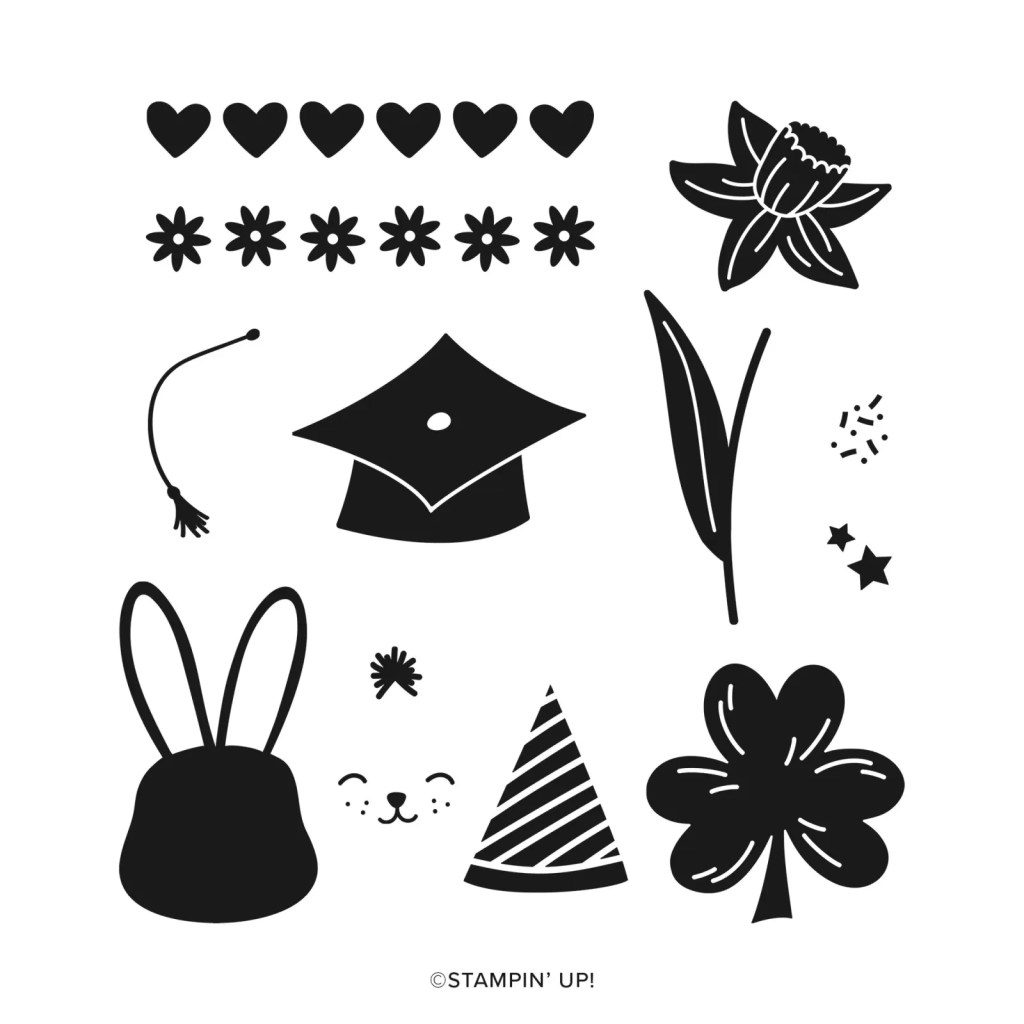
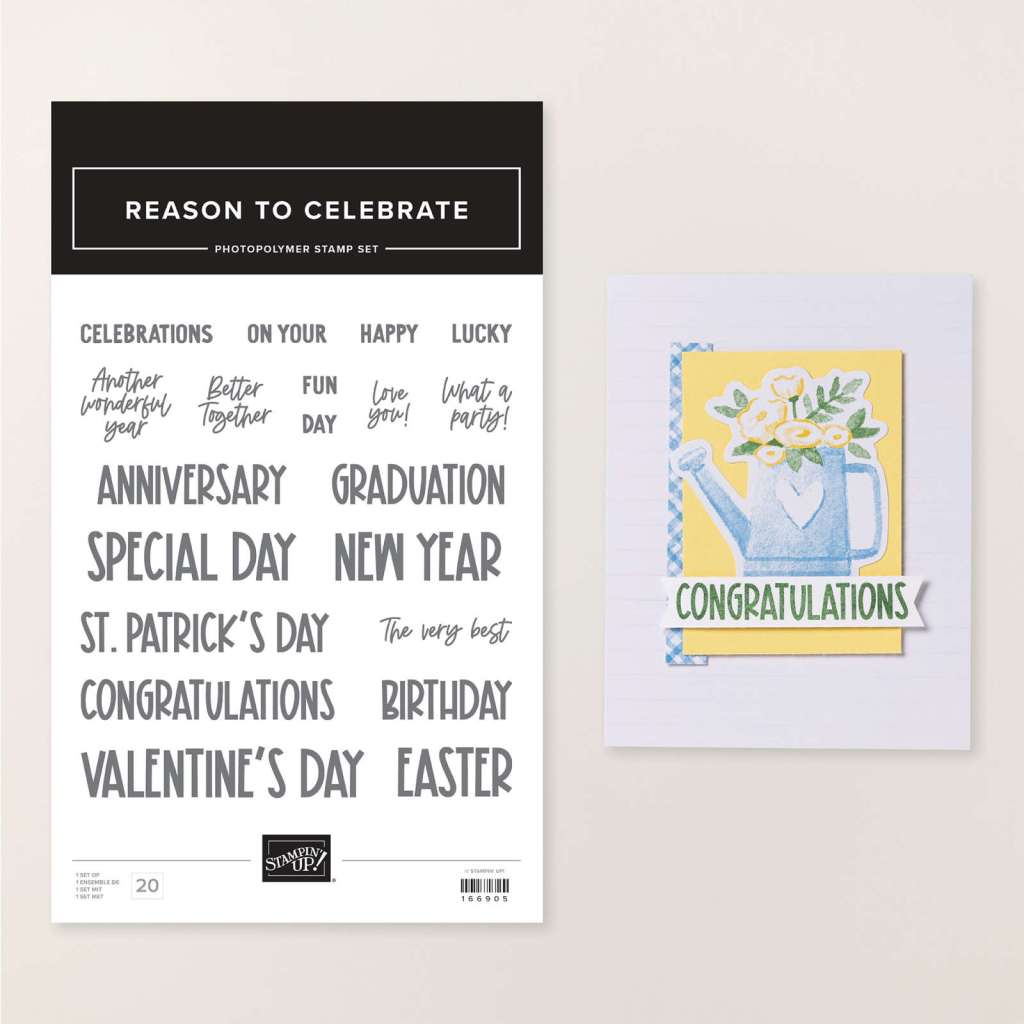
Day number 6 for our Reasons & Seasons #celebrationcombination week using the Stampin’ Up!®️ Reason to Celebrate and Seasonal Celebrations stamp sets, which were designed to stamp bold images with sensational sentiments together.
Reason To CelebrateSeasonal Celebrations
Some of these occasions which occur at the beginning of the year aren’t given the attention they deserve. For instance, have you ever thought of sending NEW YEAR cards instead of Christmas cards? While I haven’t shared a New Year card with this set here on my blog, my VIP Facebook Group did get to see the card I created for the turning of the year! When you make an order from my Stampin’ Store, you’ll be invited to join the VIP group, which gets EXTRA inspiration shared with them.
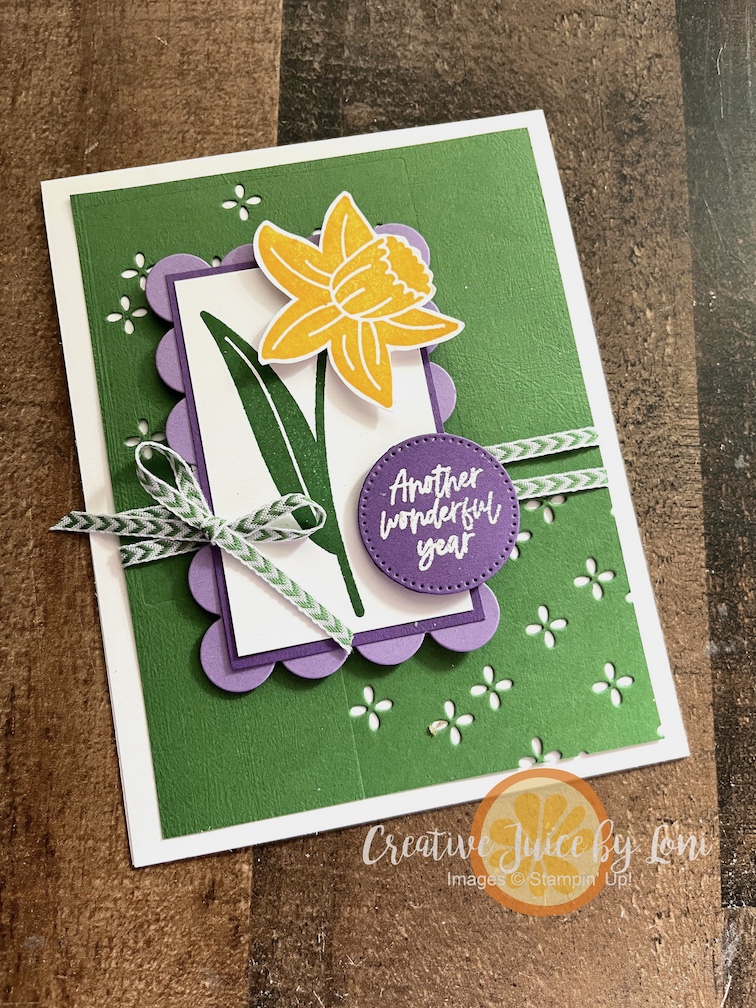
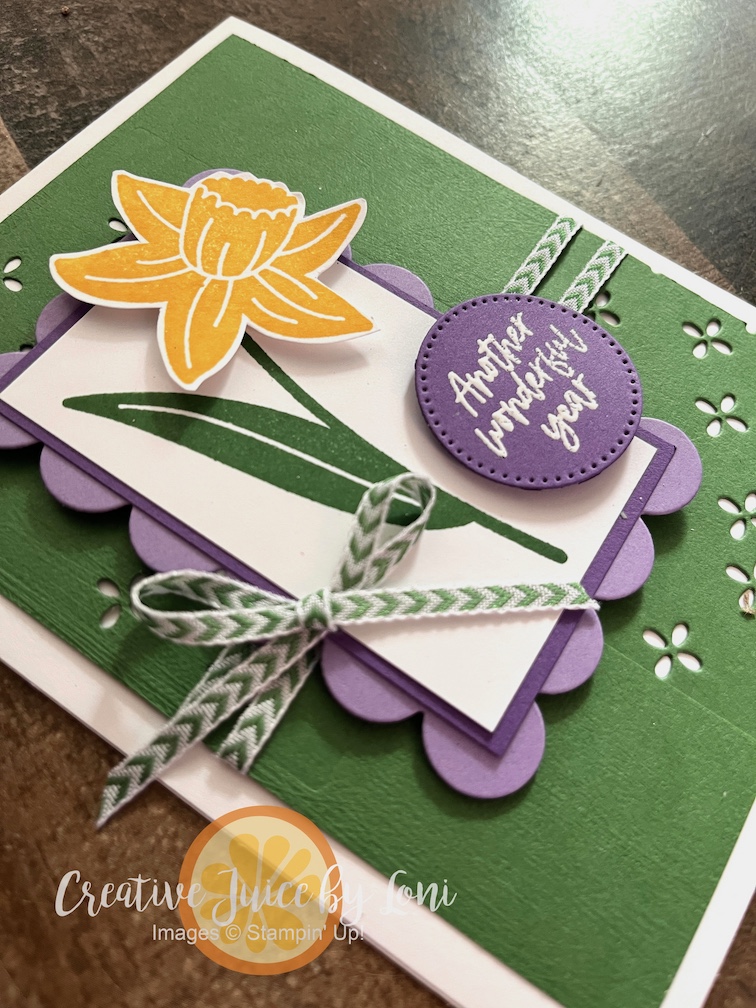
Let’s move on to the combination card, which could be for a birthday, and anniversary or any yearly celebration:
Yellow and Purple are complementary colors, so when I was considering what colors to pair with this daffodil, Highland Heather and Gorgeous Grape popped into mind!
Remember the die we used on the missing middle Special Day card earlier this week? It also makes a lovely scalloped edge for a focal point! I also grabbed the background die from the same Lovely Arrangement die set to create a peek-through background from the Garden Green layer.
TIP: The perfect size for the Gorgeous Grape rectangle inside the scallops is 3-1/8″ x 1-15/16″ and yes, that is an unusual measurement, but it perfectly layers over the circles! The Basic White layer is 3″ x 1-13/16″ (or one tick over 1-3/4″)
Adding a circle for the sentiment embossed in white mirrors the scallops and pulls the purple in one more time.
I’ve loved these bold stamps for striking images paired with celebratory sentiments, haven’t you? Because they are flat, there is no coloring required, though I’ve done a bit of fussy cutting, as there are no dies to coordinate with the images…but they are super easy to cut out!
Your comments fuel my creativity, so please pause and say hello!
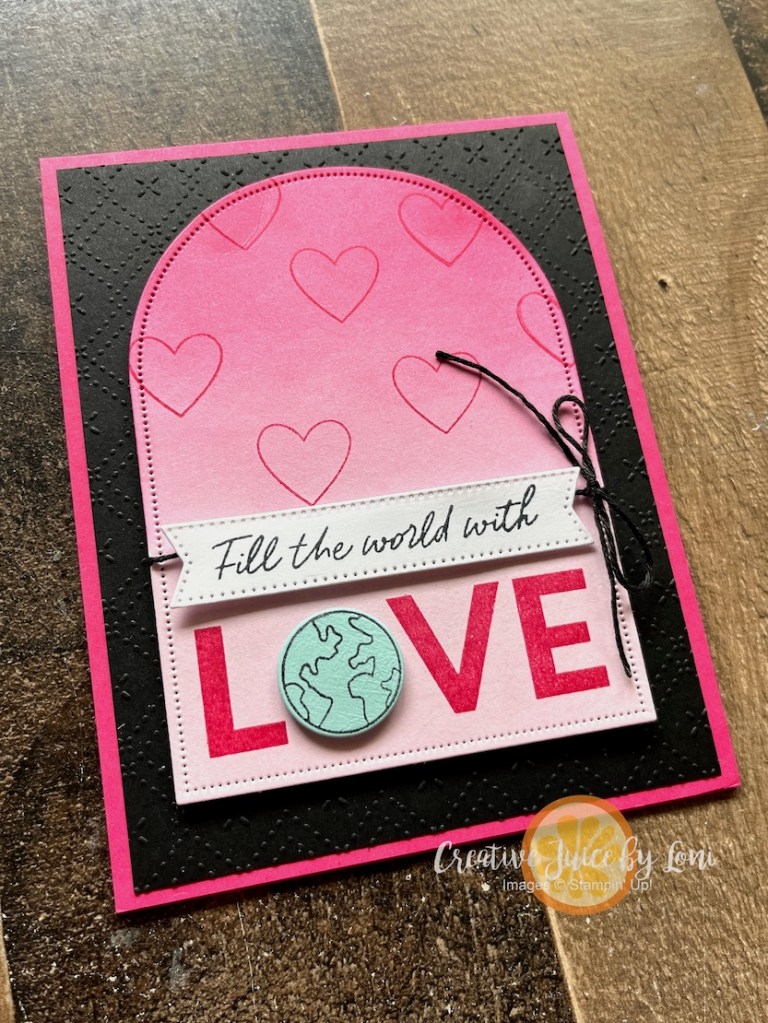
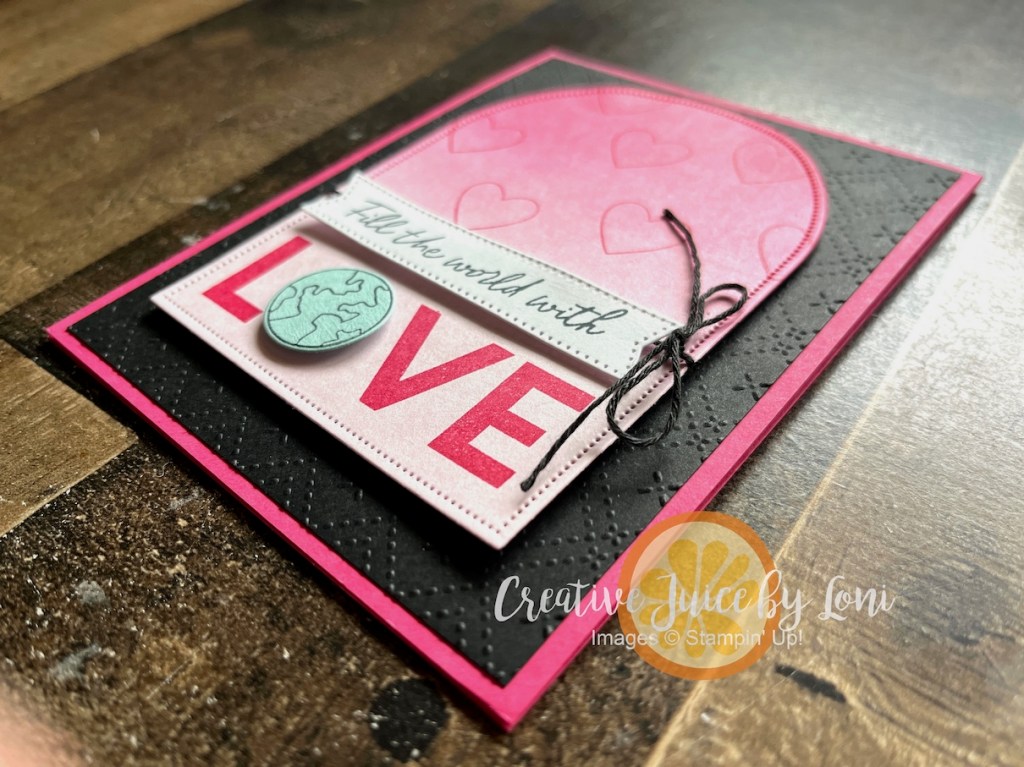
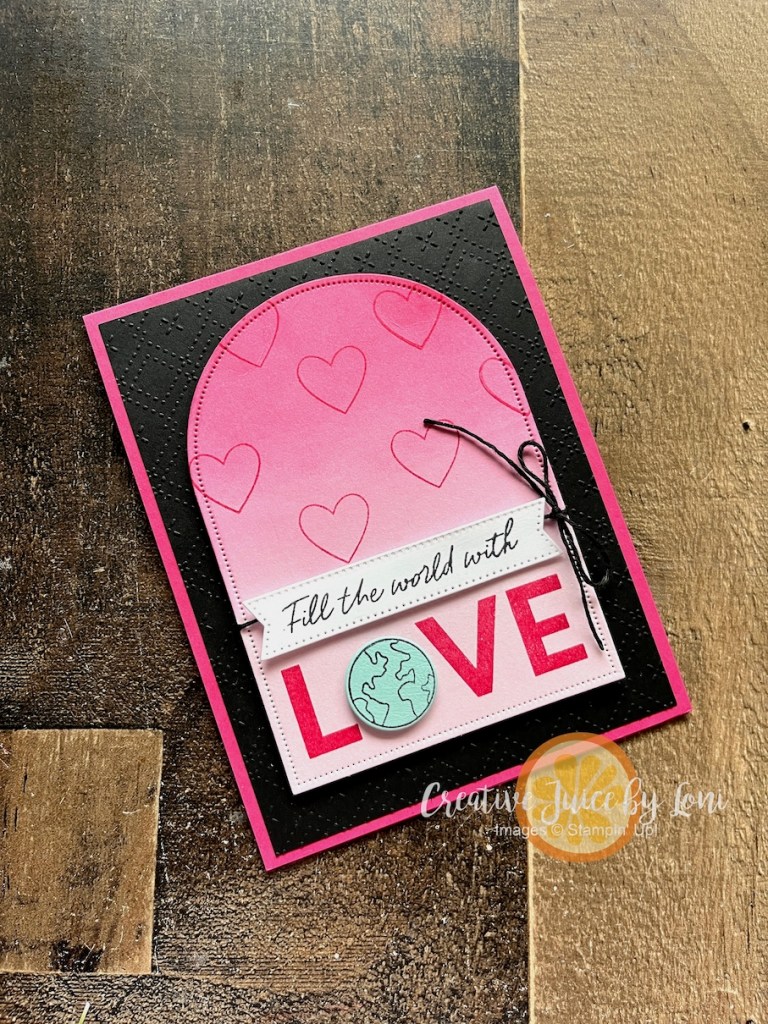
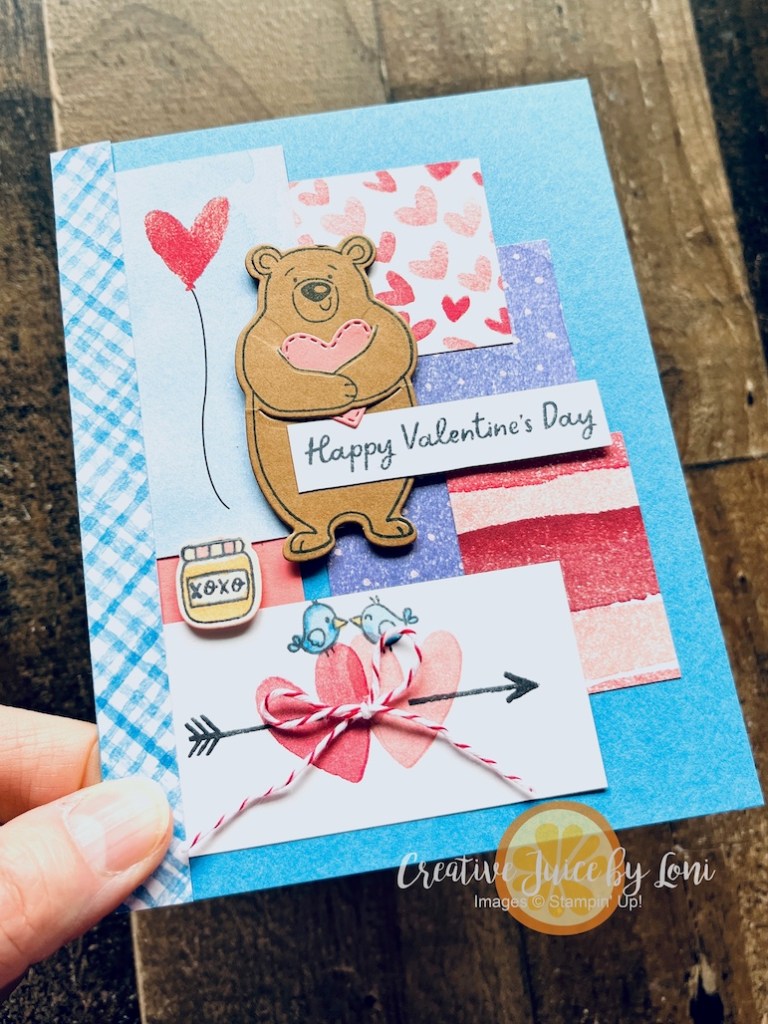
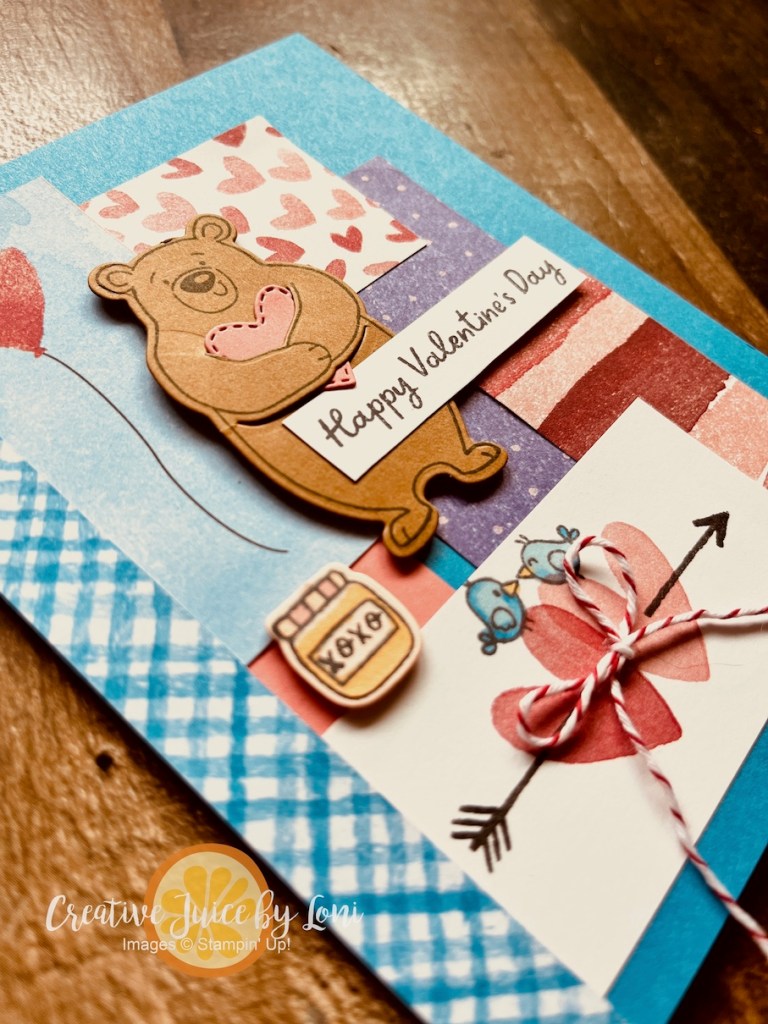
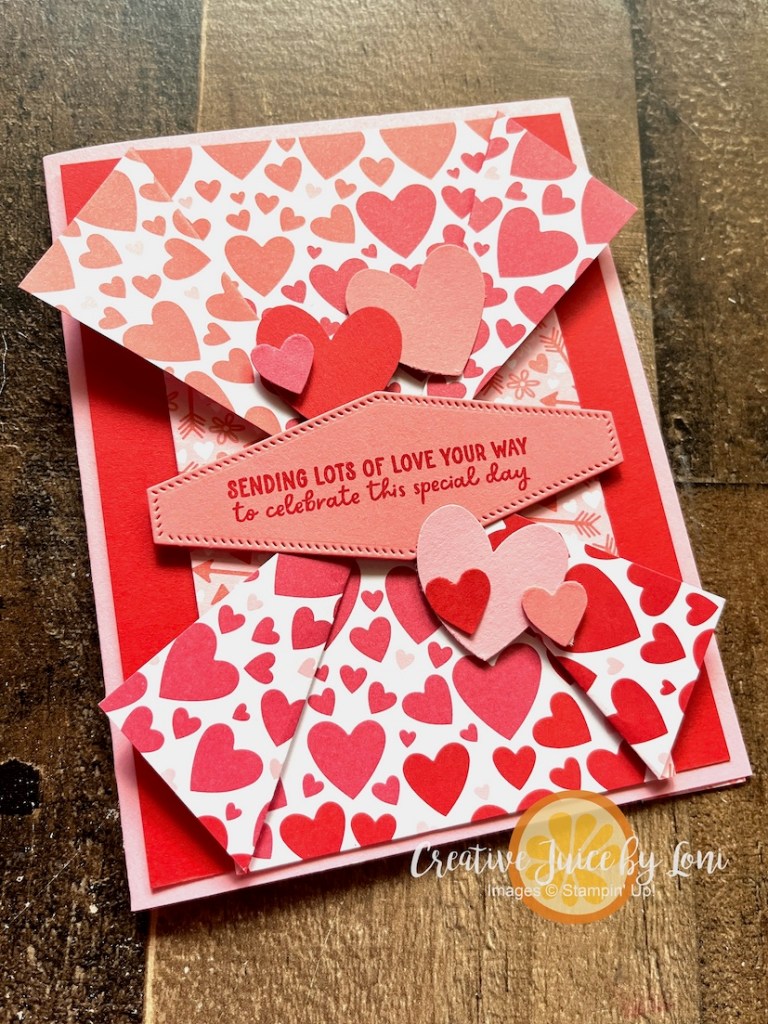
After making and mailing over 200 Valentine cards through the last two weeks, I had to pause and have a nap today! I thought I was done with the season of Love, then I saw the #tgifc563 color challenge from TGIF Challenges and the Sketch Challenge #gdp534 from Global Design Project, and knew there was one more to make.
Blending these two challenges with the Stampin’ Up!®️ Hope, Love & Joy bundle and here’s the result:
This card reminds me that a few simple layers of card stock and ink can be beautiful, and MORE THAN EVER, what the world needs is kindness, respect, charity, tolerance and LOVE.
I’ve watched as we’ve been (intentionally) polarized, and many dear friends jump on the bandwagon of one side or another before finding out where the wagon is heading. Often, what we believe is proven wrong when we have all the facts…or at least more nuanced, as life is. My choice is to flood the earth with as much GOODNESS as possible, one piece of art at a time, because that is what I have immediate control over.
Stepping off my soapbox and returning to stamping, I was pleasantly surprised at how embossing the black card stock added the subtle details needed for the background, and by using a blending brush to add Melon Mambo ink from the top of the arch fading downwards, it gives the feeling of love falling from heaven, when we love one another.
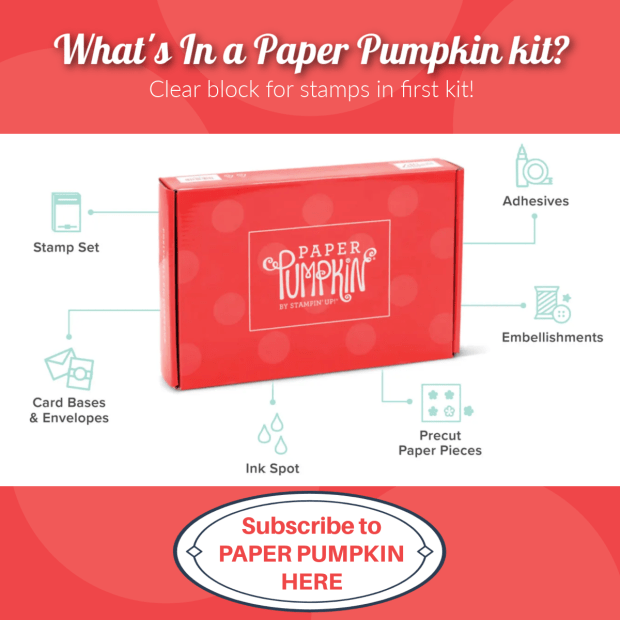
If you don’t know where to begin creating LOVEly things with stamps, ink and paper, may I suggest a monthly craft kit? Our Paper Pumpkin kit is a box that arrives each month with everything you need to make multiple projects! Pieces are pre-cut, adhesives & embellishments are included, and while the instructions are in the box, you can also watch a video on the Paper Pumpkin YouTube channel for each kit!
Long before die cut hearts and doilies, Valentine’s Day began as the feast of Saint Valentine, a priest martyred on February 14th for performing marriages for despite a ban by a Roman Emperor. By the Middle Ages, poets were already linking the date with romance, and lovers began exchanging handwritten notes and verses to mark the occasion. Early valentines were intimate, the declarations of affection carefully folded and sealed with wax.
By the 1800s, new printing techniques and affordable postage turned those private notes into something more playful and decorative. Elaborate lace trimmed cards, colorful illustrations and clever verses filled Victorian mailboxes. In America, Esther Howland helped popularize these printed valentines, transforming the tradition into the greeting card exchange we know today.
Something that hasn’t changed is the heart of the practice: Valentine cards focus on taking time to say “you are loved” with paper, ink and imagination.
This card, inspired by the #creativechallengesu January sketch, carries history forward in a fresh way. The soft layers of Stampin’ Up!®️ Love Notes Mix & Match 6″ x 6″ Designer Series Paper give it a collage charm (nod to the past), while the stamped elements from the Valentine Kisses bundle dish a dash of whimsy (embracing today).
You can play along, as well! Create a card inspired by this sketch and post it on your social media with the hashtag #creativechallengeSU during January 2026.
Paper changes and styles evolve, but the magic of sending love through a handmade card keeps fluttering along, like a blue bird of happiness winging a love letter to it’s intended 💌
Interested in a longer history of Valentine cards? Visit this excellent article by Rare Bird Antiques!
For supplies to create your own Valentine cards, thanks for shopping my Stampin’ Store ~I’ll mail a hand-stamped thanks!
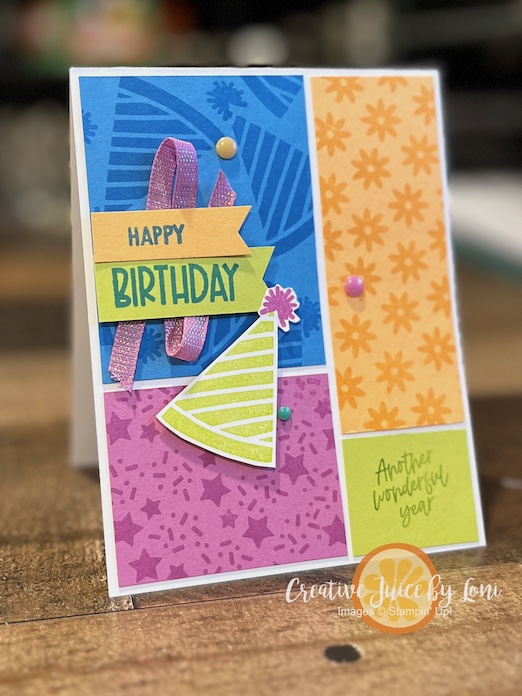
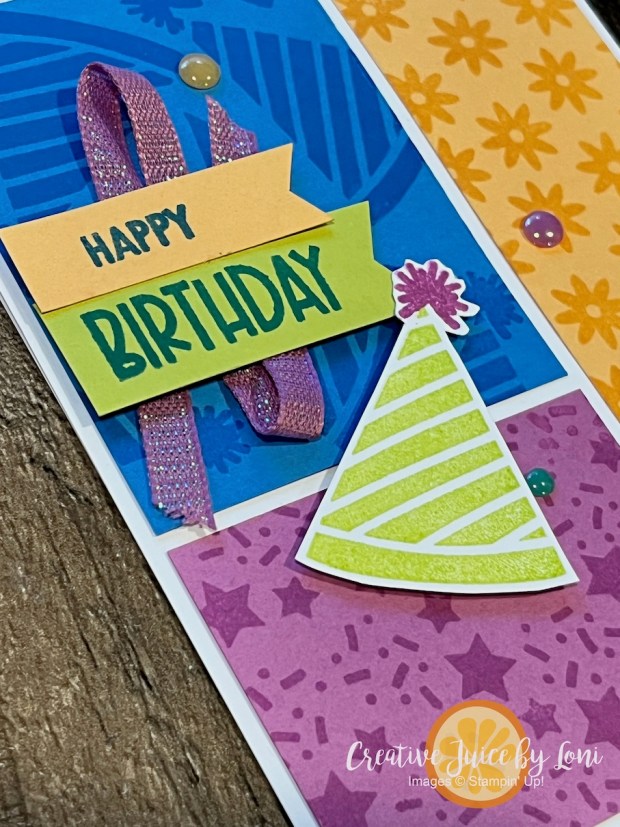
The beginning of a new year makes me want to clear a little creative space and ask a simple question: how do I want to show up for the people I love? For me, one of the easiest and most meaningful answers is birthdays. A handmade birthday card is a small thing, but it carries a reminder that someone was thought of before the day even arrived.
This bright, happy card was created by pairing the Reason to Celebrate stamp set from the new January–April Mini Catalog with Seasonal Celebrations from the January Online Exclusives, which serendipitously pair together perfectly (certainly it was good planning on the part of Stampin’ Up!®️). The bold greeting anchors the card with confidence, while the playful stamped party elements on blocks of color bring in movement, color, and a sense of joy. Together, they strike that sweet balance between cheerful and heartfelt, which is exactly what birthday cards should feel like.
Stampin’ Up! Reason to CelebrateStampin’ Up! Seasonal Celebrations
Beyond birthday celebrations, there are many ways to combine these bold images and fun fonts for many special occasions!
As the year unfolds, I’m prepared to remember the lives of people I love, not just with faceless texts, but with something tangible they can hold. A birthday card says, “You matter. I planned ahead. I made time.”
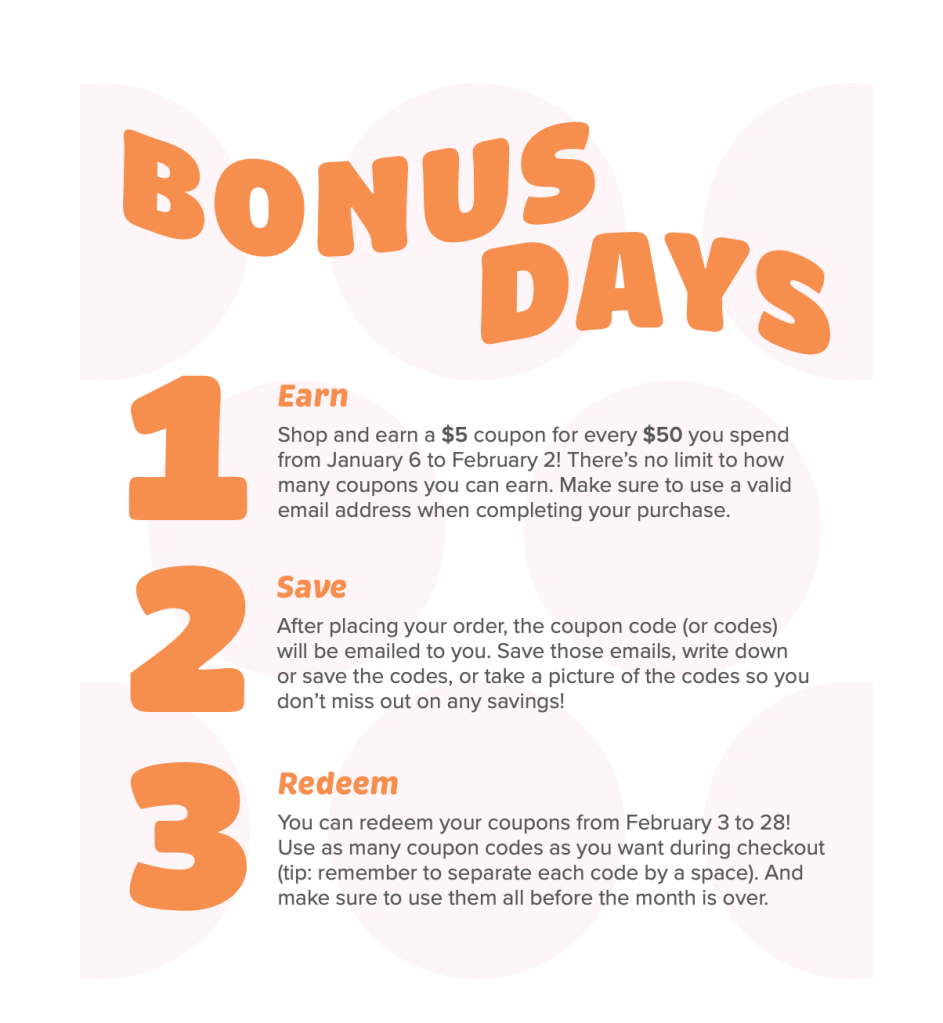
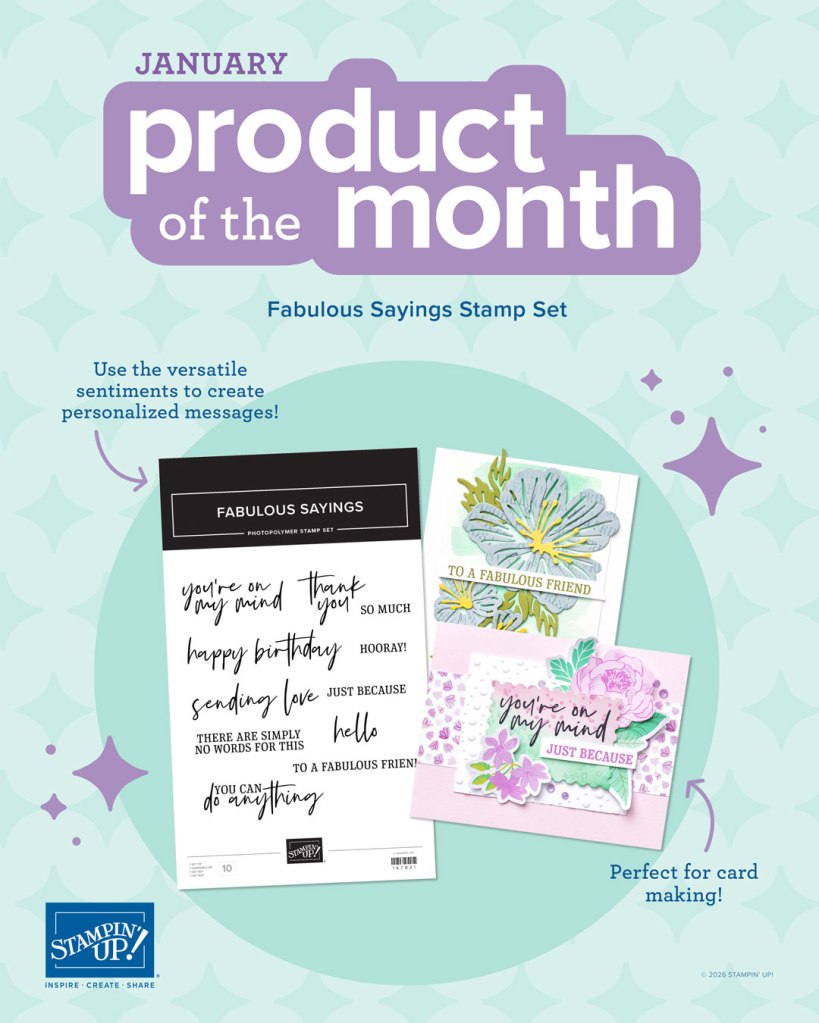
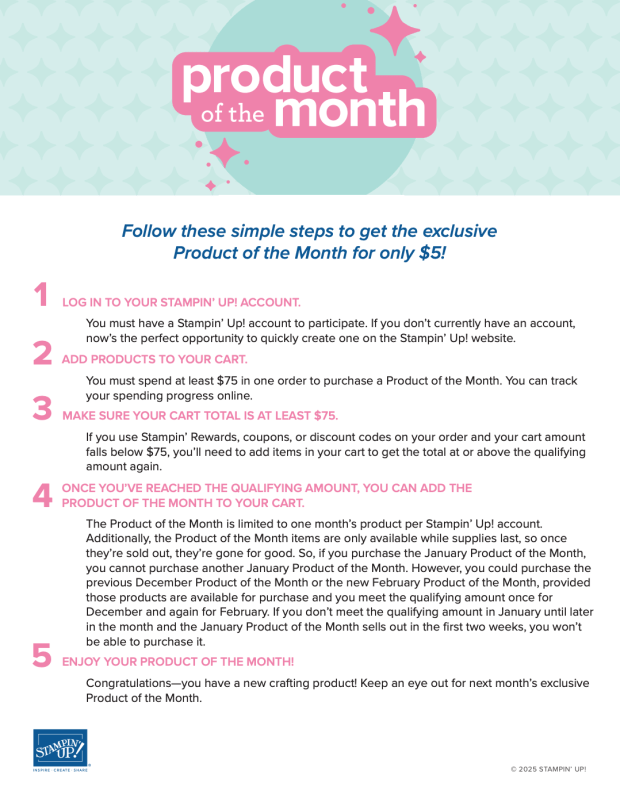
In addition to the opportunity to earn Bonus Days Coupons for every $50 spent between 1/6-2/2, a new Product of the Month has been added for January (while supplies last):
Here’s to a creative year ahead, to new stamps finding old favorites, and to celebrating birthdays, one handmade card at a time.
We card creators are constantly faced with a dilemma: Which side of this pretty paper should I use when both front and back designs are beautiful? The Wow Bow Fun Fold lets you use BOTH sides and is easily crafted from ONE PIECE of 6″ x 6″ Designer Series Paper:
This idea was adapted slightly from my friend Frances Martin of Frenchiestamps.com and you can see her versions HERE.
As I explain in the tutorial video, I like to pair bold designs with small patterns, and most of the time, Stampin’ Up! does the work for us by creating Designer Series Paper (DSP) that coordinates on front and back with contrasting colors and patterns. You can take your cue for the colors of your card from the DSP itself, as well. For my demonstration card (above) I chose a Fresh Freesia card base and Old Olive layer on the front, which matches the Lovely & Beautiful Designer Series Paper I used.
Two more versions: One showcasing the Made with Love DSP and the other featuring Cute as a Bug paper — tomorrow can’t come soon enough for you to collect all these patterns!
All of these papers will be included in the Paper & Ribbon Share, where you’ll receive a 6″ x 6″ piece of each paper arriving TOMORROW (Jan. 6, 2026) to play with! Don’t hesitate, the deadline for reserving your share is TODAY (Jan. 5, 2026). If there are any shares left over, they will be offered first-come-first-served at the Card Cafe Class in Hurricane, UT on January 15th.
The video will walk you through making this easy fancy fold card, and the measurements are below.
Card Measurements:
Card base 5.5″ x 8.5″ card stock
First layer 4″ x 5.25″ card stock
Designer Series Paper 6″ x 6″ – cut 3/4″ off bottom and score remaining piece at 1.5″ and 4.5″
Use 3/4″ strip INSIDE the card!
This final sample uses the Hobby Haven Designer Series Paper available now in my Stampin’ Store. It is NOT included in the Paper Share, but sure makes beautiful cards for folks with hobbies such as crafting, baking, houseplants (shown), sewing, self-care, etc. :
COMING TOMORROW, January 6th:
Customers may begin to order from January-April Mini Catalog and January Online Exclusives!
NEW Product of the Month drops!
NEW KITS available!
BONUS DAYS earning period begins: Earn $5 coupon for each $50 spent (in addition to collecting 10% back in Stampin’ Rewards!) to redeem between February 3-28, 2026!
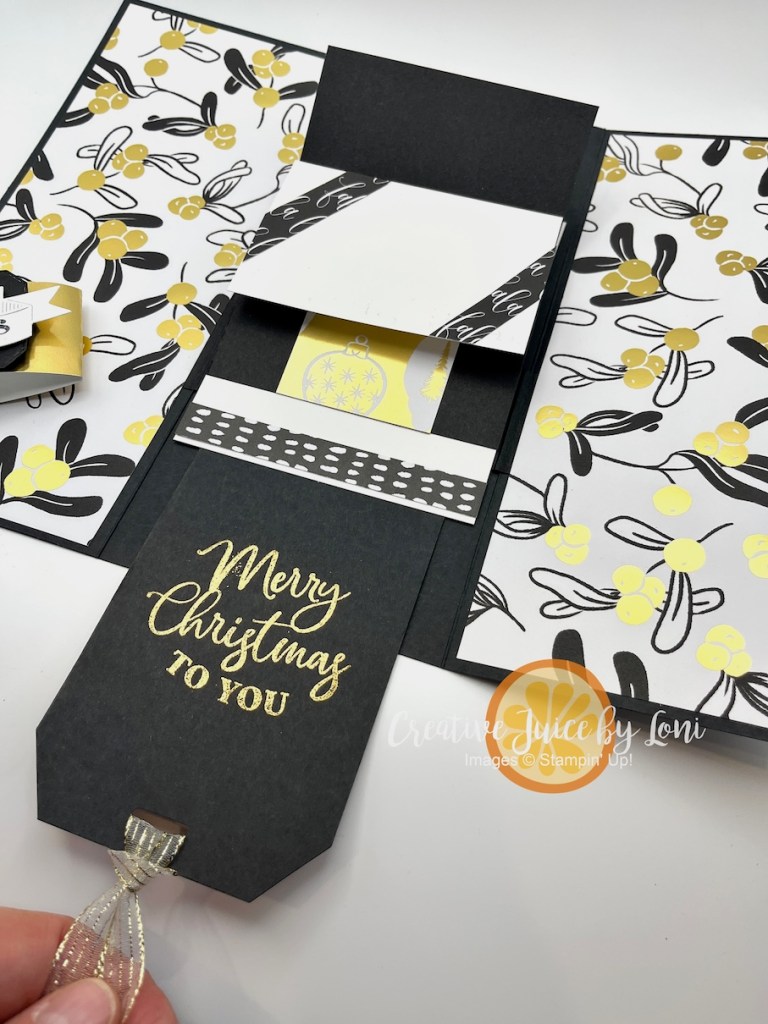
When my cousin Valarie asked if I could make a Gift Card Folio like one she had seen on a social media, I watched the video she shared and said ABSOLUTELY!
This is a larger version of a classic interactive card design called a “Waterfall Card”, and this one presents FIVE GIFT CARDS (or would be an excellent base for a mini photo album). After a few tries and tweaks, I was satisfied with the result – give this a try! You can follow along with the video instructions below 🖥️
I’ve used the Modern Christmas Designer Series Paper from Stampin’ Up!® to embellish this folio, though I show a few other versions made with the retired “Season of Green & Gold” DSP in the video. The black, white & gold is just so elegant, and of course, you can choose any colors/patterns/paper that fit your occasion.
TIP: Add gift cards to each of the five panels with mini glue dots, or use the panels and both sides of the folder for photos of a event to remember!
When you pull the tab, the “waterfall” begins to cascade, and a “secret message” appears:
Maximizing the use of materials was important to me, so this version uses a full sheet of 12″ x 12″ card stock (and a full sheet of 12″ x 12″ Designer Series Paper, if you cut it wisely), plus a few extra pieces. WATCH the tutorial to see HOW TO CUT the card stock!
Measurements:
11-7/8″ x 9″ Basic Black card stock, scored at 4″ and 8″
12″ x 3″ Basic Black card stock, scored at 1″, 2″, 3″, 4″ and 5″
6″ x 1-1/2″ Basic Black card stock, scored at 1″ and 4-7/8″
5 pieces of card stock 2-1/2″ x 3-3/4″
Designer Series Paper: TWO 8-3/4″ x 3-3/4″ and TWO 8-3/4″ x 3-5/8″
Gold Foil sheet: 1-1/2″ x 9-1/2″ for the belly band
Scraps of card stock for label, scraps of Designer Series Paper for embellishments inside.
Making paper crafting easy for you is my goal. What did you think about this tutorial? Please leave a comment and tell me what you’ll use this idea for (comments are found at the top of the post, next to the posting date).
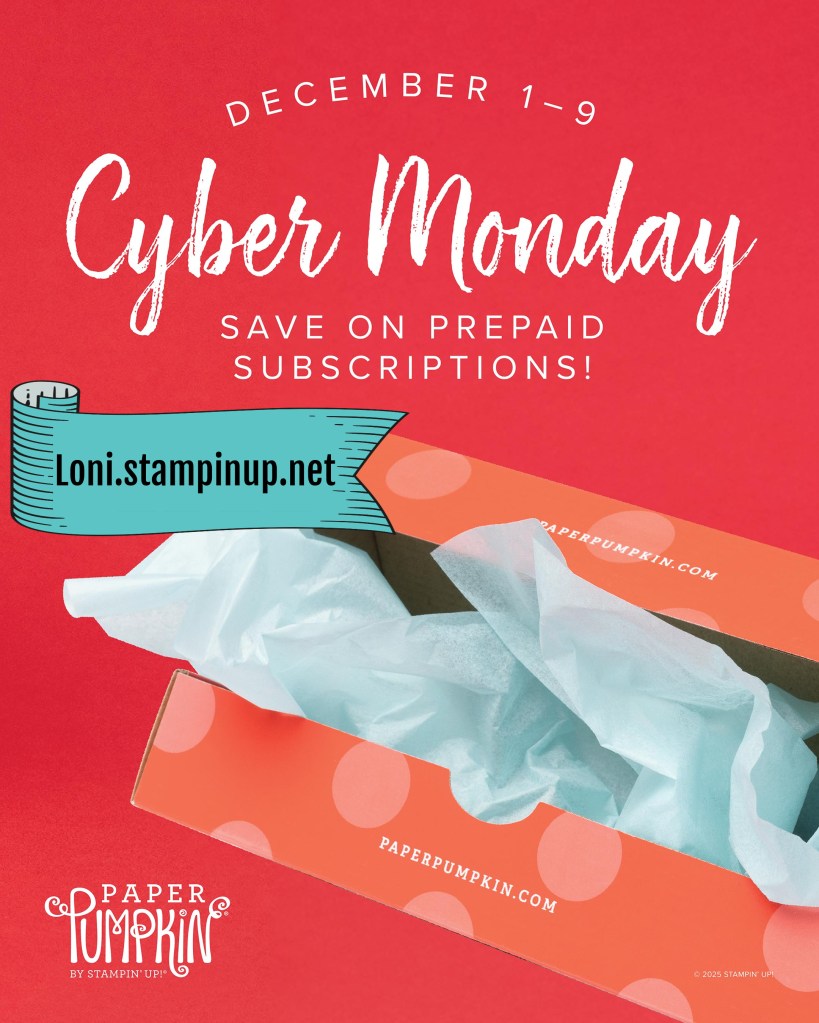
If you’ve been waiting for a good time to subscribe to the BEST MONTHLY CRAFT KIT, OR you need a unique and creative gift for a friend, this is your sign! From December 1-9, pre-paid Paper Pumpkin subscriptions are discounted as follows:
3-month prepaid: $61.00 (regular price $81.00)
6-month prepaid: $122.00 (regular price $162.00)
12-month prepaid: $244.00 (regular price $324.00)
This price includes shipping! Now, here’s the fine print:
* Subscriptions purchased during this promotion start immediately with the December Watercolor in Bloom Kit. This kit cannot be skipped.
* Do not purchase multiple subscriptions for the same recipient. The subscriptions will all start with the Watercolor in Bloom Kit, so the recipient will end up receiving duplicates of the same kit each month.
* If you are already a Paper Pumpkin monthly subscriber, this is a great opportunity to save on your upcoming kits!
* If you ALREADY HAVE a pre-paid subscription and wish to take advantage of the sale, go into your account and PAUSE your currrent December kit, unless you wish to have 2 of the same boxes shipped to you (the other would be a lovely gift to give!).
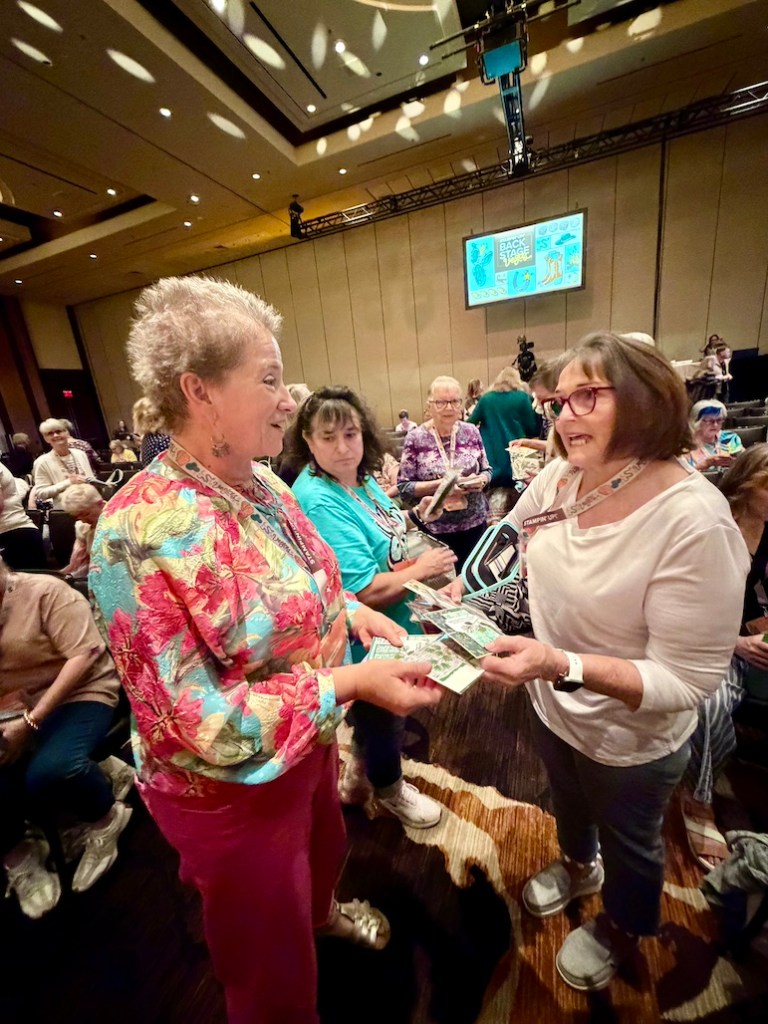
There are so many things I’ve learned while being a Stampin’ Up!® Demonstrator beyond rubber stamping: This marvelous company was the first to train me on Crucial Conversations (which I’ve invested in three times since then), leadership and time management skills, self-care, communication, and most recently I’ve returned from #StampinUpBackStage (our leadership conference) in Las Vegas, where we learned to connect more meaningfully with our creative communities. What a blessing to have the personal development opportunity to help me grow into the best version of myself, so I can serve YOU!
It was delightful to share my cards with others, and receive many lovely hand-stamped creations in return, so the las-minute midnight stamping session paid off!
While not a holiday card, it has the feel of the season, and would make an excellent birthday or wedding card for someone celebrating during the winter:
If you are here to learn card-making skills, I’d love to send you a THANK YOU card when you order supplies from my Stampin’ Store! Make sure you OPT IN for REWARDS (earn 10% of your purchase back to save or spend next time) AND OPT IN to allow me to contact you!
Ready to embark on your own Stampin’ Up! personal adventure as a demonstrator? You will be loved and cherished in the Sprinkled Ink team, my demonstrator family!


![Boardwalk Fun Photopolymer Stamp Set (English) [ 166822 ]](https://assets1.tamsnetwork.com/images/EC042017NF/166822s.jpg "Boardwalk Fun Photopolymer Stamp Set (English) [ 166822 ]")
![Beach Boardwalk 12" X 12" (30.5 X 30.5 Cm) Designer Series Paper [ 166820 ]](https://assets1.tamsnetwork.com/images/EC042017NF/166820s.jpg "Beach Boardwalk 12\" X 12\" (30.5 X 30.5 Cm) Designer Series Paper [ 166820 ]")
![Secret Sea 8 1/2" X 11" Cardstock [ 165624 ]](https://assets1.tamsnetwork.com/images/EC042017NF/165624s.jpg "Secret Sea 8 1/2\" X 11\" Cardstock [ 165624 ]")
![2024 2026 In Color™ Flat Pearls [ 165266 ]](https://assets1.tamsnetwork.com/images/EC042017NF/165266s.jpg "2024 2026 In Color™ Flat Pearls [ 165266 ]")
![Secret Sea 3/8" (1 Cm) Bordered Open Weave Ribbon [ 166932 ]](https://assets1.tamsnetwork.com/images/EC042017NF/166932s.jpg "Secret Sea 3/8\" (1 Cm) Bordered Open Weave Ribbon [ 166932 ]")
![Garden Green Classic Stampin' Pad [ 147089 ]](https://assets1.tamsnetwork.com/images/EC042017NF/147089s.jpg "Garden Green Classic Stampin' Pad [ 147089 ]")
![Fresh Freesia Classic Stampin' Pad [ 155611 ]](https://assets1.tamsnetwork.com/images/EC042017NF/155611s.jpg "Fresh Freesia Classic Stampin' Pad [ 155611 ]")
![Lost Lagoon Classic Stampin' Pad [ 161678 ]](https://assets1.tamsnetwork.com/images/EC042017NF/161678s.jpg "Lost Lagoon Classic Stampin' Pad [ 161678 ]")
![Pretty Peacock Classic Stampin’ Pad [ 150083 ]](https://assets1.tamsnetwork.com/images/EC042017NF/150083s.jpg "Pretty Peacock Classic Stampin’ Pad [ 150083 ]")
![Stampin' Seal [ 152813 ]](https://assets1.tamsnetwork.com/images/EC042017NF/152813s.jpg "Stampin' Seal [ 152813 ]")
![Stampin' Dimensionals [ 104430 ]](https://assets1.tamsnetwork.com/images/EC042017NF/104430s.jpg "Stampin' Dimensionals [ 104430 ]")


![Filled With Sweetness Bundle (English) [ 167475 ]](https://assets1.tamsnetwork.com/images/EC042017NF/167475s.jpg "Filled With Sweetness Bundle (English) [ 167475 ]")
![Homemade Sweetness 12" X 12" (30.5 X 30.5 Cm) Designer Series Paper [ 167467 ]](https://assets1.tamsnetwork.com/images/EC042017NF/167467s.jpg "Homemade Sweetness 12\" X 12\" (30.5 X 30.5 Cm) Designer Series Paper [ 167467 ]")
![Misty Moonlight 8-1/2" X 11" Cardstock [ 153081 ]](https://assets1.tamsnetwork.com/images/EC042017NF/153081s.jpg "Misty Moonlight 8-1/2\" X 11\" Cardstock [ 153081 ]")
![Real Red 8-1/2" X 11" Cardstock [ 102482 ]](https://assets1.tamsnetwork.com/images/EC042017NF/102482s.jpg "Real Red 8-1/2\" X 11\" Cardstock [ 102482 ]")
![Basic White 8 1/2" X 11" Cardstock [ 166780 ]](https://assets1.tamsnetwork.com/images/EC042017NF/166780s.jpg "Basic White 8 1/2\" X 11\" Cardstock [ 166780 ]")
![Branching Out Dies [ 165775 ]](https://assets1.tamsnetwork.com/images/EC042017NF/165775s.jpg "Branching Out Dies [ 165775 ]")
![Tuxedo Black Memento Ink Pad [ 132708 ]](https://assets1.tamsnetwork.com/images/EC042017NF/132708s.jpg "Tuxedo Black Memento Ink Pad [ 132708 ]")
![Blueberry Bushel Stampin’ Blends Combo Pack [ 161679 ]](https://assets1.tamsnetwork.com/images/EC042017NF/161679s.jpg "Blueberry Bushel Stampin’ Blends Combo Pack [ 161679 ]")
![Uninked Stampin’ Craft Pad & Whisper White Refill [ 147277 ]](https://assets1.tamsnetwork.com/images/EC042017NF/147277s.jpg "Uninked Stampin’ Craft Pad & Whisper White Refill [ 147277 ]")
![Basics Wow! Embossing Powder [ 165679 ]](https://assets1.tamsnetwork.com/images/EC042017NF/165679s.jpg "Basics Wow! Embossing Powder [ 165679 ]")
![Heat Tool (Us And Canada) [ 129053 ]](https://assets1.tamsnetwork.com/images/EC042017NF/129053s.jpg "Heat Tool (Us And Canada) [ 129053 ]")
![Stampin' Cut & Emboss Machine [ 149653 ]](https://assets1.tamsnetwork.com/images/EC042017NF/149653s.jpg "Stampin' Cut & Emboss Machine [ 149653 ]")
![Multipurpose Liquid Glue [ 110755 ]](https://assets1.tamsnetwork.com/images/EC042017NF/110755s.jpg "Multipurpose Liquid Glue [ 110755 ]")

![Seasonal Celebrations Photopolymer Stamp Set [ 167225 ]](https://assets1.tamsnetwork.com/images/EC042017NF/167225s.jpg "Seasonal Celebrations Photopolymer Stamp Set [ 167225 ]")
![Reason To Celebrate Photopolymer Stamp Set (English) [ 166905 ]](https://assets1.tamsnetwork.com/images/EC042017NF/166905s.jpg "Reason To Celebrate Photopolymer Stamp Set (English) [ 166905 ]")
![Basic Beige 8 1/2" X 11" Cardstock [ 164511 ]](https://assets1.tamsnetwork.com/images/EC042017NF/164511s.jpg "Basic Beige 8 1/2\" X 11\" Cardstock [ 164511 ]")
![Pecan Pie 8 1/2" X 11" Cardstock [ 161717 ]](https://assets1.tamsnetwork.com/images/EC042017NF/161717s.jpg "Pecan Pie 8 1/2\" X 11\" Cardstock [ 161717 ]")
![Pool Party 8-1/2" X 11" Cardstock [ 122924 ]](https://assets1.tamsnetwork.com/images/EC042017NF/122924s.jpg "Pool Party 8-1/2\" X 11\" Cardstock [ 122924 ]")
![Daffodil Delight 8-1/2" X 11" Cardstock [ 119683 ]](https://assets1.tamsnetwork.com/images/EC042017NF/119683s.jpg "Daffodil Delight 8-1/2\" X 11\" Cardstock [ 119683 ]")
![Granny Apple Green 8-1/2" X 11" Cardstock [ 146990 ]](https://assets1.tamsnetwork.com/images/EC042017NF/146990s.jpg "Granny Apple Green 8-1/2\" X 11\" Cardstock [ 146990 ]")
![Basic Beige Classic Stampin Pad [ 163806 ]](https://assets1.tamsnetwork.com/images/EC042017NF/163806s.jpg "Basic Beige Classic Stampin Pad [ 163806 ]")
![Daffodil Delight Classic Stampin' Pad [ 147094 ]](https://assets1.tamsnetwork.com/images/EC042017NF/147094s.jpg "Daffodil Delight Classic Stampin' Pad [ 147094 ]")
![Granny Apple Green Stampin' Pad [ 147095 ]](https://assets1.tamsnetwork.com/images/EC042017NF/147095s.jpg "Granny Apple Green Stampin' Pad [ 147095 ]")
![Pool Party Classic Stampin' Pad [ 147107 ]](https://assets1.tamsnetwork.com/images/EC042017NF/147107s.jpg "Pool Party Classic Stampin' Pad [ 147107 ]")
![Blending Brushes [ 153611 ]](https://assets1.tamsnetwork.com/images/EC042017NF/153611s.jpg "Blending Brushes [ 153611 ]")
![Everyday Arches Dies [ 164629 ]](https://assets1.tamsnetwork.com/images/EC042017NF/164629s.jpg "Everyday Arches Dies [ 164629 ]")
![Birch Wood 3 D Embossing Folder [ 164069 ]](https://assets1.tamsnetwork.com/images/EC042017NF/164069s.jpg "Birch Wood 3 D Embossing Folder [ 164069 ]")


![Lovely Arrangements Dies [ 167175 ]](https://assets1.tamsnetwork.com/images/EC042017NF/167175s.jpg "Lovely Arrangements Dies [ 167175 ]")
![Stylish Shapes Dies [ 159183 ]](https://assets1.tamsnetwork.com/images/EC042017NF/159183s.jpg "Stylish Shapes Dies [ 159183 ]")
![Basic White 12" X 12" (30.5 X 30.5 Cm) Thick Cardstock [ 166782 ]](https://assets1.tamsnetwork.com/images/EC042017NF/166782s.jpg "Basic White 12\" X 12\" (30.5 X 30.5 Cm) Thick Cardstock [ 166782 ]")
![Garden Green 8-1/2" X 11" Cardstock [ 102584 ]](https://assets1.tamsnetwork.com/images/EC042017NF/102584s.jpg "Garden Green 8-1/2\" X 11\" Cardstock [ 102584 ]")
![Highland Heather 8-1/2" X 11" Cardstock [ 146986 ]](https://assets1.tamsnetwork.com/images/EC042017NF/146986s.jpg "Highland Heather 8-1/2\" X 11\" Cardstock [ 146986 ]")
![Gorgeous Grape 8-1/2" X 11" Cardstock [ 146987 ]](https://assets1.tamsnetwork.com/images/EC042017NF/146987s.jpg "Gorgeous Grape 8-1/2\" X 11\" Cardstock [ 146987 ]")
![Garden Green 1/8" (3.2 Mm) Chevron Ribbon [ 167212 ]](https://assets1.tamsnetwork.com/images/EC042017NF/167212s.jpg "Garden Green 1/8\" (3.2 Mm) Chevron Ribbon [ 167212 ]")
![Mini Glue Dots [ 103683 ]](https://assets1.tamsnetwork.com/images/EC042017NF/103683s.jpg "Mini Glue Dots [ 103683 ]")


![Hope Love & Joy Bundle (English) [ 166858 ]](https://assets1.tamsnetwork.com/images/EC042017NF/166858s.jpg "Hope Love & Joy Bundle (English) [ 166858 ]")
![Melon Mambo 8-1/2" X 11" Cardstock [ 115320 ]](https://assets1.tamsnetwork.com/images/EC042017NF/115320s.jpg "Melon Mambo 8-1/2\" X 11\" Cardstock [ 115320 ]")
![Bubble Bath 8 1/2" X 11" Cardstock [ 161718 ]](https://assets1.tamsnetwork.com/images/EC042017NF/161718s.jpg "Bubble Bath 8 1/2\" X 11\" Cardstock [ 161718 ]")
![Beautiful Pattern 3 D Embossing Folder [ 167097 ]](https://assets1.tamsnetwork.com/images/EC042017NF/167097s.jpg "Beautiful Pattern 3 D Embossing Folder [ 167097 ]")
![Melon Mambo Classic Stampin' Pad [ 147051 ]](https://assets1.tamsnetwork.com/images/EC042017NF/147051s.jpg "Melon Mambo Classic Stampin' Pad [ 147051 ]")
![Baker's Twine Essentials Pack [ 155475 ]](https://assets1.tamsnetwork.com/images/EC042017NF/155475s.jpg "Baker's Twine Essentials Pack [ 155475 ]")
![Black Stampin' Dimensionals Combo Pack [ 150893 ]](https://assets1.tamsnetwork.com/images/EC042017NF/150893s.jpg "Black Stampin' Dimensionals Combo Pack [ 150893 ]")


![Valentine Kisses Bundle (English) [ 167310 ]](https://assets1.tamsnetwork.com/images/EC042017NF/167310s.jpg "Valentine Kisses Bundle (English) [ 167310 ]")
![Love Notes 6" X 6" (15.2 X 15.2 Cm) Mix & Match Designer Series Paper [ 166985 ]](https://assets1.tamsnetwork.com/images/EC042017NF/166985s.jpg "Love Notes 6\" X 6\" (15.2 X 15.2 Cm) Mix & Match Designer Series Paper [ 166985 ]")
![Azure Afternoon 8 1/2" X 11" Cardstock [ 161719 ]](https://assets1.tamsnetwork.com/images/EC042017NF/161719s.jpg "Azure Afternoon 8 1/2\" X 11\" Cardstock [ 161719 ]")
![Flirty Flamingo 8-1/2" X 11" Cardstock [ 141416 ]](https://assets1.tamsnetwork.com/images/EC042017NF/141416s.jpg "Flirty Flamingo 8-1/2\" X 11\" Cardstock [ 141416 ]")
![Mini Stampin' Cut & Emboss Machine [ 150673 ]](https://assets1.tamsnetwork.com/images/EC042017NF/150673s.jpg "Mini Stampin' Cut & Emboss Machine [ 150673 ]")
![Real Red & White Baker's Twine [ 164051 ]](https://assets1.tamsnetwork.com/images/EC042017NF/164051s.jpg "Real Red & White Baker's Twine [ 164051 ]")


![Peach Pie 8 1/2" X 11" Cardstock [ 163799 ]](https://assets1.tamsnetwork.com/images/EC042017NF/163799s.jpg "Peach Pie 8 1/2\" X 11\" Cardstock [ 163799 ]")
![Petunia Pop 8 1/2" X 11" Cardstock [ 163801 ]](https://assets1.tamsnetwork.com/images/EC042017NF/163801s.jpg "Petunia Pop 8 1/2\" X 11\" Cardstock [ 163801 ]")
![Lemon Lime Twist 8-1/2" X 11" Cardstock [ 144245 ]](https://assets1.tamsnetwork.com/images/EC042017NF/144245s.jpg "Lemon Lime Twist 8-1/2\" X 11\" Cardstock [ 144245 ]")
![Peach Pie Classic Stampin Pad [ 163810 ]](https://assets1.tamsnetwork.com/images/EC042017NF/163810s.jpg "Peach Pie Classic Stampin Pad [ 163810 ]")
![Azure Afternoon Classic Stampin' Pad [ 161663 ]](https://assets1.tamsnetwork.com/images/EC042017NF/161663s.jpg "Azure Afternoon Classic Stampin' Pad [ 161663 ]")
![Petunia Pop Classic Stampin Pad [ 163811 ]](https://assets1.tamsnetwork.com/images/EC042017NF/163811s.jpg "Petunia Pop Classic Stampin Pad [ 163811 ]")
![Petunia Pop 1/4" (6.4 Mm) Iridescent Ribbon [ 166203 ]](https://assets1.tamsnetwork.com/images/EC042017NF/166203s.jpg "Petunia Pop 1/4\" (6.4 Mm) Iridescent Ribbon [ 166203 ]")


![Traditional Labels Bundle (English) [ 165865 ]](https://assets1.tamsnetwork.com/images/EC042017NF/165865s.jpg "Traditional Labels Bundle (English) [ 165865 ]")
![Basic Black 12" X 12" (30.5 X 30.5 Cm) Cardstock [ 166786 ]](https://assets1.tamsnetwork.com/images/EC042017NF/166786s.jpg "Basic Black 12\" X 12\" (30.5 X 30.5 Cm) Cardstock [ 166786 ]")
![Modern Christmas 12" X 12" (30.5 X 30.5 Cm) Specialty Designer Series Paper [ 165990 ]](https://assets1.tamsnetwork.com/images/EC042017NF/165990s.jpg "Modern Christmas 12\" X 12\" (30.5 X 30.5 Cm) Specialty Designer Series Paper [ 165990 ]")
![Gold Foil Sheets [ 132622 ]](https://assets1.tamsnetwork.com/images/EC042017NF/132622s.jpg "Gold Foil Sheets [ 132622 ]")
![Gold Striped 3/8" (1 Cm) Mesh Ribbon [ 165599 ]](https://assets1.tamsnetwork.com/images/EC042017NF/165599s.jpg "Gold Striped 3/8\" (1 Cm) Mesh Ribbon [ 165599 ]")
![Hole Punch Assortment [ 165409 ]](https://assets1.tamsnetwork.com/images/EC042017NF/165409s.jpg "Hole Punch Assortment [ 165409 ]")
![Paper Trimmer [ 152392 ]](https://assets1.tamsnetwork.com/images/EC042017NF/152392s.jpg "Paper Trimmer [ 152392 ]")
![Tear & Tape Adhesive [ 154031 ]](https://assets1.tamsnetwork.com/images/EC042017NF/154031s.jpg "Tear & Tape Adhesive [ 154031 ]")


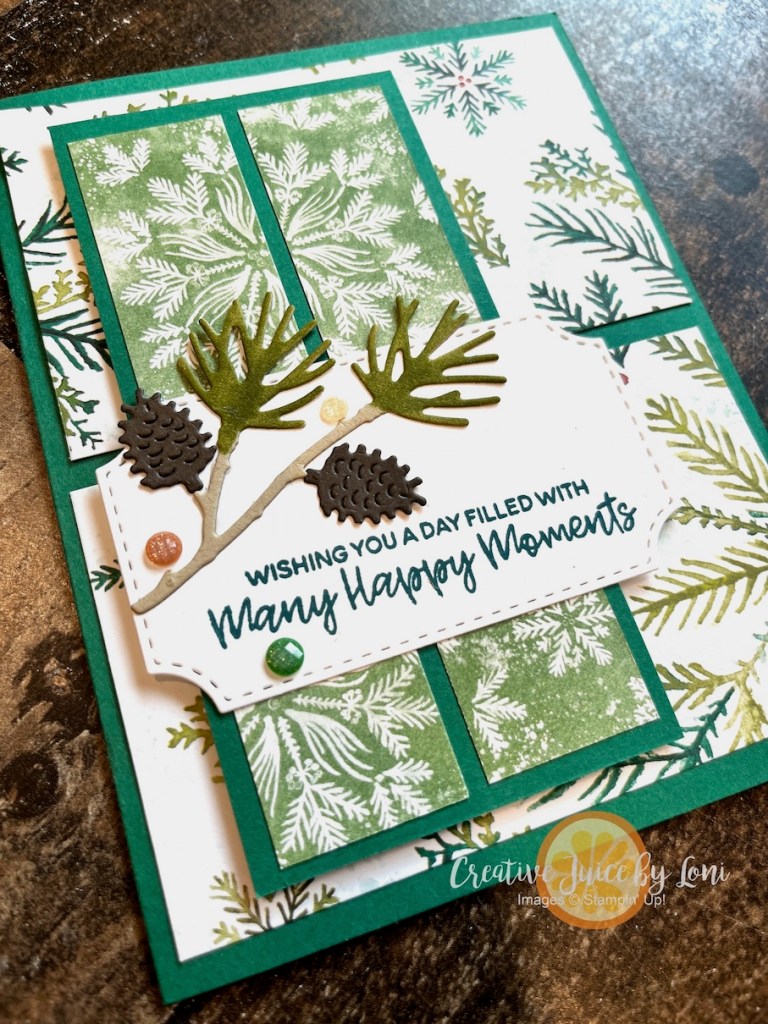
![Branching Out Bundle (English) [ 165776 ]](https://assets1.tamsnetwork.com/images/EC042017NF/165776s.jpg "Branching Out Bundle (English) [ 165776 ]")
![Elegant Pine Snowflakes 12" X 12" (30.5 X 30.5 Cm) Designer Series Paper [ 166066 ]](https://assets1.tamsnetwork.com/images/EC042017NF/166066s.jpg "Elegant Pine Snowflakes 12\" X 12\" (30.5 X 30.5 Cm) Designer Series Paper [ 166066 ]")
![Old Olive 8-1/2" X 11" Cardstock [ 100702 ]](https://assets1.tamsnetwork.com/images/EC042017NF/100702s.jpg "Old Olive 8-1/2\" X 11\" Cardstock [ 100702 ]")
![Pretty Peacock 8-1/2" X 11" Cardstock [ 150880 ]](https://assets1.tamsnetwork.com/images/EC042017NF/150880s.jpg "Pretty Peacock 8-1/2\" X 11\" Cardstock [ 150880 ]")
![Crumb Cake 8-1/2" X 11" Cardstock [ 120953 ]](https://assets1.tamsnetwork.com/images/EC042017NF/120953s.jpg "Crumb Cake 8-1/2\" X 11\" Cardstock [ 120953 ]")
![Early Espresso 8-1/2" X 11" Cardstock [ 119686 ]](https://assets1.tamsnetwork.com/images/EC042017NF/119686s.jpg "Early Espresso 8-1/2\" X 11\" Cardstock [ 119686 ]")
![Old Olive Stampin' Blends Combo Pack [ 154892 ]](https://assets1.tamsnetwork.com/images/EC042017NF/154892s.jpg "Old Olive Stampin' Blends Combo Pack [ 154892 ]")
