Popcorn Faux Shaker Card

Creative Juice LIVE Crafting (on YouTube & Facebook) IS BACK…with a twist! Going forward, I’ll be going live in my channels at 12:30 p.m. MT ON THE FIRST MONDAY OF EACH MONTH. As I *pop* back into your social feed, I have an a-maize-ing Faux Shaker Card tutorial to share with you in today’s video!

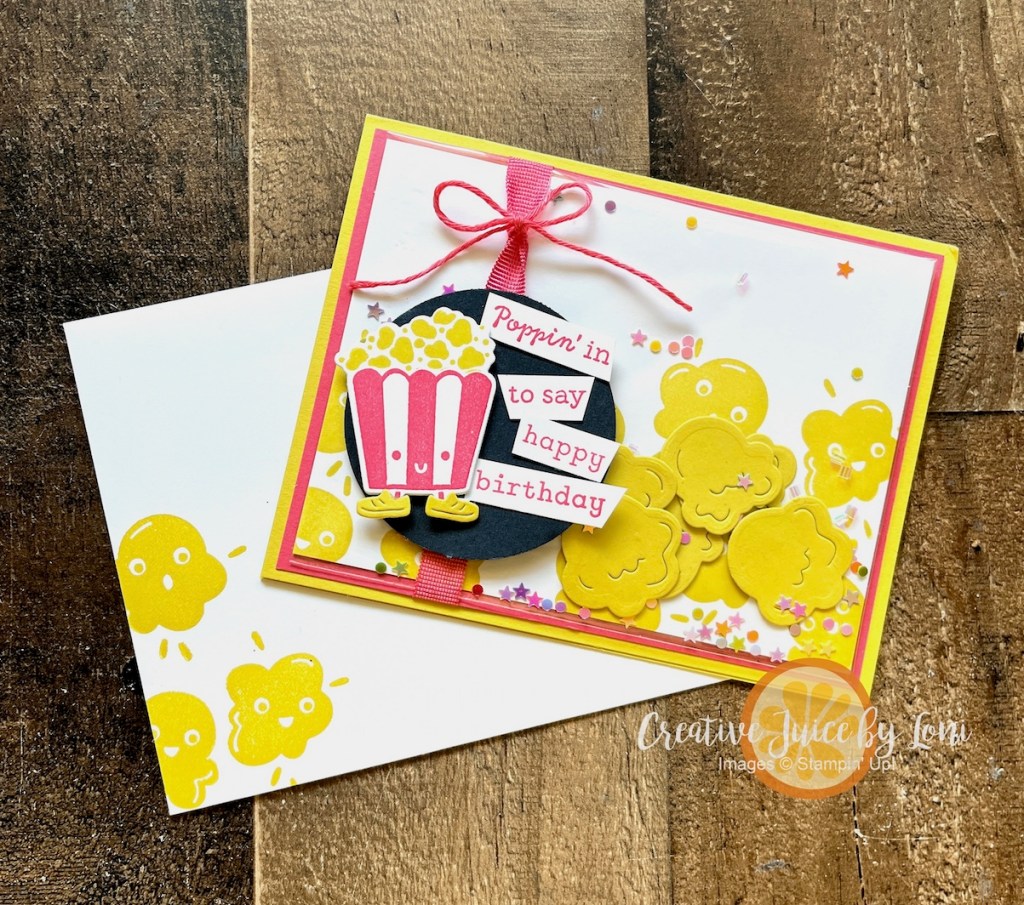
Traditional shaker cards are quite thick, so using a clear envelope to hold the shaker elements makes the card thinner to mail, and easy to make.

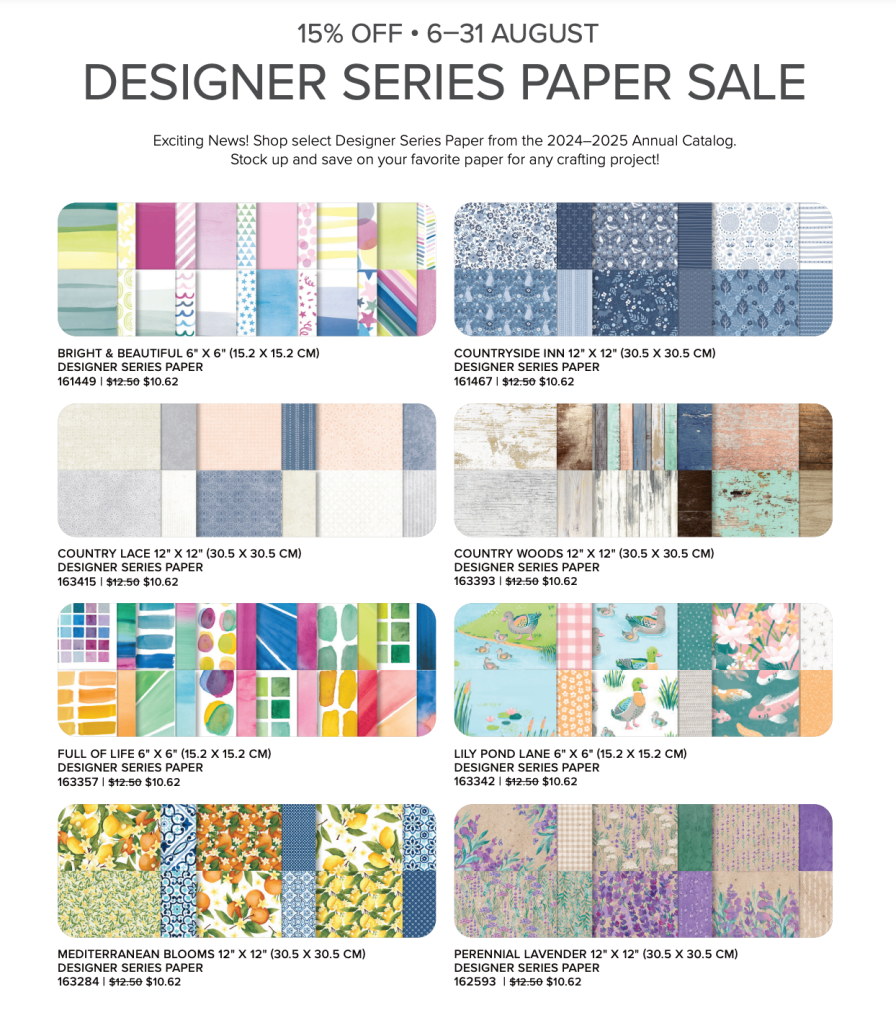
Colors used: Darling Duckling, Strawberry Slush and Secret Sea, which are all 2025-2027 In Colors, and an announcement you’ll appreciate is that tomorrow (August 5th) is the beginning of an IN COLOR SALE!

Many In Color products are 15% off through August 31st, and I need to remember to order refills for my ink pads…my shopping list is started.

Without further adieu, here is the VIDEO TUTORIAL for the Faux Shaker Popcorn Birthday card, and you may add the supplies to your cart with the list below the video:

Crafting cards doesn’t get “butter” than this!

Product List

Keep your creative juices flowing! 🍊🧡– Loni Spendlove


3 Unique Ways to Use Designer Series Paper

Patterned Paper may fade into the background for most paper crafting projects, but here are THREE different ways to make the most of this crafting staple:

  1. STAMP IT: Double up on your backgrounds to give it faux layers! For the first sample, I stamped the Drizzling Droplets stamp onto a piece of the Country Lace Designer Series Paper and the second card has the Leaf Collection stamped onto a piece of the Full of Life Designer Series Paper:

    2. Heat Emboss Over It: Embossing powder covers patterns beautifully! LIghter paper patterns allow you to color in parts of the embossed image.

    These samples use the same Designer Series Paper as the first cards, just different patterns from the same packages:

    3. Dry Emboss It: Stamp a sentiment first, then run it through an embossing folder. To bring out the pattern, rub a sanding block (or emery board) over the top of the ridges!

    The Sending Love & Hugs card uses the Perennial Lavender Designer Series Paper and a 3D embossing folder (EF) called “Forever Plaid” (available 8/4/24), while the Mediterranean Blooms version was embossed with the 3D Eyelet EF:

    Just 5 days left of the Designer Series Paper Sale (ends August 31, 2024) – featuring ALL OF THE PATTERNS USED TODAY!

    LOVE Stampin’ Up! Designer Series Paper?? Don’t miss the chance to reserve a 6″x6″ sample of (almost) every pattern in the upcoming September-December Mini Catalog:

    Watch today’s video showing these three techniques to try on Designer Series Paper :

    Busted Canvas Card Technique

    TREND ALERT! This technique was popping up in my social media, so I wanted to bring it to card-making: The Busted Canvas looks like the card is being unwrapped to reveal an image and sentiment, so while it’s not going to fit in a traditional envelope, it will look fabulous hanging out of a gift bag or handed to a friend personally.

    The happy surprise behind the paper has an excited “feel”… like you were too thrilled to open the package to carefully undo the wrapping!

    In the video tutorial, I share some tips and tricks, and one thing to note is that when you roll the Designer Series Paper out as tightly as you can, it doesn’t really *need* to be glued down, but if you choose to adhere it to the front, you’ll probably want to use hot glue. The pointed edges do adhere well flat using Tear & Tape, but the rolled pieces tend to pull away unless you use a glue gun.

    While I stamped and colored in both my images with Stampin’ Blends, you could use a pre-printed image or more Designer Series Paper on the inside.

    Before I share the video, here’s the second example using the Nests of Winter products coming in the September-December mini catalog:

    The technique is too much fun to stop with one!

    Okay, okay, here’s the tutorial! You’ll need an 11″ x 4-1/4″ card base, a 5-1/2″ x 4-1/4″ piece of white card stock and a 5-1/2″ x 4-1/4″ piece of Designer Series Paper, plus your stamps, ink and coloring tools to craft along:

    It’s a timely technique for the Stampin’ Up! Designer Series Paper Sale during August 2024

    Product List

    Joseph’s Coat Technique (with Embossing Folders)

    Revisiting a classic stamping technique- this time with 3-D Embossing Folders!

    The Joseph’s Coat technique has been done with heat embossing in the past, but Stampin’ Up!’s beautifully detailed and deep image embossing folders really make it easier than ever to create colors that seem to POP from a dark background.

    This was the second card I created in the how-to video today using the Layered Florals embossing folder, and it shows the vibrancy of the colors you can achieve with this trick. I also made these cards into a Z-Fold style that stand up to display.

    In a nutshell, the way to make this stunning background is to emboss a white or vanilla piece of card stock, then color in the RECESSED images using sponge daubers + Classic Ink Pads -OR- Stampin’ Write Markers. Once you’ve colored all the images, drag a dark ink across the top of the background. I used Night of Navy ink over my Petunia Pop water lilies on this version.

    Watch to learn how:

    Peek at the details from the Changing Leaves Hybrid Folder Joseph’s Coat card…amazing, eh?

    For best results, make sure your dark ink pads are inked up well to achieve the dark “background” in one swipe of your pad.

    Here are the supplies I used – order them today, then give this technique a try!

    Product List

    Just a few days left to earn BONUS DAYS coupons in July! Redemption for the codes you’ve earned this month will begin August 1st!

    Hybrid Embossing Folder How-To

    Curious about how a “Hybrid Embossing Folder” works? Allow me to demonstrate how-to using the new Online Exclusive Changing Leaves bundle.

    The embossing folder creates amazingly detailed leaves which are beautiful both embossed (raised) and debossed (recessed). Here is a “raised” example in Granny Apple Green using the embossed design for a background on a card:

    Flip the embossed paper over and paint into the recessed images using water painters and ink refills -OR- water painters with Metallic Enamel Effects for shine:

    Simply stamping the images and die cutting them to use on your projects is also an option. Watch for the tip to lining up all three leaf images in the correct spot, making them easier to die cut at the beginning of this video, in which I also demonstrate all the techniques I’m sharing:

    I used my stamped/die cut leaves on a floating frame card:

    Finally – and this is the HYBRID VERSION – the dies snap into the embossing folder! All you have to do is add your paper, run it through the Stampin’ Cut & Emboss Machine, and out come die-cut, embossed accents! This is a bonus project that shows the detail:

    I borrowed the sentiment from another Online Exclusive stamp set called Comforting Thoughts for an occasion when there are just no words to express what you are feeling for someone’s heartache.

    Try dragging your ink pad across the top of an embossed/cut leaf to bring out the details (or use a brayer rolled in ink), like the Pretty Peacock leaf on the card:

    The Changing Leaves bundle is $54 (US) so it qualifies for a $5 BONUS DAYS coupon when you purchase it during July 2024. Collect coupons July 3-31st, then redeem them during August!

    Coloring with Masks (Enduring Beauty)

    Masks (the fancy Stampin’ Up! term for stencils) make coloring stamped images speedy and simple!

    I was truly WOWed with how quickly I was able to color the floral spray image from the Enduring Beauty bundle with the coordinating masks, blending brushes and ink pads. This is a technique you may embrace if you don’t love to color, OR if you are just getting started, you can stamp and color this image with just two ink pads! Watch & learn how:

    Did you catch how to die cut just half the image so you can add a layer of Designer Series Paper as the background? For the video, I added a second fold that opens on the right:

    But you can just add a 4 1/4″ x 5 1/2″ layer of Designer Series Paper behind the flowers to make it a regular card. I really like the look of the Poetic Expressions designs with the flowers, and used the colors of that paper for coloring the flowers, as well.

    Turn the design sideways and try different colors, too.

    It’s a beautiful stamp set to use for so many projects, and if you haven’t seen my two previous posts using this set this week, check out the Notebook Cover project HERE and the color challenge card HERE.

    THANK YOU for shopping in my Stampin’ Store for GENUINE Stampin’ Up! products!!! It enables me to continue bringing you creative ideas and you are guaranteed high quality products with service from someone who cares about you.

    Product List

    Sent by Blueberry Post

    Rooty-Tooty Fresh & Fruity! Tomorrow- Thursday, January 4th- the January-April Mini Catalog goes live AND 2024 Sale-a-Bration begins!

    I admired the “Blueberry Bunches” stamp set (item #162692) the moment I saw it: It feels like a floral, but it’s a fruit, and that’s kinda my “jam” (see what I did there?).

    I’ve paired the stamps with the Perennial Postage bundle (Item #162608) for the sentiment and postage stamp die (in various sizes).

    This is the second largest die and after I cut a piece of basic white, I stamped the blueberries in the center, then used Masking Paper around the edges so I could blend Pool Party ink from the outside into the image- a technique called “Reverse Masking”. As you carefully peel off the masking paper, the background appears as a frame!

    Once I colored the image with Stampin’ Blends alcohol markers, I “cancelled” the postage stamp with the cutest little detail of the cancellation mark, which I dipped into Memento Tuxedo black ink before running through the Stampin’ Cut & Emboss machine on top of my colored postage stamp.

    Seemed fitting to share it with the #tgifc453 postal theme this week.

    I’ll update the supply list once the catalog goes live, and hope you’ll try this technique and mail bunches of happy mail.

    Need a Mini Catalog and Sale-a-Bration brochure? Shoot me a message and I’ll send it out to you.

    Don’t want to miss a publication in the future? I mail mini catalogs to my customers who order $50 or more in the previous 6 months!

    Product List

    3-D Dots On DSP

    Hey! It’s good to see you here and know you’ll like the next 3-D embossed card idea. Are you pinning these ideas for inspiration when you want some texture on your cards and paper crafts?!

    Stampin’ Up! has an embossing folder that matches the Countryside Inn Designer Series Paper – The Countryside Blossoms E.F. matches one of the patterns perfectly! – but you don’t have to have a matching design to emboss on Designer Series Paper. For this card, I debossed the 3-D Dots into a striped citrus pattern from the Delightfully Eclectic mega-pack:

    You CAN combine dots & stripes!

    I appreciate that the pattern on the paper hearkens back to my signature “Sweet Citrus” bundle, and in my Tips & Technique video, I used the HYBRID 3-D embossing folder to show you how that one CUTS & EMBOSSES at the SAME TIME!

    That’s the third embossing folder from the Basics 3-D Embossing Folder Trio in the Online Exclusives section of my store, but I do have another card to share with you tomorrow.

    Make your own ZESTY birthday card with the supplies listed below, and remember to save your BONUS DAYS coupons from July in a folder in your email so you can easily find them to SPEND in August!

    Product List

    Fence Me In: A Split-Front Card

    Split-front cards are trending in paper crafting, and the Sending Smiles bundle makes today’s card a sunny one!

    I’d been seeing these pretty cards and knew it was time to jump in, so today I taught you how with a video. Will you try this unique style of a split-front card?

    The Sending Smiles stamps and Sending Dies WILL be carrying over to the 2023-2024 catalog in May, but they won’t be bundled together with a discount, as they are now!

    Have a ball making your own Fence-Post cards! Here are the supplies you need for this version:

    Product List

    If you are wanting the best deal to gain CREATIVE CONFIDENCE, add $125 worth of these items to a STARTER KIT (and only pay $99)…then you’ll be part of my Sprinkled Ink team and connected to other creative people sharing what they love! It’s my job to help you learn and grow your business, and we’ll have a fun time doing it together.

    Floating Circle Card

    When you have thin strips of Designer Series Paper you don’t want to throw away, just glue them to a window sheet and die cut a “floating circle”! Want to see more? Watch my Facebook Live video from 10/17/22 and see how easy this card was to create!

    We stampers love a little shine and shimmer, and that’s just what you’ll get in the Splendid Day Specialty Designer Series Paper pack…this angle shows how each double-sided paper has one metallic side and one pretty printed side, and you really can’t bear to let any go to waste:

    Pick a small sentiment to stamp on one of your non-metallic strips. Mini Stampin’ Dimensionals are easy to hide behind the strips, and lift your circle off the card to make it look like it’s floating! Add a floral image and you have a simply sensational card.

    While this DSP was created to coordinate stunningly with the Splendid Thoughts bundle (see my original card below the supply list), I used the Sending Smiles bundle for my video demonstration – the sentiments in the Sending Smiles stamps fit on the strips perfectly.

    This is one to try immediately in your stamp studio!

    Product List

    Same card, with the Splendid Thoughts bundle (sentiment still from Sending Smiles stamp set):