New at SU! – Gingerbread Gifts

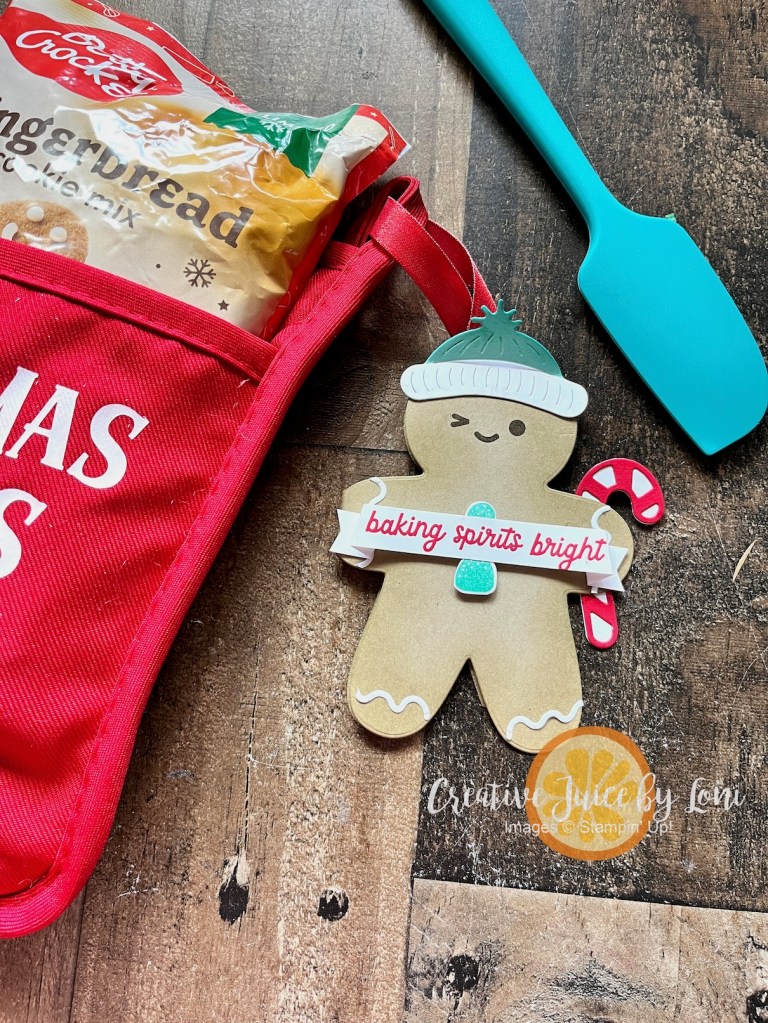
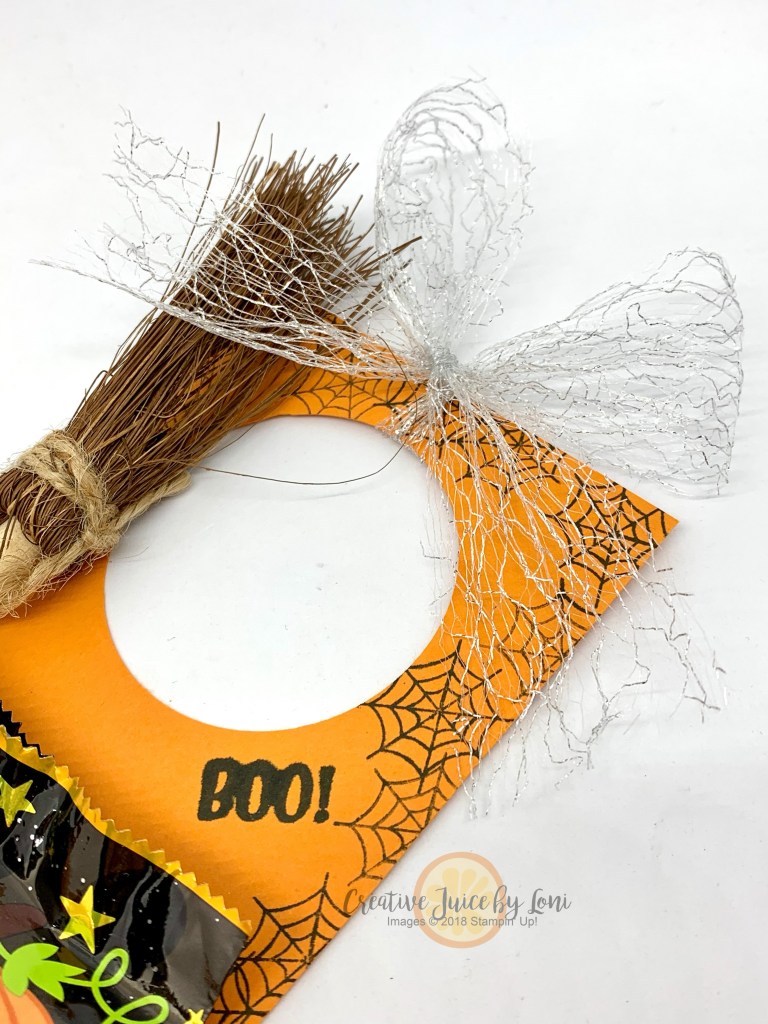
The theme for the October New at SU! blog hop is “No Tricks – Just Treats!” and I’m sharing a Gingerbread Man Tag for a cute Holiday Gift Idea for neighbors, co-workers or anyone who deserved a jolly bit of baking!

Crafters LOVE to give presents, and the details make each gift delightful. This creative idea will have the recipient “baking spirits bright” for a delicious treat hot out of the oven!

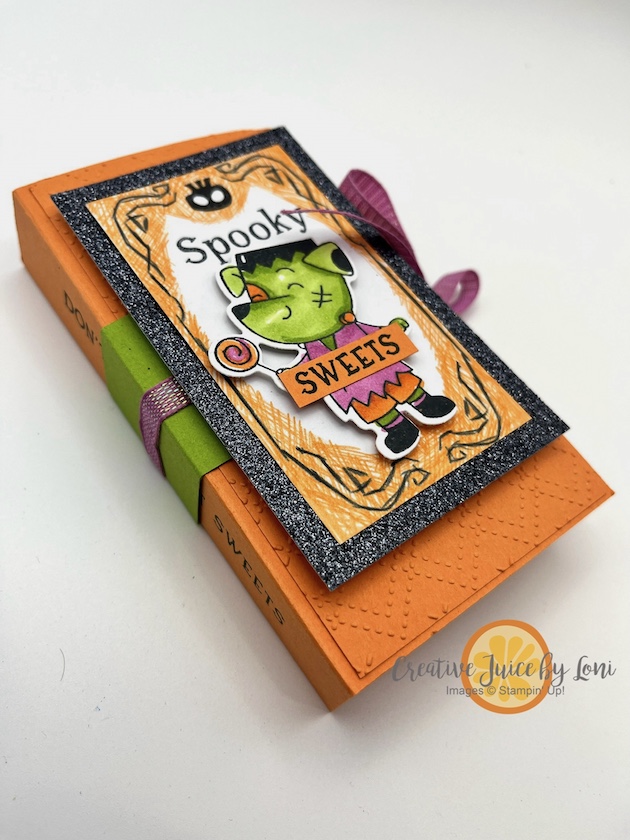
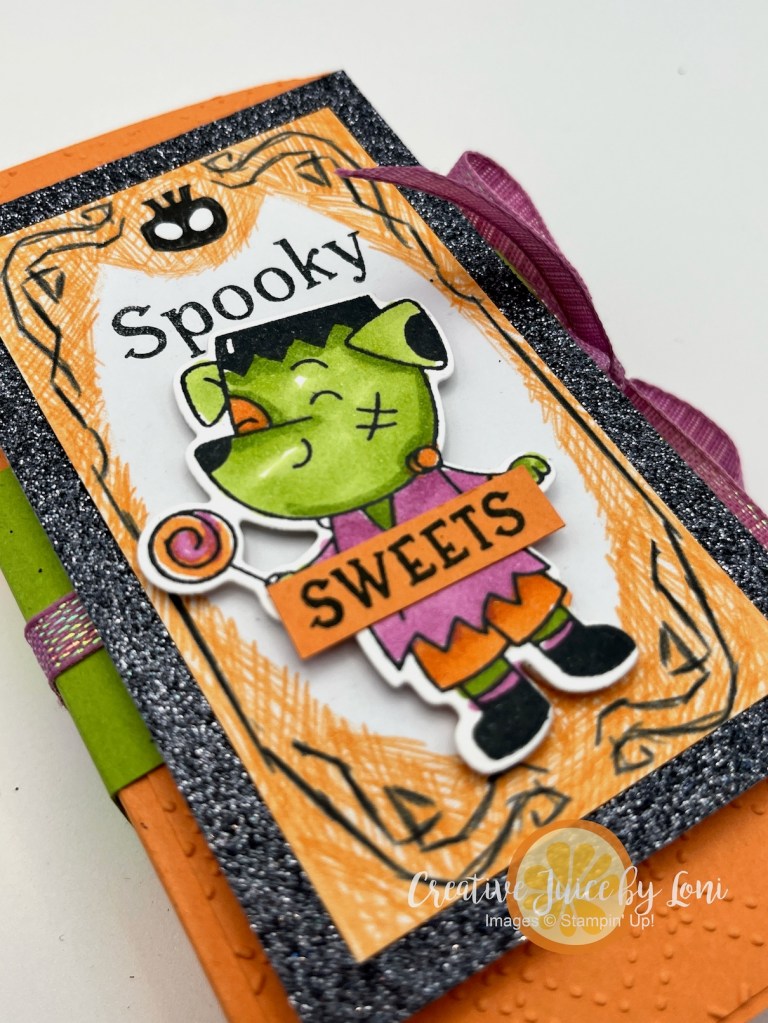
The Gingerbread Man bundle includes a die that cuts a cookie that folds in half to form a card. I decided that when it opens, it should look good enough to eat (or rather, HAS been eaten):

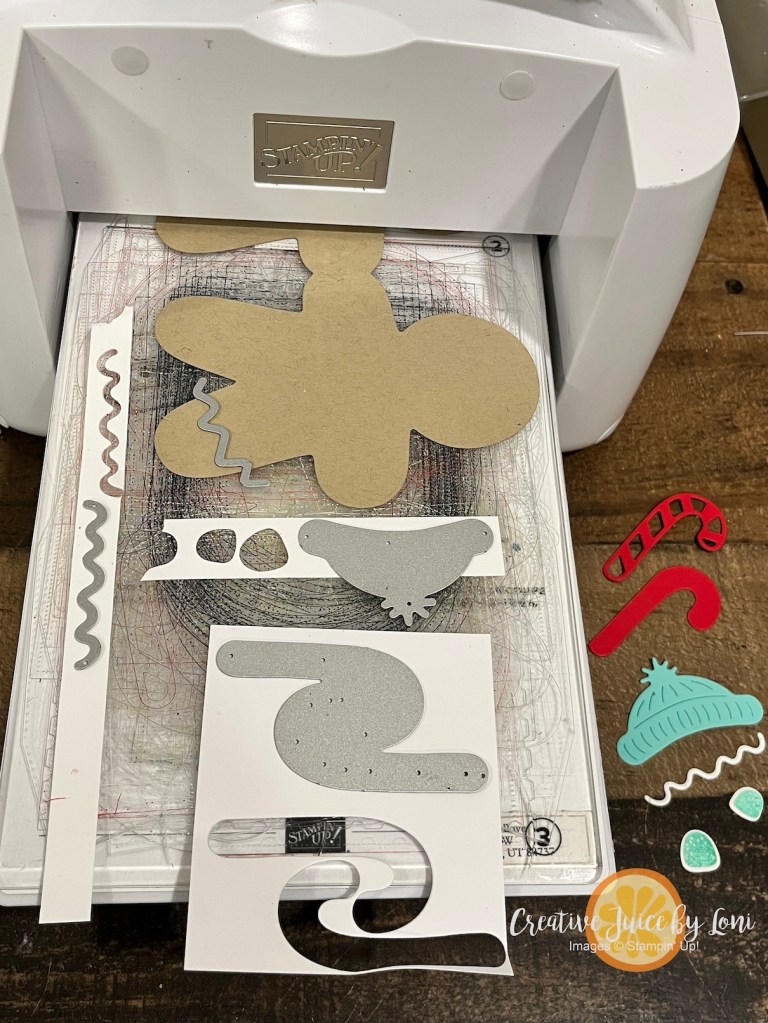
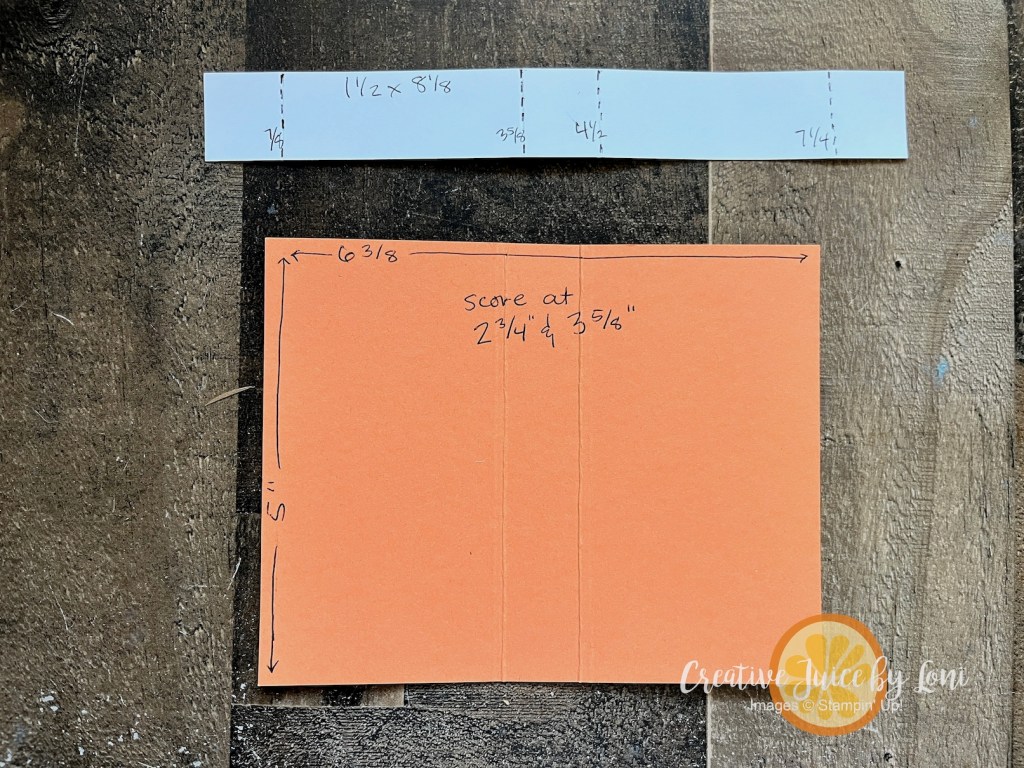
I have a few TIPS to make this project easy to prep for making multiple tags:

  1. The 1/2″ strips of Basic White card stock you have left over from making card layers are perfect for the icing squiggles: Remember to put a strip of adhesive sheet on the back of that strip before die cutting, and each squiggle can do one wrist and one ankle on the gingerbread man.
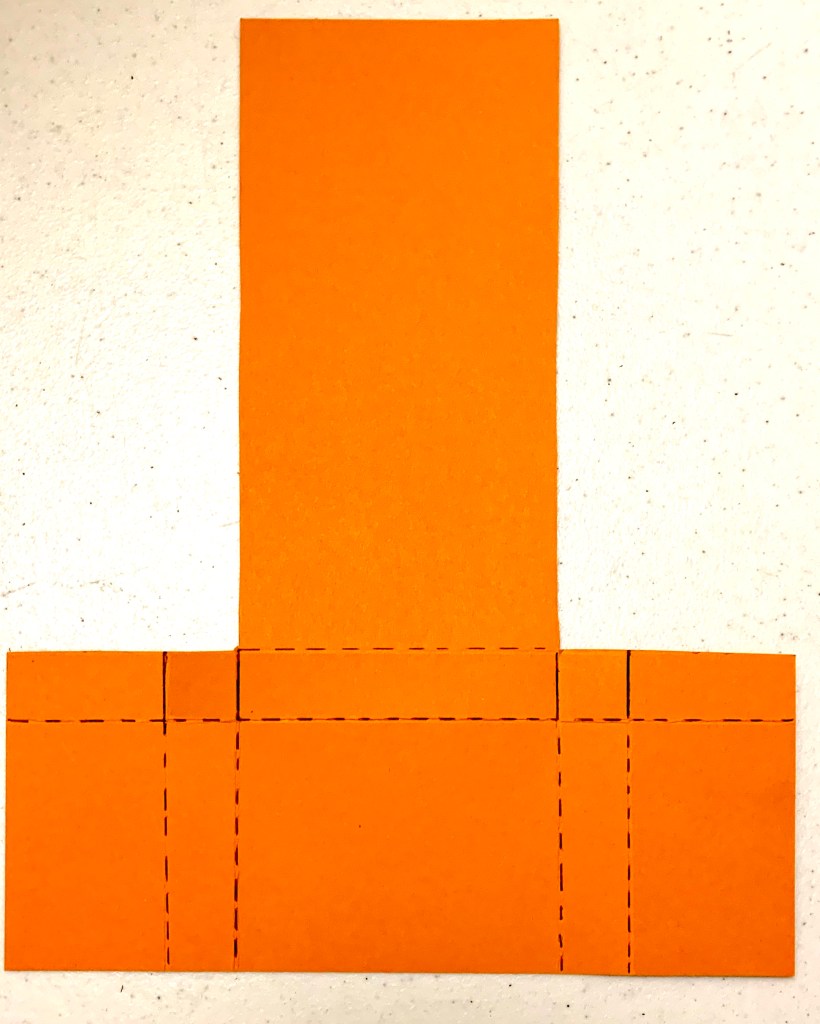
  2. Including the Gingerbread man, you can get all the pieces cut in 3 passes through the Cut & Emboss Machine, if you follow the format below.
  3. The 3rd picture shows all the pieces cut and ready! You’ll end up with two candy canes: one with a white base and one with a red base.

I did add a little sponging of Crumb Cake ink around my cookie with a blending brush, and used another 1/2″ strip for the banner:

The festive hot pads with a POCKET can be found on Amazon HERE for less than $2 each and have some , and the skinny spatulas HERE. The Betty Crocker Gingerbread Cookie mix was at my local grocery store, but you could substitute a Sugar Cookie mix, which is often found at the Dollar Tree (or whatever mix is available in your area.

Before you move on to another tasty treat stamped by one of our dazzling New at SU! design team, I’ve added the supplies needed for this project to the end of this post to help you get started on your holiday gifting quickly (U.S. crafters only), and I’d appreciate hearing from you if you liked (or copied) this idea ~ you can leave a comment at the top of my post, near the date.

Now lick your fingers and press the GO button for “Gathering Together” treats by Karen, your next stop along the sweet tour:

October 2025 New at SU! Hop: No Tricks, Just Treats!

Previous BlogNext Blog
1.Astrids Papiereuphorie (AT) – Halloween Goodies
2.Did You Stamp Today? (US) – Halloween-ish Treat Pouches
3.247 Inkspiration (US) – Gathering Moments Treat
4.iHeartCards2 (US) – Halloween Treat Holders
5.Creative Juice by Loni (US)- Gingerbread Gifts
6.Furry Cat Designs (UK) – Gathering Together Treats
7.De Kijkkast (NL)- Kleine kersttractatie met Delicate Pines

Powered by blogcarousel.com

Product List

Remember: If your shopping list is more than $35 in October, 2025, your best shopping deal is the STARTER KIT! With two specials this month to choose from (plus a discount on your future purchases- including your Christmas Gifts! – through March 2026!) there are no strings attached to just give it a try…and possibly a wonderful adventure ahead:

Keep your creative juices flowing! 🍊🧡– Loni Spendlove


No Tricks, All Treats: Candy Bar Books

If your Halloween crafting stash is calling your name louder than a ghost in a graveyard, grab your Stampin’ Up!® Spooky Sweet Suite and conjure up something boo-tiful! Don’t worry, eat sweets with these dang cute CANDY BAR BOOKS:

I’ve brewed up two fun versions of this project. The Granny Apple Green “All Treats” Candy Bar Book holds two classic Hershey bars, while the Timid Tiger “Spooky Sweets” version was made to fit two Ghost Toast KitKats. Each one ties up neatly with ribbon to keep your candy secure until it’s time for a delicious reveal. Whether you’re giving these as gifts, party favors, or adding them to a Halloween goodie basket, they’re sure to get more “oohs” and “aahs” than a haunted house on October 31st.

These projects are surprisingly easy to assemble—no hocus pocus required! I’ve included an instructional video below, AND a printable .pdf with measurements.

Note that the belly band measurements are shown on white card stock, but the project uses Granny Apple Green card stock.

I embossed the covers to add some textured dimension (because even monsters like stampin’ style), then decorated with die cuts, stamped images, and a touch of sparkle. Isn’t it Franken-fun?

Here are the key measurements for both versions:

Green “All Treats” Book (fits two Hershey bars):

  • Cardstock base: 5 1/4″ x 6 1/2″ scored along shorter end at 2 3/8″and 2 7/8″
  • Belly Band: 1 1/2″ x 6 3/8″ scored at 1/2″, 2 7/8″, 3 3/8″ and 5 7/8″
  • Ribbon: 16″

Orange “Spooky Sweets” Book (fits two KitKats):

  • Cardstock base: 5″ x 6 3/8″ scored along the longer side at 2 3/4″ and 3 5/8″
  • Belly Band: 1 1/2″ x 8 1/8″ scored at 7/8″, 3 5/8″, 4 1/2″ and 7 1/4″
  • Ribbon: 16″

Want to see the whole project come to life? Watch my full step-by-step tutorial on YouTube here:

What else did we talk about today? The 3-day KIT SALE (through October 8th):

AND we discussed FAQs on the Starter Kit Special! Bottom line: If you are planning to order more than $35 in crafting supplies from my Stampin’ Store this month, you may as well choose the Starter Kit!

To make your shopping Spooky Sweet, I’ll list the supplies for these projects below and THANK YOU for choosing me to serve your creativity!

Product List

Keep your creative juices flowing! 🍊🧡– Loni Spendlove


Watermelon Bites & NEW SAB Choices

If you can’t find fresh watermelon during February, watermelon sour bites may satisfy your cravings:

The Scalloped Gift Card box can also hold things aside from gift cards, so I designed this one for a treat box with the Watercolor Melon set (a free option with $50 order from my store through February).

You stamp on the box while it’s flat, then assemble and fill it. Since there are no words in the set, feel free to find the one that fits from your collection! I added the sentiment from the Sweet Citrus stamp set, or anything “sweet” will work! I just learned that you can punch out the WHOLE watermelon *AND* the slice from the Modern Oval punch:

It’s the midway point of Sale-a-Bration – Stampin’ Up!’s biggest party of the year – and they have added NEW options to choose at the $50 and $100 spend threshold. Remember you can mix up your options to equal the total of your order:

Ready to make a box of watermelon bites? Here’s a tutorial to print and you can shop the supply list at the link below.

Twist or Treat + October Join Special!

The “Sour Cream” package favor has been around for a while, but it’s a classic project to craft because it’s fast and adorable!

Obviously, they don’t usually stand up, but I wanted you to see how they “twist”!

It all starts with a 6″ x 6″ piece of Designer Series Paper and adhesive, then I added tags to coordinate using the Tailor Made Tags dies.

You can craft along with me in this video tutorial:

I wore my skeleton earrings to match the favor I demonstrated in the video! My Stampin’ Mama Sherrill Graff made them for me with the Bag of Bones bundle, black StazOn ink and shrink plastic:

Through October, Stampin’ Up! has an outstanding opportunity for the Starter Kit:

The Starter Kit is always the best value, but in honor of Stampin’ Up!s 35th anniversary this month, it’s absolutely irresistible!

35% OFF= Select $125 in product (including early release items only for demonstrators) for only $64.35, free shipping on the kit, PLUS a free ticket to our virtual OnStage event in November!

35% MORE= Select $168.75 worth of product and only pay $99 with free shipping, PLUS a free ticket to our virtual OnStage event!


With either Starter Kit, you’ll have the opportunity to see if the demonstrator life is for you! You’ll get to purchase your own supplies at a 20% discount through January 2024, get early access to new products and mingle with my Sprinkled Ink team. If you love it, you can keep going! I’m here to help you along the path and guide you as you explore the possibilities.

There are NO STRINGS ATTACHED…just a wonderful discount and a chance to try being a demonstrator with a warm & friendly group of creative people, and a peek behind the curtain at Stampin’ Up!

The Starter Kit is available to everyone, as many times as you’d like to take advantage of it, so click the image or Choose One button above to get started!

Interior Diorama Card, Many Ways!

When there is a “scene” printed on Stampin’ Up! Designer Series Paper, it’s perfect for creating a framed picture that pops up inside your card!

For this one, I used the A Walk in the Forest DSP, which is part of our “Making A Difference” Campaign ($3 from each pack purchased is donated to the “Toys for Tots” program). This paper coordinates with both the Beary Christmas Suite and the Merriest trees bundle!

Here’s a slightly different version of the same card using the Beary Christmas paper included in the Beary Christmas Suite:

Because it was so much fun -and simple- to make (I’ll share a how-to video below), I had to make multiple versions with different Designer Series Paper from the September-December Mini Catalog. It’s like the One Card, Two Ways challenge from the #tgifc438 WWYD? Challenge:

The design is roomy enough to sneak a treat inside (not a mailable option, obviously) and for this one I used Them Bones Designer Series Paper:

Sharp eyes may notice that the skeletons are smaller than those in the coordinating suite of Halloween products…because the stamp set I used was from the September 2019 Paper Pumpkin kit called “Bone Appetit”!

Before we get to the last version of the Interior Diorama card, here is the video tutorial:

The finished card (closed) is 4″ x 5-1/4″.

Begin with a 12″ x 5.25″ strip of Designer Series Paper and score at 1/2″, 4″, 4.5″ and 8″

Product List

My final Interior Diorama card is a Christmas Version using the O, Holy Night Designer Series Paper and Night Divine Bundle:

Will you be trying this card? Let me know what you think in the comments!

Sweet Songbird Nest Treat Favor

With only 8 more days of our ONLY Sale-a-Bration of 2023, and with the sun shining today, I chose to show you a project fit for SPRING!

This Sweet Songbird next was inspired by some that I had seen previously, and was reminded of when I discovered the Junior Mint Eggs at Dollar Tree! The green is a perfect Mint Macaron color and I wanted to put a next into a Mint Macaron tree.

Because Stampin’ Up! added a few catalog products to the choices for Sale-a-Bration, the Songbird Builder Punch is on the list you could choose free with your $50 US order before February 28, 2023, and while you don’t need the stamp set to create cute birds with the Country Gingham Designer Series Paper, the Sweet Songbirds stamp set does give you options for sentiments, nests and branches.

This would be a sweet favor at Easter dinner or, with the “Welcome” sentiment, at a baby shower, or Spring craft day with friends!

Measurements for the papers:

  • Mint Macaron: 2-1/4″ x 3-1/2″
  • Soft Suede: 3″ x 1-1/2″, scored at 1/4″ along the long sides, and at 1″ and 2″ from end to end to create the “nest”
  • Soft Suede scrap to stamp a nest on and cut out.
  • Scrap of Crumb Cake for sign
  • Country Gingham DSP: 2-1/4″ x 2-1/4″ to punch out bird

Here’s a how-to video (from my Lunchtime LIVE crafting video on YouTube & Facebook 2/20/23):

I had to use up the scraps of gingham paper on my desk, so I also made a slimline card…not a very “little” note of thanks when the finished card is 8-1/2″ x 3-1/2″!

IF YOU CHOOSE THE SONGBIRD BUILDER PUNCH AS A FREE GIFT before the end of February 2023, use item #164422 and order the Sweet Songbird stamp set #158721 as part of your $50 order to qualify for the free punch!

Product List

New at SU! Banner Year Halloween Door Hanger

We are back to celebrate the Fall-idays with more festive projects from our international group of Stampin’ Up! Demonstrators~ Take a moment to hop through and tell us what you like, and pin your favorites to your boards to remember later.

My project turns Halloween upside down by LEAVING a treat instead of taking one!

To create this door hanger, you’ll need a sheet of 8.5″ x 11″ card stock. Score from the short side at 2.5″ and 3.25″, then rotate the sheet 90 degrees and score at 1.75″, 2.5″, 6″ and 6.75″. Cut off the largest rectangles on both sides and fold along the score (dotted) lines and cut along the solid lines as shown:

It’s easiest to do any stamping you wish at this point while it’s flat, then fold the sides in, then up and adhere the lower outside rectangles to the front of the largest rectangle, creating a pocket. Punch a large circle at the top, embellish and fill with treats!

I used the circle I punched out at the top for the moon behind the cat:

I’ll post my supply list below, but if you are ready to skip to the next blog, here’s the button to take you to Heather’s blog where you’ll Have a Hoot!

Product List

October 2020 New at SU! Roll

Chase and Main – Gather Together

Tricia’s Stamping Creations – Don’t Stop Believin’

Stamping Flair – Plaid Tidings

Carterie Plus – Merry Moose

Sugar & Scraps – Gilded Autumn

Stampin’ Scrapper – Banner Year/Stitched Leaves

247Inkspiration – Tree Angle

Moore Fun Stamping – Celebration Tidings

Stamping with the Copper Cropper – Gilded Autumn

Creative Juice by Loni – Banner Year. YOU ARE HERE

Heather Cooper – Have a Hoot

Gifted Hands Ink – In the Pines/Festive Corners

Trim the Town, Make a Difference

The August–December 2020 Mini Catalog Inspiration

TRIMMING THE TOWN SUITE

Now is a great time to make something adorable and make a difference! The Coming Home stamp set (#153500) is part of the popular Trimming The Town suite and is the August-December 2020 Mini Catalog Making a Difference stamp set.

When you purchase the Coming Home stamp set you’ll be a part of supporting adoption, foster care, and infertility charities.

The Home Together Dies coordinate with both the stamps and the Trimming the Town Designer Series Paper (#153491) and makes it simple and fast to create layered scenes on card and decor projects.
————————————————–

Trimming the Town Treat Boxes

Trimming the Town Treat Boxes

Join my Email Newsletter List and receive my tutorials by email! With each mailing you will receive a picture of the finished project, a supply list, card layout, and a step-by-step tutorial.

SUPPLIES:

STAMPS
Coming Home (#153500)
*these coordinating stamps are optional for this project but are great for accents and coordination
PAPER
Old Olive (#100702), Whisper White (#100730), Poppy Parade (#119793), Bumblebee (#153077)
TOOLS
Home Together Dies (#153515), Paper Trimmer (#152392), Simply Scored Scoring Tool (#122334)
ADHESIVE
Multipurpose Liquid Glue (#110755), Mini Glue Dots (#103683)
EMBELLISHMENTS
All The Trimmings Ribbon Combo Pack (#153541)

TIPS: You can make the house treat box longer to fit bigger candies or gifts. Keep the 1-1/4″ width the same and increase the 2-1/2″ length to your preferred size. The score lines measurements will remain the same at 1/8″ along the long sides and 3/4″ along the 1-1/4″ sides.

Coordinating Products


TRIMMING THE TOWN SUITE COLLECTION #155105COMING HOME BUNDLE #155144COMING HOME PHOTOPOLYMER STAMP SET #153500TRIMMING THE TOWN DESIGNER SERIES PAPER #153491ALL THE TRIMMINGS EMBELLISHMENTS #153540ALL THE TRIMMINGS RIBBON COMBO PACK #153541

The August–December 2020 Mini Catalog Inspiration

VIEW OUR SUITES ONLINE

More Love to Mail

But wait! There’s MORE! Yesterday I shared a Pink/Red/White card (or Flirty Flamingo, Real Red and Whisper White), but if you haven’t had time to watch my Lunchtime Live Crafting Videos on Facebook each Monday, you may have missed some of the other Valentine themed projects I’ve been creating from the From My Heart Suite by Stampin’ Up!~ so I thought I’d share some here.

IMG_4399-(W)

If you have a hard time choosing which side of your Designer Series Paper to use on a card, make THESE CARDS instead, because you don’t have to choose! You can see one side on the front of the card and enjoy the other side of the DSP on the inside of the card! IMG_4398-(W)

They are simple enough to make with elementary students, too!

A few weeks ago, I demonstrated a few ideas for a party or small gift and made this fun tin with the same suite stuff:IMG_4385-(W)

One thing I really appreciate is that if you LOVE all these coordinating products, Stampin’ Up! has made it very easy to get them all (with a bit of a discount) with just one item from my Stampin’ Store! Of course, you can still pick and choose the products you like best (or order more of the things you LOVE).

Thanks for stopping by and may all the love you send come back to you!

IMG_4396-(W)