Paper Florist & Doing Good in July

I’d reckon you didn’t see the Paper Florist dies that are new to the Stampin’ Up! catalog, did you?

You’ll have them on your radar now~ they’ll make you into a flower arranger extraordinaire!

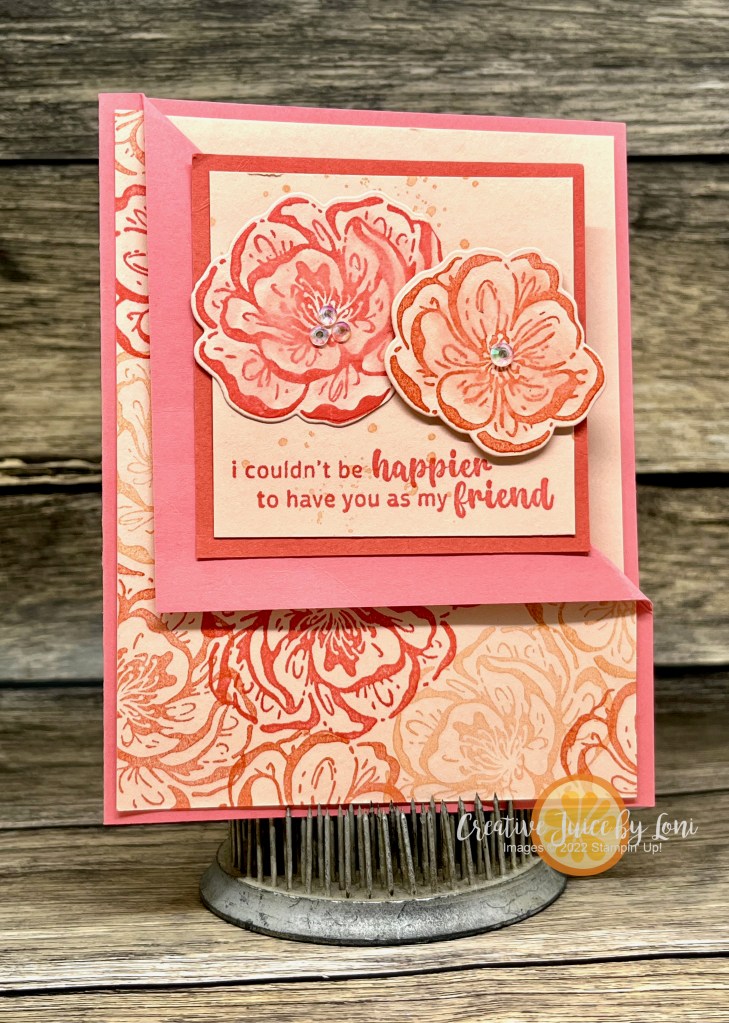
This project started with a wood cut-out from Dollar Tree and layered Designer Series Paper, spelled out m motto and adorned it with these gorgeous card stock blooms.

Enjoy a how-to video with a few helpful hints:

July is my birthday month! It always feels like a party, and I am content with all that I’ve been blessed with, so it’s an opportunity to glorify God by sharing my bounty. That’s why I’m supporting my personal charitable passion, Operation Underground Railroad by donating 10% of my sales in July (plus 10% to another organization chosen by YOU).

With more than 40 million victims of human trafficking worldwide (25% reported to be children), my heart hurts for every child who doesn’t have the freedom to be innocent. And it’s happening here.

You are welcome to add to my #riseupforfreedom fundraiser. Family and friends- in lieu of birthday gifts, please consider a donation!

Add the Paper Florist Dies to your next order and I’ll donate $3.70 to both OUR and the other organization (once it’s decided by vote).

Product List

Diagonal Cut Card: Show BOTH Sides of the Paper!

Sometimes I obsess over WHICH SIDE of my pretty Designer Series Paper I should use, and if this dilemma sounds familiar, you will like today’s card design because it allows you to show BOTH sides of the paper!

This example features the Masterfully Made Designer Series Paper and a set of dies you may not have noticed yet. The Paper Florist dies will have you putting together breathtaking blooms that never wilt!

You’ll be seeing more of these flowers next Monday, but I also wanted to point out the incredible detail of the photographic style of the Masterfully Made DSP~ I did NOT tear any of the Lemon Lime Twist paper, that is just a flat layer, but it LOOKS 3-D!!

Next, I created this version with the patterns slightly separated, and used the Delightfully Eclectic Designer Series Paper:

When you watch the replay of my live demonstration, you’ll learn how this MEGAPACK of paper patterns gives expanded options for some of the newer products in our catalog, and offers versatile designs to enhance any project.

Final reminder that most of our Designer Series Papers are 15% off through the end of June, 2023! Don’t miss a chance to stock up with paper that has new colors and textures to keep you crafting through the summer…

Looking for the supply list? Simply click on the orange buttons!

New at SU!- Level Complete Pull-Tab Flip Card

Zelda is a big deal for my granddaughter, so when the June “New at SU!” blog hop theme was Kid’s Cards, I thought maybe someone else has kids playing video games this summer. The new LEVEL COMPLETE stamp set is great for the young, and young-at-heart!

I wanted this to be an interactive card, as gamers love to “play” and fidget, and this one flips open when the tab is pulled on the right:

I saw Aubrey (of the Stampin’ Jill team) create a Pull-Tab Flip Card last week, I wanted to put my own spin on it!

To make it easy to assemble, here are the measurements (supply list at bottom of post), then you can watch either or both videos to put it together (my pieces are different sizes than Aubrey’s, as my card pulls from the right and hers from the bottom) :

Card base: 4-1/2″ x 5-1/2″

First layer: 3-3/4″ x 5″, cut the smallest banner from the Stylish Shapes dies about 1/3 in from the left side for the mechanism to slide through before attaching to card base with dimensionals in each corner.

Mechanism: 1-1/2″ x 7″, scored at 4-7/8″ and 5-1/4″

Flip Layer: 2-3/4″ x 4-1/2″. Adhere this to the 3/8″ piece only, under the left edge of the layer.

Inside layers (2): 2-1/4″ x 3-1/2″

TIP: Use strong adhesive, such as Stampin’ Seal+ or Tear & Tape because this card will be tugged and pulled over and over again!

Give this card a try- it comes together quickly when you have all the pieces cut and ready! If you can’t make it today, PIN it/save it for later and I’d love to see your version.

Off you pop to one of the other kid-friendly card ideas around the world:

June 2023 New at SU! Hop: Kid’s Cards

Previous BlogNext Blog
1.iHeartCards2 (US) – Zany Zoo Platform Pop Up Card
2.scraphexe (DE) – Kleine Träume | Little Dreamers
3.Joni in the Spotlight Stamping (US)-Hello Ladybug
4.The Tantalizing Stamper (UK)- Supremely Awesome
5.The Joy of Stampin’ with Rachael (US)- Reach for the Stars
6.Creative Juice by Loni (US) – Level Complete Pull-Tab Flip Card
7.Carterie Plus (CA)- Carte d’enfant
8.Playing with Papercrafting (CA) – Reach for the Stars
9.TanjasKartenwelt (DE)- Zuckersüsser Zoo
10.De Kijkkast (NL) – Kid’s Card with Little Monkey
11.Nature’s INKspirations (US) – Beside Me
12.Tricia’s Stamping Creations (US) – Zany Zoo
13.247Inkspiration (US) – Little Monkey
14.My Flutterby Moments (US)- It’s A Science Stamp Set
15.Stamping Flair (AU) – Construction Zone

Powered by blogcarousel.com

Product List

4 Backgrounds from 6×6 Paper: Corner Angle Layer Card

BREAKING NEWS: FREE SHIPPING day just announced! Set an alarm for Wednesday, June 21st and earn free shipping on your orders over $75 that day only!

Paper crafters pride themselves on using scraps, so when we find a way to NOT WASTE A PIECE of pretty paper, we must give it a try!

I appreciated this idea from fellow demonstrator Rachel Tessman, and with the Glorious Gingham Designer Series Paper ON SALE through June, knew it was time to share it with you! It’s a fabulous way to get 4 angled corner backgrounds from one 6″ x 6″ piece of Designer Series Paper, and you’ll love how simple it is.

Lay a ruler down and mark 1-1/2″ on each bottom right corner as you rotate the paper 90-degrees four times. Mark it on the BACK SIDE of the paper you want to use, then you don’t have to worry about erasing lines! Then connect the marks across from each other like this:

Use your Paper Trimmer to cut along each of your lines and you’ll have 4 angled pieces to put in the corners of your card fronts:

My card base is Thick Basic White Card stock: 5-1/2″ x 8-1/2″, scored in half at 4-1/4″

Pretty Peacock card stock: 5-1/8″ x 3-7/8″

Basic White card stock: 5″ x 3-3/4″

I used the So Refreshing Bundle to complete my cards, and here’s a video to watch & learn how to:

Filled my pitcher with “water” and stuck in the flowers:

Let me know if you try it, or share your version in my Creative Corner Facebook Group for my V.I.C.’s (Very Important Crafters). Now turn up the alarm to remind you to order on Free Shipping Day and add these supplies to your cart:

Product List

Designer Series Paper Gift Box

Today’s project encourages you to USE THAT PRETTY PAPER- Don’t hoard it! This hinge-lidded gift box (3.5″ x 4″ x 1-1/4″ finished size) is speedy to make, and begins with a 6″ x 12″ piece of Designer Series Paper.

Score along each long size at 1-1/4″ in (or if you are using a Simply Scored board, put the short end at the top and score at 1-1/4″ and 4-3/4″)

Turn the 12″ side of the paper along the top of your trimmer or Simply Scored, then score at 4″, 5-1/4″, 9-1/4″ and 10-1/2″. You’ll trim at each of these score lines from the long edges just into the intersecting 1-1/4″ score line.

**If your paper is DIRECTIONAL (meaning there is a top and bottom to the pattern), watch the video to see instructions- or make sure that the top of your design is at the left when you make the first 4″ score along the long side.

This box is ideal for 2 bolts of Stampin’ Up! ribbon (or one large bolt, like the Boho Blue one I showed in the video), and it’s tight, but will work for 2 classic ink pads, or a myriad of other small gifts!

Three things to note if you are reading this in June 2023:

Most of the Designer Series Paper in the Stampin’ Up! Annual Catalog is 15% off during June only!

You CAN add discounted paper to the Starter Kit+ Special Offer in June! It’s the best VALUE for anyone with a long wishlist or who wants to try a new adventure- no obligation to try it out.

The Circle Sayings 3-for-Free offer ends June 15th!

When you purchase the Circle Sayings bundle from my Stampin’ Store by 6/15/23, I’ll email you a tutorial for 3 exclusive cards you won’t find anywhere else PLUS I send you the supplies (card stock, ribbon, paper, etc) to make those three cards with your new stamp set and coordinating punch! This is the bundle I used on my box today:

PIN or save this post to try soon, if not today!

Product List

Pinwheel Tower Card

You are going to want to make this card, believe me!

Since most of our Designer Series Paper is discounted through June 30th, I’ll be demonstrating some projects to inspire you to pull out your patterned paper and use every last scrap. You can set an alarm for Mondays and join me live on my Facebook Page or YouTube Channel at 12:30 pm MT, or watch the replay at your convenience.

Without further adieu, here is the fabulous Pinwheel Tower Card I taught today:

It opens up to stand and displays 4 panels! This card is best created in landscape orientation, giving you plenty of area on each panel to decorate or write a message. The finished size of this card (laying flat) is 4.25″ x 5.5″, so it fits into our Basic Medium Stampin’ Up! envelopes perfectly.

You’ll be delighted at how EASY this fancy card is to create and if you want to craft along with my video below, gather these supplies:

  1. One 4-1/4″ x 4-1/4″ piece of Designer Series Paper
  2. Four pieces of 2-1/2″ x 4″ Designer Series Paper that coordinate (don’t have to be the same pattern, but from the same pack) with another four 1-1/2″ x 4″ pieces of Designer Series Paper.
  3. Four 2-3/4″ x 4-1/4″ panels of card stock that match one of the colors from your Designer Series Paper
  4. Simply Scored Board (or paper trimmer with scoring blade)
  5. Adhesive

Once you’ve made a Pinwheel Tower Card, you may want to make a larger version in a slimline card, which could also be a “mini album” if you add photos to some of the panels!

This version is 9″ x 4″ when flat, so it fits into a legal envelope (don’t forget to stamp your envelope, too).

For this larger version, here are the supplies you’ll need (and adjusted measurements):

  1. One 4″ x 4-1/4″ piece of Designer Series Paper (still score along the longest side at each inch)
  2. Four pieces of 3-3/4″ x 4-1/4″ Designer Series Paper (or cardstock) with another four 3-1/4″ x 3-3/4″ pieces of Designer Series Paper (or cardstock and scraps of Designer Series Paper, as shown)
  3. Four 4-1/2″ x 4″ panels of card stock that match one of the colors from your Designer Series Paper
  4. Simply Scored Board (or paper trimmer with scoring blade)
  5. Adhesive

I used the BRIGHT & BEAUTIFUL Designer Series Paper along with the Sweetest Cherries stamps and Cherry builder punch on the Slimline version, and will list the supplies for the Hello, Irresistible original card below.

REMEMBER THE PAPER IS ON SALE THROUGH JUNE 30, 2023 – SAVE 15%!

Product List

Cupcakes, Pop Art & Free Projects to Make!

On our last trip to Washington, D. C. my husband and I decided to step into the Hirshhorn Art museum, as it was one of a handful of Smithsonian buildings we hadn’t yet visited. It was a short tour, as most of the modern art didn’t appeal to either of us AT ALL. My personal philosophy on art is that it should do one- if not both- of the following:

  1. Uplift and Inspire
  2. Make the viewer happy

Big talk coming from a person whose biggest art influence was the game “Masterpiece” (do you remember that??) however, that’s my opinion and I stand by it.

One exception to my ambivalence toward modern art is Pop Art. I am attracted by color (no surprise) and bold images of pretty (or in this case, yummy) everyday objects!

Since I have a special offer (see below) for customers who purchase the Circle Sayings bundle from my Stampin’ Store, I wanted to show a card using the stamp set WITHOUT a circle. The cupcake image is my “food spirit animal” so I channeled my inner-Andy-Warhol to give you an eyeful of BRIGHT sweets!

Each section alternates between being raised by black dimensionals or having just the cupcake raised on a color adhered flat to the card:

Good thing card stock isn’t as dangerous as the food coloring it would take to make frosting in that color! These are the Stampin’ Up! colors I used: Calypso Coral, Tahitian Tide, Daffodil Delight, Melon Mambo, Parakeet Party, Gorgeous Grape

Here’s a special just for you:

Purchase the bundle from my Stampin’ Store and you’ll receive 3 never-seen project tutorials PLUS the consumable supplies to create all three projects! You’ll get the tutorials via email and the supplies in the mail by June 30th. Offer valid for U.S. customers only.

The Circle Sayings bundle includes a photopolymer stamp set and a NEW coordinating 2-3/8″ circle punch.

While I’ll send you all the card stock, paper, ribbon, etc. to create the projects from my tutorials, you may also need these items (found in my store, as well):

  • Memento Tuxedo Black ink pad
  • Tahitian Tide OR Azure Afternoon ink pad
  • Lost Lagoon ink pad
  • Colored Pencils (I used Stampin’ Up! Watercolor Pencils)
  • Suggested Stampin’ Blends combos (could use colored pencils or Stampin’ Write Markers): Lemon Lolly, Tahitian Tide, Berry Burst, Medium combo
  • OPTIONAL: Wink of Stella pen
  • Scissors and adhesive, clear blocks B, C & D for the stamps

Circling Round to Monochromatic Colors (Plus 3 for FREE)

It’s been fun to teach color theory in May and I really hope you’ve learned some skills to help you choose palettes for your paper crafting and rubber stamping projects! Today, I “circled around” to MONOCHROMATIC schemes, which isn’t limited to only one color, but can include 2 or 3 variations of the same HUE. Here are a few examples:

Stampin’ Up! yellows are a exquisite example of how 3 different tints, tones or shades can harmonize well: Crushed Curry (card base), Daffodil Delight (sentiment and banner) and NEW Lemon Lolly (focal point) are different depths of the same sunny color and coordinate together!

We have a variety of purples, and not all of them start in the same corner of the color wheel, so this is where you need to learn to “see” harmonizing colors. The three I used for this card were Gorgeous Grape (card base), Highland Heather (larger banner and cupcake frosting) and Fresh Freesia (background and cupcake liner).

The tutorial for this card style includes further explanation:

I chose to use the Circle Sayings Bundle for our lesson on monochromatic color ideas because I have an exclusive opportunity through June 15th for you: Purchase the bundle from my Stampin’ Store and you’ll receive 3 never-seen project tutorials PLUS the consumable supplies to create all three projects! You’ll get the tutorials via email and the supplies in the mail by June 30th.

Let me share a few additional Stampin’ Up! color trios that work well as monochromatic combinations. These are NOT all the possible pairings, only a few I came up with to get your juices flowing:

Now it’s your turn to give a “monochromatic” card a try!

Product List

Inside the cards:

Analogous Colors- What? And How to Use them

Another lesson in COLOR CONFIDENCE!

Analogous colors are three to five colors NEXT TO EACH OTHER on the color wheel. When used together, they create a peaceful, harmonious project that flows.

I store my ink pads by Stampin’ Up! color family, but I store my card stock in rainbow order (see below), which makes choosing analogous colors a piece of cake! To create today’s card, I started with Calypso Coral card stock (reminds me of my favorite roses beginning to bloom in my yard!) and chose the two colors right before it: Petal Pink and Flirty Flamingo.

Then I made the same card design and tried a different analogous color scheme, pulling Berry Burst and the colors on either side of it: Blackberry Bliss and Moody Mauve (new)!

Here are the 2023-2024 Stampin’ Up! Colors in Rainbow order:

  • Cherry Cobbler
  • Real Red
  • Poppy Parade
  • Sweet Sorbet
  • Melon Mambo
  • Flirty Flamingo
  • Petal Pink
  • Calypso Coral
  • Copper Clay
  • Cajun Craze
  • Wild Wheat
  • Pumpkin Pie
  • Crushed Curry
  • Daffodil Delight
  • Lemon Lolly
  • Soft Sea Foam
  • Lemon Lime Twist
  • Parakeet Party
  • Granny Apple Green
  • Old Olive
  • Mossy Meadow
  • Garden Green
  • Shaded Spruce
  • Pretty Peacock
  • Lost Lagoon
  • Coastal Cabana
  • Pool Party
  • Balmy Blue
  • Tahitian Tide
  • Azure Afternoon
  • Misty Moonlight
  • Boho Blue
  • Blueberry Bushel
  • Night of Navy
  • Starry Sky
  • Orchid Oasis
  • Highland Heather
  • Gorgeous Grape
  • Blackberry Bliss
  • Berry Burst
  • Moody Mauve
  • Fresh Freesia
  • Bubble Bath
  • Early Espresso
  • Pecan Pie
  • Crumb Cake
  • Pebbled Path
  • Gray Granite
  • Smoky Slate
  • Basic Gray

Here’s my HIGHLY HUMAN explanation of Analagous colors and a simple fun-fold card (that I only mess up a few times…thank goodness for the ability to skip ahead on YouTube!):

There are a few days left to join the 2023-2025 In Color Club, where you’ll collect all the color collection products in the 5 new In Colors over the next 5 months. YOU CAN BE PART OF THE CLUB from anywhere in the U.S.A. ~ sign up by May 31, 2023 and learn more here:

A Thank-You Faux Step Card

Have you explored the Online Exclusive products in my Stampin’ Up! Store? One of the ones I’ve been loving is the Hello, Irresistible Suite and this Faux Step Card is a snap to put together using the products in the suite!

This is a Portrait (tall) version of the Rain or Shine card I created a few months ago (watch the tutorial HERE) and the card base measurements are:

  • Card Base is 11″ x 4.25″ (scored at 2″, 4″ and 7.5″)
  • Designer Series Paper: 4″ x 1.75″ (Pretty Peacock lattice piece) and 4″ x 3.25″ (leaves).
  • Tall panel is 2.25″ x 11″, scored at 5.5″
  • Designer Series Paper is 2″ x 5.25″ (Flirty Flamingo pink piece)

Emboss the greeting in white embossing powder on Basic Black card stock and fussy cut for the front. I did use the now-retired white seam binding ribbon around the bottom step panel, but you can substitute any that you have in your collection.

The coordinating dies cut the flowers from both the stamp set AND the Designer Series Paper, as I’ve done here, and then I embellished with a few of the Frosted Dots (also in the suite) using mini glue dots to adhere to the center of the flowers, or scattered across the front.

Once you make this card, you’ll want to make many more just like it, so cut your paper accordingly! Shop the supplies here:

Product List