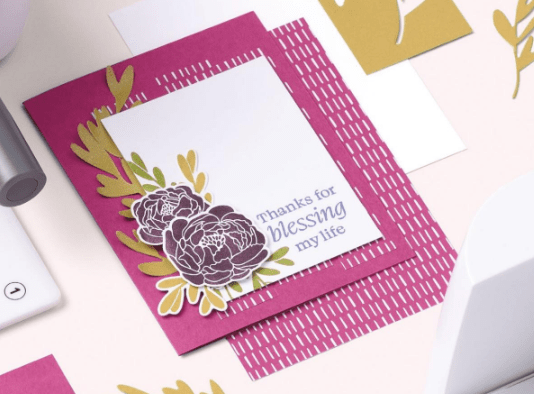
Have you explored the Online Exclusive products in my Stampin’ Up! Store? One of the ones I’ve been loving is the Hello, Irresistible Suite and this Faux Step Card is a snap to put together using the products in the suite!
This is a Portrait (tall) version of the Rain or Shine card I created a few months ago (watch the tutorial HERE) and the card base measurements are:
Card Base is 11″ x 4.25″ (scored at 2″, 4″ and 7.5″)
Designer Series Paper: 4″ x 1.75″ (Pretty Peacock lattice piece) and 4″ x 3.25″ (leaves).
Tall panel is 2.25″ x 11″, scored at 5.5″
Designer Series Paper is 2″ x 5.25″ (Flirty Flamingo pink piece)
Emboss the greeting in white embossing powder on Basic Black card stock and fussy cut for the front. I did use the now-retired white seam binding ribbon around the bottom step panel, but you can substitute any that you have in your collection.
The coordinating dies cut the flowers from both the stamp set AND the Designer Series Paper, as I’ve done here, and then I embellished with a few of the Frosted Dots (also in the suite) using mini glue dots to adhere to the center of the flowers, or scattered across the front.
Once you make this card, you’ll want to make many more just like it, so cut your paper accordingly! Shop the supplies here:
Understanding a COLOR WHEEL a little bit will help you put together beautiful color palettes for your stamping projects, and today we are talking about COMPLEMENTARY colors, or colors directly across from each other on the color wheel:
When you choose complementary colors, you create HIGH ENERGY in a palette, like this turtle card made from the Playing in the Rain stamp set from Stampin’ Up! using Azure Afternoon (blue) and Pumpkin Pie (orange):
You can always add a bit of a third color (in this case, Granny Apple Green) and still keep the two main colors in focus!
One thing I love doing with a new catalog is to look for card layouts I can copy. Both of the cards I am sharing today were inspired by this card on page 152 of the annual catalog (154 in the digital version):
This next complementary color card follows the same pattern or card layout, but uses the LOVELY new Lemon Lolly color paired with Fresh Freesia, which I cannot get enough of:
This time I used the Sweet Citrus stamps and dies (my signature for creative juice) and embossed the front panel with the Raindrops embossing folder after I stamped the greeting.
All of this is shared in my weekly video, and if you are like me and want it to play faster, just speed up the playback by clicking on the gear at the bottom of the YouTube video!
Now you know a little more about complementary colors, try it yourself! Find a card design in the catalog (or use one of my previous samples here on CJBL) and re-create it with your own colors and stamps.
If you want to copy one of the cards I shared today, here are the supplies I used for both cards:
If choosing colors to use in your crafting is daunting, I have a tool for you!
The new 2023 In Color Coach will be going out with my email this week (if you aren’t subscribed yet, you will get it when you join my email list) and in Lunchtime Crafting LIVE today (video below), I showed a few examples using the page featuring the 2023-2025 In Colors.
Stampin’ Up! created Copper Clay, Wild Wheat, Boho Blue, Moody Mauve and Pebbled Path (in the order they are on my Classic Birthday Card) to set the TONE for the next two years as “In” colors. A tone is a pure color (HUE) with GREY added.
These colors feel “retro” and “earthy” when I look at them…what adjective would you choose?
While they look fabulous together, they can also be combined with other colors from our collections and I used the Color Coach to create two more examples:
When I combined Boho Blue with Lost Lagoon, Petal Pink and Misty Moonlight, it felt SEA-worthy, so I put them on a Crumb Cake beachy background and used the new Circle Sayings bundle for a summer “Thinking of You” card.
Next, I looked at Moody Mauve and the Color Coach suggested pairing it with Petal Pink again and Flirty Flamingo. It needed one more color, and the new CORE color of Bubble Bath felt just right. The Crafting with You bundle was ideal for this Handmade Hug card. All these new products are available MAY 2, 2023 from the new Stampin’ Up! Annual Catalog. Shopping links will be added at the bottom of this post on that day.
I “quilted” the background by running it through the Basics 3-D folder. This reminds me so much of a quilt I’ve snuggled under as a child!
Each month from May 2023 through September 2023, you will receive a package of one new IN COLOR products (May- Boho Blue, June- Copper Clay, July- Wild Wheat, August- Moody Mauve and September- Pebbled Path):
Classic Ink Pad
Classic Ink Refill
Stampin’ Blends Combo Pack
5 sheets of Card Stock
Two 6″x6″ pieces of Designer Series Paper
2 yards of ribbon
PLUS a bonus embellishment each month!
PLUS an exclusive project tutorial (supplies for the project will be included FREE, you’ll use your own ink and any stamp set to complete the project)
PLUS each month a member of the club will receive a set of the five 2023-2025 In Color Stampin’ Write Markers FREE until everyone has a set!
The Monthly Cost will be (plus $6 for shipping to you if you can’t pick up from Loni’s house in Hurricane, UT) and if you sign up, you are agreeing to all 5 months (worth it, I promise!).
Let me show you how to make the cards above and use the Color Coach to find a pretty palette:
Have you ever made a triangle gift box? It starts with a regular card base (8.5″ x 5.5″) and is quick to complete, no geometry required!
It felt like this triangle needed tacos, but you can put anything on it! Print the instructions below, then watch the video that follows for a few more finished samples and HOW TO!
Any supplies you need to craft your own can be found in my STAMPIN’ STORE! And heads up… tomorrow (Wednesday, April 19, 2023) is a FLASH FREE SHIPPING DAY on all orders over $75!
Thanks for allowing me to help you gain creative confidence!
Split-front cards are trending in paper crafting, and the Sending Smiles bundle makes today’s card a sunny one!
I’d been seeing these pretty cards and knew it was time to jump in, so today I taught you how with a video. Will you try this unique style of a split-front card?
If you are wanting the best deal to gain CREATIVE CONFIDENCE, add $125 worth of these items to a STARTER KIT (and only pay $99)…then you’ll be part of my Sprinkled Ink team and connected to other creative people sharing what they love! It’s my job to help you learn and grow your business, and we’ll have a fun time doing it together.
Crafter Problems #763: When you haven’t had time to play with a stamp set & die bundle before it’s about to be retired!
Today I showed how to use the dies from the Conversation Bubbles bundle (about to retire from the Jan-April mini catalog) to create a stencil for the background of a card:
Inspired by Cathy Zielke‘s concept on Youtube, I figured I could make my OWN stencil, and it worked beautifully! What other dies would you try to make your own stencil with?
My problem is YOUR opportunity: Starting tomorrow (April 4th), you can shop the LAST CHANCE SALE in my Stampin’ Store to collect the Conversation Bubbles stamp set and Conversation Bubbles dies at a discount! The bundle was $46.75 originally, but if you purchase them separately, the total will be just $32 (while supplies last)!
Watch the video here (feel free to speed it up on YouTube to make it quick and easy):
I hope I’ll have time to spotlight this playful bundle one more time before they are gone for good.
Meanwhile, set an alarm to remind you to shop my Stampin’ Store tomorrow for the Last Chance Sale!
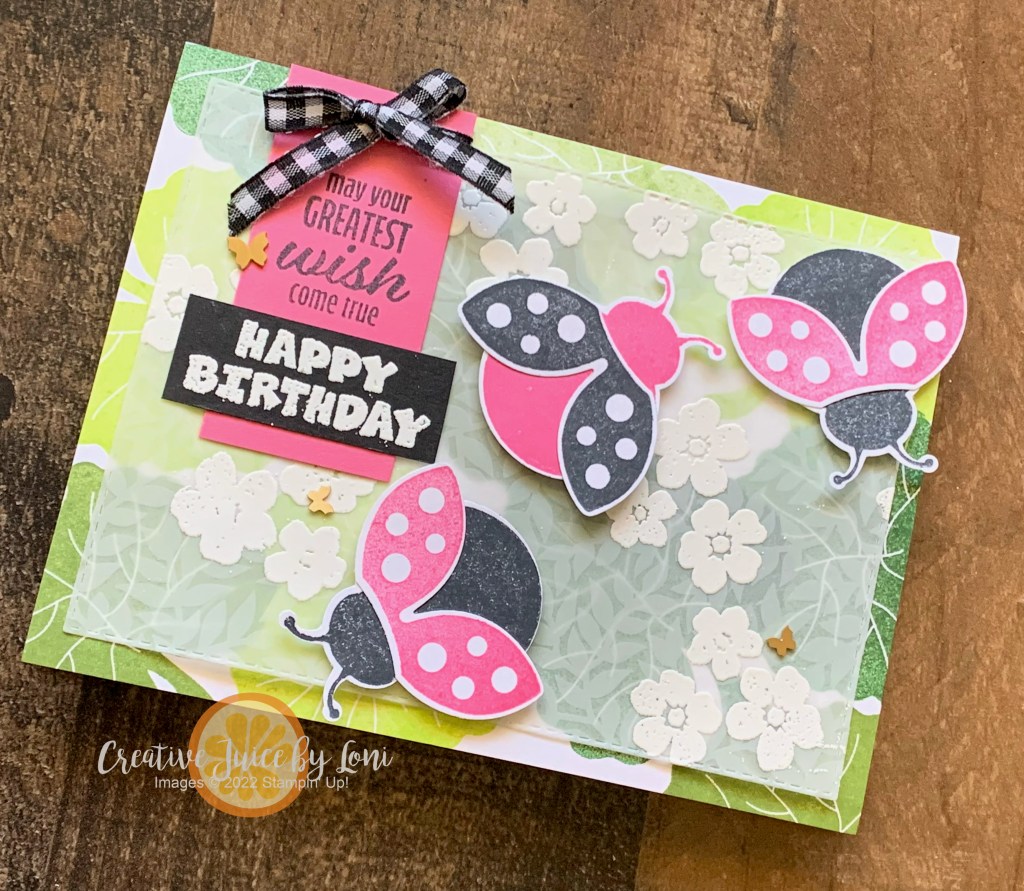
I challenged my Sprinkled Ink team to use Vellum this month, and what kind of leader would I be if I didn’t do what I asked them to do? So it was delightful when Friday’s TGIF challenge went right along with it! Plus, I got to pull out my Ladybug builder punch to create Polished Pink bugs for a birthday card, so who wouldn’t have fun with that?
Have you played with the Vellum Basics Specialty Designer Series Paper? With SIX 12″x12″ pieces of printed vellum – 2 each of stripes, polka dots, and this pretty leafy vine that I used – it’s gives a soft layer of texture, which I enhanced by heat-embossing the blossoms on top of:
While I stamped and punched out the ladybugs for the Polished Pink version of the card, you can also just use the Ladybug Builder punch to punch the pieces out and stamp the polka-dots on the wings, as in the Real Red version-
You’ll have such an enjoyable time putting together these cards, and remember to order some Brushed Brass Butterfly embellishments to include inside your card as the birthday gift!
Here’s a step-by-step video to make it easy for you – simply pause the video and collect the pieces you need to create along with me.
Click the links to add the supplies you’ll need to your cart (Stitched Rectangle dies and Cut & Emboss machine are optional):
THE BEST DEAL is always the Starter Kit!! Add $125 of the products you want to your Starter Kit and only pay $99…PLUS, save every time you shop, and be a part of my fabulous Sprinkled Ink team of Stampin’ Up! demonstrators. It’s a WIN/WIN opportuntiy!
Have you taken the time to explore the new Online Exclusives in my Stampin’ Up! Store? Some things have been so popular, they are already backordered and we are waiting for more!
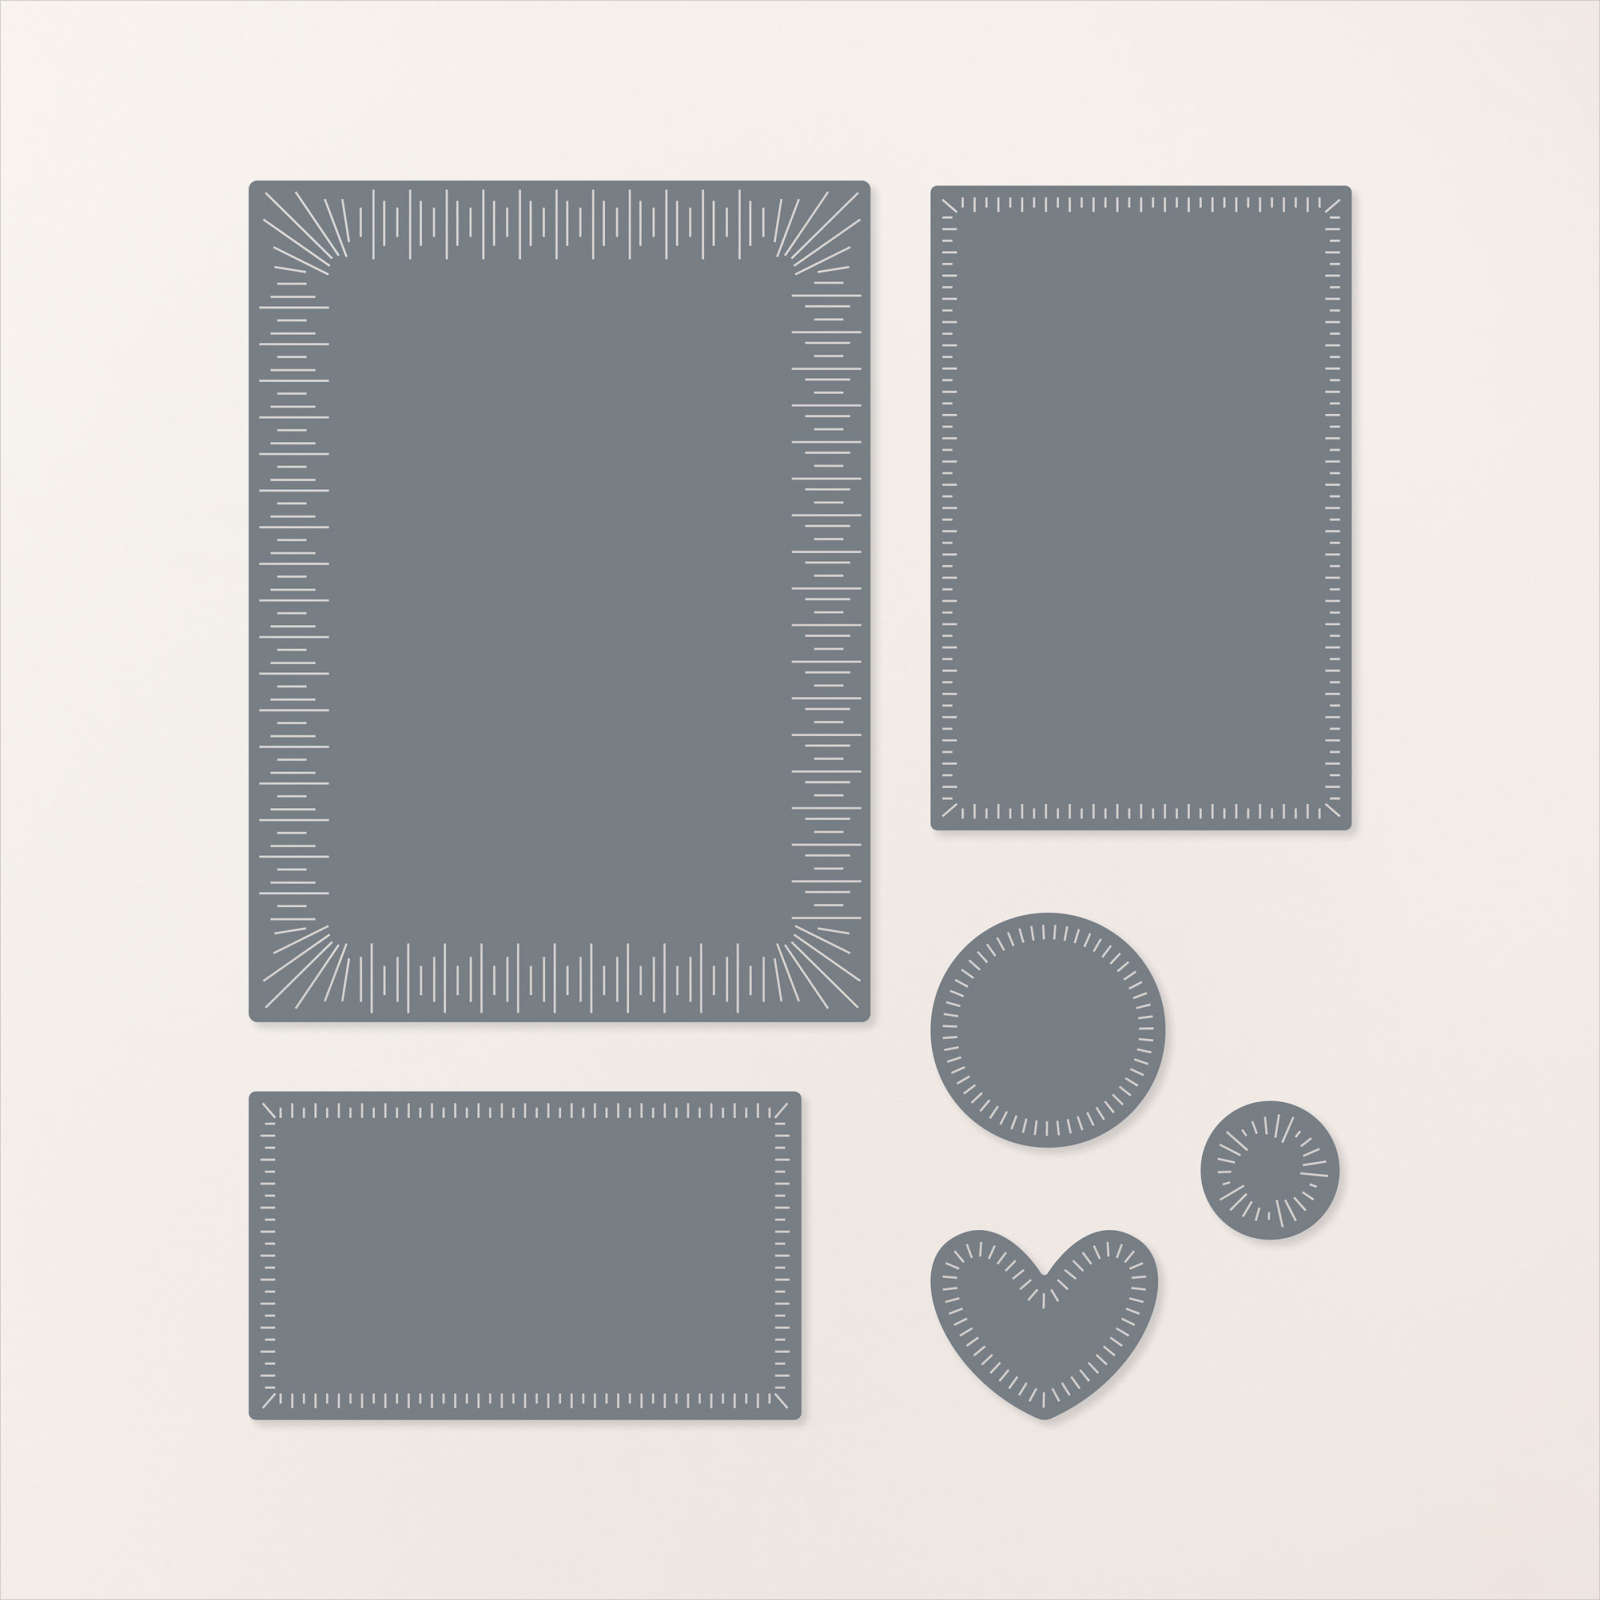
One new item I wanted to share with you is the Radiating Stitches Dies…these cutting tools will take ANY stamps you already have and give them a pretty frame or add a bit of whimsy with a layer of “stitching” around the edges of your layers:
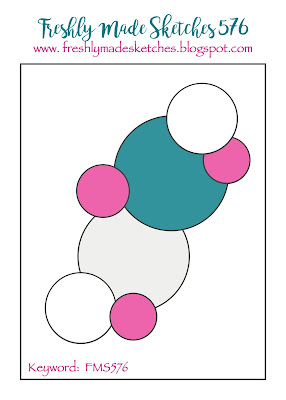
I chose to follow the Freshly Made Sketch #576 during my Live Crafting today and used two In Color Combinations to demonstrate the versatility of starting with a sketch, and the ease of using a combination of colors curated in a color “family”.
It happens that from today through Mid-April, I have 10 family birthdays (and about 15 friend and team birthdays) to celebrate, so this was an opportunity to get prepared!
This version I turned sideways and used the 2022-2024 In Colors as my palette. A sketch can be turned any which-way!
And this card followed the portrait layout of the original sketch, plus I used a base of Very Vanilla with my colors from the (retiring) 2021-2023 In Colors. All supplies listed below to make it easy to add to your cart!
Black & White is a classic, elegant color combination, but when you add a POP of color, a card becomes stunning!
In my LIVE broadcast today, I teach you how to stack the individual pieces from the Daffodil Dies to craft a bundle of flowers on top of a black & white polka-dot background. While I chose Melon Mambo as my “POP” of color, you could use yellow, purple or bright blue!
Having a few shades of the pink really helped these flowers feel real (lightest to darkest: Blushing Bride, Polished Pink, Melon Mambo).
It certainly brightened my day to make these fabulous cards!
Every crafter loves the feeling of using up *every*scrap* of pretty paper. It’s a magical feat of unparalleled proportions! That’s how I feel today, after successfully finishing off a whole pack of Favored Flowers Designer Series Paper from Sale-a-Bration.
After using up a bunch of this pretty paper for cards to swap at StampFest, I had just a few long strips and edges left that seemed a shame to waste, so I came up with the Peek-a-Boo Pocket card:
Starting with a Basic White Envelope, I cut off one end to create a pocket, then punched a shape for my greeting to peek out of. To finish it off, I embellished with pieces fussy cut from the Designer Series Paper. I demonstrated this for my Monday Lunchtime Live project today:


")


")


")
 Designer Series Paper")


")


 Designer Series Paper")


")


")


")
")

 Specialty Designer Series Paper")


 Gingham Ribbon")


")


 Designer Series Paper")
")


