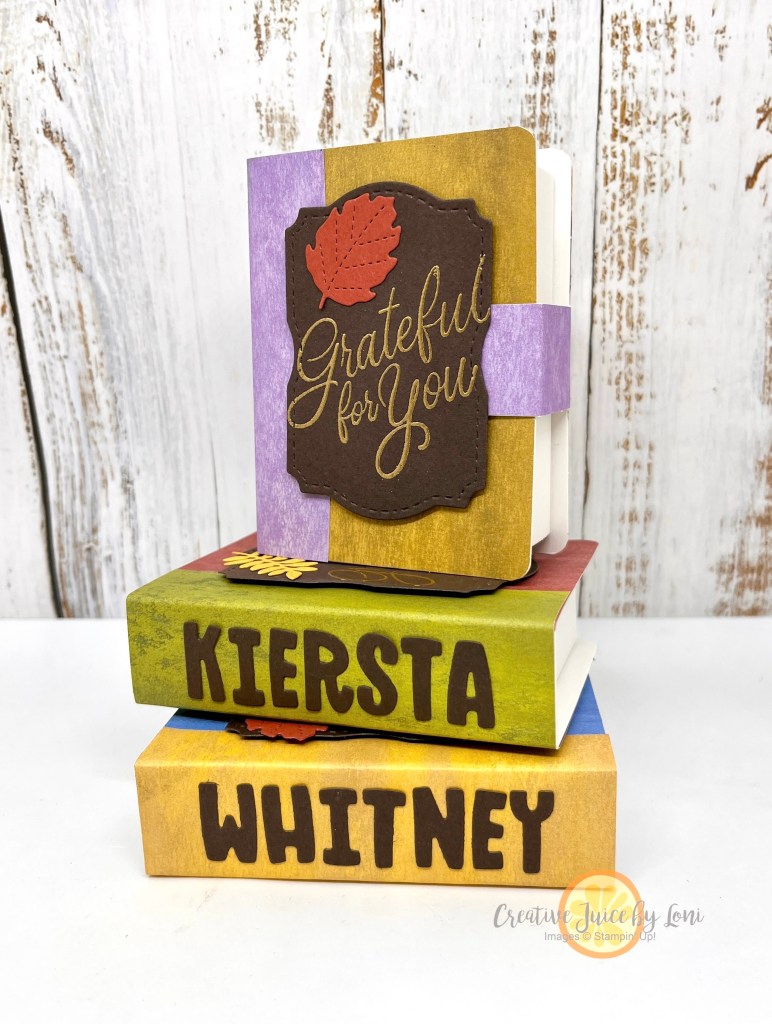
A great DIY is one that is prepared for you to put the finishing touches on, and these darling little book treat box accordion albums double as precious keepsakes, once you add photos and journaling of which blessings you are most grateful for.
The Book Treat Boxes give you the canvas to embellish, and I chose to use the back side of the lovely Splendid Autumn Designer Series Paper to cover my boxes, because it looks like colored leather or parchment, perfect for my vision of classic books:
Embossing the sentiment on the piece cut from the frame in the Splendid Autumn bundle adds a old-fashioned title to the album, and the Mini Alphabet dies personalizes the book.
You could fill these boxes with treats, but I chose to make a Gratitude album. Open it up and pull out the pages to add photos of who or what you are thankful for, and journal why they matter to you. You can add at least TWO strips of 3.25″ x 12″ card stock (scored every 2.5″) end-to-end to make long accordion pages, though this is just one strip:
Watch the video for tips and how to assemble, then add the supplies to your cart below:
If you can use scissors and glue, you have the ability to make pretty things with paper! All you need next is a kit: Lucky for you ~ the Stampin’ Up! Kit Collection is up to 30% off through October 31st:
Not only is a kit a wonderful starting point for any new paper crafter, they also give you ideas for further crafting, as I’m about to show you.
Playing with the Hello Hollyhocks kit (an all-inclusive, non-stamping kit), I demonstrated how to let the sketch for card #1 (on the left) inspire a future project (on the right):
Swapping out a hollyhocks for stamped and colored zinnias and creating your own splatter background made this “dupe” super simple.
Next, you can “step up” a card from the kit by cutting apart the card base and framing it on coordinating card stock:
Watch the video (below) to see what I did for the inside of the stepped-up version!
Finally, let a kit teach you a new technique to try, like this floating frame idea. The card on the left is from the kit, which inspired the Christmas card on the right:
Keep a few kits on hand for gift-giving occasions, too~ they are unique, thoughtful gifts!
Being a paper crafter means always having supplies on hand to create anything you can dream of: From greeting cards to memory albums, or gifts to seasonal decorations, you’re prepared to MAKE IT!
Rummaging through my crafty closet, I found a few chargers left over from a previous project. I know my Creative Juice community has a lot of Halloween decor, but if you have a void between October 31st and Christmas, this may be a project to embrace:
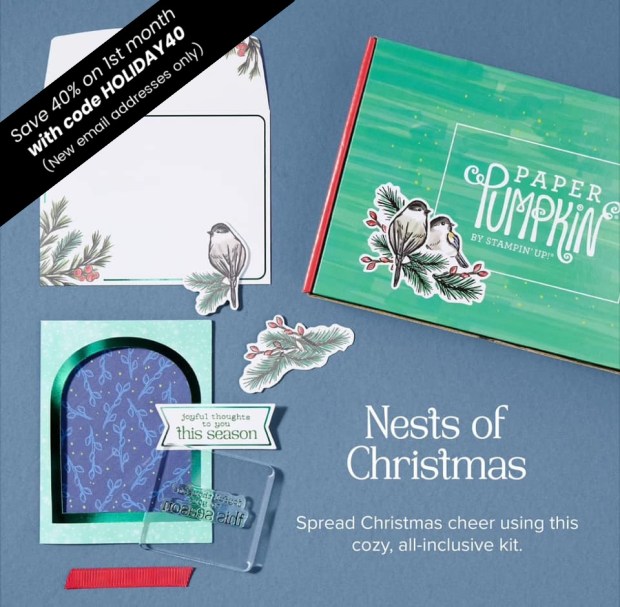
Because the October Paper Pumpkin kit coordinates with the Nests of Winter Suite, I wanted to show a card using those products that pops out of the envelope to create a stand-up 3-D frame:
This was a pretty simple card to create, and if you dislike fussy cutting (as I did with the birds from the Designer Series Paper), you could use the coordinating dies to cut different birds out for the inside.
Here’s the video tutorial to follow along:
Add a panel to the back of the card for writing your message, and remember, #nonakedenvelopes
If you love this project, DON’T MISS THE “Nests of Christmas” craft kit in the mail! You must subscribe by October 10th in order to receive this kit, and new subscribers can use code HOLIDAY40 to save 40% off their first kit!
The stamp set from the Kit will work perfectly with the Suite from the mini catalog (which we used today). When you purchase Stampin’ Up! products from your demonstrator, you support a small business, PLUS keep artists creating beautiful crafting supplies for you to enjoy~ THANK YOU.
A stamp set that covers multiple seasons and occasions is a good investment, and when it’s as cute as the Warms My Heart images & sentiments, there are so many stories to tell with it!
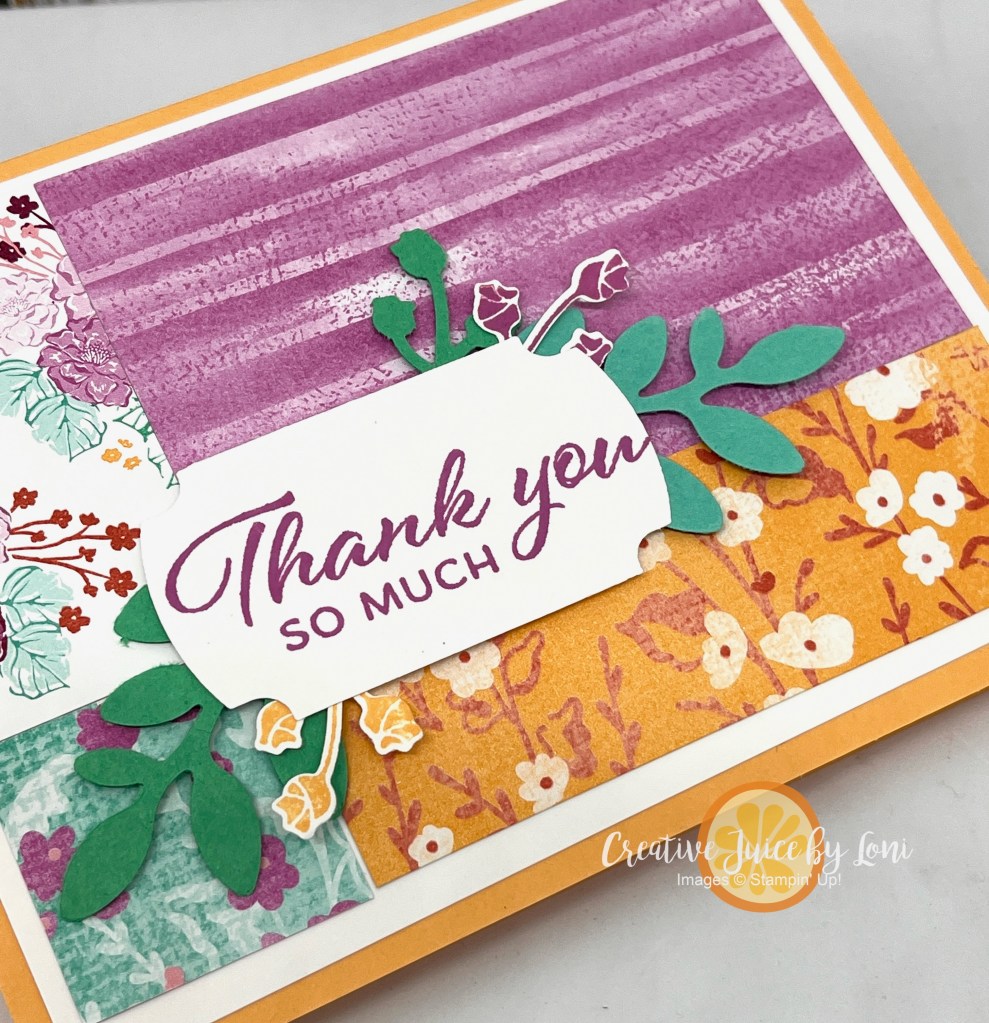
Do you remember the “Choose Your Own Adventure” book series? That’s what we did today during my Monday LIVE video on my Facebook Page & YouTube! I let those who were watching in real time CHOOSE the season, the background, the colors and the label shape for the card we created, and THIS is the result:
If you want to watch us make this card, here’s the video, and if you want to see some alternate options, keep reading:
This style of card would be just as cute with Designer Series Paper for the background, and created for Christmas!
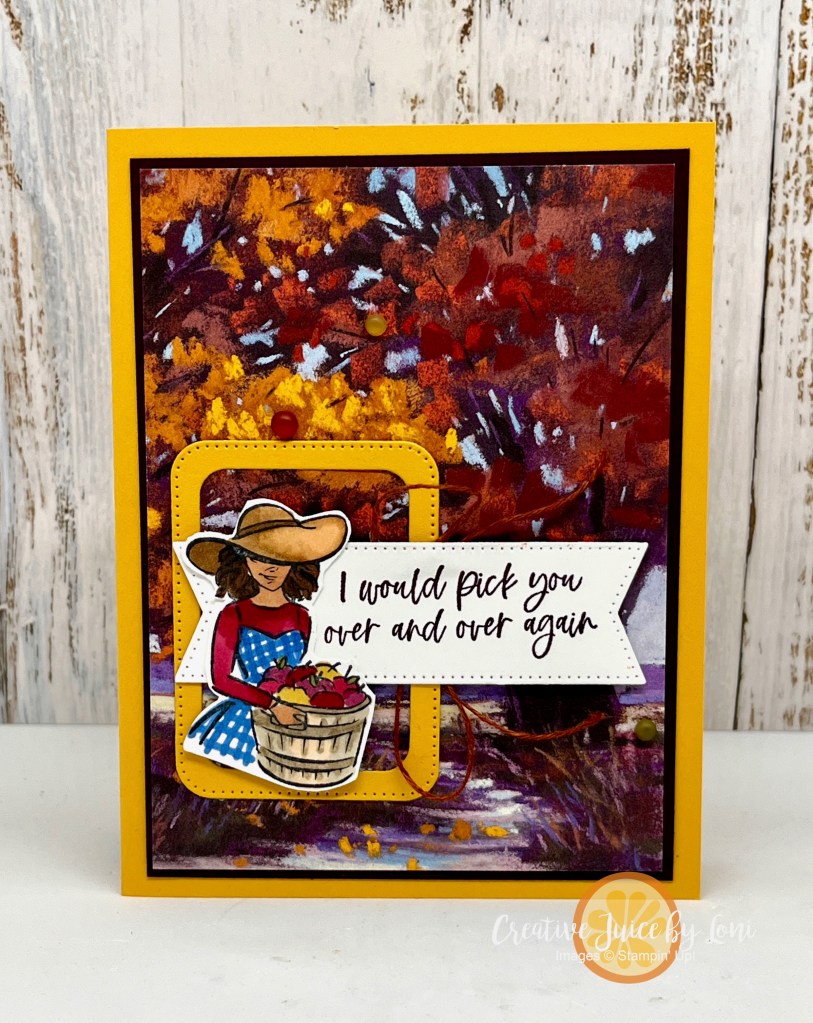
With both of these cards (and the next) I colored the stamped images with Watercolor Pencils and blended them together with Wink of Stella, which is every crafters FAVORITE tool for adding a wash of SHIMMER & SHINE. However, it’s very difficult to capture in a photo! This one is as close as I could get: The texture you can see is really specks of sparkle!
Another option, still keeping it simple with the sentiment on a banner, but without the need to fussy cut (there are no coordinating dies for this set, FYI):
Just so we’ve used every piece of this set, here’s an autumn apple-picking version, in portrait:
When I taught piano lessons, I’d tell my students “Practice trumps talent when talent doesn’t practice”. If you’ve ever thought, “I’m not creative,” believe me when I say CREATIVITY CAN BE LEARNED!!
The easiest way to become more artistic is to have a starting point. Paper Pumpkin – a monthly craft box kit subscription – gives you a place to practice. Let me show you how:
On the left is a card created as designed for the September Paper Pumpkin Kit (“Autumn Abundance”). It took me less than 5 minutes to make it, following the instructions in the box. I thought the colors were so pretty, I chose to use the same palette on another card. Using Cajun Craze, Crushed Curry and Night of Navy ink pads, I followed a sketch from the Stampin’ Up! Sept-Dec Mini Catalog (pg. 16) to make the second card. It was simply stamped on Very Vanilla card stock and used the Labeled with Love punch to make the trio of panels.
Each quarter, there is a coordinating die set available to add-on to the kits, so I used the same sketch & colors to create a second version with the die-cut leaves using the dies for last quarter. They are sold out, but you CAN order the Merry Tags & More Dies (which coordinate with the Oct-Dec 2024 kits) while supplies last.
Next, this Thank You card in the kit (left) had a beautiful base. What if you needed a small gift package?
Make it into a box, of course! I’m teaching you how to make all these alternate projects in today’s video, so watch here for instructions:
Also included in the kit this month was this third card project- it was a 4″ x 4″ Autumn card, then I looked at the window and it made me think of a shaker card:
The snail and leaves shake around inside!
The kit is terrific to get your creative juices flowing, and making the projects as intended, you will learn the basics of paper crafting. You can always make different projects with the supplies you have in the box, and I send an EXCLUSIVE email each month to my Paper Pumpkin subscribers with ways to use the stamp set and ink spot after the kit is complete!
HERE’S THE DEAL:
Try a Paper Pumpkin craft kit subscription with 40% off your first month (new subscribers only)! Use promo code HOLIDAY40 when you subscribe HERE by October 10, 2024!
You are peeking at the “Nest of Christmas” October Kit, which coordinates with the Nests of Winter Suite in the Sept-Dec Mini catalog, and you could try it at a discount! This kit will make 10 Christmas Cards.
While the September Autumn Abundance kit isn’t available as a full kit, the refill IS available in my store (limited supplies available) and you could use other stamps and ink pads you already have to make it. You must be a current Paper Pumpkin subscriber to order refills or add-ons, so sign up and then start shopping the extras, using the same email you subscribed with.
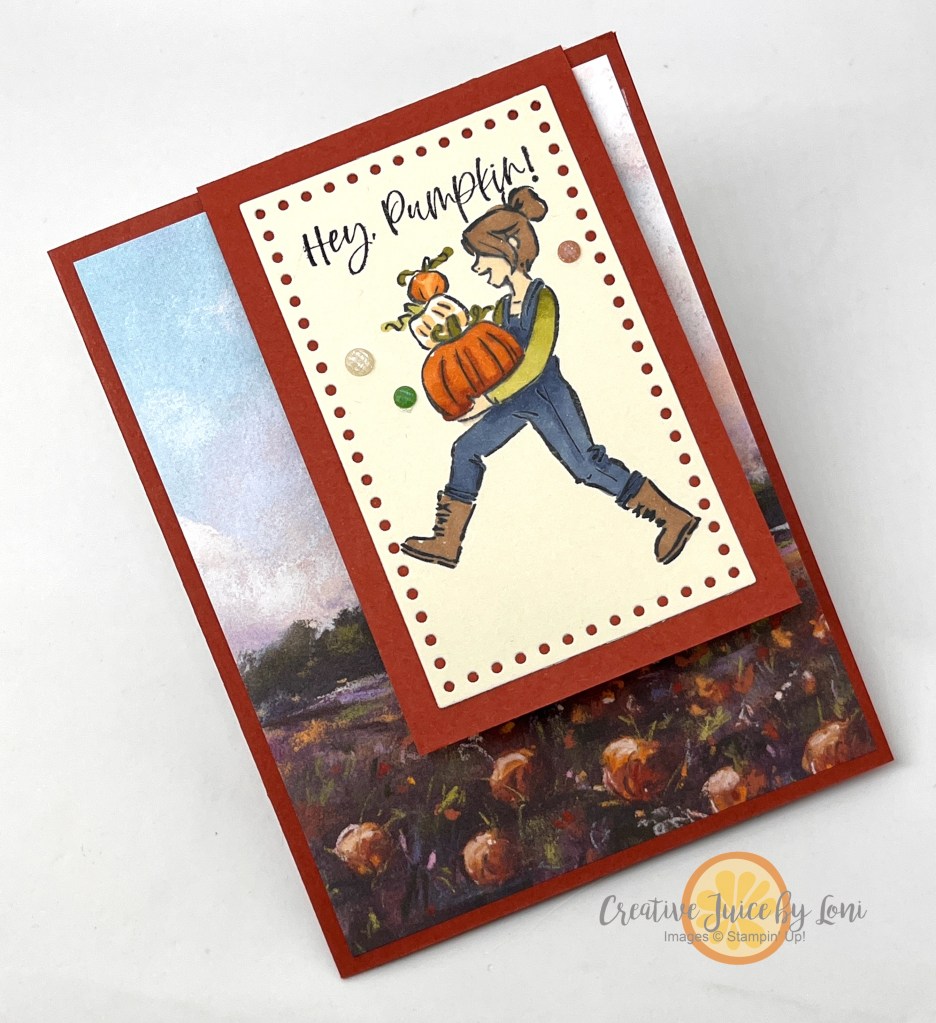
Simplifying an idea today with this flip-top fun-fold card! I wanted to use the “Warms My Heart” stamp set, which doesn’t have coordinating dies, so opted to use a panel I could stamp on as the focal point. The Everyday Details dies has these darling dots around the edge of the rectangles, and don’t need much dressing up. Plus, the beautiful pumpkin patch on the bottom of the patterned paper needs to be seen:
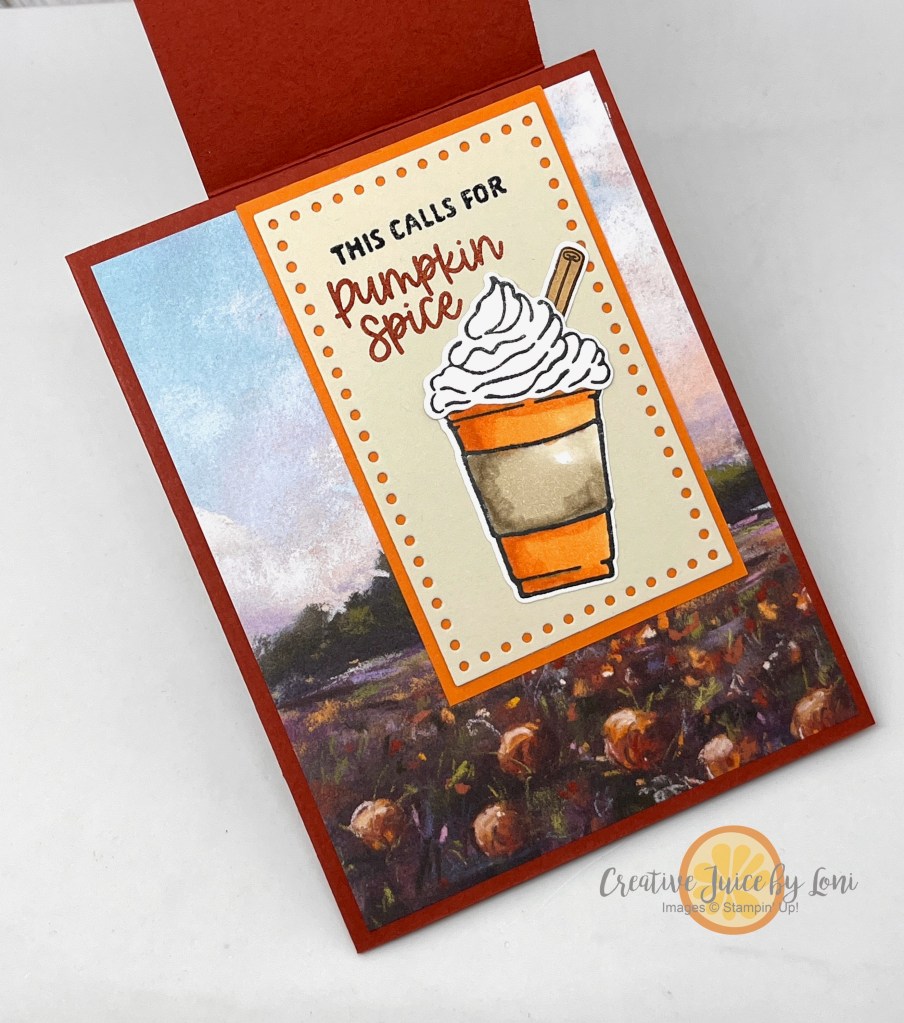
The top flap (with girl carrying pumpkins) flips up and there is a second message that matches the theme on the top of the card:
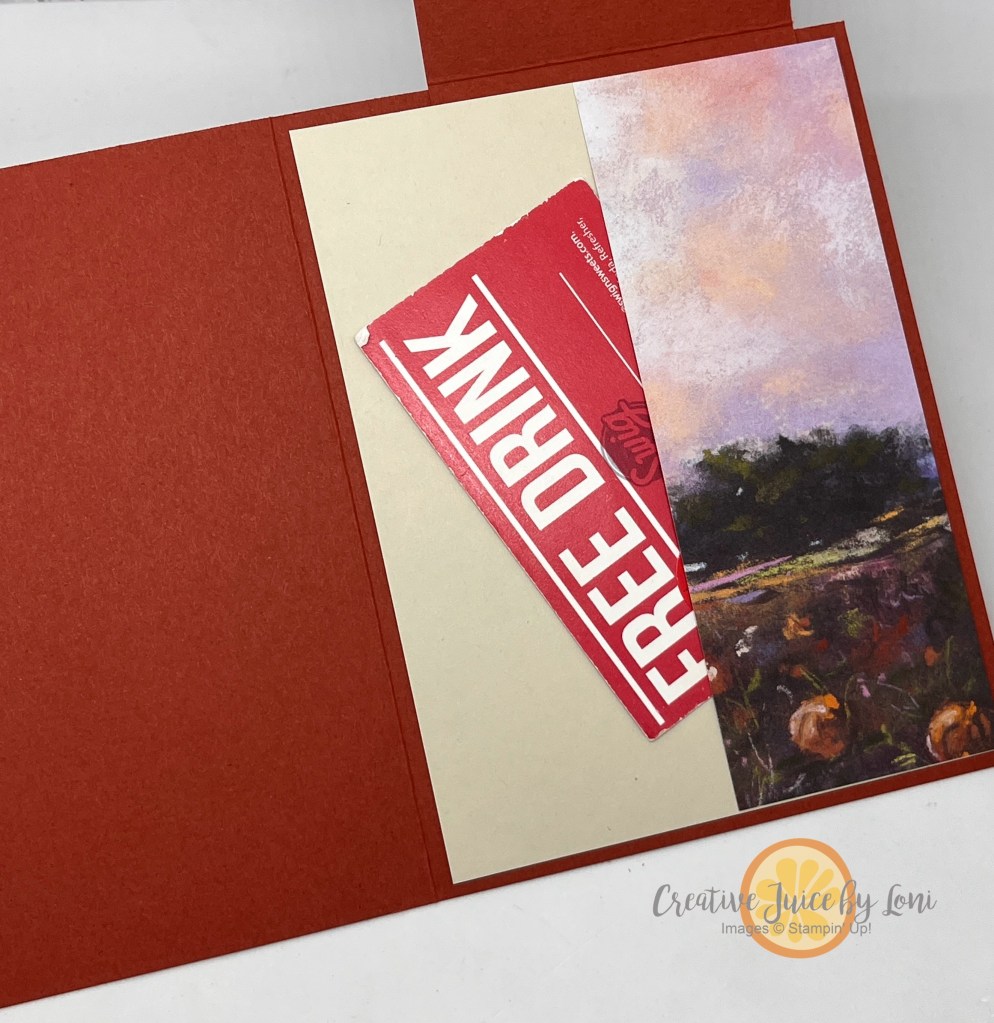
Finally, you open the card all the way and you can make a pocket with the other large piece of Designer Series Paper to slip a gift card in!
Here are the paper supplies you’ll need (with the ones I used for the card above in parentheses):
Card base: 8.5″ x 5.5″ scored at 4.25″ (Cajun Craze)
Flap for over top: 5.25″ x 2.75″, scored at 4.25″ (Cajun Craze)- watch video for paper-saving TIP!
Designer Series Paper: 5.25″ x 4″ and 5.25″ x 2″ (Splendid Autumn)
For the Pumpkin Spice drink layer, I used the More Than Autumn bundle (you’ll see more of that bundle on Wednesday!)
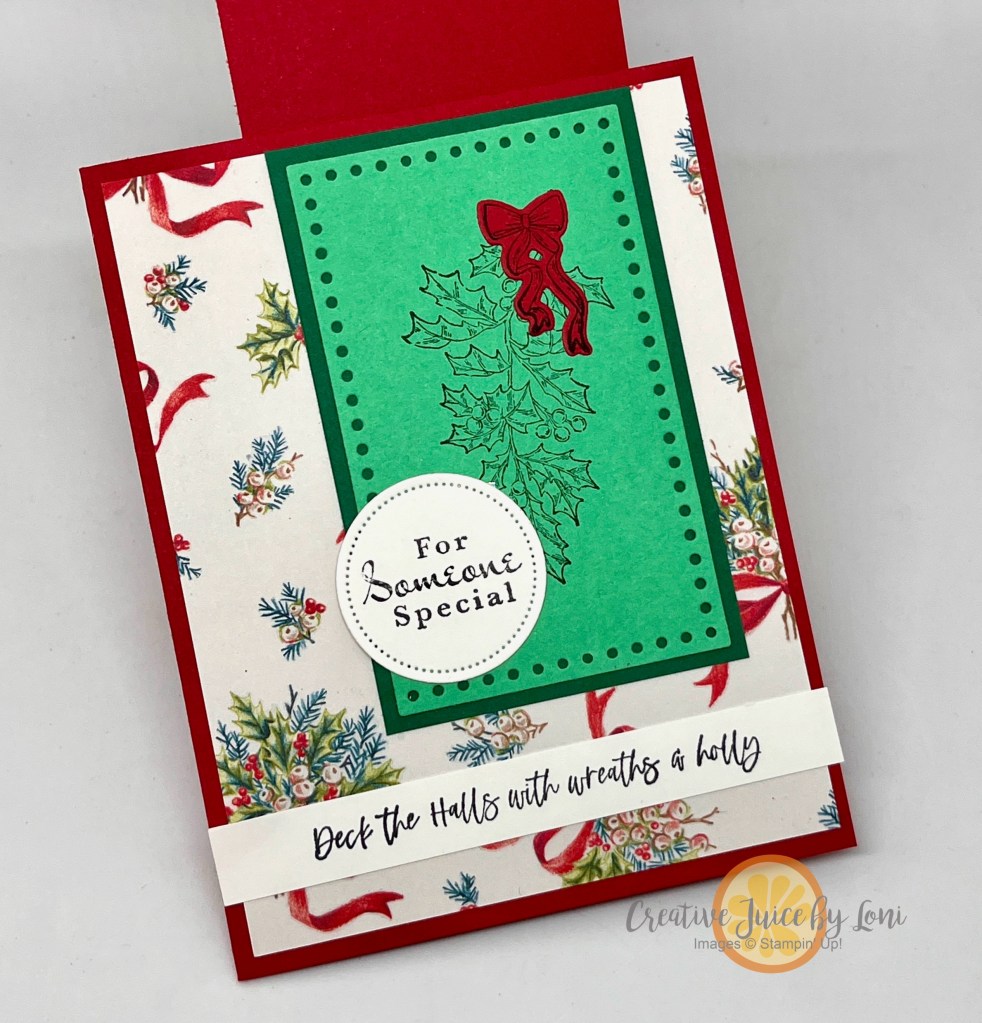
After this How-To video, you’ll find the Christmas version of this simple fun-fold card!
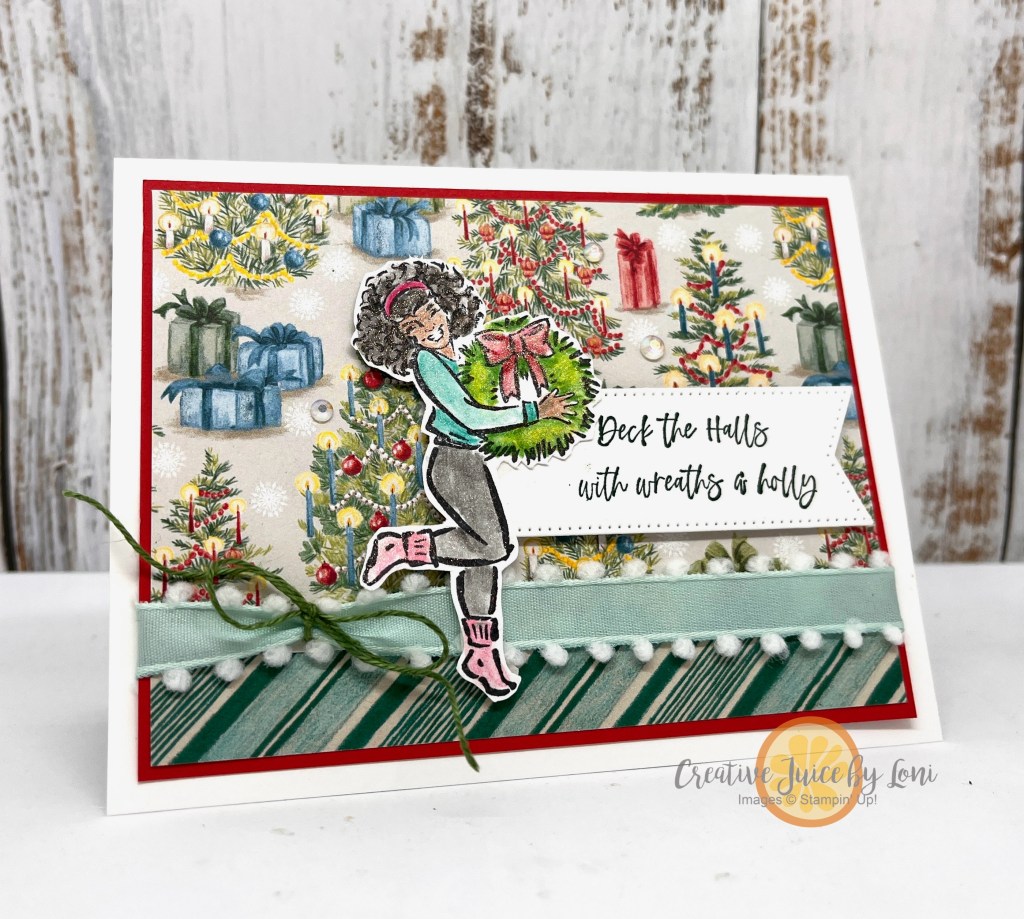
Here’s the same card pattern using the image of the woman with the holiday wreath:
While this version could also hold a gift card, I chose to make it a normal card and on the inside, and simply added a strip of the back side of the Designer Series Paper to the inside to make it fancy:
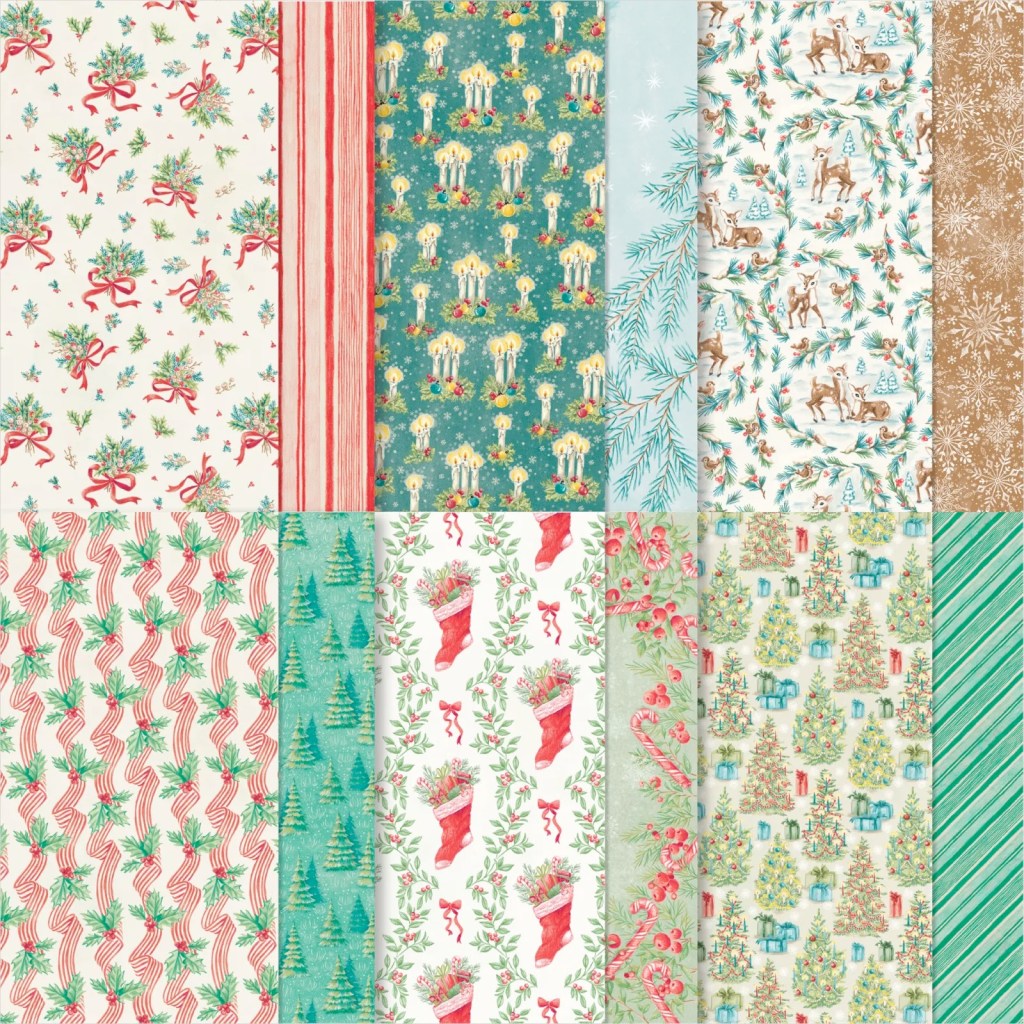
The Christmas Version features the Sentimental Christmas Designer Series Paper which is our “Craft & Give Back” product: For each package ordered, Stampin’ Up! donates $3 to Firstbook.org to support Children’s Literacy. (Outside the US? Check with your demonstrator to find out where the donation goes in your country)
Patterned Paper may fade into the background for most paper crafting projects, but here are THREE different ways to make the most of this crafting staple:
2. Heat Emboss Over It: Embossing powder covers patterns beautifully! LIghter paper patterns allow you to color in parts of the embossed image.
These samples use the same Designer Series Paper as the first cards, just different patterns from the same packages:
3. Dry Emboss It: Stamp a sentiment first, then run it through an embossing folder. To bring out the pattern, rub a sanding block (or emery board) over the top of the ridges!
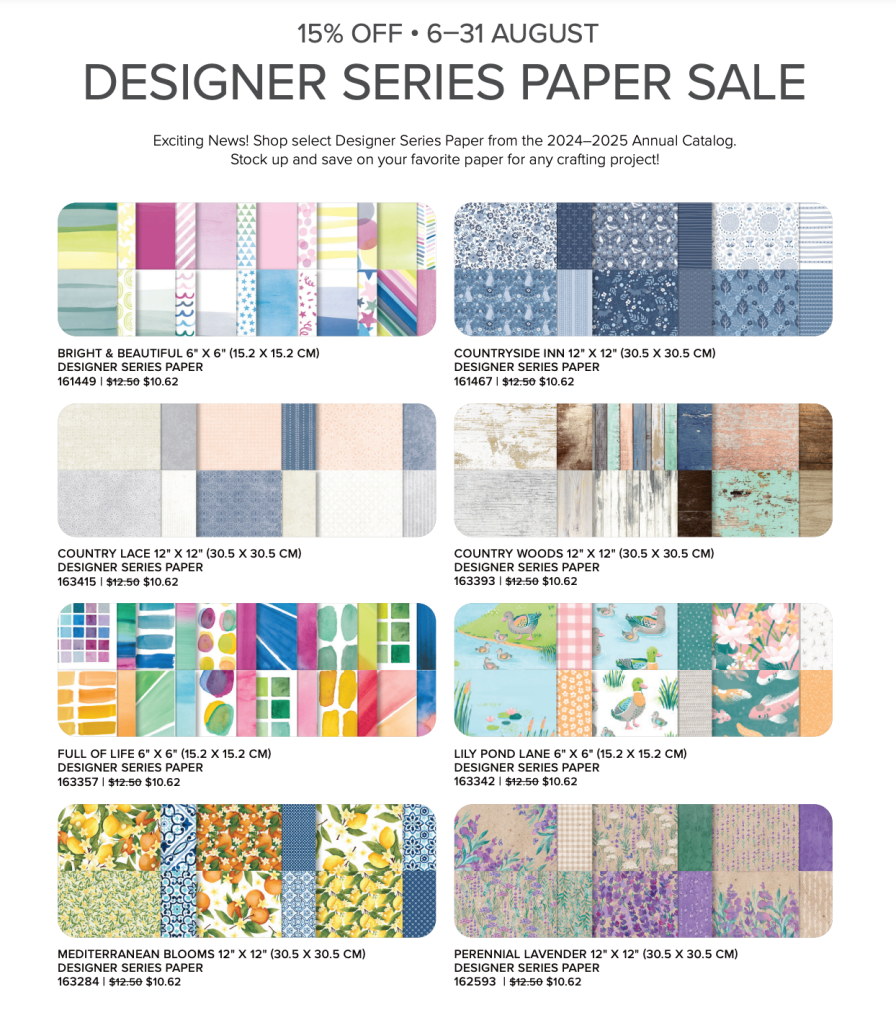
Just 5 days left of the Designer Series Paper Sale (ends August 31, 2024) – featuring ALL OF THE PATTERNS USED TODAY!
LOVE Stampin’ Up! Designer Series Paper?? Don’t miss the chance to reserve a 6″x6″ sample of (almost) every pattern in the upcoming September-December Mini Catalog:
Watch today’s video showing these three techniques to try on Designer Series Paper :
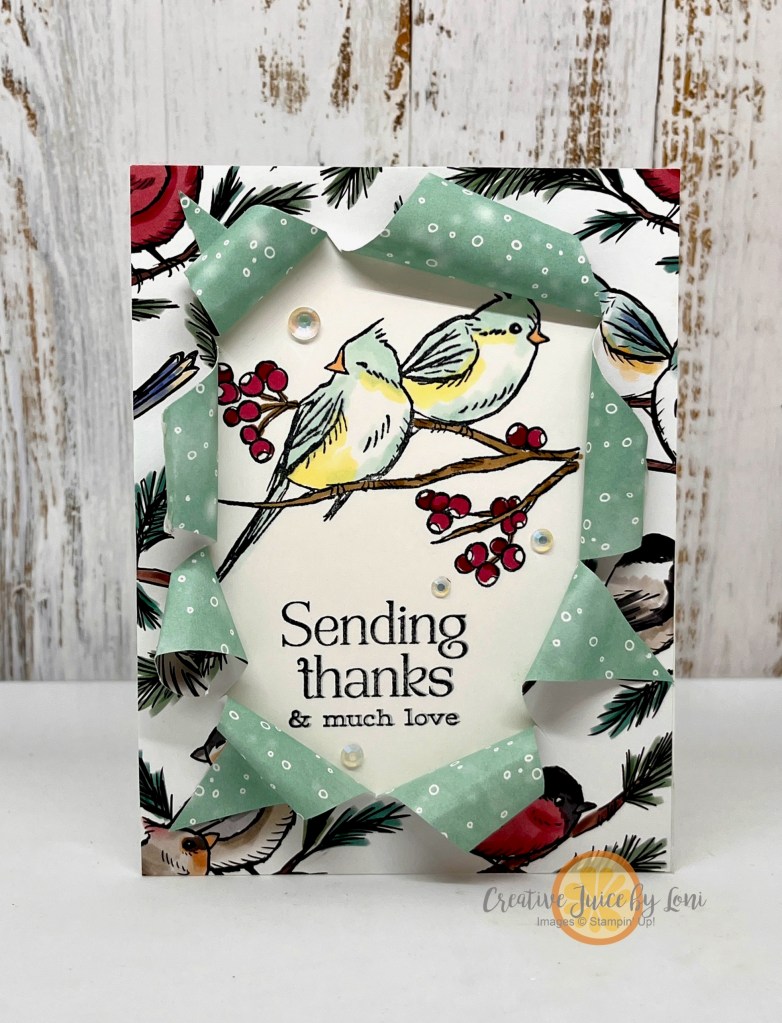
TREND ALERT! This technique was popping up in my social media, so I wanted to bring it to card-making: The Busted Canvas looks like the card is being unwrapped to reveal an image and sentiment, so while it’s not going to fit in a traditional envelope, it will look fabulous hanging out of a gift bag or handed to a friend personally.
The happy surprise behind the paper has an excited “feel”… like you were too thrilled to open the package to carefully undo the wrapping!
In the video tutorial, I share some tips and tricks, and one thing to note is that when you roll the Designer Series Paper out as tightly as you can, it doesn’t really *need* to be glued down, but if you choose to adhere it to the front, you’ll probably want to use hot glue. The pointed edges do adhere well flat using Tear & Tape, but the rolled pieces tend to pull away unless you use a glue gun.
While I stamped and colored in both my images with Stampin’ Blends, you could use a pre-printed image or more Designer Series Paper on the inside.
Before I share the video, here’s the second example using the Nests of Winter products coming in the September-December mini catalog:
The technique is too much fun to stop with one!
Okay, okay, here’s the tutorial! You’ll need an 11″ x 4-1/4″ card base, a 5-1/2″ x 4-1/4″ piece of white card stock and a 5-1/2″ x 4-1/4″ piece of Designer Series Paper, plus your stamps, ink and coloring tools to craft along:
It’s a timely technique for the Stampin’ Up! Designer Series Paper Sale during August 2024
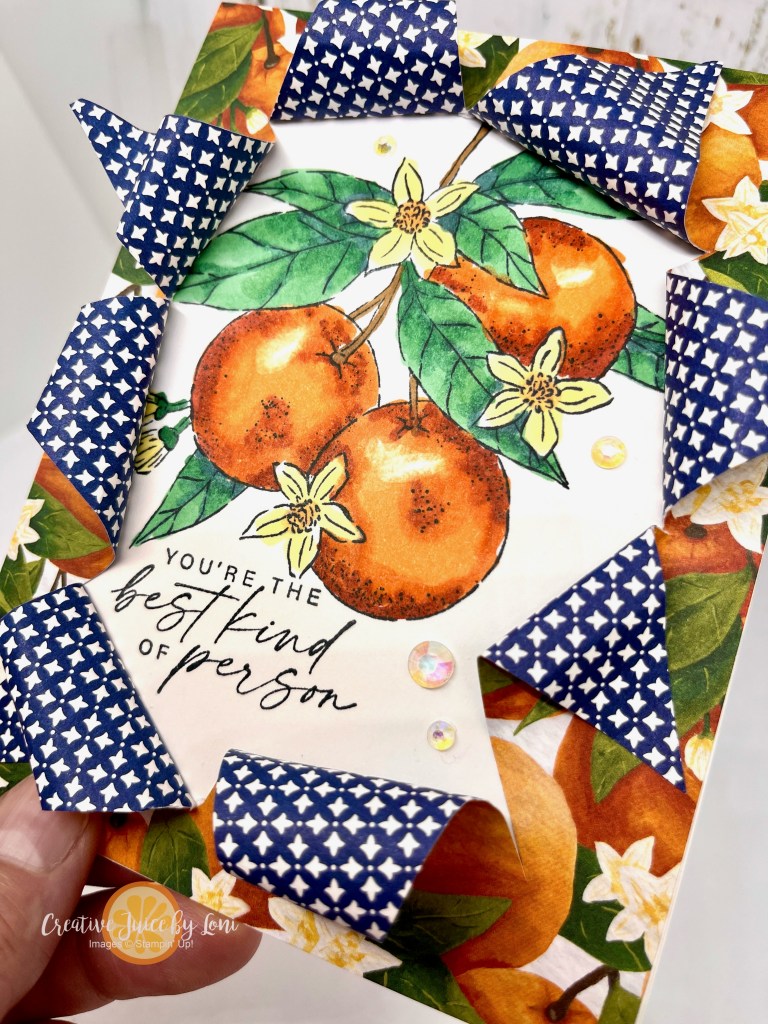
So many marvelous Designer Series Papers, so little time? This technique for cutting a stack of patterned paper will have you making multiple cards at ONE TIME!
Begin by selecting 4 patterns of Designer Series Paper- I suggest using a maximum of two busy or bold patterns and add a subtle design and a tiny or monochromatic print, in 4 different colors (or different shades of the same hue). This will give you the CONTRAST you need when piecing them back together.
You can adhere the shuffled pieces edge-to-edge (as on the card, left) or leave a small space between them, giving a window-pane look (card on right). You may find that a design on the BACK of your paper works well, so go ahead and flip it over, if needed.
I used the Unbounded Beauty 12″ x 12″ pack- it’s part of the Designer Series Paper SALE this month, August 2024 and showcases the 2024-2026 In Colors, which are lovely together. With the few scraps left over, I added a piece to the inside layer and to the flap of my envelope.
Grab your patterned paper and follow along with me here, as you practice your cardmaking:
If you paper is directional, you’ll need to decide if you are creating PORTRAIT cards (tall) or LANDSCAPE cards (wide) **before** you cut your paper, and make sure it’s oriented the correct way.
The Unbounded Beauty cards were landscape, but I also needed some sympathy cards, and the blues in the Countryside Inn Designer Series Paper (also 15% off in August) seemed fitting. These are portrait versions of the Stack, Cut, Shuffle technique:
Inside the cards:
I’ll list supplies for both versions, starting with the Unbounded Beauty demonstrated in the how-to video:


![Book Treat Boxes [ 164048 ]](https://assets1.tamsnetwork.com/images/EC042017NF/164048s.jpg "Book Treat Boxes [ 164048 ]")
![Splendid Autumn 6" X 6" (15.2 X 15.2 Cm) Designer Series Paper [ 164173 ]](https://assets1.tamsnetwork.com/images/EC042017NF/164173s.jpg "Splendid Autumn 6\" X 6\" (15.2 X 15.2 Cm) Designer Series Paper [ 164173 ]")
![Autumn Expressions Bundle (English) [ 164056 ]](https://assets1.tamsnetwork.com/images/EC042017NF/164056s.jpg "Autumn Expressions Bundle (English) [ 164056 ]")
![Early Espresso 8-1/2" X 11" Cardstock [ 119686 ]](https://assets1.tamsnetwork.com/images/EC042017NF/119686s.jpg "Early Espresso 8-1/2\" X 11\" Cardstock [ 119686 ]")
![Adhesive Sheets [ 152334 ]](https://assets1.tamsnetwork.com/images/EC042017NF/152334s.jpg "Adhesive Sheets [ 152334 ]")
![Versamark Pad [ 102283 ]](https://assets1.tamsnetwork.com/images/EC042017NF/102283s.jpg "Versamark Pad [ 102283 ]")
![Metallics Wow! Embossing Powder [ 165678 ]](https://assets1.tamsnetwork.com/images/EC042017NF/165678s.jpg "Metallics Wow! Embossing Powder [ 165678 ]")
![Heat Tool (Us And Canada) [ 129053 ]](https://assets1.tamsnetwork.com/images/EC042017NF/129053s.jpg "Heat Tool (Us And Canada) [ 129053 ]")
![Multipurpose Liquid Glue [ 110755 ]](https://assets1.tamsnetwork.com/images/EC042017NF/110755s.jpg "Multipurpose Liquid Glue [ 110755 ]")
![Stampin' Dimensionals [ 104430 ]](https://assets1.tamsnetwork.com/images/EC042017NF/104430s.jpg "Stampin' Dimensionals [ 104430 ]")


![Hello Hollyhocks Kit [ 164458 ]](https://assets1.tamsnetwork.com/images/EC042017NF/164458s.jpg "Hello Hollyhocks Kit [ 164458 ]")
![Simply Zinnia Bundle (English) [ 163480 ]](https://assets1.tamsnetwork.com/images/EC042017NF/163480s.jpg "Simply Zinnia Bundle (English) [ 163480 ]")
![Tuxedo Black Memento Ink Pad [ 132708 ]](https://assets1.tamsnetwork.com/images/EC042017NF/132708s.jpg "Tuxedo Black Memento Ink Pad [ 132708 ]")
![Pumpkin Pie Stampin' Blends Markers Combo Pack [ 144599 ] (Retired)](https://assets1.tamsnetwork.com/images/EC042017NF/144599s.jpg "Pumpkin Pie Stampin' Blends Markers Combo Pack [ 144599 ] (Retired)")
![Copper Clay Stampin’ Blends Combo Pack [ 161662 ]](https://assets1.tamsnetwork.com/images/EC042017NF/161662s.jpg "Copper Clay Stampin’ Blends Combo Pack [ 161662 ]")
![Old Olive Stampin' Blends Combo Pack [ 154892 ]](https://assets1.tamsnetwork.com/images/EC042017NF/154892s.jpg "Old Olive Stampin' Blends Combo Pack [ 154892 ]")
![Very Vanilla 8-1/2" X 11" Thick Cardstock [ 144237 ]](https://assets1.tamsnetwork.com/images/EC042017NF/144237s.jpg "Very Vanilla 8-1/2\" X 11\" Thick Cardstock [ 144237 ]")
![Copper Clay 8 1/2" X 11" Cardstock [ 161721 ]](https://assets1.tamsnetwork.com/images/EC042017NF/161721s.jpg "Copper Clay 8 1/2\" X 11\" Cardstock [ 161721 ]")
![Mini Stampin' Cut & Emboss Machine [ 150673 ]](https://assets1.tamsnetwork.com/images/EC042017NF/150673s.jpg "Mini Stampin' Cut & Emboss Machine [ 150673 ]")
![Three Twine Combo Pack [ 160597 ]](https://assets1.tamsnetwork.com/images/EC042017NF/160597s.jpg "Three Twine Combo Pack [ 160597 ]")
![Everyday Details Dies [ 162864 ]](https://assets1.tamsnetwork.com/images/EC042017NF/162864s.jpg "Everyday Details Dies [ 162864 ]")
![Sentimental Wishes Bundle (English) [ 164220 ]](https://assets1.tamsnetwork.com/images/EC042017NF/164220s.jpg "Sentimental Wishes Bundle (English) [ 164220 ]")
![Take A Bow 6" X 6" (15.2 X 15.2 Cm) Designer Series Paper [ 164309 ]](https://assets1.tamsnetwork.com/images/EC042017NF/164309s.jpg "Take A Bow 6\" X 6\" (15.2 X 15.2 Cm) Designer Series Paper [ 164309 ]")
![Real Red Classic Stampin' Pad [ 147084 ]](https://assets1.tamsnetwork.com/images/EC042017NF/147084s.jpg "Real Red Classic Stampin' Pad [ 147084 ]")
![Basic White 8 1/2" X 11" Thick Cardstock [ 159229 ]](https://assets1.tamsnetwork.com/images/EC042017NF/159229s.jpg "Basic White 8 1/2\" X 11\" Thick Cardstock [ 159229 ]")
![Granny Apple Green 8-1/2" X 11" Cardstock [ 146990 ]](https://assets1.tamsnetwork.com/images/EC042017NF/146990s.jpg "Granny Apple Green 8-1/2\" X 11\" Cardstock [ 146990 ]")
![Garden Green 8-1/2" X 11" Cardstock [ 102584 ]](https://assets1.tamsnetwork.com/images/EC042017NF/102584s.jpg "Garden Green 8-1/2\" X 11\" Cardstock [ 102584 ]")
![Petal Pink 8-1/2" X 11" Cardstock [ 146985 ]](https://assets1.tamsnetwork.com/images/EC042017NF/146985s.jpg "Petal Pink 8-1/2\" X 11\" Cardstock [ 146985 ]")
![Mini Stampin' Dimensionals [ 144108 ]](https://assets1.tamsnetwork.com/images/EC042017NF/144108s.jpg "Mini Stampin' Dimensionals [ 144108 ]")


![Sweet Days Of Autumn 12" X 12" (30.5 X 30.5 Cm) Designer Series Paper & Sticker Sheet (English) [ 166609 ]](https://assets1.tamsnetwork.com/images/EC042017NF/166609s.jpg "Sweet Days Of Autumn 12\" X 12\" (30.5 X 30.5 Cm) Designer Series Paper & Sticker Sheet (English) [ 166609 ]")
![Wild Wheat 3/8" (1 Cm) Rustic Striped Ribbon [ 164061 ]](https://assets1.tamsnetwork.com/images/EC042017NF/164061s.jpg "Wild Wheat 3/8\" (1 Cm) Rustic Striped Ribbon [ 164061 ]")
![Woven Golden Leaves [ 164059 ]](https://assets1.tamsnetwork.com/images/EC042017NF/164059s.jpg "Woven Golden Leaves [ 164059 ]")
![Autumn Expressions Dies [ 164055 ]](https://assets1.tamsnetwork.com/images/EC042017NF/164055s.jpg "Autumn Expressions Dies [ 164055 ]")
![Old Olive 8-1/2" X 11" Cardstock [ 100702 ]](https://assets1.tamsnetwork.com/images/EC042017NF/100702s.jpg "Old Olive 8-1/2\" X 11\" Cardstock [ 100702 ]")
![Crushed Curry 8-1/2" X 11" Cardstock [ 131199 ]](https://assets1.tamsnetwork.com/images/EC042017NF/131199s.jpg "Crushed Curry 8-1/2\" X 11\" Cardstock [ 131199 ]")
![Tear & Tape Adhesive [ 154031 ]](https://assets1.tamsnetwork.com/images/EC042017NF/154031s.jpg "Tear & Tape Adhesive [ 154031 ]")


![Winterly Tree Tops Bundle (English) [ 164066 ]](https://assets1.tamsnetwork.com/images/EC042017NF/164066s.jpg "Winterly Tree Tops Bundle (English) [ 164066 ]")
![Nests Of Winter 12" X 12" (30.5 X 30.5 Cm) Designer Series Paper [ 164183 ]](https://assets1.tamsnetwork.com/images/EC042017NF/164183s.jpg "Nests Of Winter 12\" X 12\" (30.5 X 30.5 Cm) Designer Series Paper [ 164183 ]")
![Shaded Spruce 8-1/2" X 11" Cardstock [ 146981 ]](https://assets1.tamsnetwork.com/images/EC042017NF/146981s.jpg "Shaded Spruce 8-1/2\" X 11\" Cardstock [ 146981 ]")
![Smoky Slate 8-1/2" X 11" Cardstock [ 131202 ]](https://assets1.tamsnetwork.com/images/EC042017NF/131202s.jpg "Smoky Slate 8-1/2\" X 11\" Cardstock [ 131202 ]")
![Basic White 8 1/2" X 11" Cardstock [ 159276 ]](https://assets1.tamsnetwork.com/images/EC042017NF/159276s.jpg "Basic White 8 1/2\" X 11\" Cardstock [ 159276 ]")
![Basic White Medium Envelopes [ 159236 ]](https://assets1.tamsnetwork.com/images/EC042017NF/159236s.jpg "Basic White Medium Envelopes [ 159236 ]")
![Shaded Spruce Classic Stampin' Pad [ 147088 ]](https://assets1.tamsnetwork.com/images/EC042017NF/147088s.jpg "Shaded Spruce Classic Stampin' Pad [ 147088 ]")
![Mossy Meadow Classic Stampin' Pad [ 147111 ]](https://assets1.tamsnetwork.com/images/EC042017NF/147111s.jpg "Mossy Meadow Classic Stampin' Pad [ 147111 ]")
![Small Blending Brushes [ 160518 ]](https://assets1.tamsnetwork.com/images/EC042017NF/160518s.jpg "Small Blending Brushes [ 160518 ]")
![Smoky Slate Classic Stampin' Pad [ 147113 ]](https://assets1.tamsnetwork.com/images/EC042017NF/147113s.jpg "Smoky Slate Classic Stampin' Pad [ 147113 ]")
![Simply Scored [ 122334 ]](https://assets1.tamsnetwork.com/images/EC042017NF/122334s.jpg "Simply Scored [ 122334 ]")
![Stampin' Cut & Emboss Machine [ 149653 ]](https://assets1.tamsnetwork.com/images/EC042017NF/149653s.jpg "Stampin' Cut & Emboss Machine [ 149653 ]")


![Warms My Heart Cling Stamp Set (English) [ 164267 ]](https://assets1.tamsnetwork.com/images/EC042017NF/164267s.jpg "Warms My Heart Cling Stamp Set (English) [ 164267 ]")
![Forever Plaid 3 D Embossing Folder [ 164049 ]](https://assets1.tamsnetwork.com/images/EC042017NF/164049s.jpg "Forever Plaid 3 D Embossing Folder [ 164049 ]")
![Cajun Craze 8-1/2" X 11" Cardstock [ 119684 ]](https://assets1.tamsnetwork.com/images/EC042017NF/119684s.jpg "Cajun Craze 8-1/2\" X 11\" Cardstock [ 119684 ]")
![Basic Beige 8 1/2" X 11" Cardstock [ 164511 ]](https://assets1.tamsnetwork.com/images/EC042017NF/164511s.jpg "Basic Beige 8 1/2\" X 11\" Cardstock [ 164511 ]")
![Coastal Cabana 8-1/2" X 11" Cardstock [ 131297 ]](https://assets1.tamsnetwork.com/images/EC042017NF/131297s.jpg "Coastal Cabana 8-1/2\" X 11\" Cardstock [ 131297 ]")
![Pumpkin Pie 8-1/2" X 11" Cardstock [ 105117 ]](https://assets1.tamsnetwork.com/images/EC042017NF/105117s.jpg "Pumpkin Pie 8-1/2\" X 11\" Cardstock [ 105117 ]")
![Mossy Meadow 8-1/2" X 11" Cardstock [ 133676 ]](https://assets1.tamsnetwork.com/images/EC042017NF/133676s.jpg "Mossy Meadow 8-1/2\" X 11\" Cardstock [ 133676 ]")
![Cajun Craze Classic Stampin' Pad [ 147085 ]](https://assets1.tamsnetwork.com/images/EC042017NF/147085s.jpg "Cajun Craze Classic Stampin' Pad [ 147085 ]")
![Watercolor Pencils Assortment 1 [ 161700 ]](https://assets1.tamsnetwork.com/images/EC042017NF/161700s.jpg "Watercolor Pencils Assortment 1 [ 161700 ]")
![Watercolor Pencils Assortment 2 [ 149014 ]](https://assets1.tamsnetwork.com/images/EC042017NF/149014s.jpg "Watercolor Pencils Assortment 2 [ 149014 ]")
![Clear Wink Of Stella Glitter Brush [ 141897 ]](https://assets1.tamsnetwork.com/images/EC042017NF/141897s.jpg "Clear Wink Of Stella Glitter Brush [ 141897 ]")
![Earth Tones Shimmer Gems [ 164070 ]](https://assets1.tamsnetwork.com/images/EC042017NF/164070s.jpg "Earth Tones Shimmer Gems [ 164070 ]")
![Bough Punch [ 157711 ]](https://assets1.tamsnetwork.com/images/EC042017NF/157711s.jpg "Bough Punch [ 157711 ]")
![Nested Essentials Dies [ 161597 ]](https://assets1.tamsnetwork.com/images/EC042017NF/161597s.jpg "Nested Essentials Dies [ 161597 ]")
![Sentimental Christmas 12" X 12" (30.5 X 30.5 Cm) Designer Series Paper [ 164209 ]](https://assets1.tamsnetwork.com/images/EC042017NF/164209s.jpg "Sentimental Christmas 12\" X 12\" (30.5 X 30.5 Cm) Designer Series Paper [ 164209 ]")
![Pool Party 5/8" (1.6 Cm) Pompom Ribbon [ 164129 ]](https://assets1.tamsnetwork.com/images/EC042017NF/164129s.jpg "Pool Party 5/8\" (1.6 Cm) Pompom Ribbon [ 164129 ]")
![Iridescent Faceted Gems [ 163368 ]](https://assets1.tamsnetwork.com/images/EC042017NF/163368s.jpg "Iridescent Faceted Gems [ 163368 ]")
![Stylish Shapes Dies [ 159183 ]](https://assets1.tamsnetwork.com/images/EC042017NF/159183s.jpg "Stylish Shapes Dies [ 159183 ]")
![Silver & White 1/2" (1.3 Cm) Sheer Ribbon [ 162149 ]](https://assets1.tamsnetwork.com/images/EC042017NF/162149s.jpg "Silver & White 1/2\" (1.3 Cm) Sheer Ribbon [ 162149 ]")
![Natural Tones Linen Thread [ 164071 ]](https://assets1.tamsnetwork.com/images/EC042017NF/164071s.jpg "Natural Tones Linen Thread [ 164071 ]")
![Snowflake Sky 3 D Embossing Folder [ 162026 ]](https://assets1.tamsnetwork.com/images/EC042017NF/162026s.jpg "Snowflake Sky 3 D Embossing Folder [ 162026 ]")
![Poppy Parade 8-1/2" X 11" Cardstock [ 119793 ]](https://assets1.tamsnetwork.com/images/EC042017NF/119793s.jpg "Poppy Parade 8-1/2\" X 11\" Cardstock [ 119793 ]")
![Pretty In Pink 8 1/2" X 11" Cardstock [ 163793 ]](https://assets1.tamsnetwork.com/images/EC042017NF/163793s.jpg "Pretty In Pink 8 1/2\" X 11\" Cardstock [ 163793 ]")
![Blackberry Bliss 8-1/2" X 11" Cardstock [ 133675 ]](https://assets1.tamsnetwork.com/images/EC042017NF/133675s.jpg "Blackberry Bliss 8-1/2\" X 11\" Cardstock [ 133675 ]")
![Pecan Pie Classic Stampin' Pad [ 161665 ]](https://assets1.tamsnetwork.com/images/EC042017NF/161665s.jpg "Pecan Pie Classic Stampin' Pad [ 161665 ]")
![Blackberry Bliss Classic Stampin' Pad [ 147092 ]](https://assets1.tamsnetwork.com/images/EC042017NF/147092s.jpg "Blackberry Bliss Classic Stampin' Pad [ 147092 ]")


![Real Red 8-1/2" X 11" Cardstock [ 102482 ]](https://assets1.tamsnetwork.com/images/EC042017NF/102482s.jpg "Real Red 8-1/2\" X 11\" Cardstock [ 102482 ]")
![Shy Shamrock 8 1/2" X 11" Cardstock [ 163795 ]](https://assets1.tamsnetwork.com/images/EC042017NF/163795s.jpg "Shy Shamrock 8 1/2\" X 11\" Cardstock [ 163795 ]")
![Pretty In Pink Stampin’ Blends Combo Pack [ 163824 ]](https://assets1.tamsnetwork.com/images/EC042017NF/163824s.jpg "Pretty In Pink Stampin’ Blends Combo Pack [ 163824 ]")
![Shaded Spruce Combo Pack Stampin' Blends [ 147938 ] (Retired)](https://assets1.tamsnetwork.com/images/EC042017NF/147938s.jpg "Shaded Spruce Combo Pack Stampin' Blends [ 147938 ] (Retired)")
![Real Red Stampin' Blends Combo Pack [ 154899 ]](https://assets1.tamsnetwork.com/images/EC042017NF/154899s.jpg "Real Red Stampin' Blends Combo Pack [ 154899 ]")
![Pretty Peacock Stampin’ Blends Combo Pack [ 161676 ]](https://assets1.tamsnetwork.com/images/EC042017NF/161676s.jpg "Pretty Peacock Stampin’ Blends Combo Pack [ 161676 ]")


 Designer Series Paper")
")


 Designer Series Paper")
")


 Circle Punch")

 Designer Series Paper")
")


 Diagonal Trim Combo Pack")


