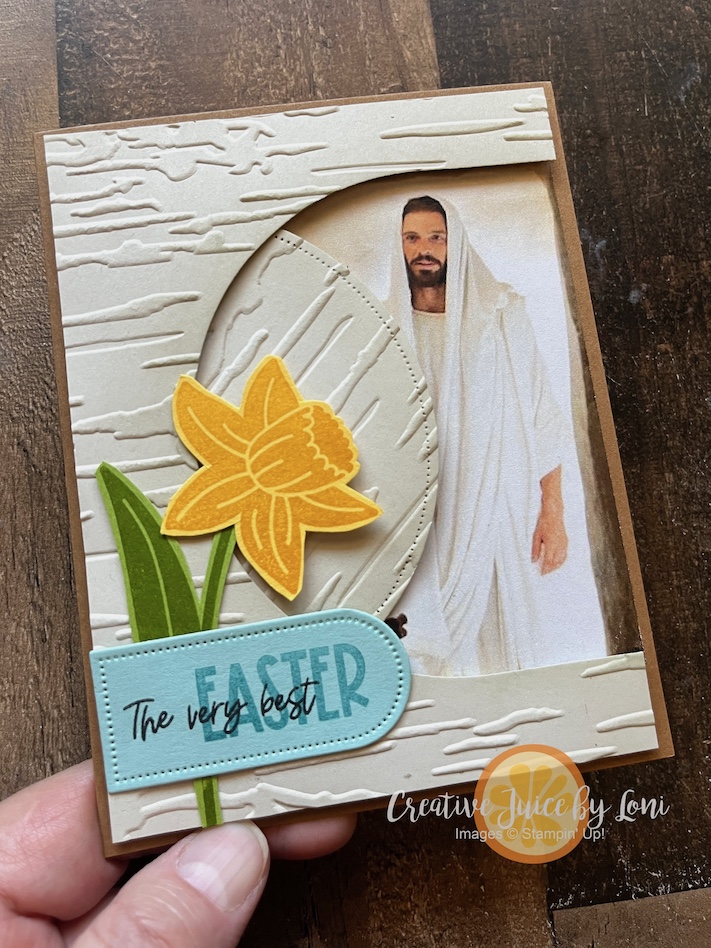
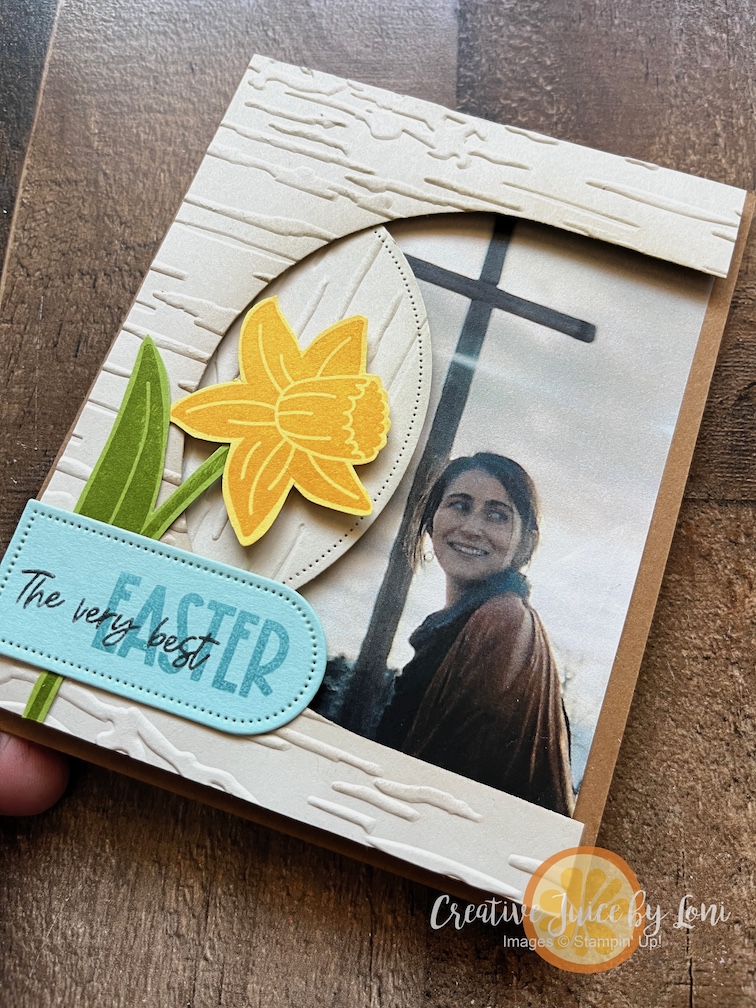
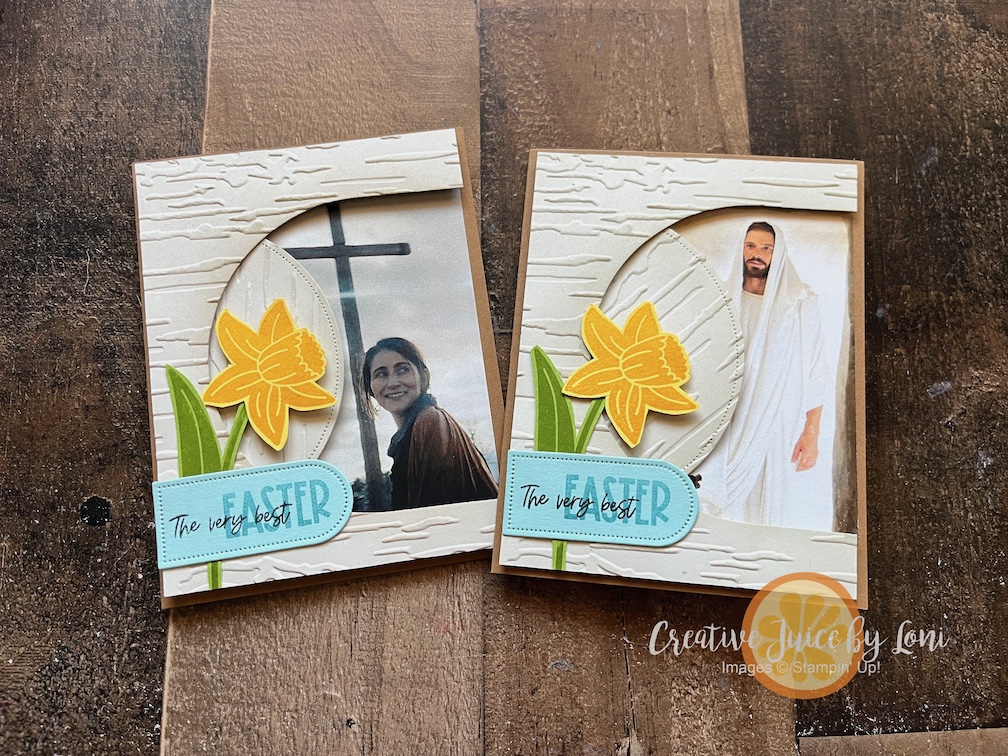
As we come to the end of our Reasons & Season week, I have one ultimate #celebrationcombination card for you, and it’s the VERY BEST REASON to celebrate: The Life, Atonement and Resurrection of the Savior of the World!
In my first-Monday-of-the-Month LIVE crafting video, I demonstrated this “Empty-Tomb” card which testifies of the greatest gift we have ever received:
I am grateful to combine more than just two stamp sets, but also my love of paper crafting with my testimony of Jesus Christ. Because of His life, sacrifice and resurrection, we can have HOPE for better things to come! We can repent of our sins and strive to become the person He wants each of us to be. Without Easter, there would be NO joy at Christmas!
For this card, you can use any picture that shows your gratitude for Christ’s atonement. This is the picture I printed depicting a risen Christ speaking to Mary which I used in the first card, but perhaps you have another illustration that strikes your heart-strings. Obviously, there were no cameras to mark this event most central to the history of all creation, but I appreciate those who attempt to capture the awe and reverence of the moment.
In this video, I share tips and tricks to make this card simple to prepare, stamp and assemble:
Thank you for visiting, for saving your favorite project of the past week (scroll through to see them all), and for supporting my Stampin’ Up!®️ business in many ways.
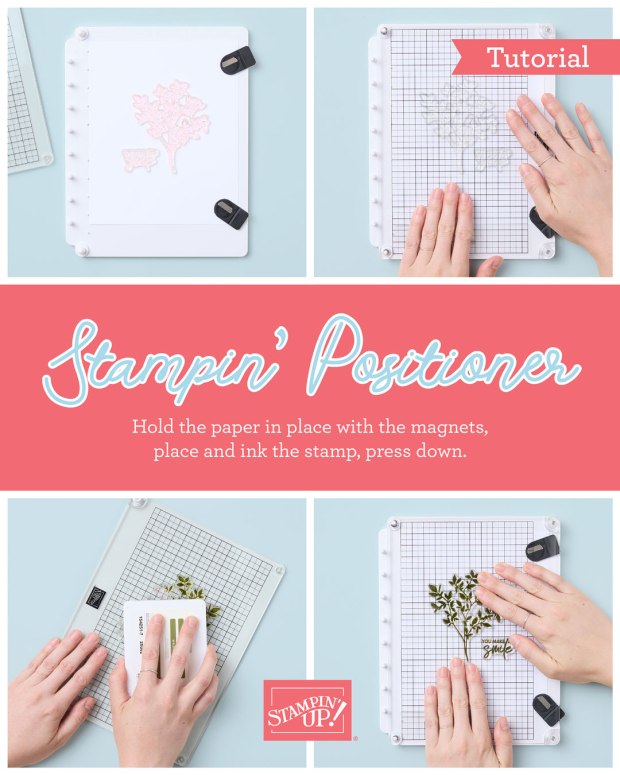
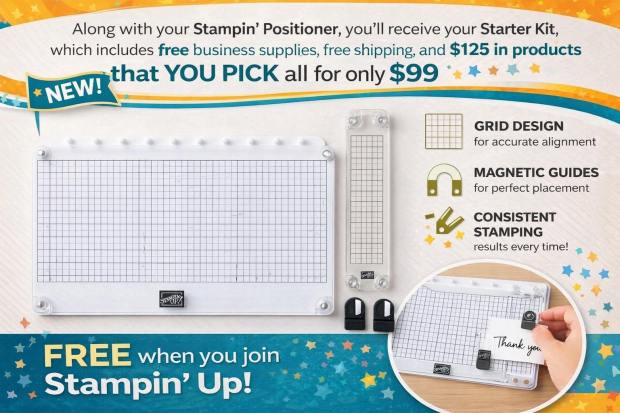
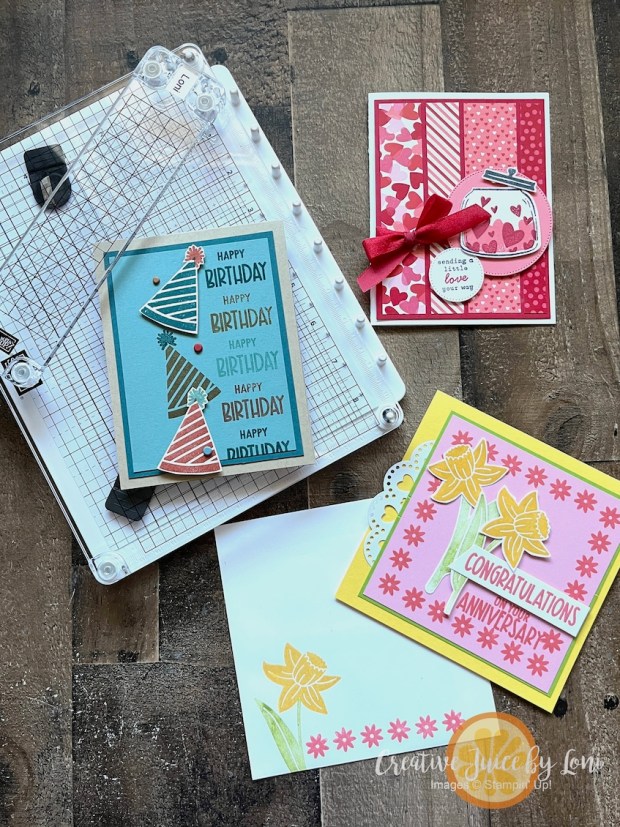
What’s the latest at Stampin’ Up!®️?? Our international New at SU! design team is here to show you how versatile and essential a stamp positioning tool is, AND how you can get the NEW Stampin’ Positioner FREE during February 2026!
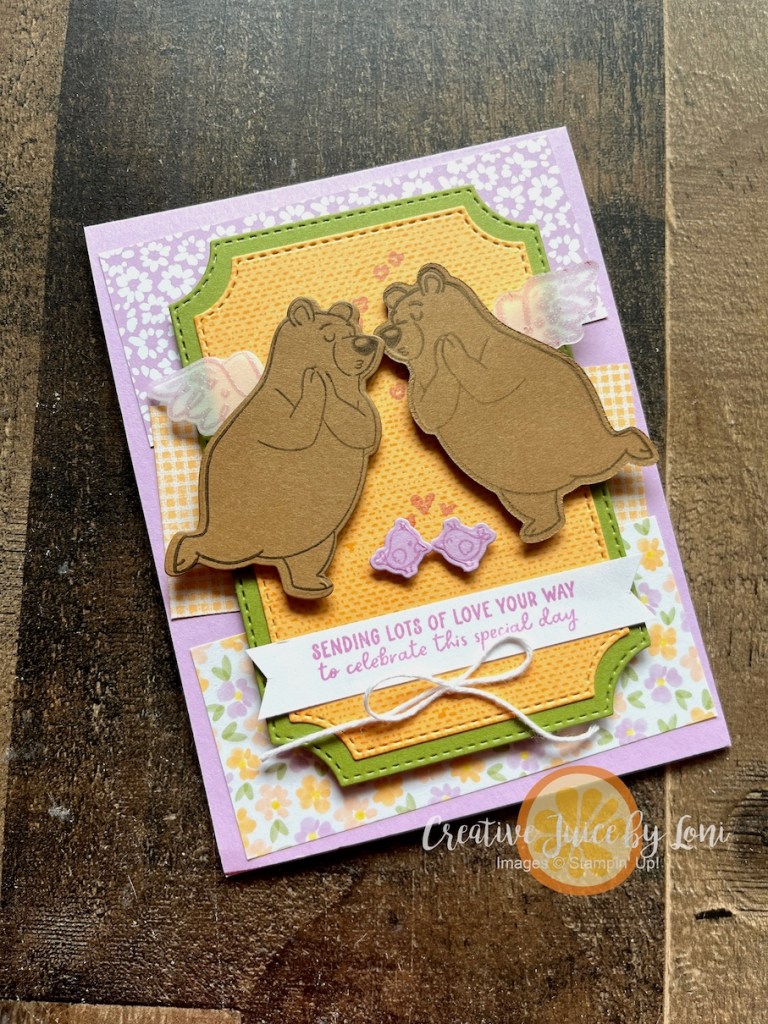
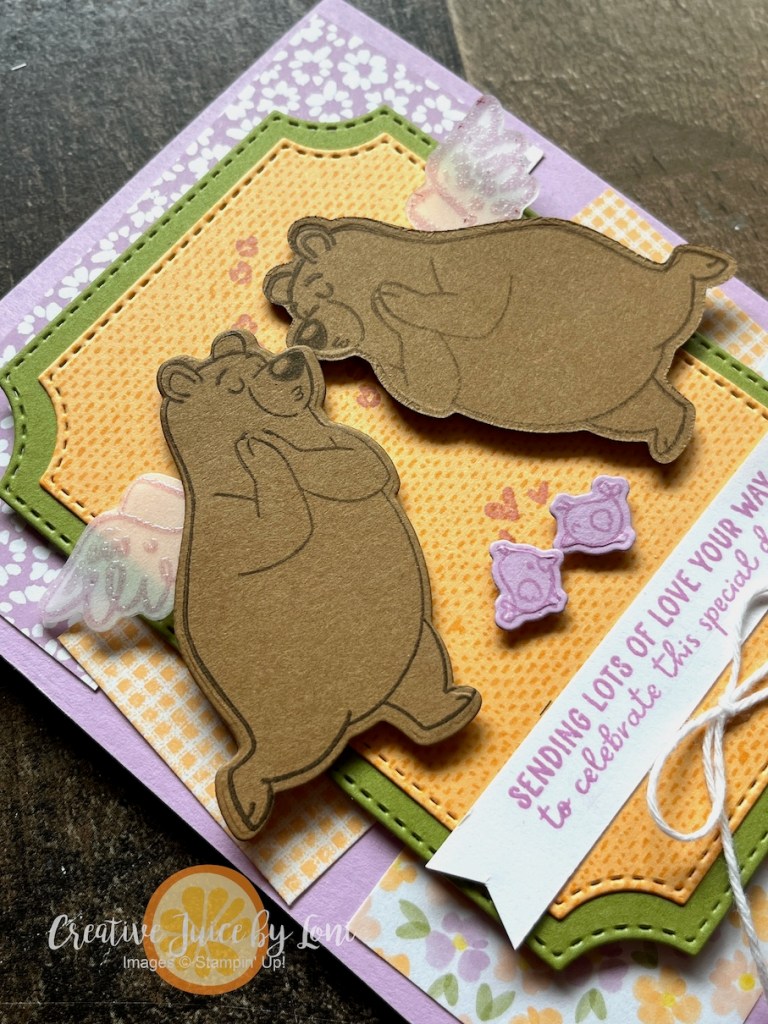
Let’s use the Stampin’ Positioner to make a REVERSE IMAGE using the Valentine Kisses bundle to make an adorable greeting card for a Wedding Anniversary ~ make sure to WATCH THE TUTORIAL below.
The bear stamp originally faces right, so how can you flip it? By using your SILICONE CRAFT SHEET on your Stampin’ Positioner! It makes it so easy, you can use the die to cut it out and it’s in the perfect place every time. Watch this:
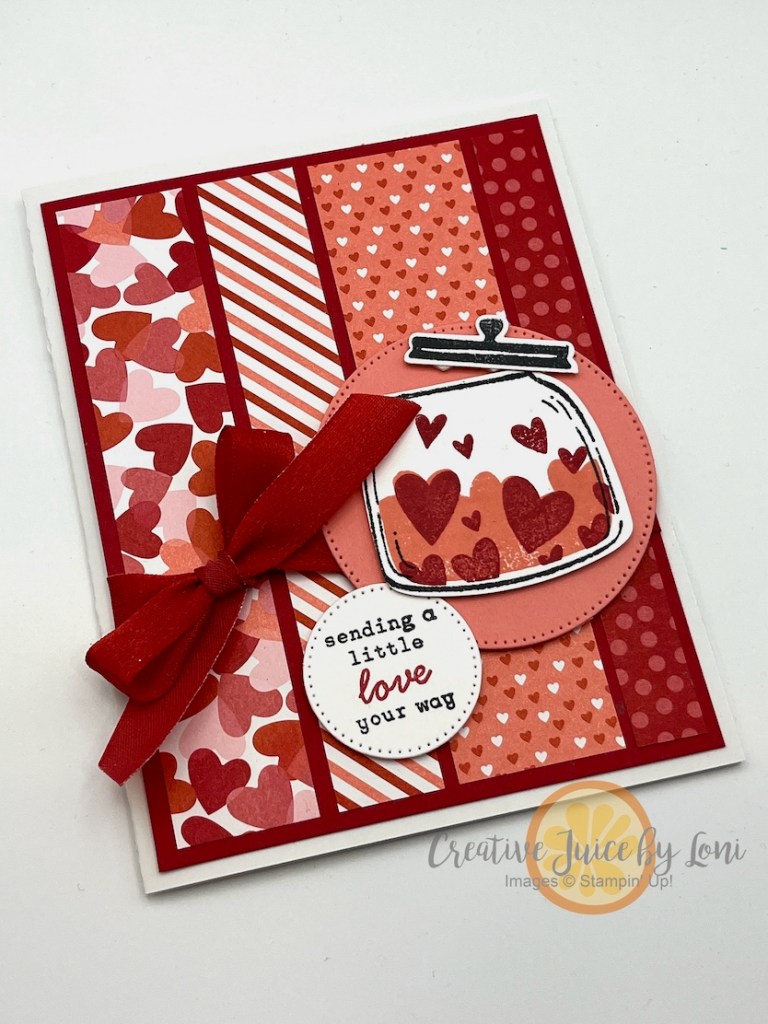
I used the same technique for the vellum wings, and embossed them with clear powder over the Fresh Freesia ink, so they would dry quickly. And the Lasting Linen stamp set gives the background a faux-texture that is beautiful.
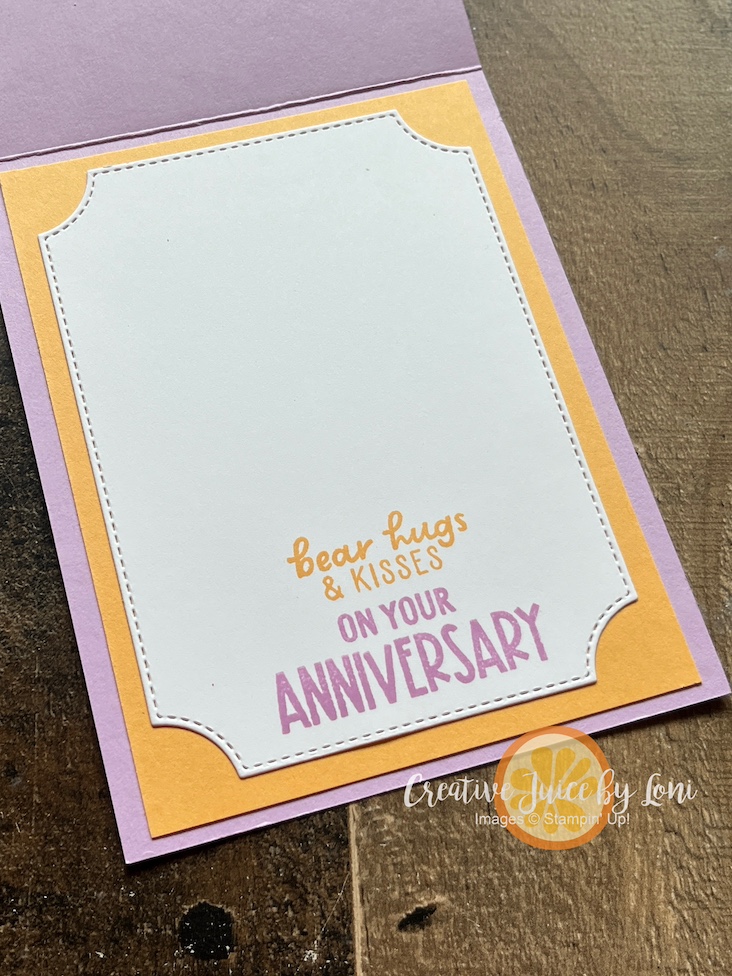
On the inside, I added sentiments from both Valentine Kisses and Reason to Celebrate:
The only way to get the Stampin’ Positioner this month is in the Stampin’ Up!®️ Starter Kit, and it will be automatically added to your order. Smart stampers know this is the best value anytime, but it has ADDED value this month!
Eventually, this tool will be available for purchase, but we don’t have a date yet, so if you just can’t wait, join my team (click link or image) or ask your demonstrator how to join.
What ELSE can you do with the positioner? I’m GLAD YOU ASKED! These demonstrators are all showing techniques and tips that you’ll love to learn. Visit each blog and SAVE your favorite ideas:
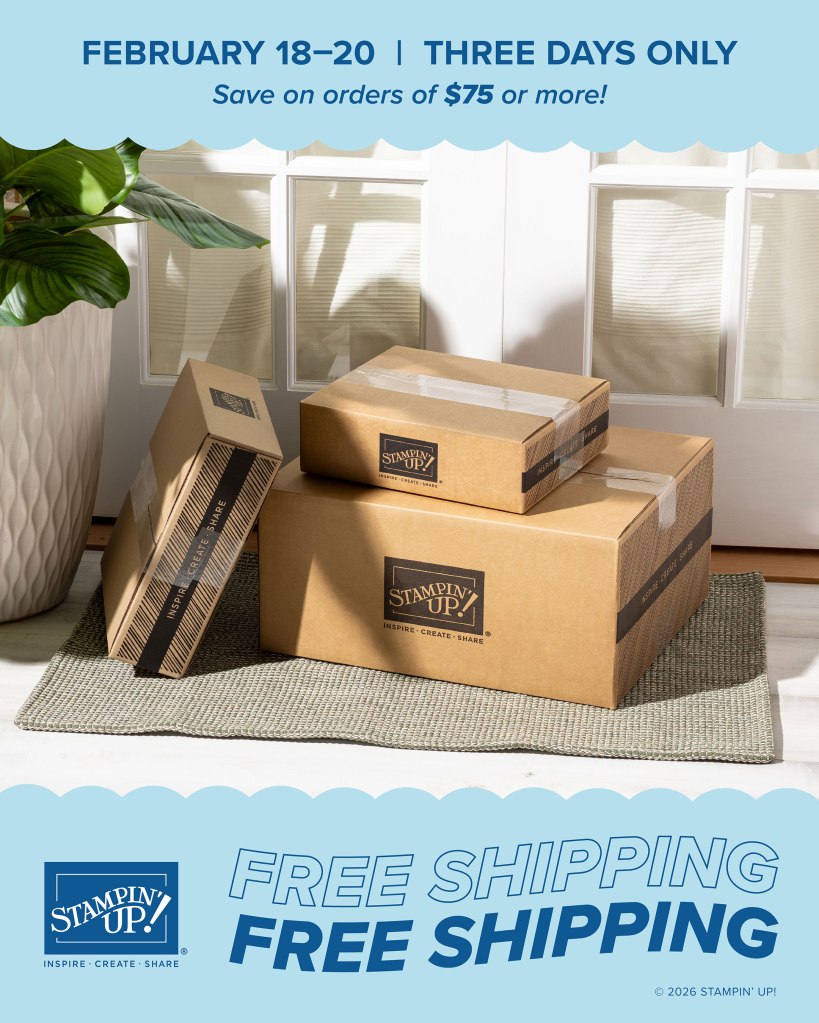
Not ready to join, but want to shop? Starting today (for 3 DAYS ONLY-February 18-20, 2026) enjoy FREE SHIPPING on orders over $75 PLUS qualify to purchase the Product of the Month for just $5!
From building to baking, from sewing to paper crafting, the correct tool makes any project easier, and the new Stampin’ Up!® Stampin’ Positioner does exactly that. Once you use it, you wonder how you ever crafted without it! Today I shared three simple ways to put it to work, and each one shines in the trio of projects you see here, with a video tutorial included.
3 Clever Ways to Use the NEW Stampin’ Up!® Stampin’ Positioner
1. Perfect Placement: Line up your stamps to be exactly where you want them to be, and if you need to re-stamp, or have two-step stamps (like the jar of hearts), this tool is your best friend.
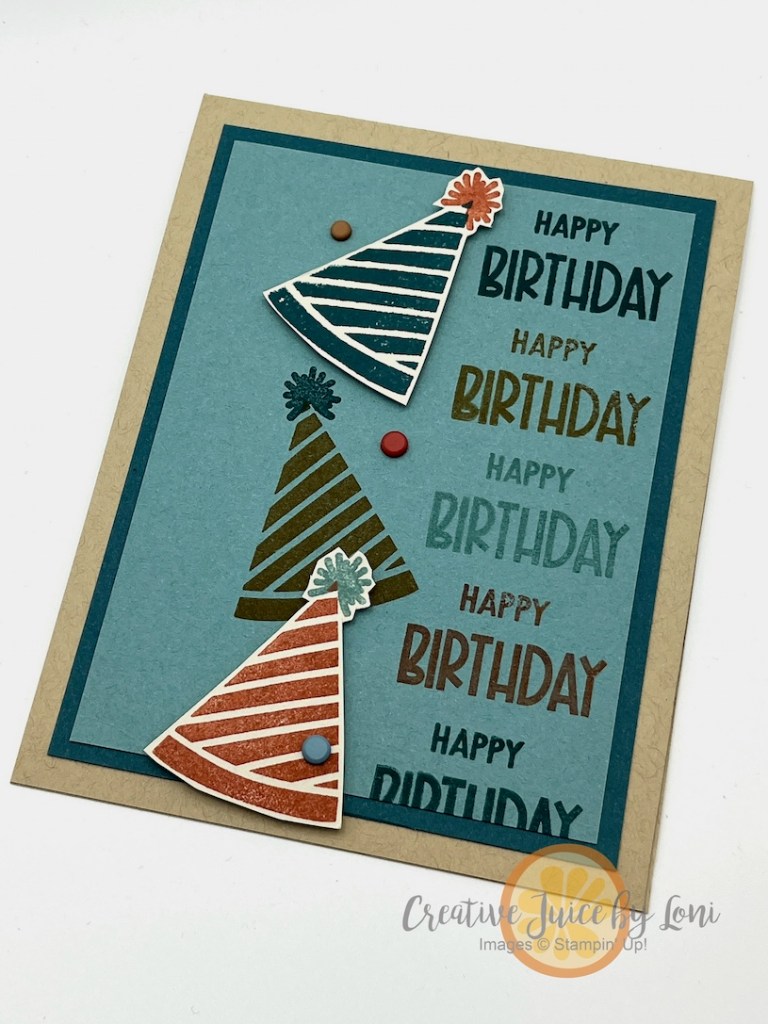
2. Can You Repeat That, Please? When you want sentiments or images to be duplicated, use the smaller plate and move it down the pegs to stamp it again! For the masculine birthday card, “Happy Birthday” was easy to impress multiple times in a clean, evenly spaced design. Because the stamp stays in place, you can re-ink the saying and re-stamp with confidence.
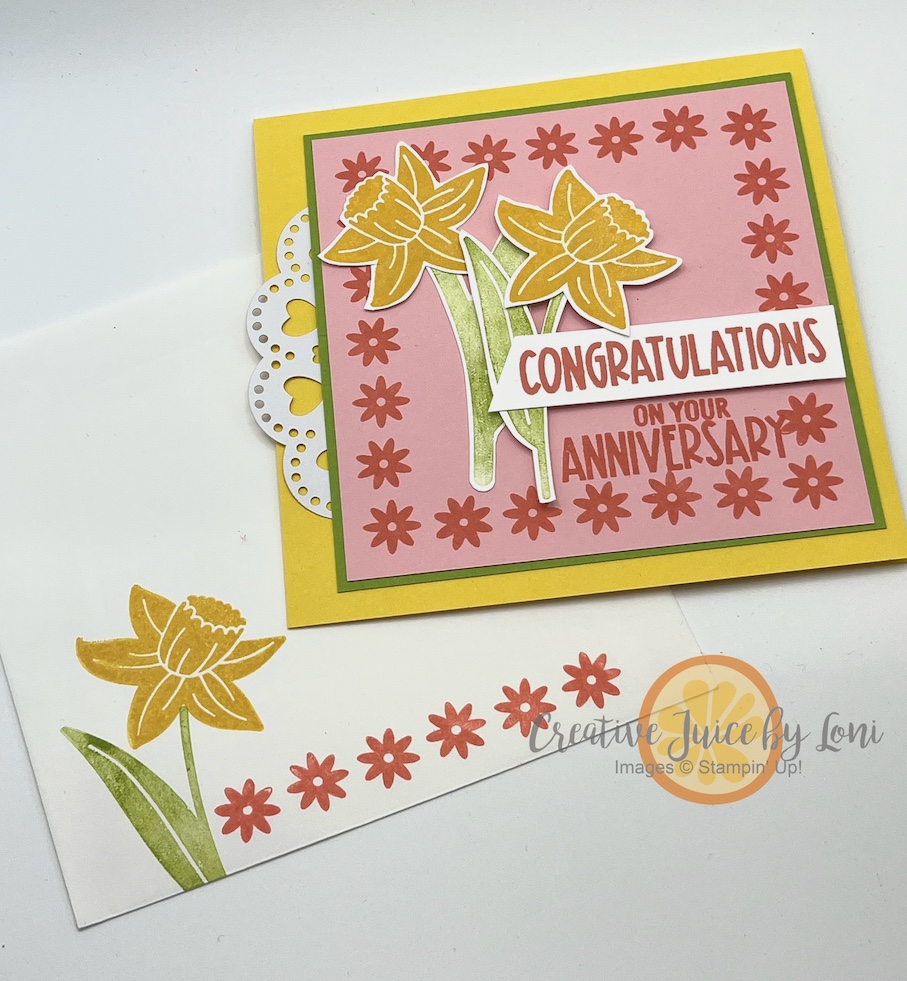
3. You’ve Been Framed The daisy chain “frame” around this anniversary card is a single line of flower images, but this tool made it easy to stamp around the block! Flirty Flamingo card stock: 4.5″ square (finished card is 5.25″ square, because I had envelopes that size).
Ready to get your hands on this cool tool?
Current demonstrators had the opportunity to pre-order it, but starting tomorrow – February 3 through March 2, 2026 –
Yes, it will be available in the future for customers to purchase, but we don’t have a date yet when it will be released, so accept the opportunity to choose $125 in Stampin’ Up! products AND A FREE STAMPIN’ POSITIONER for just $99! Shipping on starter kits is FREE (another perk) and you’ll get a 20-25% discount on your future purchases, as you “try on” the demonstrator apron with NO STRINGS ATTACHED (pun intended)
Whenever I can craft smarter (not harder), it’s a win!
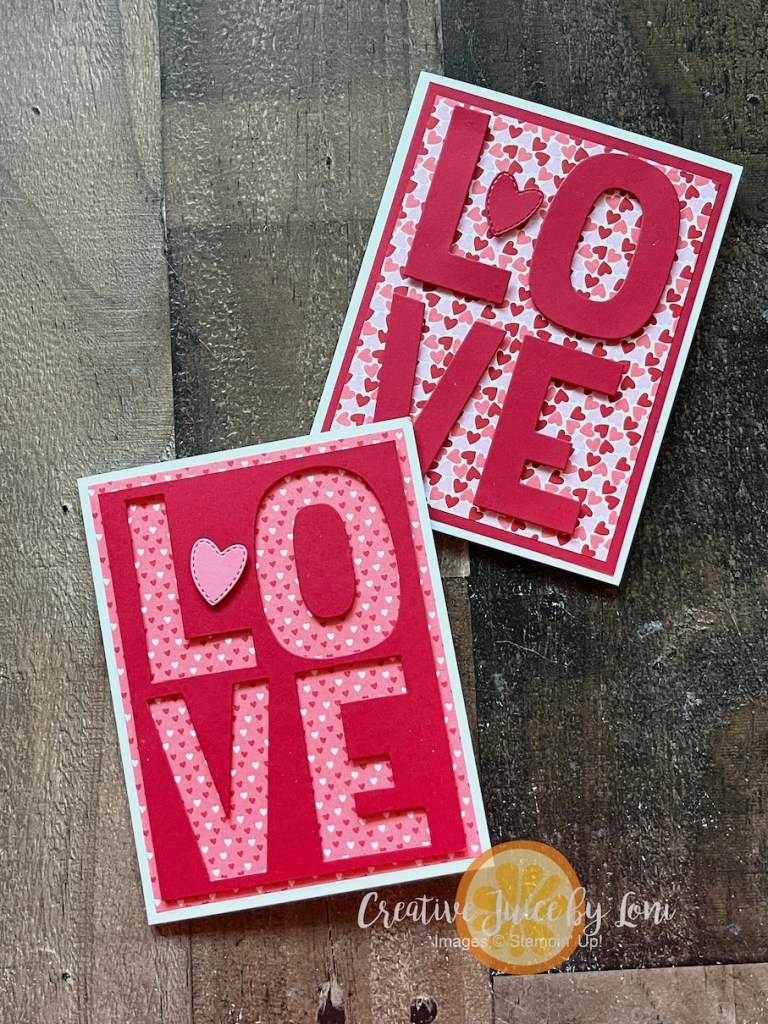
This Valentine card duo only requires ONE pass through the Stampin’ Cut & Emboss machine, and you’ll have letters and the negative space to create two LOVE LETTERS:
Cutting Guide (supplies listed at bottom for easy adding to cart!):
Two Basic White Thick card bases, 8.5″ x 5.5″ scored at 4.25″
Two Real Red card stock layers: One cut to 5.25″ x 4″ and one 5″ x 3.75″
Two pieces of Made with Love Designer Series Paper: One cut to 5.25″ x 4″ and one 5″ x 3.75″
Scraps of Real Red and Flirty Flamingo for heart embellishments.
It’s so simple to do, and you can follow along with a short video. ** Remember to die cut the letters from the smaller Real Red card stock (5″ x 3.75″)
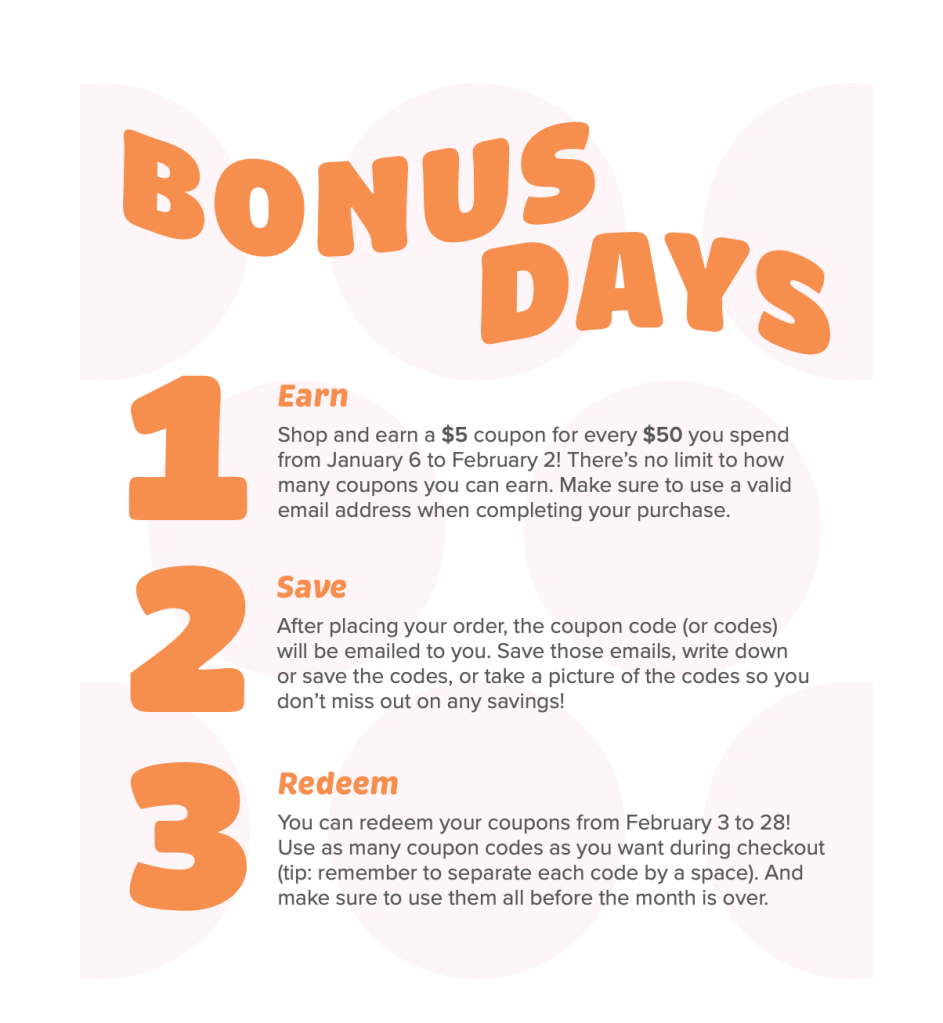
Important note: There are just a few days left to earn BONUS DAYS coupons with each $50 ordered from my Stampin’ Store by February 2nd!
Collect all the coupon codes emailed to you after your order(s) and set a reminder to redeem them in February!
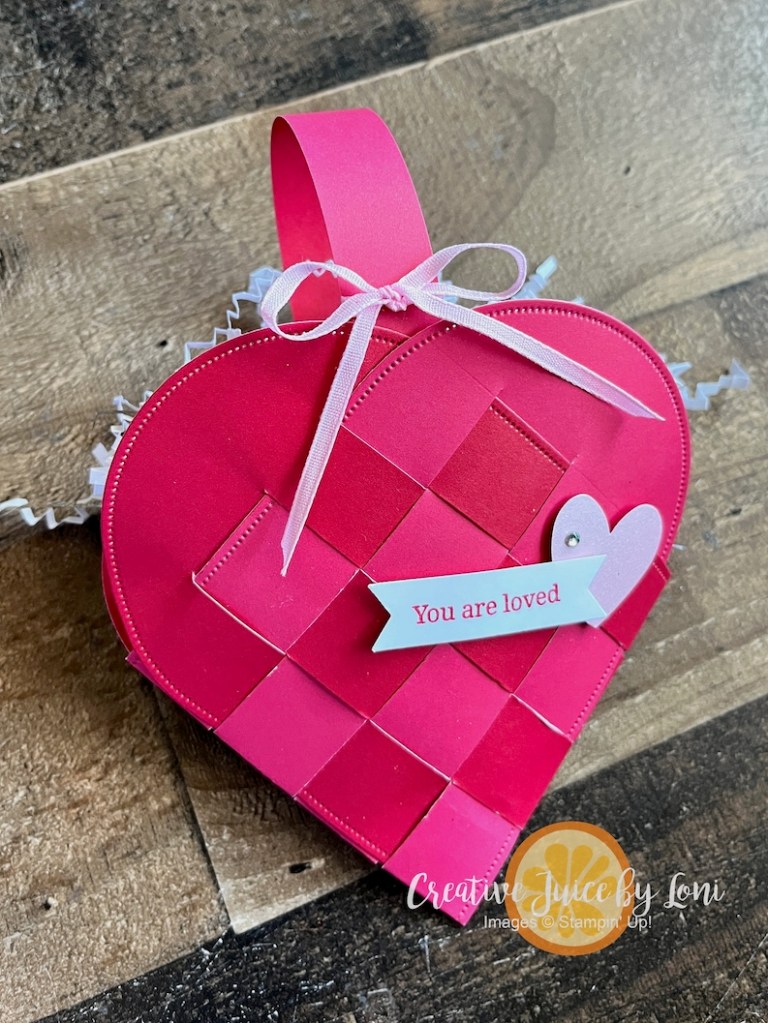
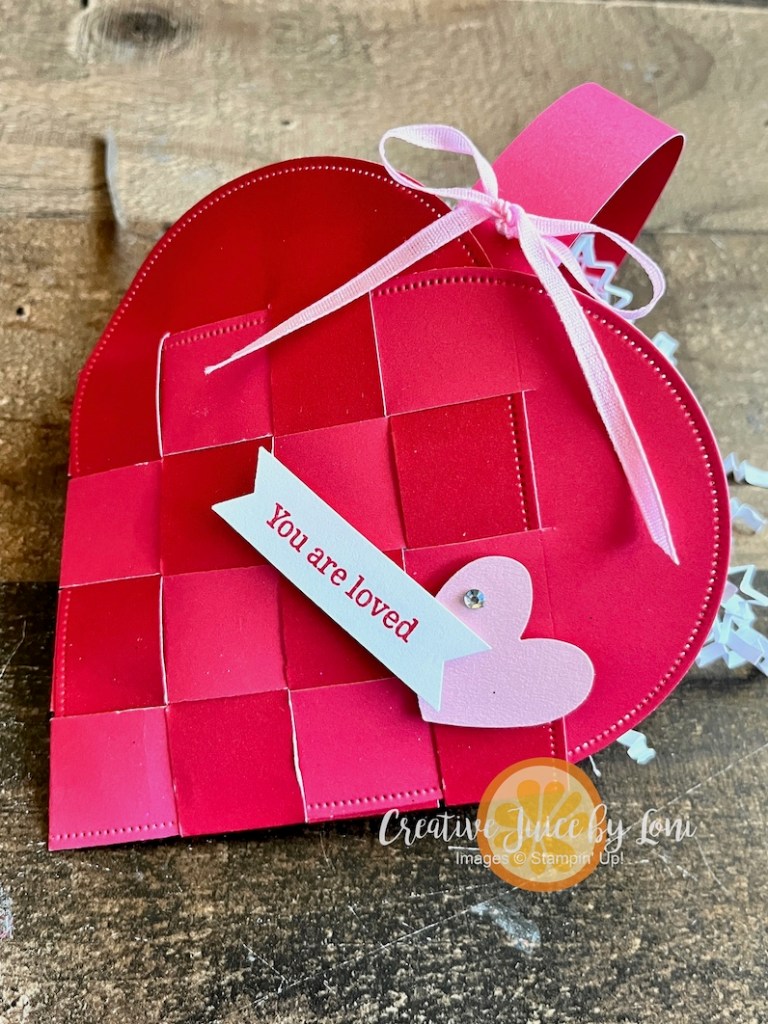
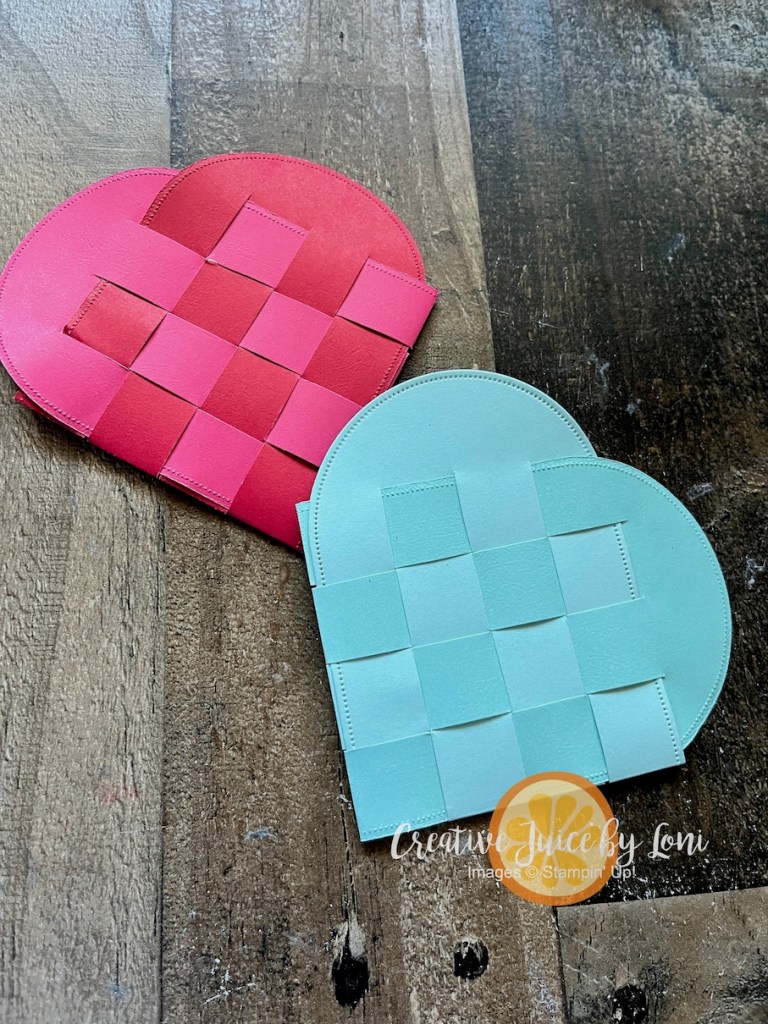
Our worldwide New at SU! design team is back to inspire you with new stamping ideas for 2026 and we’re starting off with the theme of “Handcrafted Hearts” 💕 I’ve been wanting to make these adorable “danish woven heart baskets” with the Everyday Arches dies, so this is the moment:
My mom taught me to make these when I was a young girl, and truthfully, I never really got the hang of them until NOW. To help YOU, I’ve created a short How-To video:
The woven pattern is so lovely with the two-tone card stock that I didn’t want anything covering it, so opted for a small heart punched from the new Pastels Shimmer paper and a mini-banner with the message that matches.
You’ll have all the heart eyes 😍 when you see more works of heart made by the other folks, and remember to PIN or SAVE your favorites:
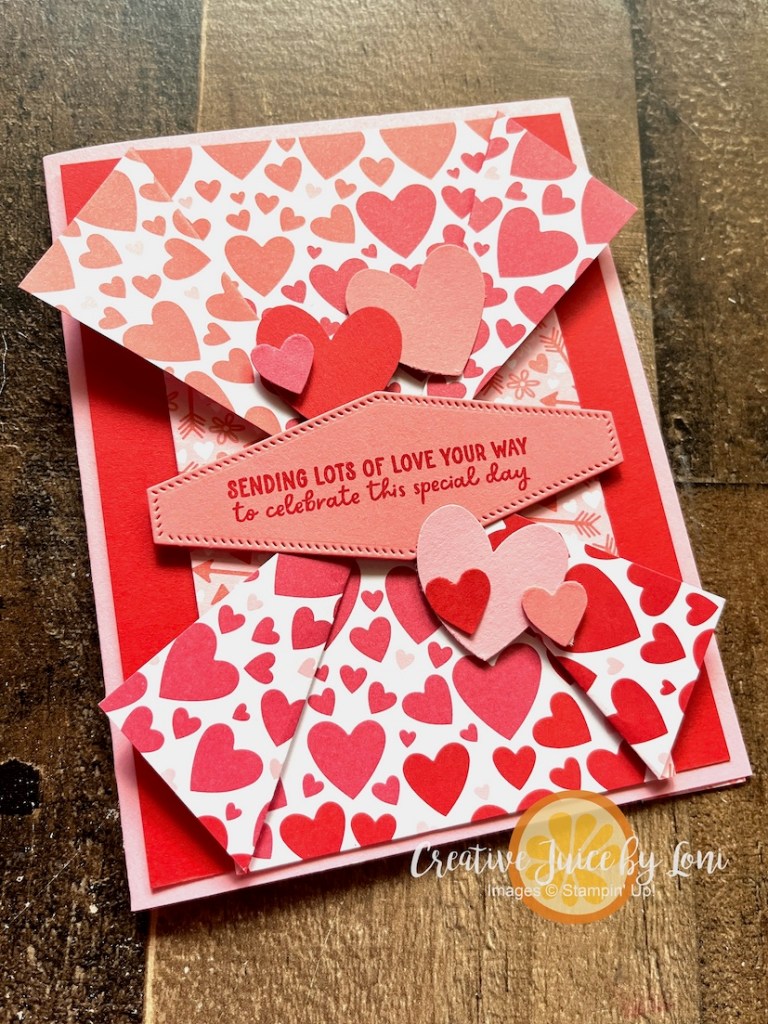
We card creators are constantly faced with a dilemma: Which side of this pretty paper should I use when both front and back designs are beautiful? The Wow Bow Fun Fold lets you use BOTH sides and is easily crafted from ONE PIECE of 6″ x 6″ Designer Series Paper:
This idea was adapted slightly from my friend Frances Martin of Frenchiestamps.com and you can see her versions HERE.
As I explain in the tutorial video, I like to pair bold designs with small patterns, and most of the time, Stampin’ Up! does the work for us by creating Designer Series Paper (DSP) that coordinates on front and back with contrasting colors and patterns. You can take your cue for the colors of your card from the DSP itself, as well. For my demonstration card (above) I chose a Fresh Freesia card base and Old Olive layer on the front, which matches the Lovely & Beautiful Designer Series Paper I used.
Two more versions: One showcasing the Made with Love DSP and the other featuring Cute as a Bug paper — tomorrow can’t come soon enough for you to collect all these patterns!
All of these papers will be included in the Paper & Ribbon Share, where you’ll receive a 6″ x 6″ piece of each paper arriving TOMORROW (Jan. 6, 2026) to play with! Don’t hesitate, the deadline for reserving your share is TODAY (Jan. 5, 2026). If there are any shares left over, they will be offered first-come-first-served at the Card Cafe Class in Hurricane, UT on January 15th.
The video will walk you through making this easy fancy fold card, and the measurements are below.
Card Measurements:
Card base 5.5″ x 8.5″ card stock
First layer 4″ x 5.25″ card stock
Designer Series Paper 6″ x 6″ – cut 3/4″ off bottom and score remaining piece at 1.5″ and 4.5″
Use 3/4″ strip INSIDE the card!
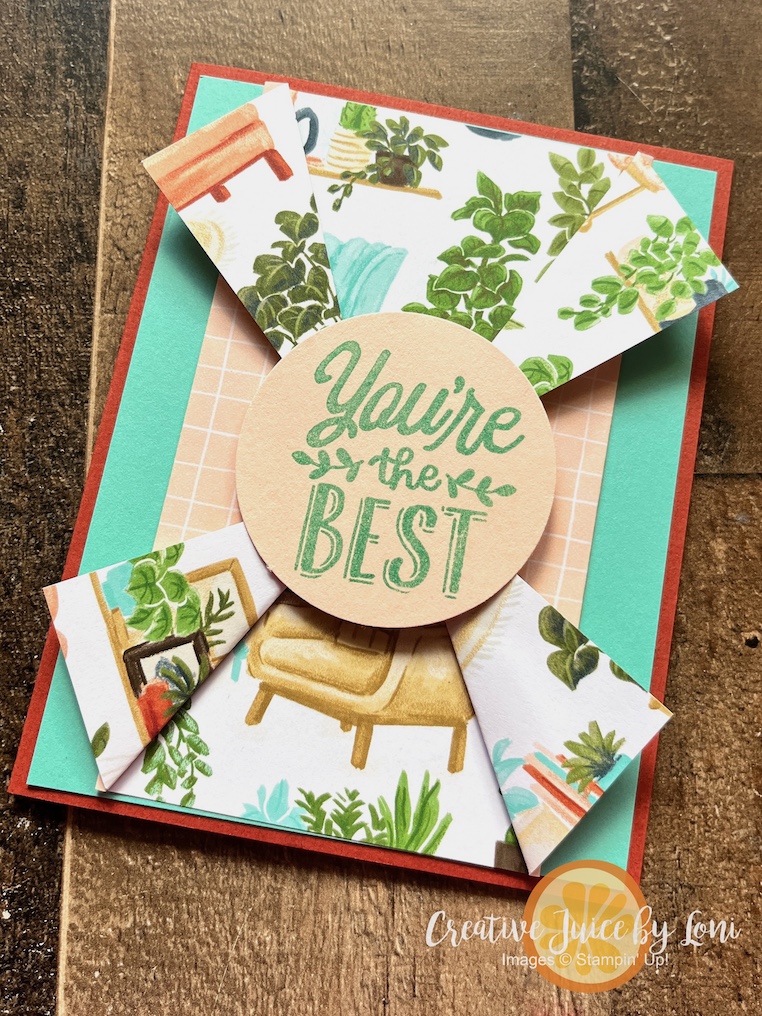
This final sample uses the Hobby Haven Designer Series Paper available now in my Stampin’ Store. It is NOT included in the Paper Share, but sure makes beautiful cards for folks with hobbies such as crafting, baking, houseplants (shown), sewing, self-care, etc. :
COMING TOMORROW, January 6th:
Customers may begin to order from January-April Mini Catalog and January Online Exclusives!
NEW Product of the Month drops!
NEW KITS available!
BONUS DAYS earning period begins: Earn $5 coupon for each $50 spent (in addition to collecting 10% back in Stampin’ Rewards!) to redeem between February 3-28, 2026!
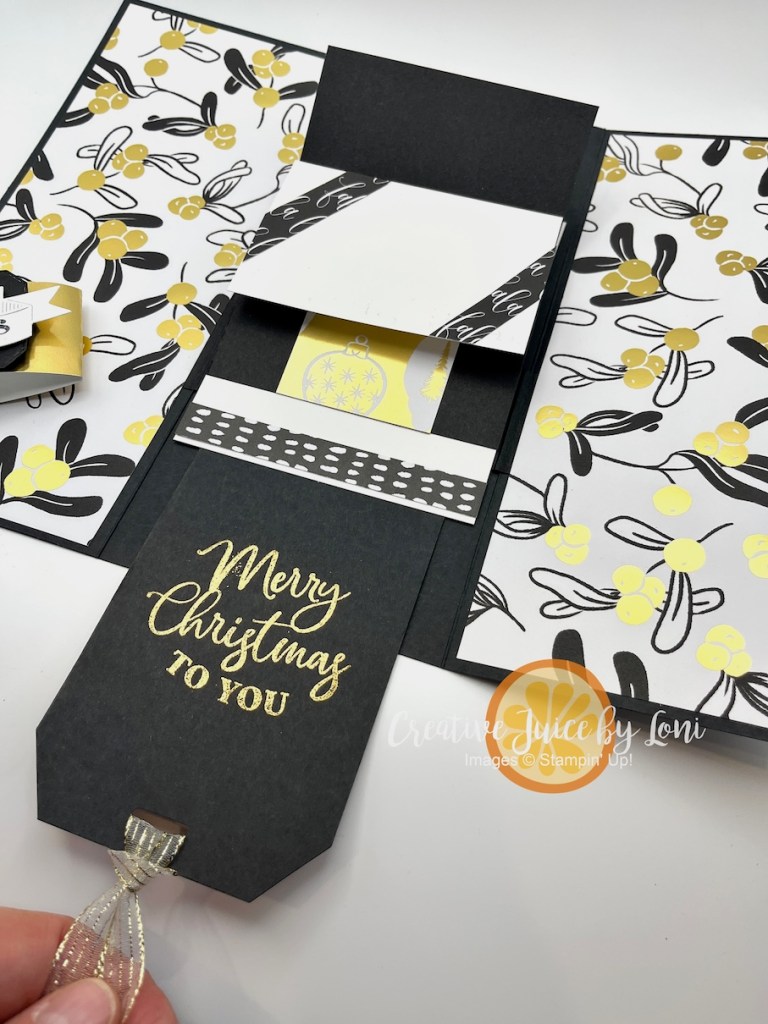
When my cousin Valarie asked if I could make a Gift Card Folio like one she had seen on a social media, I watched the video she shared and said ABSOLUTELY!
This is a larger version of a classic interactive card design called a “Waterfall Card”, and this one presents FIVE GIFT CARDS (or would be an excellent base for a mini photo album). After a few tries and tweaks, I was satisfied with the result – give this a try! You can follow along with the video instructions below 🖥️
I’ve used the Modern Christmas Designer Series Paper from Stampin’ Up!® to embellish this folio, though I show a few other versions made with the retired “Season of Green & Gold” DSP in the video. The black, white & gold is just so elegant, and of course, you can choose any colors/patterns/paper that fit your occasion.
TIP: Add gift cards to each of the five panels with mini glue dots, or use the panels and both sides of the folder for photos of a event to remember!
When you pull the tab, the “waterfall” begins to cascade, and a “secret message” appears:
Maximizing the use of materials was important to me, so this version uses a full sheet of 12″ x 12″ card stock (and a full sheet of 12″ x 12″ Designer Series Paper, if you cut it wisely), plus a few extra pieces. WATCH the tutorial to see HOW TO CUT the card stock!
Measurements:
11-7/8″ x 9″ Basic Black card stock, scored at 4″ and 8″
12″ x 3″ Basic Black card stock, scored at 1″, 2″, 3″, 4″ and 5″
6″ x 1-1/2″ Basic Black card stock, scored at 1″ and 4-7/8″
5 pieces of card stock 2-1/2″ x 3-3/4″
Designer Series Paper: TWO 8-3/4″ x 3-3/4″ and TWO 8-3/4″ x 3-5/8″
Gold Foil sheet: 1-1/2″ x 9-1/2″ for the belly band
Scraps of card stock for label, scraps of Designer Series Paper for embellishments inside.
Making paper crafting easy for you is my goal. What did you think about this tutorial? Please leave a comment and tell me what you’ll use this idea for (comments are found at the top of the post, next to the posting date).
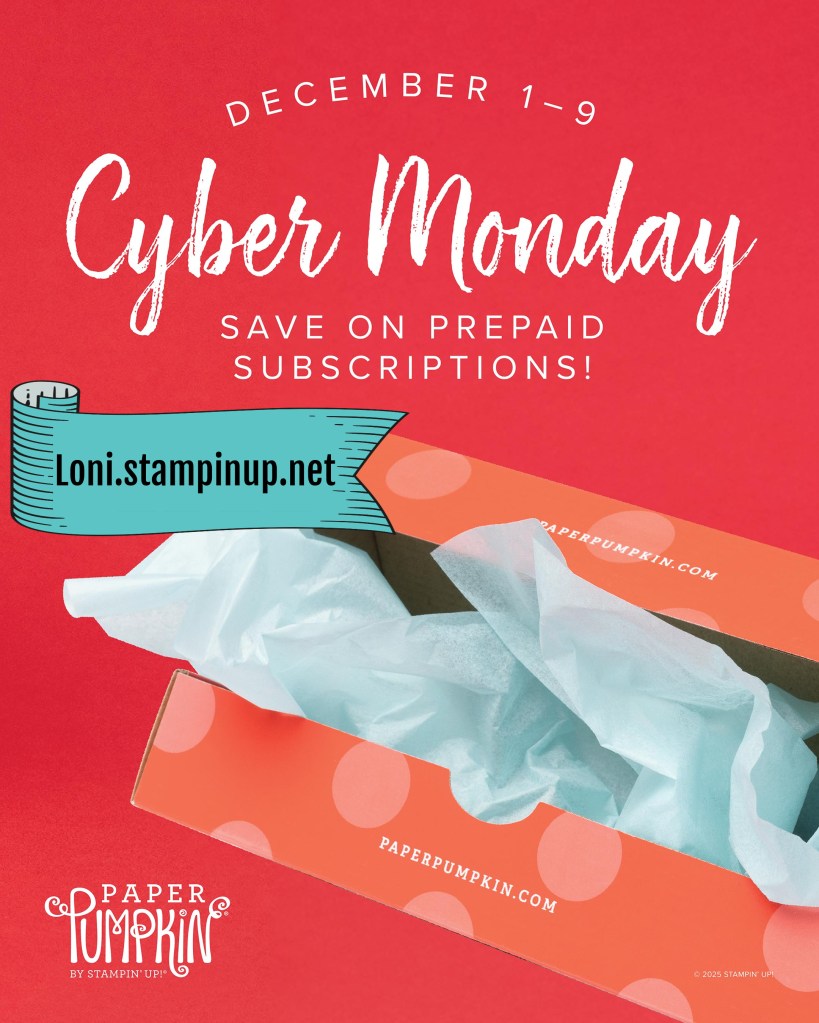
If you’ve been waiting for a good time to subscribe to the BEST MONTHLY CRAFT KIT, OR you need a unique and creative gift for a friend, this is your sign! From December 1-9, pre-paid Paper Pumpkin subscriptions are discounted as follows:
3-month prepaid: $61.00 (regular price $81.00)
6-month prepaid: $122.00 (regular price $162.00)
12-month prepaid: $244.00 (regular price $324.00)
This price includes shipping! Now, here’s the fine print:
* Subscriptions purchased during this promotion start immediately with the December Watercolor in Bloom Kit. This kit cannot be skipped.
* Do not purchase multiple subscriptions for the same recipient. The subscriptions will all start with the Watercolor in Bloom Kit, so the recipient will end up receiving duplicates of the same kit each month.
* If you are already a Paper Pumpkin monthly subscriber, this is a great opportunity to save on your upcoming kits!
* If you ALREADY HAVE a pre-paid subscription and wish to take advantage of the sale, go into your account and PAUSE your currrent December kit, unless you wish to have 2 of the same boxes shipped to you (the other would be a lovely gift to give!).
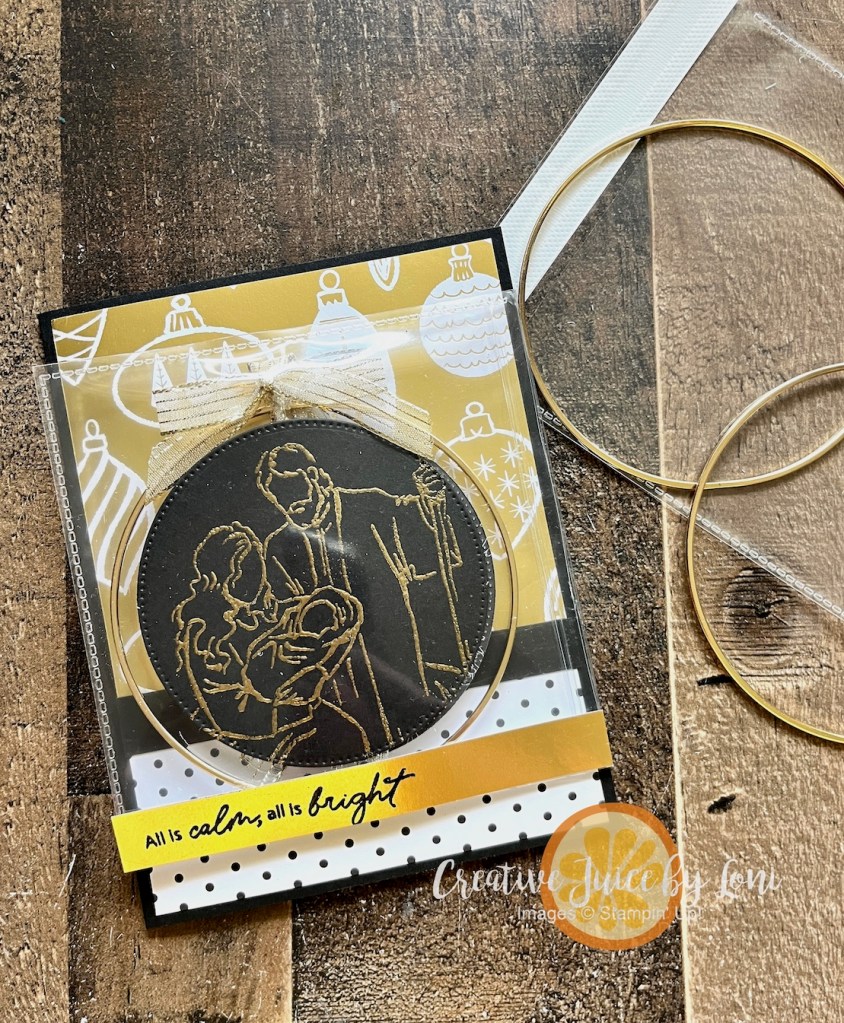
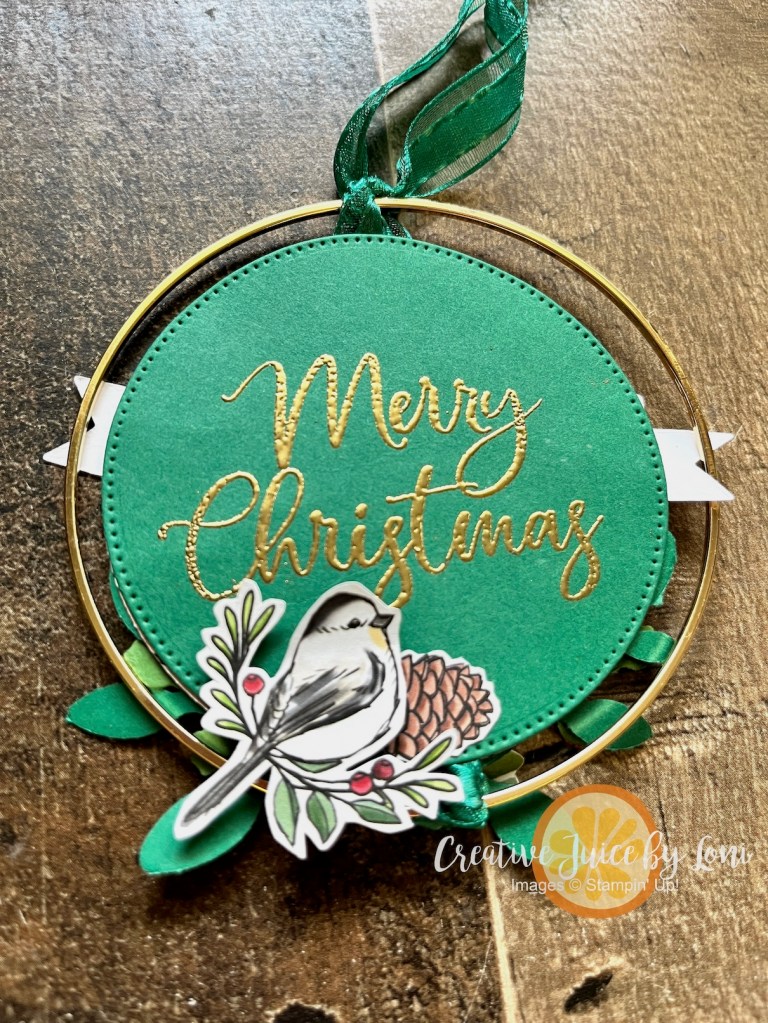
There have been a lot of MAILABLE GIFT IDEAS shared on my website this year, thus, it’s fitting that we add an ornament featuring the large Gold Hoops (also from my store) that could be hung on a Christmas tree. Awesomely, Stampin’ Up!’s new 4″ x 4″ FLIP-FLAPS allow the ornament to double as the decoration for the front of the card, and I have a video tutorial to help you learn how to make one!
By folding the Flip Flap pocket over the front of the card, you can slide the ornament inside and lift the flap to open and get it out. NOTE: In my tutorial, I adhered the flip flap to the inside layer, but you’ll want to adhere it to the back panel inside the card instead, so the ornament doesn’t fall out until you open the flap!
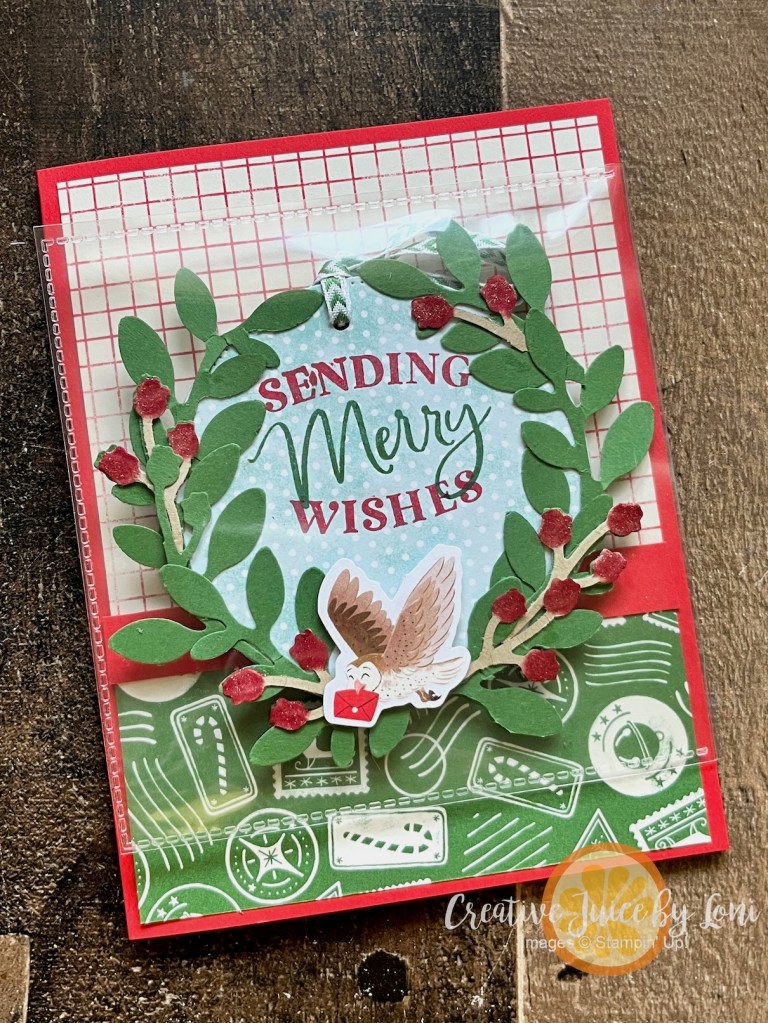
This next version was inspired by an ornament my teammate Angaleen taught us in our November team virtual Stamp & Chat meeting, and uses the North Pole Delivery Specialty Designer Series Paper, which includes printed die cuts:
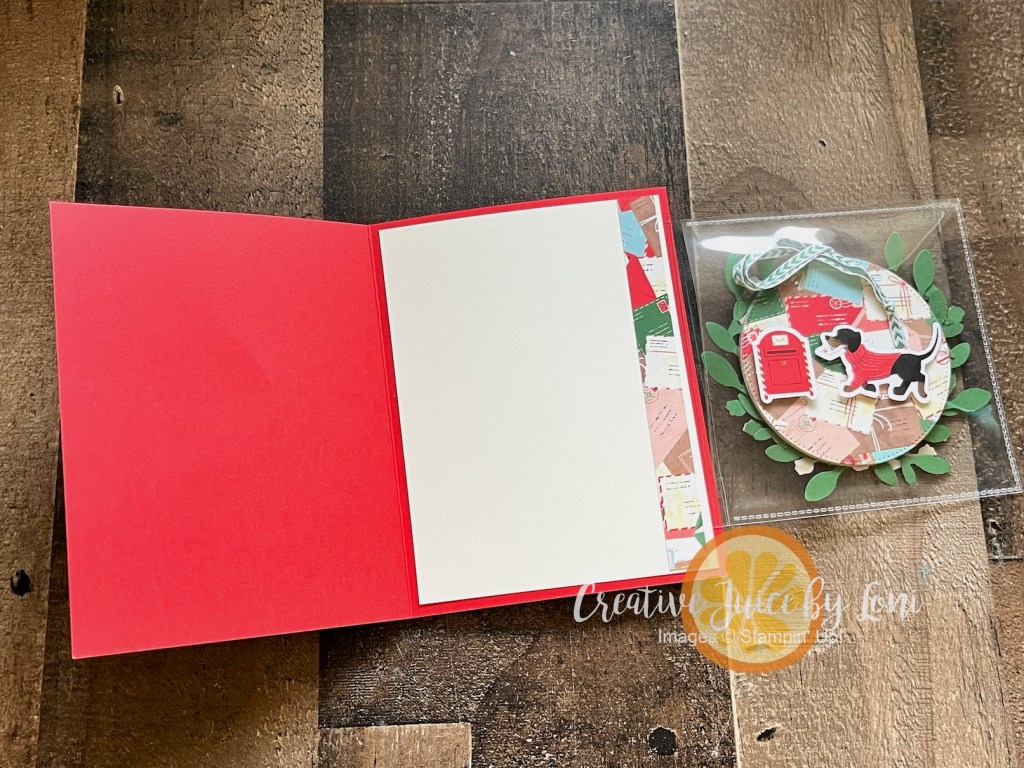
Here’s how it looks when you open it up, and the back side of the ornament:
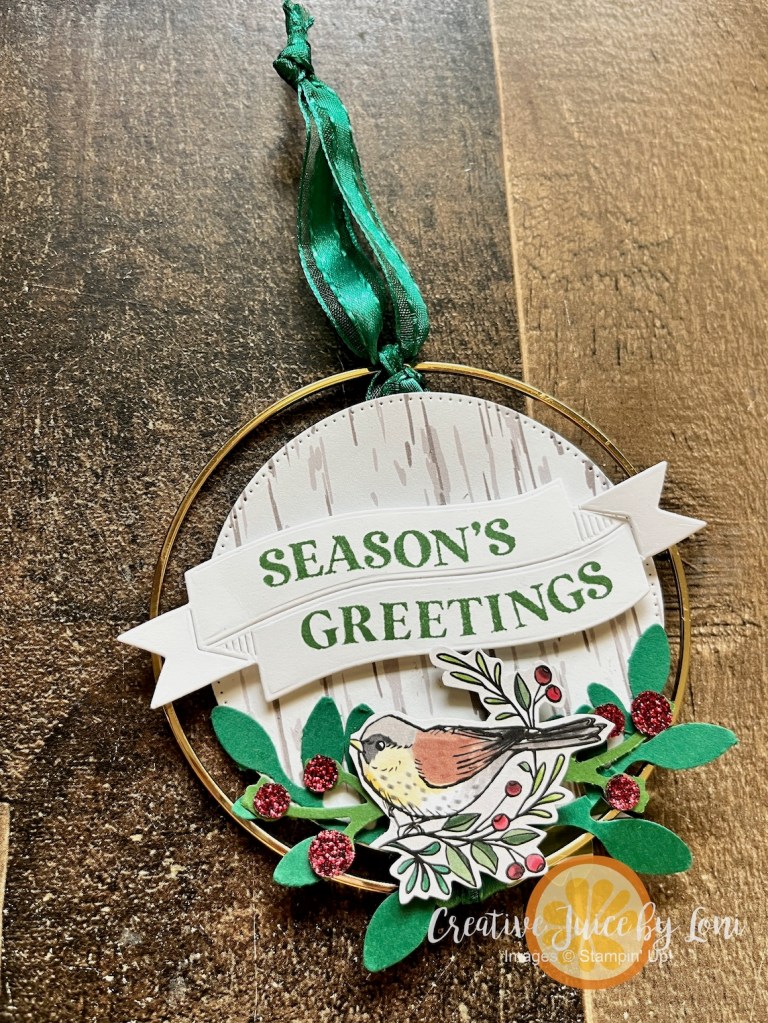
I didn’t use the Gold Hoop on this version, but will on the last one. Use any punch or die for your leaves. The recently retired “Bough Punch” was on my desk, so that’s what I grabbed for both the North Pole card and the next one, featuring my favorite Designer Series Paper from last year (and still available online), Nests of Winter.
The birds were fussy cut from the patterned paper and the sentiments came from the Traditional Labels bundle. I added some Cherry Cobbler delicate details from the Branching Out dies along the top and bottom of the Flip-Flap for this card (TIP: Add a piece of adhesive sheet to the card stock BEFORE you die cut them out, to make the berry branch stick without mess!)
Here is the card opened:
Ready to craft along with me? Watch the video (and rest assured, I usually don’t have such a beastly time with Stampin’ Seal + !!!). THANKS IN ADVANCE for choosing to shop with me! It allows me to have the time and resources to share more ideas with you without charging for the tutorials.
If you find these instructions useful, please shop by clicking any of the links to the products listed above! Another way to show your support: Scroll back to the comment section at the top of the post near the date and leave a COMMENT!
FINAL TIP for this card idea: Score your 4″ x 4″ Flip Flap at 4-1/4″ (the score will be close to the side with adhesive) before you attach it to the inside back panel of your card, so it folds over the front and lays flat.
Keep your creative juices flowing! 🍊🧡– Loni Spendlove
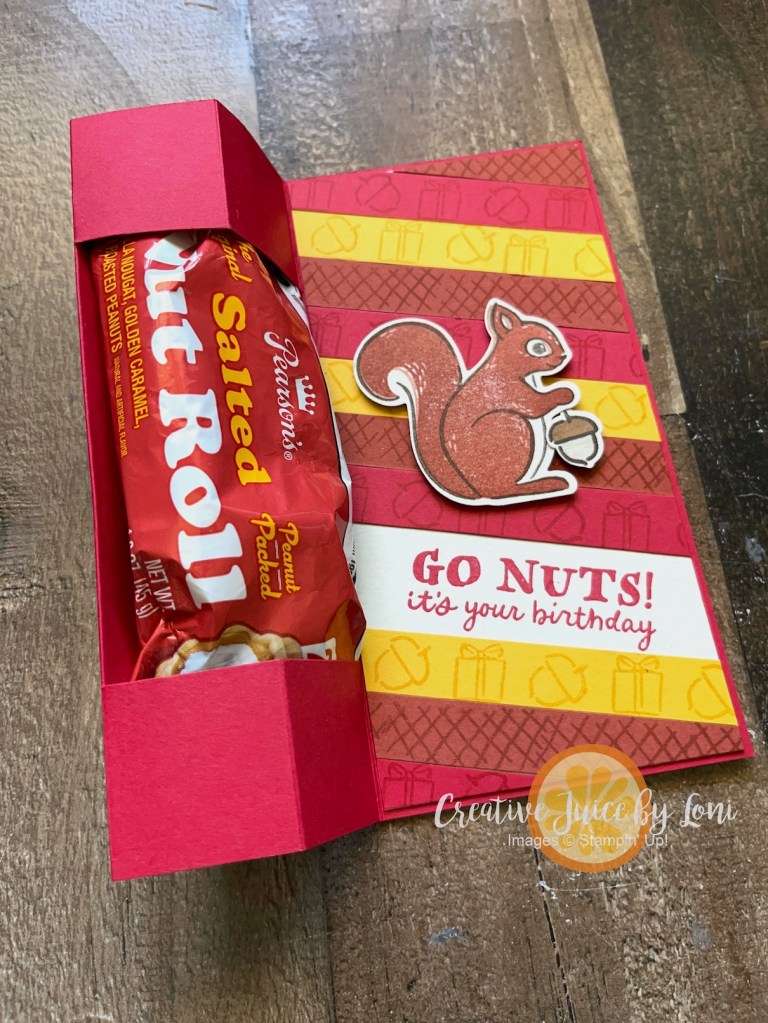
If having a sweet tooth is wrong, I don’t want to be right! Admittedly, I do *attempt* to control it, but peanuts are healthy, right? Even in a bit of caramel and nougat?
“Festive Treats” is the TGIF Challenges theme this week- this birthday treat fits for #tgifc548
Here’s a 90-second tutorial, then I’ll write the measurements below:
Card Base: 11″ x 6″, scored at 4-1/4″, 5-1/2″, 6-3/4″ and 8″
Card layer (front and inside: 5-7/8″ x 2-7/8″ with 1/2″ strips to stamp on.
Just 4 days left to take advantage of the Starter Kit Special! Smart Stampers won’t let this amazing shopping deal pass by (with the opportunity to get a discount on your stamping supplies, birthday and holiday gifts through April, 2026!) This offer EXPIRES OCTOBER 31, 2025!
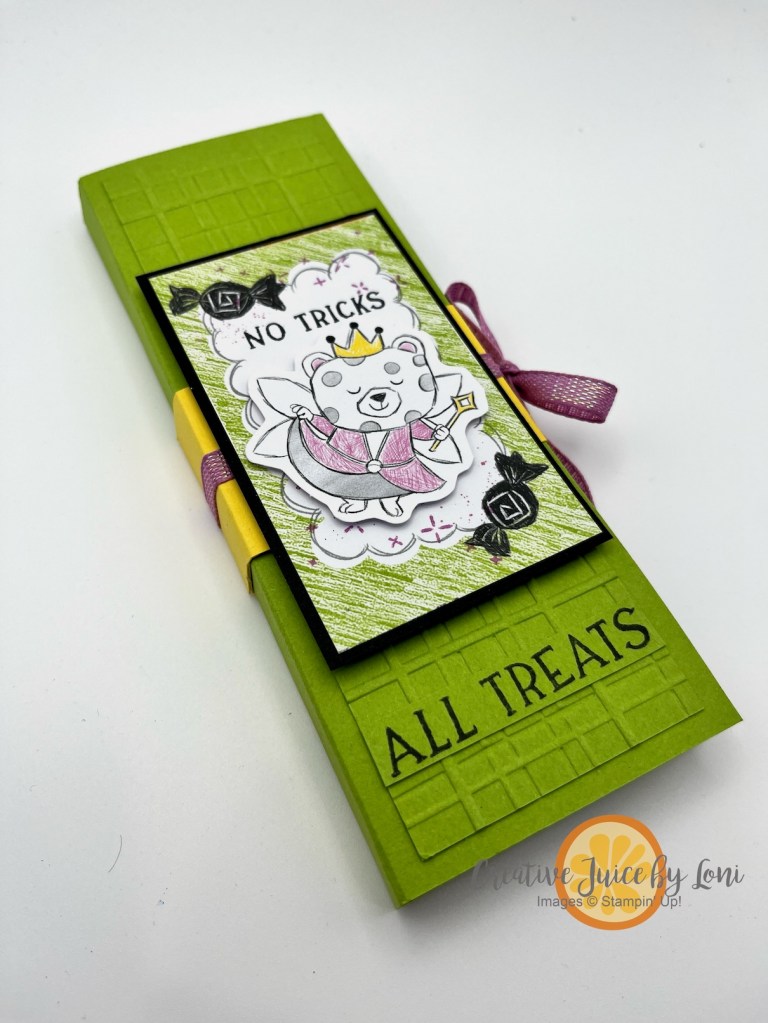
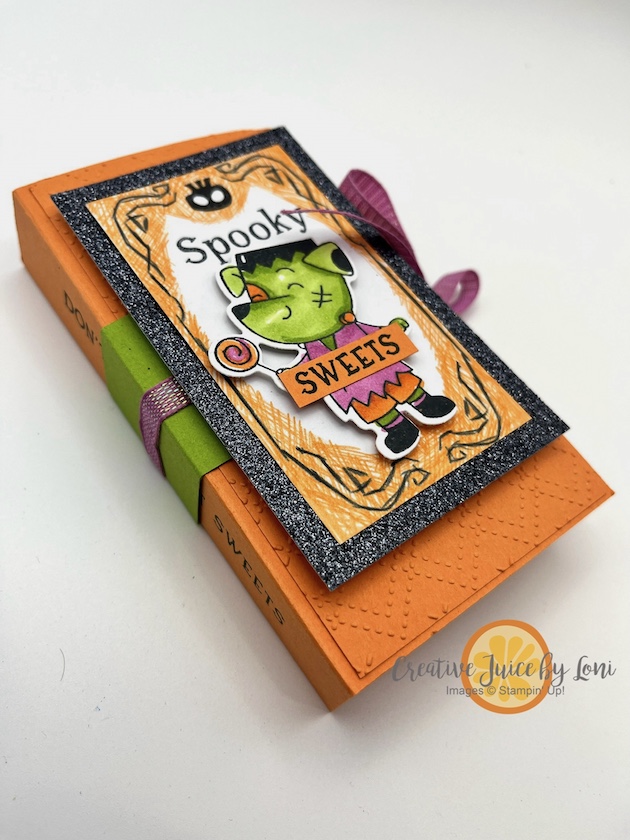
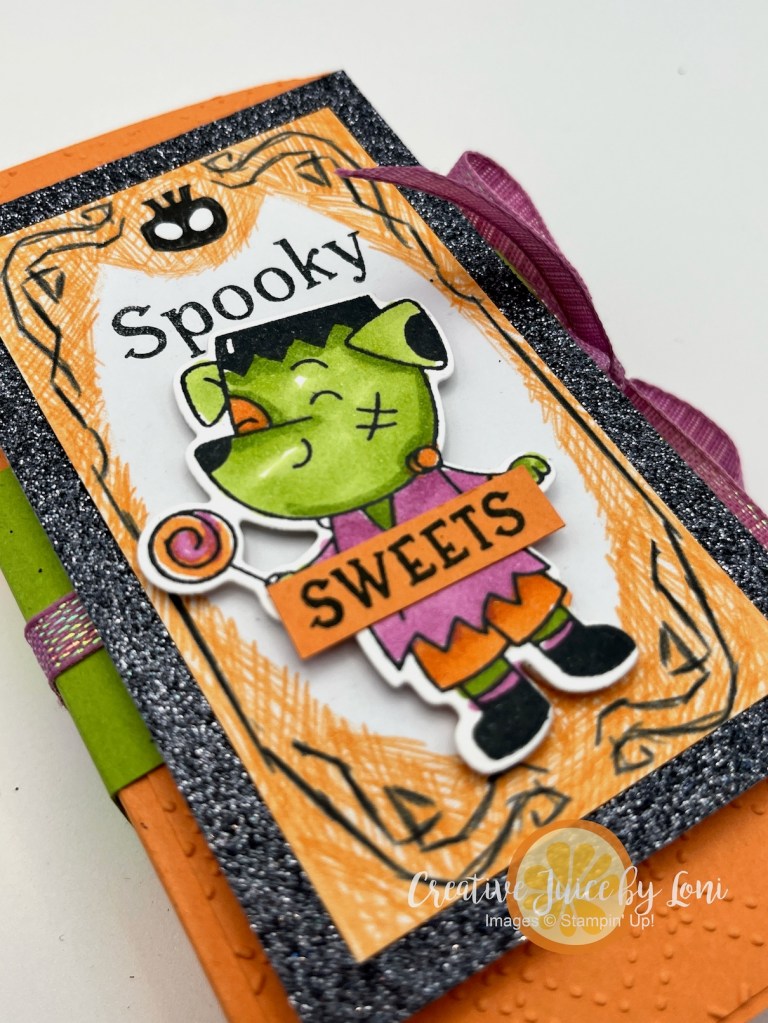
If your Halloween crafting stash is calling your name louder than a ghost in a graveyard, grab your Stampin’ Up!® Spooky Sweet Suite and conjure up something boo-tiful! Don’t worry, eat sweets with these dang cute CANDY BAR BOOKS:
I’ve brewed up two fun versions of this project. The Granny Apple Green “All Treats” Candy Bar Book holds two classic Hershey bars, while the Timid Tiger “Spooky Sweets” version was made to fit two Ghost Toast KitKats. Each one ties up neatly with ribbon to keep your candy secure until it’s time for a delicious reveal. Whether you’re giving these as gifts, party favors, or adding them to a Halloween goodie basket, they’re sure to get more “oohs” and “aahs” than a haunted house on October 31st.
These projects are surprisingly easy to assemble—no hocus pocus required! I’ve included an instructional video below, AND a printable .pdf with measurements.
Note that the belly band measurements are shown on white card stock, but the project uses Granny Apple Green card stock.
I embossed the covers to add some textured dimension (because even monsters like stampin’ style), then decorated with die cuts, stamped images, and a touch of sparkle. Isn’t it Franken-fun?
Here are the key measurements for both versions:
Green “All Treats” Book (fits two Hershey bars):
Cardstock base: 5 1/4″ x 6 1/2″ scored along shorter end at 2 3/8″and 2 7/8″
Belly Band: 1 1/2″ x 6 3/8″ scored at 1/2″, 2 7/8″, 3 3/8″ and 5 7/8″
Ribbon: 16″
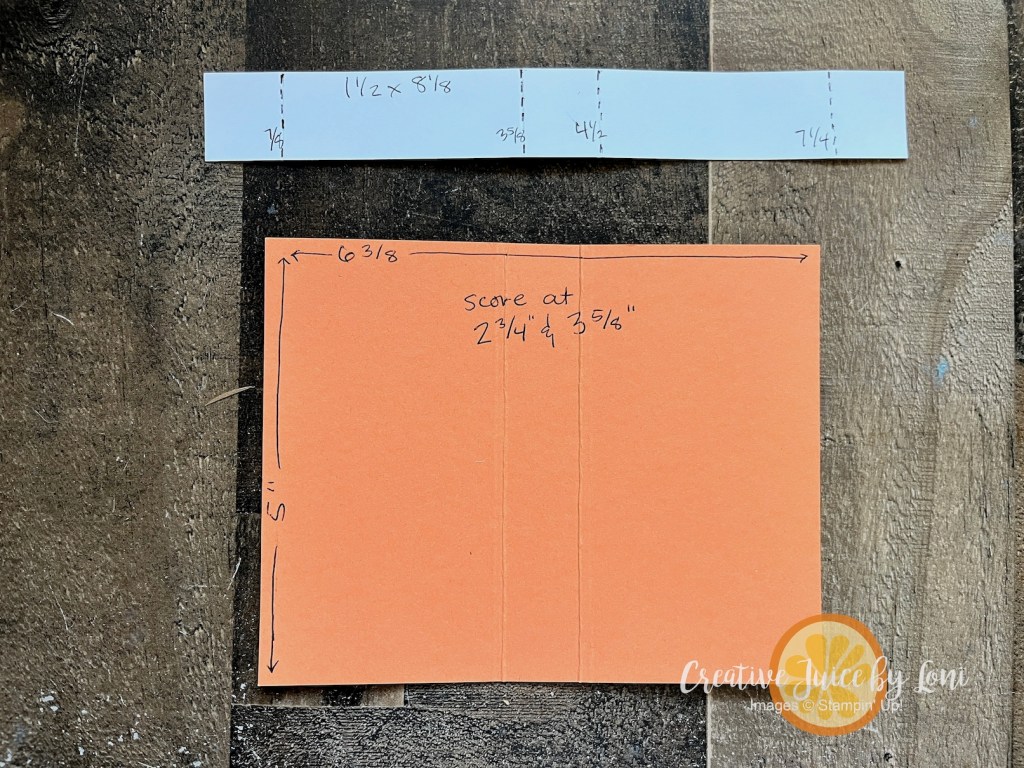
Orange “Spooky Sweets” Book (fits two KitKats):
Cardstock base: 5″ x 6 3/8″ scored along the longer side at 2 3/4″ and 3 5/8″
Belly Band: 1 1/2″ x 8 1/8″ scored at 7/8″, 3 5/8″, 4 1/2″ and 7 1/4″
Ribbon: 16″
Want to see the whole project come to life? Watch my full step-by-step tutorial on YouTube here:
What else did we talk about today? The 3-day KIT SALE (through October 8th):
AND we discussed FAQs on the Starter Kit Special! Bottom line: If you are planning to order more than $35 in crafting supplies from my Stampin’ Store this month, you may as well choose the Starter Kit!
To make your shopping Spooky Sweet, I’ll list the supplies for these projects below and THANK YOU for choosing me to serve your creativity!

![Seasonal Celebrations Photopolymer Stamp Set [ 167225 ]](https://assets1.tamsnetwork.com/images/EC042017NF/167225s.jpg "Seasonal Celebrations Photopolymer Stamp Set [ 167225 ]")
![Reason To Celebrate Photopolymer Stamp Set (English) [ 166905 ]](https://assets1.tamsnetwork.com/images/EC042017NF/166905s.jpg "Reason To Celebrate Photopolymer Stamp Set (English) [ 166905 ]")
![Basic Beige 8 1/2" X 11" Cardstock [ 164511 ]](https://assets1.tamsnetwork.com/images/EC042017NF/164511s.jpg "Basic Beige 8 1/2\" X 11\" Cardstock [ 164511 ]")
![Pecan Pie 8 1/2" X 11" Cardstock [ 161717 ]](https://assets1.tamsnetwork.com/images/EC042017NF/161717s.jpg "Pecan Pie 8 1/2\" X 11\" Cardstock [ 161717 ]")
![Pool Party 8-1/2" X 11" Cardstock [ 122924 ]](https://assets1.tamsnetwork.com/images/EC042017NF/122924s.jpg "Pool Party 8-1/2\" X 11\" Cardstock [ 122924 ]")
![Daffodil Delight 8-1/2" X 11" Cardstock [ 119683 ]](https://assets1.tamsnetwork.com/images/EC042017NF/119683s.jpg "Daffodil Delight 8-1/2\" X 11\" Cardstock [ 119683 ]")
![Granny Apple Green 8-1/2" X 11" Cardstock [ 146990 ]](https://assets1.tamsnetwork.com/images/EC042017NF/146990s.jpg "Granny Apple Green 8-1/2\" X 11\" Cardstock [ 146990 ]")
![Basic Beige Classic Stampin Pad [ 163806 ]](https://assets1.tamsnetwork.com/images/EC042017NF/163806s.jpg "Basic Beige Classic Stampin Pad [ 163806 ]")
![Daffodil Delight Classic Stampin' Pad [ 147094 ]](https://assets1.tamsnetwork.com/images/EC042017NF/147094s.jpg "Daffodil Delight Classic Stampin' Pad [ 147094 ]")
![Granny Apple Green Stampin' Pad [ 147095 ]](https://assets1.tamsnetwork.com/images/EC042017NF/147095s.jpg "Granny Apple Green Stampin' Pad [ 147095 ]")
![Pool Party Classic Stampin' Pad [ 147107 ]](https://assets1.tamsnetwork.com/images/EC042017NF/147107s.jpg "Pool Party Classic Stampin' Pad [ 147107 ]")
![Tuxedo Black Memento Ink Pad [ 132708 ]](https://assets1.tamsnetwork.com/images/EC042017NF/132708s.jpg "Tuxedo Black Memento Ink Pad [ 132708 ]")
![Blending Brushes [ 153611 ]](https://assets1.tamsnetwork.com/images/EC042017NF/153611s.jpg "Blending Brushes [ 153611 ]")
![Stampin' Cut & Emboss Machine [ 149653 ]](https://assets1.tamsnetwork.com/images/EC042017NF/149653s.jpg "Stampin' Cut & Emboss Machine [ 149653 ]")
![Everyday Arches Dies [ 164629 ]](https://assets1.tamsnetwork.com/images/EC042017NF/164629s.jpg "Everyday Arches Dies [ 164629 ]")
![Birch Wood 3 D Embossing Folder [ 164069 ]](https://assets1.tamsnetwork.com/images/EC042017NF/164069s.jpg "Birch Wood 3 D Embossing Folder [ 164069 ]")
![Stampin' Seal [ 152813 ]](https://assets1.tamsnetwork.com/images/EC042017NF/152813s.jpg "Stampin' Seal [ 152813 ]")
![Stampin' Dimensionals [ 104430 ]](https://assets1.tamsnetwork.com/images/EC042017NF/104430s.jpg "Stampin' Dimensionals [ 104430 ]")


![Valentine Kisses Bundle (English) [ 167310 ]](https://assets1.tamsnetwork.com/images/EC042017NF/167310s.jpg "Valentine Kisses Bundle (English) [ 167310 ]")
![Lasting Linen Photopolymer Stamp Set [ 167107 ]](https://assets1.tamsnetwork.com/images/EC042017NF/167107s.jpg "Lasting Linen Photopolymer Stamp Set [ 167107 ]")
![Silicone Craft Sheet [ 127853 ]](https://assets1.tamsnetwork.com/images/EC042017NF/127853s.jpg "Silicone Craft Sheet [ 127853 ]")
![Branching Out Dies [ 165775 ]](https://assets1.tamsnetwork.com/images/EC042017NF/165775s.jpg "Branching Out Dies [ 165775 ]")
![Lovely & Beautiful 12" X 12" (30.5 X 30.5 Cm) Specialty Designer Series Paper [ 166957 ]](https://assets1.tamsnetwork.com/images/EC042017NF/166957s.jpg "Lovely & Beautiful 12\" X 12\" (30.5 X 30.5 Cm) Specialty Designer Series Paper [ 166957 ]")
![Fresh Freesia 8 1/2" X 11" Cardstock [ 155613 ]](https://assets1.tamsnetwork.com/images/EC042017NF/155613s.jpg "Fresh Freesia 8 1/2\" X 11\" Cardstock [ 155613 ]")
![Old Olive 8-1/2" X 11" Cardstock [ 100702 ]](https://assets1.tamsnetwork.com/images/EC042017NF/100702s.jpg "Old Olive 8-1/2\" X 11\" Cardstock [ 100702 ]")
![Peach Pie 8 1/2" X 11" Cardstock [ 163799 ]](https://assets1.tamsnetwork.com/images/EC042017NF/163799s.jpg "Peach Pie 8 1/2\" X 11\" Cardstock [ 163799 ]")
![Basic White 8 1/2" X 11" Cardstock [ 166780 ]](https://assets1.tamsnetwork.com/images/EC042017NF/166780s.jpg "Basic White 8 1/2\" X 11\" Cardstock [ 166780 ]")
![Vellum 12" X 12" (30.5 X 30.5 Cm) Specialty Paper [ 167099 ]](https://assets1.tamsnetwork.com/images/EC042017NF/167099s.jpg "Vellum 12\" X 12\" (30.5 X 30.5 Cm) Specialty Paper [ 167099 ]")
![Fresh Freesia Classic Stampin' Pad [ 155611 ]](https://assets1.tamsnetwork.com/images/EC042017NF/155611s.jpg "Fresh Freesia Classic Stampin' Pad [ 155611 ]")
![Peach Pie Classic Stampin Pad [ 163810 ]](https://assets1.tamsnetwork.com/images/EC042017NF/163810s.jpg "Peach Pie Classic Stampin Pad [ 163810 ]")
![Pecan Pie Classic Stampin' Pad [ 161665 ]](https://assets1.tamsnetwork.com/images/EC042017NF/161665s.jpg "Pecan Pie Classic Stampin' Pad [ 161665 ]")
![Baker's Twine Essentials Pack [ 155475 ]](https://assets1.tamsnetwork.com/images/EC042017NF/155475s.jpg "Baker's Twine Essentials Pack [ 155475 ]")
![Basics Wow! Embossing Powder [ 165679 ]](https://assets1.tamsnetwork.com/images/EC042017NF/165679s.jpg "Basics Wow! Embossing Powder [ 165679 ]")
![Heat Tool (Us And Canada) [ 129053 ]](https://assets1.tamsnetwork.com/images/EC042017NF/129053s.jpg "Heat Tool (Us And Canada) [ 129053 ]")
![Mini Glue Dots [ 103683 ]](https://assets1.tamsnetwork.com/images/EC042017NF/103683s.jpg "Mini Glue Dots [ 103683 ]")


![Sweet Jar Bundle (English) [ 165507 ]](https://assets1.tamsnetwork.com/images/EC042017NF/165507s.jpg "Sweet Jar Bundle (English) [ 165507 ]")
![Basic White 8 1/2" X 11" Thick Cardstock [ 159229 ]](https://assets1.tamsnetwork.com/images/EC042017NF/159229s.jpg "Basic White 8 1/2\" X 11\" Thick Cardstock [ 159229 ]")
![Stylish Shapes Dies [ 159183 ]](https://assets1.tamsnetwork.com/images/EC042017NF/159183s.jpg "Stylish Shapes Dies [ 159183 ]")
![Flirty Flamingo Classic Stampin' Pad [ 147052 ]](https://assets1.tamsnetwork.com/images/EC042017NF/147052s.jpg "Flirty Flamingo Classic Stampin' Pad [ 147052 ]")
![Real Red Classic Stampin' Pad [ 147084 ]](https://assets1.tamsnetwork.com/images/EC042017NF/147084s.jpg "Real Red Classic Stampin' Pad [ 147084 ]")
![Real Red 8-1/2" X 11" Cardstock [ 102482 ]](https://assets1.tamsnetwork.com/images/EC042017NF/102482s.jpg "Real Red 8-1/2\" X 11\" Cardstock [ 102482 ]")
![Made With Love 12" X 12" (30.5 X 30.5 Cm) Designer Series Paper [ 167054 ]](https://assets1.tamsnetwork.com/images/EC042017NF/167054s.jpg "Made With Love 12\" X 12\" (30.5 X 30.5 Cm) Designer Series Paper [ 167054 ]")
![Real Red 1/2" (1.3 Cm) Shiny Ribbon [ 165876 ]](https://assets1.tamsnetwork.com/images/EC042017NF/165876s.jpg "Real Red 1/2\" (1.3 Cm) Shiny Ribbon [ 165876 ]")
![Crumb Cake 12" X 12" (30.5 X 30.5 Cm) Cardstock [ 166787 ]](https://assets1.tamsnetwork.com/images/EC042017NF/166787s.jpg "Crumb Cake 12\" X 12\" (30.5 X 30.5 Cm) Cardstock [ 166787 ]")
![Pretty Peacock 8-1/2" X 11" Cardstock [ 150880 ]](https://assets1.tamsnetwork.com/images/EC042017NF/150880s.jpg "Pretty Peacock 8-1/2\" X 11\" Cardstock [ 150880 ]")
![Lost Lagoon 8-1/2" X 11" Cardstock [ 133679 ]](https://assets1.tamsnetwork.com/images/EC042017NF/133679s.jpg "Lost Lagoon 8-1/2\" X 11\" Cardstock [ 133679 ]")
![Pretty Peacock Classic Stampin’ Pad [ 150083 ]](https://assets1.tamsnetwork.com/images/EC042017NF/150083s.jpg "Pretty Peacock Classic Stampin’ Pad [ 150083 ]")
![Lost Lagoon Classic Stampin' Pad [ 161678 ]](https://assets1.tamsnetwork.com/images/EC042017NF/161678s.jpg "Lost Lagoon Classic Stampin' Pad [ 161678 ]")
![Cajun Craze Classic Stampin' Pad [ 147085 ]](https://assets1.tamsnetwork.com/images/EC042017NF/147085s.jpg "Cajun Craze Classic Stampin' Pad [ 147085 ]")
![Earthy Matte Dots [ 167213 ]](https://assets1.tamsnetwork.com/images/EC042017NF/167213s.jpg "Earthy Matte Dots [ 167213 ]")
![Flirty Flamingo 8-1/2" X 11" Cardstock [ 141416 ]](https://assets1.tamsnetwork.com/images/EC042017NF/141416s.jpg "Flirty Flamingo 8-1/2\" X 11\" Cardstock [ 141416 ]")
![Lovely Doilies [ 167104 ]](https://assets1.tamsnetwork.com/images/EC042017NF/167104s.jpg "Lovely Doilies [ 167104 ]")
![Clear Wink Of Stella Glitter Brush [ 141897 ]](https://assets1.tamsnetwork.com/images/EC042017NF/141897s.jpg "Clear Wink Of Stella Glitter Brush [ 141897 ]")


![Party Alphabet Dies [ 165263 ]](https://assets1.tamsnetwork.com/images/EC042017NF/165263s.jpg "Party Alphabet Dies [ 165263 ]")
![Valentine Kisses Dies [ 167029 ]](https://assets1.tamsnetwork.com/images/EC042017NF/167029s.jpg "Valentine Kisses Dies [ 167029 ]")

![Real Red 12" X 12" (30.5 X 30.5 Cm) Two Tone Cardstock [ 166696 ]](https://assets1.tamsnetwork.com/images/EC042017NF/166696s.jpg "Real Red 12\" X 12\" (30.5 X 30.5 Cm) Two Tone Cardstock [ 166696 ]")
![Banner Sayings Bundle (English) [ 167051 ]](https://assets1.tamsnetwork.com/images/EC042017NF/167051s.jpg "Banner Sayings Bundle (English) [ 167051 ]")
![Pastels Shimmer 12" X 12" (30.5 X 30.5 Cm) Specialty Paper [ 167198 ]](https://assets1.tamsnetwork.com/images/EC042017NF/167198s.jpg "Pastels Shimmer 12\" X 12\" (30.5 X 30.5 Cm) Specialty Paper [ 167198 ]")
![Bee Builder Punch [ 162553 ]](https://assets1.tamsnetwork.com/images/EC042017NF/162553s.jpg "Bee Builder Punch [ 162553 ]")
![Bubble Bath 1/8" (3.2 Mm) Faux Linen Ribbon [ 167075 ]](https://assets1.tamsnetwork.com/images/EC042017NF/167075s.jpg "Bubble Bath 1/8\" (3.2 Mm) Faux Linen Ribbon [ 167075 ]")
![Rhinestone Basic Jewels [ 144220 ]](https://assets1.tamsnetwork.com/images/EC042017NF/144220s.jpg "Rhinestone Basic Jewels [ 144220 ]")
![Multipurpose Liquid Glue [ 110755 ]](https://assets1.tamsnetwork.com/images/EC042017NF/110755s.jpg "Multipurpose Liquid Glue [ 110755 ]")


![Traditional Labels Bundle (English) [ 165865 ]](https://assets1.tamsnetwork.com/images/EC042017NF/165865s.jpg "Traditional Labels Bundle (English) [ 165865 ]")
![Basic Black 12" X 12" (30.5 X 30.5 Cm) Cardstock [ 166786 ]](https://assets1.tamsnetwork.com/images/EC042017NF/166786s.jpg "Basic Black 12\" X 12\" (30.5 X 30.5 Cm) Cardstock [ 166786 ]")
![Modern Christmas 12" X 12" (30.5 X 30.5 Cm) Specialty Designer Series Paper [ 165990 ]](https://assets1.tamsnetwork.com/images/EC042017NF/165990s.jpg "Modern Christmas 12\" X 12\" (30.5 X 30.5 Cm) Specialty Designer Series Paper [ 165990 ]")
![Gold Foil Sheets [ 132622 ]](https://assets1.tamsnetwork.com/images/EC042017NF/132622s.jpg "Gold Foil Sheets [ 132622 ]")
![Gold Striped 3/8" (1 Cm) Mesh Ribbon [ 165599 ]](https://assets1.tamsnetwork.com/images/EC042017NF/165599s.jpg "Gold Striped 3/8\" (1 Cm) Mesh Ribbon [ 165599 ]")
![Hole Punch Assortment [ 165409 ]](https://assets1.tamsnetwork.com/images/EC042017NF/165409s.jpg "Hole Punch Assortment [ 165409 ]")
![Paper Trimmer [ 152392 ]](https://assets1.tamsnetwork.com/images/EC042017NF/152392s.jpg "Paper Trimmer [ 152392 ]")
![Tear & Tape Adhesive [ 154031 ]](https://assets1.tamsnetwork.com/images/EC042017NF/154031s.jpg "Tear & Tape Adhesive [ 154031 ]")
![Black Stampin' Dimensionals Combo Pack [ 150893 ]](https://assets1.tamsnetwork.com/images/EC042017NF/150893s.jpg "Black Stampin' Dimensionals Combo Pack [ 150893 ]")


![Fluffy Squirrel Bundle (English) [ 165819 ]](https://assets1.tamsnetwork.com/images/EC042017NF/165819s.jpg "Fluffy Squirrel Bundle (English) [ 165819 ]")
![Cajun Craze 8-1/2" X 11" Cardstock [ 119684 ]](https://assets1.tamsnetwork.com/images/EC042017NF/119684s.jpg "Cajun Craze 8-1/2\" X 11\" Cardstock [ 119684 ]")
![Crushed Curry 8-1/2" X 11" Cardstock [ 131199 ]](https://assets1.tamsnetwork.com/images/EC042017NF/131199s.jpg "Crushed Curry 8-1/2\" X 11\" Cardstock [ 131199 ]")
![Crushed Curry Classic Stampin' Pad [ 147087 ]](https://assets1.tamsnetwork.com/images/EC042017NF/147087s.jpg "Crushed Curry Classic Stampin' Pad [ 147087 ]")
![Early Espresso Classic Stampin' Pad [ 147114 ]](https://assets1.tamsnetwork.com/images/EC042017NF/147114s.jpg "Early Espresso Classic Stampin' Pad [ 147114 ]")


![Spooky Sweet Suite Collection (English) [ 166205 ]](https://assets1.tamsnetwork.com/images/EC042017NF/166205s.jpg "Spooky Sweet Suite Collection (English) [ 166205 ]")
![Timid Tiger 8 1/2" X 11" Cardstock [ 165626 ]](https://assets1.tamsnetwork.com/images/EC042017NF/165626s.jpg "Timid Tiger 8 1/2\" X 11\" Cardstock [ 165626 ]")
![Timid Tiger Stampin’ Blends Combo Pack [ 165291 ]](https://assets1.tamsnetwork.com/images/EC042017NF/165291s.jpg "Timid Tiger Stampin’ Blends Combo Pack [ 165291 ]")
![Granny Apple Green Stampin' Blends Combo Pack [ 154885 ]](https://assets1.tamsnetwork.com/images/EC042017NF/154885s.jpg "Granny Apple Green Stampin' Blends Combo Pack [ 154885 ]")
![Petunia Pop Stampin’ Blends Combo Pack [ 163828 ]](https://assets1.tamsnetwork.com/images/EC042017NF/163828s.jpg "Petunia Pop Stampin’ Blends Combo Pack [ 163828 ]")
![Peaceful Garden 12" X 12" (30.5 X 30.5 Cm) Glimmer Paper [ 165929 ]](https://assets1.tamsnetwork.com/images/EC042017NF/165929s.jpg "Peaceful Garden 12\" X 12\" (30.5 X 30.5 Cm) Glimmer Paper [ 165929 ]")
