In Colors on a Leafy Card, with Ann

What a delight to have my dear friend and Sprinkled Ink teammate Ann Olsen in the studio with me! We got to stamp and visit together, and reminisce about some of our fun times together as demonstrators over 27 years together. PLUS, we stamped a few cards with current sets of In Colors, the Layering Leaves stamp set and the BOUGH PUNCH, which is finally back in stock!

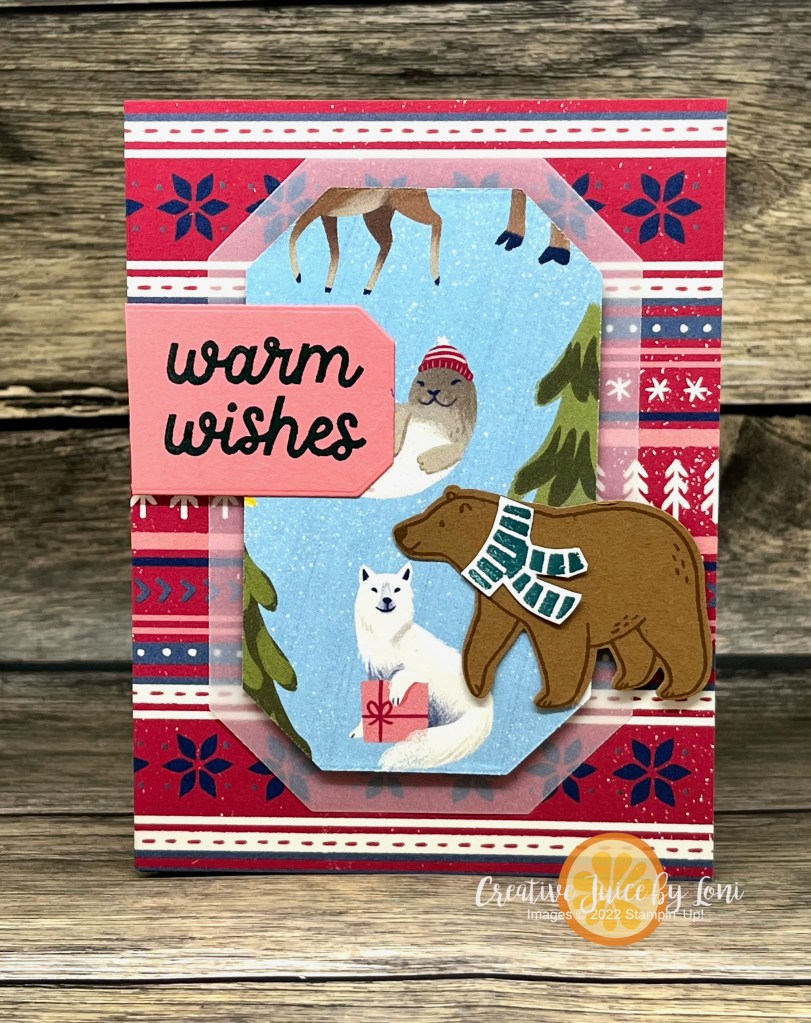
My card started with Very Vanilla card stock and the 2023-2025 In Colors (Copper Clay, Wild Wheat, Moody Mauve, Pebbled Path and Boho Blue). Ann’s card is the same layout on a white card stock base, but with 2022-2024 In Colors (Tahitian Tide, Starry Sky, Sweet Sorbet, Parakeet Party and Orchid Opulence).

Each colored section started out as 2″ x 1-1/4″ rectangles, which I forgot to mention during the video. Trim off the section on the top and bottom that hang over, after you adhere them to the front layer.

Which color combination do you like best? I usually prefer the vivid colors, but am feeling the fall weather and leaning into the vanilla/earthy tones today. The brighter colors are available through April 2024, so make sure you have ink refills and paper stocked up!

Product List

27 years ago, Ann had to ask me how to join Stampin’ Up! but I’ve become better at offering this opportunity to others! If you are interested in joining a creative community and expanding your circle of friendships, we have an AMAZING offer coming October 3-31, 2023:

Interior Diorama Card, Many Ways!

When there is a “scene” printed on Stampin’ Up! Designer Series Paper, it’s perfect for creating a framed picture that pops up inside your card!

For this one, I used the A Walk in the Forest DSP, which is part of our “Making A Difference” Campaign ($3 from each pack purchased is donated to the “Toys for Tots” program). This paper coordinates with both the Beary Christmas Suite and the Merriest trees bundle!

Here’s a slightly different version of the same card using the Beary Christmas paper included in the Beary Christmas Suite:

Because it was so much fun -and simple- to make (I’ll share a how-to video below), I had to make multiple versions with different Designer Series Paper from the September-December Mini Catalog. It’s like the One Card, Two Ways challenge from the #tgifc438 WWYD? Challenge:

The design is roomy enough to sneak a treat inside (not a mailable option, obviously) and for this one I used Them Bones Designer Series Paper:

Sharp eyes may notice that the skeletons are smaller than those in the coordinating suite of Halloween products…because the stamp set I used was from the September 2019 Paper Pumpkin kit called “Bone Appetit”!

Before we get to the last version of the Interior Diorama card, here is the video tutorial:

The finished card (closed) is 4″ x 5-1/4″.

Begin with a 12″ x 5.25″ strip of Designer Series Paper and score at 1/2″, 4″, 4.5″ and 8″

Product List

My final Interior Diorama card is a Christmas Version using the O, Holy Night Designer Series Paper and Night Divine Bundle:

Will you be trying this card? Let me know what you think in the comments!

A Gift Bag That Closes With a Tag

I wanted to give the leaders in my Sprinkled Ink team a special gift when we attended BackStage last weekend. My Kit.sch pillowcase is one of my favorite things, so I knew it would be a special gift, but I needed a way to wrap them, so I came up with a gift bag/box that closes at the top with a TAG.

Both Sue and Kristi LOVE purple, so I used a piece of the Delighfully Eclectic Designer Series Paper to create the bag for them, but today I demonstrated it with a sneak peek piece of the Walk in the Forest Designer Series Paper that will be available beginning September 6, 2023:

It’s super simple to create and you can also slip a hand-stamped card inside along with a pillowcase (or any other gift about the same size). The finished bag is 1-1/4″ x 4-1/4″ x 7″

Grab a piece of Designer Series Paper and watch the video below to craft along, then reserve your paper share at the link after the video!

Would you like a 6″ x 6″ piece of every pretty patterned paper in the upcoming September-December Mini catalog? Reserve your share by September 5th (or inquire if I have any extra after the 6th).

NOTE: The Walk in the Forest Designer Series Paper is our “giveback” product and when you purchase a package, $3 will be donated to the Marine Toys for Tots program to deliver hope to economically disadvantaged children.

Last (but not least), on Wednesday, September 6th, make sure you check out the SPECIAL RELEASE of additional Designer Series Papers that are NOT in the mini catalog – but COORDINATE with select products in the mini catalog – which are available WHILE SUPPLIES LAST! Self-adhesive gold and silver glimmer paper? YES, PLEASE! And that’s just one of the papers…

Reverse Masking Thank You Card

Since the Bough Punch is on backorder, I promised to demonstrate card using Layering Leaves (featured as my August 3 for FREE stamp set) that DOESN’T need the punch, and I’ll be using this design as thank you cards this month because it’s quick to create.

The “Reverse Masking” technique is made even easier with the new Masking Paper from Stampin’ Up! and it was magic to demonstrate HOW to use it in this quick video:

The card layout was inspired by one of my Sprinkled Ink team members, Beverly Benson. We made a similar card at our June Retreat shoebox swap and I knew it would work with this fabulous set.

You’ll be happy to learn – or remember! – this classic stamping technique.

Add the Layering Leaves to any $50+ order from my Stampin’ Store in August and receive 3 free tutorials via email plus the consumable supples from me in the mail!

Product List

Layering Leaves: August 3 for FREE

When best-laid plans go awry, we’ll just PIVOT.

I carefully curated 3 classy card kits for my customers who purchased the Layering Leaves + Bough Punch between July 31-August 31, 2023, only to find this morning that the Bough Punch is on backorder!

So let’s do this instead: Add the Layering Leaves stamp set to any $50+ order from my store during that time and you’ll still get the tutorials emailed AND the supplies sent to you, then I’ll send you a notification when the Bough punch is available! This may work better for you anyway, if you already purchased the punch 😀 as it won’t be a requirement to receive the projects.

The font for these sentiments are easy to read and elegant, and it won’t go out of style anytime soon.

Make sure you see the list of additional supplies you’ll need to complete the 3 card tutorials at the end.

Moving ahead as I had already planned, I showed a simple, classic card in my Monday Lunchtime Live Crafting video, and it’s perfectly simple:

Leaves are lovely to use, because they feel universal for anyone who needs a card, and adding a few sprigs and a double bow give it a bit of whimsy and sparkle. On August 14th, I will demo a project that *doesn’t* require the punch, so make sure to catch it!

Product List

There are just a few supplies you’ll need to complete the 3 free card tutorials that WON’T be included. You may already have these on hand OR could substitute similar products, but if you want to add them to your order, here they are:

Ink Pads: Basic Gray, Boho Blue, Moody Mauve, Wild Wheat, Copper Clay, Granny Apple and Tuxedo Black Memento Ink pad

Adhesive: Stampin’ Seal or Multipurpose Liquid Glue, Mini Glue Dots and Stampin’ Dimensionals

The LUXE of Embossed Foil

When you want someone to gasp as they open their mail, emboss some FOIL PAPER.

This gold panel embossed with the Quatrefoil Tile Embossing Folder just feels so sumptuous as it catches the light, and the sparkle is mimicked in the edge of the ribbon, too!

The Quarefoil Tile is a STANDARD embossing folder, so it’s “sandwich recipe” is a little different that the 3-D folders I’ve been showcasing earlier this week. And remember, the sandwiches are also shown on the platform #1 that comes with your Stampin’ Cut & Emboss Machine, as well.

If you HAVEN’T had a chance to watch as I explain the differences in embossing folders, watch this video- It will teach you all you need to know!

Did you know that July is my birthday month and I’m GIVING gifts? I’m donating 10% of my sales to Operation Underground Railroad to help stop human trafficking AND another 10% to the American Foundation for Suicide Prevention, as chosen by the members of my Creative Juice Crafter’s Corner Facebook Group. I’m content with the many blessings I have, and it’s a pleasure to make a difference in the world when I can.

If you’d like to join me in doing some good in the world, you may donate to either organization by clicking the links above, or through my #riseupforfreedom fundraiser for O.U.R. :

Product List

3-D Dots On DSP

Hey! It’s good to see you here and know you’ll like the next 3-D embossed card idea. Are you pinning these ideas for inspiration when you want some texture on your cards and paper crafts?!

Stampin’ Up! has an embossing folder that matches the Countryside Inn Designer Series Paper – The Countryside Blossoms E.F. matches one of the patterns perfectly! – but you don’t have to have a matching design to emboss on Designer Series Paper. For this card, I debossed the 3-D Dots into a striped citrus pattern from the Delightfully Eclectic mega-pack:

You CAN combine dots & stripes!

I appreciate that the pattern on the paper hearkens back to my signature “Sweet Citrus” bundle, and in my Tips & Technique video, I used the HYBRID 3-D embossing folder to show you how that one CUTS & EMBOSSES at the SAME TIME!

That’s the third embossing folder from the Basics 3-D Embossing Folder Trio in the Online Exclusives section of my store, but I do have another card to share with you tomorrow.

Make your own ZESTY birthday card with the supplies listed below, and remember to save your BONUS DAYS coupons from July in a folder in your email so you can easily find them to SPEND in August!

Product List

Crosshatch Embossed Background

Welcome back to day 2 of my embossing folder series! Today we are looking closer at the Crosshatch 3-D Basic embossing folder (one of a trio in my online store).

For a textured background like this, stamp your images first, then run it through the embossing folder. I used the texture OUTDENTED (it’s a real word) on my floral background, but you can also turn your paper over to get an INDENTED texture like this as an alternative:

If you missed the video teaching TIPS & TECHNIQUES for embossing folders, you can watch it here!

This texture is extremely versatile and you’ll be reaching for it often. I’ve listed the supplies for my “You Inspire Me” card below, and please visit tomorrow for the third 3-D Basics embossed card!

Product List

A “recipe” of the correct way to layer the 3-D Basics Crosshatch embossing folder into your Cut & Emboss “Sandwich”:

The Recipe for Embossing Folder Sandwiches

You may not have a preference for how your sandwiches are cut, but there is a CORRECT way to layer the “sandwich” for using embossing folders on your Stampin’ Cut & Emboss machine 🥪

Stampin’ Up! has three styles of embossing folders: Standard (approx. 1/16″ wide), 3D (approx. 1/8″ wide) and Hybrid (similar to 3D and will have a coordinating die to insert as desired). Each type of folder has a “Recipe” for successful texturizing, and if you forget, it’s PRINTED on the base plate/platform #1

Today’s LIVE video teaches the tips and tricks to remember for successful embossing:

Because there are NEW items in the Online Exclusive section of my Stampin’ Store (some are being restocked as quickly as possible!), I am showcasing the 3-D Basics trio of embossing folders, starting with the 3-D Floral:

I lightly pulled/tapped my Petal Pink ink pad across the embossed layer to help the flowers POP and the other supplies are listed below. The Radiating Stitches Dies (which is what I used for the frame) are also part of the Online Exclusives!

Come back over the next few days to see all the cards, and remember it’s BONUS DAYS in July, so for each $50 spent before 7/31, you earn a $5 coupon to redeem in August!

Product List

I enjoy visitors AND COMMENTS, so thank you for reading and saying HI! Check back in for card #2 tomorrow.

New at SU!- Level Complete Pull-Tab Flip Card

Zelda is a big deal for my granddaughter, so when the June “New at SU!” blog hop theme was Kid’s Cards, I thought maybe someone else has kids playing video games this summer. The new LEVEL COMPLETE stamp set is great for the young, and young-at-heart!

I wanted this to be an interactive card, as gamers love to “play” and fidget, and this one flips open when the tab is pulled on the right:

I saw Aubrey (of the Stampin’ Jill team) create a Pull-Tab Flip Card last week, I wanted to put my own spin on it!

To make it easy to assemble, here are the measurements (supply list at bottom of post), then you can watch either or both videos to put it together (my pieces are different sizes than Aubrey’s, as my card pulls from the right and hers from the bottom) :

Card base: 4-1/2″ x 5-1/2″

First layer: 3-3/4″ x 5″, cut the smallest banner from the Stylish Shapes dies about 1/3 in from the left side for the mechanism to slide through before attaching to card base with dimensionals in each corner.

Mechanism: 1-1/2″ x 7″, scored at 4-7/8″ and 5-1/4″

Flip Layer: 2-3/4″ x 4-1/2″. Adhere this to the 3/8″ piece only, under the left edge of the layer.

Inside layers (2): 2-1/4″ x 3-1/2″

TIP: Use strong adhesive, such as Stampin’ Seal+ or Tear & Tape because this card will be tugged and pulled over and over again!

Give this card a try- it comes together quickly when you have all the pieces cut and ready! If you can’t make it today, PIN it/save it for later and I’d love to see your version.

Off you pop to one of the other kid-friendly card ideas around the world:

June 2023 New at SU! Hop: Kid’s Cards

Previous BlogNext Blog
1.iHeartCards2 (US) – Zany Zoo Platform Pop Up Card
2.scraphexe (DE) – Kleine Träume | Little Dreamers
3.Joni in the Spotlight Stamping (US)-Hello Ladybug
4.The Tantalizing Stamper (UK)- Supremely Awesome
5.The Joy of Stampin’ with Rachael (US)- Reach for the Stars
6.Creative Juice by Loni (US) – Level Complete Pull-Tab Flip Card
7.Carterie Plus (CA)- Carte d’enfant
8.Playing with Papercrafting (CA) – Reach for the Stars
9.TanjasKartenwelt (DE)- Zuckersüsser Zoo
10.De Kijkkast (NL) – Kid’s Card with Little Monkey
11.Nature’s INKspirations (US) – Beside Me
12.Tricia’s Stamping Creations (US) – Zany Zoo
13.247Inkspiration (US) – Little Monkey
14.My Flutterby Moments (US)- It’s A Science Stamp Set
15.Stamping Flair (AU) – Construction Zone

Powered by blogcarousel.com

Product List