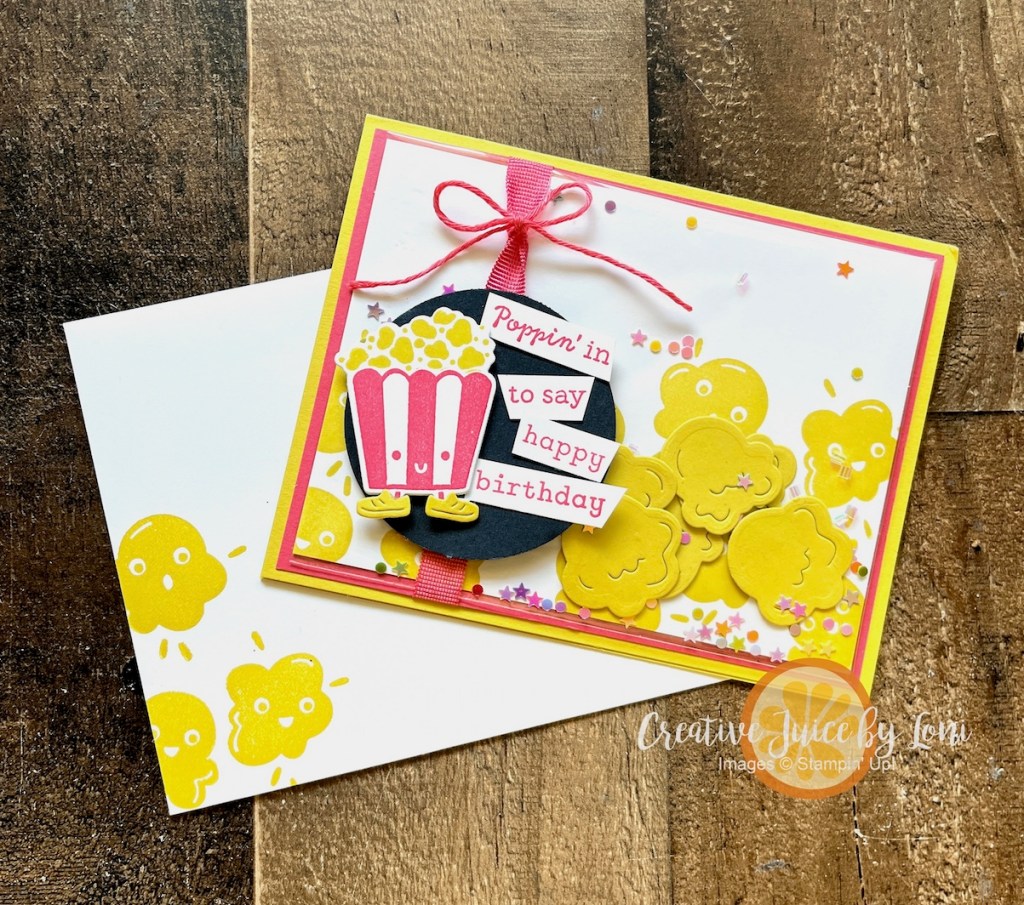
Creative Juice LIVE Crafting (on YouTube & Facebook) IS BACK…with a twist! Going forward, I’ll be going live in my channels at 12:30 p.m. MT ON THE FIRST MONDAY OF EACH MONTH. As I *pop* back into your social feed, I have an a-maize-ing Faux Shaker Card tutorial to share with you in today’s video!
Traditional shaker cards are quite thick, so using a clear envelope to hold the shaker elements makes the card thinner to mail, and easy to make.
Colors used: Darling Duckling, Strawberry Slush and Secret Sea, which are all 2025-2027 In Colors, and an announcement you’ll appreciate is that tomorrow (August 5th) is the beginning of an IN COLOR SALE!
Many In Color products are 15% off through August 31st, and I need to remember to order refills for my ink pads…my shopping list is started.
Without further adieu, here is the VIDEO TUTORIAL for the Faux Shaker Popcorn Birthday card, and you may add the supplies to your cart with the list below the video:
Scrapbooking is about telling your stories and getting the photos off your phone! Myself, I tend to keep it simple to get it done. As part of our “Sweet, Suite Summer” series (since it’s the last week of our Suite BOGO50 Sale) I wanted to use the Everyday Skies Suite to show you how these products can be fantastic for memory albums!
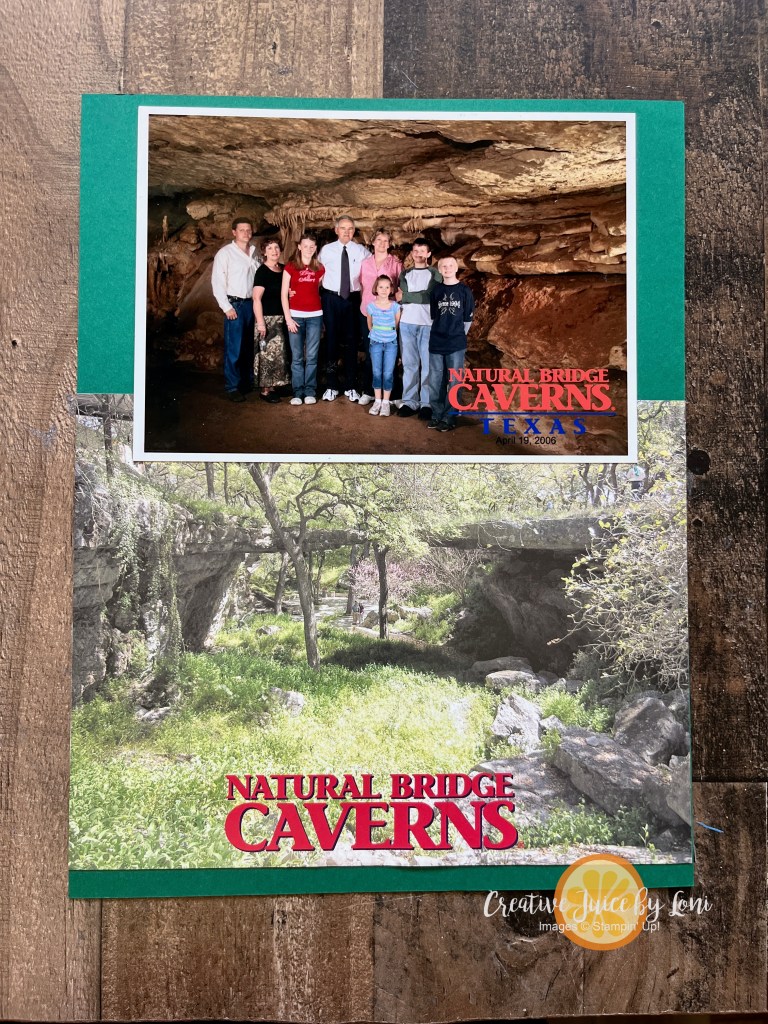
My first page capturing a trip to Texas (many years ago) could NOT be more simple because the photo has the date and the front of the folder that the picture came in tells where it is. There are no Everyday Skies products on this page, but hold on…
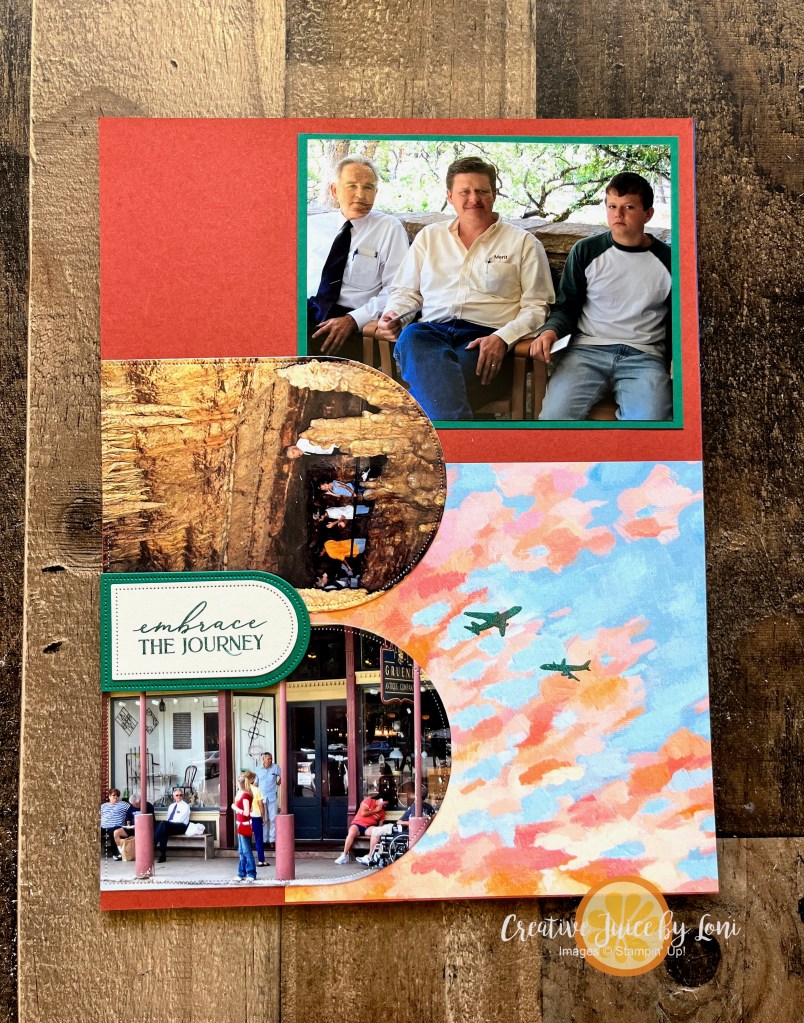
On the second page, I start using the Everyday Arches dies, which is part of the suite. Cutting photos with the arches gives them a unique look. While my preference is 8.5″ x 11″ pages, you can do the same thing on a 12″ x 12″ page:
The title uses a few of our alphabet dies (listed in complete supply list, below) and a strip of the Everyday Skies Designer Series Paper makes it feel separated.
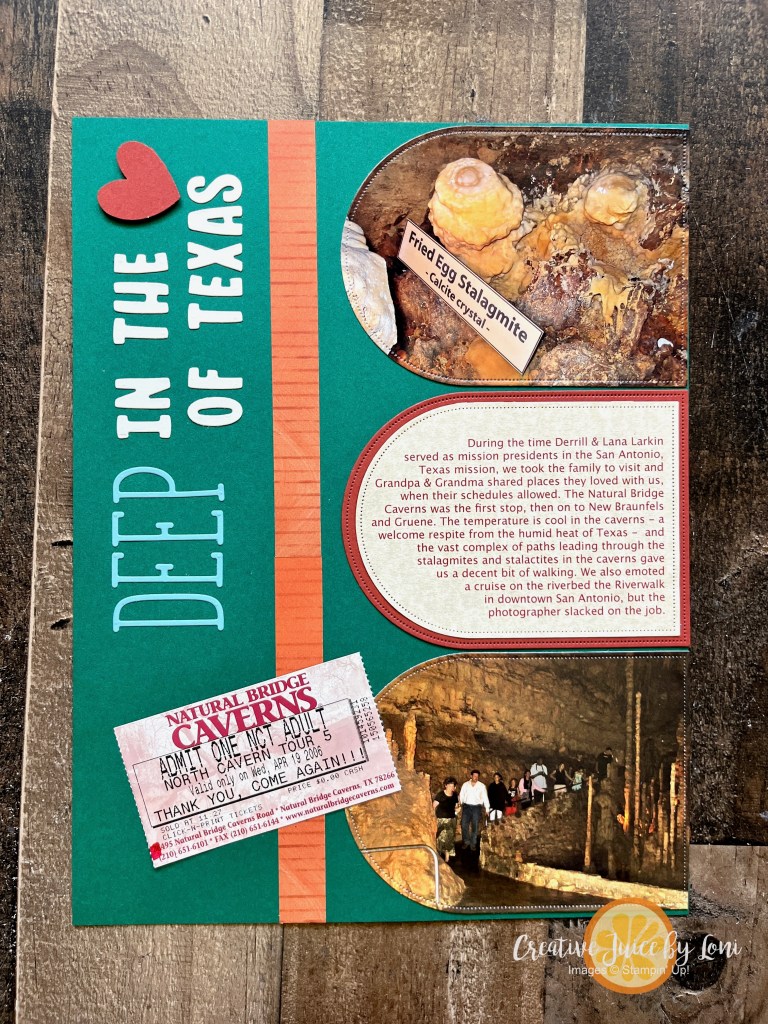
Moving to the third page (also the second page of the layout), I’ve added a whole 6″ x 6″ piece of the DSP to the lower corner to tie the colors together, and stamped the airplanes to indicate that we flew to Texas for this vacation:
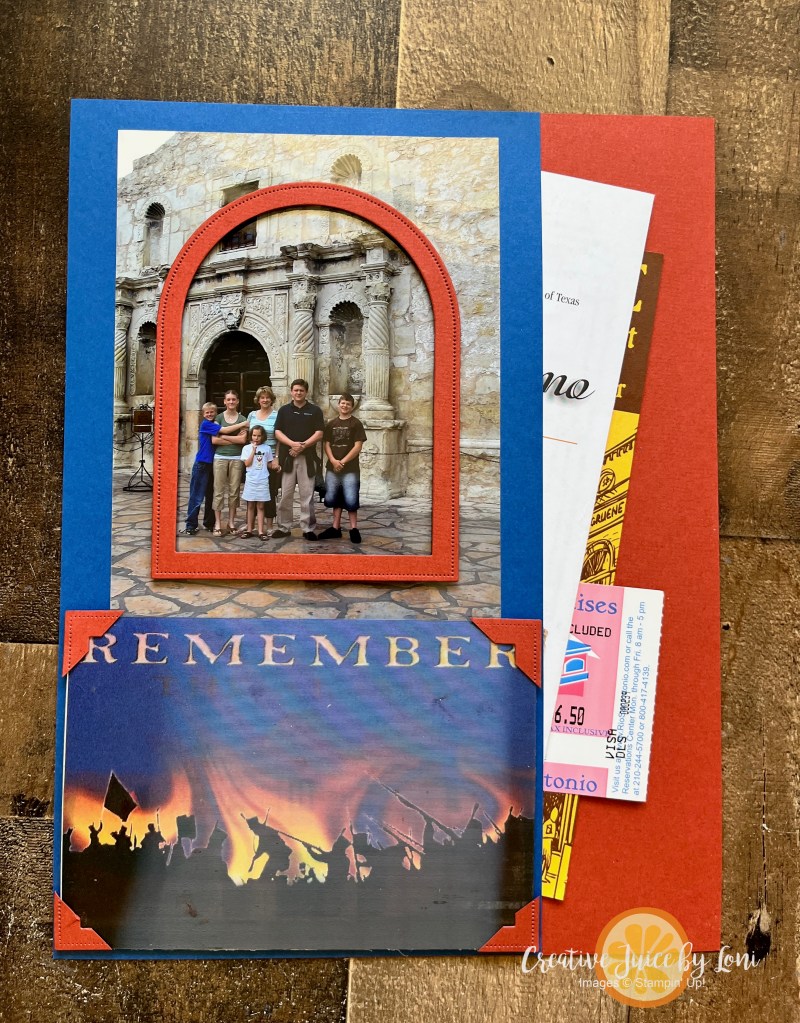
To keep all the maps, ticket stubs and brochures together, page #4 actually acts as a pocket:
Just for fun, the postcard from the Alamo in San Antonio that I used on the bottom of the pocket page is 3-D, so when you move the page, a different image appears:
Try “framing” a larger photo with an arch outline, and watch the demonstration video to learn how I made the photo corners 😉
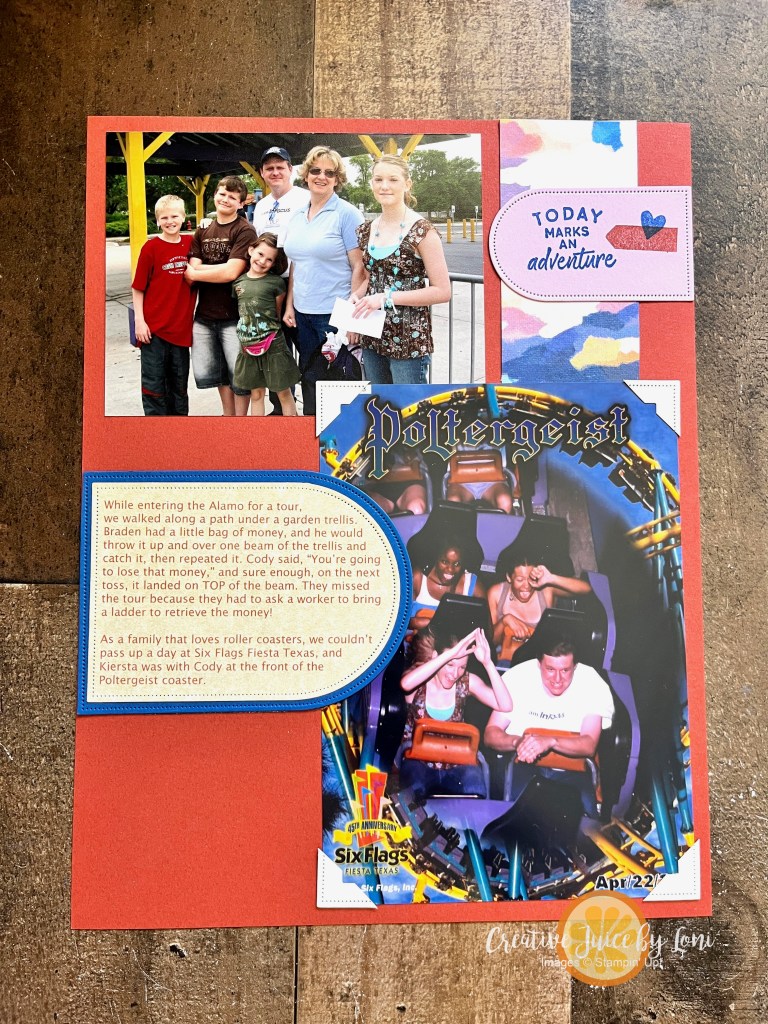
EXTRA! EXTRA! After the video, I made one more simple page to finish off my photos from that trip 21 years ago, and tie them together with the arches (and those photo corners show up again). This will face the Alamo page, completing the layout and telling the story:
The Everyday Skies suite was so popular when it launched a few months ago that it’s been out of stock. I’m super glad it is back in stock with time for you to get all of it (or just the parts you love most) before the BOGO50 Sale ends on June 30th!
If you are a scrapbooker, DON’T MISS the chance to join the VIRTUAL ALBUM RETREAT in July:
Don’t be put-off by the price: The kit includes FOUR stamp sets and 12 DOUBLE PAGE LAYOUTS (one pair for each month of the year) and the instruction you receive in the event will be worth the investment! Seriously….click to go check out the kit:
Once you purchase the kit, you’ll receive an email in early July to the exclusive Facebook Event page, so make sure your account has the best email for you! ALSO: When you purchase the kit, you earn $25 BACK in Stampin’ Rewards (if you’ve opted in) to use on your next purchase, or save up for a binder to put your pages in!
You’ll be so happy you joined the Virtual Album Retreat – order your kit today before they run out!
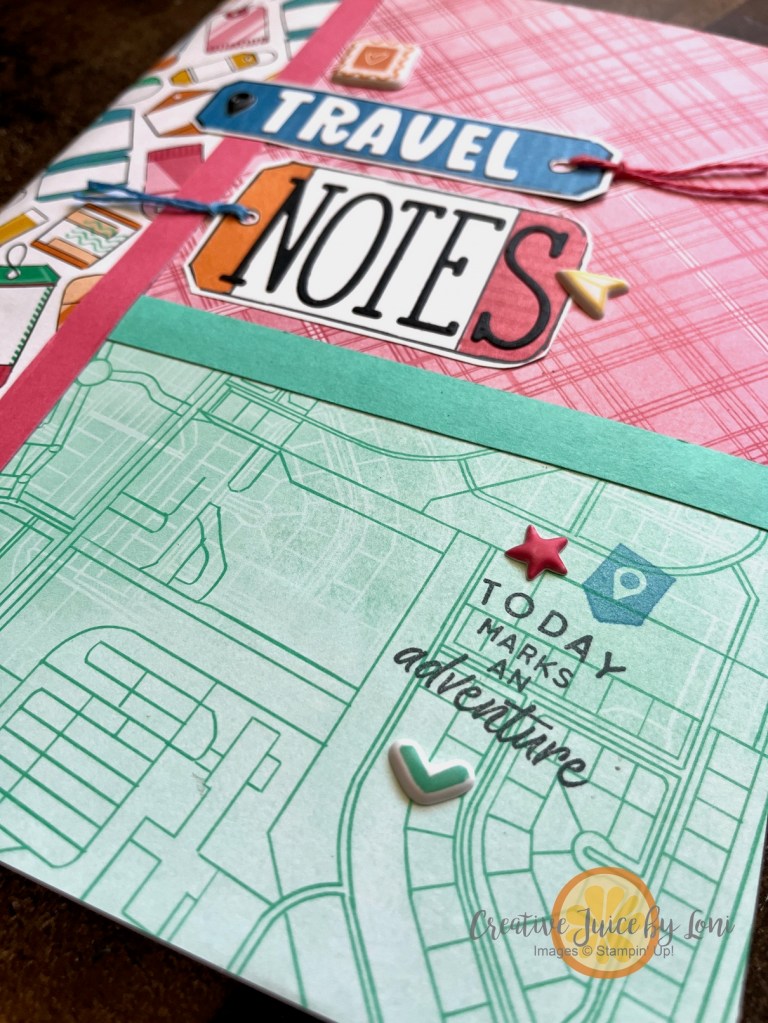
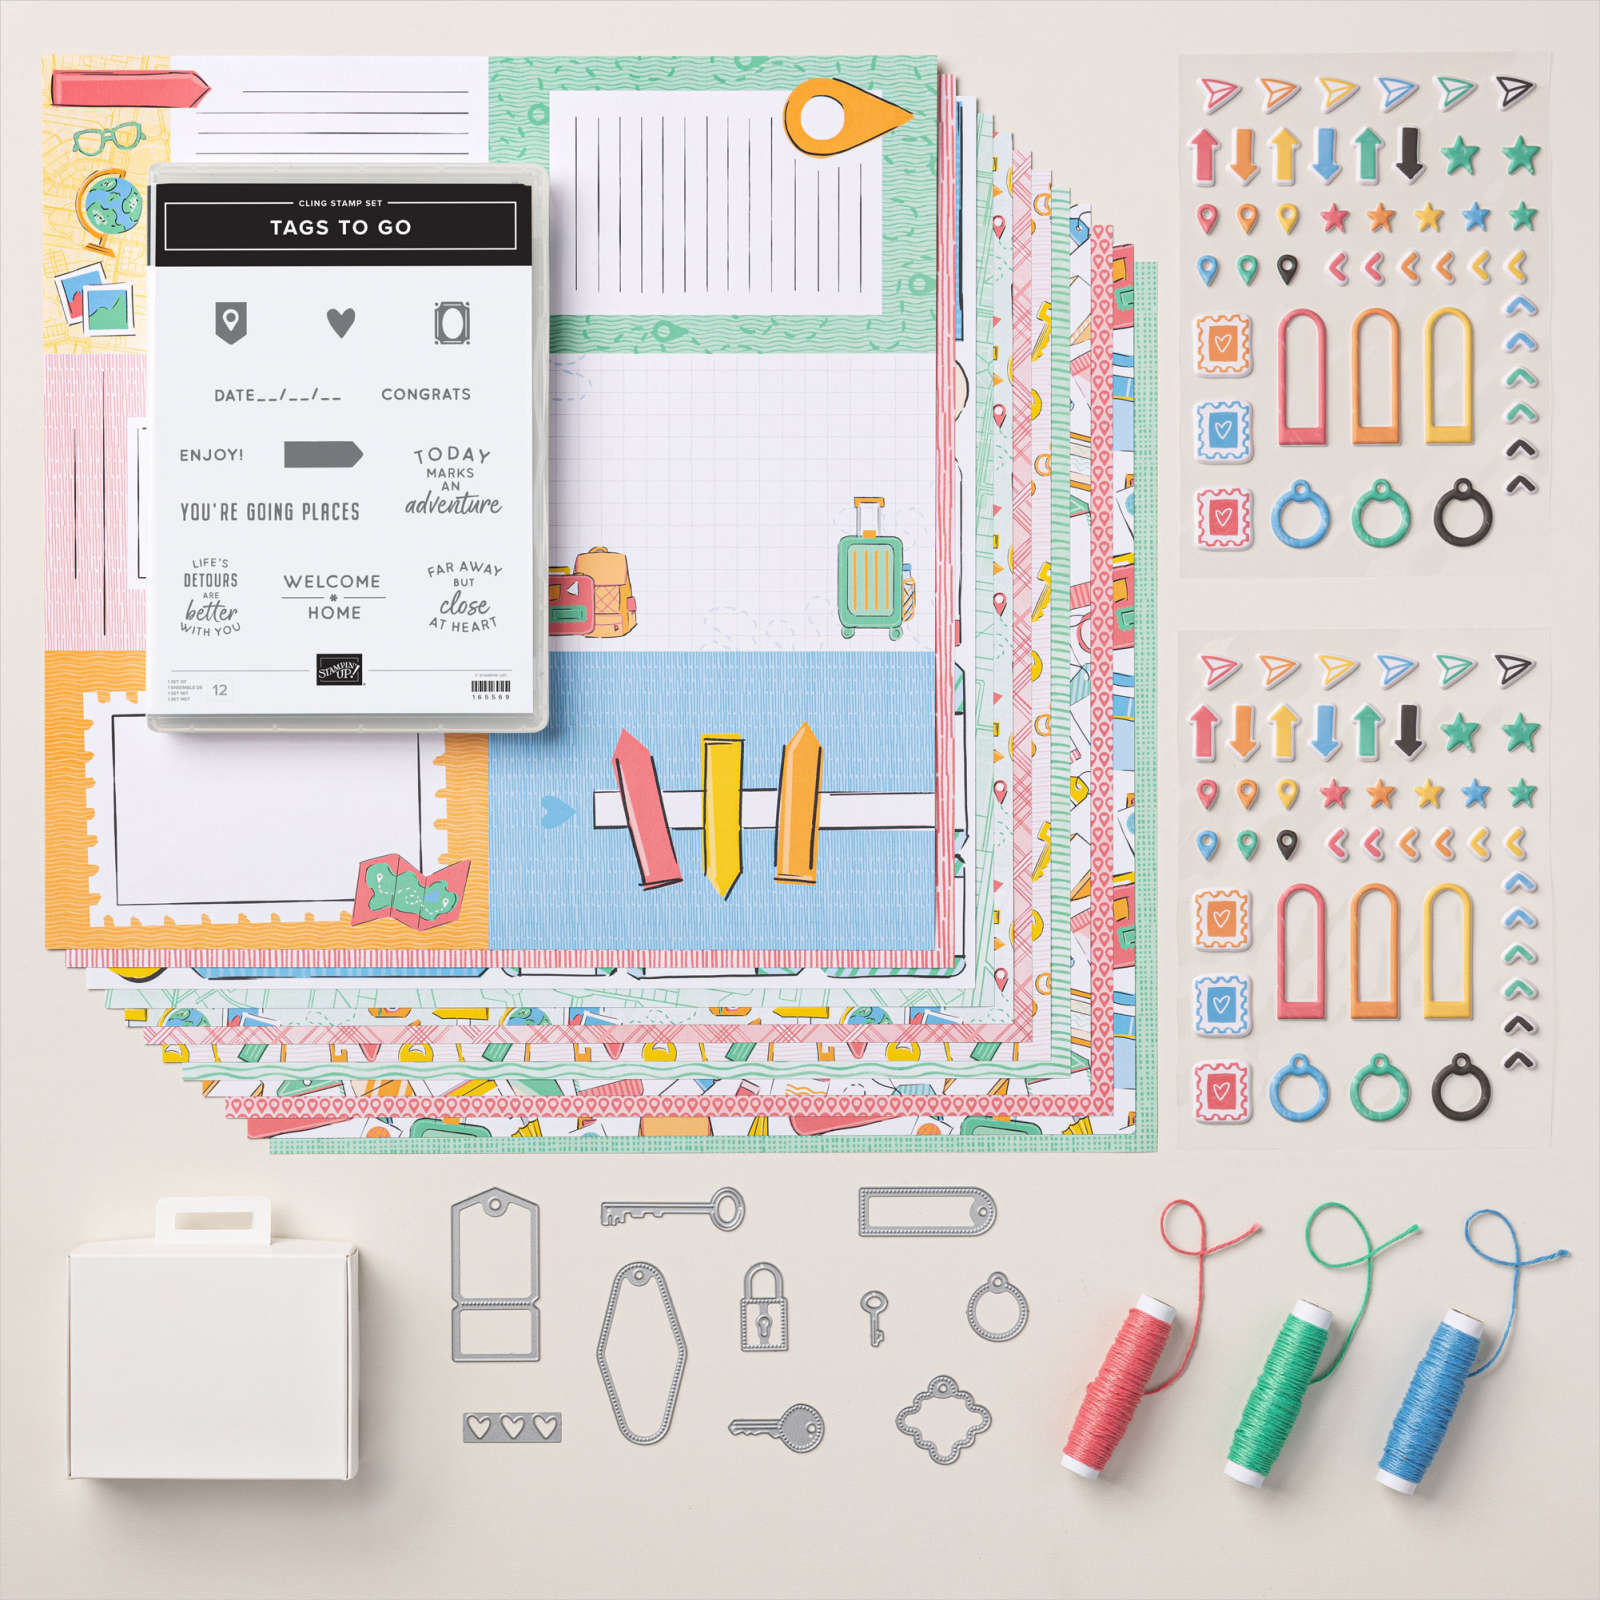
Welcome to another Sweet Suite SIMPLE Summer Stamping project: A D.I.Y. Travel Journal crafted with the Stampin’ Up!®️ On the Go Suite Collection!
This easy-peasy book began with an inexpensive composition notebook that I covered with the travel-themed On the Go Designer Series Paper by Stampin’ Up!®️
Crafting with a suite of products, like the On the Go suite takes the stress out of choosing colors or finding coordinating items, because it’s all done for you…even down to the matching puffy stickers and colored twine for the tags!
The puffy stickers really add a level of whimsy and fun!
Remember to stamp the top of each page with the date stamp, and your journal is ready for adventure:
I’ve got measurements and tips to make this project speedy and fun~ watch the tutorial:
“Summertime! And the Stampin’ is Easy!” (if you sang that in your mind~ Greetings, fellow musical geek!)
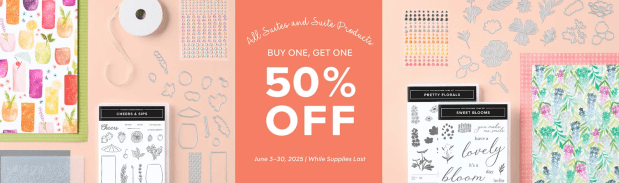
Since Stampin’ Up!®️ Suites (and suite products) are BOGO50 during June, I’ll be sharing some SIMPLE ways to use our current Suites for sensational summer stamping projects. In today’s video, I’m also revealing a BEAUTY SECRET!
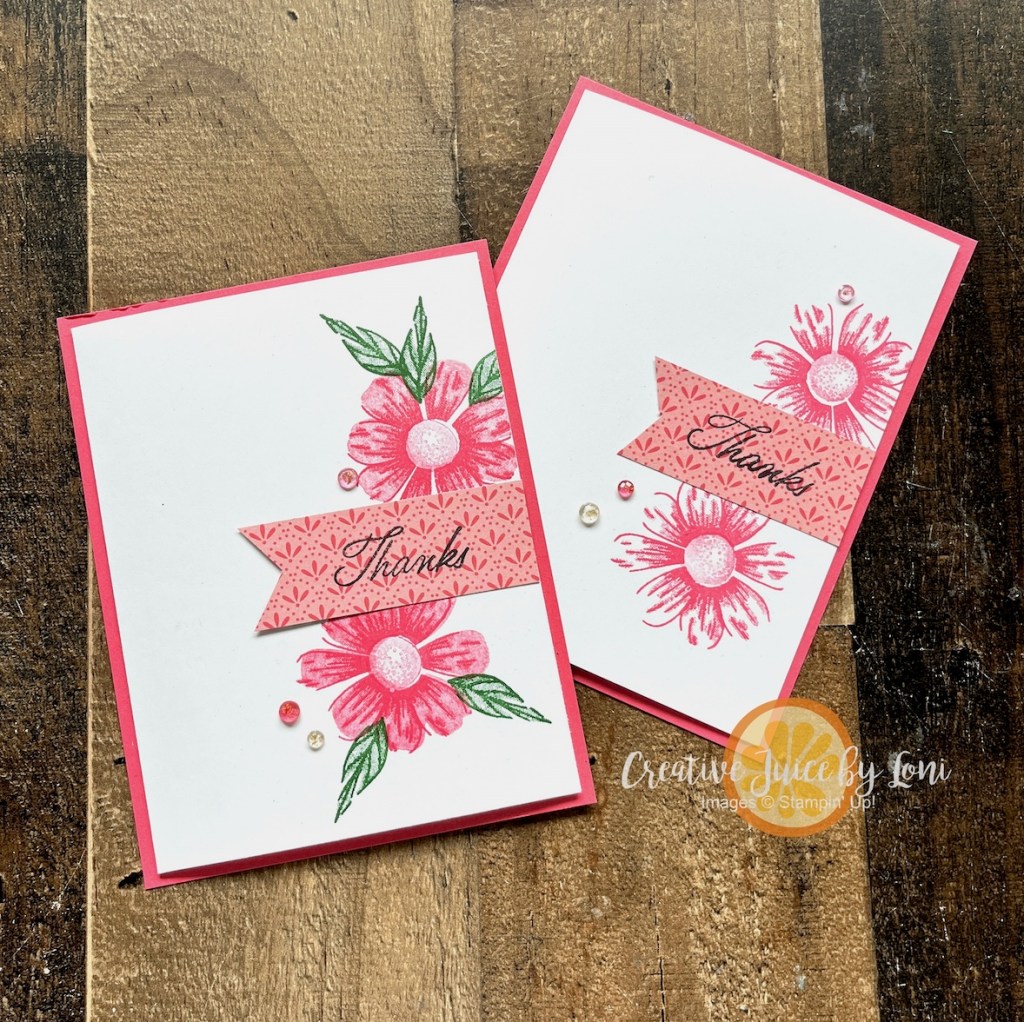
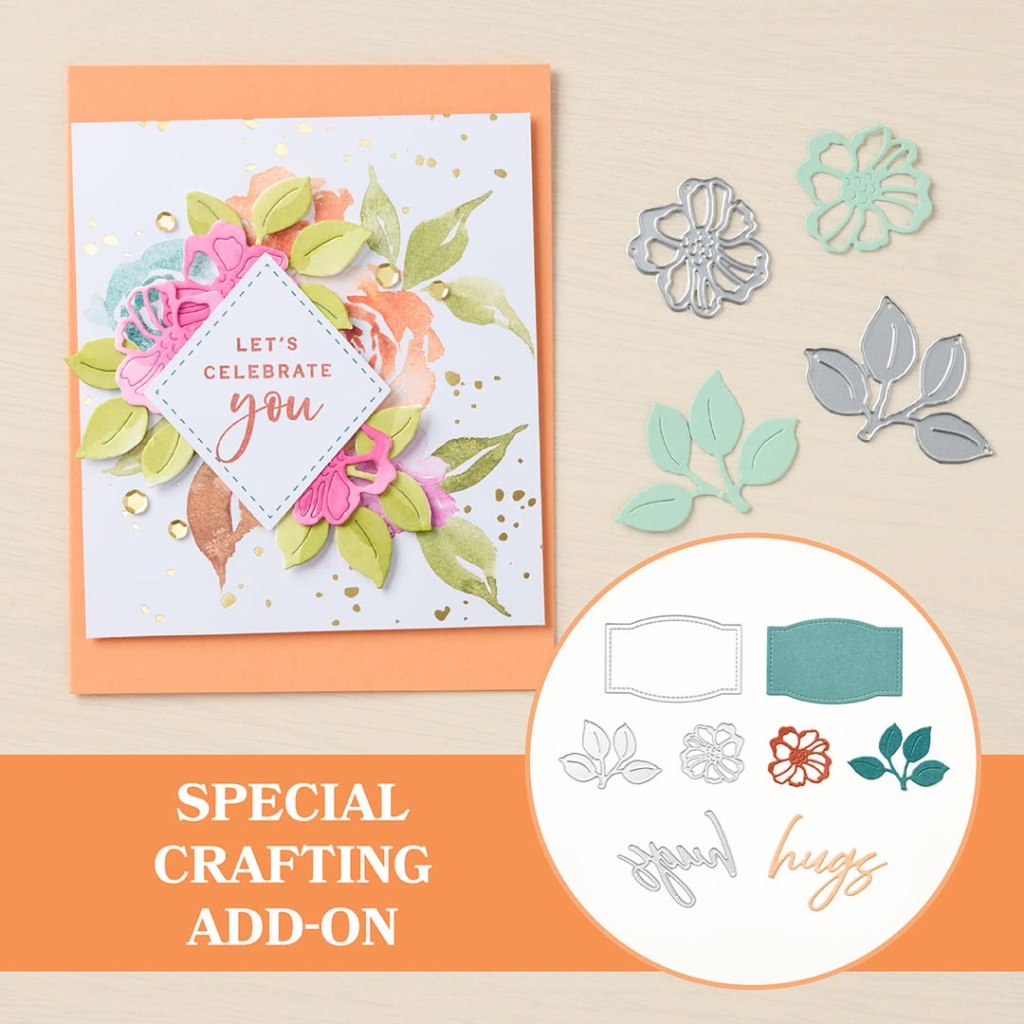
Crafting in June, July & August has to be easy & breezy, so coordinated products in a suite bring a speedy card together in moments. Using the Impressions Abloom stamp set, you can keep this Thanks card ultra simple, or add layers and leaves:
The only thing to stamp on the second card is the sentiment! If you die cut a few extra pieces while catching up on your favorite television episode, you’ll have all the pieces prepared to put an “I appreciate you” card together in seconds:
Embossing a piece of Stampin’ Up!®️ Two-Tone card stock with the Pressed Flowers embossing folder and rubbing it with an emery board to reveal the white center makes this background terrific and touchable.
Some of the Impressions Abloom Dies have detailed inserts, so you can die cut them from cardstock, or remove the details to cut out the stamped image.
TIP:Washi tape keeps both the outline and the details together while you run them through the Stampin’ Cut & Emboss machine.
All these products are part of the Floral Impressions Suite, and can be purchased as a complete collection or individually:
REMEMBER: For the Buy-One-Get-One-50% off special, the LOWEST priced items will receive the discount, so shop smart! Make separate orders and purchase 2 suites together in the first order (to get one suite half price), then use the *Stampin’ Rewards you earned on your first order for an additional discount on your second order, where you may order individual items from other suites (like more Designer Series Paper or embellishments).
*Stampin’ Rewards: Make sure you’ve OPTED IN to earn 10% back each time you shop! Save them or spend your rewards next time!
Scroll back up to the top to the comments (under the posting date) to tell me if you took the beauty secret and tried it!
One more day to SUBSCRIBE and receive the Floral Charm Paper Pumpkin kit in the mail!
Paper Pumpkin is a complete stamping experience in a box, and the June kit actually coordinates with a new Suite coming to my store in July: the Floral Charm Suite. If you are a current subscriber, you will also want to include the Hugs Abloom add-on die set to your next order, as it coordinates with the 2025 April-June kits:
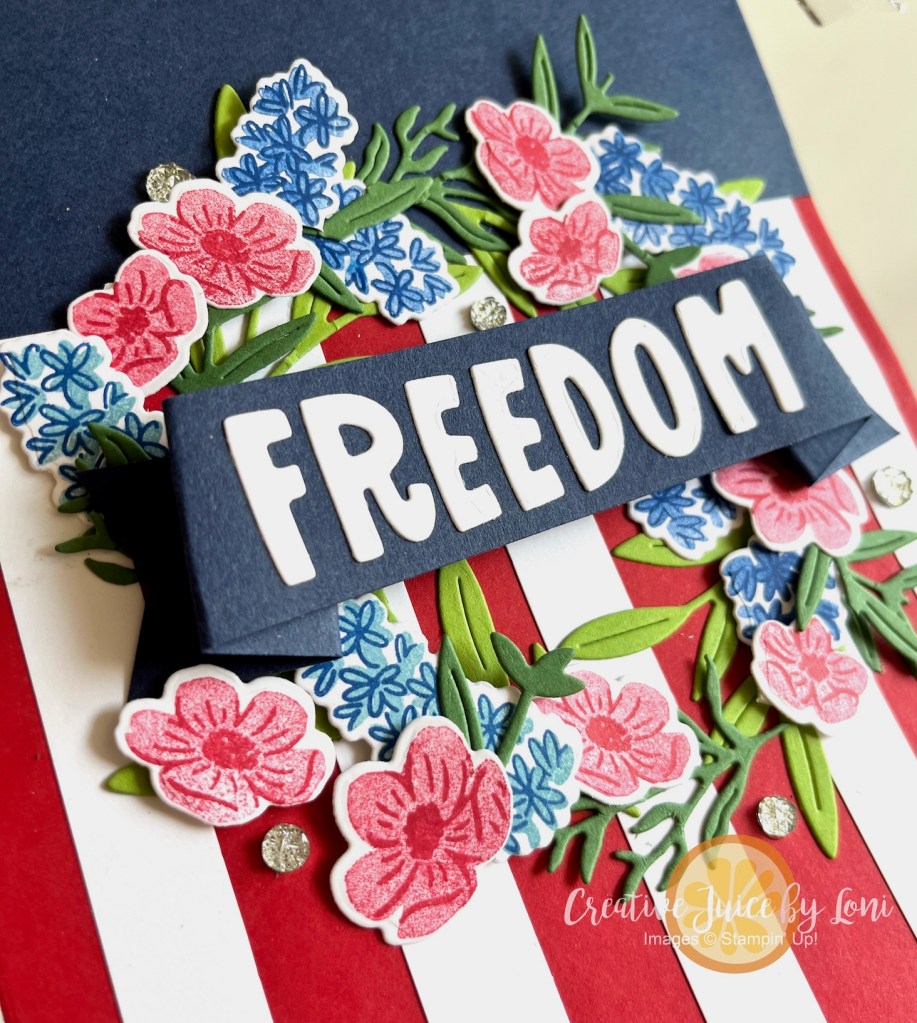
My 2025 Memorial Day began with the opportunity to sing with the Hurricane Valley Choir at a program at the Hurricane, Utah cemetery honoring those who gave the ultimate sacrifice, as well as those who still serve in the U.S. Military today. That got me thinking about the freedoms I enjoy today because of people who laid down their lives in many ways.
I love the United States of America and what the Founding Fathers intended it to be. I believe it is a land blessed by God, but to have His protection, we must follow Him. There are things I’m concerned about (and have been for many years) and I’m choosing to remember those who fought for freedom – on a battle field or in a home.
Which brings me to the paper craft I demonstrated in my live video: A banner for freedom! We start with Memorial Day at the end of May, proudly wave our country’s flag on June 14th for Flag Day and celebrate our Independence Day on July 4th…so this craft using the Party Banner Dies, Pretty Florals Bundle and Mini Alphabet dies was created in time for a multi-seasonal decoration.
It now hangs proudly on my front door:
As mentioned in my video, the best shopping deal for stampers ANYTIME is the Starter Kit, which normally includes $125 in product that YOU CAN CHOOSE, plus supplies to run your business (catalogs, etc), a free Paper Pumpkin Kit AND free shipping…all for $99!
Currently we have a special offer – for just a few more days – which allows you to choose and extra $40 in your kit! There are no requirements to this opportunity: Only a chance to see if a creative business (or get a discount on the products you are already using) is something you’d enjoy exploring.
Serendipitously, the Party Dies Bundle is $125 for both the Banners and the large Alphabet – adding them to your starter kit would be a terrific way to save on these incredible crafting tools! Once you join Stampin’ Up!, you’ll also be able to save 20% (or more) on future purchases, and connect with a community of crafters that you didn’t know how much you needed.
If shopping with a demonstrator is more your style, I’m delighted to serve you! Here are the supplies I used for the Patriotic Banner, and you can click on any to add to your order:
Sometimes you have to invest in your hobby, and when you are ready to do so, may I suggest the Stampin’ Up! Party Banners Dies and Party Alphabet Dies? You’ll save 10% when you bundle them together in one purchase, and, as I mention in the instructional video below, you can claim them as “exercise equipment” 😅
A shaped card is as fun to create as it is to receive! The 5th largest banner die is just about 5.5″ x 4.25″, so these cards fit into the basic white Medium Envelopes:
We made the Pretty Peacock version (left) in the live crafting video, then when we were done, I looked at it and realized that the Damask Designs Embossing folder probably needed to be turned vertically, so created a second with the “Thanks” from a previous Paper Pumpkin kit Add-On die set called “Thanks & Beyond” (shoutout to my PP Craft Kit subscribers!).
This week is high school graduation in southern Utah, and I’m still making cards for grads! This Shy Shamrock card is the banner turned sideways, with letters cut from 2024-2026 In Color Glimmer Paper, and the lock/key/sentiments from Tags to Go.
Finally (for today, at least), I demonstrated this slimline card to remind you of the Eclipse Technique with alphabet dies:
A card for any cake-consumption celebration!
Learn how to make all these banner-themed cards in this video:
If I’ve inspired you to add the Party Die bundle to your list, please shop in my Stampin’ Store!
Better yet…choose these dies as part of a Starter Kit and only pay $99! The other perks of being a demonstrator are even better than the discount: A community of friendly crafters, the opportunity to create a business you love – or a hobby that brings you purpose and passion.
Keep your creative juices flowing! 🍊- Loni Spendlove
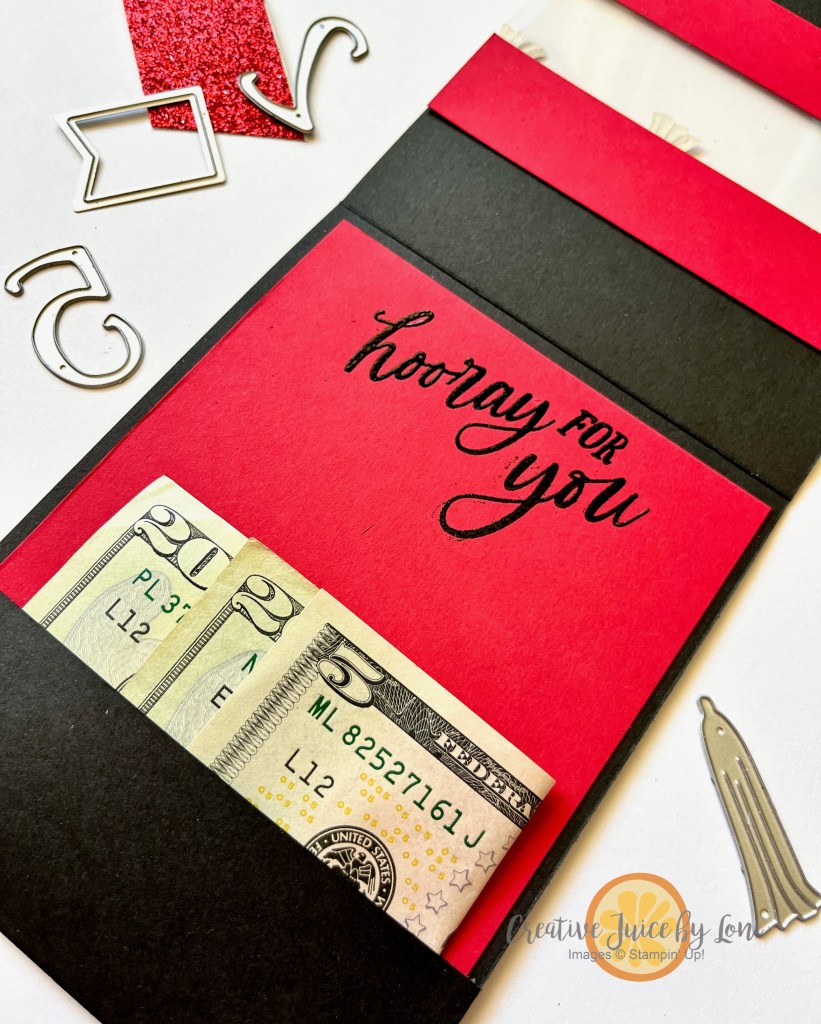
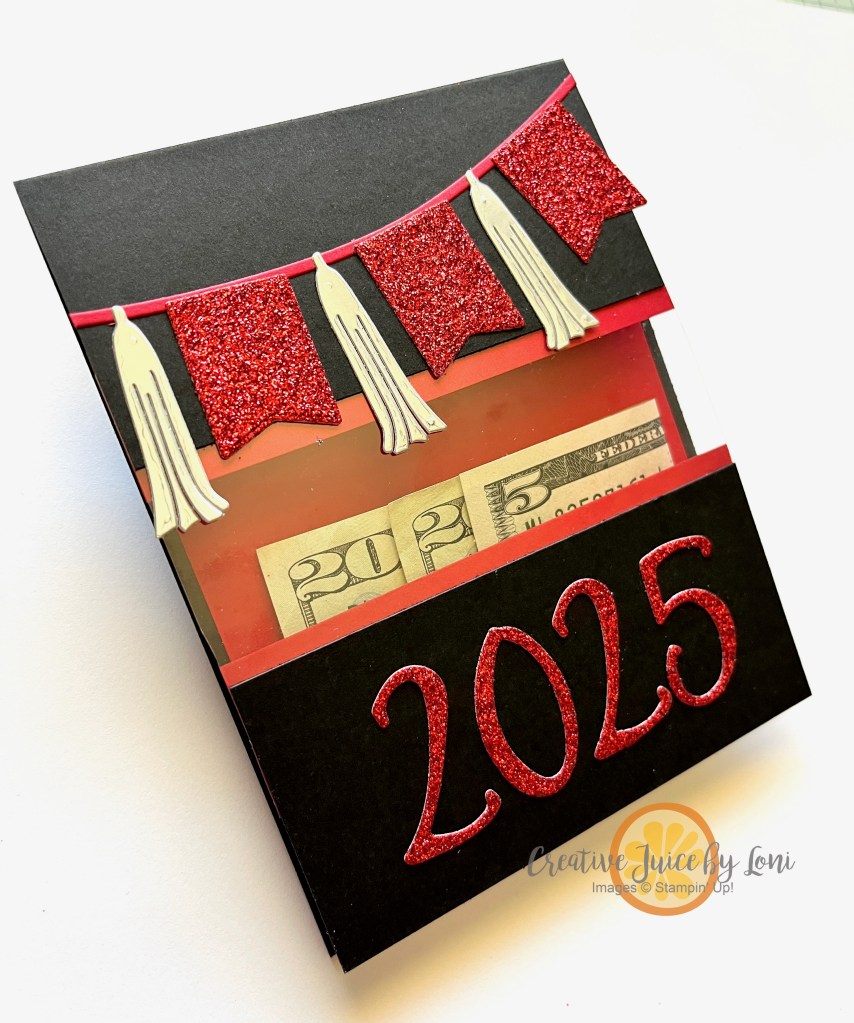
There won’t be another opportunity to gift cash like this until the year 2050, so CREATE THIS CARD FOR EVERY GRADUATE YOU KNOW!
This clever card includes a pocket AND a window to see the gift, and I can’t think of another year that could be more ideal: You could give $45 (two twenties and a five) OR $27 (a twenty, a two dollar bill and a five). Either way, it spells “twenty-twenty-five”.
I’ve walked you through exactly how to create this card in the video, and remember, you can always pause the video, slow it down or speed it up (click the gear icon on YouTube) and order all the supplies you need TODAY in time to make these cards for your 2025 Seniors.
You can modify this design to match the school colors of your graduate. While I used glimmer paper, you could also use foil sheets or Designer Series Paper – if you don’t have anything fancy on hand, peruse the specialty paper available now.
Loyal customers are wonderful, but I wouldn’t be doing my job if I didn’t let you know the BEST DEAL for any avid crafter is the STARTER KIT. Throughout May, it’s an even better value, for you can choose $165 in product (literally everything I used today…and MORE) for just $99 plus tax (shipping is included!).
It’s not “just” a great discount you’ll get on your future Stampin’ Up! purchases, it’s ALSO a family of creative people who cheer for you, experiences and events to look forward to, and personal growth that you will be grateful for.
There is no “catch”. There is nothing to “lose”…but a lot of JOY to GAIN!
As I prepare for my annual Stampin’ Soiree & BOGO Sale this Saturday (featuring a NEW Stampin’ Up!®️ Catalog and Online Exclusives), I wanted to make a few samples with some of the fresh products coming tomorrow, May 6th! Since multi-tasking is the only way this one-woman show can get things done, I chose a simple sketch, which doubles as a way to show the color palette, and used it for my lunchtime live crafting video, too:
The first card I demonstrated was inspired by the #tgifc523 color challenge of Petnunia Pop, Balmy Blue and Daffodil Delight:
Starting simple – no mat on this card (though you certainly could add one), I stamped flowers from a new Online Exclusive bundle, Impressions Abloom on top of the 3-1/2″ x 4-1/2″ panel, then added 1-3/16″ squares of the colored card stock to the bottom:
When crafting from a sketch, give yourself some freedom to make changes! I didn’t add the palette to the Poppin’ By card, but used the darling filmstrip die to add the border at the bottom:
My favorite thing about this set is probably the tennis shoes you could add to the bucket of popcorn:
Moving along, let’s take that sketch and turn it SIDEWAYS, which is what I did for the Notes & Totes bundle from the new catalog, which I paired with the 2025-2027 In Colors (from bottom to top: Secret Sea, Timid Tiger, Cloud Cover, Darling Duckling & Strawberry Slush):
And finally, I used some Celebration Expressions Memories & More Cards to make this Happy Birthday card, and my friend Barb’s Million Dollar Stamp Set Layered Thoughts, this time putting the color palette below the main panel:
To see me create two of these cards (and share some tips), watch this:
If one of these new items or colors is something you must have, visit my Stampin’ Store starting on May 6th to make an order, or click on the Stampin’ Supplies link under any card you love.
See all these samples IN PERSON – and MORE – at the Stampin’ Soiree, Saturday May 10th in Hurricane, UT. It’s FREE and open-house style, so plan to drop in with a friend between 1-4 pm!
One more announcement: If your wish list is long, the best value for Saavy Stampin’ Shoppers is the STARTER KIT, and starting tomorrow, May 6th, you can choose MORE in your starter kit, with no strings attached!
In today’s live demonstration on the Creative Juice Facebook Page and YouTube channel, I showed how to create two sizes of scrapbook pages (8.5″ x 11″ and 12″ x 12″) you can mail memories with~ .
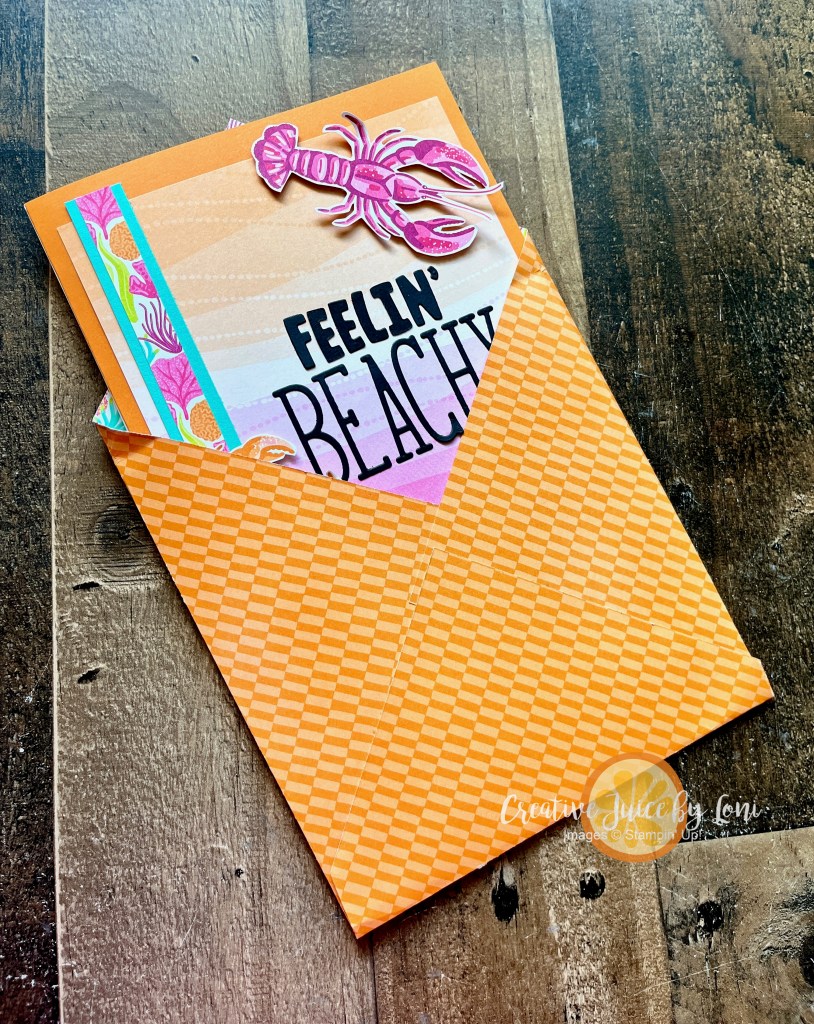
You’ll need a page layout that has quadrants, so you can fold it for mailing. This sketch features a long panel on the right and a cluster of photos on the left. Once you fold it up, it fits in a large envelope. I created the envelope from a 10″ x 10″ piece of the same Friends of the Ocean Designer Series Paper by Stampin’ Up! :
These beloved funny faces were the inspiration for this project:
INSTRUCTIONS: Start by taking the card stock for your page and scoring it in half one direction, then in half the other way. You’ll cut along one of the score lines in to the middle – on my “Funny Faces” page, I cut it along the lower center score line, but if I were to do it again, I’d cut along the horizontal line on right or left, as I did for the “Feeling Beachy” 12×12 page.
Once folded, the 8.5″ x 11″ page fits into a Basic White Medium Envelope:
TIP for mailing in 2025: If it weighs more than 1 oz. you’ll need a two ounce postage stamp, or one regular stamp and an additional ounce postage stamp. For the 12×12 page, you’ll need a Non-Machinable 1 ounce stamp ($1.19) PLUS an additional ounce stamp ($.28) for a total of $1.47.
Use the faces from the Meant to Bee and/or Bee My Valentine on Daffodil Delight card stock and punch them out with a 1/2″ circle punch to create the emoji buttons!
I’ll add this to the list of Mailable Gifts we’ve been building- bookmark that list HERE, then watch the video for more information on how to #mailamemory :
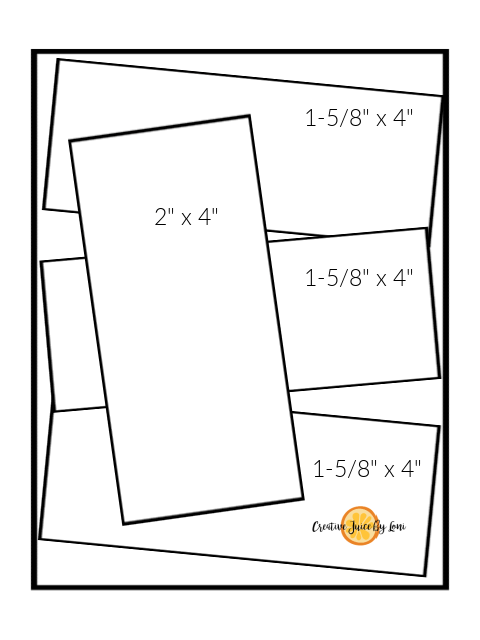
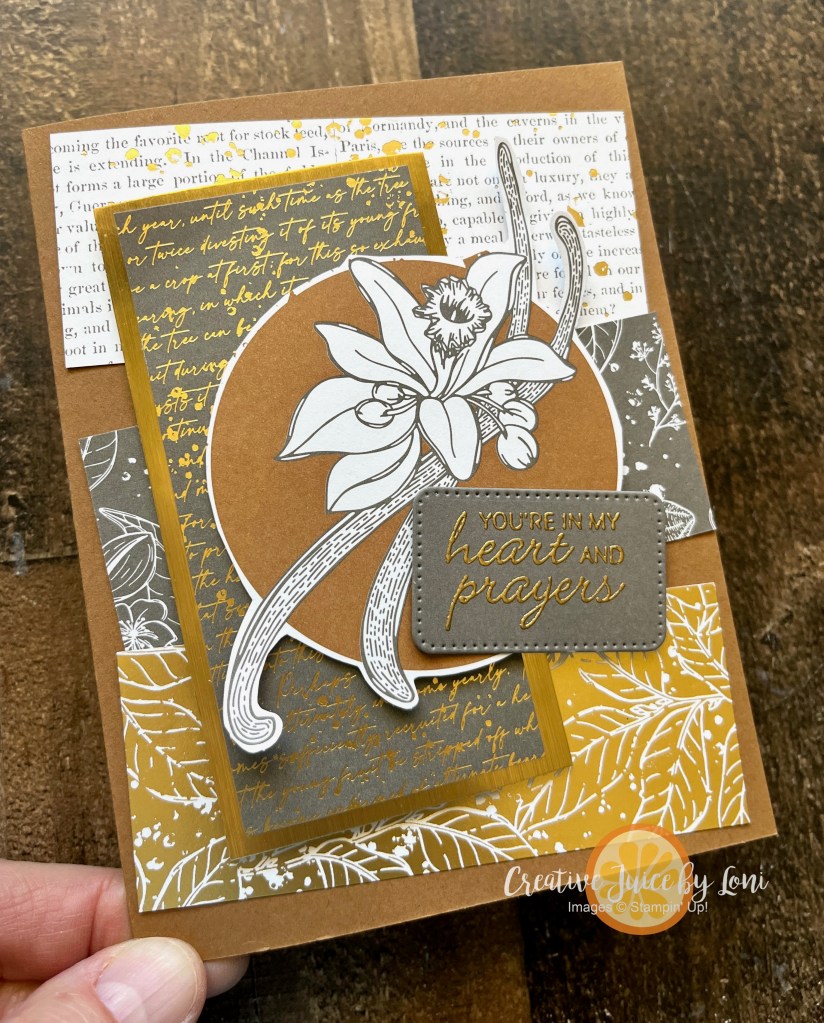
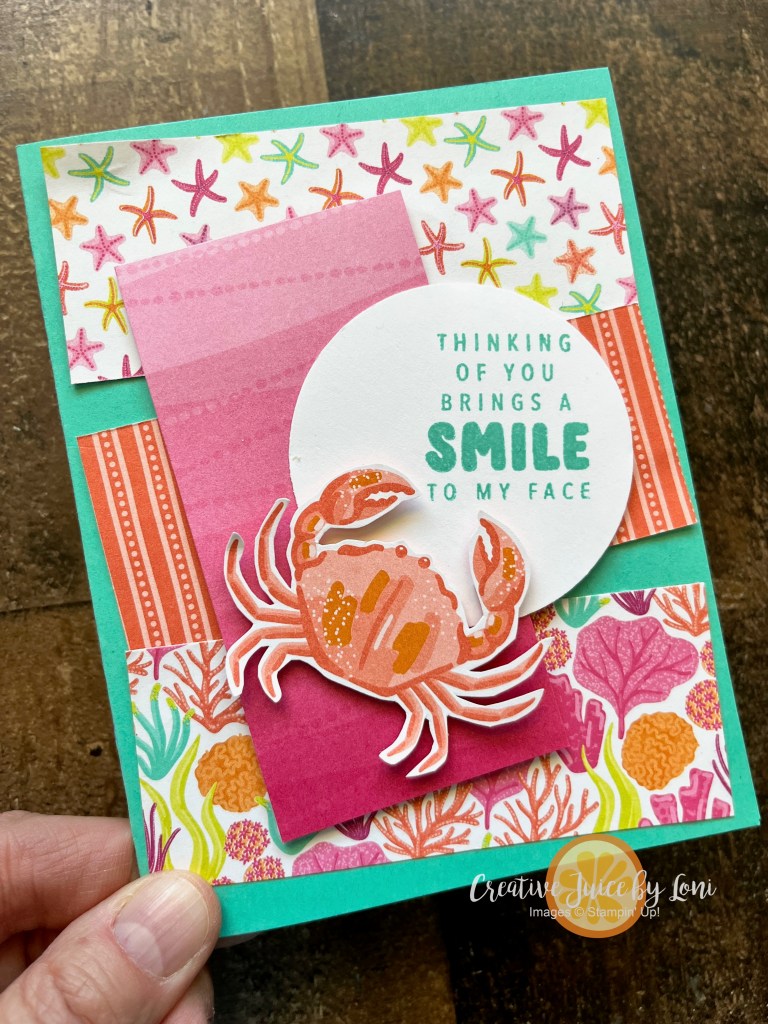
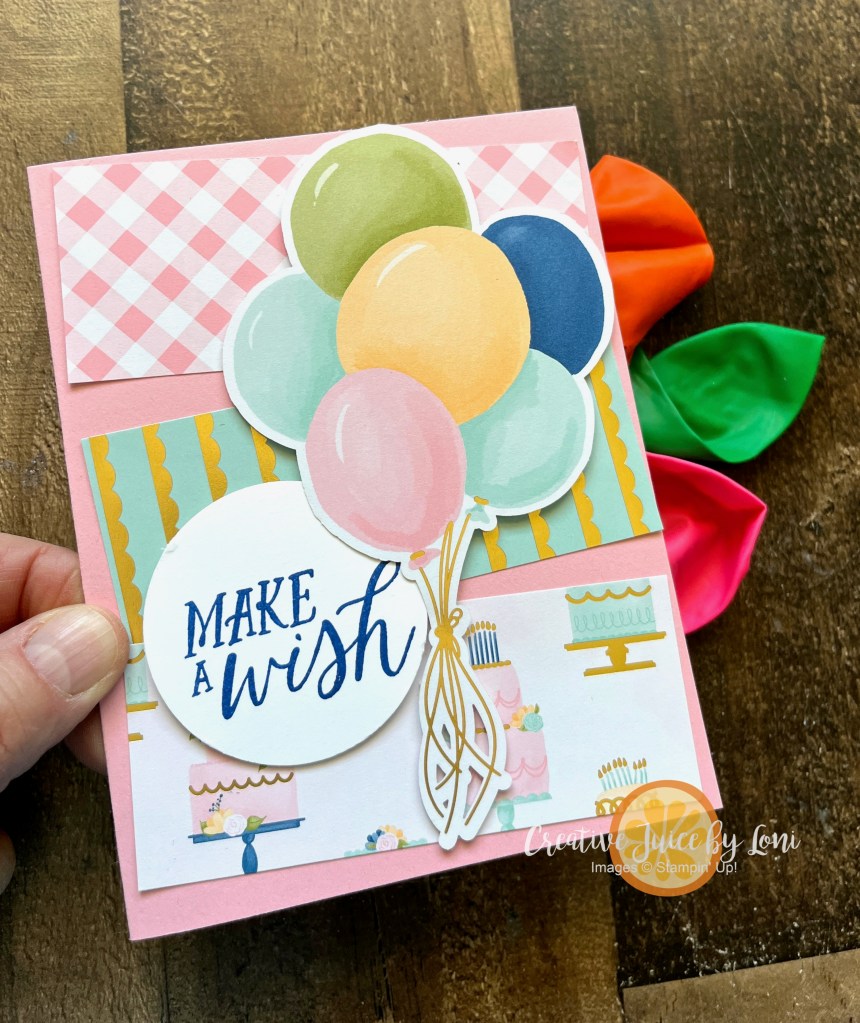
A sketch is a springboard for creativity, and today I dove into creating cards from my stash of Designer Series Paper using this sketch:
Card #1 was a sympathy card using some gilded botanical patterns that have been around Stampin’ Up! a long time, and I wanted to show it off! The Nature’s Sweetness Specialty Designer Series Paper only needed an embossed sentiment added to make this greeting card perfect:
You’ll notice that circle shapes draw the eye when used with rectangles!
Card #3 brings us to another “mailable item” idea: BALLOONS!
In my demonstration video, I suggested blowing up a balloon and writing a message on it, then deflating it again to include inside the card. It’s double fun to have to blow it up to read the greeting! You could also “reveal” what experience you have planned to celebrate with (“I’ll pick you up for birthday lunch on me this Friday at noon!”) by writing it on the balloon.
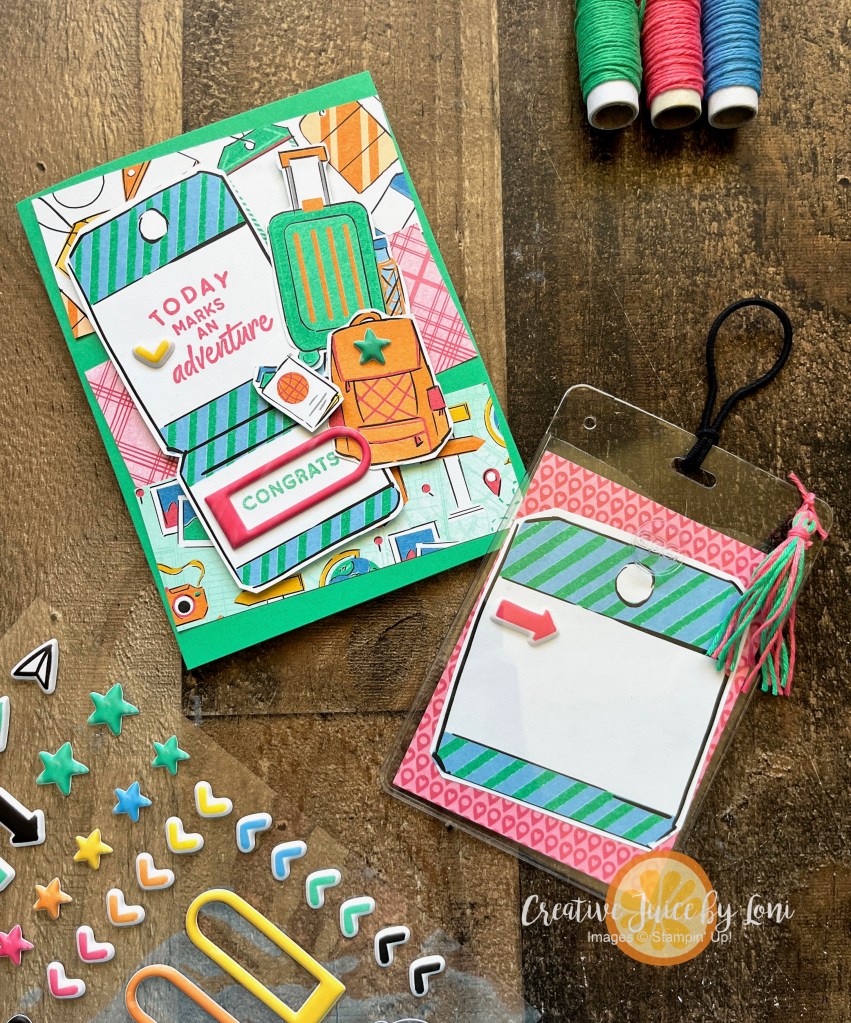
And finally, since Graduation season is imminent, Card #4 was created with the On the Go Suite Collection and includes a LUGGAGE TAG:
This will be for my niece who is graduating from High School this month and off on a grand European adventure to celebrate (remember when we were just happy to have cake & ice cream to mark a milestone like graduation 👩🎓 😂?)
I added the tassel after the demonstration in the video, and think the detail is adorable.
Missed the LONG LIST (and growing) OF MAILABLE GIFT ITEMS? Check it out HERE!
If you enjoy learning “how-to”, here’s today’s sketchy tutorial:
Thank you for choosing to shop with me. Most of the products used were linked throughout this post – just click on a product to add it to your cart…and watch for an exclusive tutorial bundle from me when you spend more than $50 in one month!
Connecting with you is a joy ~ Check out my upcoming events (in person AND online):


![Poppin' By Bundle (English) [ 165489 ]](https://assets1.tamsnetwork.com/images/EC042017NF/165489s.jpg "Poppin' By Bundle (English) [ 165489 ]")
![Darling Duckling 8 1/2" X 11" Cardstock [ 165622 ]](https://assets1.tamsnetwork.com/images/EC042017NF/165622s.jpg "Darling Duckling 8 1/2\" X 11\" Cardstock [ 165622 ]")
![Strawberry Slush 8 1/2" X 11" Cardstock [ 165625 ]](https://assets1.tamsnetwork.com/images/EC042017NF/165625s.jpg "Strawberry Slush 8 1/2\" X 11\" Cardstock [ 165625 ]")
![Secret Sea 12" X 12" (30.5 X 30.5 Cm) Two Tone Cardstock [ 166709 ]](https://assets1.tamsnetwork.com/images/EC042017NF/166709s.jpg "Secret Sea 12\" X 12\" (30.5 X 30.5 Cm) Two Tone Cardstock [ 166709 ]")
![Basic White 8 1/2" X 11" Cardstock [ 166780 ]](https://assets1.tamsnetwork.com/images/EC042017NF/166780s.jpg "Basic White 8 1/2\" X 11\" Cardstock [ 166780 ]")
![Darling Duckling Classic Stampin' Pad [ 165277 ]](https://assets1.tamsnetwork.com/images/EC042017NF/165277s.jpg "Darling Duckling Classic Stampin' Pad [ 165277 ]")
![Strawberry Slush Classic Stampin' Pad [ 165286 ]](https://assets1.tamsnetwork.com/images/EC042017NF/165286s.jpg "Strawberry Slush Classic Stampin' Pad [ 165286 ]")
![Strawberry Slush 3/8" (1 Cm) Faux Linen Ribbon [ 165274 ]](https://assets1.tamsnetwork.com/images/EC042017NF/165274s.jpg "Strawberry Slush 3/8\" (1 Cm) Faux Linen Ribbon [ 165274 ]")
![Pack Your Bags Twine Three Pack [ 165582 ]](https://assets1.tamsnetwork.com/images/EC042017NF/165582s.jpg "Pack Your Bags Twine Three Pack [ 165582 ]")
![Clear Medium Envelopes [ 102619 ]](https://assets1.tamsnetwork.com/images/EC042017NF/102619s.jpg "Clear Medium Envelopes [ 102619 ]")
![Loose Shaker Elements [ 165268 ]](https://assets1.tamsnetwork.com/images/EC042017NF/165268s.jpg "Loose Shaker Elements [ 165268 ]")
![Mini Stampin' Cut & Emboss Machine [ 150673 ]](https://assets1.tamsnetwork.com/images/EC042017NF/150673s.jpg "Mini Stampin' Cut & Emboss Machine [ 150673 ]")
![Stampin' Seal+ [ 149699 ]](https://assets1.tamsnetwork.com/images/EC042017NF/149699s.jpg "Stampin' Seal+ [ 149699 ]")
![Stampin' Dimensionals [ 104430 ]](https://assets1.tamsnetwork.com/images/EC042017NF/104430s.jpg "Stampin' Dimensionals [ 104430 ]")


![Everyday Skies Suite Collection (English) [ 164635 ]](https://assets1.tamsnetwork.com/images/EC042017NF/164635s.jpg "Everyday Skies Suite Collection (English) [ 164635 ]")
![Alphabet à La Mode Dies [ 160750 ]](https://assets1.tamsnetwork.com/images/EC042017NF/160750s.jpg "Alphabet à La Mode Dies [ 160750 ]")
![Mini Alphabet Dies [ 162934 ]](https://assets1.tamsnetwork.com/images/EC042017NF/162934s.jpg "Mini Alphabet Dies [ 162934 ]")
![Shaded Spruce 8-1/2" X 11" Cardstock [ 146981 ]](https://assets1.tamsnetwork.com/images/EC042017NF/146981s.jpg "Shaded Spruce 8-1/2\" X 11\" Cardstock [ 146981 ]")
![Cajun Craze 8-1/2" X 11" Cardstock [ 119684 ]](https://assets1.tamsnetwork.com/images/EC042017NF/119684s.jpg "Cajun Craze 8-1/2\" X 11\" Cardstock [ 119684 ]")
![Balmy Blue 8-1/2" X 11" Cardstock [ 146982 ]](https://assets1.tamsnetwork.com/images/EC042017NF/146982s.jpg "Balmy Blue 8-1/2\" X 11\" Cardstock [ 146982 ]")
![Blueberry Bushel 8-1/2" X 11" Cardstock [ 146968 ]](https://assets1.tamsnetwork.com/images/EC042017NF/146968s.jpg "Blueberry Bushel 8-1/2\" X 11\" Cardstock [ 146968 ]")
![Basic Beige 8 1/2" X 11" Cardstock [ 164511 ]](https://assets1.tamsnetwork.com/images/EC042017NF/164511s.jpg "Basic Beige 8 1/2\" X 11\" Cardstock [ 164511 ]")
![Adhesive Sheets [ 152334 ]](https://assets1.tamsnetwork.com/images/EC042017NF/152334s.jpg "Adhesive Sheets [ 152334 ]")
![Stampin' Cut & Emboss Machine [ 149653 ]](https://assets1.tamsnetwork.com/images/EC042017NF/149653s.jpg "Stampin' Cut & Emboss Machine [ 149653 ]")
![Bee Builder Punch [ 162553 ]](https://assets1.tamsnetwork.com/images/EC042017NF/162553s.jpg "Bee Builder Punch [ 162553 ]")
![Shaded Spruce Classic Stampin' Pad [ 147088 ]](https://assets1.tamsnetwork.com/images/EC042017NF/147088s.jpg "Shaded Spruce Classic Stampin' Pad [ 147088 ]")
![Blueberry Bushel Classic Stampin' Pad [ 147138 ]](https://assets1.tamsnetwork.com/images/EC042017NF/147138s.jpg "Blueberry Bushel Classic Stampin' Pad [ 147138 ]")
![Cajun Craze Classic Stampin' Pad [ 147085 ]](https://assets1.tamsnetwork.com/images/EC042017NF/147085s.jpg "Cajun Craze Classic Stampin' Pad [ 147085 ]")
![Stampin' Seal [ 152813 ]](https://assets1.tamsnetwork.com/images/EC042017NF/152813s.jpg "Stampin' Seal [ 152813 ]")


![Tags To Go Cling Stamp Set (English) [ 165569 ]](https://assets1.tamsnetwork.com/images/EC042017NF/165569s.jpg "Tags To Go Cling Stamp Set (English) [ 165569 ]")
![On The Go 12" X 12" (30.5 X 30.5 Cm) Designer Series Paper [ 165566 ]](https://assets1.tamsnetwork.com/images/EC042017NF/165566s.jpg "On The Go 12\" X 12\" (30.5 X 30.5 Cm) Designer Series Paper [ 165566 ]")
![On The Go Puffy Stickers [ 165581 ]](https://assets1.tamsnetwork.com/images/EC042017NF/165581s.jpg "On The Go Puffy Stickers [ 165581 ]")
![Tuxedo Black Memento Ink Pad [ 132708 ]](https://assets1.tamsnetwork.com/images/EC042017NF/132708s.jpg "Tuxedo Black Memento Ink Pad [ 132708 ]")
![Azure Afternoon Classic Stampin' Pad [ 161663 ]](https://assets1.tamsnetwork.com/images/EC042017NF/161663s.jpg "Azure Afternoon Classic Stampin' Pad [ 161663 ]")
![Summer Splash 8 1/2" X 11 Cardstock [ 163797 ]](https://assets1.tamsnetwork.com/images/EC042017NF/163797s.jpg "Summer Splash 8 1/2\" X 11 Cardstock [ 163797 ]")
![Basic Black 8-1/2" X 11" Cardstock [ 121045 ]](https://assets1.tamsnetwork.com/images/EC042017NF/121045s.jpg "Basic Black 8-1/2\" X 11\" Cardstock [ 121045 ]")
![Multipurpose Liquid Glue [ 110755 ]](https://assets1.tamsnetwork.com/images/EC042017NF/110755s.jpg "Multipurpose Liquid Glue [ 110755 ]")
![Paper Trimmer [ 152392 ]](https://assets1.tamsnetwork.com/images/EC042017NF/152392s.jpg "Paper Trimmer [ 152392 ]")


![Floral Impressions Suite Collection (English) [ 165617 ]](https://assets1.tamsnetwork.com/images/EC042017NF/165617s.jpg "Floral Impressions Suite Collection (English) [ 165617 ]")
![Garden Green 12" X 12" (30.5 X 30.5 Cm) Two Tone Cardstock [ 166665 ]](https://assets1.tamsnetwork.com/images/EC042017NF/166665s.jpg "Garden Green 12\" X 12\" (30.5 X 30.5 Cm) Two Tone Cardstock [ 166665 ]")
![Garden Green Classic Stampin' Pad [ 147089 ]](https://assets1.tamsnetwork.com/images/EC042017NF/147089s.jpg "Garden Green Classic Stampin' Pad [ 147089 ]")


![Party Banners Dies [ 165264 ]](https://assets1.tamsnetwork.com/images/EC042017NF/165264s.jpg "Party Banners Dies [ 165264 ]")
![Pretty Florals Bundle [ 165179 ]](https://assets1.tamsnetwork.com/images/EC042017NF/165179s.jpg "Pretty Florals Bundle [ 165179 ]")
![Real Red 8-1/2" X 11" Cardstock [ 102482 ]](https://assets1.tamsnetwork.com/images/EC042017NF/102482s.jpg "Real Red 8-1/2\" X 11\" Cardstock [ 102482 ]")
![Night Of Navy 8-1/2" X 11" Cardstock [ 100867 ]](https://assets1.tamsnetwork.com/images/EC042017NF/100867s.jpg "Night Of Navy 8-1/2\" X 11\" Cardstock [ 100867 ]")
![Garden Green 8-1/2" X 11" Cardstock [ 102584 ]](https://assets1.tamsnetwork.com/images/EC042017NF/102584s.jpg "Garden Green 8-1/2\" X 11\" Cardstock [ 102584 ]")
![Granny Apple Green 8-1/2" X 11" Cardstock [ 146990 ]](https://assets1.tamsnetwork.com/images/EC042017NF/146990s.jpg "Granny Apple Green 8-1/2\" X 11\" Cardstock [ 146990 ]")
![Real Red Classic Stampin' Pad [ 147084 ]](https://assets1.tamsnetwork.com/images/EC042017NF/147084s.jpg "Real Red Classic Stampin' Pad [ 147084 ]")
![Night Of Navy Classic Stampin' Pad [ 147110 ]](https://assets1.tamsnetwork.com/images/EC042017NF/147110s.jpg "Night Of Navy Classic Stampin' Pad [ 147110 ]")
![Balmy Blue Classic Stampin' Pad [ 147105 ]](https://assets1.tamsnetwork.com/images/EC042017NF/147105s.jpg "Balmy Blue Classic Stampin' Pad [ 147105 ]")
![Silver & White 1/2" (1.3 Cm) Sheer Ribbon [ 162149 ]](https://assets1.tamsnetwork.com/images/EC042017NF/162149s.jpg "Silver & White 1/2\" (1.3 Cm) Sheer Ribbon [ 162149 ]")
![Drusy Adhesive Backed Embellishments [ 164223 ]](https://assets1.tamsnetwork.com/images/EC042017NF/164223s.jpg "Drusy Adhesive Backed Embellishments [ 164223 ]")


![Birthday Celebration Bundle (English) [ 164599 ]](https://assets1.tamsnetwork.com/images/EC042017NF/164599s.jpg "Birthday Celebration Bundle (English) [ 164599 ]")
![Festive 12" X 12" (30.5 X 30.5 Cm) Glimmer Paper [ 164106 ]](https://assets1.tamsnetwork.com/images/EC042017NF/164106s.jpg "Festive 12\" X 12\" (30.5 X 30.5 Cm) Glimmer Paper [ 164106 ]")
![Silver 12" X 12" (30.5 X 30.5 Cm) Foil Sheets [ 163387 ]](https://assets1.tamsnetwork.com/images/EC042017NF/163387s.jpg "Silver 12\" X 12\" (30.5 X 30.5 Cm) Foil Sheets [ 163387 ]")
![Window Sheets [ 142314 ]](https://assets1.tamsnetwork.com/images/EC042017NF/142314s.jpg "Window Sheets [ 142314 ]")
![Versamark Pad [ 102283 ]](https://assets1.tamsnetwork.com/images/EC042017NF/102283s.jpg "Versamark Pad [ 102283 ]")
![Basics Wow! Embossing Powder [ 165679 ]](https://assets1.tamsnetwork.com/images/EC042017NF/165679s.jpg "Basics Wow! Embossing Powder [ 165679 ]")
![Heat Tool (Us And Canada) [ 129053 ]](https://assets1.tamsnetwork.com/images/EC042017NF/129053s.jpg "Heat Tool (Us And Canada) [ 129053 ]")
![Tear & Tape Adhesive [ 154031 ]](https://assets1.tamsnetwork.com/images/EC042017NF/154031s.jpg "Tear & Tape Adhesive [ 154031 ]")


![Friends Of The Ocean 12" X 12" (30.5 X 30.5 Cm) Designer Series Paper [ 164684 ]](https://assets1.tamsnetwork.com/images/EC042017NF/164684s.jpg "Friends Of The Ocean 12\" X 12\" (30.5 X 30.5 Cm) Designer Series Paper [ 164684 ]")
![Pumpkin Pie 8-1/2" X 11" Cardstock [ 105117 ]](https://assets1.tamsnetwork.com/images/EC042017NF/105117s.jpg "Pumpkin Pie 8-1/2\" X 11\" Cardstock [ 105117 ]")
![Daffodil Delight 8-1/2" X 11" Cardstock [ 119683 ]](https://assets1.tamsnetwork.com/images/EC042017NF/119683s.jpg "Daffodil Delight 8-1/2\" X 11\" Cardstock [ 119683 ]")
![Meant To Bee Photopolymer Stamp Set (English) [ 166583 ]](https://assets1.tamsnetwork.com/images/EC042017NF/166583s.jpg "Meant To Bee Photopolymer Stamp Set (English) [ 166583 ]")
![Bee My Valentine Photopolymer Stamp Set (English) [ 162547 ]](https://assets1.tamsnetwork.com/images/EC042017NF/162547s.jpg "Bee My Valentine Photopolymer Stamp Set (English) [ 162547 ]")
![Basic White Medium Envelopes [ 159236 ]](https://assets1.tamsnetwork.com/images/EC042017NF/159236s.jpg "Basic White Medium Envelopes [ 159236 ]")
![Mini Glue Dots [ 103683 ]](https://assets1.tamsnetwork.com/images/EC042017NF/103683s.jpg "Mini Glue Dots [ 103683 ]")