There is an art to being grateful, and expressing heartfelt appreciation is the first step to living in abundant gratitude. This simple card will help:
It’s a breeze to create quickly (watch below), and the combination of Vanilla, Lost Lagoon & Pretty Peacock are the sophisticated part.
Add a few Brushed Brass Butterflies and it’s a luxe & lovely thank you card, wouldn’t you agree?
I appreciate the opportunity to serve YOUR creative needs, as well as your recommendation to other paper crafters. THANK YOU.
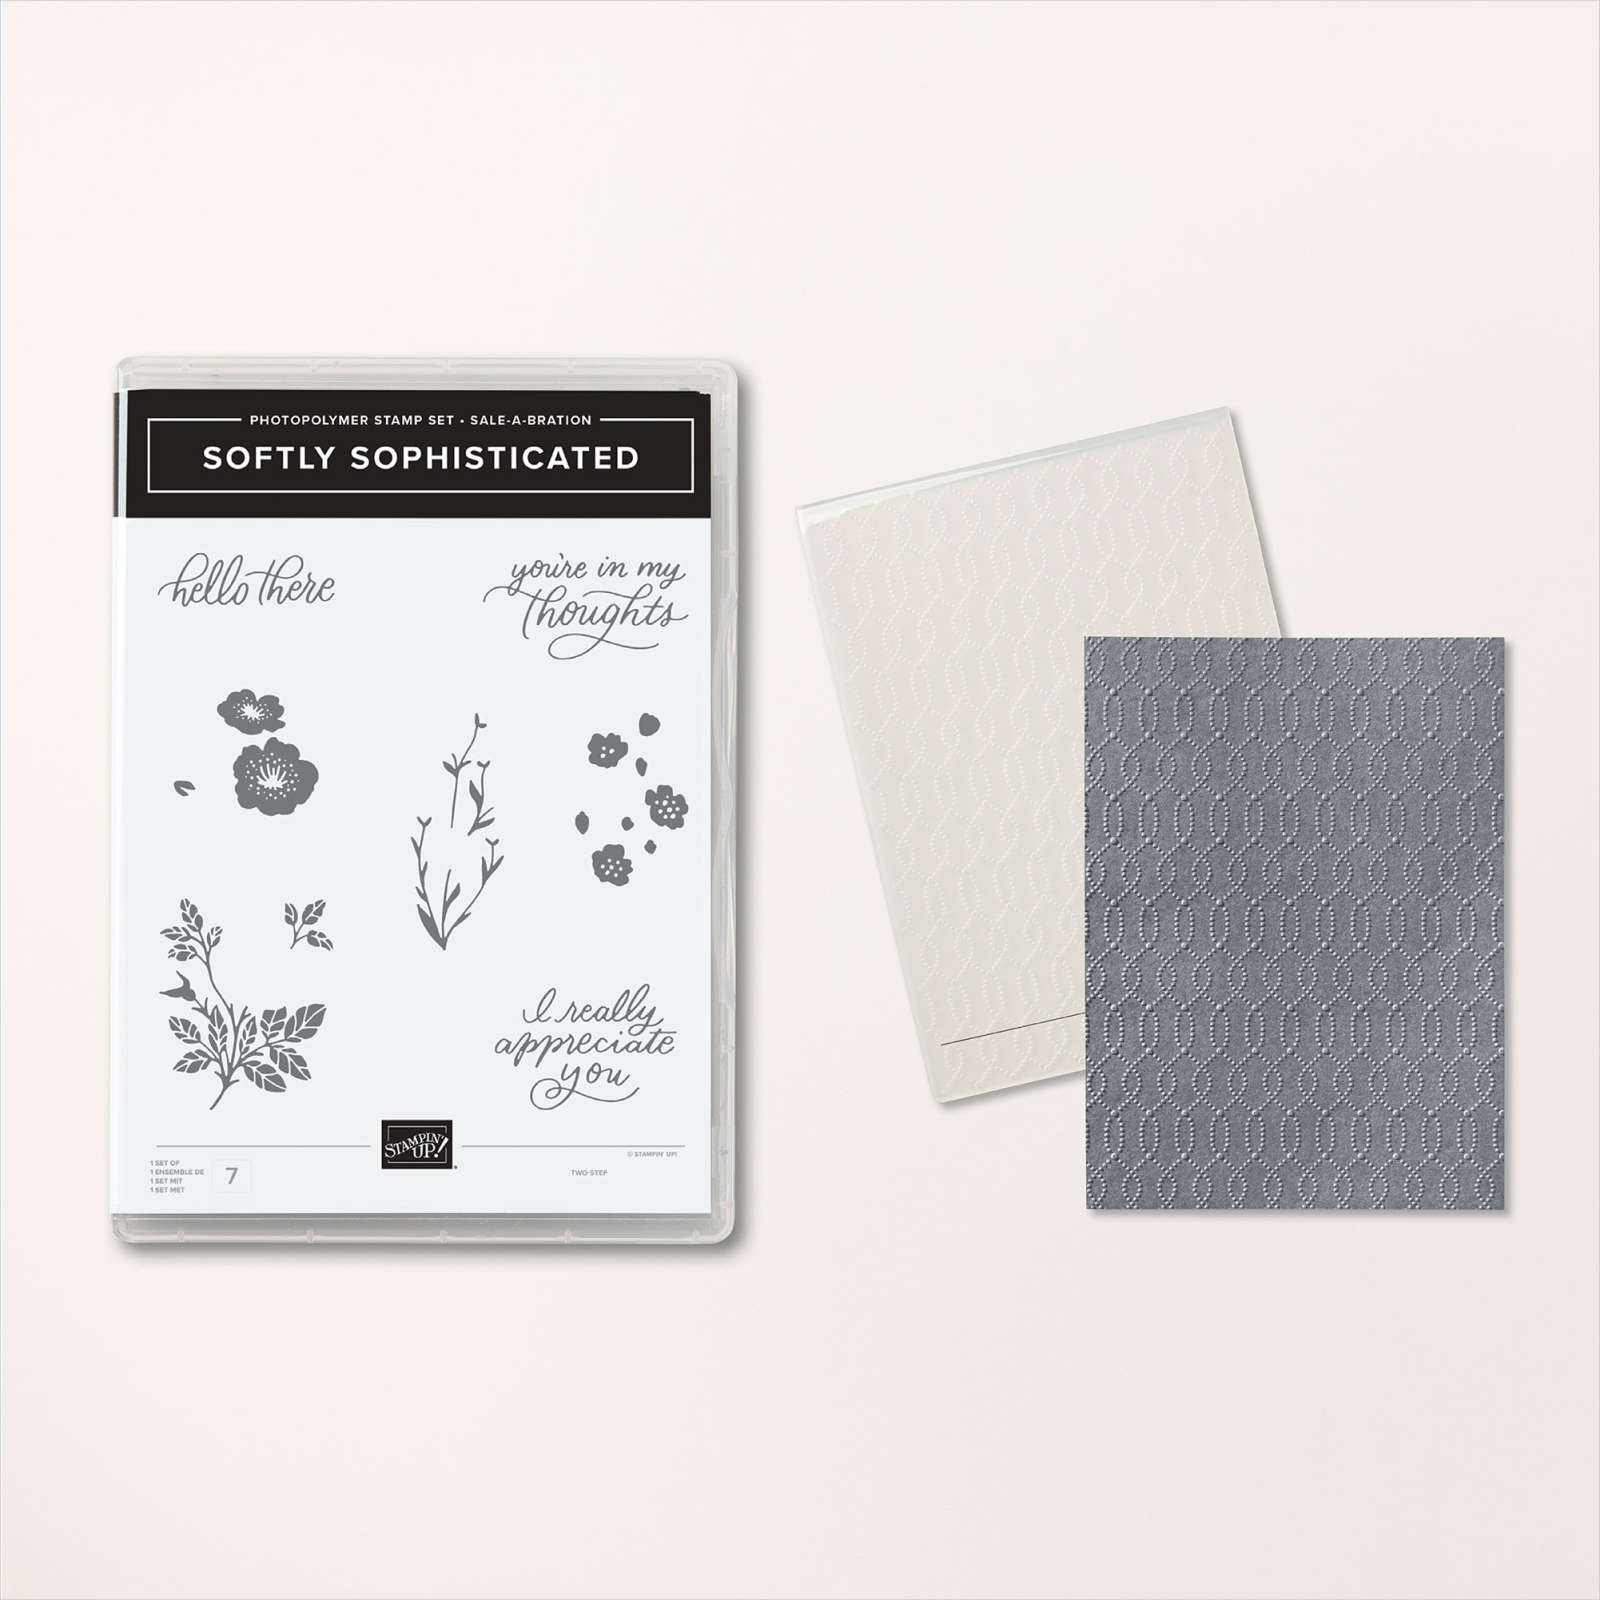
This stamp set (plus coordinating embossing folder, see previous post) is a FREE BUNDLE you could choose when you purchase $100 from my Stampin’ Store before February 29, 2024. Here are the supplies needed for this card, and adding them all to your cart would get you the Softly Sophisticated bundle as a complimentary gift (if you choose it during checkout) PLUS another free Sale-a-Bration product!
Happy to see you hopping through here! Our New at SU! global group of demonstrators have ALL the Sale-a-Brationproducts here for you this month, and trust me: You want them ALL. Whether you are ending here, or just starting, don’t miss a single post!
I get to showcase the Softly Sophisticated bundle that you could choose free through February 29th with a qualifying order in your country (in the US, it’s free with a $100 order) and it comes with a stamp set AND an embossing folder:
It feels so elegant in Very Vanilla and I used the Perennial Postage dies for this first card to show how a simple layout can be “next level” when you add a little embossed texture.
Only one little problem: The small die with the postage cancellation wasn’t long enough! So here’s HOW TO STRETCH a die!
Leave me a comment and tell me what you think of this project, or which SAB item is next on your wish list, then visit these posts to help you celebrate creativity during Stampin’ Up! Sale-a-Bration – remember to save or PIN your favorites!
Crafter problems: Losing sleep over a project that you’ve dreamed up! That was the situation last night because I was too excited about making this idea come to life:
But I’m getting ahead of myself…
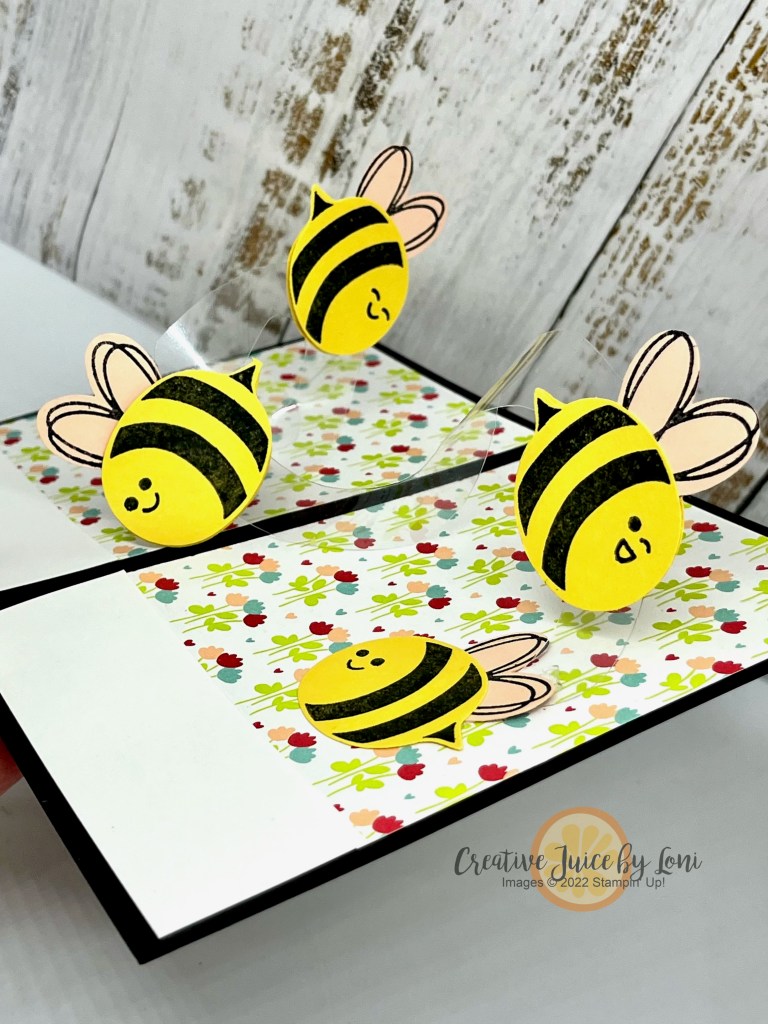
This simple pop-up card uses WINDOW sheets (spiralized) to make the bees buzz with a message of love on Valentine’s Day! The front of the card:
I actually made TWO versions with the Bee My Valentine suite AND a Sale-a-Bration specialty paper (which I’ll show you after the video). They are very easy to create and will be buzz-worthy when my grandkids open them!
Here’s the tutorial video:
It’s your last chance to sign up for myJanuary VIRTUAL Class, featuring the Bee My Valentine bundle
-OR- stamps and punches you may already have! Click the image for more info:
Stampin’ Up! Sale-a-Bration is in full swing, and you could choose the Most Adored Specialty Designer Series Paper as a free product with $50 order before it ends on 2/29/24 (or the paper is sold out), in which case, you could ALSO make this version of the Spiral Pop-Up Card:
One side of the paper is Flirty Flamingo and Real Red and the other side is white and GOLD FOIL, which will be perfect to have on hand for wedding season and anniversaries.
When you checkout from my Stampin’ Store, you’ll be prompted to choose Sale-a-Bration product(s) you qualify for! Here’s a cart I’ve started for you (add or take out, as you wish):
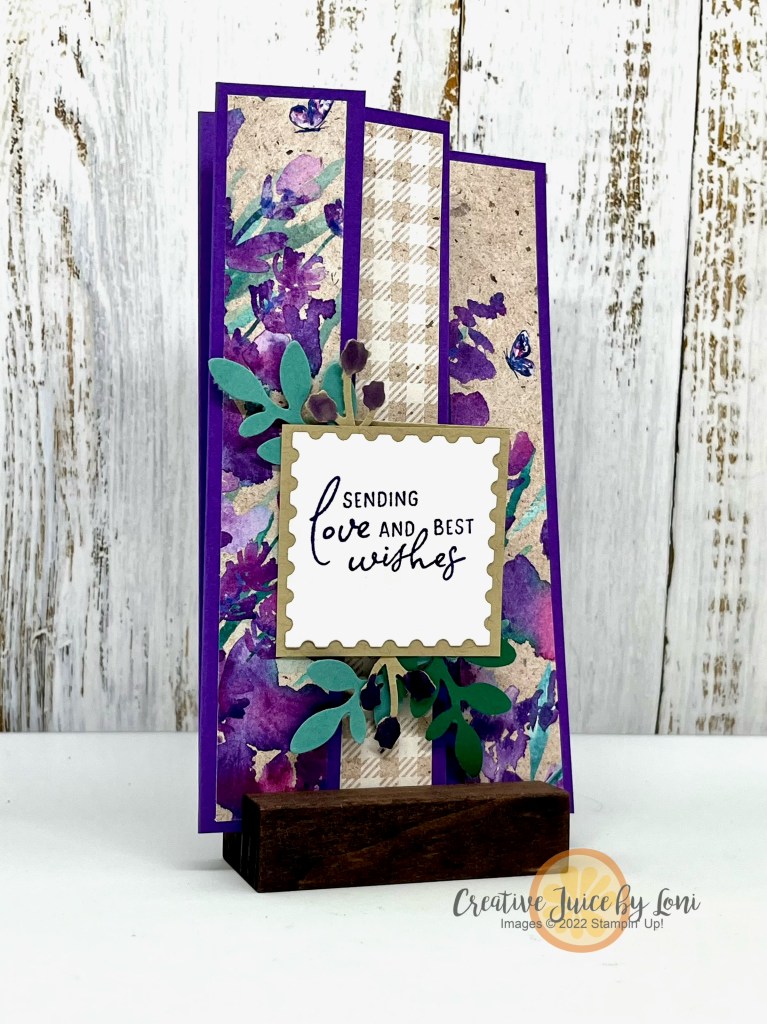
Some patterned paper comes as 12″ x 12″ and a few of our fancy designs are 6″ x 6″, so today (and to help you use up your Paper Share!), I’ve got a fun fold slimline card which uses a 6″ x 6″ piece of Perennial Lavender Designer Series Paper:
On the left is the card closed flat, and on the right, it’s open to see all the panels.
Cut two 2″ wide and two 1″ wide pieces from one 6″ x 6″ piece of pretty paper to fit into each section. You’ll also need a 1″ x 6″ and 2″ x 6″ panel of card stock to fit where you will write a message. The finished size is 3.5″ x 6.25″ when folded flat.
Here’s a different version with a piece of the Lighter Than Air Designer Series Paper, which already comes as 6″ x 6″-
I created a belly band for this one to keep it closed, then when you slide it off, it opens to wish you a Happy Birthday:
If you didn’t snag a stack of patterned paper in my Designer Series Paper Share, I have a few left!Get one piece of EVERY paper in the 2024 Jan-April Mini catalog for $18 (if you pick up from me in Hurricane, UT) or $22 shipped to you, while supplies last. Both pieces used on these cards ARE INCLUDED IN THE SHARE.
The Perennial Lavender Designer Series Paper (and Perennial Lavender suite) coordinates with the January Paper Pumpkin craft kit! Subscribe by January 10th to receive the Lovely Lavender kit:
Make love-themed cards for special occasions, Valentine’s Day, anniversaries, and more with this all-inclusive kit that arrives in your mailbox in January. The kit includes a unique photopolymer stamp set and ink spot and…
• Makes 8 cards: 4 each of 2 designs with 8 coordinating envelopes
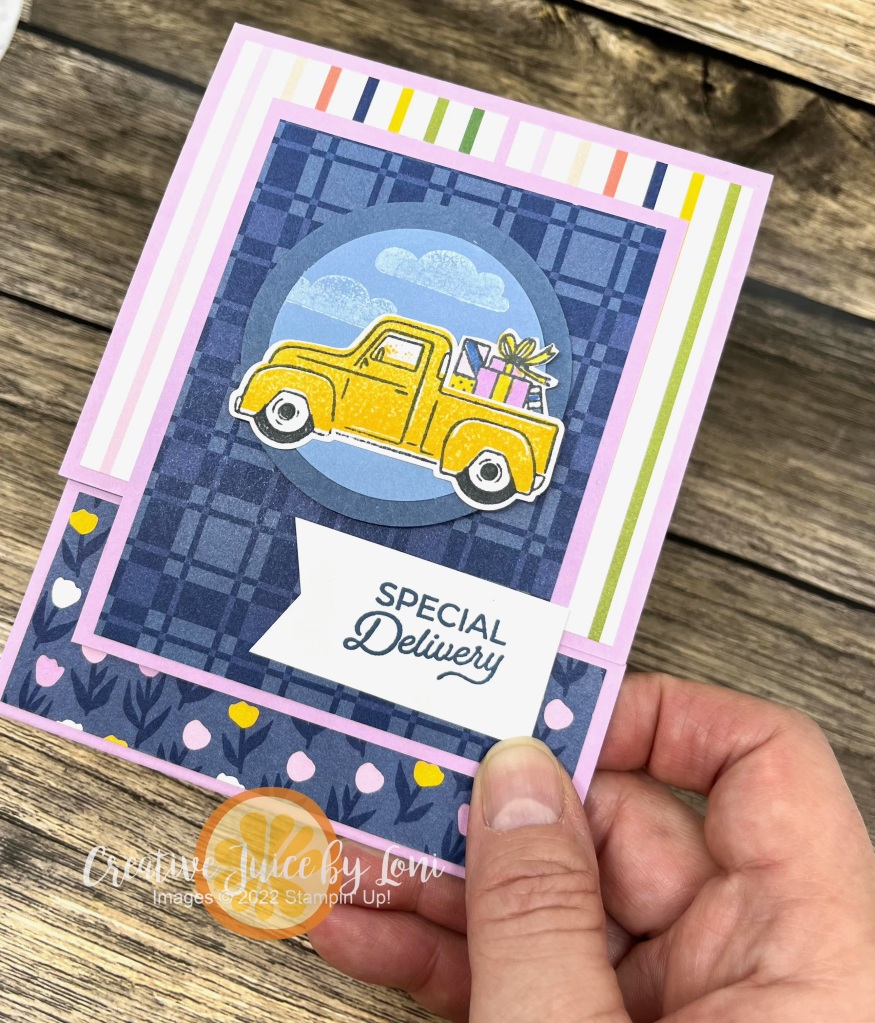
The Trucking Along bundle (an Online Exclusive in my Stampin’ Store) is an all-occasion crafting set of stamps and coordinating punch and today I’ll demonstrate how to make a slide-up gift card holder to present gift cards, money, gift certificates or other flat items for ANY occasion:
This is the outside of the holder and below you’ll see the holiday version we created at the Christmas Card Class in Cedar City a few weeks ago. When you open the card, the pocket slides up to show the gift inside!
You probably noticed the coordinating envelopes…as long as you are stamping the truck for the front of the card, you may as well stamp a second time on the envelope to make it festive!
Cutting and scoring instructions:
Card base (I used Fresh Freesia for the birthday version): 11″ x 4-1/4″ scored at 1-3/4″ and 7-1/4″, plus the same color card stock 3-1/4″ x 4-1/4″ for the mat on the top layer.
Sliding insert: THICK white card stock 6-3/4″ x 3-1/2″ scored at 1/2″, then flipped to the back side and scored at 5-1/4″ (I explain why in the video)
Designer Series Paper: 4″ x 3″ for top layer, 3-1/2″ x 4″ for top part of card and 1-1/2″ x 4″ for bottom section.
If your significant other starts asking what YOU WANT for Christmas (because it is now less than 2 weeks away 😆), did you know I offer gift certificates? They can be used on an order through me and/or toward one of my classes or events! Send them my way and I’ll take care of them (and you).
If they are really early, they could take advantage of a JUST ANNOUNCED one-day of FREE SHIPPING on December 14th (on orders over $75):
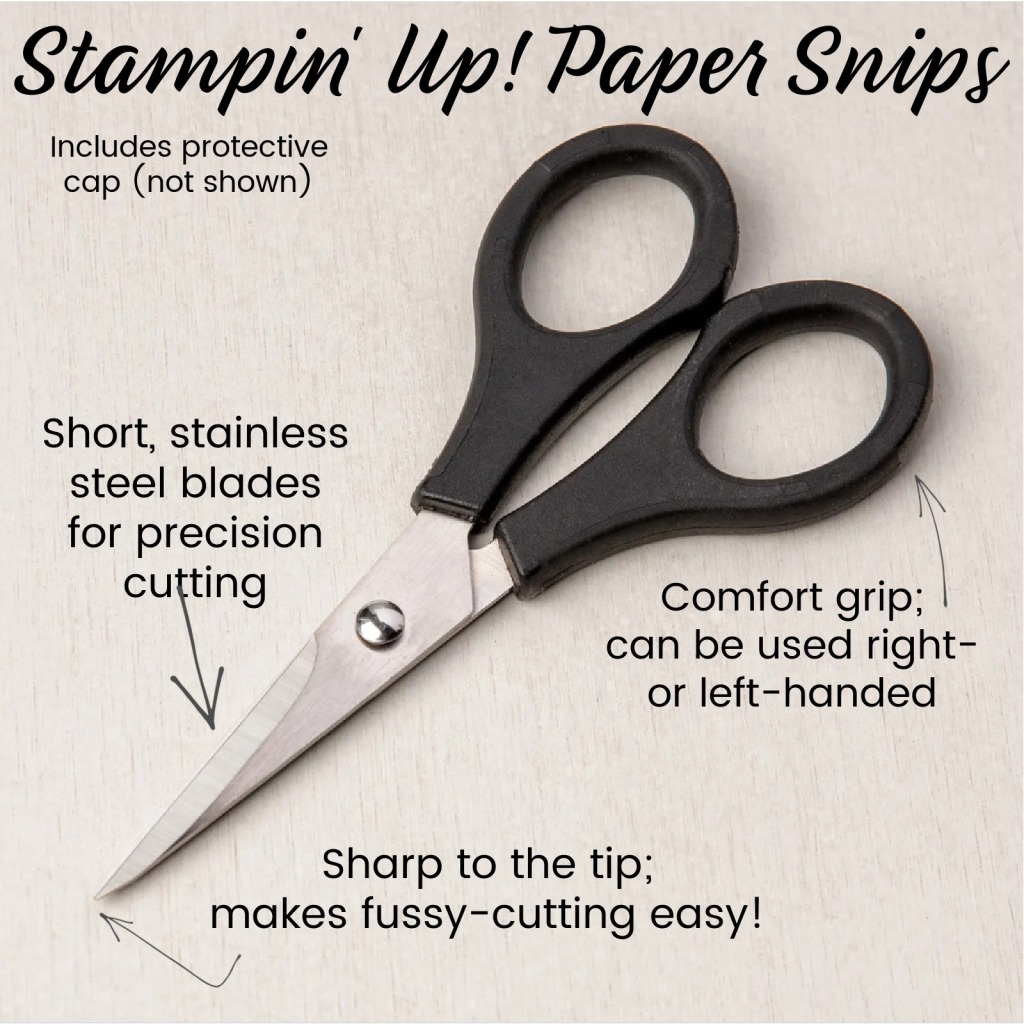
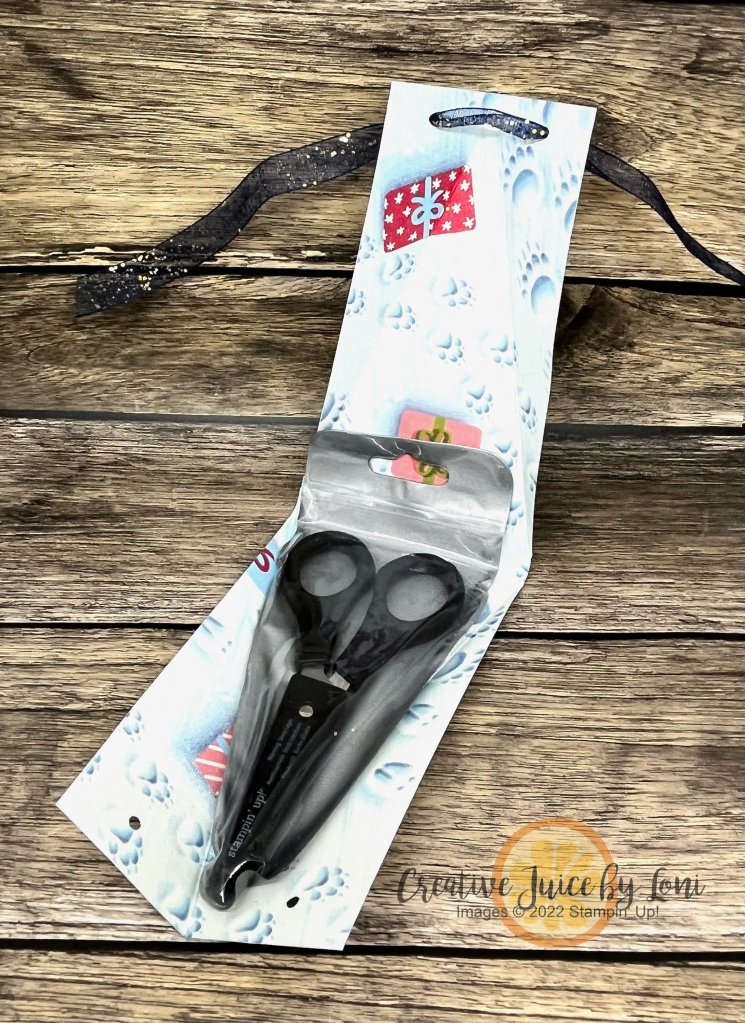
Just as bakers are always thrilled to receive a new spatula (my favorites are from Pampered Chef), CRAFTERS are delighted to add another set of scissors to their collection! The Paper Snips from Stampin’ Up! are essential for fussy cutting, plus you can make a second pair “ribbon only” scissors.
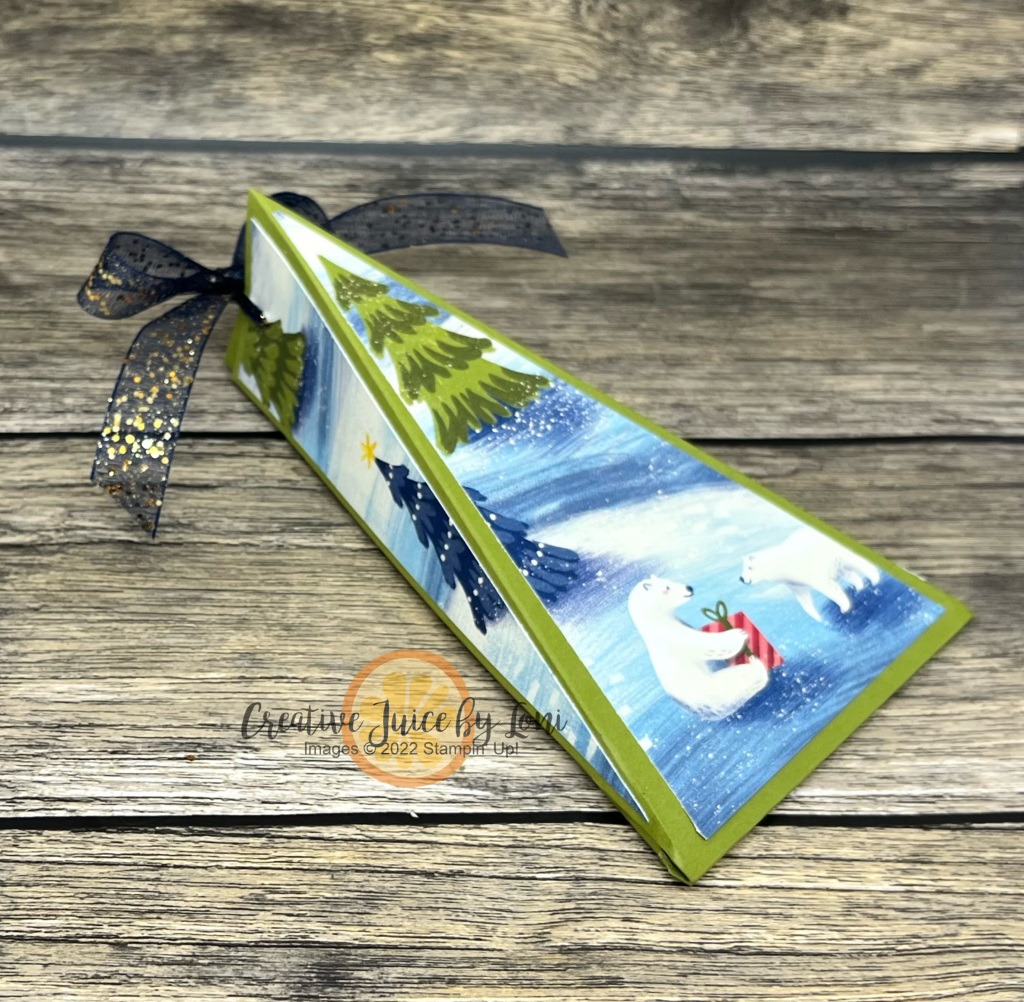
The trick is how to WRAP a gift that’s triangular shaped, and I have just the tutorial for you today!
This box is PERFECT for SNIPS and can be created for the holiday season OR any other time of gifting.
Start with a 12″ x 3.5″ piece of card stock OR Designer Series Paper, then follow the instructions here (warning: I make a mistake at the 6 minute mark, but quickly get back on track!). The layer starts with a 5.5″ x 3″ piece of card stock or Designer Series Paper.
Tip to make this box for any size: Measure the triangular object you want to wrap and add 1/2″ to the length and double it, then add 1/2″ to the width. That’s how I got the size of paper to begin my box with!
Here’s the box opened:
If you start with card stock and add Designer Series Paper, keep the two sides you trimmed off and layer them on the sides of the box- they fit perfectly and keep the “scene” wrapping around the edges:
I’d love to hear if you make these boxes- comment or tag me on social media @creativejuicebyloni on Facebook or Instagram.
Do you have a favorite Christmas Carol or holiday tune? Mine is this one:
The TGIF Challenge #448 from Friday was to create a card inspired by a beloved piece of seasonal music~
I used “Come Lord Jesus” to create a card that could also be displayed as part of the true meaning of CHRISTmas:
While I had prepared this card to demonstrate showing how to use the Night Divine bundlewith different Designer Series Paper (since the coordinating “O Holy Night” paper is sold out), sometime over the weekend, the “Joy of Christmas” Designer Series Paper that I used ALSO sold out during the Last Chance Sale…
THUS, I pivoted at the last minute and used patterns from the Joyful Specialty Designer Series Paper to demonstrate in my live video:
Card measurements:
Card base: 4.25″ x 11″, scored at 2, 3-3/8″, 7-5/8″ and 9″ along the long side.
Designer Series Paper for outside panels: Two pieces 4″ x 1-3/4″, (optional: two pieces 1-1/4″ x 4″ for the middle side panels, if you want it to pull all the way out).
Card stock for center (and/or back panel): 4″ square
If you were able to order the O Holy Night, I did make a version using that paper as well as an example:
I have two 6″x6″ Paper Shares left that have a sample of EVERY Designer Series Paper from the Sept-Dec mini catalog (EXCEPT the All About Autumn Designer Series Paper which sold out too fast). It is discounted to $25 (pick up) or you can pay shipping to you…first come, first served! Each pack DOES have a 6″ x 6″ piece of ALL the patterned papers on these nativity cards.
Thank you for allowing me to fuel your creativity! Here are the supplies used in the video:
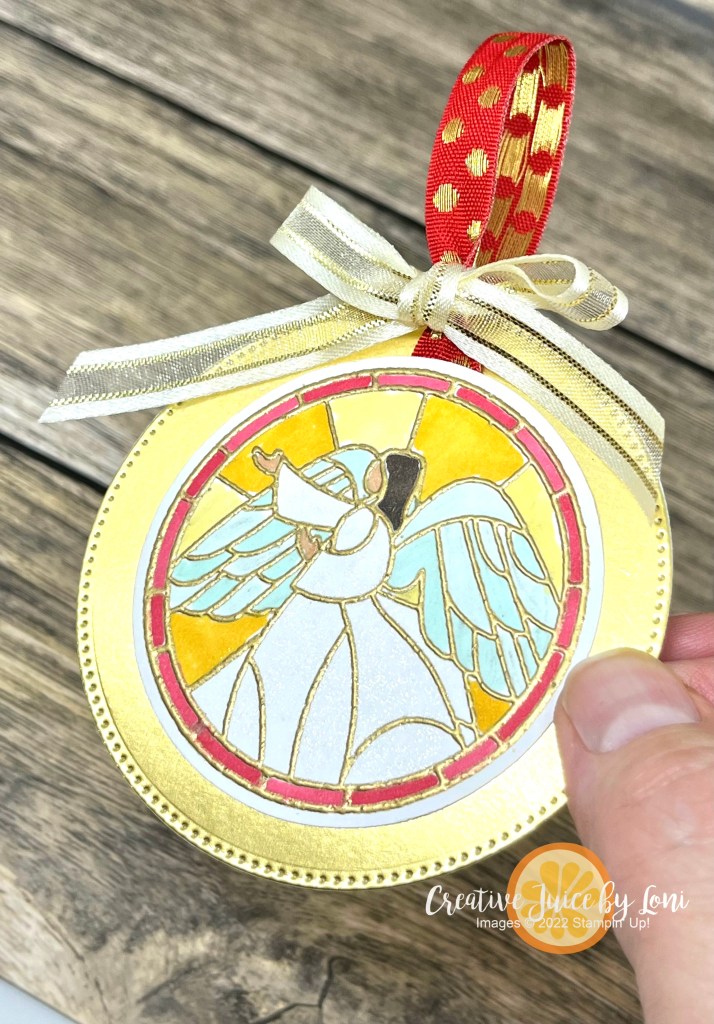
Each Monday, I think about what I can create to serve you, my crafting community. It wouldn’t be lying to say sometimes I loose sleep over it! But I count it as a blessing to bring you inspiration, so I took the opportunity to figure out a Christmas Card that would also have an ornament to hang on the tree because I know that things may be tight for some folks right now, and this pretty card + gift is a thoughtful way to share some light this season with friends and neighbors without breaking the bank.
The card is very simple: A 8.5″ x 5.5″ Wild Wheat card base with a 3.5″ x 4.75″ Pool Party stamped layer on top of a 3.75″ x 5″ Real Red layer.
Thick white card stock is needed for the banner at the top, but as I explained in the video tutorial (below), you can also cut out two banners and glue them together for more stability. I only added dimensionals to the left side, so you can slide the ornament off the right side. Remember to slide the card into the envelope fold-first, so when the recipient pulls it out, the ornament comes with it!
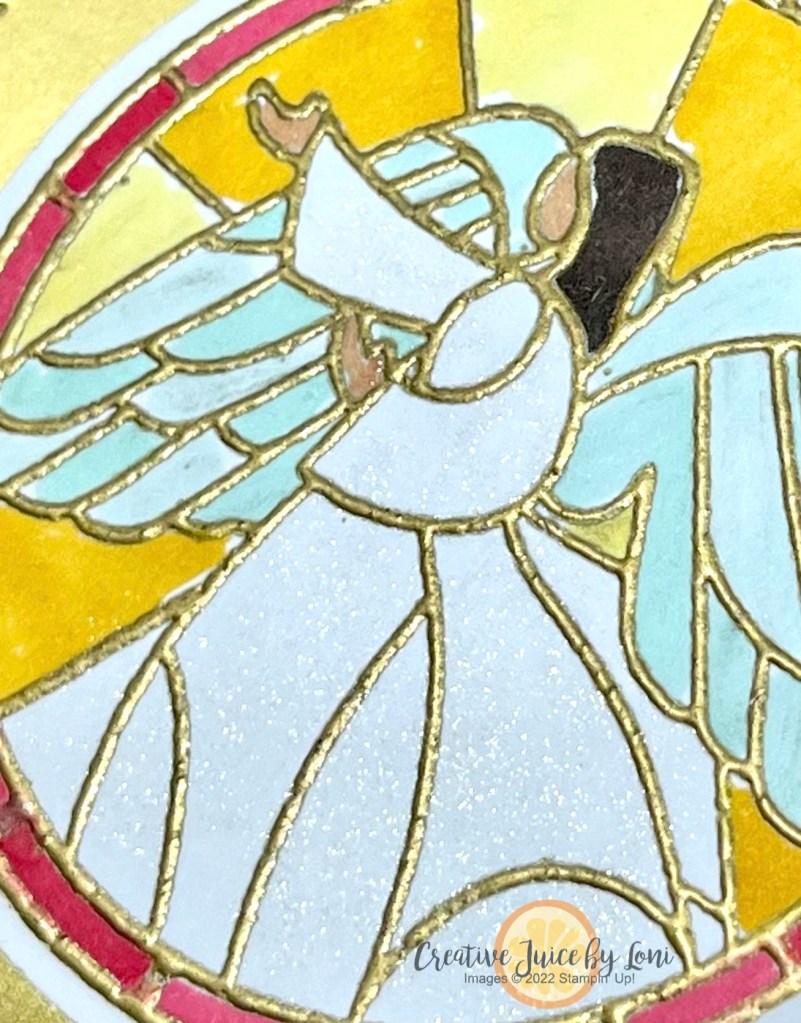
Embossing the angel image makes coloring with Stampin’ Blends (or watercolors) really easy to stay inside the lines, because they are raised! Plus, the gold makes it look LUXE! I left the angel’s dress white and just added Wink of Stella for a subtle shimmer.
Watch the video tutorial, then I would appreciate you ordering any of the supplies you need from my Stampin’ Store, if this inspired you to make some!
Good news if you are finding this soon after it’s posted: The Seasonal Sale begins tomorrow, Tuesday, November 14th, 2023 and ends on 11/16/23 at 11:59 PM MST.
The SEASONAL SALE includes:
10% off ribbons and trims.
15% off inks, including pads, refills, markers, and Blends. Bundles are not included.
20% off papers, including cardstock, specialty paper, and Designer Series Paper.
Shop online to see the full selection of discounted products. Discounts are automatically applied when sale items are added to any order, including Starter Kits.
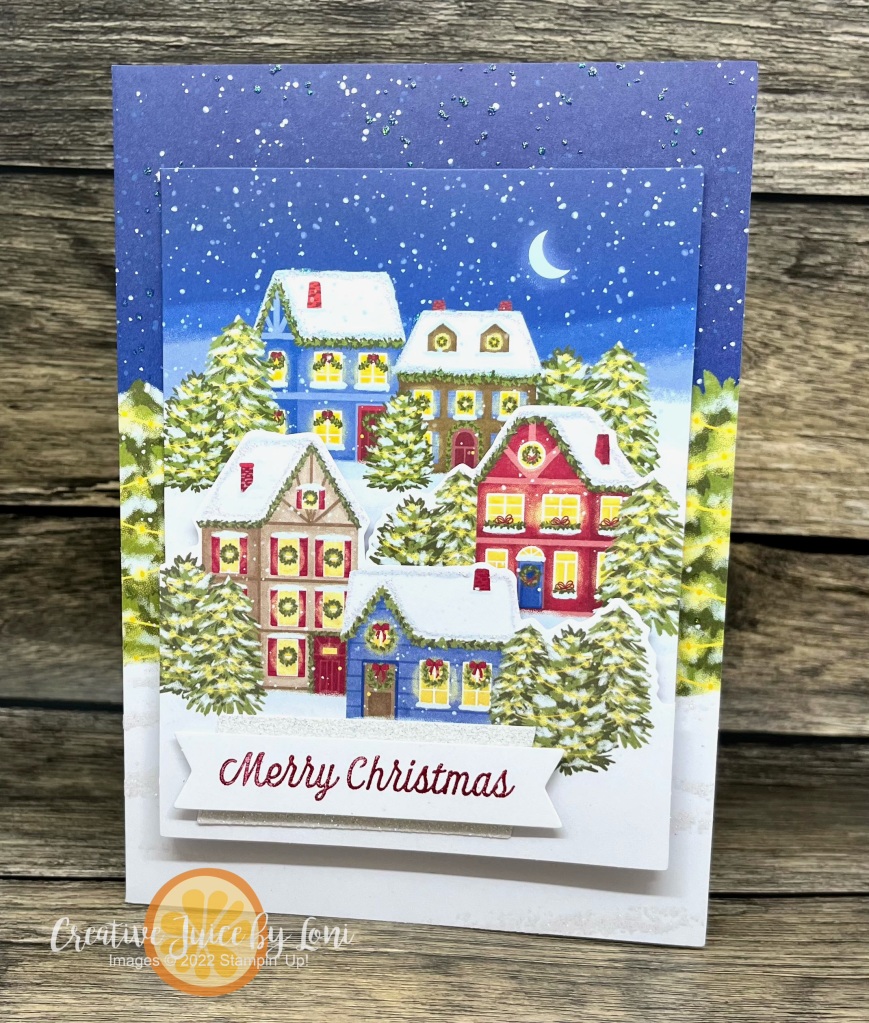
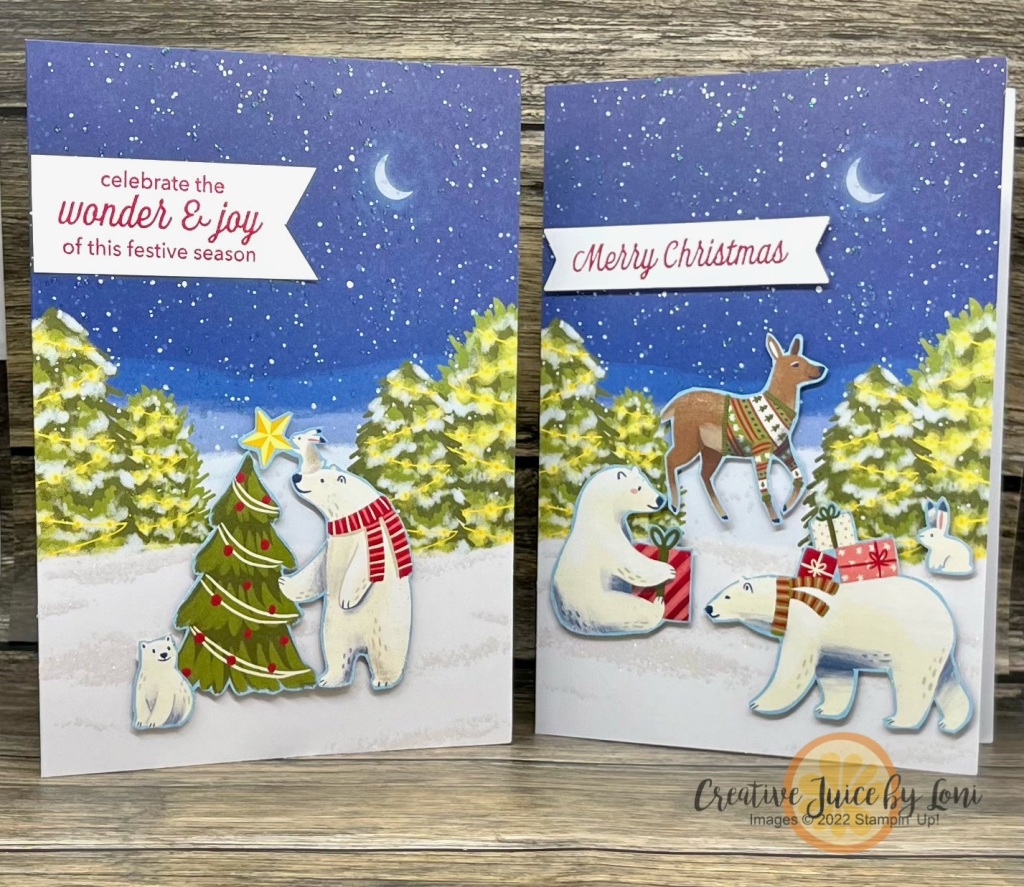
First, they also coordinated with the OCTOBER Home for the Holidays Paper Pumpkin kit (subscribers can grab the refills HEREwhile they last), so I just cut off the front of the landscape card from the kit and mounted it to the front of the card.
Next, you can add stamped, punched or fussy cut images from Designer Series Paper (like Beary Christmas) to the scene for a festive holiday card in the nighttime forest! I added sentiments using the stamps from the Oct. Home for the Holidays Paper Pumpkin Kit, and there will probably be more coming in the Warm Wishes kit in November…
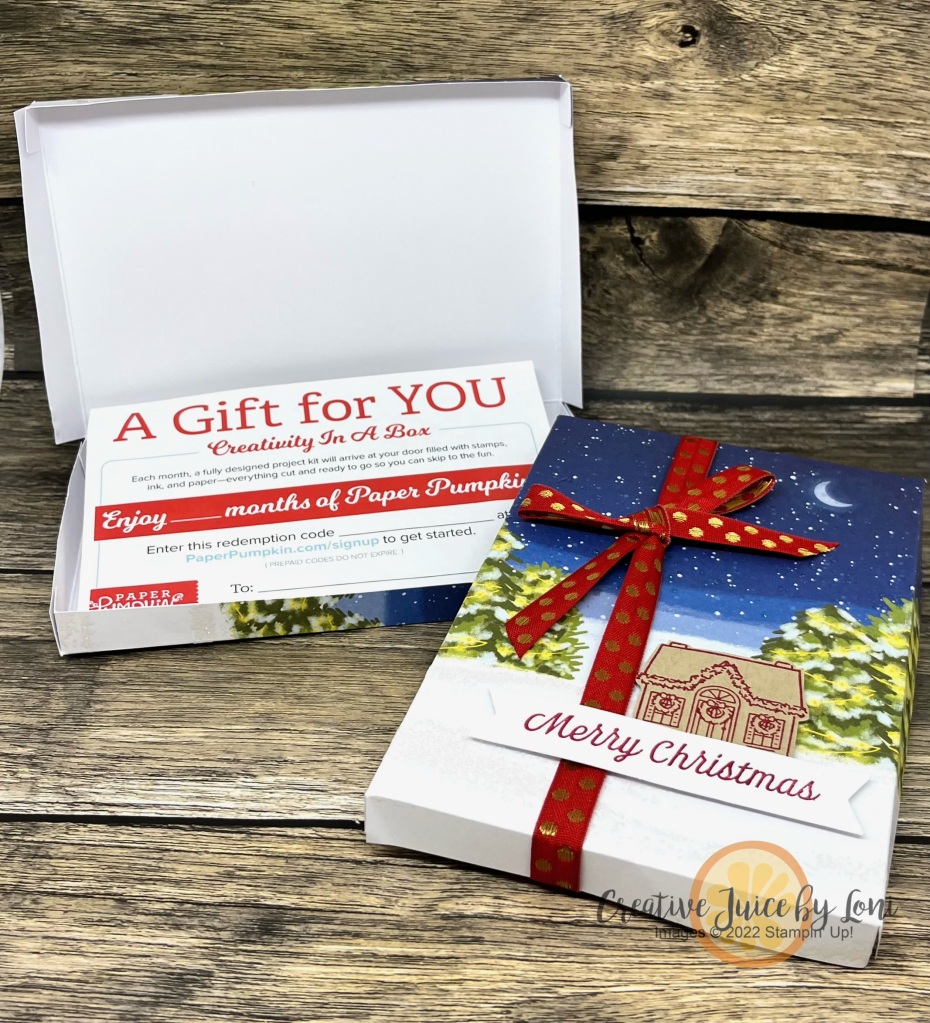
My creative friends voted on Facebook and 90% of them prefer an EXPERIENCE over a tangible gift. Good News! You can gift Paper Pumpkin subscription (which is both tangible AND an experience) to a friend with a 1-, 3-, 6- or 12-month pre-paid craft box to their mail box each month!
When the receipt is emailed to you, it includes a printable Gift Certificate you can dress up in a BOX made from the Warm Wishes Cards (or you can just forward the email to your friend and follow up to make sure they redeem the gift):
All of these projects were demonstrated in my Live Video today:
REMEMBER: The Warm Wishes Cards & Envelopes Add-On package are available WHILE SUPPLIES LAST and are ONLY available to Paper Pumpkin Subscribers, so SUBSCRIBE NOW!
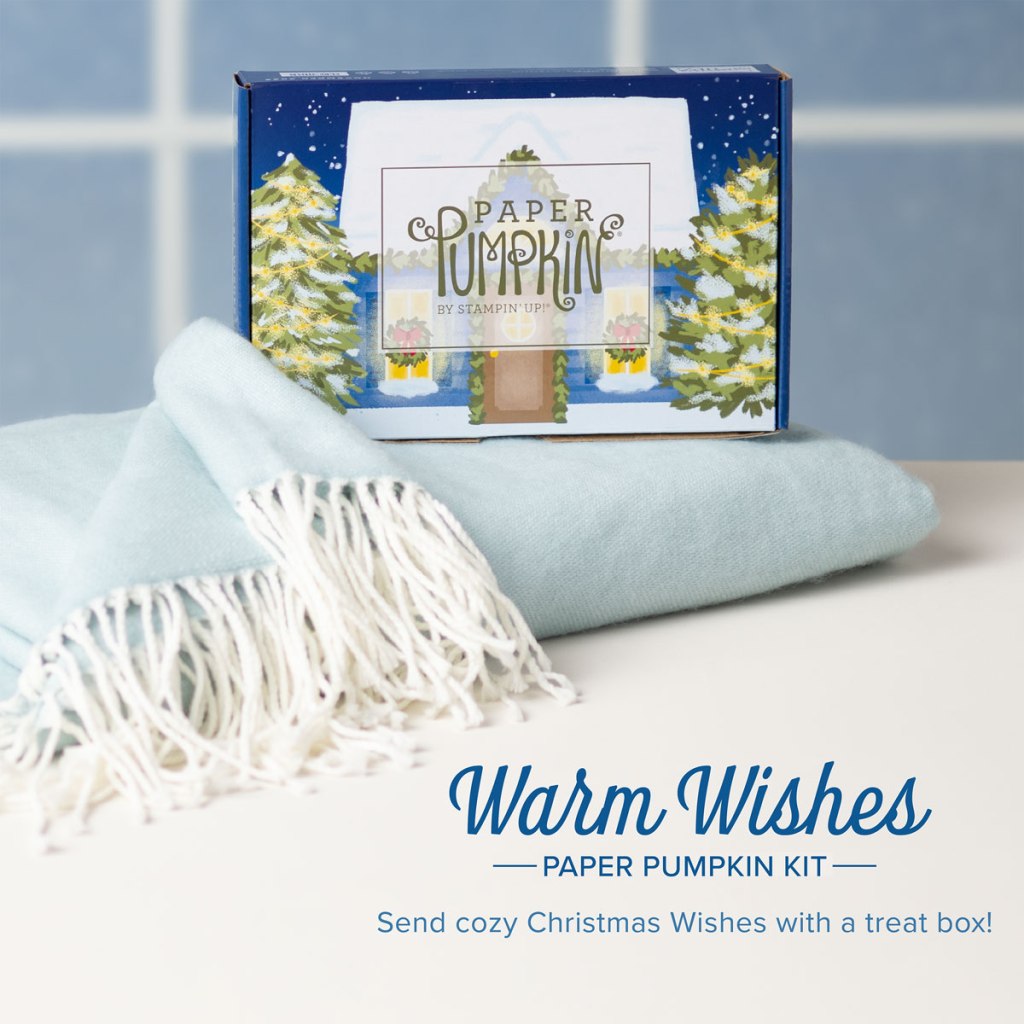
I do expect them to sell out, so get yours QUICKLY, then you can enjoy using them with the November 2023 Warm Wishes kit as well:
The Warm WIshes kit will create 8 treat packaging boxes (4 each of 2 different designs), 1 Mossy Meadow ink spot, 8 clear food-safe bags, linen thread and a photopolymer stamp set.
Need paper crafting ideas? Look no further than any Stampin’ Up! catalog!
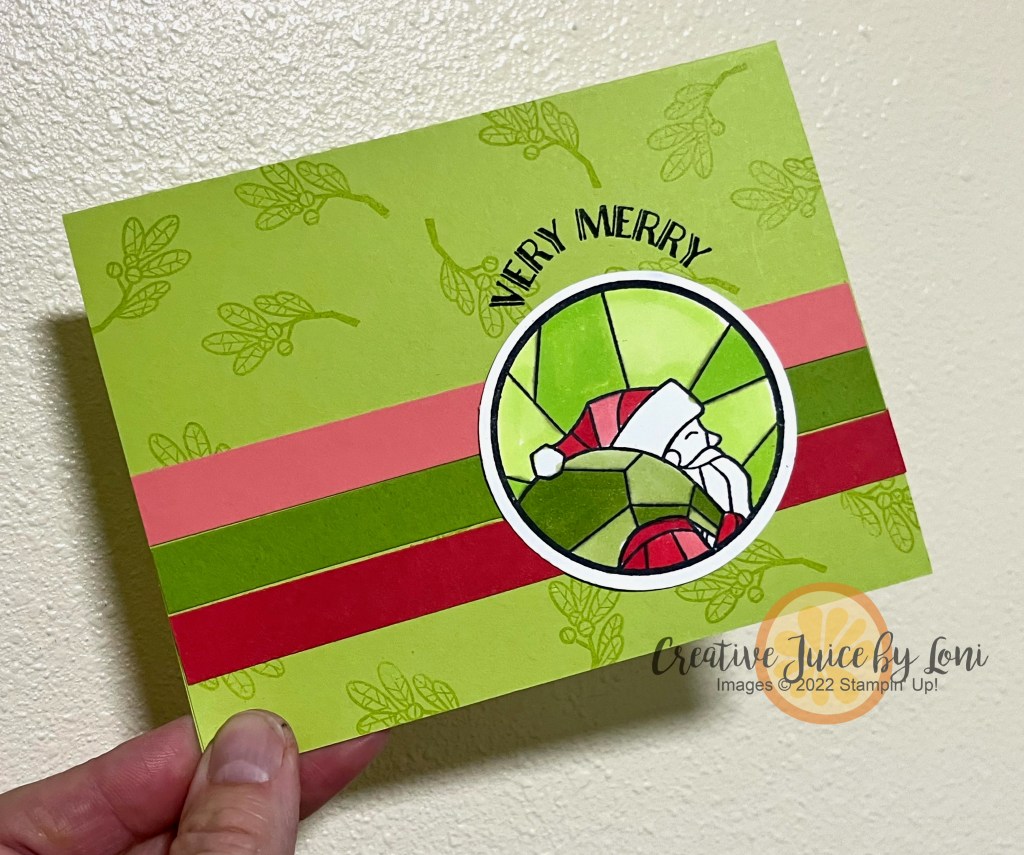
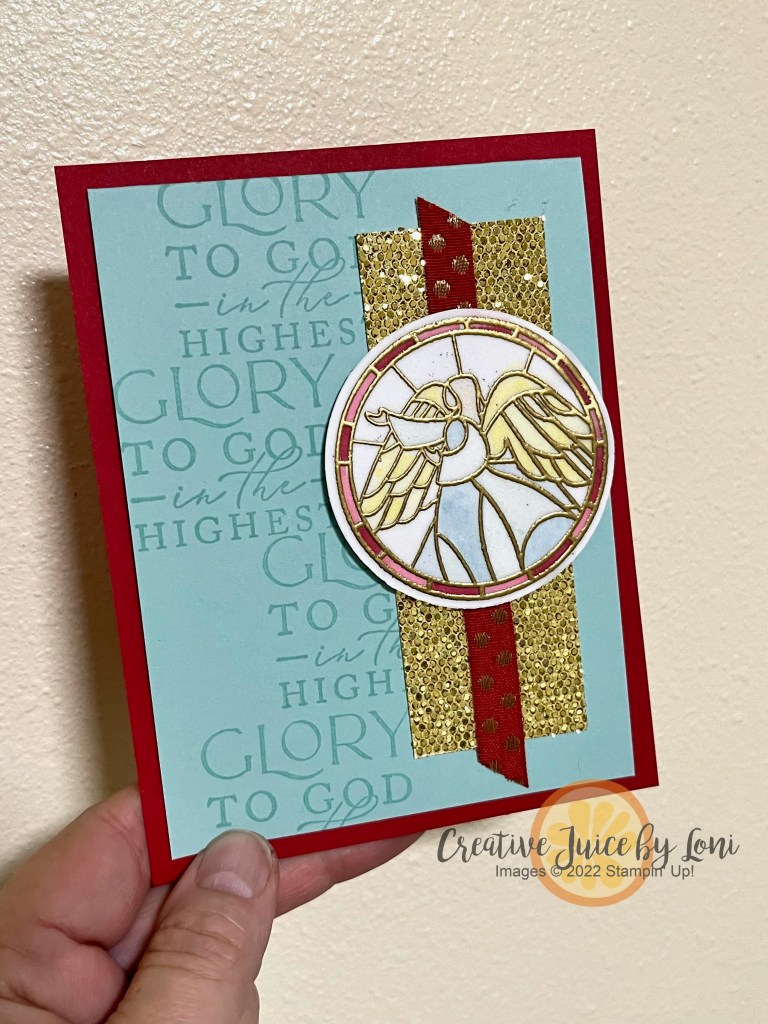
In today’s live video, I demonstrated how to use the So Very Merry stamp set to re-create cards made with the Circle Sayings bundle (if you have one, you *need* the other!).
The card on the left is found on page 147 of the annual catalog and the card on the right is the one I stamped:
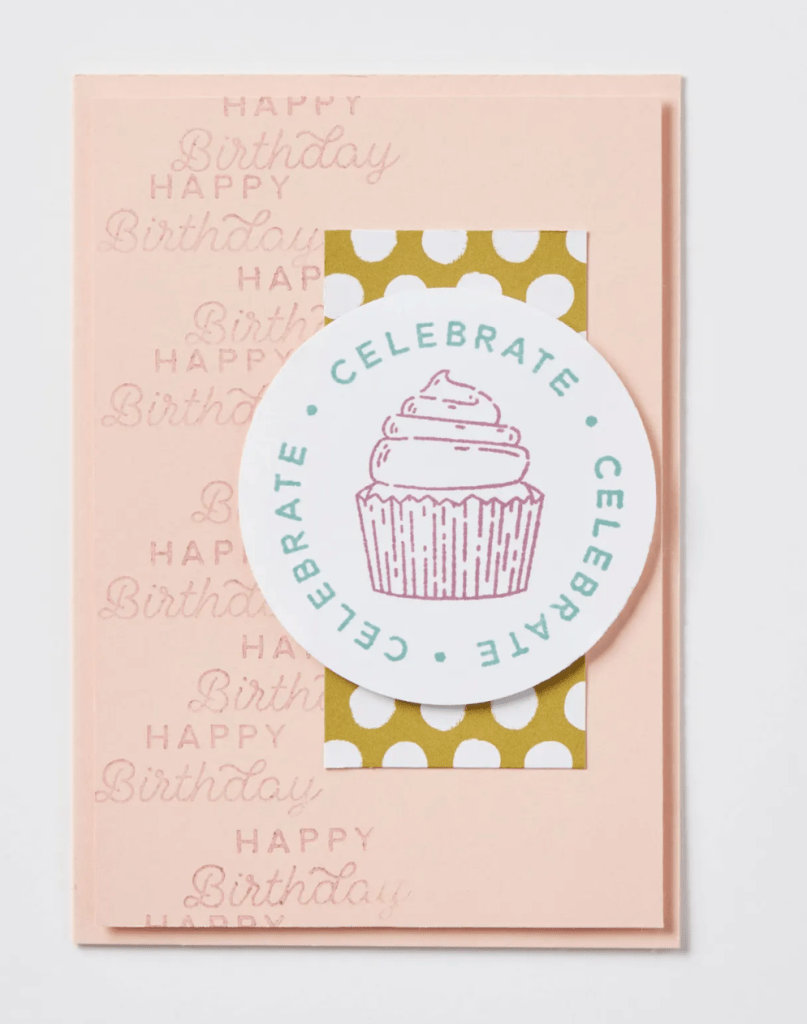
Let me show another example. Card on left from catalog, card on right I created to show you how well these two sets interchange!
In my Angel version of the cupcake card from the catalog, the More Dazzle paper is truly heavenly, and I embossed the angel image on Vellum cardstock in gold embossing powder, then colored it from the back with Stampin’ Blends markers. TIP: To adhere the vellum to the white background, lightly sponge liquid glue to the back of the vellum for a no-show adhesive.
With two days left of our 35th Anniversary Starter Kit promotion, you may consider getting the starter kit for 35% off -OR- choosing 35% more in the starter kit ($168.75 product value) for the regular price of $99…and if you don’t know what to choose, these two interchangeable sets/bundles are a good place to begin, plus you can copy the cards I showed! More Starter Kit suggestions in the video:
Happy you stopped by! Have you ever copied an idea from the catalog and put your own “stamp” on it?


")

 Designer Series Paper")


 Designer Series Paper")
")


")
 Designer Series Paper")


 Circle Punch")
 Circle Punch")


 Designer Series Paper")
 Cardstock")
 Glittered Ribbon")
")
")
 Specialty Paper")


")
 Specialty Designer Series Paper")


")
")


 Dotted Ribbon")
 Satin Edged Ribbon")