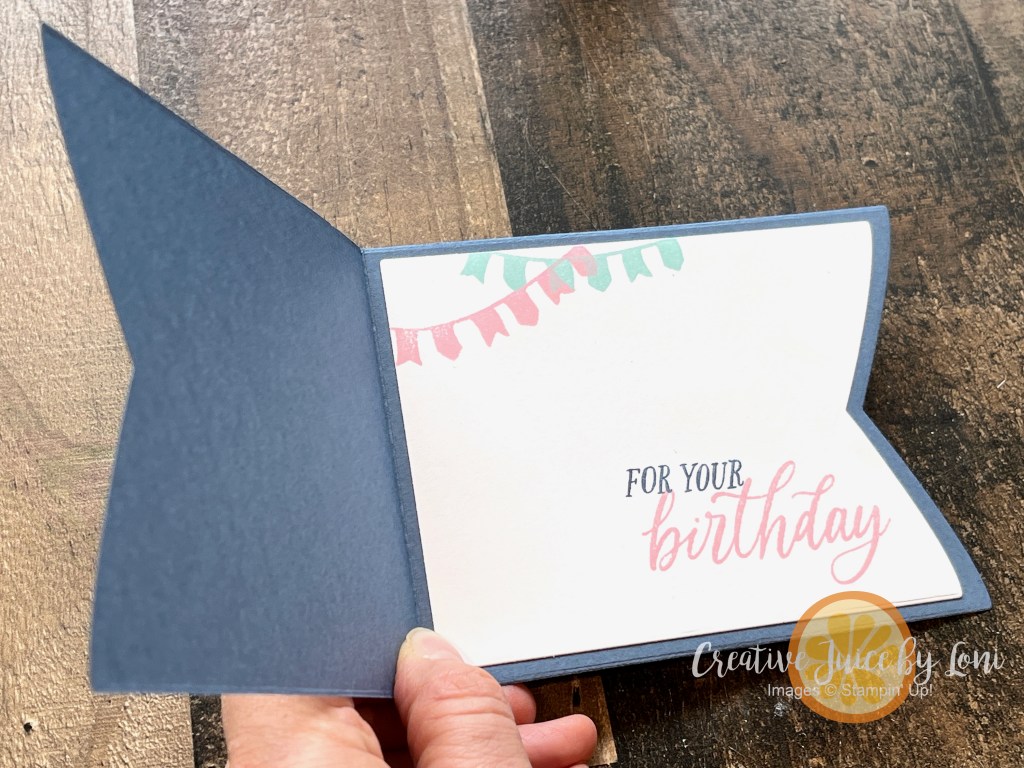
Having a “banner” month, as I’ve been playing with the new Party Banners Dies from Stampin’ Up!®
Since I’m traveling today, I don’t have a video for you, but I DO HAVE a tutorial you can print out for making this birthday cake card – and YES, it fits into an A2 envelope like the Medium Basic White Envelopes in my Stampin’ Store (which you always want to have on hand for your creations)!
Sometimes you have to invest in your hobby, and when you are ready to do so, may I suggest the Stampin’ Up! Party Banners Dies and Party Alphabet Dies? You’ll save 10% when you bundle them together in one purchase, and, as I mention in the instructional video below, you can claim them as “exercise equipment” 😅
A shaped card is as fun to create as it is to receive! The 5th largest banner die is just about 5.5″ x 4.25″, so these cards fit into the basic white Medium Envelopes:
We made the Pretty Peacock version (left) in the live crafting video, then when we were done, I looked at it and realized that the Damask Designs Embossing folder probably needed to be turned vertically, so created a second with the “Thanks” from a previous Paper Pumpkin kit Add-On die set called “Thanks & Beyond” (shoutout to my PP Craft Kit subscribers!).
This week is high school graduation in southern Utah, and I’m still making cards for grads! This Shy Shamrock card is the banner turned sideways, with letters cut from 2024-2026 In Color Glimmer Paper, and the lock/key/sentiments from Tags to Go.
Finally (for today, at least), I demonstrated this slimline card to remind you of the Eclipse Technique with alphabet dies:
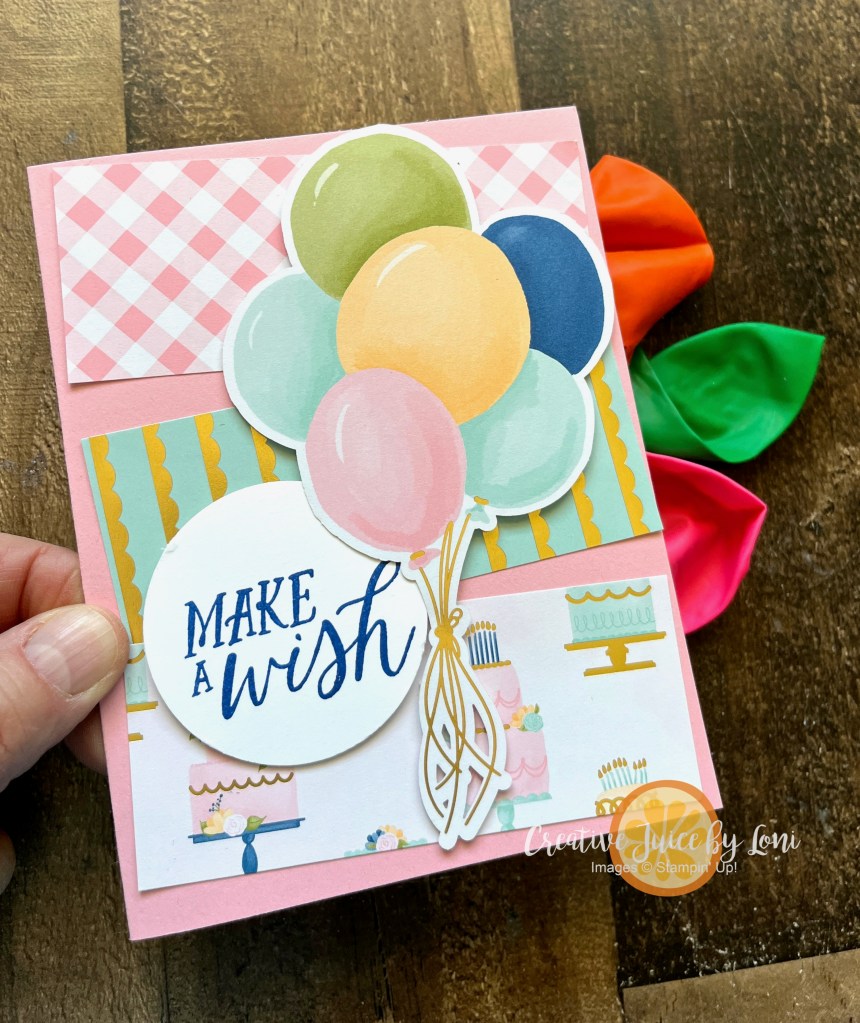
A card for any cake-consumption celebration!
Learn how to make all these banner-themed cards in this video:
If I’ve inspired you to add the Party Die bundle to your list, please shop in my Stampin’ Store!
Better yet…choose these dies as part of a Starter Kit and only pay $99! The other perks of being a demonstrator are even better than the discount: A community of friendly crafters, the opportunity to create a business you love – or a hobby that brings you purpose and passion.
Keep your creative juices flowing! 🍊- Loni Spendlove
A sketch is a springboard for creativity, and today I dove into creating cards from my stash of Designer Series Paper using this sketch:
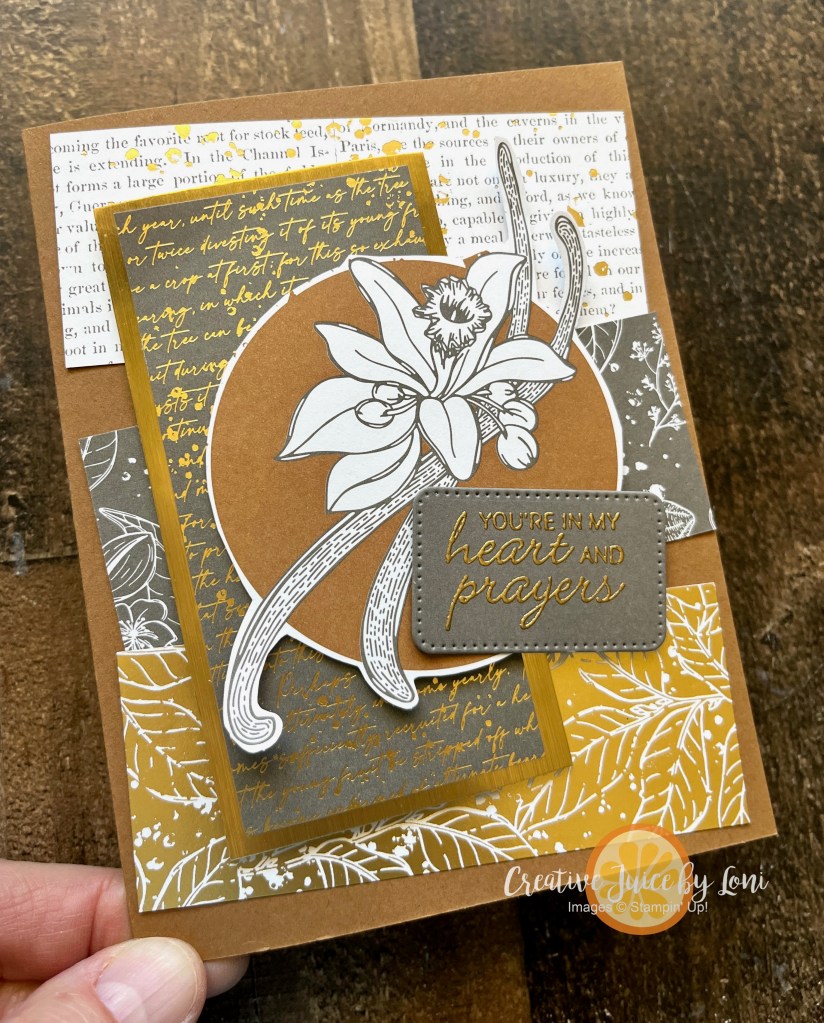
Card #1 was a sympathy card using some gilded botanical patterns that have been around Stampin’ Up! a long time, and I wanted to show it off! The Nature’s Sweetness Specialty Designer Series Paper only needed an embossed sentiment added to make this greeting card perfect:
You’ll notice that circle shapes draw the eye when used with rectangles!
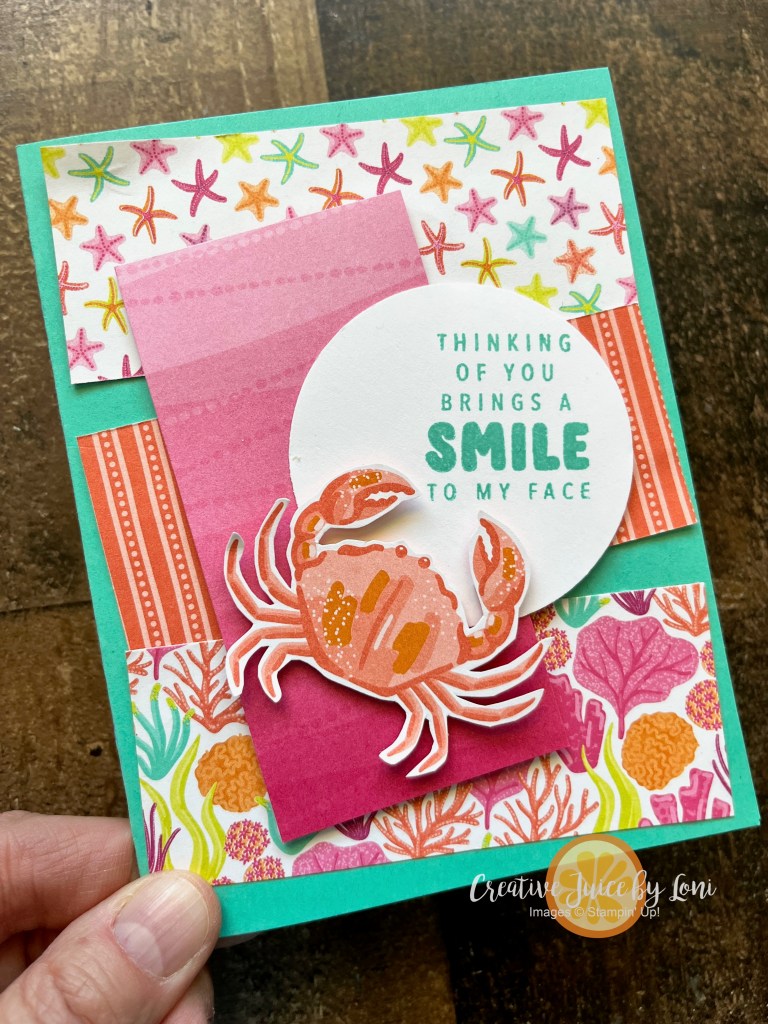
Card #3 brings us to another “mailable item” idea: BALLOONS!
In my demonstration video, I suggested blowing up a balloon and writing a message on it, then deflating it again to include inside the card. It’s double fun to have to blow it up to read the greeting! You could also “reveal” what experience you have planned to celebrate with (“I’ll pick you up for birthday lunch on me this Friday at noon!”) by writing it on the balloon.
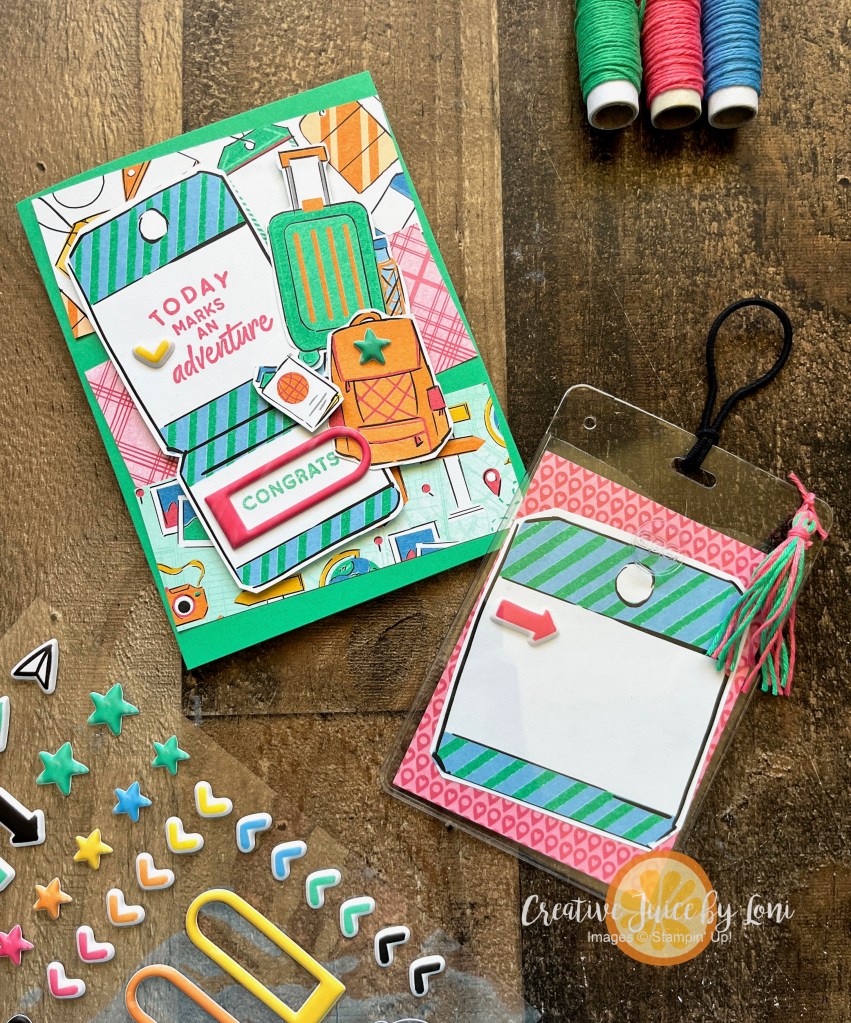
And finally, since Graduation season is imminent, Card #4 was created with the On the Go Suite Collection and includes a LUGGAGE TAG:
This will be for my niece who is graduating from High School this month and off on a grand European adventure to celebrate (remember when we were just happy to have cake & ice cream to mark a milestone like graduation 👩🎓 😂?)
I added the tassel after the demonstration in the video, and think the detail is adorable.
Missed the LONG LIST (and growing) OF MAILABLE GIFT ITEMS? Check it out HERE!
If you enjoy learning “how-to”, here’s today’s sketchy tutorial:
Thank you for choosing to shop with me. Most of the products used were linked throughout this post – just click on a product to add it to your cart…and watch for an exclusive tutorial bundle from me when you spend more than $50 in one month!
Connecting with you is a joy ~ Check out my upcoming events (in person AND online):
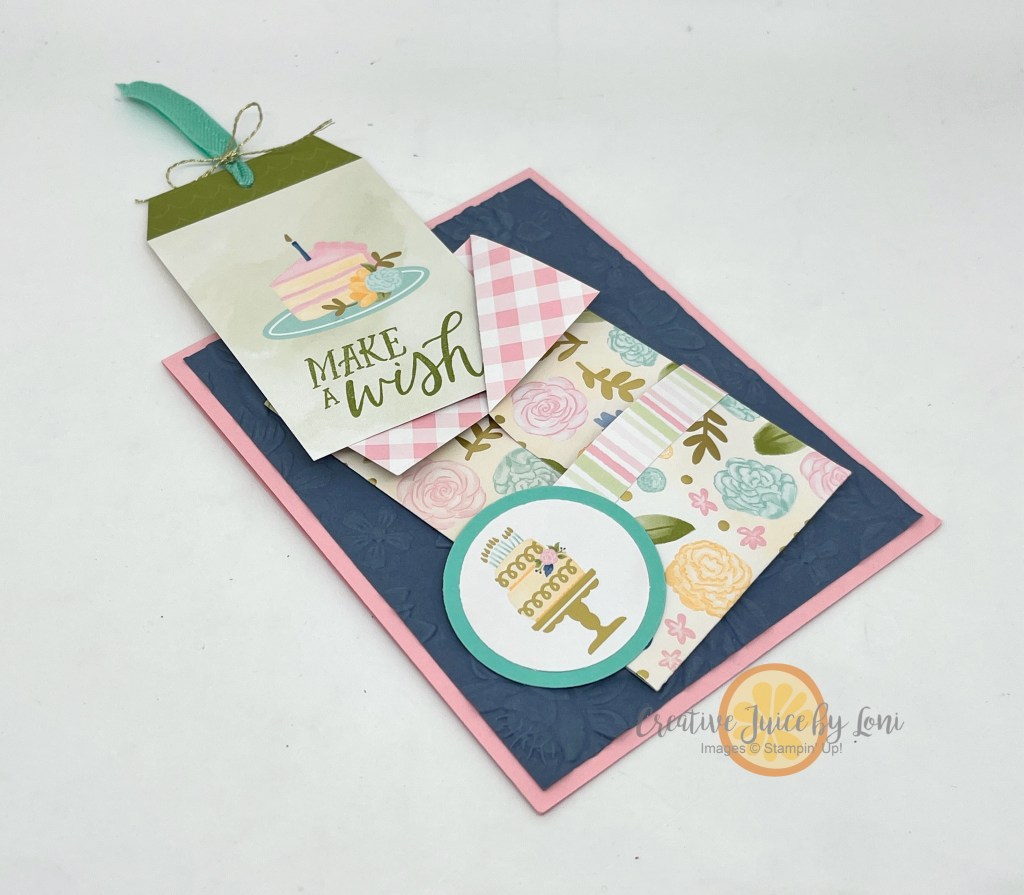
The month of March is a busy birthday month for my family, so you can expect to find a LOT of Birthday Inspo here for the next 4 weeks, starting with this fun pocket card, which fits one of the FIVE tags from the Designer Series Paper perfectly:
Yes, this is the SAME mini-loaded-envelope I created a few weeks ago using the Toadstool Gardens Designer Series Paper, and when I realized the tags fit perfectly, I had to make some birthday cards!
They come together quickly, and it would be easy to attach a gift card to the back of the tag with a strip of Stampin’ Seal! If you are handing it to the recipient in person, you could also slip a Ghiradelli square into the front pocket, as well.
Follow along with me in the video tutorial:
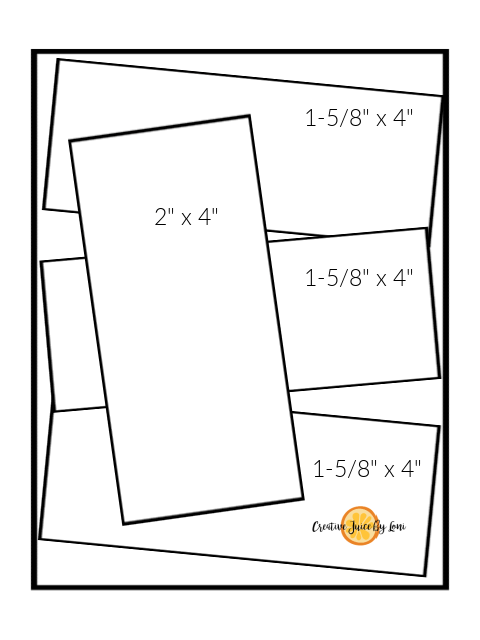
Instructions for POCKET: Start with a 6″ x 6″ piece of double-sided patterned paper, then score along two opposite sides at 1-5/8″. One the bottom, score at 1-7/8″. Fold paper in along both 1-5/8″ sides and on the top, fold out the corners in a “collar”, then adhere edges together in center. Next, fold up along 1-7/8″ score line and wrap a 1/2″ strip around the lower pocket edge (can adhere the lower pocket to the front, or along the sides, creating TWO smaller front pockets).
You really need to see this gorgeous paper in person to appreciate the gold foil accents, but here’s as close as I could get in a photo:
Thank you for purchasing the supplies from my Stampin’ Store to make your own~ watch for 30+ exclusive tutorials to be emailed to your inbox every month you order over $50 from my store AND a hand-stamped card to thank you for your business!
The best way to teach about which adhesive to use for paper crafting is to make a card, right?
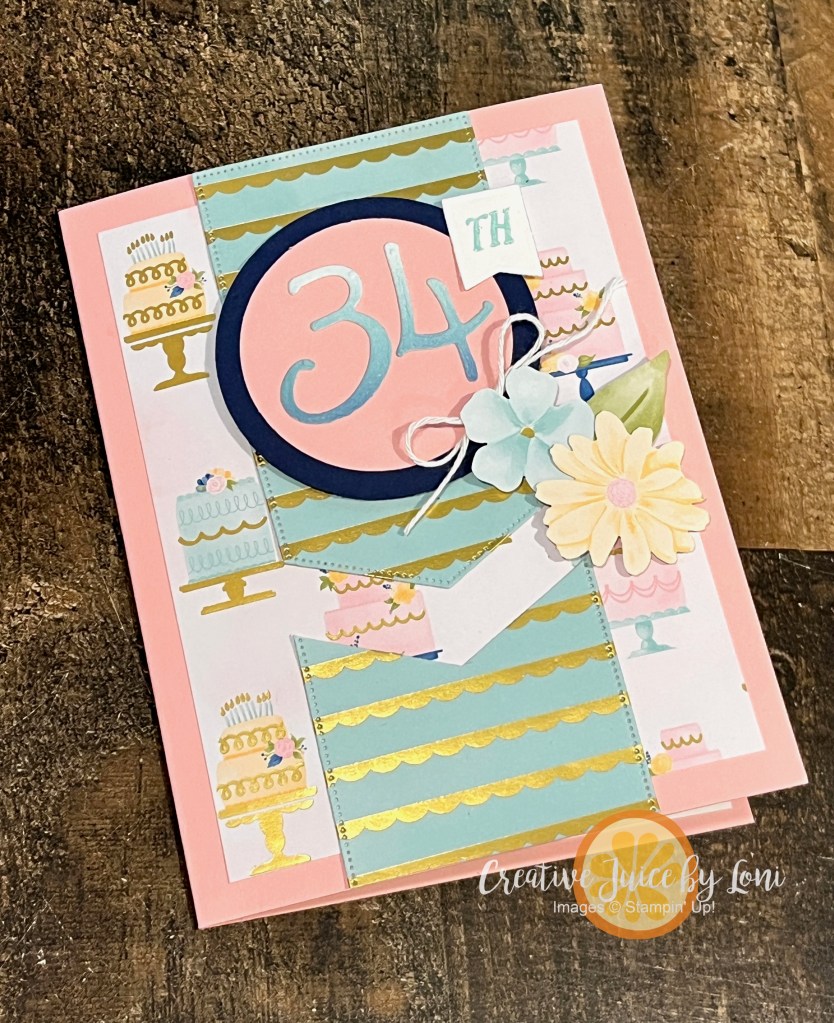
Since my daughter’s birthday is coming up, I had a reason to create an over-the-top greeting card to celebrate, and the Stampin’ Up! Wildflower Birthday Suite has all the cake and flowers that girl could want!
I’d love to see her face when she opens it and the three panels swing out!
Because there is ALWAYS a “right tool” for a job to make it easier and secure, there are also correct ADHESIVES for different parts of paper crafting. Adhering papers together? You can choose between Stampin’ Seal or Multipurpose Liquid Glue (your personal preference). Want something to pop off the page? That’s the job for Dimensionals! Need to attach a small embellishment or twine bow? Pick a Mini Glue Dot.
Learn more by watching the way this card comes together:
Some of the adhesives take time to master (I’m looking at YOU, Stampin’ Seal!), but once you practice and learn a few tips, you’ll have them mastered.
What’s YOUR go-to glue?? Which one do you still need help with? (Comments are found at the top of the post, under the date, and I really want to hear from you)
If this was a contest, you would have OVERWHELMINGLY voted for the Fault Line Cards as BEST OF SHOW! Since they have been such a hit, I wanted to try an EMBOSSED version, and they are just as show-stopping as the originals, just take a look (watch the video tutorial)…
The Happy Hibiscus bundle includes a photopolymer stamp set, hybrid embossing folder and coordinating dies. With all that divine coordination, it was a lovely choice for this project! This time I started with a 4.25″ x 9″ card base and pulled a white craft ink pad across the embossed Melon Mambo card stock to make the flowers pop.
Next, I used the Eyelet 3D embossing folder to create a background in hues of purple for a few toadstools (arriving January 7th- just in time to add to your cart and qualify for a free Sale-a-Bration product, like the embellishments on the card):
Watch this “How-To” tutorial for making Fault-Line cards of all types:
This version gives you one more look at one of the Designer Series Papers that will be included in the Paper Share (reserve your share by 1/7/25) and it’s called Wildflower Birthday, which is part of a suite of coordinating products in the Stampin’ Up! 2025 Jan-April mini catalog.
It is destined for one of my team members who has a birthday in January, and I know she’ll love it!


![Wildflower Birthday 12" X 12" (30.5 X 30.5 Cm) Specialty Designer Series Paper [ 164591 ]](https://assets1.tamsnetwork.com/images/EC042017NF/164591s.jpg "Wildflower Birthday 12\" X 12\" (30.5 X 30.5 Cm) Specialty Designer Series Paper [ 164591 ]")
![Birthday Celebration Photopolymer Stamp Set (English) [ 164592 ]](https://assets1.tamsnetwork.com/images/EC042017NF/164592s.jpg "Birthday Celebration Photopolymer Stamp Set (English) [ 164592 ]")
![Paper Trimmer [ 152392 ]](https://assets1.tamsnetwork.com/images/EC042017NF/152392s.jpg "Paper Trimmer [ 152392 ]")
![Pretty In Pink 8 1/2" X 11" Cardstock [ 163793 ]](https://assets1.tamsnetwork.com/images/EC042017NF/163793s.jpg "Pretty In Pink 8 1/2\" X 11\" Cardstock [ 163793 ]")
![Misty Moonlight 8-1/2" X 11" Cardstock [ 153081 ]](https://assets1.tamsnetwork.com/images/EC042017NF/153081s.jpg "Misty Moonlight 8-1/2\" X 11\" Cardstock [ 153081 ]")
![Coastal Cabana 8-1/2" X 11" Cardstock [ 131297 ]](https://assets1.tamsnetwork.com/images/EC042017NF/131297s.jpg "Coastal Cabana 8-1/2\" X 11\" Cardstock [ 131297 ]")
![Misty Moonlight Classic Stampin' Pad [ 153118 ]](https://assets1.tamsnetwork.com/images/EC042017NF/153118s.jpg "Misty Moonlight Classic Stampin' Pad [ 153118 ]")
![Pretty In Pink 3/8" (1 Cm) Bordered Ribbon [ 163784 ]](https://assets1.tamsnetwork.com/images/EC042017NF/163784s.jpg "Pretty In Pink 3/8\" (1 Cm) Bordered Ribbon [ 163784 ]")
![Gold Twisted Thread [ 164603 ]](https://assets1.tamsnetwork.com/images/EC042017NF/164603s.jpg "Gold Twisted Thread [ 164603 ]")
![1-3/4" (4.4 Cm) Circle Punch [ 119850 ]](https://assets1.tamsnetwork.com/images/EC042017NF/119850s.jpg "1-3/4\" (4.4 Cm) Circle Punch [ 119850 ]")
![Layered Florals 3 D Embossing Folder [ 162935 ]](https://assets1.tamsnetwork.com/images/EC042017NF/162935s.jpg "Layered Florals 3 D Embossing Folder [ 162935 ]")
![Stampin' Cut & Emboss Machine [ 149653 ]](https://assets1.tamsnetwork.com/images/EC042017NF/149653s.jpg "Stampin' Cut & Emboss Machine [ 149653 ]")
![Multipurpose Liquid Glue [ 110755 ]](https://assets1.tamsnetwork.com/images/EC042017NF/110755s.jpg "Multipurpose Liquid Glue [ 110755 ]")
![Stampin' Seal [ 152813 ]](https://assets1.tamsnetwork.com/images/EC042017NF/152813s.jpg "Stampin' Seal [ 152813 ]")
![Stampin' Dimensionals [ 104430 ]](https://assets1.tamsnetwork.com/images/EC042017NF/104430s.jpg "Stampin' Dimensionals [ 104430 ]")
![Mini Glue Dots [ 103683 ]](https://assets1.tamsnetwork.com/images/EC042017NF/103683s.jpg "Mini Glue Dots [ 103683 ]")
![Basic White Medium Envelopes [ 159236 ]](https://assets1.tamsnetwork.com/images/EC042017NF/159236s.jpg "Basic White Medium Envelopes [ 159236 ]")


![Wildflower Birthday Suite Collection (English) [ 164604 ]](https://assets1.tamsnetwork.com/images/EC042017NF/164604s.jpg "Wildflower Birthday Suite Collection (English) [ 164604 ]")
![Night Of Navy 8-1/2" X 11" Cardstock [ 100867 ]](https://assets1.tamsnetwork.com/images/EC042017NF/100867s.jpg "Night Of Navy 8-1/2\" X 11\" Cardstock [ 100867 ]")
![Basic White 8 1/2" X 11" Cardstock [ 159276 ]](https://assets1.tamsnetwork.com/images/EC042017NF/159276s.jpg "Basic White 8 1/2\" X 11\" Cardstock [ 159276 ]")
![Pool Party 8-1/2" X 11" Cardstock [ 122924 ]](https://assets1.tamsnetwork.com/images/EC042017NF/122924s.jpg "Pool Party 8-1/2\" X 11\" Cardstock [ 122924 ]")
![Soft Sea Foam 8-1/2" X 11" Cardstock [ 146988 ]](https://assets1.tamsnetwork.com/images/EC042017NF/146988s.jpg "Soft Sea Foam 8-1/2\" X 11\" Cardstock [ 146988 ]")
![Night Of Navy Classic Stampin' Pad [ 147110 ]](https://assets1.tamsnetwork.com/images/EC042017NF/147110s.jpg "Night Of Navy Classic Stampin' Pad [ 147110 ]")
![Pool Party Classic Stampin' Pad [ 147107 ]](https://assets1.tamsnetwork.com/images/EC042017NF/147107s.jpg "Pool Party Classic Stampin' Pad [ 147107 ]")
![Small Blending Brushes [ 160518 ]](https://assets1.tamsnetwork.com/images/EC042017NF/160518s.jpg "Small Blending Brushes [ 160518 ]")
![2" (5.1 Cm) Circle Punch [ 133782 ]](https://assets1.tamsnetwork.com/images/EC042017NF/133782s.jpg "2\" (5.1 Cm) Circle Punch [ 133782 ]")
![2 3/8" (6 Cm) Circle Punch [ 161354 ]](https://assets1.tamsnetwork.com/images/EC042017NF/161354s.jpg "2 3/8\" (6 Cm) Circle Punch [ 161354 ]")
![Mini Stampin' Cut & Emboss Machine [ 150673 ]](https://assets1.tamsnetwork.com/images/EC042017NF/150673s.jpg "Mini Stampin' Cut & Emboss Machine [ 150673 ]")
![Stampin' Seal+ [ 149699 ]](https://assets1.tamsnetwork.com/images/EC042017NF/149699s.jpg "Stampin' Seal+ [ 149699 ]")
![Adhesive Sheets [ 152334 ]](https://assets1.tamsnetwork.com/images/EC042017NF/152334s.jpg "Adhesive Sheets [ 152334 ]")
![Baker's Twine Essentials Pack [ 155475 ]](https://assets1.tamsnetwork.com/images/EC042017NF/155475s.jpg "Baker's Twine Essentials Pack [ 155475 ]")


")


