New at SU!- A Beary Cute Card Sketch

Welcome to all our Stampin’ friends from around the world to our October New at SU! blog hop where we are hoping you see how a SKETCH can get your creative juices flowing for card making. We’ll show you our version of the sketch…then YOU try it, too!

My card uses the Beary Cute bundle (stamp set + punch) and the Beary Christmas Designer Series Paper. Can you see how the card layout above was inspired by our card “sketch” below?

Don’t feel constrained to use the sketch in just one way. I turned it into landscape orientation for a second version, this time with a brown bear rather than a polar bear:

This landscape variation uses the same stamp set and punch with the “Walk in the Forest” Designer Series Paper, which is our MAKING A DIFFERENCE product. It coordinates with both the Beary Christmas suite AND the Merriest Trees bundle! For each package purchased in the USA*, Stampin’ Up! donates $3 to Marines Toys for Tots (*different amounts and charities are supported in different markets around the globe).

Even a simple card can have an unexpected bit of bling to catch the eye… each of my Beary Cute cards has a little sparkle! On the polar bear card, there is an gold star atop the tree (behind the sentiment) and on the brown bear card, it comes in the form of some glitter sequins (which are FLAT, so shouldn’t require extra postage) – both embellishments are included in the supply list below the Blog Hop links.

TIP: For the TREE with the brown bear, I turned my stamp upside down on my block and stamped off the Shaded Spruce ink one time before stamping the whole image over the dark details, like one of our Reversible stamp sets.

Have we inspired you to give this sketch a try? Tag us on social media with #newatsu so we can see your creativity!

If you haven’t seen all the other variations of this card sketch, click on any of our links for more inspiration:

October 2023 New at SU! Blog Hop: Sketch Challenge

Previous BlogNext Blog
1.iHeatCards2.bolgspot.com (US) – Magical Meadow
2.Joni in the Spotlight Stamping (US)-SKETCH CHALLENGE
3.My Flutterby Moments (US)- Garden Walk Sketch
4.De Kijkkast (NL) – Sketch with Winter Owls
5.Scraphexe (DE) – Sketch – Joy of Christmas | Fröhlich und Festlich
6.Playing with Papercrafting (CA) – Joy of Christmas
7.Stamping Flair (AU) – Translucent Florals with Delightful Floral DSP
8.The Joy of Stampin’ with Rachael (US)- Layering Leaves
9.Tricia’s Stamping Creations (US) – Heartfelt Hexagon
10.Nature’s INKspirations (US) – Wishes All Around
11.Carterie Plus (CA)- Créer une carte utilisant un Sketch
12.Stampinxime (DE) – Sketch Challenge
13.Creative Juice by Loni (US)- A Berry Cute Card Sketch
14.24-7 Inkspiration (US) – Merriest Trees

Powered by blogcarousel.com

Product List

4 Backgrounds from 6×6 Paper: Corner Angle Layer Card

BREAKING NEWS: FREE SHIPPING day just announced! Set an alarm for Wednesday, June 21st and earn free shipping on your orders over $75 that day only!

Paper crafters pride themselves on using scraps, so when we find a way to NOT WASTE A PIECE of pretty paper, we must give it a try!

I appreciated this idea from fellow demonstrator Rachel Tessman, and with the Glorious Gingham Designer Series Paper ON SALE through June, knew it was time to share it with you! It’s a fabulous way to get 4 angled corner backgrounds from one 6″ x 6″ piece of Designer Series Paper, and you’ll love how simple it is.

Lay a ruler down and mark 1-1/2″ on each bottom right corner as you rotate the paper 90-degrees four times. Mark it on the BACK SIDE of the paper you want to use, then you don’t have to worry about erasing lines! Then connect the marks across from each other like this:

Use your Paper Trimmer to cut along each of your lines and you’ll have 4 angled pieces to put in the corners of your card fronts:

My card base is Thick Basic White Card stock: 5-1/2″ x 8-1/2″, scored in half at 4-1/4″

Pretty Peacock card stock: 5-1/8″ x 3-7/8″

Basic White card stock: 5″ x 3-3/4″

I used the So Refreshing Bundle to complete my cards, and here’s a video to watch & learn how to:

Filled my pitcher with “water” and stuck in the flowers:

Let me know if you try it, or share your version in my Creative Corner Facebook Group for my V.I.C.’s (Very Important Crafters). Now turn up the alarm to remind you to order on Free Shipping Day and add these supplies to your cart:

Product List

Circling Round to Monochromatic Colors (Plus 3 for FREE)

It’s been fun to teach color theory in May and I really hope you’ve learned some skills to help you choose palettes for your paper crafting and rubber stamping projects! Today, I “circled around” to MONOCHROMATIC schemes, which isn’t limited to only one color, but can include 2 or 3 variations of the same HUE. Here are a few examples:

Stampin’ Up! yellows are a exquisite example of how 3 different tints, tones or shades can harmonize well: Crushed Curry (card base), Daffodil Delight (sentiment and banner) and NEW Lemon Lolly (focal point) are different depths of the same sunny color and coordinate together!

We have a variety of purples, and not all of them start in the same corner of the color wheel, so this is where you need to learn to “see” harmonizing colors. The three I used for this card were Gorgeous Grape (card base), Highland Heather (larger banner and cupcake frosting) and Fresh Freesia (background and cupcake liner).

The tutorial for this card style includes further explanation:

I chose to use the Circle Sayings Bundle for our lesson on monochromatic color ideas because I have an exclusive opportunity through June 15th for you: Purchase the bundle from my Stampin’ Store and you’ll receive 3 never-seen project tutorials PLUS the consumable supplies to create all three projects! You’ll get the tutorials via email and the supplies in the mail by June 30th.

Let me share a few additional Stampin’ Up! color trios that work well as monochromatic combinations. These are NOT all the possible pairings, only a few I came up with to get your juices flowing:

Now it’s your turn to give a “monochromatic” card a try!

Product List

Inside the cards:

Fence Me In: A Split-Front Card

Split-front cards are trending in paper crafting, and the Sending Smiles bundle makes today’s card a sunny one!

I’d been seeing these pretty cards and knew it was time to jump in, so today I taught you how with a video. Will you try this unique style of a split-front card?

The Sending Smiles stamps and Sending Dies WILL be carrying over to the 2023-2024 catalog in May, but they won’t be bundled together with a discount, as they are now!

Have a ball making your own Fence-Post cards! Here are the supplies you need for this version:

Product List

If you are wanting the best deal to gain CREATIVE CONFIDENCE, add $125 worth of these items to a STARTER KIT (and only pay $99)…then you’ll be part of my Sprinkled Ink team and connected to other creative people sharing what they love! It’s my job to help you learn and grow your business, and we’ll have a fun time doing it together.

Vellum Overlay Ladybug Birthday Card

I challenged my Sprinkled Ink team to use Vellum this month, and what kind of leader would I be if I didn’t do what I asked them to do? So it was delightful when Friday’s TGIF challenge went right along with it! Plus, I got to pull out my Ladybug builder punch to create Polished Pink bugs for a birthday card, so who wouldn’t have fun with that?

Have you played with the Vellum Basics Specialty Designer Series Paper? With SIX 12″x12″ pieces of printed vellum – 2 each of stripes, polka dots, and this pretty leafy vine that I used – it’s gives a soft layer of texture, which I enhanced by heat-embossing the blossoms on top of:

While I stamped and punched out the ladybugs for the Polished Pink version of the card, you can also just use the Ladybug Builder punch to punch the pieces out and stamp the polka-dots on the wings, as in the Real Red version-

You’ll have such an enjoyable time putting together these cards, and remember to order some Brushed Brass Butterfly embellishments to include inside your card as the birthday gift!

Here’s a step-by-step video to make it easy for you – simply pause the video and collect the pieces you need to create along with me.

Click the links to add the supplies you’ll need to your cart (Stitched Rectangle dies and Cut & Emboss machine are optional):

Product List

THE BEST DEAL is always the Starter Kit!! Add $125 of the products you want to your Starter Kit and only pay $99…PLUS, save every time you shop, and be a part of my fabulous Sprinkled Ink team of Stampin’ Up! demonstrators. It’s a WIN/WIN opportuntiy!

Grapefruit Easel Thank-You Card

When you are so grateful for someone you could just SQUEEZE them tight, here’s your card!

The Sweet Citrus stamps can become anything (oranges, lemons, limes and even coconuts!) so this time I used Mango Melody and Flirty Flamingo to turn them into GRAPEFRUIT.

But the best thing about this card is that it’s an EASEL card when you open it and stand the front up against the slice inside:

It’s a simple fancy fold: The card base is an 11″ x 4-1/4″ piece of Mango Melody card stock scored at 2-3/4″ and 5-1/2″, plus you’ll need another 4-1/4″ x 5-1/2″ piece of Mango Melody to adhere to the bottom half of the front of the card ONLY (below where it bends) to create the part that stands up. Then just decorate the front panel as desired.

Inside, you’ll need a piece of fruit to create a “stop” for the easel front to rest against. I used a slice of grapefruit popped up on a few dimensionals:

It’s a very easy card to make and yet it packs a (grapefruit) PUNCH!

Product List

Thanks for visiting my website and choosing me to serve your creative needs. Your support means so much to me!

Here’s a bonus for reading to the end: I also made this card with the Beautifully Happy set from Sale-a-Bration (last month), just to show how versatile this style of card is.

Peek-a-Boo Pocket Card

Every crafter loves the feeling of using up *every*scrap* of pretty paper. It’s a magical feat of unparalleled proportions! That’s how I feel today, after successfully finishing off a whole pack of Favored Flowers Designer Series Paper from Sale-a-Bration.

After using up a bunch of this pretty paper for cards to swap at StampFest, I had just a few long strips and edges left that seemed a shame to waste, so I came up with the Peek-a-Boo Pocket card:

Starting with a Basic White Envelope, I cut off one end to create a pocket, then punched a shape for my greeting to peek out of. To finish it off, I embellished with pieces fussy cut from the Designer Series Paper. I demonstrated this for my Monday Lunchtime Live project today:

While the Favored Flowers paper is only available through February 28, 2023 as a free gift option with qualifying order, you could create the Peek-a-Boo Pocket with any Designer Series Paper and punch, like I did with the Hues of Happiness and Heart Punch:

Try this in your craft room and you’ll feel fancy, fast!

Product List

PSSST! Sale-a-Bration ENDS TOMORROW, FEBRUARY 28th! Click below to shop & earn today!

Cute as a Carrot Could Be

Have you earned free products from Sale-a-Bration yet? Today’s project features two SAB exclusives: the Thanks a Bunch stamp set (free choice with a $50 order) and the Dandy Designs Designer Series Paper (free choice with a $100 order). The card design would work beautifully with other stamps and supplies as well.

If you count ink on your fingers, then I am a green-thumb…and these carrots prove it, right?

Here’s a quick video tutorial:

Along with the special products created just for this time of the year, SU! has released MORE products you could choose from our current offerings as free products with qualifying orders through February 28, 2023:

Product List

Scottie Dog Loves You- Simple to Stepped Up

Woof! means “Welcome” to the October New at SU! Blog Hop. We really stretched our creativity to bring you not one, but THREE projects this month~ all using the same stamps, but ranging from simple to sensational!

Perhaps you are just starting to stamp, or you need an easy card in a hurry? Or you are ready to add a little “extra” to your card? Don’t worry, avid stampers, I’ve got something for you to make this card “over the top” too!

I’m using the Christmas Scottie bundle (stamps & punch) but with a non-holiday card concept…it could easily be adapted for a Christmas Card just by changing the colors and greeting.

Simple Card: 3″ x 5″ banner (use a 3″ x 1/2″ strip of the other side of the Designer Series Paper for the top), stamp and punch out dog, bow and add greeting. TIP: Remember to stamp your envelope(s) at the same time as you are stamping the card!

Step it up to a Casual Card: Add a 4″ x 5-1/2″ piece of Soft Suede Designer Series Paper to the card background, tie a ribbon around the top of the banner and emboss the greeting on Soft Suede. Tip: Add a 1/2″ wide piece of card stock punched with the Banners Pick-a-Punch behind the heat-embossed sentiment to make it look like a banner:

To step it up to an Avid Card: Score 1-1/4″ from the right edge of the card and fold it back. Add 1″ strips of Designer Series Paper to the flap and inside right edge of card and 2-3/4″ 5-1/4″ panels of Designer Series Paper and basic white card stock to front left side and inside card. Banner: 3-3/4″ x 3″ (DSP) and 3-1/4″ x 4″ Soft Suede. Add Iridescent Rhinestones.

TIP: Only adhere banner to the front flap so it can open like this:

Wherever you are on the Stamping Spectrum, you’ll discover multiple ways to keep it simple OR step it up at all these amazing posts along our October Hop…Pin your favorites to remember them!

Simple to Stepped Up: October New at SU! Hop

Powered by blogcarousel.com

Product List

Christmas Choo-Choo Card + October Announcements

This week’s TGIF Challenge #tgifc388 was a tricky one indeed! A card WITHOUT a sentiment?! Who does that?

I couldn’t even wrap my head around it, until I found a loophole: No sentiment…on the FRONT.

Inspired by a project my friend Sue designed for our Fall StampFest, I pulled out the SANTA EXPRESS suite and die cut images from the Designer Series Paper to follow my “train” of thought:

See? No sentiment! Even the signpost has stars instead of words.

But untie the top and extend it out and the rest of the idea follows:

NOW we are cooking with coal! Isn’t that adorable? The only thing I did stamp was the sentiment, then punched it out with the Label Me Lovely punch and attached them all with Stampin’ Dimensionals.

Some folks like to create cards without a sentiment on the front so they may add the appropriate words when they need to use it. For me, it’s like singing a familiar song and STOPPING just before the last word! The suspense just *hangs* in the air until the final note is sung.

Hopefully, this card meets the requirements AND finishes the last note, once opened. I’ve listed the supplies after the announcements.

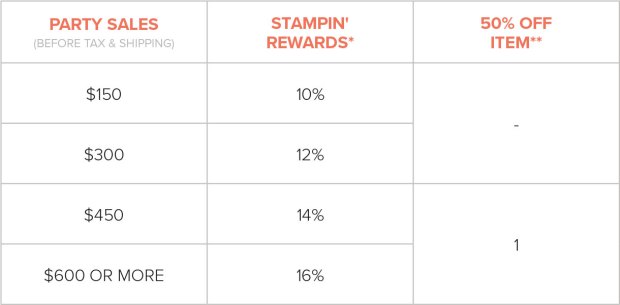
HEY! If you read all the way through on the day this post was published (Tuesday, October 4th), I’ve got one more surprise for you: FREE SHIPPING on orders over $75 today only! If your order is less than $150, enter host code XJM43JKB in your cart as you check out and you’ll be entered into my monthly host code drawing.

If you are ordering MORE than $150 dollars, you can be your own host and earn Stampin’ Rewards immediately:

I wouldn’t be doing my job if I didn’t let you know that there is also a fabulous Starter Kit offer in October: Choose $155 in products for just $99 (the starter kit always includes free shipping!): START HERE

Product List