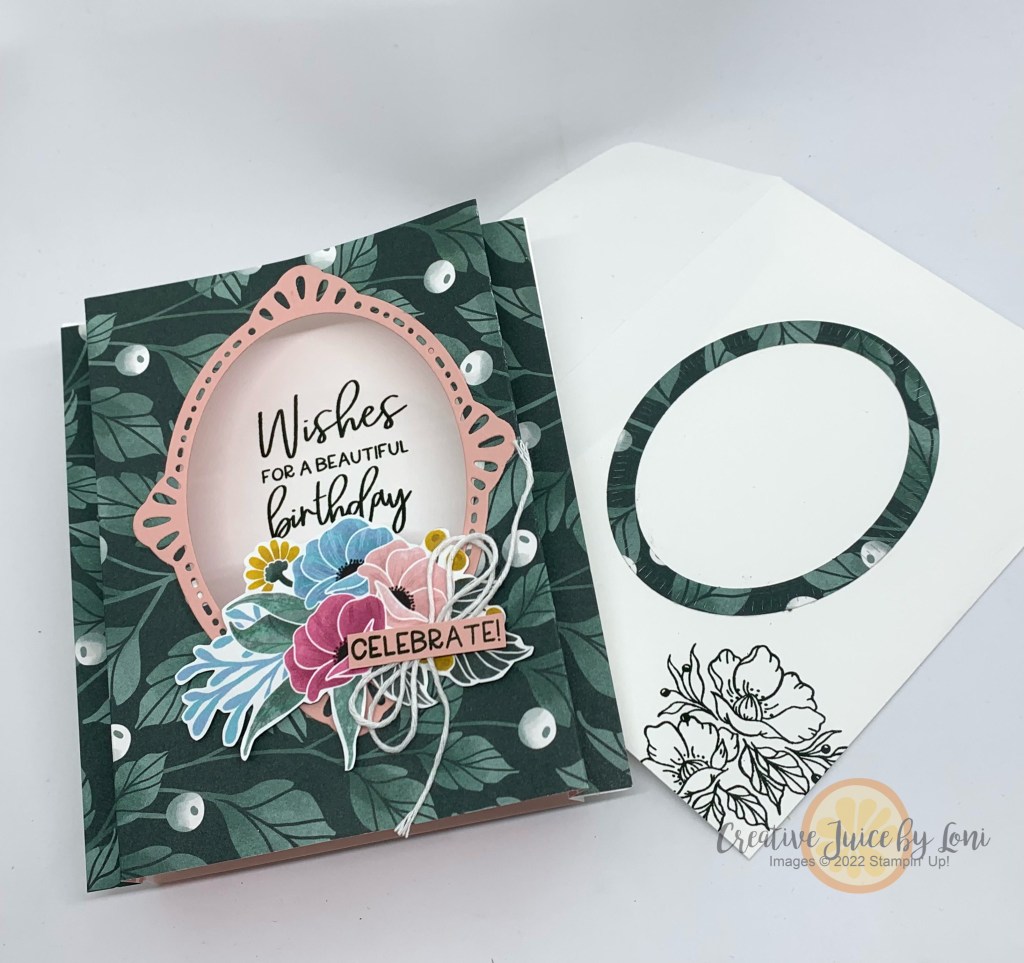
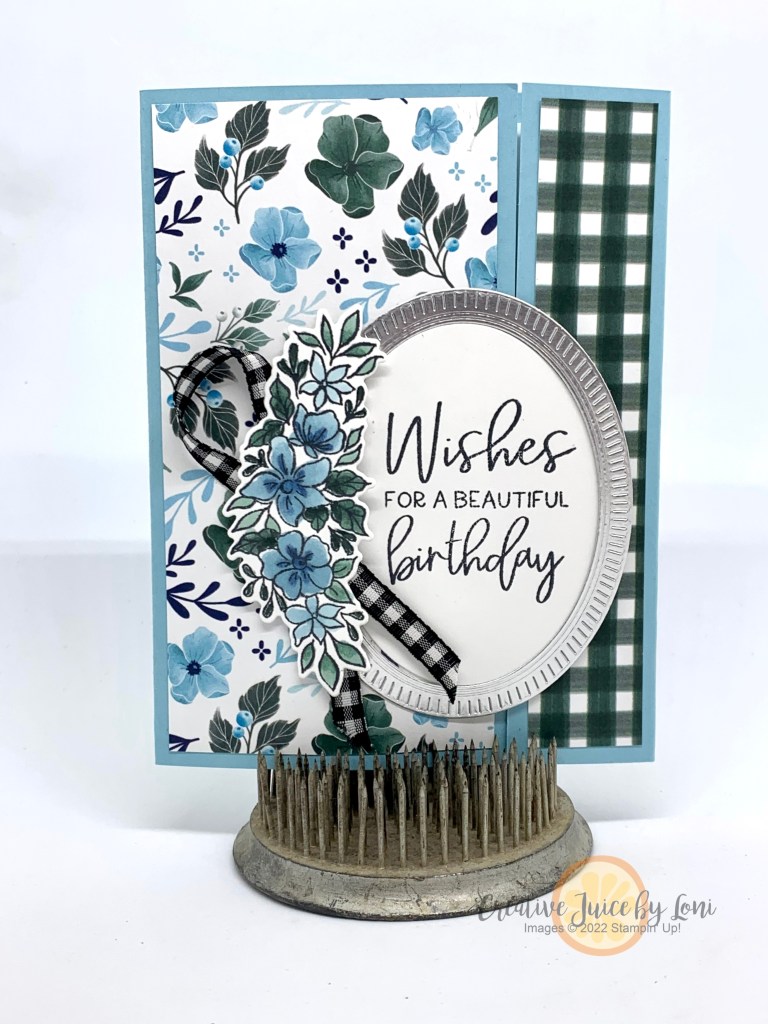
When you want to mail something a bit fancier than a regular birthday card, try this very versatile design: It folds flat to fit into an envelope, but pops open to stand up and the frame makes it feel like a piece of art:
It’s simple to create and I made the video to help you step-by-step:
Just push in the folded sides to slide it into an envelope:
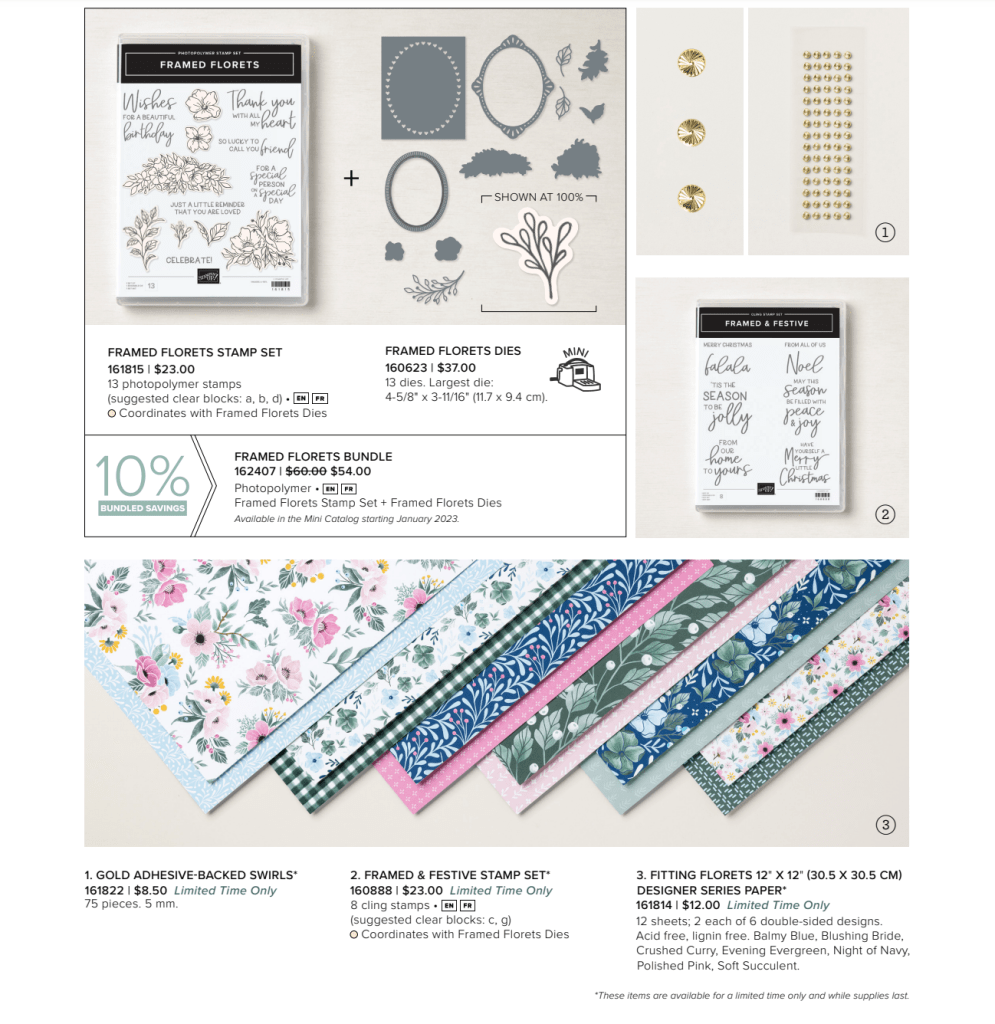
While the Framed Florets bundle (stamps and dies) are also in the Stampin’ Up! 2023 January-April Mini Catalog which goes live for customers on January 5th, THE BEAUTIFUL Designer Series Paper is a preview exclusive only through January 4th, so DON’T MISS IT.
Do you ever get overwhelmed with all the options in your craft room? This quote, which I heard on a podcast recently, really resonated with me, and for crafters, it’s GOOD ADVICE:
“Creativity THRIVES on LIMITATIONS” – Sarah Jane Wright
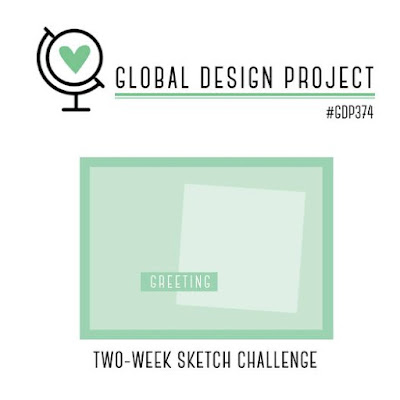
It got me thinking about what helps me to be creative, and she was correct: When I have parameters to work within, I’m always more productive and imaginative! For instance, a card sketch is a limitation:
A sketch constrains you to stay within the prescribed boundaries, with a few options for making it your own, as I did by twisting the background for the Global Design Project sketch #gdp374 a bit for my card:
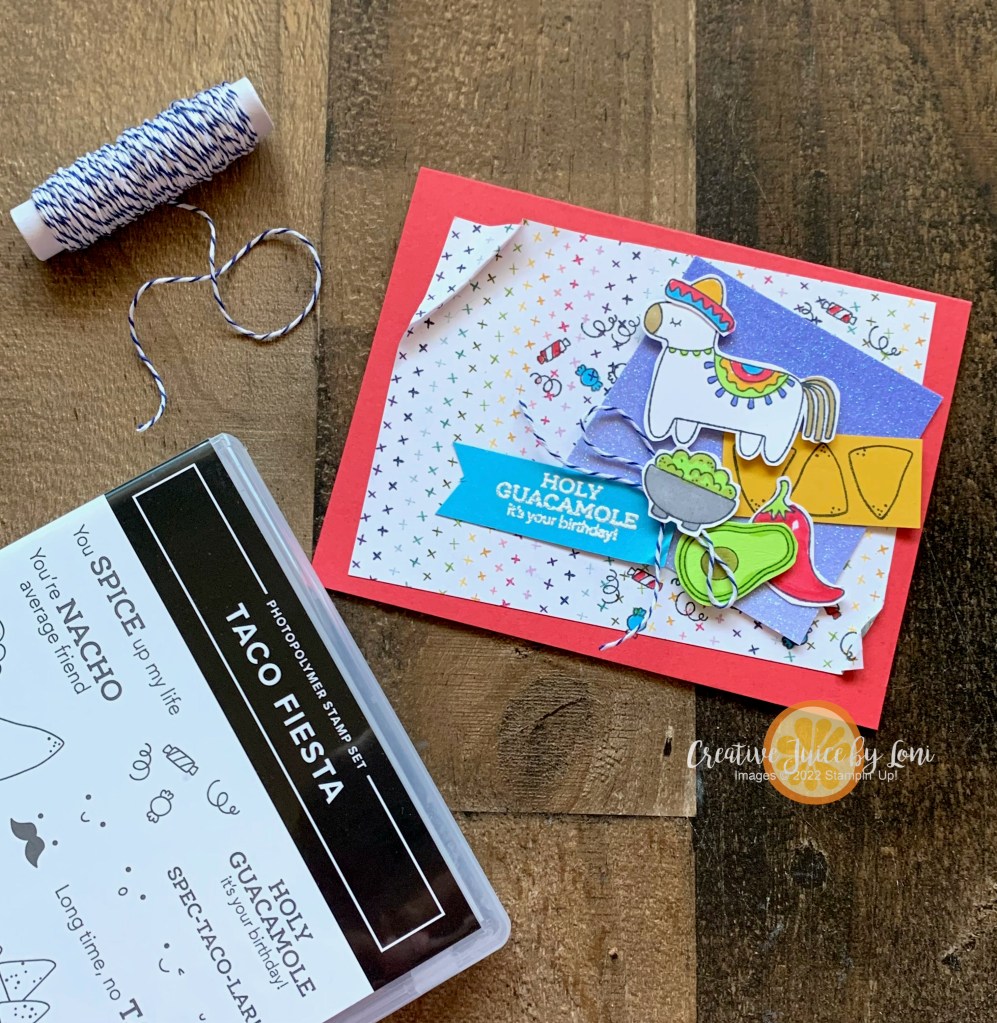
I also “limited” myself to (mostly) the 2022-2024 In Colors as my color palette. It seemed the best choice for a FIESTA!
I “sprinkled” the images from the Taco Fiesta stamp set (item #167032, available 1/5/2023) across the glimmer paper 2-3/4″ square to capture the feeling of a party (with chips & guac). You can watch the creation of the card in my video replay:
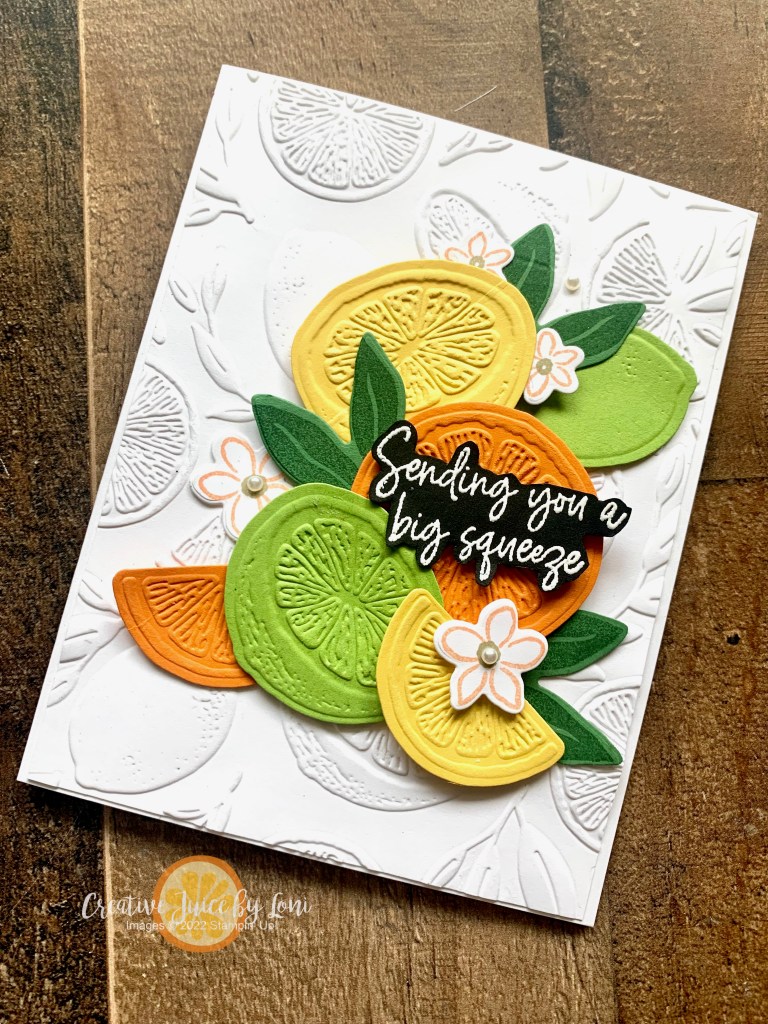
You’re up to your neck in Christmas, but what is Christmas without an orange in the stocking? Or in this instance, a whole case of citrus fruit?
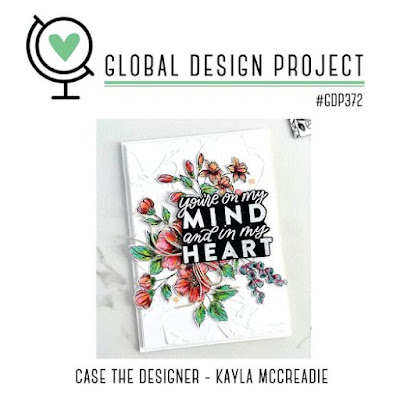
This was another situation where the inspiration woke me up early to create a card! The Global Design Project #gdp372 challenge was to CASE (Copy and Selectively Edit) a project by Kayla McCreadie:
I reached for my new signature stamp set (coming in the January 2023 Mini catalog!) SWEET CITRUS:
With a coordinating Hybrid Embossing Folder and dies, I guarantee you are going to see a LOT of this set from me!
Lest you think it’s not timely for the holiday season, let me show you a Christmas card I showed in yesterday’s live video: This one features a sentiment from the Cozy & Bright Kit currently available in my Stampin’ Store…and highly recommend you collect this kit before it’s gone, so you can use the sentiments from the kit with the Sweet Citrus bundle next year, plus, it’s a very easy kit to assemble and could still afford you time to send Christmas Cards this year.
In addition to the Sweet Citrus bundle (which will be available on January 5th…or you can join my team and order it now!), these are the supplies I used for the Christmas Card:
Have you ever wished you had a card on hand to lift the spirits of a friend? If you answered yes, let this one be the one you always have in your box!
These remind me of the “In case of emergency, break glass” cases: Sometimes acting like a grown up is difficult, and we all know CHOCOLATE helps. So you may need to break one of these open at any moment.
The cards are also the SWAPS I made for Stampin’ Up! OnStage Local. I’m headed to Anaheim this weekend for our annual convention (OnStage) and demonstrators always swap cards at events; make multiples of the same card and trade with other demonstrators so you have a wide variety of samples to inspire you when you get home!
Though they are simple, they are certainly SWEET!
Stamp a stack to keep in stock, but don’t eat all the chocolate! Here’s what you’ll need:
Starting TODAY, the Fitting Florets Collection (a pre-release from Stampin’ Up!’s 2023 January-June Mini Catalog) is ready to add to cart – with some of the limited time products only available while supplies last! The BUNDLE will be available through June 2023, but you’ll want to get the whole collection ASAP to use through the holiday season.
To make this fold, you need a piece of 8.5″ x 5.5″ card stock and score at 3″ and 7.25″ along the longer side with the Simple Scored board (or your paper trimmer and scoring blade). Layer on a piece of 5.25″ x 2.75″ Fitting Florets Designer Series Paper (available only while supplies last) on the front left side of card and a 1″ x 5.25″ piece on the front right flap.
The Framed & Festive stamp set could be combined with ANY Christmas paper, stamps and accessories and the font makes is playful and perfect.
One way to play with this new collection will be to attend the Christmas Card Class THIS SATURDAY, November 5th at 3 pm in Hurricane, Utah:
You’ll create 8 gorgeous greeting cards for the holiday (2 each of 4 different designs, including envelopes) for just $20, and one of the cards is designed with the Fitting Florets collection. Remember to bring scissors and adhesive, but if you forget or need more, we’ll have both scissors & adhesive + refills available for purchase at the class.
Reserve your spot by November 2nd by clicking the button below, or send Venmo to Loni-Spendlove
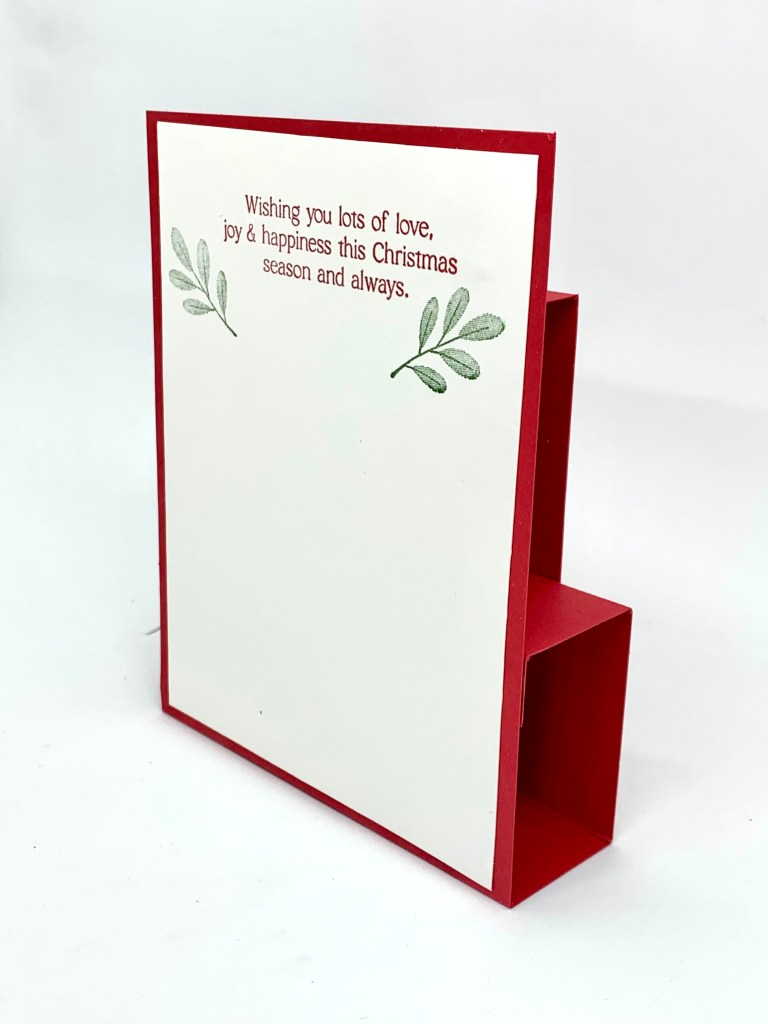
Here’s a taste of Christmas Cheer in greeting-card form, and while it stands up to display, it folds FLAT to mail!
Crafters at the Kane County Crafter’s Convention also made this card using the Sweet Candy Cane suite last weekend. It’s one of my favorite fancy folds, and it’s easier to make than you would imagine! Here’s how:
For the card base, you’ll need:
10.5″ x 4.25″ Real Red card stock, scored at 1/2″, 1.75″, 3.75″ and 5″
5.5″ x 3″ Real Red card stock, scored at 1/2″ and 1.75″
4″ x 5.25″ Pool Party card stock: Die cut stripe background from the center of this piece
4″ x 1.75″ piece of Sweetest Christmas Designer Series Paper
3.5″ x 2.75″ Pool Party card stock (optional: emboss with Wintry 3D embossing folder)
5.5″ x 4.25″ Basic White: Stamp candy canes, leaves and sentiment, cut out with coordinating dies
4″ x 5.25″ Basic White for back of card, where you can write a message when sending
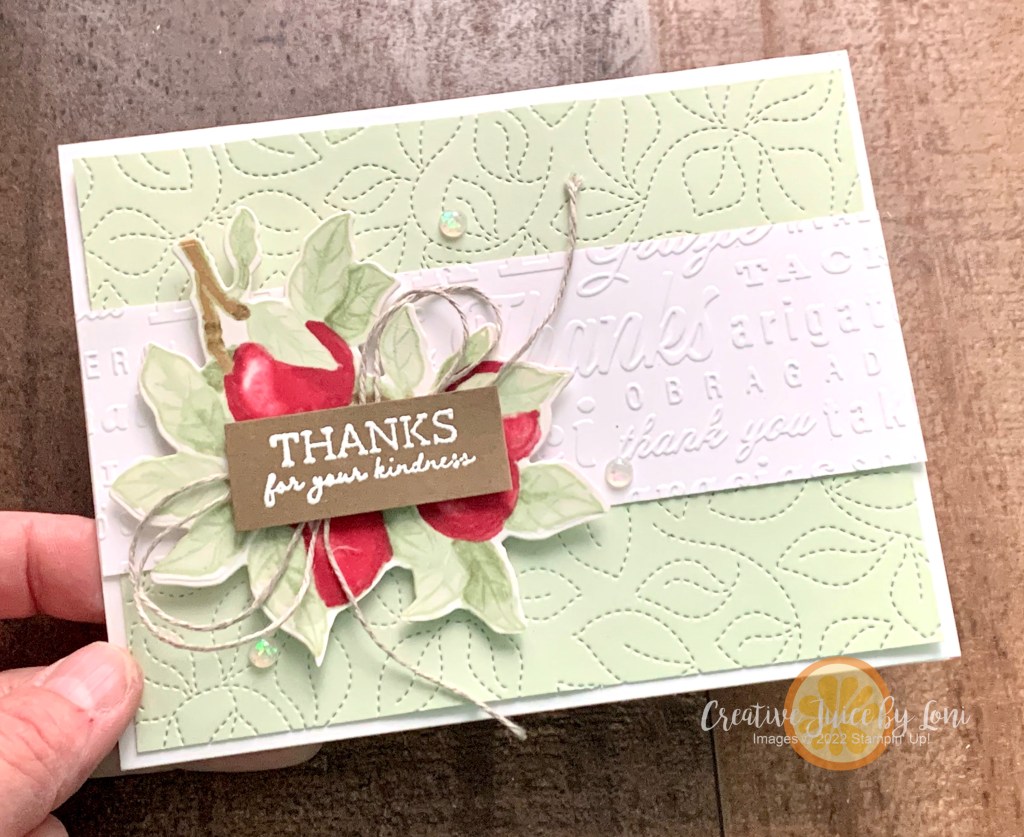
Do you say “I’m sorry” too much? Women are the worst at apologizing, even when we haven’t done anything wrong!
I’m working on replacing “Sorry” with “Thank You” and had the opportunity to practice on Sunday when my husband was waiting for to go to church while I finished handouts for my primary class. When I was done (we weren’t late), I said “Thank You for your patience!” instead of ”Sorry to make you wait” and he was more gracious about the wait.
Of course, an apology when I HAVE done something wrong is appropriate, but when I can use THANK YOU instead, it feels more validating for both parties: “Thank you for listening” rather than “I’m sorry I’ve been talking so much”!
My card today is one I can use when someone has sacrificed their time to help me (and I have a friend in mind)…so instead of saying “Sorry I took your time” I can express my appreciation for their assistance!
It’s also a #multicrafting project: I used the Global Design Project sketch #gdp366 , the Apple Harvest stamp set to participate in the Stampin’ Through the Catalog challenge on Instagram and the colors Soft Sea Foam and Cherry Cobbler so I could share it for a Red & Green creative challenge I gave my Sprinkled Ink team.
Speaking of my team…there are just a few days left to take advantage of the Starter Kit+ promotion…just in time to buy your Christmas gifts from yourself as a demonstrator, or jump start a business to earn extra during the holidays 🎁
It’s a risk-free opportunity to join my Sprinkled Ink team and see if your passion for rubber stamps, ink and paper could also be your purpose! Click here to get $30 extra in your starter kit (already an awesome value) and see if you like being a demonstrator.
Woof! means “Welcome” to the October New at SU! Blog Hop. We really stretched our creativity to bring you not one, but THREE projects this month~ all using the same stamps, but ranging from simple to sensational!
Perhaps you are just starting to stamp, or you need an easy card in a hurry? Or you are ready to add a little “extra” to your card? Don’t worry, avid stampers, I’ve got something for you to make this card “over the top” too!
I’m using the Christmas Scottie bundle (stamps & punch) but with a non-holiday card concept…it could easily be adapted for a Christmas Card just by changing the colors and greeting.
Simple Card: 3″ x 5″ banner (use a 3″ x 1/2″ strip of the other side of the Designer Series Paper for the top), stamp and punch out dog, bow and add greeting. TIP: Remember to stamp your envelope(s) at the same time as you are stamping the card!
Step it up to a Casual Card: Add a 4″ x 5-1/2″ piece of Soft Suede Designer Series Paper to the card background, tie a ribbon around the top of the banner and emboss the greeting on Soft Suede. Tip: Add a 1/2″ wide piece of card stock punched with the Banners Pick-a-Punch behind the heat-embossed sentiment to make it look like a banner:
To step it up to an Avid Card: Score 1-1/4″ from the right edge of the card and fold it back. Add 1″ strips of Designer Series Paper to the flap and inside right edge of card and 2-3/4″ 5-1/4″ panels of Designer Series Paper and basic white card stock to front left side and inside card. Banner: 3-3/4″ x 3″ (DSP) and 3-1/4″ x 4″ Soft Suede. Add Iridescent Rhinestones.
TIP: Only adhere banner to the front flap so it can open like this:
Wherever you are on the Stamping Spectrum, you’ll discover multiple ways to keep it simple OR step it up at all these amazing posts along our October Hop…Pin your favorites to remember them!
This card was inspired by a card created by German Demonstrator Madeleine Mrotzek for the #gdp364 challenge:
I turned the slimline card on the side (3.5″ x 6.25″) and used the Stamparatus to get perfect placement: Just take out the plate with the stamp on it and move it down to the next hinge, then ink up your stamp with a different color (watch video, top).
It’s a fast & fabulous technique to try in your craft room! Don’t forget to stamp the envelope, too!
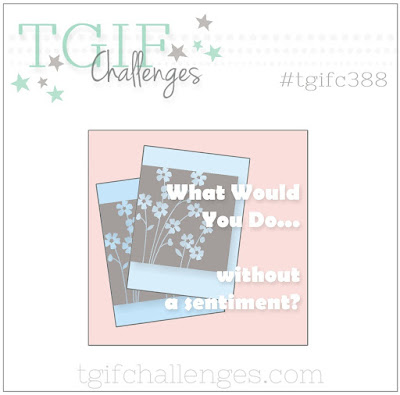
This week’s TGIF Challenge #tgifc388 was a tricky one indeed! A card WITHOUT a sentiment?! Who does that?
I couldn’t even wrap my head around it, until I found a loophole: No sentiment…on the FRONT.
Inspired by a project my friend Sue designed for our Fall StampFest, I pulled out the SANTA EXPRESS suite and die cut images from the Designer Series Paper to follow my “train” of thought:
See? No sentiment! Even the signpost has stars instead of words.
But untie the top and extend it out and the rest of the idea follows:
NOW we are cooking with coal! Isn’t that adorable? The only thing I did stamp was the sentiment, then punched it out with the Label Me Lovely punch and attached them all with Stampin’ Dimensionals.
Some folks like to create cards without a sentiment on the front so they may add the appropriate words when they need to use it. For me, it’s like singing a familiar song and STOPPING just before the last word! The suspense just *hangs* in the air until the final note is sung.
Hopefully, this card meets the requirements AND finishes the last note, once opened. I’ve listed the supplies after the announcements.
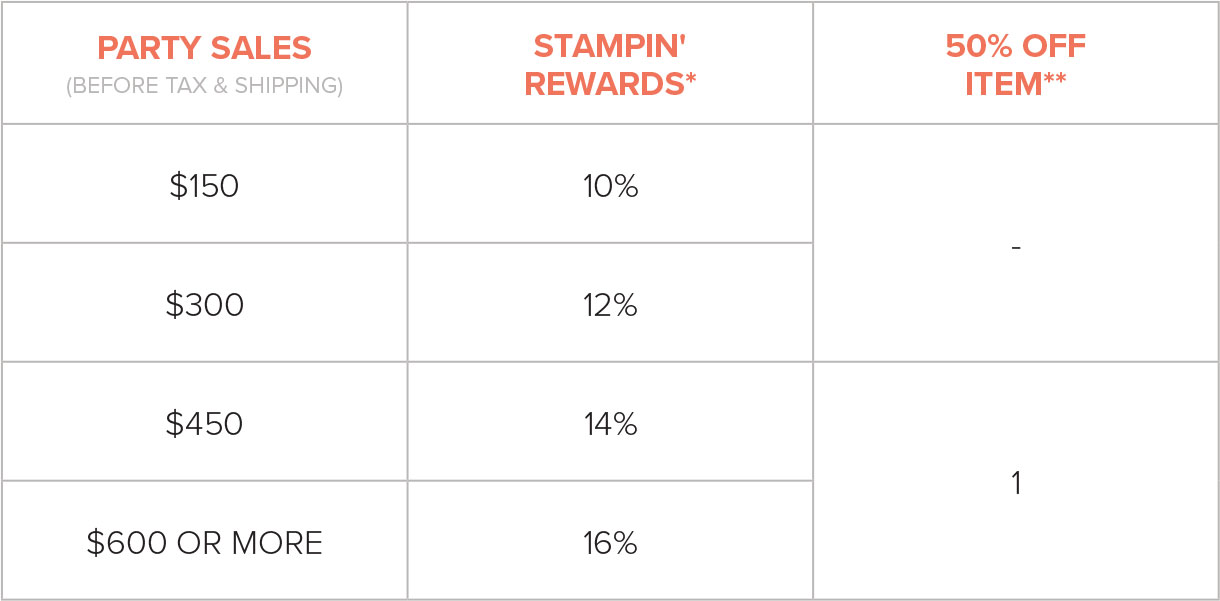
HEY! If you read all the way through on the day this post was published (Tuesday, October 4th), I’ve got one more surprise for you: FREE SHIPPING on orders over $75 today only! If your order is less than $150, enter host code XJM43JKB in your cart as you check out and you’ll be entered into my monthly host code drawing.
If you are ordering MORE than $150 dollars, you can be your own host and earn Stampin’ Rewards immediately:
I wouldn’t be doing my job if I didn’t let you know that there is also a fabulous Starter Kit offer in October: Choose $155 in products for just $99 (the starter kit always includes free shipping!): START HERE


")
 Designer Series Paper")
 Cardstock")


 Designer Series Paper")
 Glimmer Paper")


")


")


 Shimmer Ribbon")


")


 Host Designer Series Paper")
 Sheer Ribbon")
 Soft Polyester Ribbon")


")
 Designer Series Paper")


")


")


 Designer Series Paper")
 Designer Series Paper")

 Crinkled Seam Binding Ribbon")


")


")
 Designer Series Paper")


