Celebrating the 500th TGIF Challenge with a birthday card I made for a dear friend, and my longest team member. Ann, if you see this, just act surprised when you open your mail!
Tearing – or ripping – paper was one of the first techniques I remember being taught at an EARLY crafting convention I attended. It’s so simple, and adds terrific texture, and while many things have changed in paper crafting styles, this technique has just grown more sophisticated.
To be honest, there were a few times I almost threw out this card to begin again, but I persevered, and surprisingly, I think the end result is “tres shabby chic”!
With a whopping 6 (or more) layers of card stock, Designer Series Paper, ribbon, and the birds (also die cut from the patterned paper, so I didn’t have to color them), this was much more detailed than I usually do, but the card needed all the fussy stuff, and Ann deserves a very special card.
Luckily, most of the elements came from the Nests of Winter Suite, so all I had to add was the pretty pompom ribbon. These items can also be ordered individually, which I will include in the supply list below.
Added a few more torn patterns to the inside of the card and the envelope!
Next time you are crafting, give Torn Paper a try. #tgifc500
Using this reverse masking concept with blending & stamping to give your hand-crafted projects the look of layers without the bulk of extra paper! While I’m sharing projects used mostly with the November “Filled with Joy” Paper Pumpkin kit, I know you’ll find ways to try it with what you have.
Watch the video tutorial, then see the finished projects below.
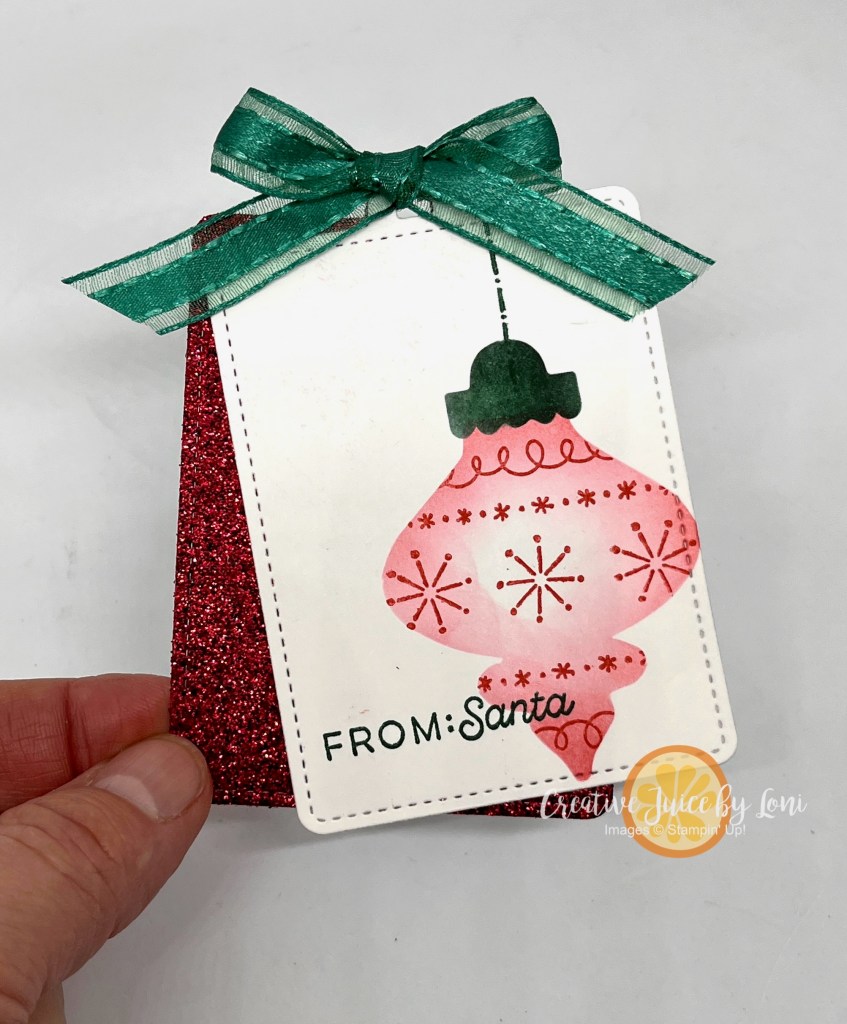
A good paper crafter looks for new ways to use every piece of a kit, such as the piece that we popped the ornaments from in the kit – I used it as a stencil for blending ink onto this tag (from the coordinating Merry Tags & More dies), then stamped through the stencil before removing it:
Voila! A new ornament! Same technique on a card:
These stockings were included in the “Filled with Joy” kit – there were still some refills available to Paper Pumpkin subscribers at the time of this post – and DID YOU KNOW you could add texture to fabric by running it through an embossing folder?! The Eyelet 3D folder was adorable on these and the tag was another alternative idea that wasn’t shown in the video:
I’ll stuff these with some goodies for my primary class at church and for the sisters I minister to. That’s 8 gifts wrapped, thanks to a kit!
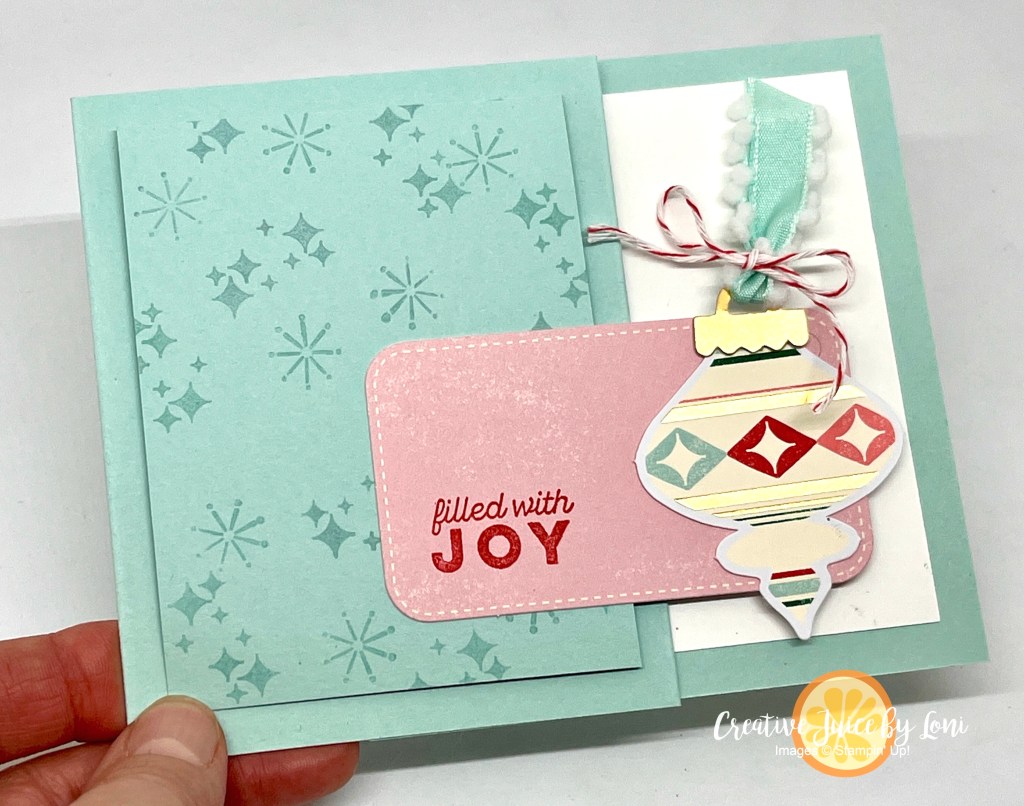
You can “think outside the box” and use the supplies from a kit for different projects, like this quick gift card holder (demonstrated in the video):
If you missed subscribing for the November Paper Pumpkin kit, don’t worry…you could make the same gift card holder idea with the Festive Tags kit, which is available a la carte in the Kit Collection!
While you can order from the Kit Collection ANYTIME (new kits are added monthly!), you may not want to miss a month of our premium craft kit subscription…the December kit is called “Notes from the Heart” and here’s a sneak peek:
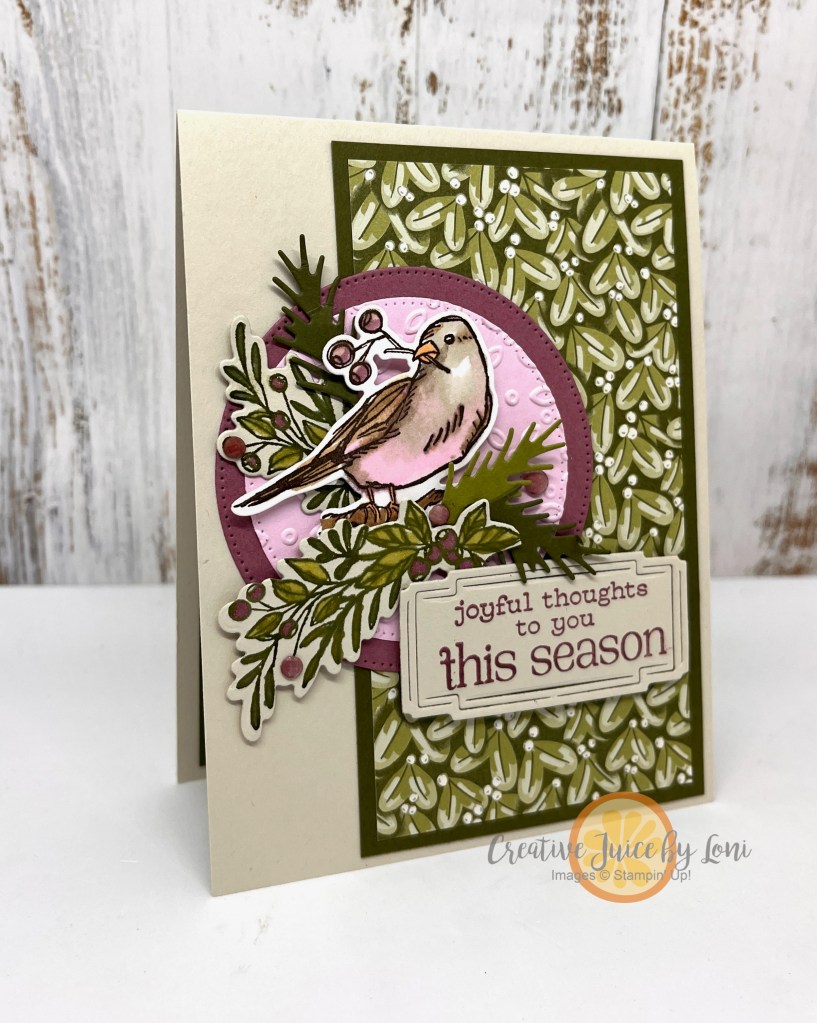
Stepping away from the familiar reds & greens of Christmas with my international Stampin’ Up! demonstrator friends in the New at SU! Design Team, we are using this unique palette that mixes a pinch of pink with deep greens:
The coordinating Paper Pumpkin stamp set from October – “Nests of Christmas” – provided sentiments for both front and inside of the card, in a font that matched the bundle from the Sept-Dec catalog.
Tip: Use the same Moody Mauve Stampin’ Blends markers you color the images with to “dye” the beige Earth Tones Shimmer Gems for sparkling “berries”. I also touched the other berries with the tip of the Wink of Stella pen for added shimmer, which is gorgeous in person, but doesn’t photograph well.
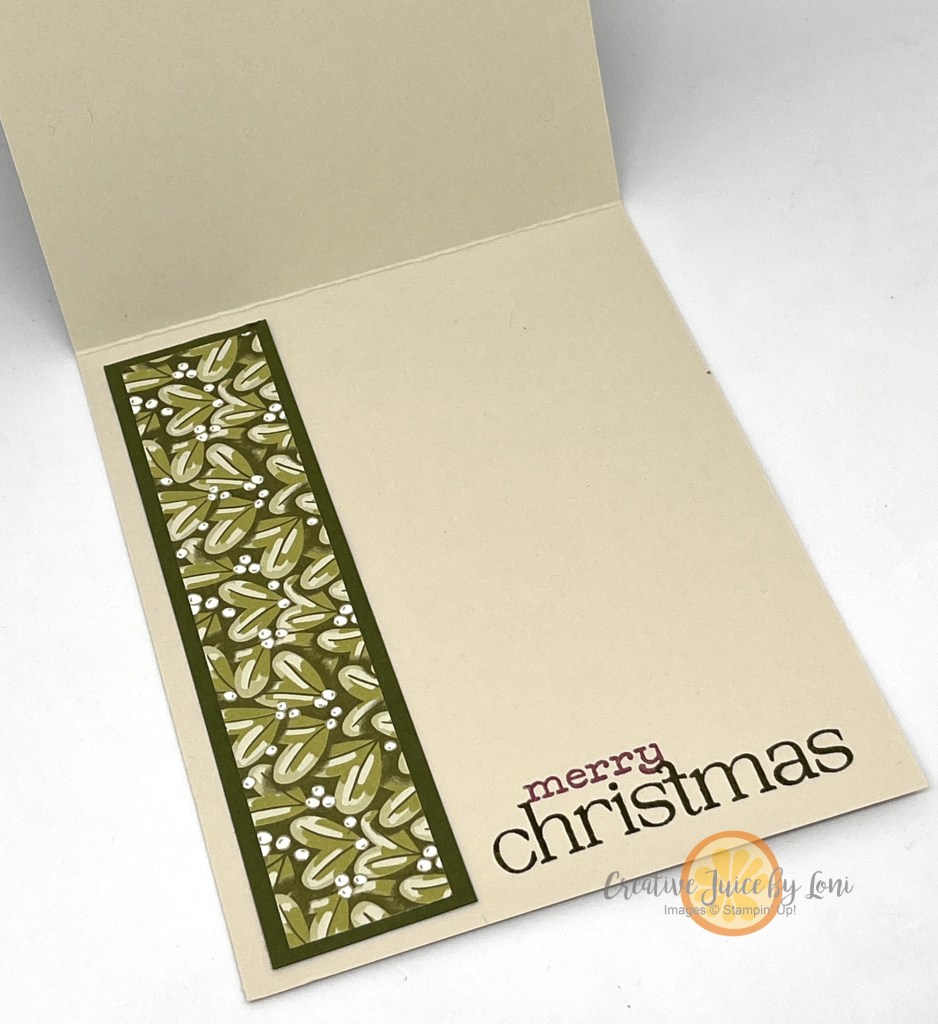
There are always strips of Designer Series Paper left over, so carry the theme to the inside of the card:
Remember! #nonakedenvelopes
Basic Beige is a neutral that is lovely to color on AND makes a card base you can write on, as well.
Is this a color combination you are ready to try? Share a creation using this palette on FB or IG and tag me @creativejuicebyloni ~ I also love your thoughts on my projects…scroll to top of this post to leave a comment on the left!
Off you pop to the next project by Diane, and more fun with unexpected colors! Make sure to see all~
November New at SU! Blog Hop: One Color Combination, Many Ways
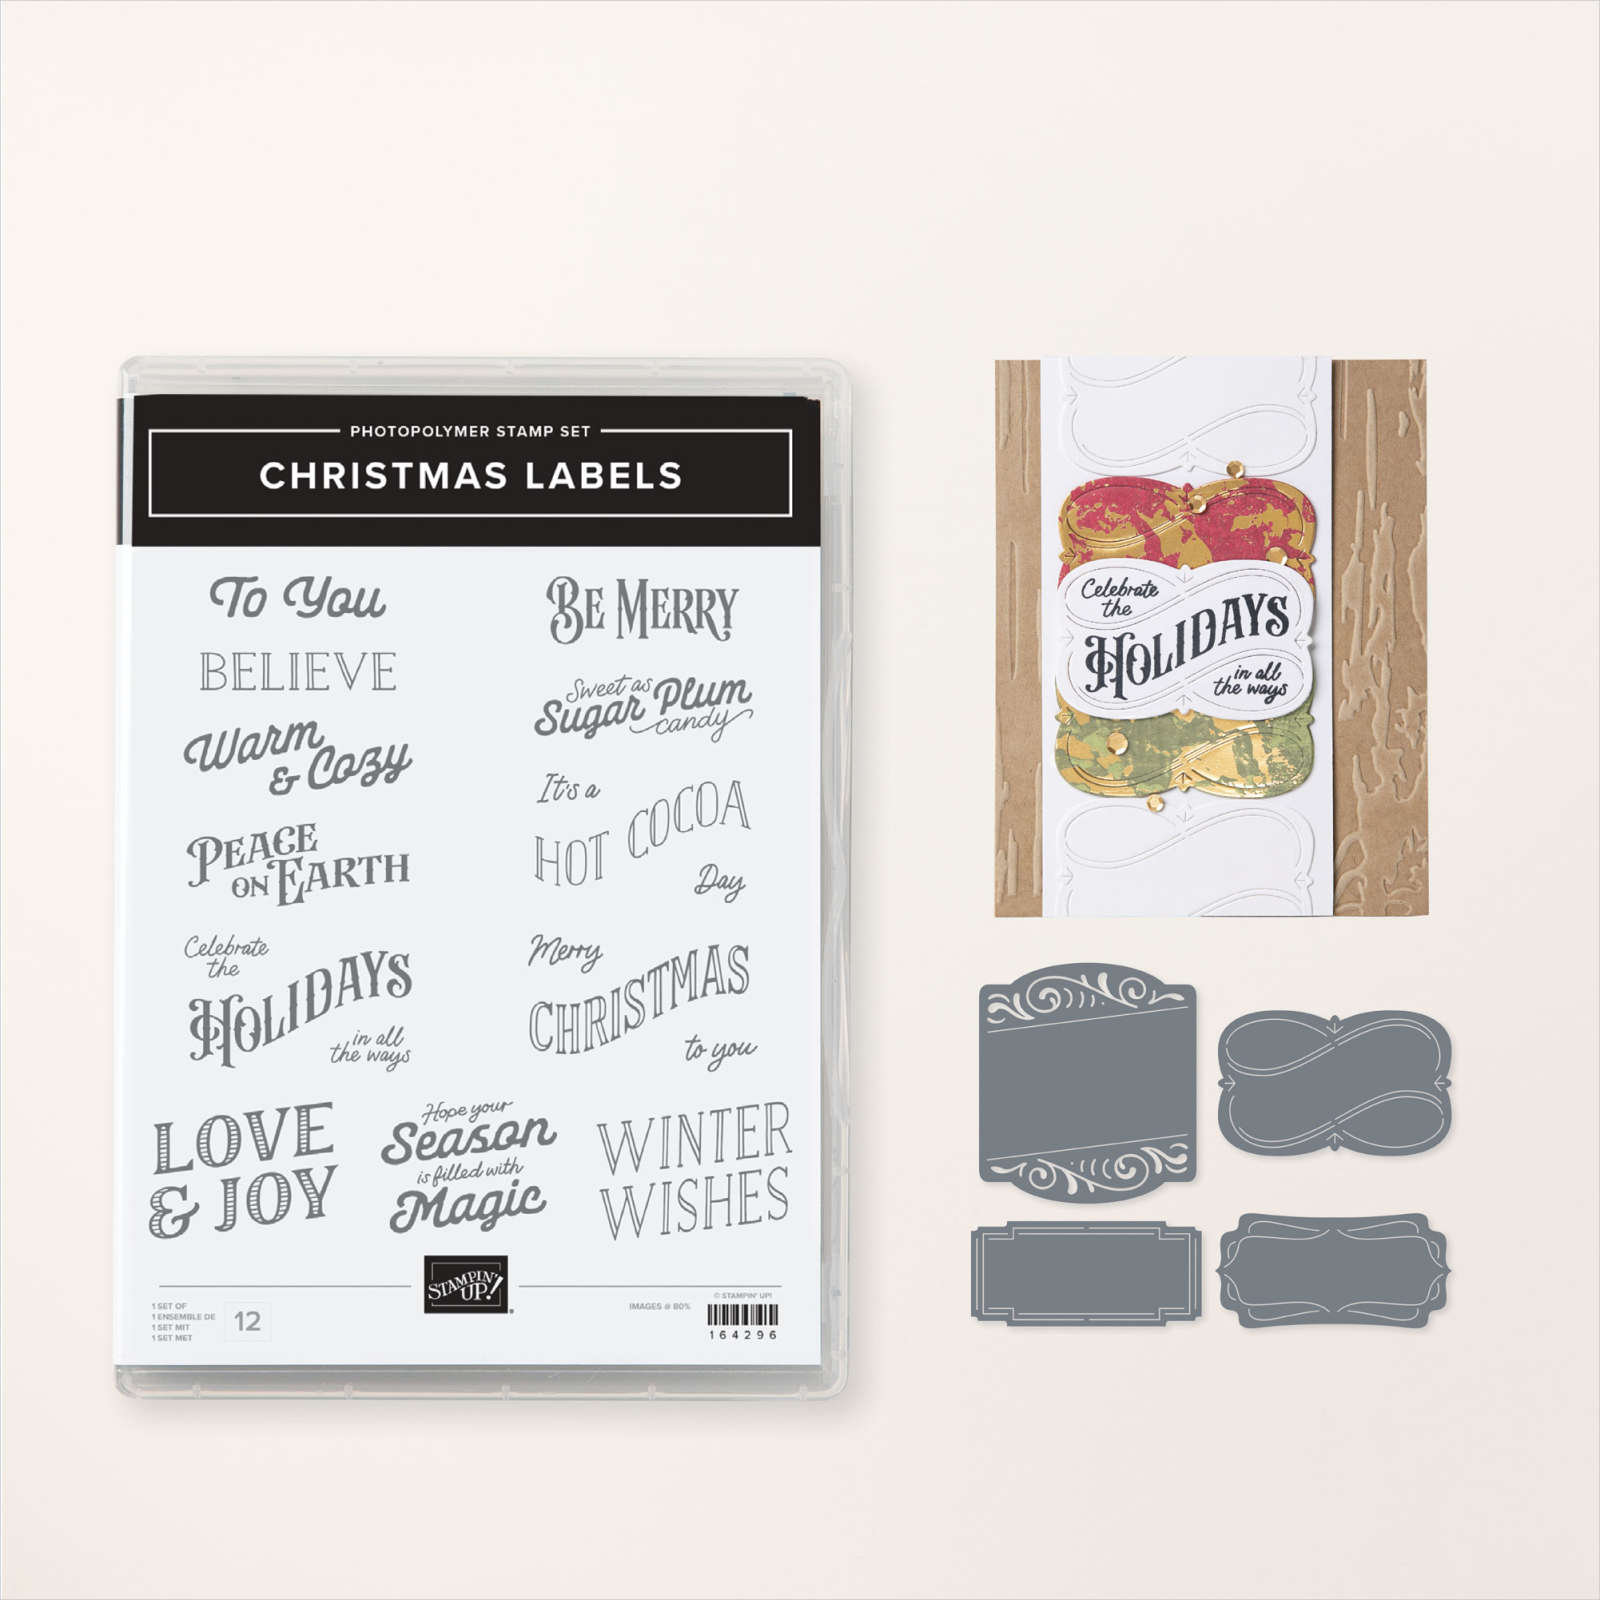
Perhaps it’s the reader in me, but I am a typophile (someone who appreciates a pretty FONT). Stampin’ Up! combined lovely label dies with the gorgeous typography in the Christmas Labels stamp set, and it was a must-have BUNDLE for me.
The way a label can elevate a simple card or gift is what I wanted to demonstrate in a video tutorial:
These were the projects made during the video. The first card features the Season of Green & Gold Specialty Designer Series Paper, and the shiny gold accents aren’t as visible in the picture, but can be seen in the video:
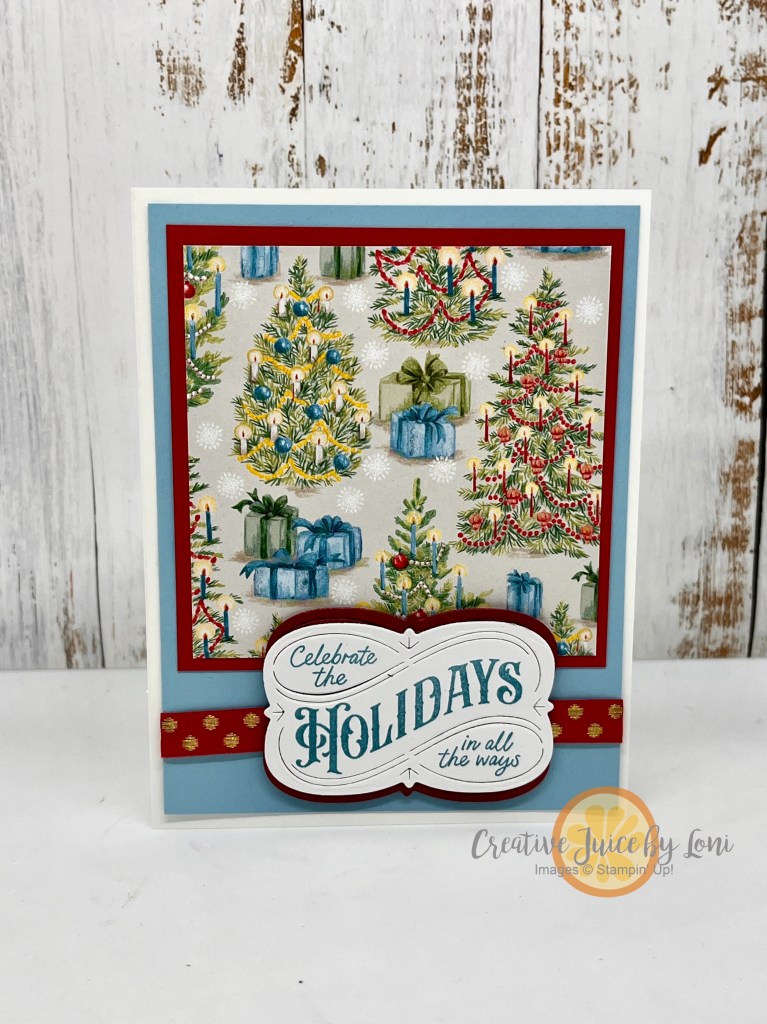
Next is another simple card layout spotlighting a piece of the Sentimental Christmas Designer Series Paper, and showed how to create a contrasting matte behind the label by cutting a second label in half:
I’m sharing easy cards to encourage you to keep your holiday crafting attainable! No need to overthink it, or add stress.
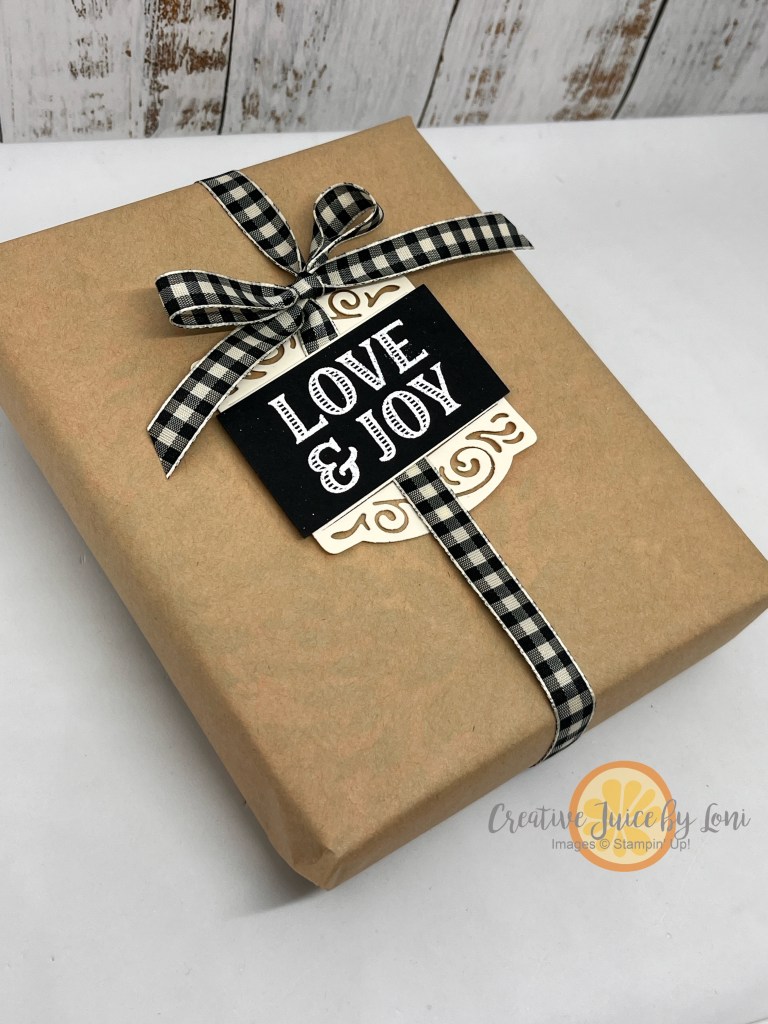
Layer a color over the center of the larger label for a striking contrast, add a coordinating ribbon and the tag makes a basic box beautiful:
When bundles (stamps + dies -OR- stamps + punches) are introduced to my Stampin’ Store, they are 10% off the price of purchasing each product individually.CLARIFICATION: In the video, we thought the Christmas Label bundle and Christmas DSP would be in Seasonal Sale that begins tomorrow (11/13/24), however we learned that only bundles and patterned paper in the Annual catalog are includedin the Seasonal sale, along with most ink and card stock:
As you begin to think about gifting, don’t overlook the supplies you already have! Pair your stamps and patterned paper with a small wooden crate (found at 💲🌳) and create packaging so sweet:
The Take a Bow Designer Series Paper has candy cane vibes, and a few thin strips can be attached with a good coating of Liquid Glue to the slats on the box, then add a label with a sentiment. Finish it off with stamped adornments and embellishments (the tiny Peppermints will be back in stock mid-November) and fill your crate!
The More than Autumn bundle has truly been scrumptious to play with! Filled with mouth-watering treats for Fall AND BEYOND, you’d regret not having it in your stamping studio.
Here’s a treat for you: Download the .pdf tutorial for this project today 👇🏼
Did you know I also send exclusive tutorials in my email newsletters to customers? PLUS my Paper Pumpkin subscribers get their own special “Pumpkin Patch” email at the end of each month.
Fans of fun-fold cards, you’ll love the simplicity of this idea, which I call a Diagonal-Lock card, because of the way the front of the card locks into the back of the card. Don’t miss the video tutorial in this post!
For this first version, I paired a muted piece of the Sweet Days of Autumn Designer Series Paper pattern that I could write a message on for the INSIDE of the card, while using the fun forest friends on the front of the card. The leaves and sentiment adorning the front are from the Changing Leaves bundle.
The recipient will “unlock” the card to open and this is what the inside looks like:
Basic card instructions:
Start with an 11″ x 4.25″ card, scored in half at 5.5″.
Adhere a 5.5″ x 4.25″ piece of Designer Series Paper to the front AND inside of the card.
Make a small mark in the center of the front and BACK of the card (at 3.5″ for this A2 card size).
Cut diagonally from opposite corners of the open card in to the mark.
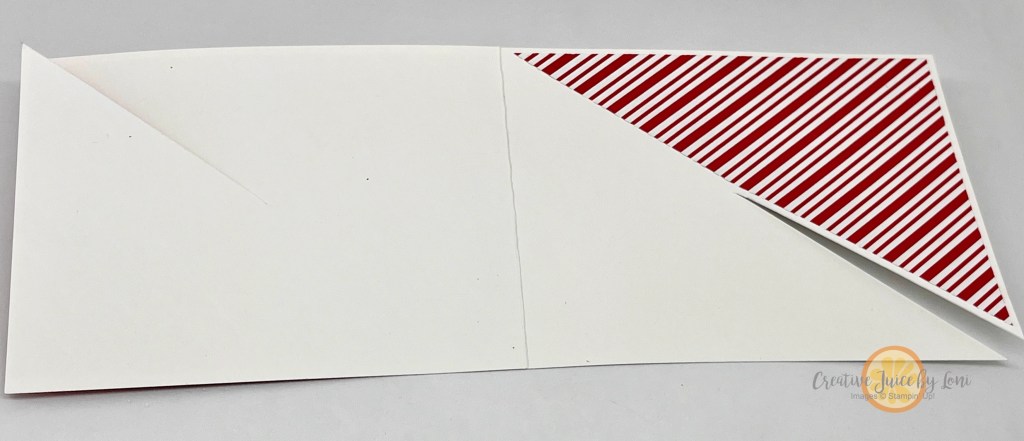
The next version for any holiday celebration (this would be a sweet December birthday card) has a 5.25″ x 4″ Designer Series Paper layer for the front, and a diagonally cut HALF piece for the inside, which leaves a mat around the card which frames it nicely. This time I used my beloved More Than Autumn bundle with the Take A Bow patterned paper:
By using half a sheet on the inside, there is still room to write, even when the pattern is bold. PLUS, you can use the other half for a second card:
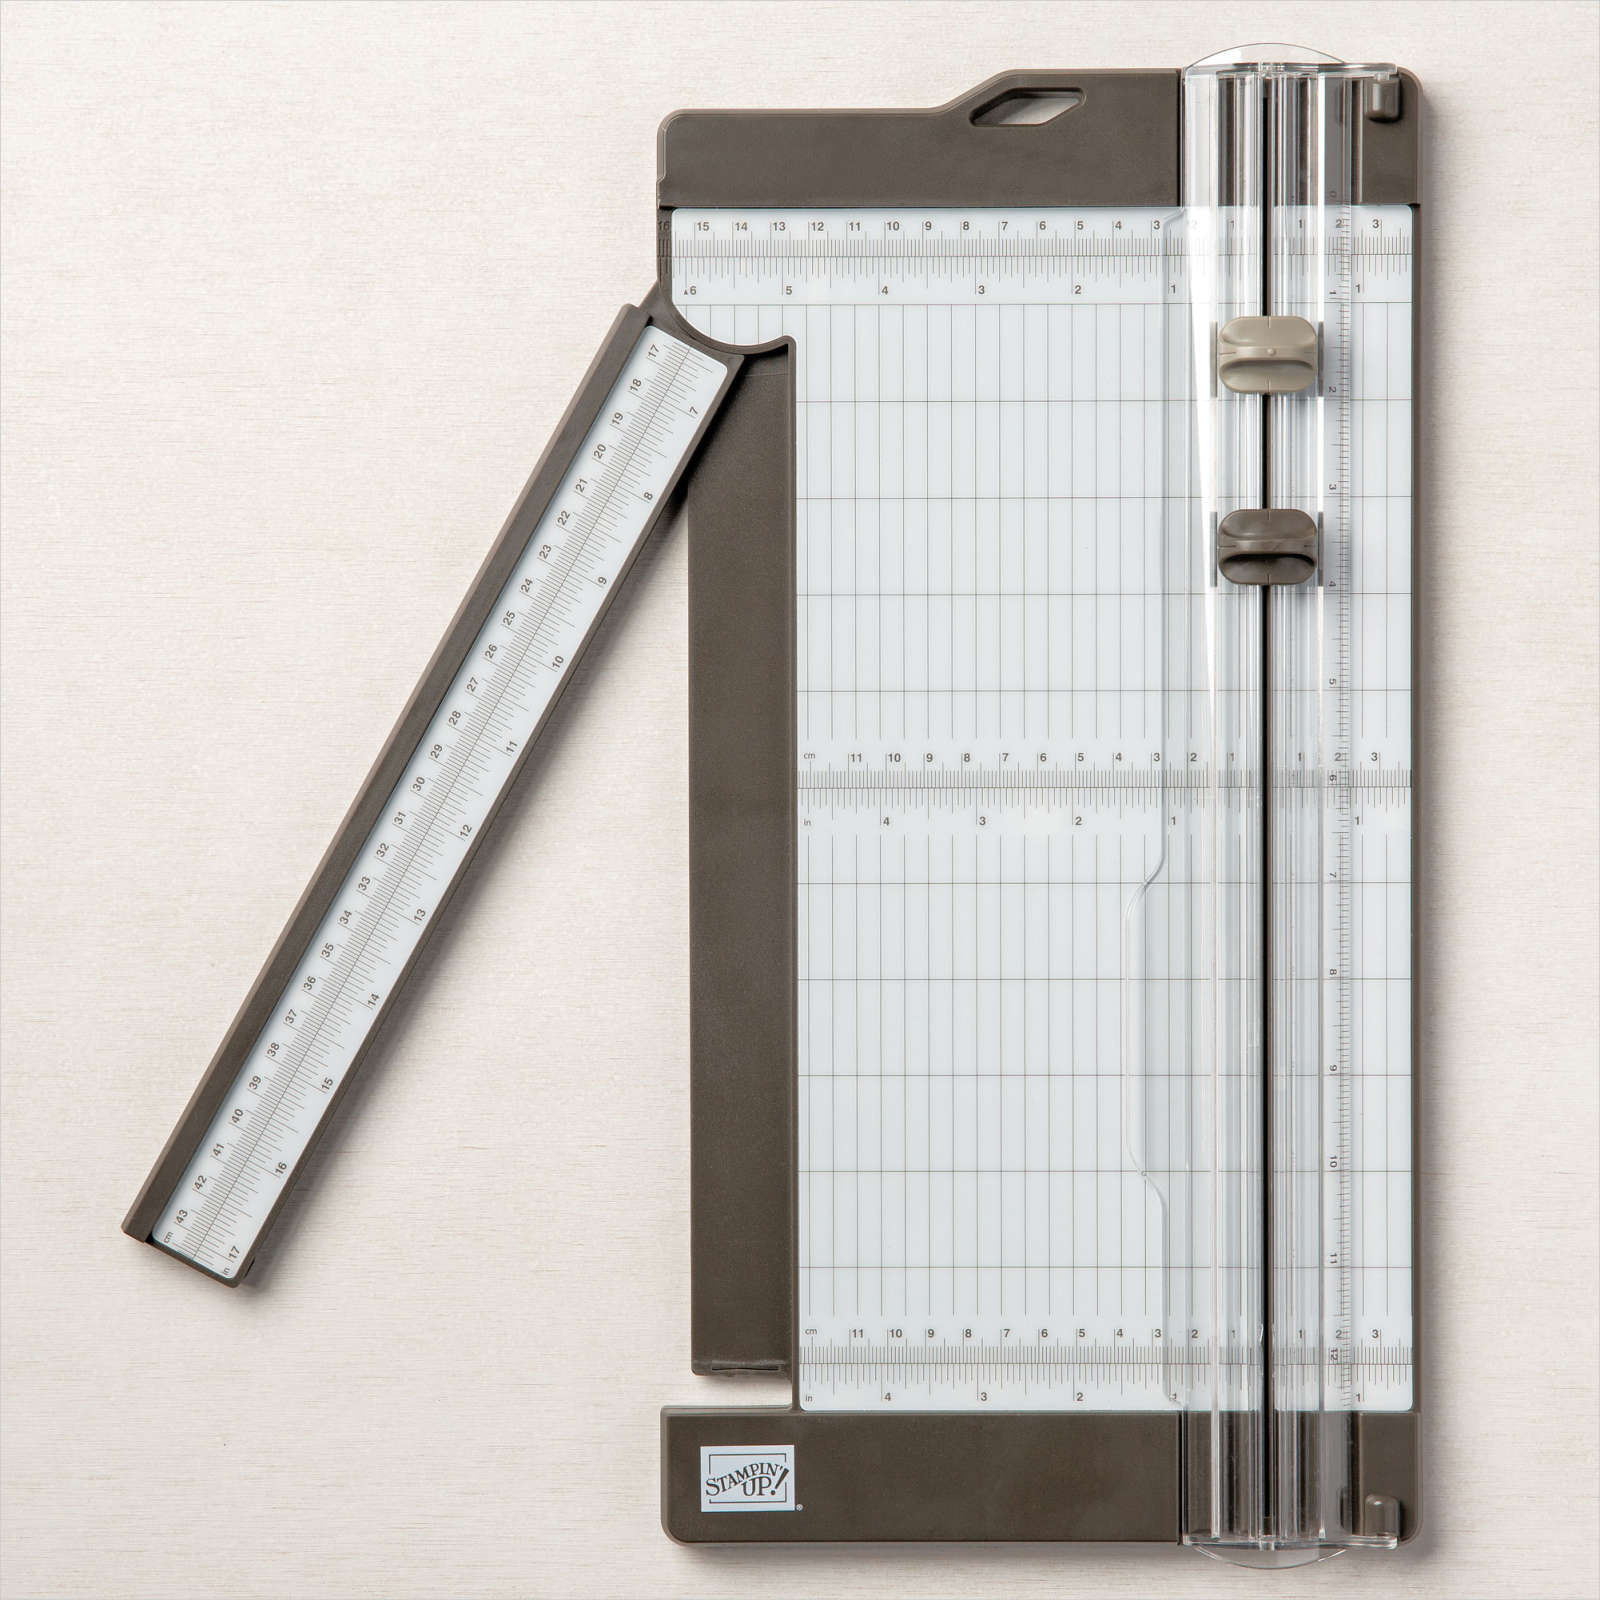
Grab a sheet of card stock and paper trimmer to craft along with this video tutorial to make a template for this card to keep in your “fun-fold” file:
Finally, since the Nests of Winter paper was sitting on my table, I used the Winterly Tree Top Dies to die cut the bird duo and fussy cut the small bird to craft this version:
Click any link to order supplies and create cards of your own!
I love hearing from you~ scroll to top to leave me a comment.
Don’t forget a Paper Trimmer, which also makes a wonderful gift for a teacher, a budding crafter or a student:
Sketches are a Stamper’s secret design tool, and not only do they work for greeting cards and scrapbook pages, sketches also help you master a GIFT TAG…and a beautiful tag will level up any gift!
For our October New at SU! blog hop, I selected 3 tag sketches from page 16 of the September-December Mini catalog and combined those sketches with a set of products that evoke classic Christmas vibes.
The sketches gave me a starting point for my creativity, and a suite of Stampin’ Up! products helped limit my options, which actually makes it easier to be artistic. All supplies are listed at the end of this post.
The Joy/Candle tag mostly features stamping the images from the stamp set:
The stocking tag shows how you can cut some of the images from the Designer Series Paper with the dies, which also match the stamped images:
Finally, the Very Merry tag puts the focus on the sentiment:
The wonderful thing about tags is that they dress up any gift, along with a bit beautiful ribbon ~ see how they make a Kit Collection box fancy? Remember that all the kits are ON SALE this month (see below).
But that’s not all! Tags are adorable on a greeting card, as well:
Not only are tags a miniature piece of art, they are also a terrific way to use up scraps! Try cutting some of your smaller pieces of card stock into tag shapes, and have them ready to pair with a sketch.
Tell me what you think of these tags- leave a comment link at the top of the post!
Visit all the other posts to see how a sketch inspired their projects:
October 2024 New at SU! Hop: Sketches-Crafter’s Secret Design Tool
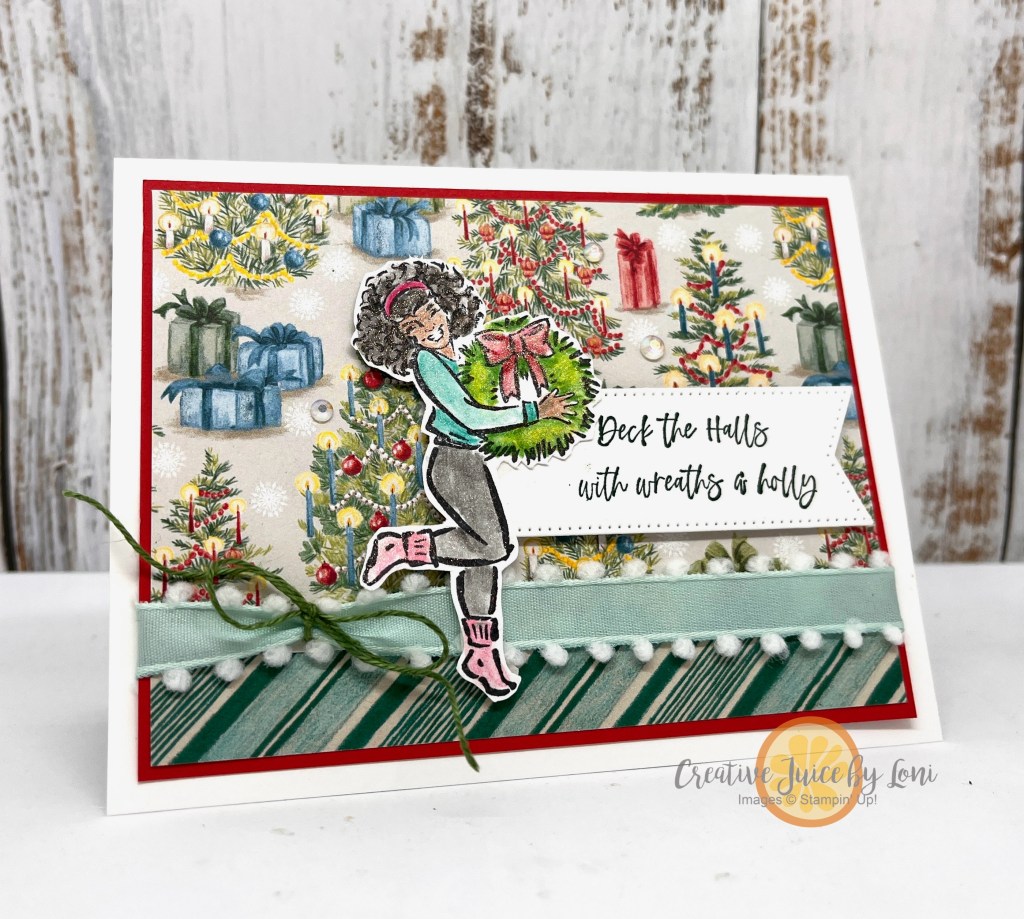
A stamp set that covers multiple seasons and occasions is a good investment, and when it’s as cute as the Warms My Heart images & sentiments, there are so many stories to tell with it!
Do you remember the “Choose Your Own Adventure” book series? That’s what we did today during my Monday LIVE video on my Facebook Page & YouTube! I let those who were watching in real time CHOOSE the season, the background, the colors and the label shape for the card we created, and THIS is the result:
If you want to watch us make this card, here’s the video, and if you want to see some alternate options, keep reading:
This style of card would be just as cute with Designer Series Paper for the background, and created for Christmas!
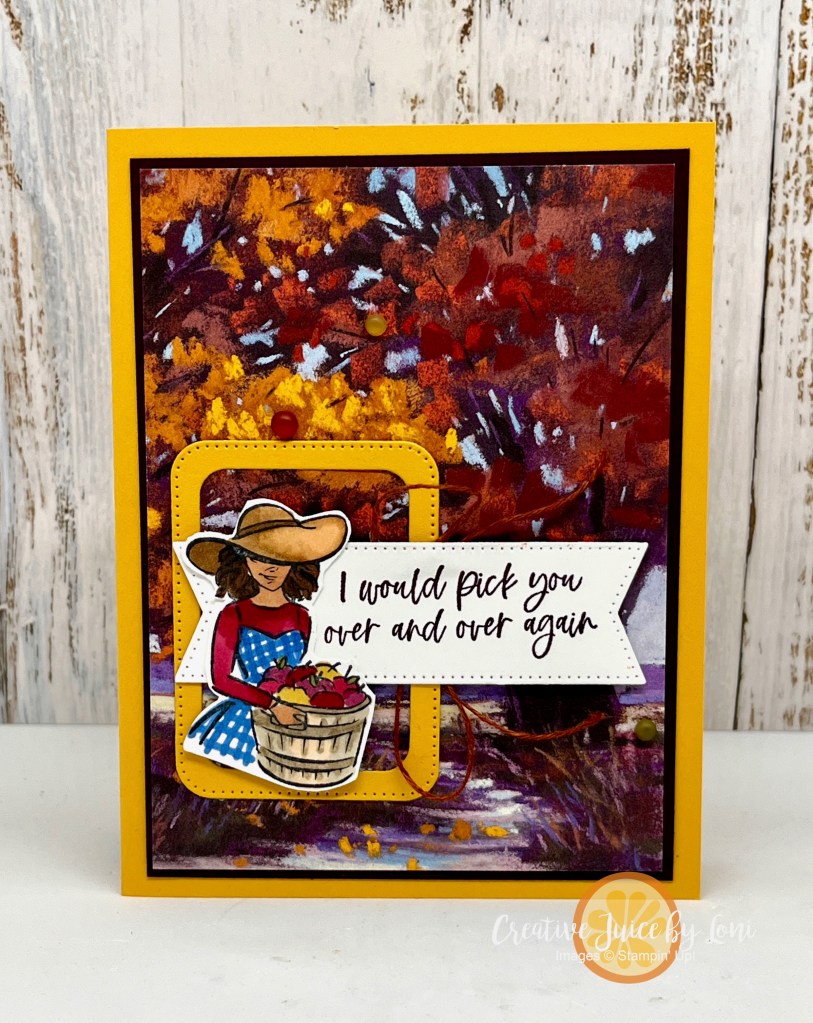
With both of these cards (and the next) I colored the stamped images with Watercolor Pencils and blended them together with Wink of Stella, which is every crafters FAVORITE tool for adding a wash of SHIMMER & SHINE. However, it’s very difficult to capture in a photo! This one is as close as I could get: The texture you can see is really specks of sparkle!
Another option, still keeping it simple with the sentiment on a banner, but without the need to fussy cut (there are no coordinating dies for this set, FYI):
Just so we’ve used every piece of this set, here’s an autumn apple-picking version, in portrait:
Humans have basic needs: Air, water, food…and NEED connection with other people! This is why I offer an in-person crafting event every month: to help you have social interaction, adult conversation and laughter and healthy relationships with other makers.
So what’s coming up? Here’s the IN-PERSON event schedule, in calendar order – carve out time to create with me:
Twice a year, I work with a few demonstrators to plan a fabulous “crafternoon” experience where you will make multiple paper-crafting projects, snack and visit, swap greeting cards, learn new techniques/ideas, win prizes, and connect with other crafters.
WHEN: Saturday, September 21st beginning at 1:00 PM (Mountain Time) WHERE: Hurricane Community Center, 63 S 100 W (SOUTH SIDE), Hurricane, Utah
Registration: $65 (LOWER PRICE!) **Save $10** if you register by September 7th- $55 for early birds!
While we provide (almost) all the supplies at the event, you’ll need to bring scissors and adhesive (also available to purchase at the event). A Paper Trimmer would also be helpful, but not required. Please label your items with your name.
Optional CARD SWAP: Create 12-16 cards using any current SU! products (no envelopes required) and trade with other crafters.
WHERE: RK Creative Studio, 55 E 100 N, Spanish Fork, UT WHEN: Saturday, September 28th, beginning at 1:00 PM (Mountain Time)
Registration: $65 **Save $10** if you register by September 14th- just $55 for early birds!
Optional CARD SWAP: Create 8-12 cards using any current SU! products (no envelopes required) and trade with other crafters at the beginning of the event!
EVENT CANCELLATION POLICY: You may request a refund if cancellation is received 2 weeks prior to event. Registrations may be transferred to another personal at any time.
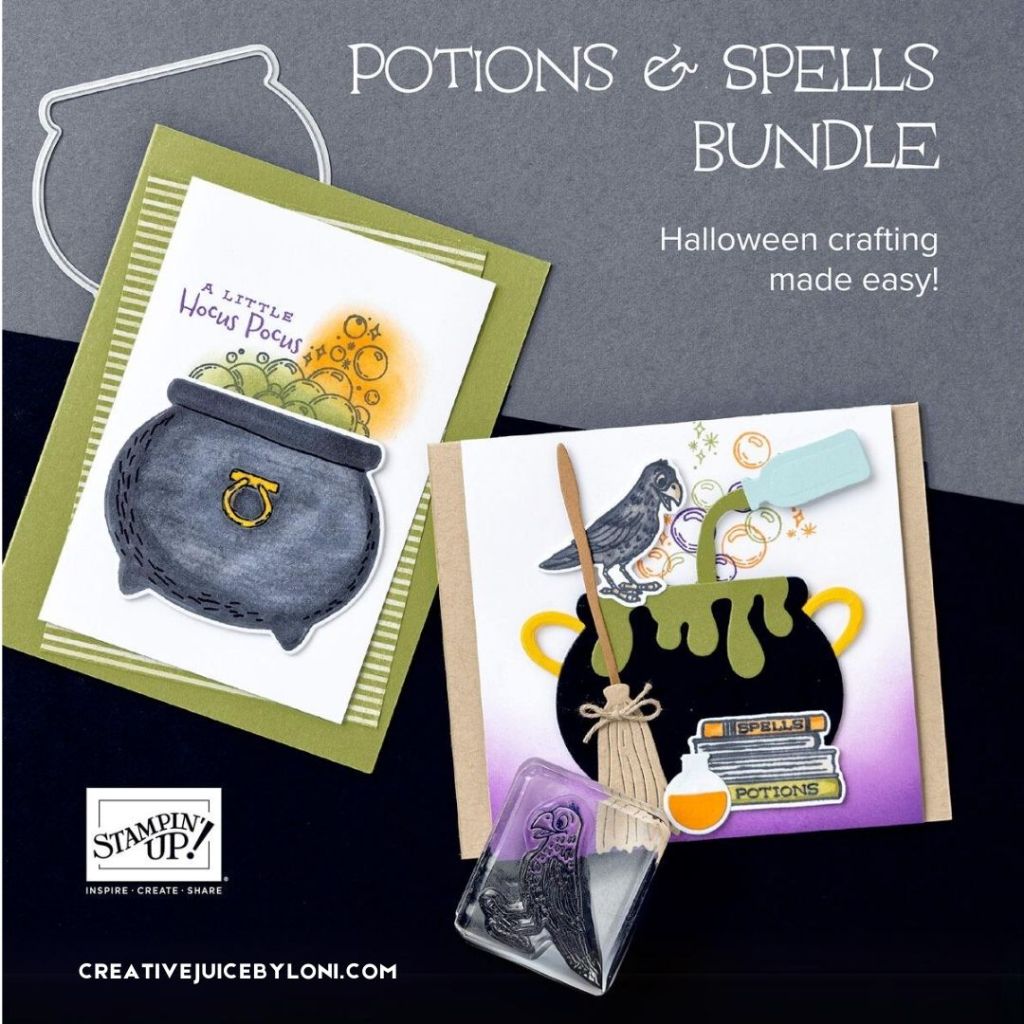
We’ll cue the monster mash and stir up a cauldron of spooky treats as we assemble a haunted home using a fabulous kit from Stampin’ Up! – You’ll have the coolest Halloween decor on the block, and have a blast making it with other crafters in Hurricane, UT on October 1st at 7 p.m.
Class fee: $26. All supplies (and snacks) are provided, but we ONLY HAVE have 9 kits available, so don’t hesitate to claim your spot by finalizing your registration (link below) and you can join & share the event with friends on Facebook HERE.
Returning for the 3 year, I’ll be teaching two classes at CraftConUSA in Kanab, UT on October 25-26, 2024! This growing event is a wonderful weekend to work on your own crafts alongside other creators, choose the classes that interest you and enjoy a beautiful part of the world!
Use promo code TEACHERSPET30 to save 30% on event registration
Here are the two classes I’ll be teaching with my teammate Sue-don’t miss them!
1. Christmas Charm: Holiday Packaging Masterclass
A simple gift is transformed by creating a charming package! Create 4 pretty packages ready to make the season bright, AND take home supplies to create many more. Class includes a full package of Stampin’ Up! Designer Series Paper, plus Ephemera tags, packaging and ribbon. CLASS FEE: $37Bring: Scissors and adhesive, Paper Trimmer (optional, but helpful)
2. Take the Scenic Route: Memories that Matter
Remember your summer vacation (or plan ahead for the next one): Complete an entire mini album highlighting where you’ve been, or where you want to go!
Includes: A Travel Journal, pages & pockets for photos & memorabilia, sticky die cuts and alphabets to capture your adventures. BONUS: You’ll also use the kit box to create a gift box (or a place to store more treasures). Bring: 20-40 photos/memorabilia of a vacation to remember. All other supplies will be provided. CLASS FEE: $37
CLASS REGISTRATION OPENS SOON- Meanwhile, register for the event below – Use Promo Code TEACHERSPET30 to save 30% on event registration!
There are TWO Christmas Card class times to choose from: 1 pm or 7 pm on Thursday, November 14th in Hurricane, Utah.
Create 8 fabulous holiday cards (2 each of 4 different designs) to make the season VeRy MeRrY! These cards could be the gift themselves, and tucking a gift card inside would bring magic to a mailbox. Bring: adhesive and scissors (also available to purchase at class). Everything else will be provided for you- including snacks! Class fee: $22
This was the #tgifc479 challenge to start our creative cogs turning:
The So Very Merry stamp set is not in the catalog, but *IS* still in the Online Exclusive section of my Stampin’ Store, and I embossed the gingerbread house on a banner cut from the Nested Essentials dies, then colored it with watercolor pencils and added Wink of Stella to the candy for sparkle (all supplies listed below). Though it’s hard to see in a photo, trust me that the treats glisten in the light!
Speaking of Online Exclusives, there are NEW ADDITIONS to that section of my store, and you’ll have a hard time choosing between the frightfully fun Halloween, the elegant Autumn or the gorgeous Holiday offerings. You have my permission to choose all of them! And there is MORE than just these shown.
Back to my gingerbread house card, the supplies I used are below and feel free to use the idea for your holiday mail, if you love it!


![Winterly Tree Tops Bundle (English) [ 164066 ]](https://assets1.tamsnetwork.com/images/EC042017NF/164066s.jpg "Winterly Tree Tops Bundle (English) [ 164066 ]")
![Nests Of Winter 12" X 12" (30.5 X 30.5 Cm) Designer Series Paper [ 164183 ]](https://assets1.tamsnetwork.com/images/EC042017NF/164183s.jpg "Nests Of Winter 12\" X 12\" (30.5 X 30.5 Cm) Designer Series Paper [ 164183 ]")
![Gray Granite 8-1/2" X 11" Cardstock [ 146983 ]](https://assets1.tamsnetwork.com/images/EC042017NF/146983s.jpg "Gray Granite 8-1/2\" X 11\" Cardstock [ 146983 ]")
![Garden Green 8-1/2" X 11" Cardstock [ 102584 ]](https://assets1.tamsnetwork.com/images/EC042017NF/102584s.jpg "Garden Green 8-1/2\" X 11\" Cardstock [ 102584 ]")
![Pool Party 8-1/2" X 11" Cardstock [ 122924 ]](https://assets1.tamsnetwork.com/images/EC042017NF/122924s.jpg "Pool Party 8-1/2\" X 11\" Cardstock [ 122924 ]")
![Garden Green Classic Stampin' Pad [ 147089 ]](https://assets1.tamsnetwork.com/images/EC042017NF/147089s.jpg "Garden Green Classic Stampin' Pad [ 147089 ]")
![Pool Party 5/8" (1.6 Cm) Pompom Ribbon [ 164129 ]](https://assets1.tamsnetwork.com/images/EC042017NF/164129s.jpg "Pool Party 5/8\" (1.6 Cm) Pompom Ribbon [ 164129 ]")
![Earth Tones Shimmer Gems [ 164070 ]](https://assets1.tamsnetwork.com/images/EC042017NF/164070s.jpg "Earth Tones Shimmer Gems [ 164070 ]")
![Stampin' Cut & Emboss Machine [ 149653 ]](https://assets1.tamsnetwork.com/images/EC042017NF/149653s.jpg "Stampin' Cut & Emboss Machine [ 149653 ]")
![Multipurpose Liquid Glue [ 110755 ]](https://assets1.tamsnetwork.com/images/EC042017NF/110755s.jpg "Multipurpose Liquid Glue [ 110755 ]")
![Stampin' Dimensionals [ 104430 ]](https://assets1.tamsnetwork.com/images/EC042017NF/104430s.jpg "Stampin' Dimensionals [ 104430 ]")


![Festive Tags Kit [ 162485 ]](https://assets1.tamsnetwork.com/images/EC042017NF/162485s.jpg "Festive Tags Kit [ 162485 ]")
![Festive 12" X 12" (30.5 X 30.5 Cm) Glimmer Paper [ 164106 ]](https://assets1.tamsnetwork.com/images/EC042017NF/164106s.jpg "Festive 12\" X 12\" (30.5 X 30.5 Cm) Glimmer Paper [ 164106 ]")
![Basic White 8 1/2" X 11" Cardstock [ 159276 ]](https://assets1.tamsnetwork.com/images/EC042017NF/159276s.jpg "Basic White 8 1/2\" X 11\" Cardstock [ 159276 ]")
![Small Blending Brushes [ 160518 ]](https://assets1.tamsnetwork.com/images/EC042017NF/160518s.jpg "Small Blending Brushes [ 160518 ]")
![Poppy Parade Classic Stampin' Pad [ 147050 ]](https://assets1.tamsnetwork.com/images/EC042017NF/147050s.jpg "Poppy Parade Classic Stampin' Pad [ 147050 ]")
![Shaded Spruce Classic Stampin' Pad [ 147088 ]](https://assets1.tamsnetwork.com/images/EC042017NF/147088s.jpg "Shaded Spruce Classic Stampin' Pad [ 147088 ]")
![Pool Party Classic Stampin' Pad [ 147107 ]](https://assets1.tamsnetwork.com/images/EC042017NF/147107s.jpg "Pool Party Classic Stampin' Pad [ 147107 ]")
![Shaded Spruce 1/2" (1.3 Cm) Satin & Sheer Ribbon [ 164224 ]](https://assets1.tamsnetwork.com/images/EC042017NF/164224s.jpg "Shaded Spruce 1/2\" (1.3 Cm) Satin & Sheer Ribbon [ 164224 ]")
![Poppy Parade 8-1/2" X 11" Cardstock [ 119793 ]](https://assets1.tamsnetwork.com/images/EC042017NF/119793s.jpg "Poppy Parade 8-1/2\" X 11\" Cardstock [ 119793 ]")
![Pretty In Pink 8 1/2" X 11" Cardstock [ 163793 ]](https://assets1.tamsnetwork.com/images/EC042017NF/163793s.jpg "Pretty In Pink 8 1/2\" X 11\" Cardstock [ 163793 ]")
![Lost Lagoon 8-1/2" X 11" Cardstock [ 133679 ]](https://assets1.tamsnetwork.com/images/EC042017NF/133679s.jpg "Lost Lagoon 8-1/2\" X 11\" Cardstock [ 133679 ]")
![Bubble Bath 8 1/2" X 11" Cardstock [ 161718 ]](https://assets1.tamsnetwork.com/images/EC042017NF/161718s.jpg "Bubble Bath 8 1/2\" X 11\" Cardstock [ 161718 ]")
![Snowflake Sky 3 D Embossing Folder [ 162026 ]](https://assets1.tamsnetwork.com/images/EC042017NF/162026s.jpg "Snowflake Sky 3 D Embossing Folder [ 162026 ]")
![Everyday Details Dies [ 162864 ]](https://assets1.tamsnetwork.com/images/EC042017NF/162864s.jpg "Everyday Details Dies [ 162864 ]")


![Basic Beige 8 1/2" X 11" Cardstock [ 164511 ]](https://assets1.tamsnetwork.com/images/EC042017NF/164511s.jpg "Basic Beige 8 1/2\" X 11\" Cardstock [ 164511 ]")
![Mossy Meadow 8-1/2" X 11" Cardstock [ 133676 ]](https://assets1.tamsnetwork.com/images/EC042017NF/133676s.jpg "Mossy Meadow 8-1/2\" X 11\" Cardstock [ 133676 ]")
![Moody Mauve 8 1/2" X 11" Cardstock [ 161723 ]](https://assets1.tamsnetwork.com/images/EC042017NF/161723s.jpg "Moody Mauve 8 1/2\" X 11\" Cardstock [ 161723 ]")
![Old Olive 8-1/2" X 11" Cardstock [ 100702 ]](https://assets1.tamsnetwork.com/images/EC042017NF/100702s.jpg "Old Olive 8-1/2\" X 11\" Cardstock [ 100702 ]")
![Season Of Green & Gold 12" X 12" (30.5 X 30.5 Cm) Specialty Designer Series Paper [ 164324 ]](https://assets1.tamsnetwork.com/images/EC042017NF/164324s.jpg "Season Of Green & Gold 12\" X 12\" (30.5 X 30.5 Cm) Specialty Designer Series Paper [ 164324 ]")
![Eyelet 3 D Embossing Folder [ 163414 ]](https://assets1.tamsnetwork.com/images/EC042017NF/163414s.jpg "Eyelet 3 D Embossing Folder [ 163414 ]")
![Stylish Shapes Dies [ 159183 ]](https://assets1.tamsnetwork.com/images/EC042017NF/159183s.jpg "Stylish Shapes Dies [ 159183 ]")
![Christmas Labels Dies [ 164100 ]](https://assets1.tamsnetwork.com/images/EC042017NF/164100s.jpg "Christmas Labels Dies [ 164100 ]")
![Mossy Meadow Classic Stampin' Pad [ 147111 ]](https://assets1.tamsnetwork.com/images/EC042017NF/147111s.jpg "Mossy Meadow Classic Stampin' Pad [ 147111 ]")
![Moody Mauve Classic Stampin' Pad [ 161649 ]](https://assets1.tamsnetwork.com/images/EC042017NF/161649s.jpg "Moody Mauve Classic Stampin' Pad [ 161649 ]")
![Early Espresso Classic Stampin' Pad [ 147114 ]](https://assets1.tamsnetwork.com/images/EC042017NF/147114s.jpg "Early Espresso Classic Stampin' Pad [ 147114 ]")
![Pecan Pie Stampin’ Blends Combo Pack [ 161674 ]](https://assets1.tamsnetwork.com/images/EC042017NF/161674s.jpg "Pecan Pie Stampin’ Blends Combo Pack [ 161674 ]")
![Crumb Cake Stampin' Blends Combo Pack [ 154882 ]](https://assets1.tamsnetwork.com/images/EC042017NF/154882s.jpg "Crumb Cake Stampin' Blends Combo Pack [ 154882 ]")
![Moody Mauve Stampin’ Blends Combo Pack [ 161660 ]](https://assets1.tamsnetwork.com/images/EC042017NF/161660s.jpg "Moody Mauve Stampin’ Blends Combo Pack [ 161660 ]")
![Bubble Bath Stampin’ Blends Combo Pack [ 161675 ]](https://assets1.tamsnetwork.com/images/EC042017NF/161675s.jpg "Bubble Bath Stampin’ Blends Combo Pack [ 161675 ]")
![Basic White Medium Envelopes [ 159236 ]](https://assets1.tamsnetwork.com/images/EC042017NF/159236s.jpg "Basic White Medium Envelopes [ 159236 ]")
![Clear Wink Of Stella Glitter Brush [ 141897 ]](https://assets1.tamsnetwork.com/images/EC042017NF/141897s.jpg "Clear Wink Of Stella Glitter Brush [ 141897 ]")


![Sentimental Wishes Bundle (English) [ 164220 ]](https://assets1.tamsnetwork.com/images/EC042017NF/164220s.jpg "Sentimental Wishes Bundle (English) [ 164220 ]")
![Sentimental Christmas 12" X 12" (30.5 X 30.5 Cm) Designer Series Paper [ 164209 ]](https://assets1.tamsnetwork.com/images/EC042017NF/164209s.jpg "Sentimental Christmas 12\" X 12\" (30.5 X 30.5 Cm) Designer Series Paper [ 164209 ]")
![Greetings Of The Season Dies [ 164112 ]](https://assets1.tamsnetwork.com/images/EC042017NF/164112s.jpg "Greetings Of The Season Dies [ 164112 ]")
![Nested Essentials Dies [ 161597 ]](https://assets1.tamsnetwork.com/images/EC042017NF/161597s.jpg "Nested Essentials Dies [ 161597 ]")
![Mini Stampin' Cut & Emboss Machine [ 150673 ]](https://assets1.tamsnetwork.com/images/EC042017NF/150673s.jpg "Mini Stampin' Cut & Emboss Machine [ 150673 ]")
![Shaded Spruce 8-1/2" X 11" Cardstock [ 146981 ]](https://assets1.tamsnetwork.com/images/EC042017NF/146981s.jpg "Shaded Spruce 8-1/2\" X 11\" Cardstock [ 146981 ]")
![Real Red 8-1/2" X 11" Cardstock [ 102482 ]](https://assets1.tamsnetwork.com/images/EC042017NF/102482s.jpg "Real Red 8-1/2\" X 11\" Cardstock [ 102482 ]")
![Real Red Classic Stampin' Pad [ 147084 ]](https://assets1.tamsnetwork.com/images/EC042017NF/147084s.jpg "Real Red Classic Stampin' Pad [ 147084 ]")
![Tuxedo Black Memento Ink Pad [ 132708 ]](https://assets1.tamsnetwork.com/images/EC042017NF/132708s.jpg "Tuxedo Black Memento Ink Pad [ 132708 ]")
![Watercolor Pencils Assortment 1 [ 161700 ]](https://assets1.tamsnetwork.com/images/EC042017NF/161700s.jpg "Watercolor Pencils Assortment 1 [ 161700 ]")
![Blender Pens [ 102845 ]](https://assets1.tamsnetwork.com/images/EC042017NF/102845s.jpg "Blender Pens [ 102845 ]")
![Gold & Silver 1/8" (3.2 Mm) Trim Combo Pack [ 161633 ]](https://assets1.tamsnetwork.com/images/EC042017NF/161633s.jpg "Gold & Silver 1/8\" (3.2 Mm) Trim Combo Pack [ 161633 ]")


![Warms My Heart Cling Stamp Set (English) [ 164267 ]](https://assets1.tamsnetwork.com/images/EC042017NF/164267s.jpg "Warms My Heart Cling Stamp Set (English) [ 164267 ]")
![Forever Plaid 3 D Embossing Folder [ 164049 ]](https://assets1.tamsnetwork.com/images/EC042017NF/164049s.jpg "Forever Plaid 3 D Embossing Folder [ 164049 ]")
![Cajun Craze 8-1/2" X 11" Cardstock [ 119684 ]](https://assets1.tamsnetwork.com/images/EC042017NF/119684s.jpg "Cajun Craze 8-1/2\" X 11\" Cardstock [ 119684 ]")
![Coastal Cabana 8-1/2" X 11" Cardstock [ 131297 ]](https://assets1.tamsnetwork.com/images/EC042017NF/131297s.jpg "Coastal Cabana 8-1/2\" X 11\" Cardstock [ 131297 ]")
![Pumpkin Pie 8-1/2" X 11" Cardstock [ 105117 ]](https://assets1.tamsnetwork.com/images/EC042017NF/105117s.jpg "Pumpkin Pie 8-1/2\" X 11\" Cardstock [ 105117 ]")
![Cajun Craze Classic Stampin' Pad [ 147085 ]](https://assets1.tamsnetwork.com/images/EC042017NF/147085s.jpg "Cajun Craze Classic Stampin' Pad [ 147085 ]")
![Watercolor Pencils Assortment 2 [ 149014 ]](https://assets1.tamsnetwork.com/images/EC042017NF/149014s.jpg "Watercolor Pencils Assortment 2 [ 149014 ]")
![Bough Punch [ 157711 ]](https://assets1.tamsnetwork.com/images/EC042017NF/157711s.jpg "Bough Punch [ 157711 ]")
![Iridescent Faceted Gems [ 163368 ]](https://assets1.tamsnetwork.com/images/EC042017NF/163368s.jpg "Iridescent Faceted Gems [ 163368 ]")
![Silver & White 1/2" (1.3 Cm) Sheer Ribbon [ 162149 ]](https://assets1.tamsnetwork.com/images/EC042017NF/162149s.jpg "Silver & White 1/2\" (1.3 Cm) Sheer Ribbon [ 162149 ]")
![Splendid Autumn 6" X 6" (15.2 X 15.2 Cm) Designer Series Paper [ 164173 ]](https://assets1.tamsnetwork.com/images/EC042017NF/164173s.jpg "Splendid Autumn 6\" X 6\" (15.2 X 15.2 Cm) Designer Series Paper [ 164173 ]")
![Natural Tones Linen Thread [ 164071 ]](https://assets1.tamsnetwork.com/images/EC042017NF/164071s.jpg "Natural Tones Linen Thread [ 164071 ]")
![Crushed Curry 8-1/2" X 11" Cardstock [ 131199 ]](https://assets1.tamsnetwork.com/images/EC042017NF/131199s.jpg "Crushed Curry 8-1/2\" X 11\" Cardstock [ 131199 ]")
![Blackberry Bliss 8-1/2" X 11" Cardstock [ 133675 ]](https://assets1.tamsnetwork.com/images/EC042017NF/133675s.jpg "Blackberry Bliss 8-1/2\" X 11\" Cardstock [ 133675 ]")
![Pecan Pie Classic Stampin' Pad [ 161665 ]](https://assets1.tamsnetwork.com/images/EC042017NF/161665s.jpg "Pecan Pie Classic Stampin' Pad [ 161665 ]")
![Blackberry Bliss Classic Stampin' Pad [ 147092 ]](https://assets1.tamsnetwork.com/images/EC042017NF/147092s.jpg "Blackberry Bliss Classic Stampin' Pad [ 147092 ]")


")


")


