Have you ever made a triangle gift box? It starts with a regular card base (8.5″ x 5.5″) and is quick to complete, no geometry required!
It felt like this triangle needed tacos, but you can put anything on it! Print the instructions below, then watch the video that follows for a few more finished samples and HOW TO!
Any supplies you need to craft your own can be found in my STAMPIN’ STORE! And heads up… tomorrow (Wednesday, April 19, 2023) is a FLASH FREE SHIPPING DAY on all orders over $75!
Thanks for allowing me to help you gain creative confidence!
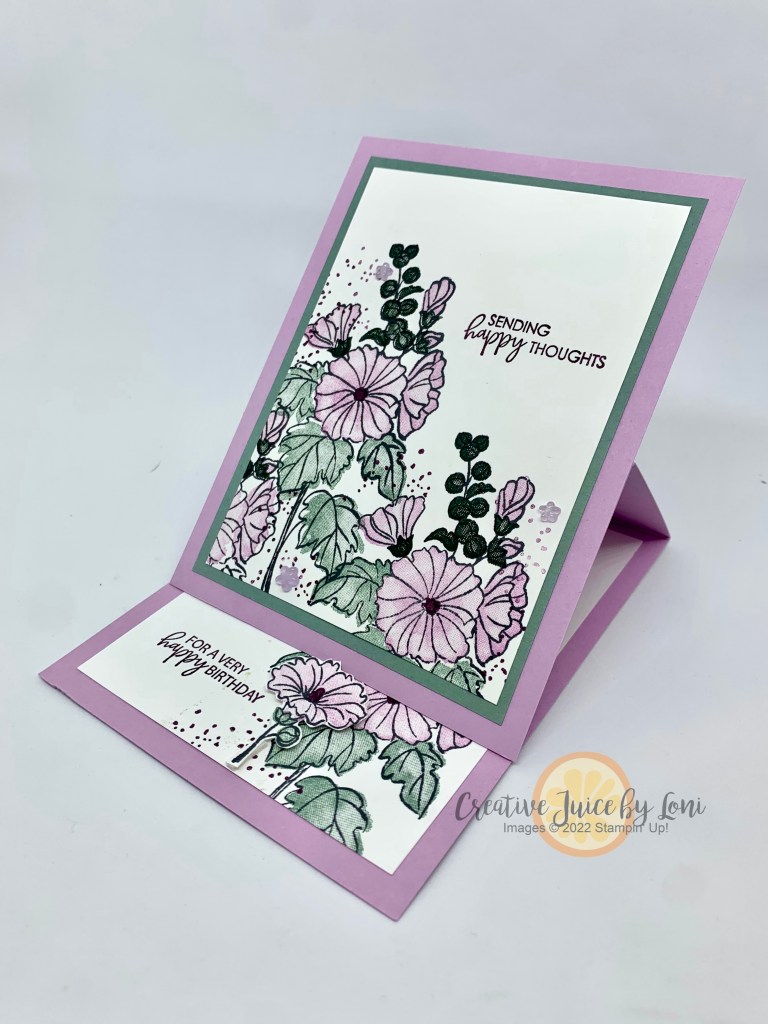
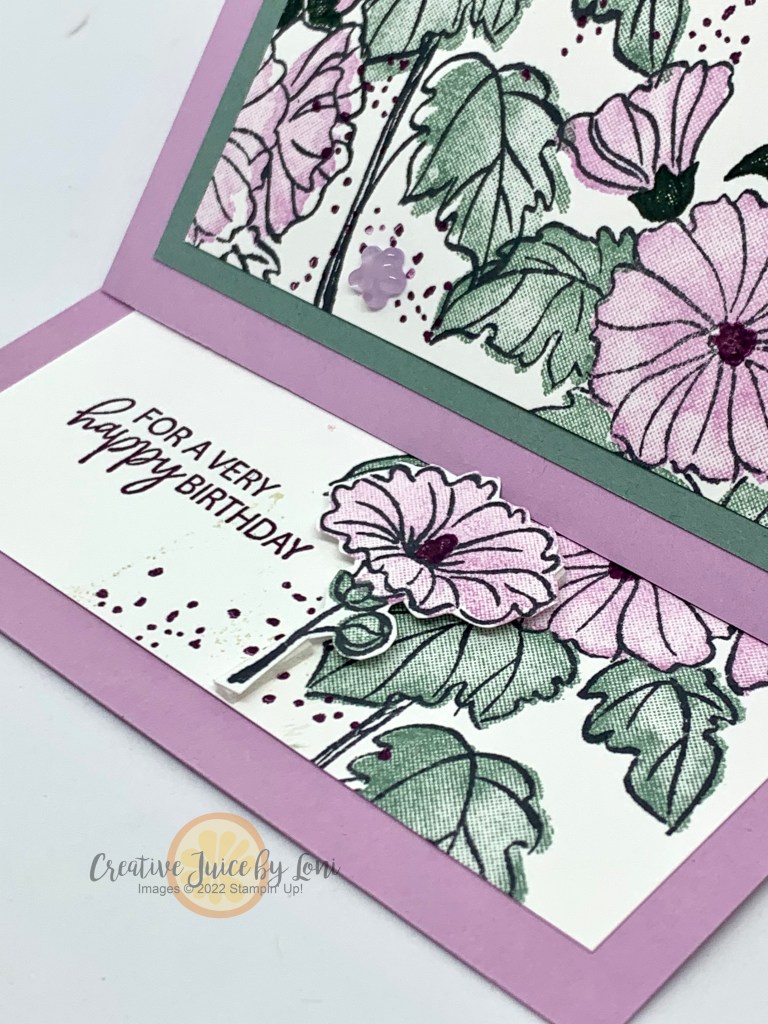
Split-front cards are trending in paper crafting, and the Sending Smiles bundle makes today’s card a sunny one!
I’d been seeing these pretty cards and knew it was time to jump in, so today I taught you how with a video. Will you try this unique style of a split-front card?
If you are wanting the best deal to gain CREATIVE CONFIDENCE, add $125 worth of these items to a STARTER KIT (and only pay $99)…then you’ll be part of my Sprinkled Ink team and connected to other creative people sharing what they love! It’s my job to help you learn and grow your business, and we’ll have a fun time doing it together.
Crafter Problems #763: When you haven’t had time to play with a stamp set & die bundle before it’s about to be retired!
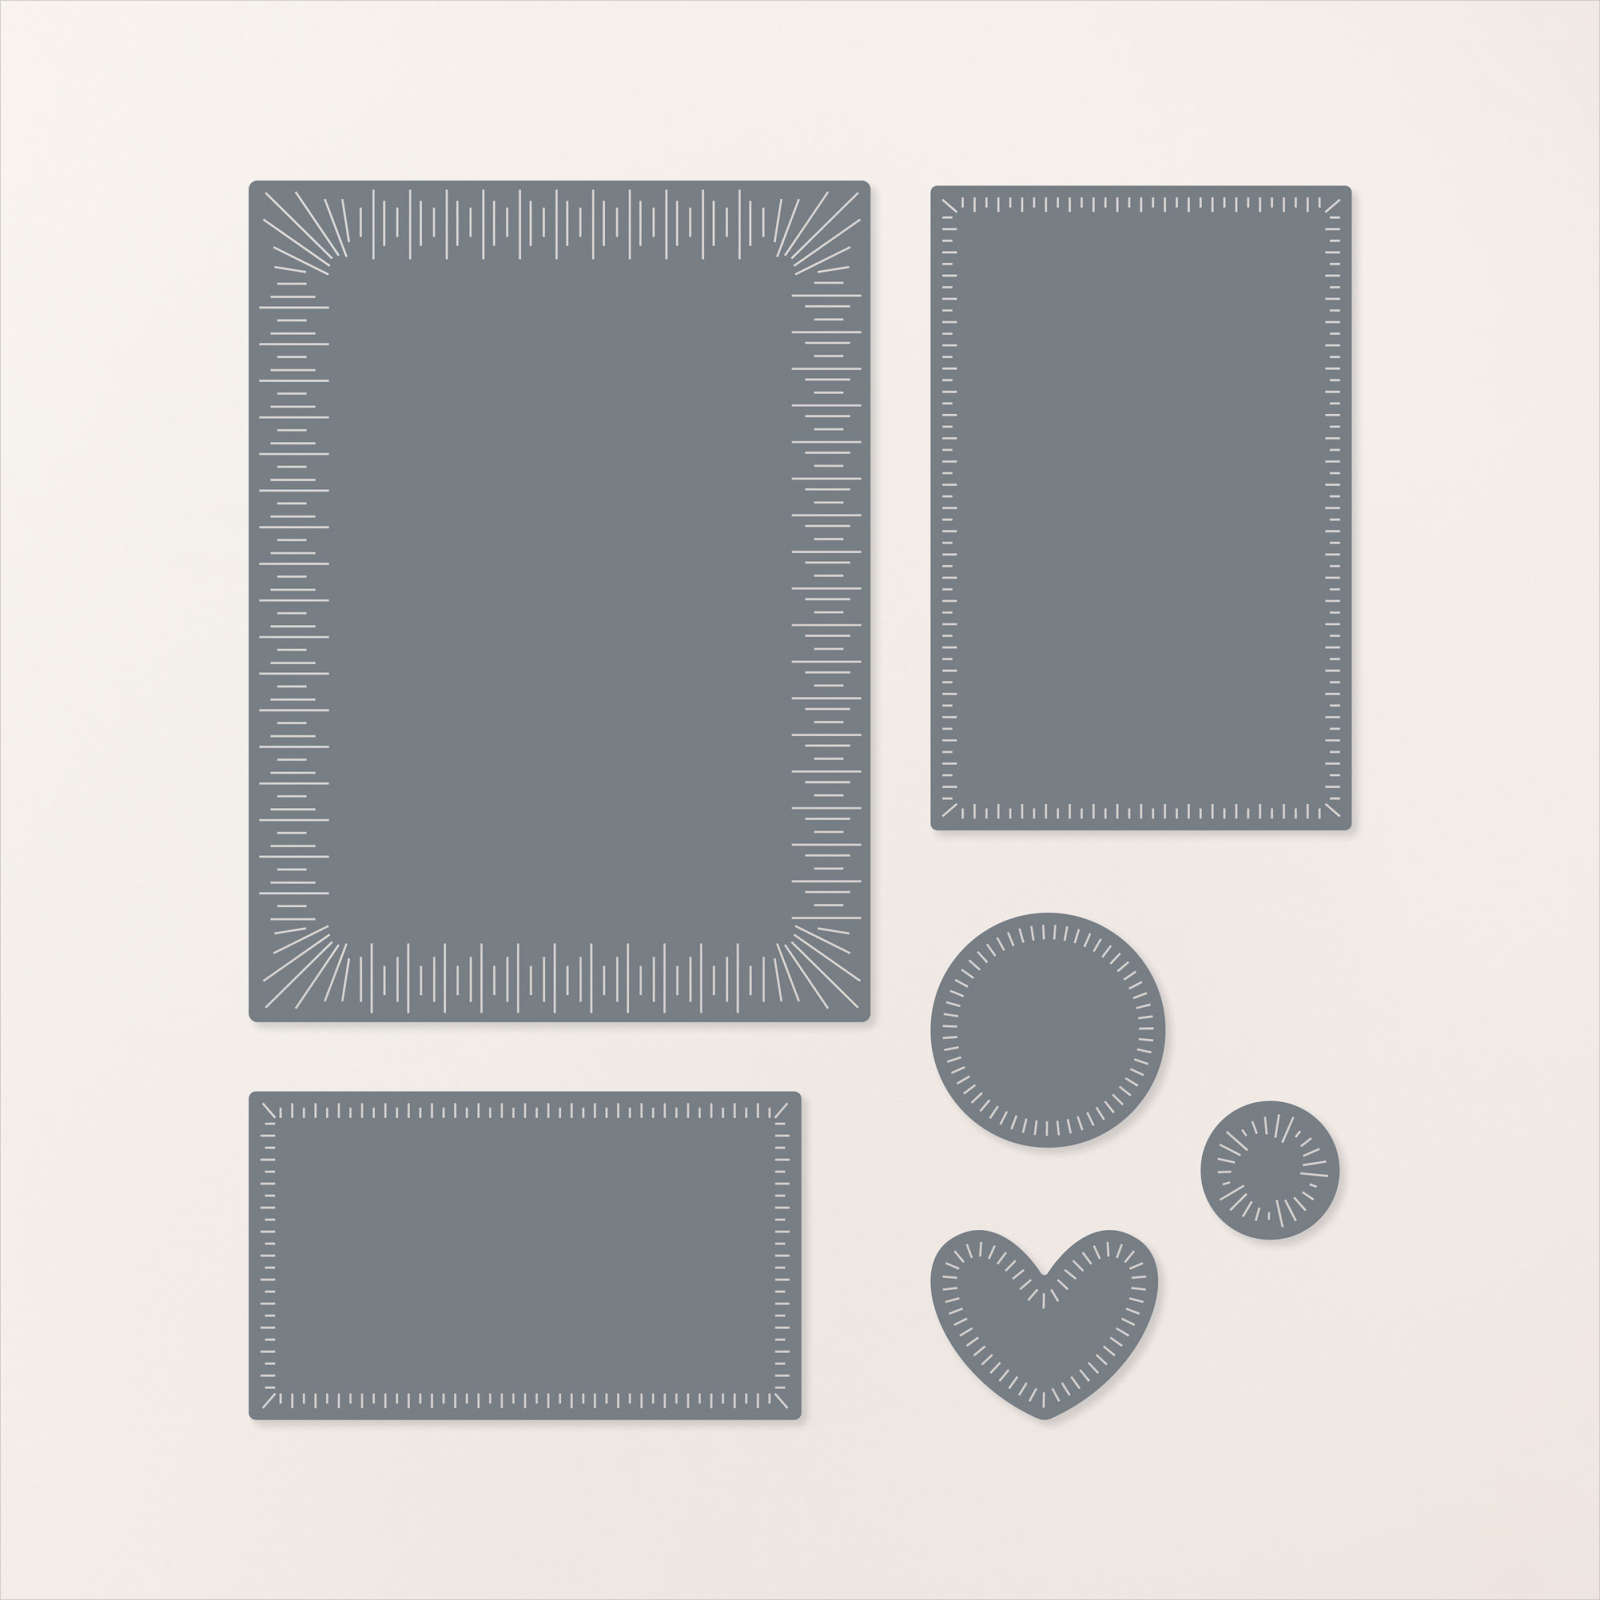
Today I showed how to use the dies from the Conversation Bubbles bundle (about to retire from the Jan-April mini catalog) to create a stencil for the background of a card:
Inspired by Cathy Zielke‘s concept on Youtube, I figured I could make my OWN stencil, and it worked beautifully! What other dies would you try to make your own stencil with?
My problem is YOUR opportunity: Starting tomorrow (April 4th), you can shop the LAST CHANCE SALE in my Stampin’ Store to collect the Conversation Bubbles stamp set and Conversation Bubbles dies at a discount! The bundle was $46.75 originally, but if you purchase them separately, the total will be just $32 (while supplies last)!
Watch the video here (feel free to speed it up on YouTube to make it quick and easy):
I hope I’ll have time to spotlight this playful bundle one more time before they are gone for good.
Meanwhile, set an alarm to remind you to shop my Stampin’ Store tomorrow for the Last Chance Sale!
Don’t pretty colors make you happy? They can evoke many moods, for certain! I’d love to hear how the new 2023-2025 IN COLORS make you feel:
From left, the 2023-2025 IN Colors are: Moody Mauve, Wild Wheat, Boho Blue, Copper Clay and Pebbled Path.
While these colors won’t be available until May 2nd to purchase in my Stampin’ Store, I wanted you to get a good look! The best words I have to describe them are earthy, organic, and cozy. What are your descriptors?
Stampin’ Up! also “refreshes” their core colors ever 5-7 years, and I’m thrilled about some of these new and returning colors to our lineup:
Ready to see more? Watch this video for all the prettiness and new color family associations:
Do you see any that appeal to you? Leave me a comment with the colors you are anticipating the most, then set an alarm for May 2nd to get your color fix!
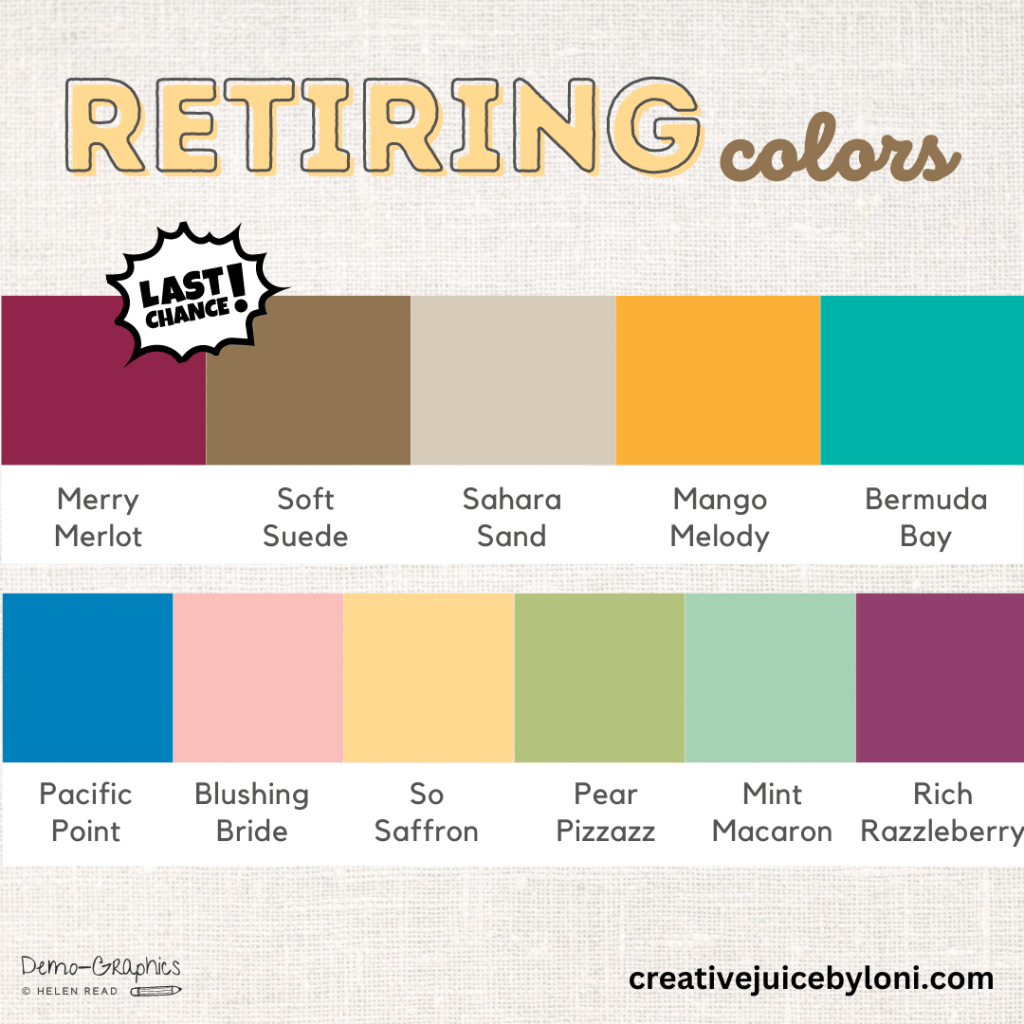
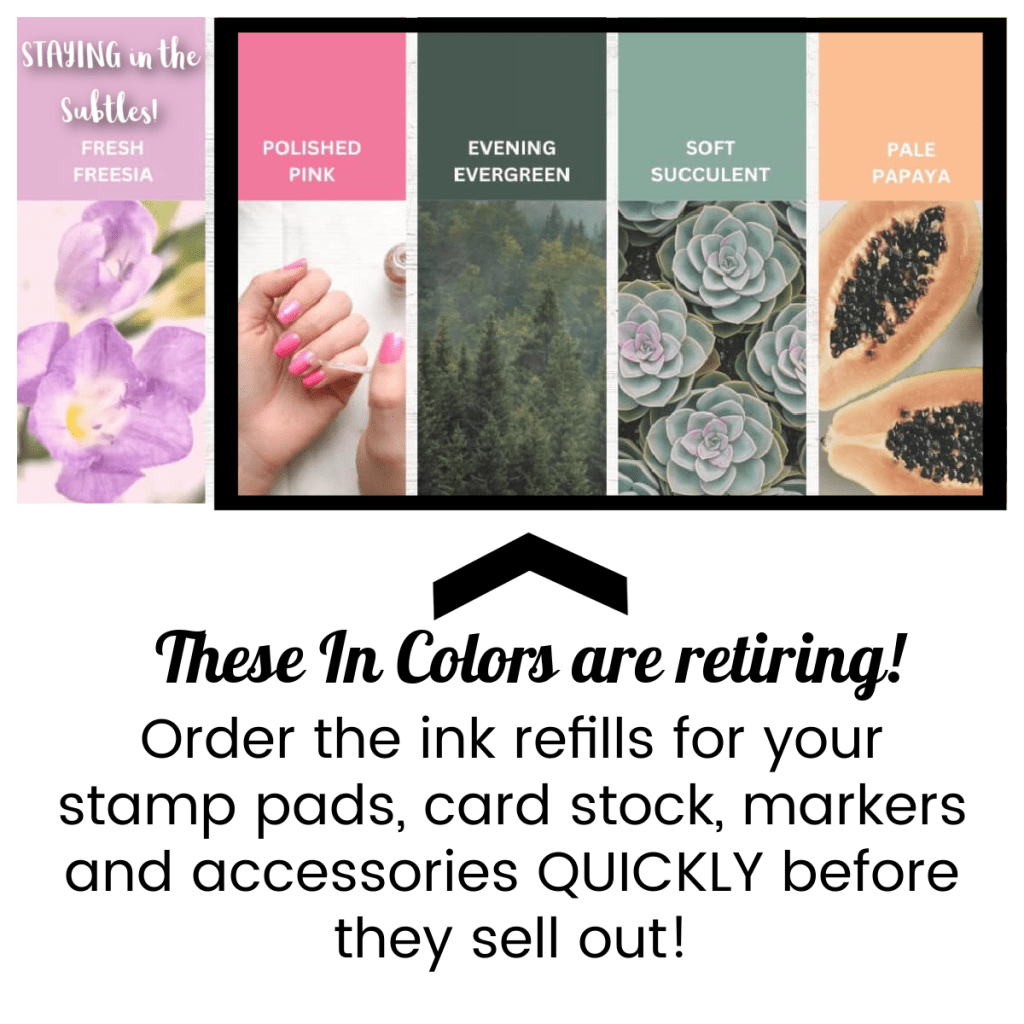
A flurry of activity at Stampin’ Up! the past few days: Demonstrators were given a peek into the COLOR REFRESH that is coming with the new Annual Catalog on May 2nd – including the 2023-2024 IN COLORS – as well as a list of all the retiring products (see below).
You may come back tomorrow for a look at some of the NEW colors, but first, let’s talk about what is leaving.
These CORE COLORS are leaving the lineup to make room for a fresh new set of hues! If your favorites are on this list, you will want to quickly MAKE SURE YOU HAVE an ink refill for your ink pads, as well as card stock and any accessories in the same color.
When a big change like this happens, ink refills are the first thing to sell out, so don’t wait!
I AM happy that Fresh Freesia is going to step up and take a place in the SU! Subtle color family, but the other 2021-2023 In-Colors are also walking out the door…
I will share what I can tomorrow about the NEW & Returning colors.
The list of retiring products from the ANNUAL catalog and January – April Mini Catalog is also available now!
As you download or print these lists, you’ll notice that some have a discount by them: THE LAST CHANCE SALE BEGINS APRIL 4th, but if you have a favorite item, beware that some supplies are limited and may sell out before the sale starts. Once they are gone, they will NOT be restocked.
is the Stamaparatus! Sadly, SU! had to make a legal decision to discontinue this amazing tool, and it’s indispensible for stampers…do you have one yet? ADD IT TO YOUR CART NOW!
With all the changes, I’m cleaning out my Stamp Studio in preparation for my BOGO SALE and NEW Catalog Open House on May 6th! Mark your calendar and come to this once-a-year event at my house in Hurricane, UT and bring a friend.
Thank you for letting me serve your creative needs – Loni
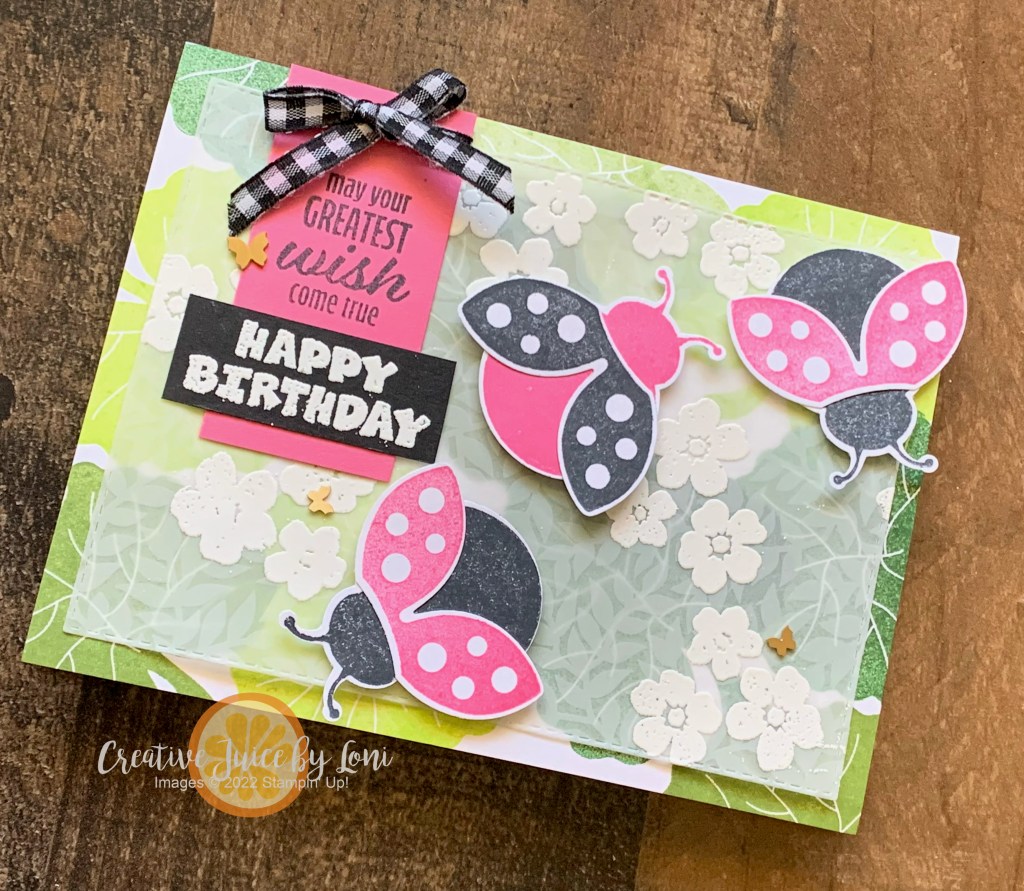
I challenged my Sprinkled Ink team to use Vellum this month, and what kind of leader would I be if I didn’t do what I asked them to do? So it was delightful when Friday’s TGIF challenge went right along with it! Plus, I got to pull out my Ladybug builder punch to create Polished Pink bugs for a birthday card, so who wouldn’t have fun with that?
Have you played with the Vellum Basics Specialty Designer Series Paper? With SIX 12″x12″ pieces of printed vellum – 2 each of stripes, polka dots, and this pretty leafy vine that I used – it’s gives a soft layer of texture, which I enhanced by heat-embossing the blossoms on top of:
While I stamped and punched out the ladybugs for the Polished Pink version of the card, you can also just use the Ladybug Builder punch to punch the pieces out and stamp the polka-dots on the wings, as in the Real Red version-
You’ll have such an enjoyable time putting together these cards, and remember to order some Brushed Brass Butterfly embellishments to include inside your card as the birthday gift!
Here’s a step-by-step video to make it easy for you – simply pause the video and collect the pieces you need to create along with me.
Click the links to add the supplies you’ll need to your cart (Stitched Rectangle dies and Cut & Emboss machine are optional):
THE BEST DEAL is always the Starter Kit!! Add $125 of the products you want to your Starter Kit and only pay $99…PLUS, save every time you shop, and be a part of my fabulous Sprinkled Ink team of Stampin’ Up! demonstrators. It’s a WIN/WIN opportuntiy!
With all the awesome alphabet products Stampin’ Up! currently carries, the New at SU! design team is showing up to demonstrate ways to say what you want to say in our March 2023 Blog Hop!
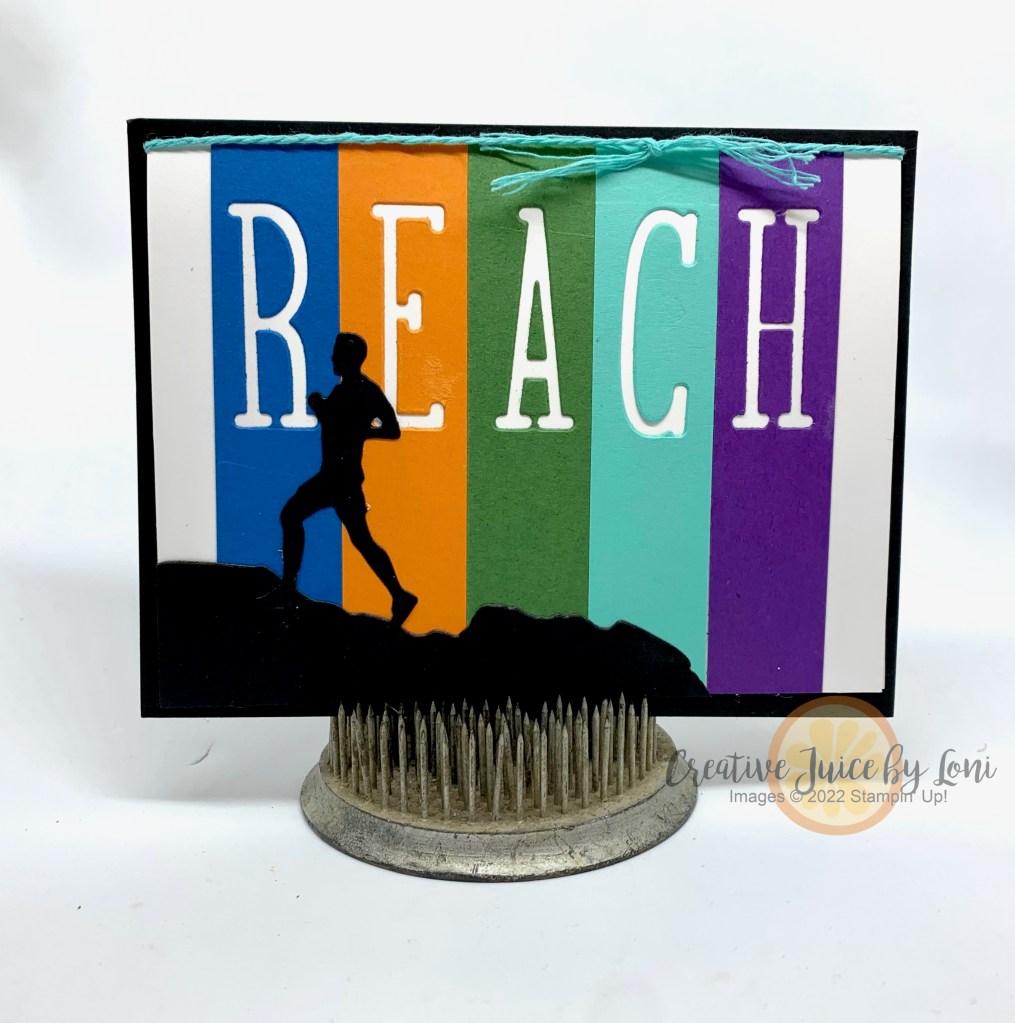
I’ve paired the Alphabet a la Mode dies with the Greatest Journey dies to create a card of encouragement for someone who is working toward a goal:
The trickiest part of this card was making sure I cut out the letters the same distance from the top of each strip of card stock, and to remember to keep the inside of the letter “A” to adhere inside the negative image. I did add an adhesive sheet to the back of each 7/8″ x 4″ piece of card stock before die cutting, so I could easily adhere the strips to the card AND use the letters I cut out for another project.
TIP:Use a piece of washi tape to hold the letters in place as you run the dies through the Cut & Emboss machine!
After that, it was all downhill (so to speak): die cut the runner and mountain from Basic Black, and layer the card onto a black mat.
I stamped the “This Moment” sentiment inside the card, because we don’t always recognize that our hard work now will pay off later.
Now, discover MORE ways to use letters and alphabets in your paper crafting with these ideas from our International New at SU! Group of Demonstrators:
Yes, this is the second sketch challenge in two days, and one that I dreamed about. So to stop obsessing over it when I should be sleeping, I had to stamp it to get it off my mind.
Then I looked at my stamps and saw the Warm Welcome set on my shelf that needed some attention. The door is just so inviting and the sentiment is ideal for welcoming friends into your home, so I imagined an open door and hot cocoa.
Take a look at the Enjoy the Journey Designer Series Paper and see it in a new way: through a window or door, it makes a great background! And the patterns on the opposite sides of the scenery are fun for wallpaper or accents. I even used a piece to stamp the “Hello” sentiment on.
The Warm Welcome bundle includes all sorts of dies that make creating an open-door policy fun…and you can color the small pieces (like the hands holding the mugs) with any markers. I used Stampin’ Blends (not listed in the supplies), but the images are tiny enough a Stampin’ Write marker would work as well.
Don’t miss the new BASICS 3D Embossing Folders (new to my online store); as a set of 3, you can choose from flowers, hobnail-glass dots or this very nice crosshatch design. It gave the background a subtle texture that helped pull the design together. Surely these patterns will be showing up in my crafting often.
Send this card to a friend and invite them over to craft and chill sometime!
Have you taken the time to explore the new Online Exclusives in my Stampin’ Up! Store? Some things have been so popular, they are already backordered and we are waiting for more!
One new item I wanted to share with you is the Radiating Stitches Dies…these cutting tools will take ANY stamps you already have and give them a pretty frame or add a bit of whimsy with a layer of “stitching” around the edges of your layers:
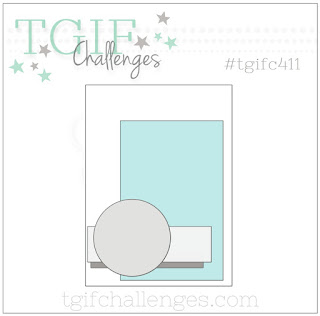
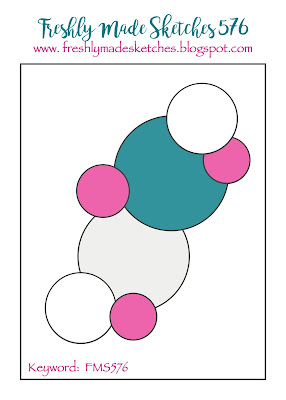
I chose to follow the Freshly Made Sketch #576 during my Live Crafting today and used two In Color Combinations to demonstrate the versatility of starting with a sketch, and the ease of using a combination of colors curated in a color “family”.
It happens that from today through Mid-April, I have 10 family birthdays (and about 15 friend and team birthdays) to celebrate, so this was an opportunity to get prepared!
This version I turned sideways and used the 2022-2024 In Colors as my palette. A sketch can be turned any which-way!
And this card followed the portrait layout of the original sketch, plus I used a base of Very Vanilla with my colors from the (retiring) 2021-2023 In Colors. All supplies listed below to make it easy to add to your cart!
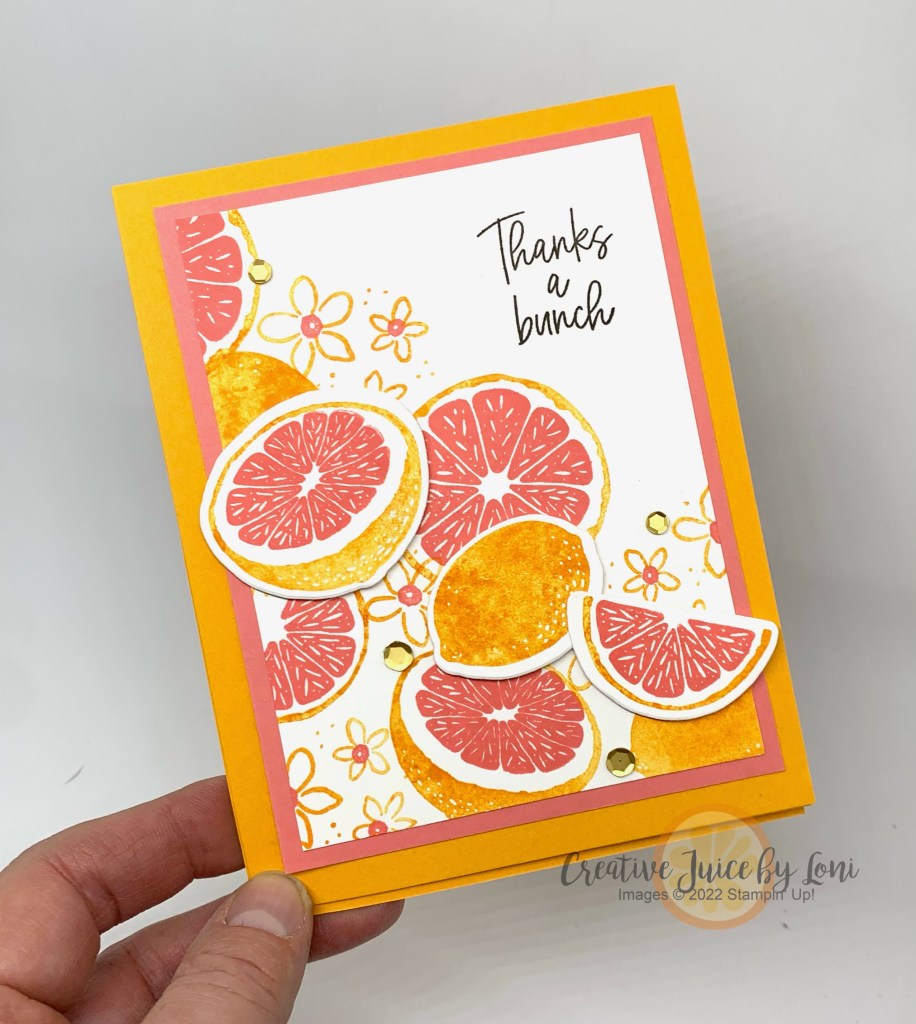
When you are so grateful for someone you could just SQUEEZE them tight, here’s your card!
The Sweet Citrus stamps can become anything (oranges, lemons, limes and even coconuts!) so this time I used Mango Melody and Flirty Flamingo to turn them into GRAPEFRUIT.
But the best thing about this card is that it’s an EASEL card when you open it and stand the front up against the slice inside:
It’s a simple fancy fold: The card base is an 11″ x 4-1/4″ piece of Mango Melody card stock scored at 2-3/4″ and 5-1/2″, plus you’ll need another 4-1/4″ x 5-1/2″ piece of Mango Melody to adhere to the bottom half of the front of the card ONLY (below where it bends) to create the part that stands up. Then just decorate the front panel as desired.
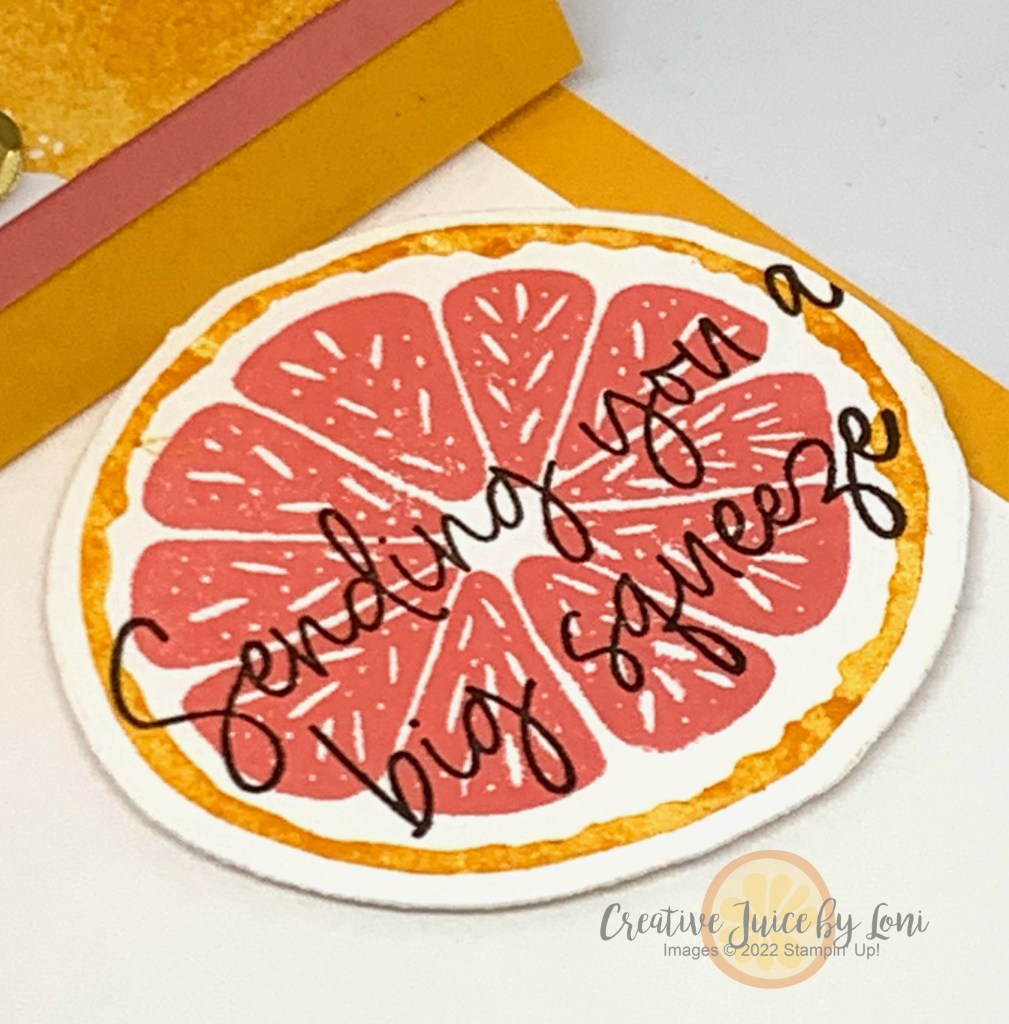
Inside, you’ll need a piece of fruit to create a “stop” for the easel front to rest against. I used a slice of grapefruit popped up on a few dimensionals:
It’s a very easy card to make and yet it packs a (grapefruit) PUNCH!
Thanks for visiting my website and choosing me to serve your creative needs. Your support means so much to me!
Here’s a bonus for reading to the end: I also made this card with the Beautifully Happy set from Sale-a-Bration (last month), just to show how versatile this style of card is.


")


")


")


")
")

 Specialty Designer Series Paper")


 Gingham Ribbon")


")


")
 Designer Series Paper")


")