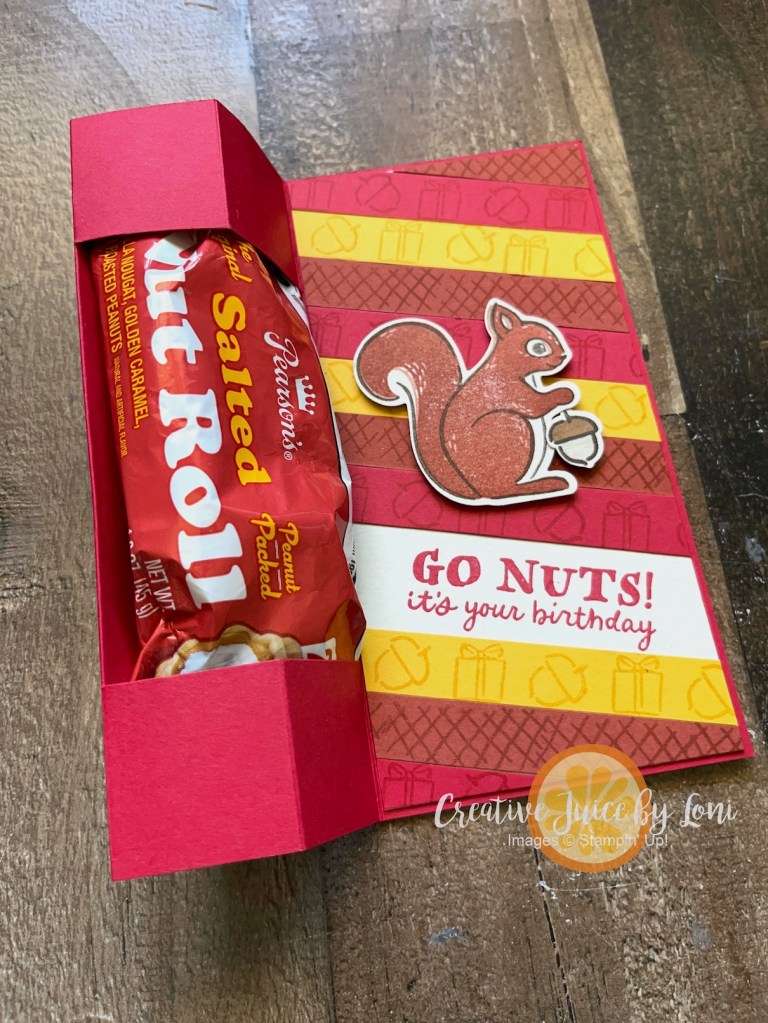
If having a sweet tooth is wrong, I don’t want to be right! Admittedly, I do *attempt* to control it, but peanuts are healthy, right? Even in a bit of caramel and nougat?
“Festive Treats” is the TGIF Challenges theme this week- this birthday treat fits for #tgifc548
Here’s a 90-second tutorial, then I’ll write the measurements below:
Card Base: 11″ x 6″, scored at 4-1/4″, 5-1/2″, 6-3/4″ and 8″
Card layer (front and inside: 5-7/8″ x 2-7/8″ with 1/2″ strips to stamp on.
Just 4 days left to take advantage of the Starter Kit Special! Smart Stampers won’t let this amazing shopping deal pass by (with the opportunity to get a discount on your stamping supplies, birthday and holiday gifts through April, 2026!) This offer EXPIRES OCTOBER 31, 2025!
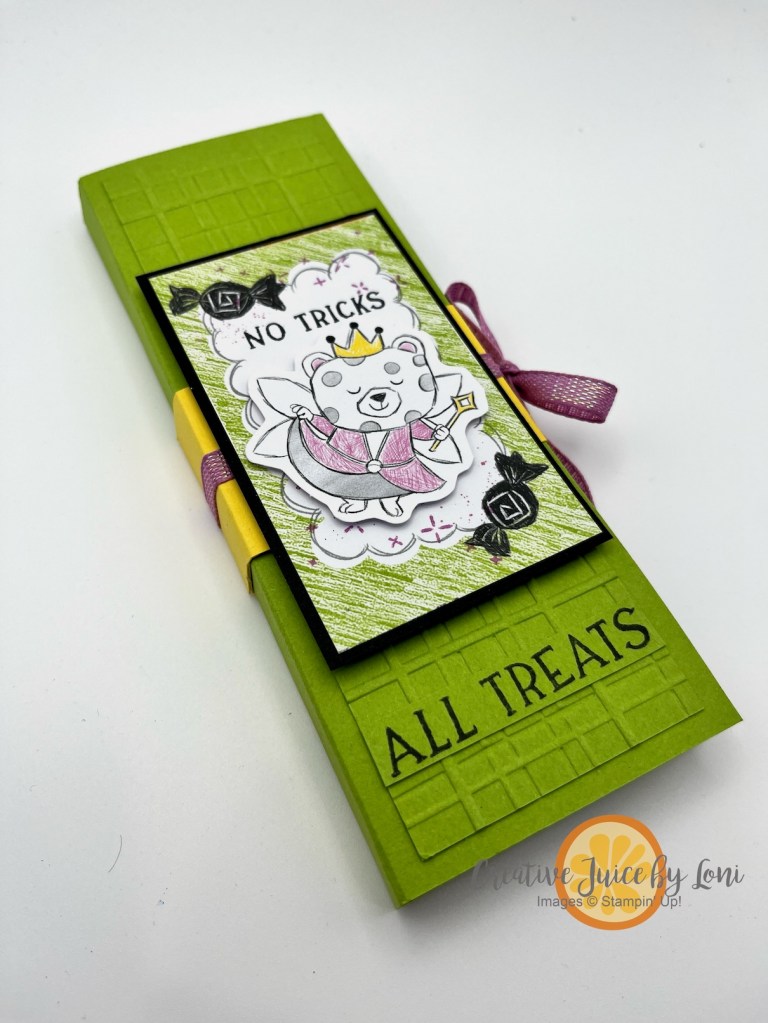
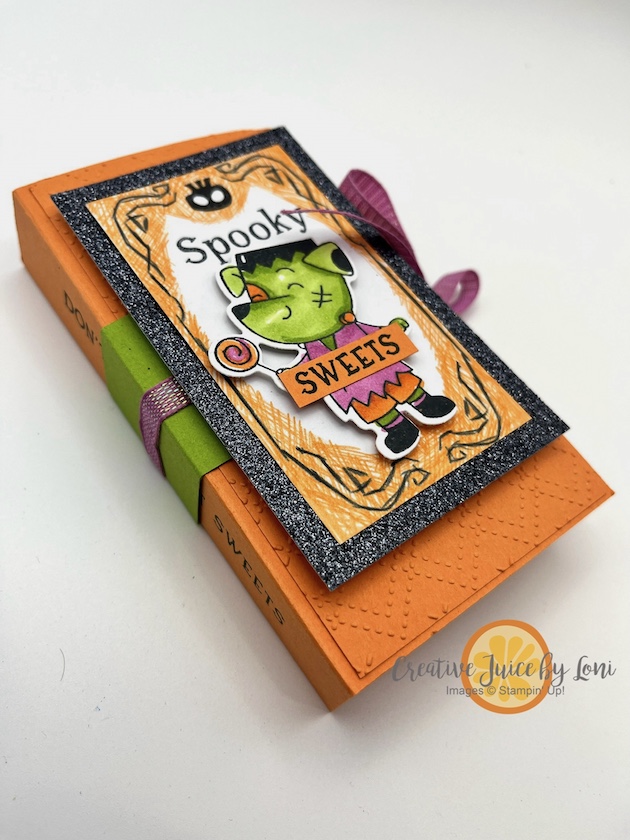
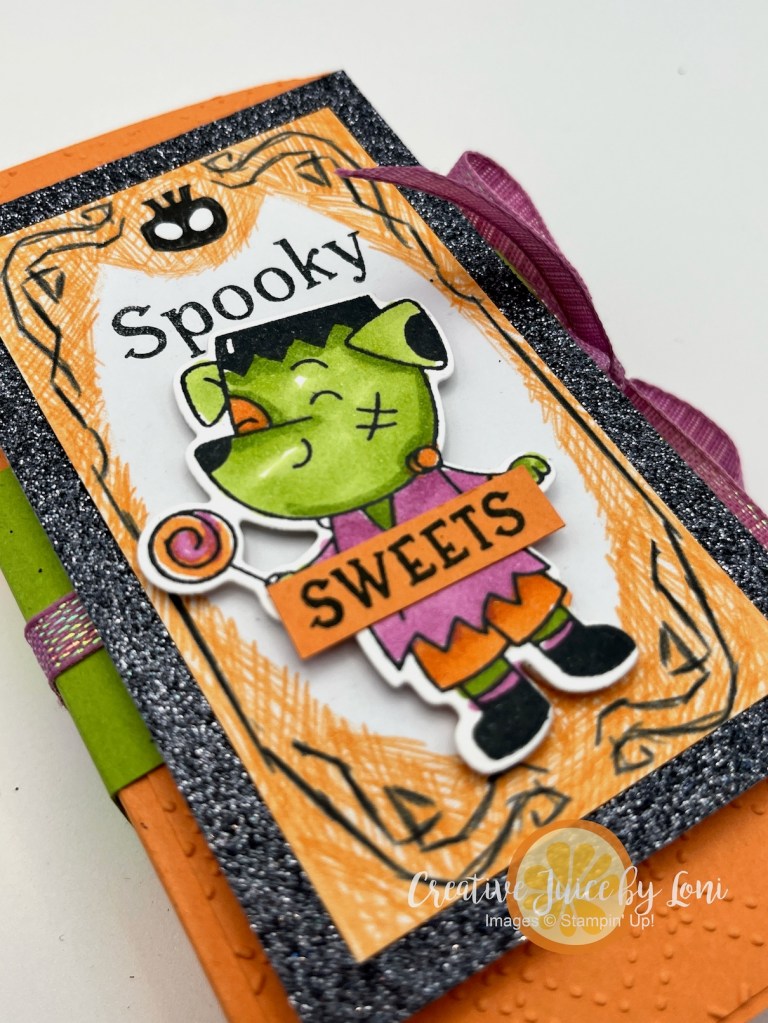
If your Halloween crafting stash is calling your name louder than a ghost in a graveyard, grab your Stampin’ Up!® Spooky Sweet Suite and conjure up something boo-tiful! Don’t worry, eat sweets with these dang cute CANDY BAR BOOKS:
I’ve brewed up two fun versions of this project. The Granny Apple Green “All Treats” Candy Bar Book holds two classic Hershey bars, while the Timid Tiger “Spooky Sweets” version was made to fit two Ghost Toast KitKats. Each one ties up neatly with ribbon to keep your candy secure until it’s time for a delicious reveal. Whether you’re giving these as gifts, party favors, or adding them to a Halloween goodie basket, they’re sure to get more “oohs” and “aahs” than a haunted house on October 31st.
These projects are surprisingly easy to assemble—no hocus pocus required! I’ve included an instructional video below, AND a printable .pdf with measurements.
Note that the belly band measurements are shown on white card stock, but the project uses Granny Apple Green card stock.
I embossed the covers to add some textured dimension (because even monsters like stampin’ style), then decorated with die cuts, stamped images, and a touch of sparkle. Isn’t it Franken-fun?
Here are the key measurements for both versions:
Green “All Treats” Book (fits two Hershey bars):
Cardstock base: 5 1/4″ x 6 1/2″ scored along shorter end at 2 3/8″and 2 7/8″
Belly Band: 1 1/2″ x 6 3/8″ scored at 1/2″, 2 7/8″, 3 3/8″ and 5 7/8″
Ribbon: 16″
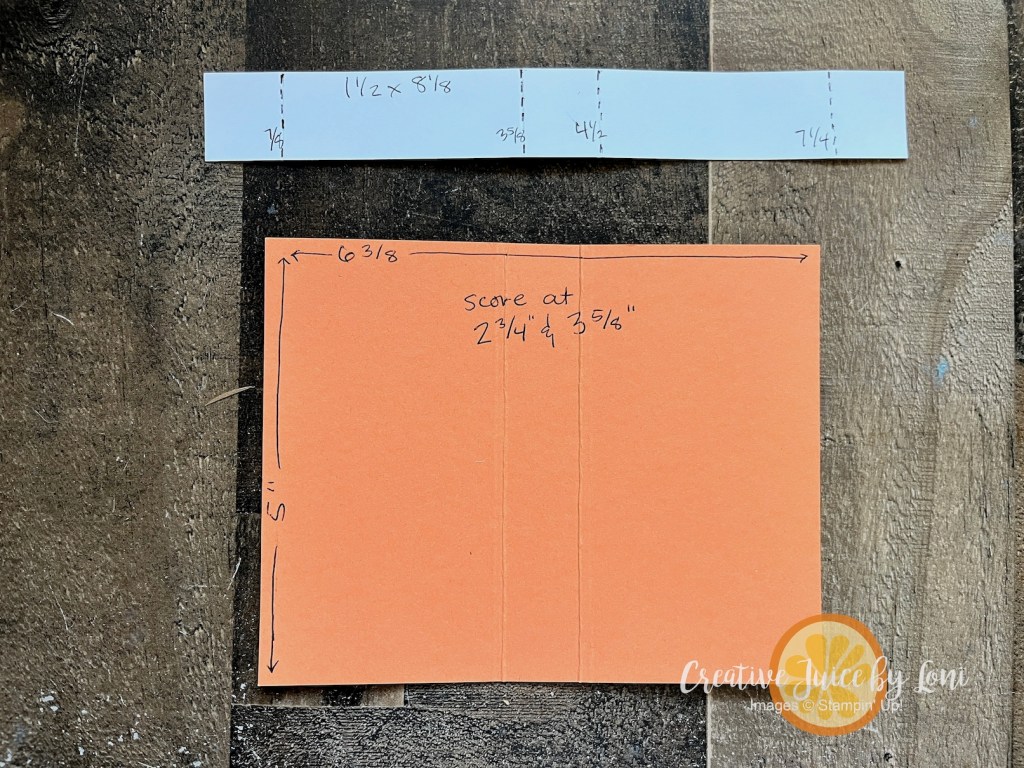
Orange “Spooky Sweets” Book (fits two KitKats):
Cardstock base: 5″ x 6 3/8″ scored along the longer side at 2 3/4″ and 3 5/8″
Belly Band: 1 1/2″ x 8 1/8″ scored at 7/8″, 3 5/8″, 4 1/2″ and 7 1/4″
Ribbon: 16″
Want to see the whole project come to life? Watch my full step-by-step tutorial on YouTube here:
What else did we talk about today? The 3-day KIT SALE (through October 8th):
AND we discussed FAQs on the Starter Kit Special! Bottom line: If you are planning to order more than $35 in crafting supplies from my Stampin’ Store this month, you may as well choose the Starter Kit!
To make your shopping Spooky Sweet, I’ll list the supplies for these projects below and THANK YOU for choosing me to serve your creativity!
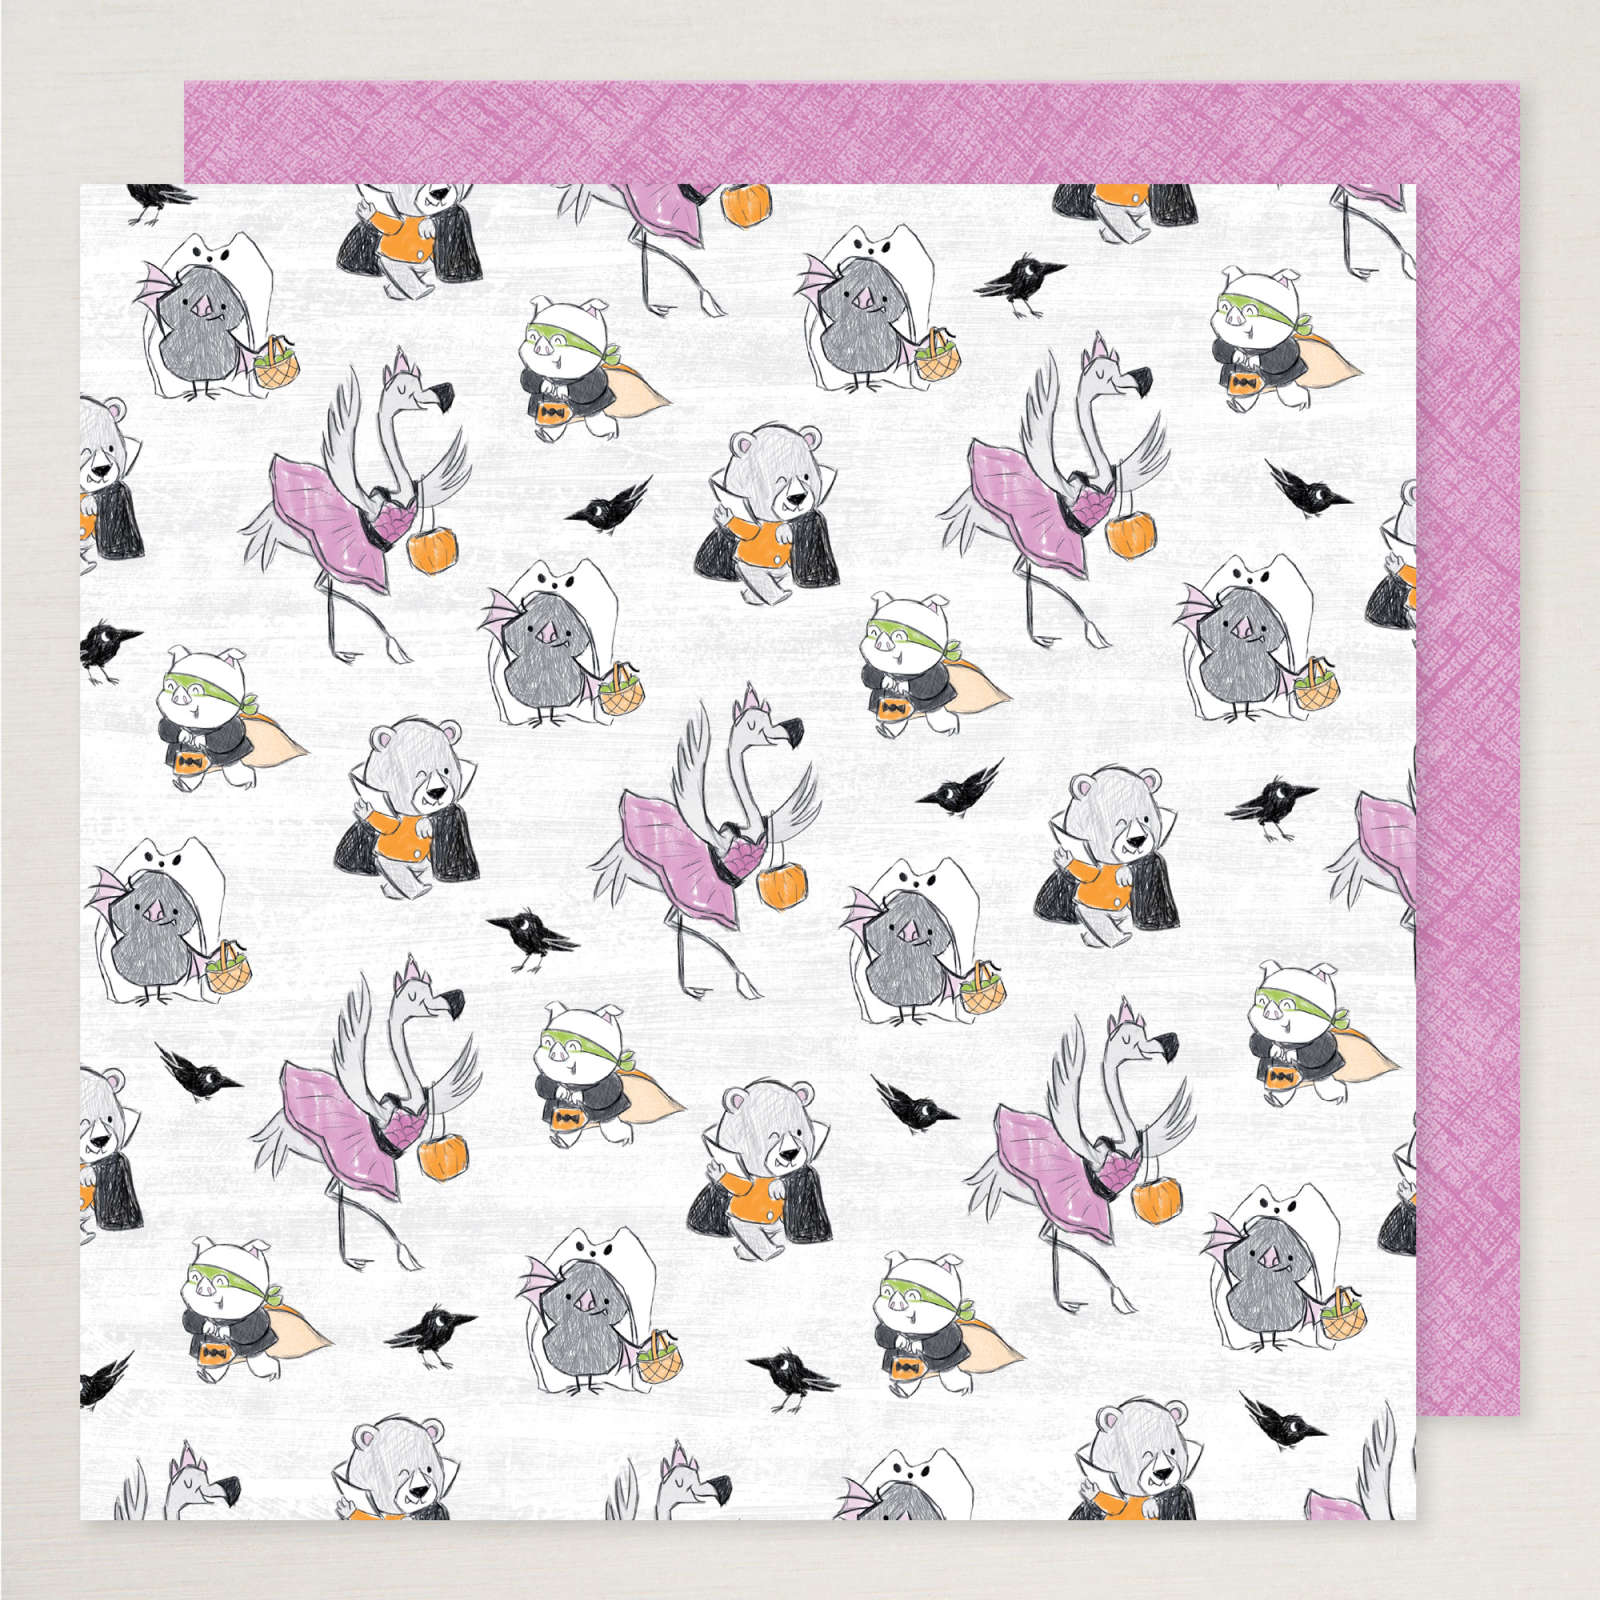
Halloween is around the corner, but you don’t need to be limited to the Trick or Treat season when crafting with the Stampin’ Up!®️ Spooky Sweet products, and particularly the Designer Series Paper. This sheet has a flamingo dressed in a tutu that I’m going to use on a birthday card:
It’s TOO TOO cute when paired with the Not 29 Anymore stamp set for a card you can send to “THAT FRIEND” who is fiesty & fabulous:
This card is called a “Missing Middle” card, and is easier than it looks: Start with a 4-1/4″ x 8 1/2″ piece of card stock (mine is Granny Apple Green) and score it at 5-1/2″ and cut it at 7″… leaving you a 1-1/2″ x 4-1/4″ piece of card stock for the bottom of the card. (All the supplies I used are listed at the bottom)
Fold the top 1-1/2″ down and add a layer of Designer Series Paper, if desired. Lay the section you cut off at the bottom edge of the card, and attach a 2-1/4″ x 4-1/4″ piece of card stock to the top section and bottom section only. Then it will open like this and you can add a white layer inside to write or stamp on:
My flamingo is layered over a piece of retired Be Dazzling specialty paper, but any of our current Glimmer Paper brings the bling when you need it.
Heading into the Halloween season, there are a few events (online and in-person) you’ll want to know about:
First: The VIRTUAL Spooky Sweet Class happens Thursday, October 2nd, and the last day you can order the suite and be invited to join the class is September 24th! This gives me time to prepare and mail the supplies you’ll need, and for you to have the suite ready to use. Learn more at the event description on Facebook by clicking the image below, or on my event calendar HERE.
Second: Stamping is the best medicine to make you feel good, and you’ll stamp 3 FALL paper crafting projects at ourStamp Therapy sessions in Hurricane, UT on October 9th. Choose to attend the 10 am session or the 6 pm session, but register early, because these seem to fill up quickly. Class fee: $15.
Southern Utah crafters: Here’s another tasty opportunity for more Spooky Sweet crafting at the Cookies, Cards & Cocoa class on Oct. 16th at 6:30 PM at the Strap Tank Restaurant in St. George, UT.
Decorate 4 Halloween sugar cookies and stamp two paper crafting projects, while enjoying a beverage from the restaurant. Class fee: $35 ALL SUPPLIES PROVIDED! Click HERE to register by Oct. 9th
Some cards just make you grin from the moment you start cutting paper. This one certainly did—because honestly, how can you not smile at a trio of darling dinos in perfectly coordinated colors?
For this design, I paired three of the 2025-2027 In Colors—Timid Tiger, Cloud Cover and Secret Sea —with a fresh pop of Old Olive. The bold contrast gives each dinosaur its own “personality,” while the embossed background panels add texture without overwhelming the scene.
But wait- there is more to discover as you dig in to this fun-fold card! We call it a “Quarter Fold”:
It’s a greeting card that works for all ages—kids will love the creatures, and adults will appreciate the wink of whimsy. It’s easier to make than you think: 2 card bases (one long, one wide) overlap each other, and close like the top of a box. To help you create your own, I’ve got a tutorial to download and print so you can refer to it anytime~
Working with In Colors is one of my favorite ways to keep my cards looking fresh without overthinking. Stampin’ Up! has done the color-coordinating work, so all I have to do is choose my favorites and let the creativity flow. With the August 2025 In-Color sale, even dinosaurs know to nod YES to new colors!
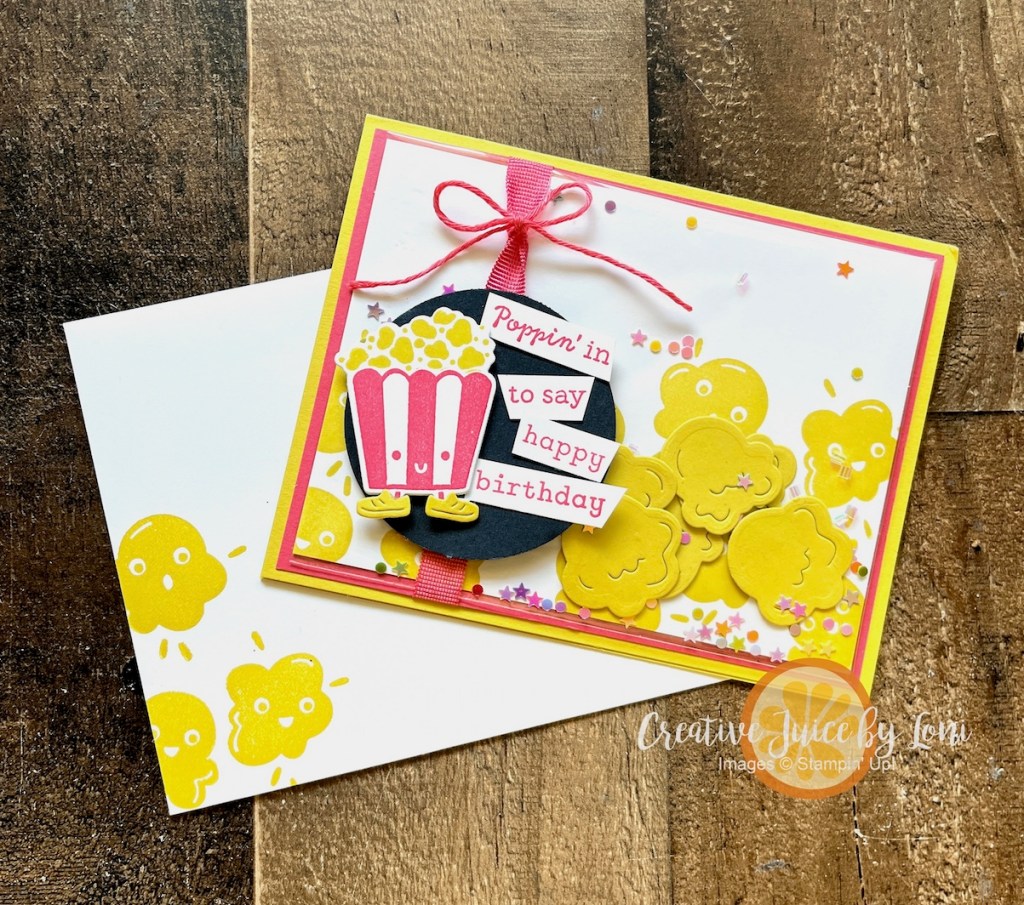
Creative Juice LIVE Crafting (on YouTube & Facebook) IS BACK…with a twist! Going forward, I’ll be going live in my channels at 12:30 p.m. MT ON THE FIRST MONDAY OF EACH MONTH. As I *pop* back into your social feed, I have an a-maize-ing Faux Shaker Card tutorial to share with you in today’s video!
Traditional shaker cards are quite thick, so using a clear envelope to hold the shaker elements makes the card thinner to mail, and easy to make.
Colors used: Darling Duckling, Strawberry Slush and Secret Sea, which are all 2025-2027 In Colors, and an announcement you’ll appreciate is that tomorrow (August 5th) is the beginning of an IN COLOR SALE!
Many In Color products are 15% off through August 31st, and I need to remember to order refills for my ink pads…my shopping list is started.
Without further adieu, here is the VIDEO TUTORIAL for the Faux Shaker Popcorn Birthday card, and you may add the supplies to your cart with the list below the video:
A simple card can be transformed by an easy fun-fold element, and in today’s free tutorial, I’ll show you how to make someone’s birthday brighter!
Behind this simple facade lies a fancy surprise as you open the card:
The Everyday Arches dies are the star of this card, and an essential set of paper crafting tools that belong in every stamper’s arsenal.
Let me know if you like this idea by leaving a comment (top of post, near posting date), order the supplies you need below the button, then download the tutorial and give it a go!
Scrapbooking is about telling your stories and getting the photos off your phone! Myself, I tend to keep it simple to get it done. As part of our “Sweet, Suite Summer” series (since it’s the last week of our Suite BOGO50 Sale) I wanted to use the Everyday Skies Suite to show you how these products can be fantastic for memory albums!
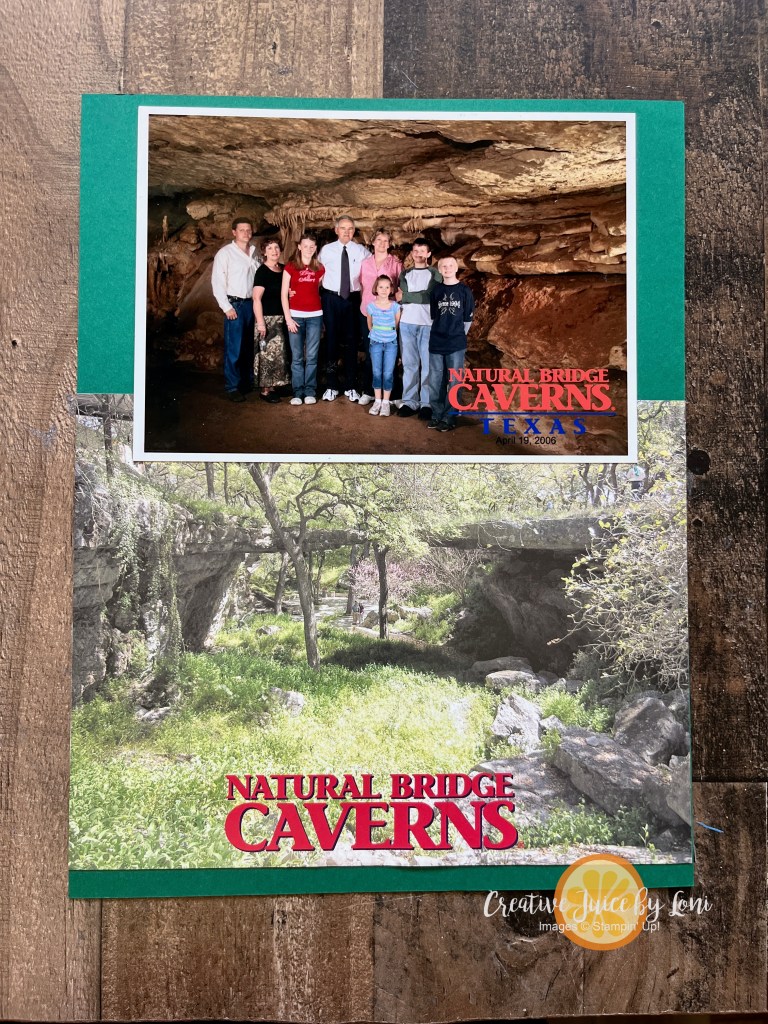
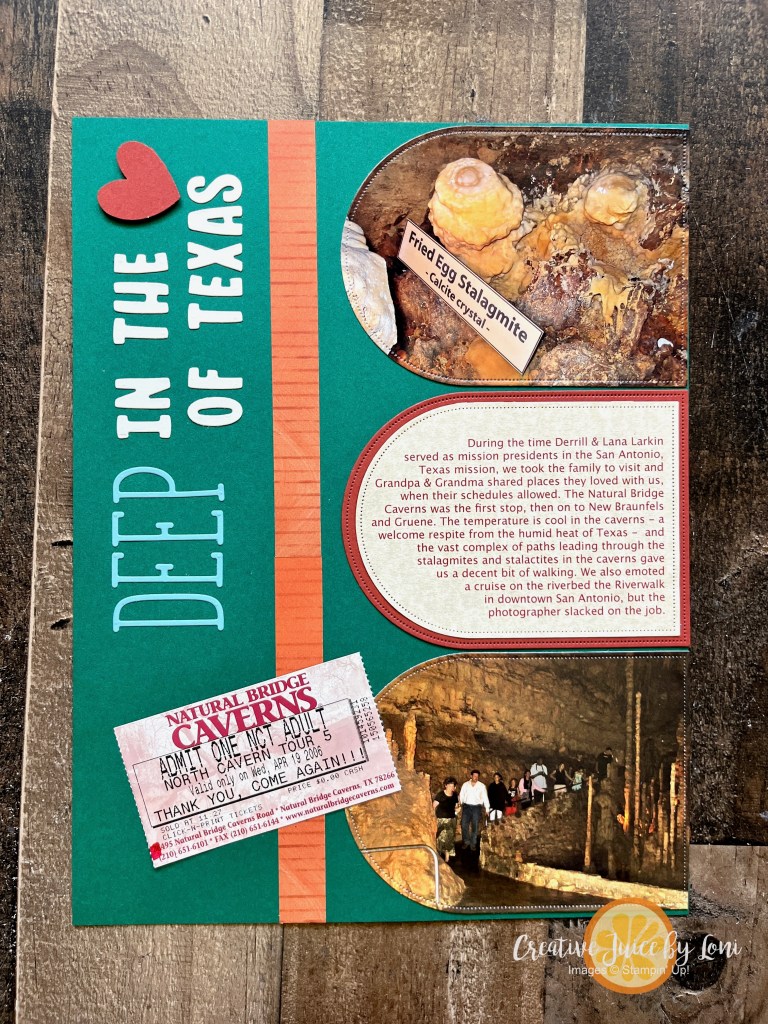
My first page capturing a trip to Texas (many years ago) could NOT be more simple because the photo has the date and the front of the folder that the picture came in tells where it is. There are no Everyday Skies products on this page, but hold on…
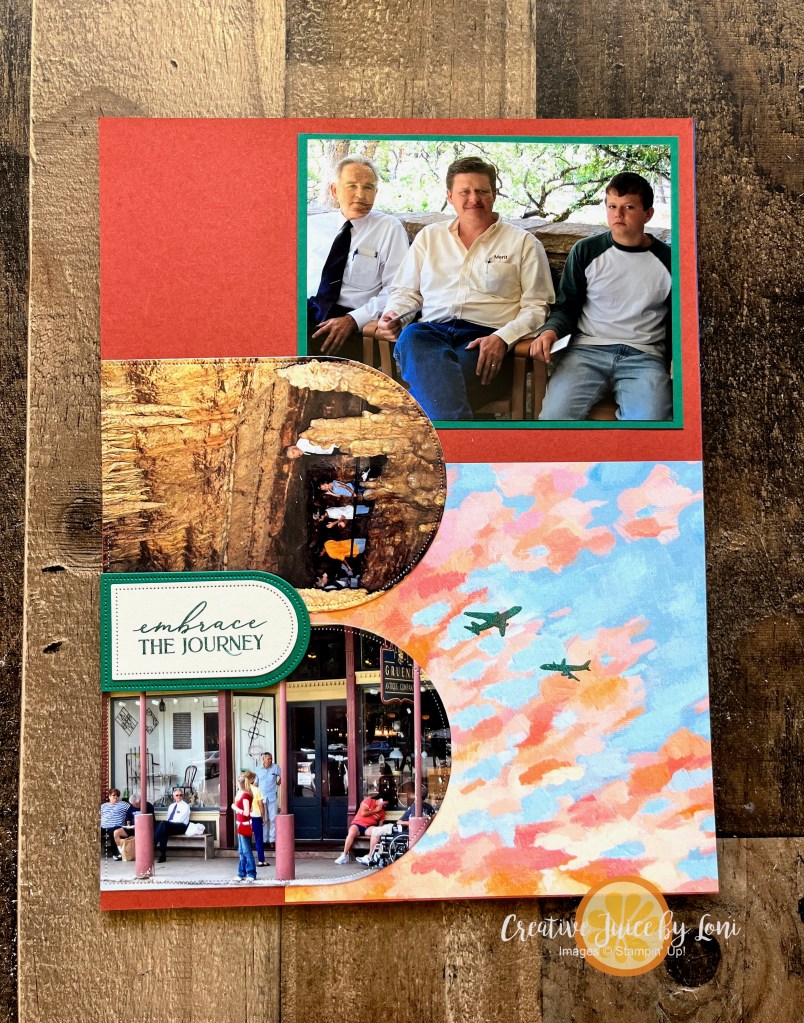
On the second page, I start using the Everyday Arches dies, which is part of the suite. Cutting photos with the arches gives them a unique look. While my preference is 8.5″ x 11″ pages, you can do the same thing on a 12″ x 12″ page:
The title uses a few of our alphabet dies (listed in complete supply list, below) and a strip of the Everyday Skies Designer Series Paper makes it feel separated.
Moving to the third page (also the second page of the layout), I’ve added a whole 6″ x 6″ piece of the DSP to the lower corner to tie the colors together, and stamped the airplanes to indicate that we flew to Texas for this vacation:
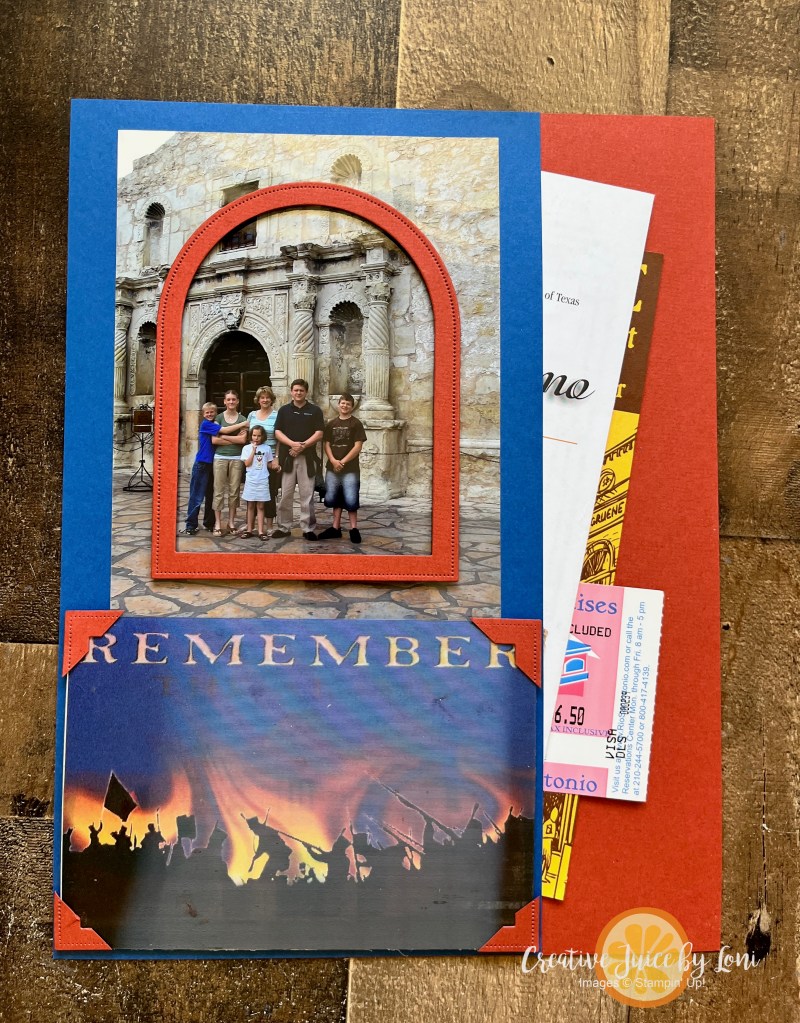
To keep all the maps, ticket stubs and brochures together, page #4 actually acts as a pocket:
Just for fun, the postcard from the Alamo in San Antonio that I used on the bottom of the pocket page is 3-D, so when you move the page, a different image appears:
Try “framing” a larger photo with an arch outline, and watch the demonstration video to learn how I made the photo corners 😉
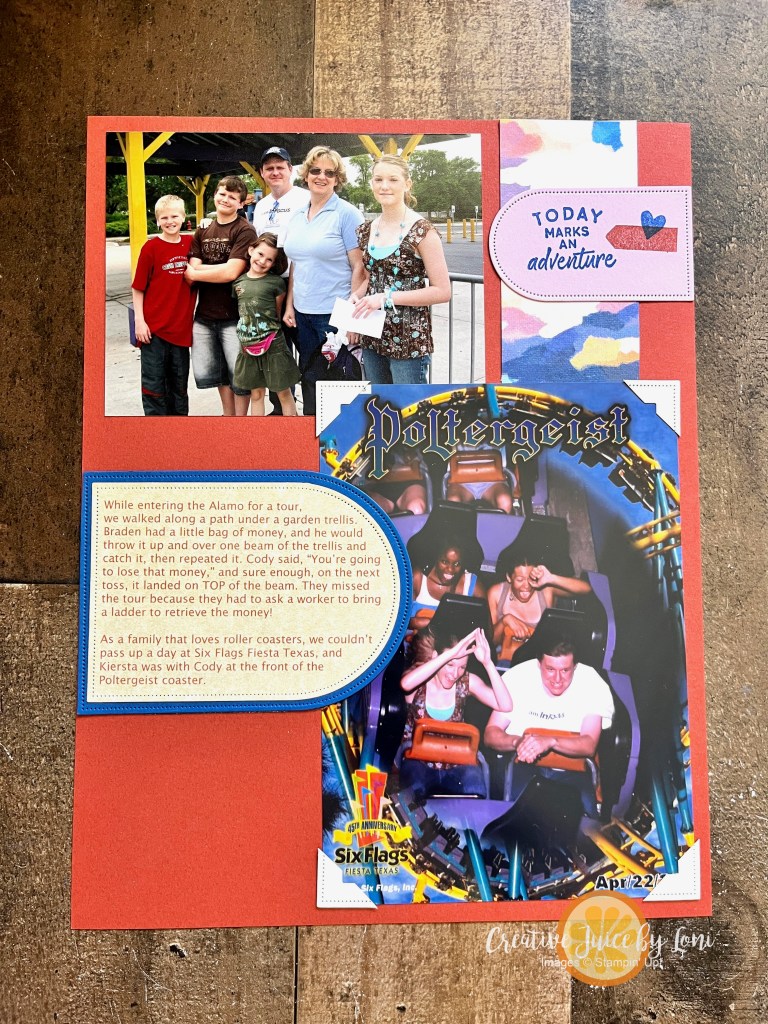
EXTRA! EXTRA! After the video, I made one more simple page to finish off my photos from that trip 21 years ago, and tie them together with the arches (and those photo corners show up again). This will face the Alamo page, completing the layout and telling the story:
The Everyday Skies suite was so popular when it launched a few months ago that it’s been out of stock. I’m super glad it is back in stock with time for you to get all of it (or just the parts you love most) before the BOGO50 Sale ends on June 30th!
If you are a scrapbooker, DON’T MISS the chance to join the VIRTUAL ALBUM RETREAT in July:
Don’t be put-off by the price: The kit includes FOUR stamp sets and 12 DOUBLE PAGE LAYOUTS (one pair for each month of the year) and the instruction you receive in the event will be worth the investment! Seriously….click to go check out the kit:
Once you purchase the kit, you’ll receive an email in early July to the exclusive Facebook Event page, so make sure your account has the best email for you! ALSO: When you purchase the kit, you earn $25 BACK in Stampin’ Rewards (if you’ve opted in) to use on your next purchase, or save up for a binder to put your pages in!
You’ll be so happy you joined the Virtual Album Retreat – order your kit today before they run out!
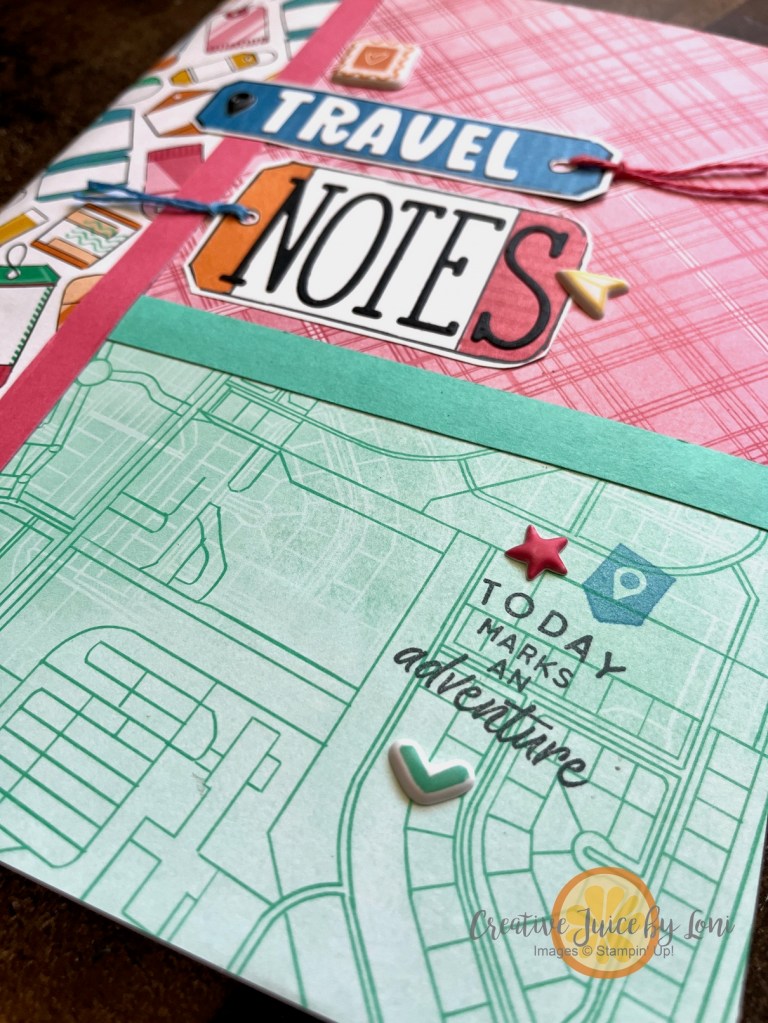
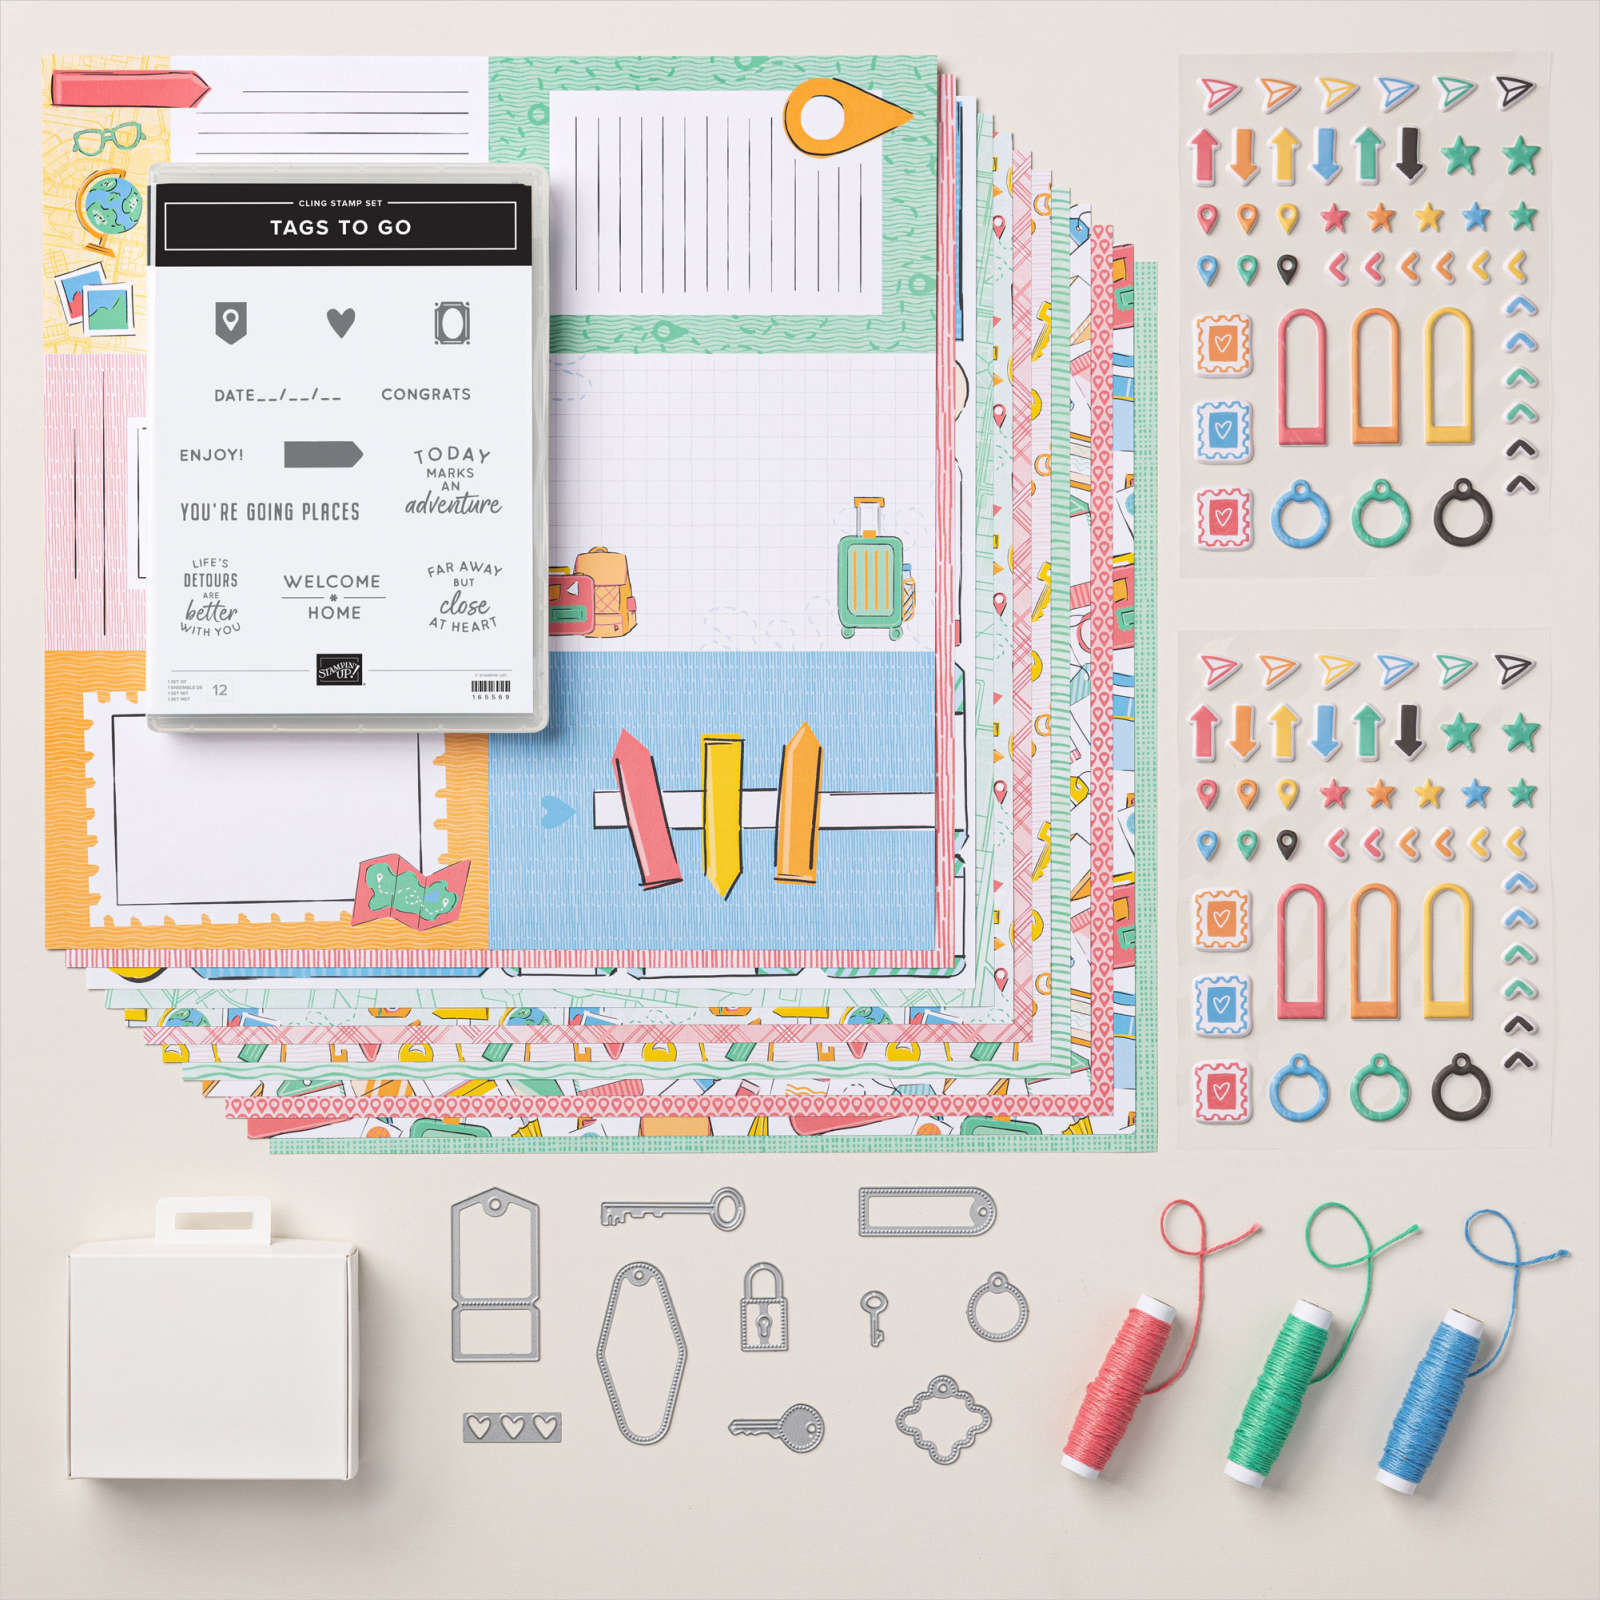
Welcome to another Sweet Suite SIMPLE Summer Stamping project: A D.I.Y. Travel Journal crafted with the Stampin’ Up!®️ On the Go Suite Collection!
This easy-peasy book began with an inexpensive composition notebook that I covered with the travel-themed On the Go Designer Series Paper by Stampin’ Up!®️
Crafting with a suite of products, like the On the Go suite takes the stress out of choosing colors or finding coordinating items, because it’s all done for you…even down to the matching puffy stickers and colored twine for the tags!
The puffy stickers really add a level of whimsy and fun!
Remember to stamp the top of each page with the date stamp, and your journal is ready for adventure:
I’ve got measurements and tips to make this project speedy and fun~ watch the tutorial:
“Summertime! And the Stampin’ is Easy!” (if you sang that in your mind~ Greetings, fellow musical geek!)
Since Stampin’ Up!®️ Suites (and suite products) are BOGO50 during June, I’ll be sharing some SIMPLE ways to use our current Suites for sensational summer stamping projects. In today’s video, I’m also revealing a BEAUTY SECRET!
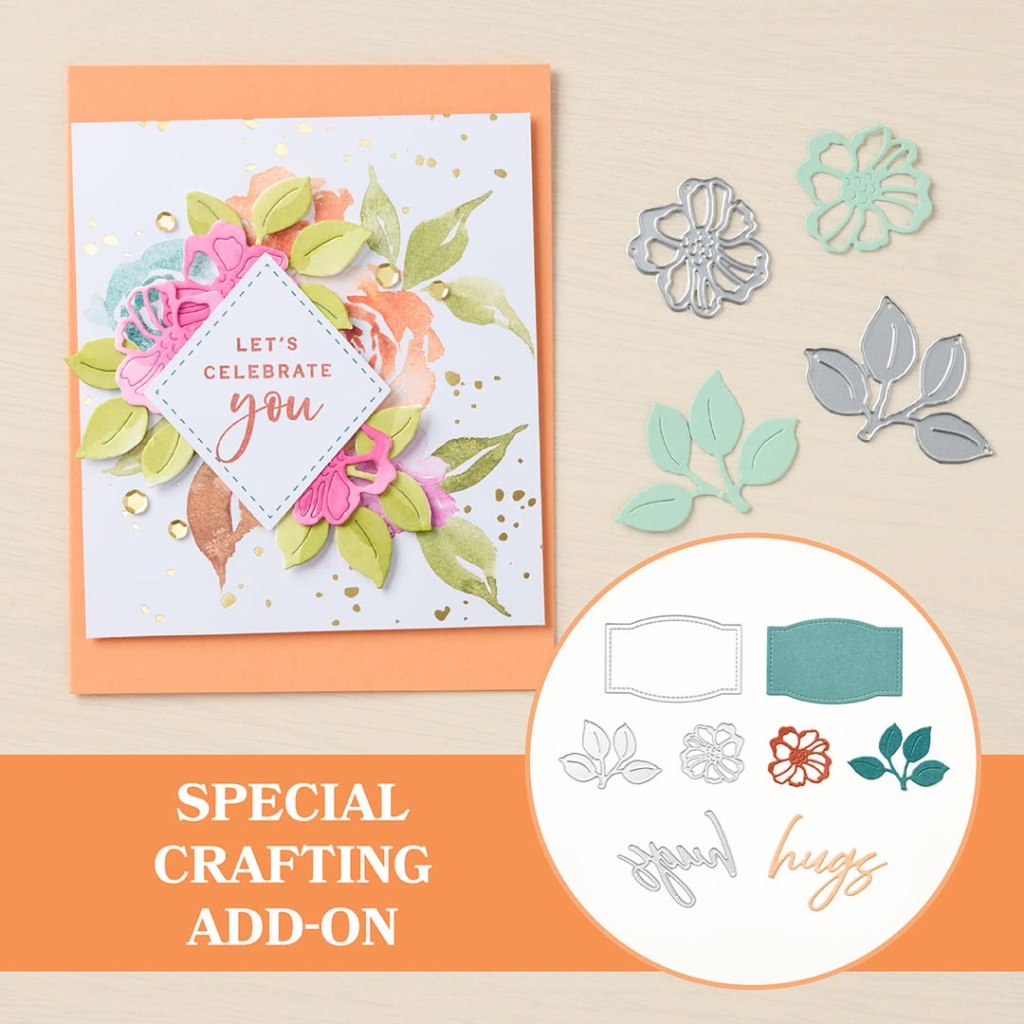
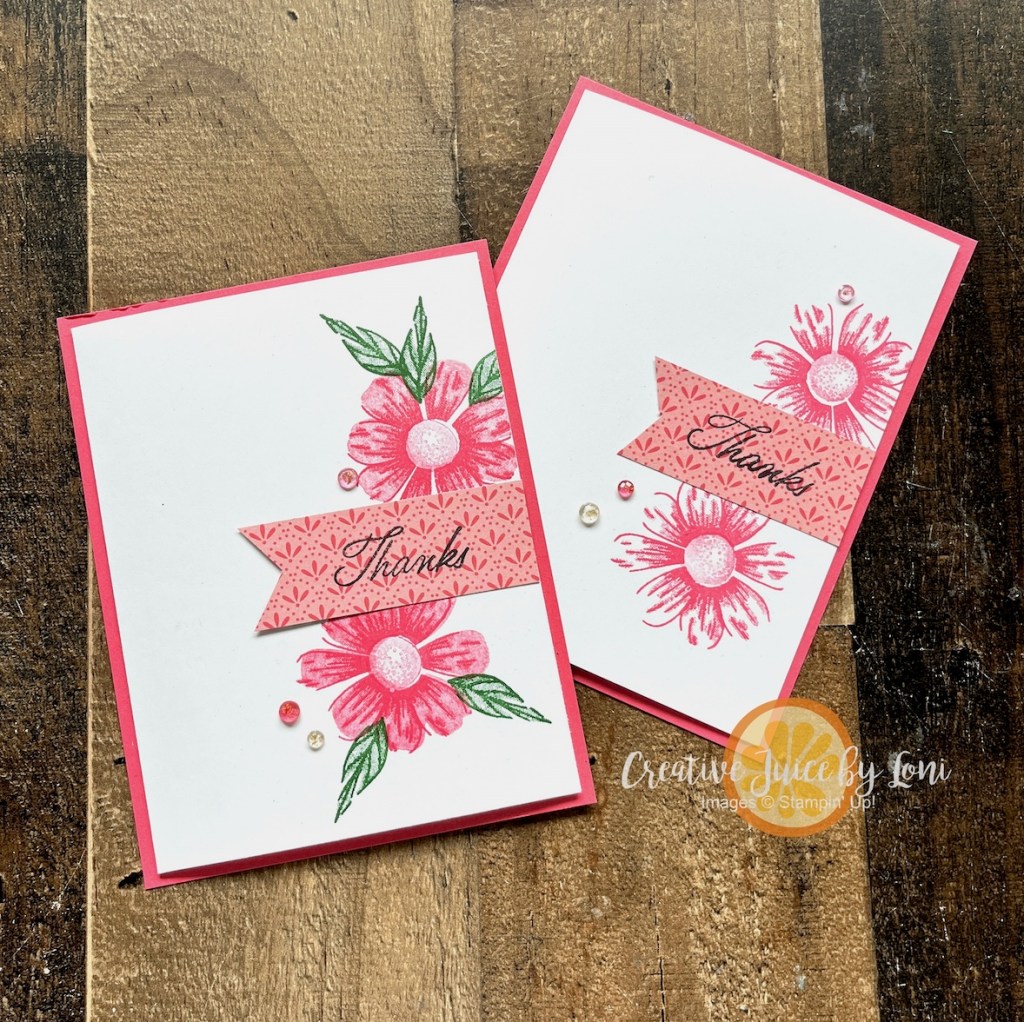
Crafting in June, July & August has to be easy & breezy, so coordinated products in a suite bring a speedy card together in moments. Using the Impressions Abloom stamp set, you can keep this Thanks card ultra simple, or add layers and leaves:
The only thing to stamp on the second card is the sentiment! If you die cut a few extra pieces while catching up on your favorite television episode, you’ll have all the pieces prepared to put an “I appreciate you” card together in seconds:
Embossing a piece of Stampin’ Up!®️ Two-Tone card stock with the Pressed Flowers embossing folder and rubbing it with an emery board to reveal the white center makes this background terrific and touchable.
Some of the Impressions Abloom Dies have detailed inserts, so you can die cut them from cardstock, or remove the details to cut out the stamped image.
TIP:Washi tape keeps both the outline and the details together while you run them through the Stampin’ Cut & Emboss machine.
All these products are part of the Floral Impressions Suite, and can be purchased as a complete collection or individually:
REMEMBER: For the Buy-One-Get-One-50% off special, the LOWEST priced items will receive the discount, so shop smart! Make separate orders and purchase 2 suites together in the first order (to get one suite half price), then use the *Stampin’ Rewards you earned on your first order for an additional discount on your second order, where you may order individual items from other suites (like more Designer Series Paper or embellishments).
*Stampin’ Rewards: Make sure you’ve OPTED IN to earn 10% back each time you shop! Save them or spend your rewards next time!
Scroll back up to the top to the comments (under the posting date) to tell me if you took the beauty secret and tried it!
One more day to SUBSCRIBE and receive the Floral Charm Paper Pumpkin kit in the mail!
Paper Pumpkin is a complete stamping experience in a box, and the June kit actually coordinates with a new Suite coming to my store in July: the Floral Charm Suite. If you are a current subscriber, you will also want to include the Hugs Abloom add-on die set to your next order, as it coordinates with the 2025 April-June kits:
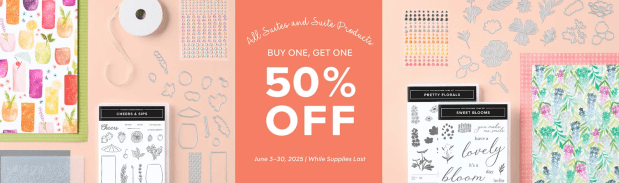
There’s sweet offer during June on Stampin’ Up!®️ Suites – AND individual products from the suites! It is a bit tricky, so read carefully to understand how this BOGO sale works, then I’ll share summery stamping projects using the suites all month long!
What is included in the Buy One, Get One 50% off sale? All available suites and suite products from the 2025–2026 Annual Catalog and Online Exclusives. If a suite product is out of stock, there is no rain check, but come back often during the month to see if they return!
Which item will be half off? The 50% off discount will apply to the lower-priced item (for example, if you buy a full suite collection and a stamp set from a suite, the suite would be full price, and the stamp set would be 50% off).
Do the products I choose have to be from the same suite? NO- you can mix and match products from any suite!
How can I tell which item will be 50% off? The lowest priced item(s) will always get the discount, and the discount will appear in your cart once you’ve added two items within the sale parameters to your cart. You might choose to place separate orders: One with higher-priced items bundled together, and another with less expensive suite products.
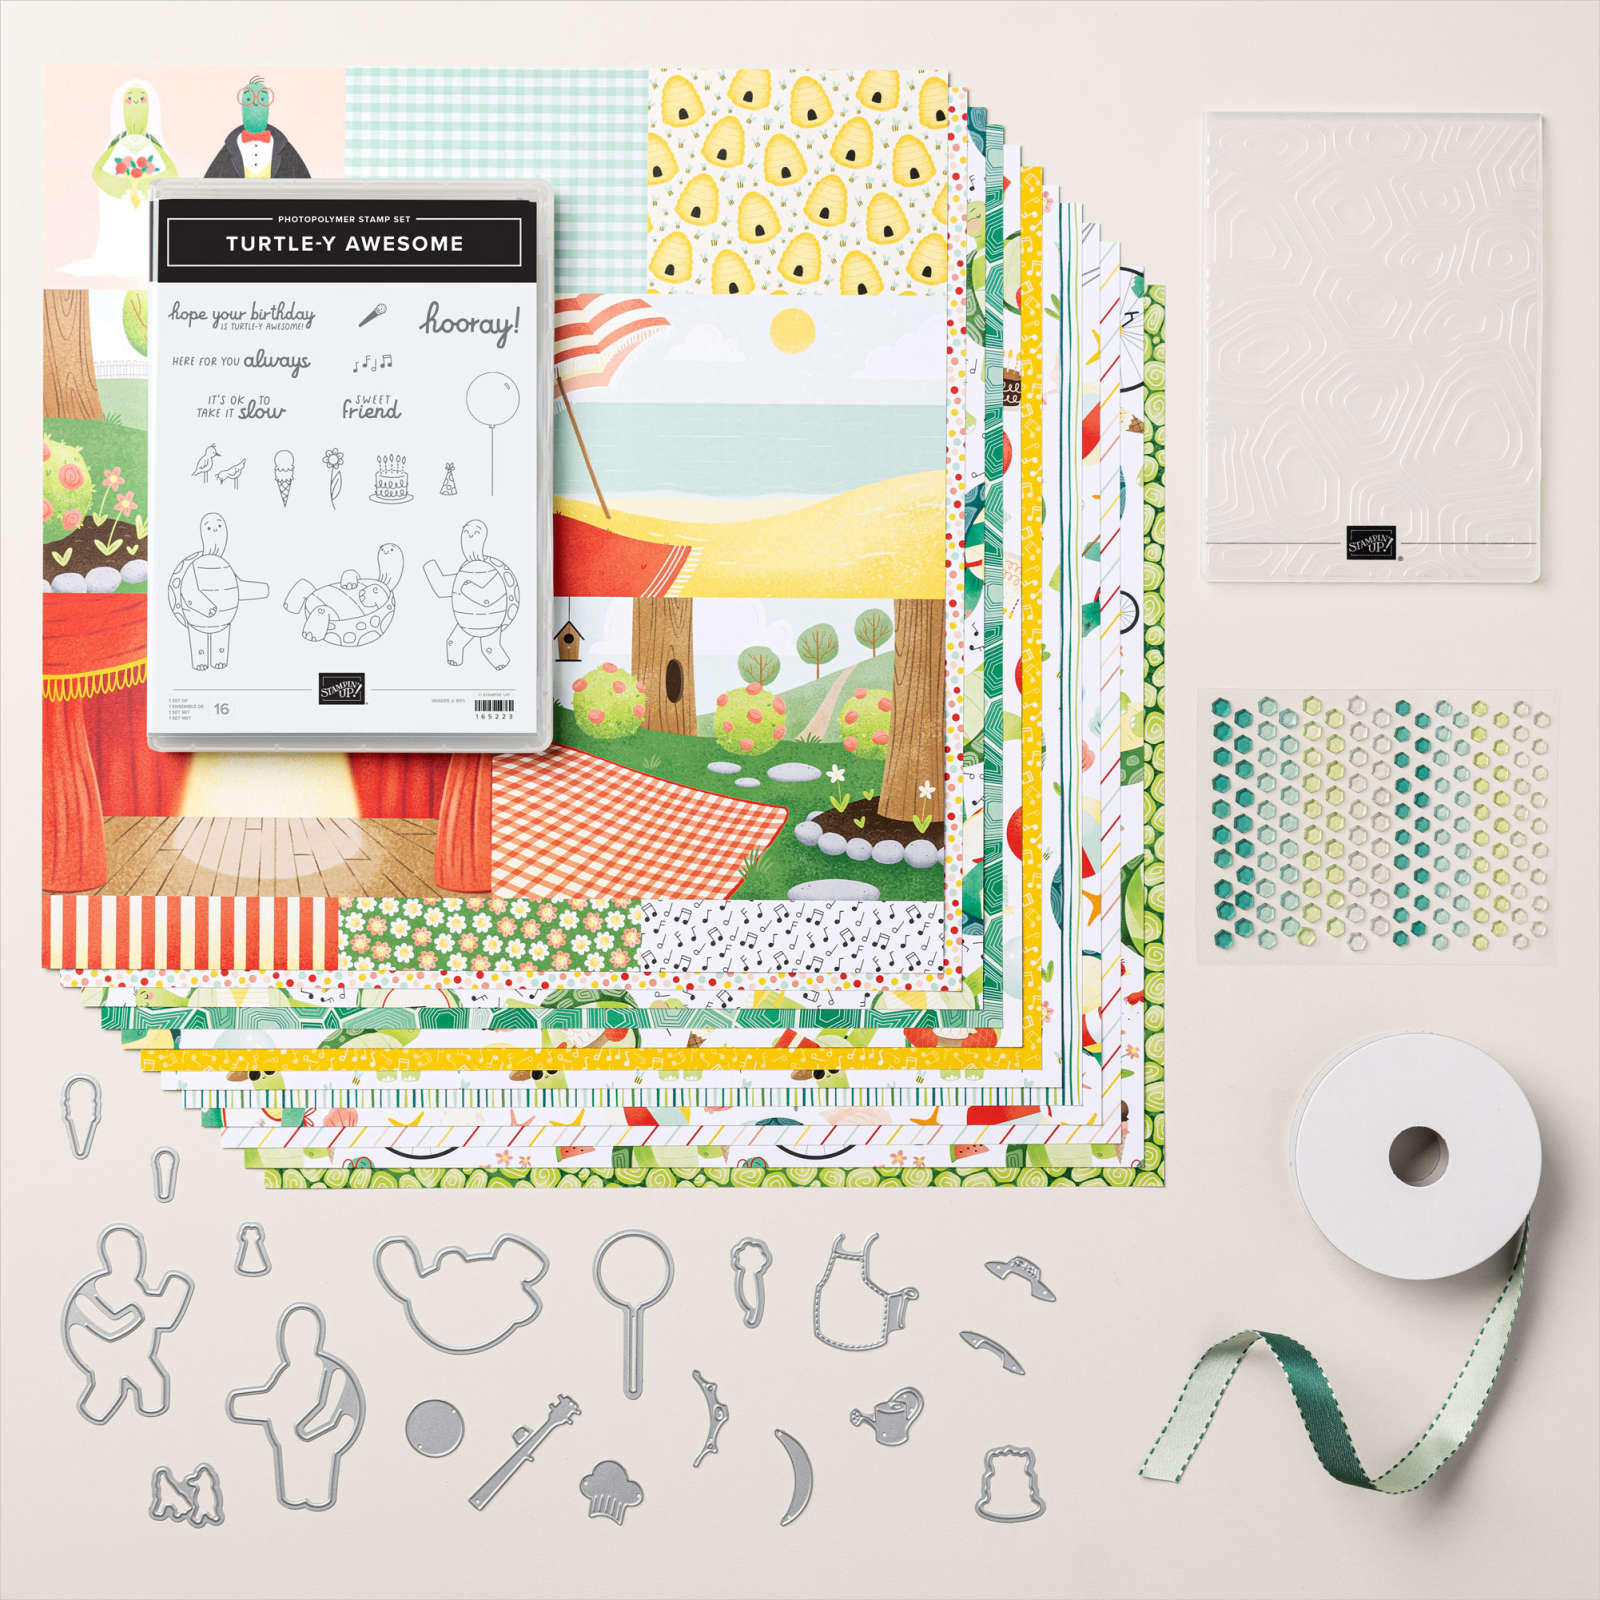
I’ll be sharing simple projects with the Stampin’ Up!®️ Suites throughout the month, so let’s start with the Turtle-y Cute Suite and a fun-fold card you can create quickly, without doing any coloring, thanks to the Designer Series Paper:
The designs on the paper cover every occasion from weddings to picnics, and everything in between! My favorite pieces of the suite (after the DSP) are the Turtle Textures embossing folder and the Shades of Green Hexagons – a delightful little detail with a nod to a turtle shell!
Keep your creative juices flowing! 🍊🧡– Loni Spendlove


![Fluffy Squirrel Bundle (English) [ 165819 ]](https://assets1.tamsnetwork.com/images/EC042017NF/165819s.jpg "Fluffy Squirrel Bundle (English) [ 165819 ]")
![Real Red 8-1/2" X 11" Cardstock [ 102482 ]](https://assets1.tamsnetwork.com/images/EC042017NF/102482s.jpg "Real Red 8-1/2\" X 11\" Cardstock [ 102482 ]")
![Basic Beige 8 1/2" X 11" Cardstock [ 164511 ]](https://assets1.tamsnetwork.com/images/EC042017NF/164511s.jpg "Basic Beige 8 1/2\" X 11\" Cardstock [ 164511 ]")
![Cajun Craze 8-1/2" X 11" Cardstock [ 119684 ]](https://assets1.tamsnetwork.com/images/EC042017NF/119684s.jpg "Cajun Craze 8-1/2\" X 11\" Cardstock [ 119684 ]")
![Crushed Curry 8-1/2" X 11" Cardstock [ 131199 ]](https://assets1.tamsnetwork.com/images/EC042017NF/131199s.jpg "Crushed Curry 8-1/2\" X 11\" Cardstock [ 131199 ]")
![Real Red Classic Stampin' Pad [ 147084 ]](https://assets1.tamsnetwork.com/images/EC042017NF/147084s.jpg "Real Red Classic Stampin' Pad [ 147084 ]")
![Cajun Craze Classic Stampin' Pad [ 147085 ]](https://assets1.tamsnetwork.com/images/EC042017NF/147085s.jpg "Cajun Craze Classic Stampin' Pad [ 147085 ]")
![Crushed Curry Classic Stampin' Pad [ 147087 ]](https://assets1.tamsnetwork.com/images/EC042017NF/147087s.jpg "Crushed Curry Classic Stampin' Pad [ 147087 ]")
![Early Espresso Classic Stampin' Pad [ 147114 ]](https://assets1.tamsnetwork.com/images/EC042017NF/147114s.jpg "Early Espresso Classic Stampin' Pad [ 147114 ]")
![Paper Trimmer [ 152392 ]](https://assets1.tamsnetwork.com/images/EC042017NF/152392s.jpg "Paper Trimmer [ 152392 ]")
![Stampin' Seal [ 152813 ]](https://assets1.tamsnetwork.com/images/EC042017NF/152813s.jpg "Stampin' Seal [ 152813 ]")
![Stampin' Dimensionals [ 104430 ]](https://assets1.tamsnetwork.com/images/EC042017NF/104430s.jpg "Stampin' Dimensionals [ 104430 ]")


![Spooky Sweet Suite Collection (English) [ 166205 ]](https://assets1.tamsnetwork.com/images/EC042017NF/166205s.jpg "Spooky Sweet Suite Collection (English) [ 166205 ]")
![Timid Tiger 8 1/2" X 11" Cardstock [ 165626 ]](https://assets1.tamsnetwork.com/images/EC042017NF/165626s.jpg "Timid Tiger 8 1/2\" X 11\" Cardstock [ 165626 ]")
![Granny Apple Green 8-1/2" X 11" Cardstock [ 146990 ]](https://assets1.tamsnetwork.com/images/EC042017NF/146990s.jpg "Granny Apple Green 8-1/2\" X 11\" Cardstock [ 146990 ]")
![Basic White 8 1/2" X 11" Cardstock [ 166780 ]](https://assets1.tamsnetwork.com/images/EC042017NF/166780s.jpg "Basic White 8 1/2\" X 11\" Cardstock [ 166780 ]")
![Timid Tiger Stampin’ Blends Combo Pack [ 165291 ]](https://assets1.tamsnetwork.com/images/EC042017NF/165291s.jpg "Timid Tiger Stampin’ Blends Combo Pack [ 165291 ]")
![Granny Apple Green Stampin' Blends Combo Pack [ 154885 ]](https://assets1.tamsnetwork.com/images/EC042017NF/154885s.jpg "Granny Apple Green Stampin' Blends Combo Pack [ 154885 ]")
![Petunia Pop Stampin’ Blends Combo Pack [ 163828 ]](https://assets1.tamsnetwork.com/images/EC042017NF/163828s.jpg "Petunia Pop Stampin’ Blends Combo Pack [ 163828 ]")
![Peaceful Garden 12" X 12" (30.5 X 30.5 Cm) Glimmer Paper [ 165929 ]](https://assets1.tamsnetwork.com/images/EC042017NF/165929s.jpg "Peaceful Garden 12\" X 12\" (30.5 X 30.5 Cm) Glimmer Paper [ 165929 ]")
![Stampin' Cut & Emboss Machine [ 149653 ]](https://assets1.tamsnetwork.com/images/EC042017NF/149653s.jpg "Stampin' Cut & Emboss Machine [ 149653 ]")
![Mini Glue Dots [ 103683 ]](https://assets1.tamsnetwork.com/images/EC042017NF/103683s.jpg "Mini Glue Dots [ 103683 ]")


![Spooky Sweet 12" X 12" (30.5 X 30.5 Cm) Specialty Designer Series Paper [ 166191 ]](https://assets1.tamsnetwork.com/images/EC042017NF/166191s.jpg "Spooky Sweet 12\" X 12\" (30.5 X 30.5 Cm) Specialty Designer Series Paper [ 166191 ]")
![Not 29 Anymore Photopolymer Stamp Set (English) [ 166182 ]](https://assets1.tamsnetwork.com/images/EC042017NF/166182s.jpg "Not 29 Anymore Photopolymer Stamp Set (English) [ 166182 ]")
![Petunia Pop 8 1/2" X 11" Cardstock [ 163801 ]](https://assets1.tamsnetwork.com/images/EC042017NF/163801s.jpg "Petunia Pop 8 1/2\" X 11\" Cardstock [ 163801 ]")
![Granny Apple Green Stampin' Pad [ 147095 ]](https://assets1.tamsnetwork.com/images/EC042017NF/147095s.jpg "Granny Apple Green Stampin' Pad [ 147095 ]")
![Petunia Pop Classic Stampin Pad [ 163811 ]](https://assets1.tamsnetwork.com/images/EC042017NF/163811s.jpg "Petunia Pop Classic Stampin Pad [ 163811 ]")
![Tuxedo Black Memento Ink Pad [ 132708 ]](https://assets1.tamsnetwork.com/images/EC042017NF/132708s.jpg "Tuxedo Black Memento Ink Pad [ 132708 ]")
![More Dazzle 6" X 6" (15.2 X 15.2 Cm) Specialty Paper [ 161749 ]](https://assets1.tamsnetwork.com/images/EC042017NF/161749s.jpg "More Dazzle 6\" X 6\" (15.2 X 15.2 Cm) Specialty Paper [ 161749 ]")
![Stampin' Seal+ [ 149699 ]](https://assets1.tamsnetwork.com/images/EC042017NF/149699s.jpg "Stampin' Seal+ [ 149699 ]")


![Darling Dinos Bundle (English) [ 164735 ]](https://assets1.tamsnetwork.com/images/EC042017NF/164735s.jpg "Darling Dinos Bundle (English) [ 164735 ]")
![Secret Sea 8 1/2" X 11" Cardstock [ 165624 ]](https://assets1.tamsnetwork.com/images/EC042017NF/165624s.jpg "Secret Sea 8 1/2\" X 11\" Cardstock [ 165624 ]")
![Cloud Cover 8 1/2" X 11" Cardstock [ 165621 ]](https://assets1.tamsnetwork.com/images/EC042017NF/165621s.jpg "Cloud Cover 8 1/2\" X 11\" Cardstock [ 165621 ]")
![Old Olive 8-1/2" X 11" Cardstock [ 100702 ]](https://assets1.tamsnetwork.com/images/EC042017NF/100702s.jpg "Old Olive 8-1/2\" X 11\" Cardstock [ 100702 ]")
![Secret Sea Classic Stampin' Pad [ 165285 ]](https://assets1.tamsnetwork.com/images/EC042017NF/165285s.jpg "Secret Sea Classic Stampin' Pad [ 165285 ]")
![Timid Tiger Classic Stampin' Pad [ 165278 ]](https://assets1.tamsnetwork.com/images/EC042017NF/165278s.jpg "Timid Tiger Classic Stampin' Pad [ 165278 ]")
![Forever Plaid 3 D Embossing Folder [ 164049 ]](https://assets1.tamsnetwork.com/images/EC042017NF/164049s.jpg "Forever Plaid 3 D Embossing Folder [ 164049 ]")
![Multipurpose Liquid Glue [ 110755 ]](https://assets1.tamsnetwork.com/images/EC042017NF/110755s.jpg "Multipurpose Liquid Glue [ 110755 ]")


![Poppin' By Bundle (English) [ 165489 ]](https://assets1.tamsnetwork.com/images/EC042017NF/165489s.jpg "Poppin' By Bundle (English) [ 165489 ]")
![Darling Duckling 8 1/2" X 11" Cardstock [ 165622 ]](https://assets1.tamsnetwork.com/images/EC042017NF/165622s.jpg "Darling Duckling 8 1/2\" X 11\" Cardstock [ 165622 ]")
![Strawberry Slush 8 1/2" X 11" Cardstock [ 165625 ]](https://assets1.tamsnetwork.com/images/EC042017NF/165625s.jpg "Strawberry Slush 8 1/2\" X 11\" Cardstock [ 165625 ]")
![Secret Sea 12" X 12" (30.5 X 30.5 Cm) Two Tone Cardstock [ 166709 ]](https://assets1.tamsnetwork.com/images/EC042017NF/166709s.jpg "Secret Sea 12\" X 12\" (30.5 X 30.5 Cm) Two Tone Cardstock [ 166709 ]")
![Darling Duckling Classic Stampin' Pad [ 165277 ]](https://assets1.tamsnetwork.com/images/EC042017NF/165277s.jpg "Darling Duckling Classic Stampin' Pad [ 165277 ]")
![Strawberry Slush Classic Stampin' Pad [ 165286 ]](https://assets1.tamsnetwork.com/images/EC042017NF/165286s.jpg "Strawberry Slush Classic Stampin' Pad [ 165286 ]")
![Strawberry Slush 3/8" (1 Cm) Faux Linen Ribbon [ 165274 ]](https://assets1.tamsnetwork.com/images/EC042017NF/165274s.jpg "Strawberry Slush 3/8\" (1 Cm) Faux Linen Ribbon [ 165274 ]")
![Pack Your Bags Twine Three Pack [ 165582 ]](https://assets1.tamsnetwork.com/images/EC042017NF/165582s.jpg "Pack Your Bags Twine Three Pack [ 165582 ]")
![Clear Medium Envelopes [ 102619 ]](https://assets1.tamsnetwork.com/images/EC042017NF/102619s.jpg "Clear Medium Envelopes [ 102619 ]")
![Loose Shaker Elements [ 165268 ]](https://assets1.tamsnetwork.com/images/EC042017NF/165268s.jpg "Loose Shaker Elements [ 165268 ]")
![Mini Stampin' Cut & Emboss Machine [ 150673 ]](https://assets1.tamsnetwork.com/images/EC042017NF/150673s.jpg "Mini Stampin' Cut & Emboss Machine [ 150673 ]")


![Arched Wishes Cling Stamp Set (English) [ 165428 ]](https://assets1.tamsnetwork.com/images/EC042017NF/165428s.jpg "Arched Wishes Cling Stamp Set (English) [ 165428 ]")
![Painted Stripes Cling Stamp Set [ 165437 ]](https://assets1.tamsnetwork.com/images/EC042017NF/165437s.jpg "Painted Stripes Cling Stamp Set [ 165437 ]")
![Everyday Arches Dies [ 164629 ]](https://assets1.tamsnetwork.com/images/EC042017NF/164629s.jpg "Everyday Arches Dies [ 164629 ]")
![Highland Heather 8-1/2" X 11" Cardstock [ 146986 ]](https://assets1.tamsnetwork.com/images/EC042017NF/146986s.jpg "Highland Heather 8-1/2\" X 11\" Cardstock [ 146986 ]")
![Summer Splash 8 1/2" X 11 Cardstock [ 163797 ]](https://assets1.tamsnetwork.com/images/EC042017NF/163797s.jpg "Summer Splash 8 1/2\" X 11 Cardstock [ 163797 ]")
![Daffodil Delight 8-1/2" X 11" Cardstock [ 119683 ]](https://assets1.tamsnetwork.com/images/EC042017NF/119683s.jpg "Daffodil Delight 8-1/2\" X 11\" Cardstock [ 119683 ]")
![Highland Heather Classic Stampin' Pad [ 147103 ]](https://assets1.tamsnetwork.com/images/EC042017NF/147103s.jpg "Highland Heather Classic Stampin' Pad [ 147103 ]")
![Daffodil Delight Classic Stampin' Pad [ 147094 ]](https://assets1.tamsnetwork.com/images/EC042017NF/147094s.jpg "Daffodil Delight Classic Stampin' Pad [ 147094 ]")
![Summer Splash Classic Stampin Pad [ 163809 ]](https://assets1.tamsnetwork.com/images/EC042017NF/163809s.jpg "Summer Splash Classic Stampin Pad [ 163809 ]")
![Highland Heather Stampin' Blends Combo Pack [ 154887 ]](https://assets1.tamsnetwork.com/images/EC042017NF/154887s.jpg "Highland Heather Stampin' Blends Combo Pack [ 154887 ]")
![Flirty Flamingo Stampin' Blends Combo Pack [ 154884 ]](https://assets1.tamsnetwork.com/images/EC042017NF/154884s.jpg "Flirty Flamingo Stampin' Blends Combo Pack [ 154884 ]")
![Summer Splash Stampin’ Blends Combo Pack [ 163826 ]](https://assets1.tamsnetwork.com/images/EC042017NF/163826s.jpg "Summer Splash Stampin’ Blends Combo Pack [ 163826 ]")
![Clear Wink Of Stella Glitter Brush [ 141897 ]](https://assets1.tamsnetwork.com/images/EC042017NF/141897s.jpg "Clear Wink Of Stella Glitter Brush [ 141897 ]")
![Starburst Sequins [ 165539 ]](https://assets1.tamsnetwork.com/images/EC042017NF/165539s.jpg "Starburst Sequins [ 165539 ]")


![Everyday Skies Suite Collection (English) [ 164635 ]](https://assets1.tamsnetwork.com/images/EC042017NF/164635s.jpg "Everyday Skies Suite Collection (English) [ 164635 ]")
![Alphabet à La Mode Dies [ 160750 ]](https://assets1.tamsnetwork.com/images/EC042017NF/160750s.jpg "Alphabet à La Mode Dies [ 160750 ]")
![Mini Alphabet Dies [ 162934 ]](https://assets1.tamsnetwork.com/images/EC042017NF/162934s.jpg "Mini Alphabet Dies [ 162934 ]")
![Shaded Spruce 8-1/2" X 11" Cardstock [ 146981 ]](https://assets1.tamsnetwork.com/images/EC042017NF/146981s.jpg "Shaded Spruce 8-1/2\" X 11\" Cardstock [ 146981 ]")
![Balmy Blue 8-1/2" X 11" Cardstock [ 146982 ]](https://assets1.tamsnetwork.com/images/EC042017NF/146982s.jpg "Balmy Blue 8-1/2\" X 11\" Cardstock [ 146982 ]")
![Blueberry Bushel 8-1/2" X 11" Cardstock [ 146968 ]](https://assets1.tamsnetwork.com/images/EC042017NF/146968s.jpg "Blueberry Bushel 8-1/2\" X 11\" Cardstock [ 146968 ]")
![Adhesive Sheets [ 152334 ]](https://assets1.tamsnetwork.com/images/EC042017NF/152334s.jpg "Adhesive Sheets [ 152334 ]")
![Bee Builder Punch [ 162553 ]](https://assets1.tamsnetwork.com/images/EC042017NF/162553s.jpg "Bee Builder Punch [ 162553 ]")
![Shaded Spruce Classic Stampin' Pad [ 147088 ]](https://assets1.tamsnetwork.com/images/EC042017NF/147088s.jpg "Shaded Spruce Classic Stampin' Pad [ 147088 ]")
![Blueberry Bushel Classic Stampin' Pad [ 147138 ]](https://assets1.tamsnetwork.com/images/EC042017NF/147138s.jpg "Blueberry Bushel Classic Stampin' Pad [ 147138 ]")


![Tags To Go Cling Stamp Set (English) [ 165569 ]](https://assets1.tamsnetwork.com/images/EC042017NF/165569s.jpg "Tags To Go Cling Stamp Set (English) [ 165569 ]")
![On The Go 12" X 12" (30.5 X 30.5 Cm) Designer Series Paper [ 165566 ]](https://assets1.tamsnetwork.com/images/EC042017NF/165566s.jpg "On The Go 12\" X 12\" (30.5 X 30.5 Cm) Designer Series Paper [ 165566 ]")
![On The Go Puffy Stickers [ 165581 ]](https://assets1.tamsnetwork.com/images/EC042017NF/165581s.jpg "On The Go Puffy Stickers [ 165581 ]")
![Azure Afternoon Classic Stampin' Pad [ 161663 ]](https://assets1.tamsnetwork.com/images/EC042017NF/161663s.jpg "Azure Afternoon Classic Stampin' Pad [ 161663 ]")
![Basic Black 8-1/2" X 11" Cardstock [ 121045 ]](https://assets1.tamsnetwork.com/images/EC042017NF/121045s.jpg "Basic Black 8-1/2\" X 11\" Cardstock [ 121045 ]")


![Floral Impressions Suite Collection (English) [ 165617 ]](https://assets1.tamsnetwork.com/images/EC042017NF/165617s.jpg "Floral Impressions Suite Collection (English) [ 165617 ]")
![Garden Green 12" X 12" (30.5 X 30.5 Cm) Two Tone Cardstock [ 166665 ]](https://assets1.tamsnetwork.com/images/EC042017NF/166665s.jpg "Garden Green 12\" X 12\" (30.5 X 30.5 Cm) Two Tone Cardstock [ 166665 ]")
![Garden Green Classic Stampin' Pad [ 147089 ]](https://assets1.tamsnetwork.com/images/EC042017NF/147089s.jpg "Garden Green Classic Stampin' Pad [ 147089 ]")