New at SU! Coming Up Carrots for Sale-a-Bration

It’s Sale-a-Bration time at Stampin’ Up! and everything’s coming up CARROTS!

The New at SU! design team is back to show you some creative ways to use the products you can collect FREE during January-February 2023 (with your qualifying orders). We will show you CARDS & COORDINATING ENVELOPES with Sale-a-Bration products, and I’m showcasing the “Thanks a Bunch” stamp set AND the Dandy Designs Designer Series Paper!

First, did you know carrots come in different colors?

Okay, maybe not Balmy Blue, but while we mostly see orange carrots in grocery stores today, that color only emerged in the 1600s. Purple and yellow were originally the most prevalent colors, and heirloom carrots are making a big comeback in gardens!

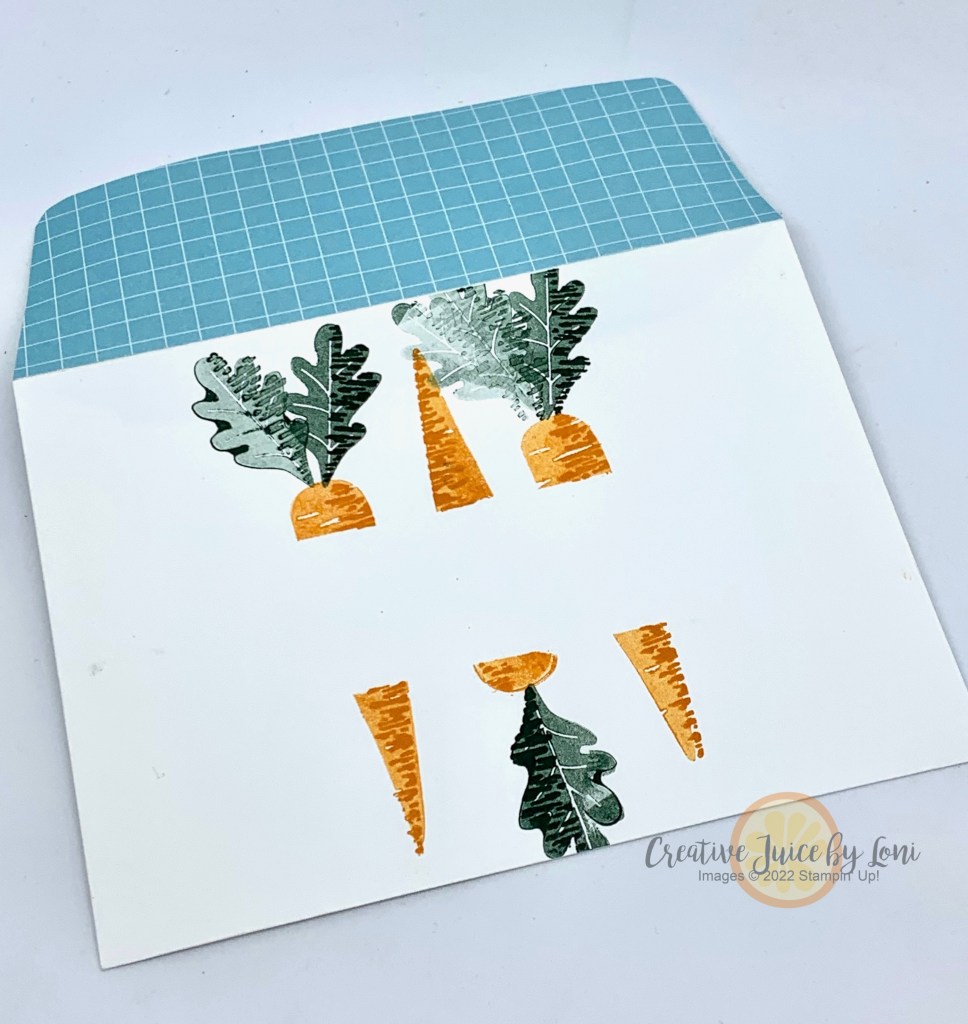
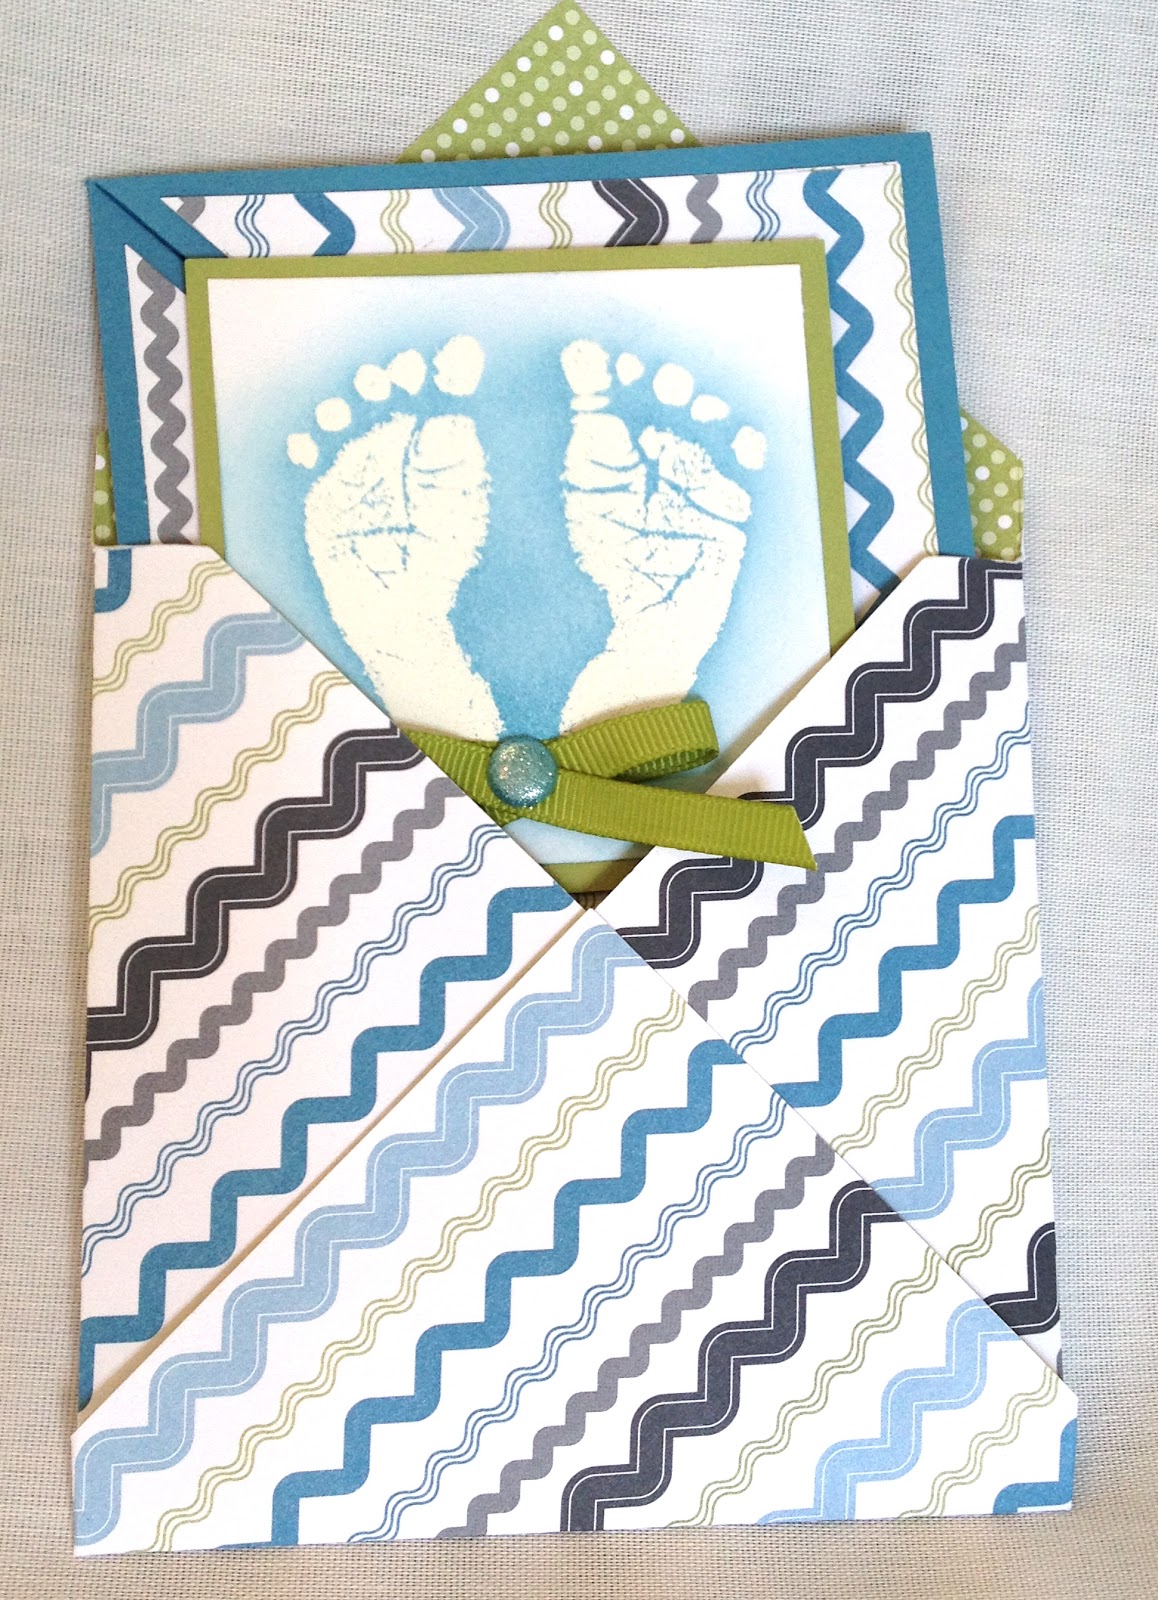
For this card, I grabbed the complimentary color across the color wheel from orange (= blue) and used the grid pattern from the Dandy Designs Designer Series Paper to use as my background (and on the flap for my coordinating envelope):

To make space on the front of your envelope for an address, just use a post-it note (cut to 1-1/4″) wide to mask off the center of the envelope and stamp your images over the top, then remove the post-it note:

I couldn’t stop with just one…there are 24 different patterns (48 sheets, 4 each of 12 double-sided designs) in the mega-pack of the Designer Series Paper, so I wanted to show you a few more:

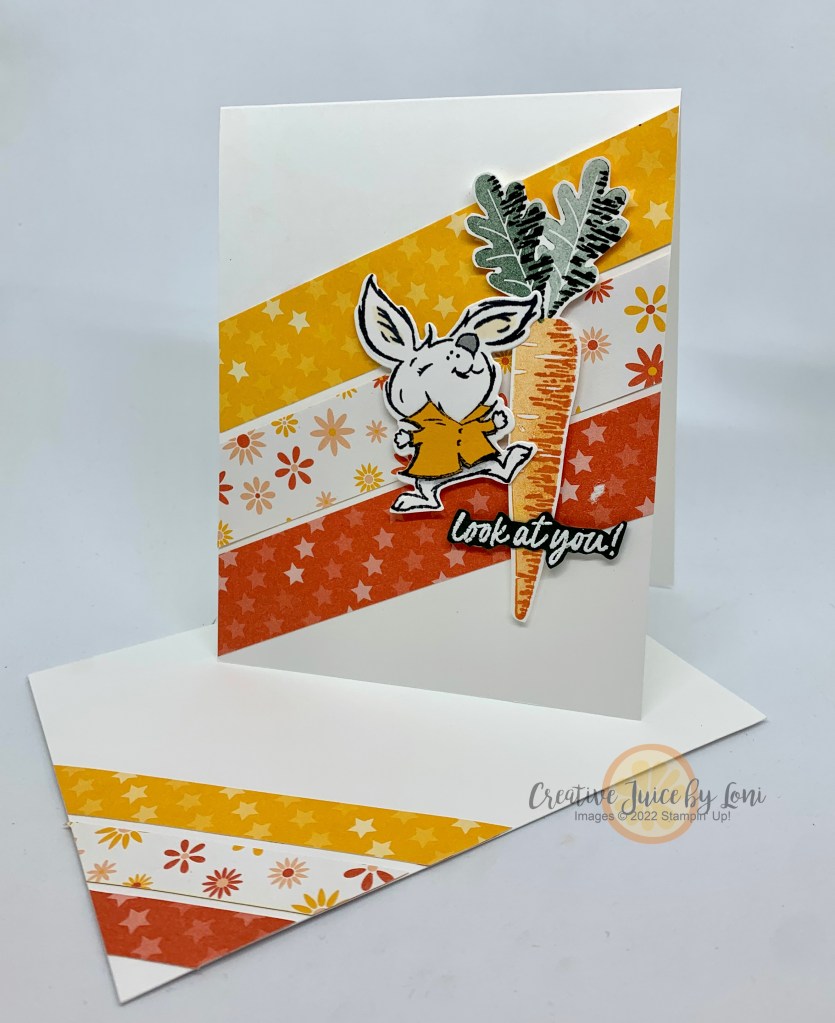
I just had to add the bunny from the “Playing in the Rain” stamp set on that one! It’s a simple card with stripes of the patterned paper as the background and on the envelope. For the bunny’s rain coat, I stamped on a scrap of Mango Melody card stock and fussy cut it out, then glued it on. You could order the Playing in the Rain BUNDLE or SUITE and choose the Thanks a Bunch stamps as your free Sale-a-Bration reward!

All the supplies are listed at the bottom of this post, and if you don’t currently have a US demonstrator, I’m happy to serve you!

Now don’t miss the other Cards + Envelope projects from our talented demonstrator design team:

January New at SU! Hop: Sale-a-Bration + Matching Envelope

Powered by blogcarousel.com

P.S. In case you didn’t hear, The Rain or Shine Suite coordinates with the February 2023 Paper Pumpkin kit! Subscribe by February 10th to get this cute craft kit in the mail:

Product List

5 Ways on Fridays: Envelope Punch Board

Today I’m sharing FIVE amazing ways to use the new Envelope Punch Board from Stampin’ Up! (Item #133774). Once you see these, you’ll NEED your own and you can order it from My Stampin; Up! Store Since it’s Halloween season, I made most of my samples using the Witches Brew Designer Series Paper (132185), Toil & Trouble and Tags 4 You stamp sets (Holiday Catalog) and Label Bracket punch (132153)

1. Make Envelopes. Stating the painfully obvious, but hey…that’s what it was made for! Just remember this: Envelopes don’t always have to hold just a card 🙂

If you haven’t seen how the Envelope Punch Board works, WATCH the Training Video from Stampin’ Up! I also love having a liner inside the envelope and the best video tutorial I’ve seen (using just a small square of Designer Series Paper) is from Mary Fish and her tutorial can be seen HERE. 

2. File Folder Cards. These unique cards are so much fun to make and you could create a whole slew of little file folders to organize things like photos, paper embellishments, receipts, etc.

Patty Bennett’s Video Tutorial explains how simple these are, and once you’ve made a few, you just can’t stop! 

3. Boxes. Yep, that’s right: The Envelope Punch Board can make BOXES! Here are two of my top picks (because they are both simple, and I’m all about easy!)

Elaine Schader (at Elaine’s Creations) made this box to hold some eerily adorable Halloween tags from four envelopes made with the Punch Board. Check it out on HER BLOG.

Designed to hold 4 cards & envelopes, I discovered (after I whipped this one out in no time flat) that this little gem also holds a King Size Kit Kat! I followed the instructions by Cindy Beach at Stamp, Paper and Ink. The only modification I made was to use my Word Window punch to create a place to insert the top flap and hold it closed.

Learn to make another candy bar box on THIS video tutorial by Janet Wakeland

4. Advent Calendar. When I saw this on the Stampin’ Up! blog post  (scroll down past the Game Day banner to see the instructions and downloadable PDF for dates) I thought it was GENIUS!

5. Envelope Tag Book. Here’s one for the memory keepers…or this could be a fun way to present love coupons, a grandma brag book or just for fun.

Tricia over at the Efficient Crafter is the artist for this project and her motto, “Quick…Let’s Craft!” tells me she’s my kind of lady! View her tutorial HERE. 
——————————————————

So there you have FIVE different ways to use the new Envelope Punch Board! It’s a MUST HAVE tool for your Craft Closet and you can order it in Loni’s Stampin’ Store today. If you have another great way to use the EPB, leave a comment below to help compile a resource for more excellent ideas!

post signature

Employees, Envelopes, Autumn & Miracles

When there is a holiday at the beginning of the month, I seem to start off slower than usual! It was a lovely Labor Day, and it got me thinking about workers that often go unthanked…so here’s a shout out to a few of the people who keep things running smoothly so my life is easier: To those who work in Utilities (including waste management, keeping us clean) THANK YOU! People who keep my lights and internet working, WAHOO! And those unsung heroes that plant, weed and harvest so I can eat, YOU ROCK! Seriously, my life would suck without you (hmmm..that could make a great song…)

On to September Stampin’ New & Noteworthy!

Envelope Punch Board

And here is the “Best Of” Autumn stamp set available now:

Butterfly Bundle

You may have heard that our beloved CEO and co-founder of Stampin’ Up! Shelli Gardner was in an accident last week. I am so grateful that it wasn’t worse and that she is on the road to recovery! Her husband has “hacked” into her blog and you can follow the story HERE (starting on August 31, 2013)
It always amazes me how small miracles add up and reveal the arm of the Lord in our lives. As a whole SU! community, we are appreciative that her life has been spared and pray for her speedy healing.
post signature

A Happy Hello/Goodbye Sale-a-Bration

5 days left of Sale-a-Bration and I’ve had fun demonstrating these boxes at my March parties from the Happy Hello Card Kit:

The instructions for the boxes are on Barb’s website HERE...and my only change/suggestion to make it easier is to put your card on the Simply Scored with the flat side flush against the left side and score at 1″, then flip the card over so the other flat edge is flush against the left side and score again at 1″. Turn the card so the blue chevrons are on the left edge and score down the edge of the pattern at 3″.

I used a clear envelope with the sticky flap cut off for the “bag” inside the box and filled it with chocolate, my favorite treat.

They are really fun to make, but since the kit comes with 8 cards and envelopes (and everything else to make these cards)…

…I had a lot of these cute envelopes left over! What to do with them?? So I came up with this:

It’s a gift card holder!

Here are the simple steps to make your own:

1. Cut white card stock 2-3/4″ x 9-3/4″. Score at 1-7/8″ and 5-7/8″ on the Simply Scored Tool (122334).  Punch a half circle (I used the 1-3/8″ punch) on the smaller flap edge and the Scallop Trim Border punch (118402) on the larger side edge. Adhere sticky strip to the very edge of the smaller flap sides.

2. On the opposite side of the card stock, stamp your image. NOTE: This image is from the Carry On set which is only available when you host a party and will be retired at the end of May…call me today to schedule a private class 🙂

3. Remove red from sticky strip and fold in to create pocket. Add a small strip of colored card stock under the decorative edge and mount the pocket to a 4-1/4″ x 3″ piece of card stock.

4. Take the envelope from the Happy Hello Sale-a-Bration card kit and score at 1-3/8″ and 4-1/2″ using the Simply Scored.

5. Insert a 3-3/4″ x 3″ piece of Designer Series Paper into the scored envelope and mark with pen so you know where to trim:

6. Remove the DSP, trim and adhere to center front section of envelope. Trim into the envelope flap along score lines, fold and adhere to sides (or remove). Insert card into envelope.

7. Punch 8 layers of Creped Filter Paper (129393) using 1-1/4″ scallop circle punch (127811) and push brad through the center of all circles. Scrunch each layer up to form flower. Spray flower with Stampin’ Spritzer (126185) filled with rubbing alcohol and 4 drops of re-inker (I used Melon Mambo). Create a belly band with the Dotted Scallop Ribbon Border punch (119275) and insert flower brad to secure in the front.

Voila! A beautiful way to present a gift card AND use up those gorgeous envelopes from the Happy Hello Card Kit from Sale-a-Bration!

to purchase the items used in this tutorial and get the Happy Hello Card Kit FREE when you spend $50…but hurry! It’s only available through Friday, March 22nd when we must say GOOD-BYE to Sale-a-Bration 2013 😦

post signature

Sisters & Sunshine Jars

These are my sweet sisters, Megan and Mindi:

Hard to believe, huh? Yes, we all have the same parents: But while they got the talents and looks (that beautiful dark skin!), I got the…well, I got the…

…okay, I got the great sisters!

They have been life-savers for me throughout my life (my interior designers, fashion consultants, reality-check, manicurists and wedding planners) and while we love each other more than life itself, sometimes we don’t always see eye to eye, which makes me love this quote:

“If you don’t understand how a woman could both love her sister dearly 
and want to wring her neck at the same time, 
then you were probably an only child.”  ~Linda Sunshine
Remind me to tell you about the “Die a Virgin” incident….but I digress.
Last month was Mindi’s birthday and after all her hard work on the wedding, I wanted to do something really special for her. At a scrapbook retreat, my friend Jennifer F. shared an idea for a “Joy Jar” she made for one of her sisters and I ran with it:

That is the jar. Doesn’t it just bring a smile to your face? I like to think of it as a “Jar of Sunshine” Here’s the top:

Mindi doesn’t fully realize the amount of joy she brings into the lives of others, and I wanted her to get a little taste of what a blessing she has been in my life. And occasionally, the world seems a little dark to her and when she struggles against depression, this jar holds a few ideas of ways to let in the light 🙂

Inside the Sunshine Jar are envelopes with an opportunity to discover JOY:

Sometimes they are opportunities to serve, sometimes they are opportunities to play, occasioanally they are chances to grow and sometimes they are just FOR FUN! Once in a while there is a number on the card and it corresponds to a gift wrapped individually in a bag. 
Because Mindi’s husband is the manager of a hotel and they travel ALOT, and never do they stay at less than a 4 star hotel…this luggage tag was one of my favorite coordinating gifts
 
(in case you can’t read it, it says “I’ll follow you to the ends of the earth…but not to Motel 6”)

Joy Jar Recipe:
All from Stampin’ Up! unless indicated by *asterisk. To order supplies to make your own, click HERE.

  • Stamps: Feel Goods (Spring Catalog pg 21) and Blue Ribbon (Catalog pg 33)
  • Ink: Tangerine Tango
  • Paper: Try Summer Smooches Designer Series Paper (item 125409) Card stock: Whisper White, Daffodil Delight
  • Etc: Paper Doilies (129399), Calypso Coral Baker’s Twine (122976), Punches: 1-3/8″ Circle (119860) and 1-3/4″ Scallop Circle (119854). Simply Scored Tool (122334) to make the rosette on front. Big Shot (113439) and Scallop Envelope Bigz Die (113462). Wide mouth jar and lid. Ribbon.
  • Optional: Iridescent Ice embossing powder (101930) and heat tool (129053) 

 
Here are some ideas if you’d like to create your own Joy Jar/Jar of Sunshine, here are a few ideas of opportunities to include inside and as coordinating gifts (and BTW, Mindi, these aren’t necessarily in your jar):

  • Pay for someone’s order behind you at the drive-through restaurant (include $)
  • Blow Bubbles (wrap a jar of bubbles)
  • Read a book to a child
  • Try a new exercise (dvd, gym trial membership or workout clothing)
  • Take a flower to a friend just because
  • Crank up the music and DANCE!
  • Write 20 things to be happy for in a journal (wrap a new journal)
  • Listen to classical music for half an hour
  • Make a fruit smoothie in your blender
  • Take a drive alone. Park somewhere with a view and thank God for your eyes.
  • Bake cupcakes (wrap a cake mix, cute cupcake wrappers, frosting & sprinkles) and share some with a friend
  • Go on a picnic
  • Share your favorite scripture of JOY
  • Send a card to a friend
  • Take out the trash for your neighbor
  • Give them a reason to practice a talent: Do they paint? Wrap a paintbrush. Play an instrument? Give some music! Craft? Give them a Paper Pumpkin* subscription 🙂  *choose me as your demonstrator!
  • Plan a party for friends (Murder Mystery Dinner? Minute to Win It?)
  • Pop Pocorn and watch a movie (wrap popcorn)
  • Build a fort
  • Forgive someone
  • Clean out your purse
  • Get a pedicure (gift certificate or nail polish)

Help me build this list! I know there are other great ideas out there, so share them in the comments, please!

post signature

Diagonal Fold Card Tutorial

Today I am sharing a fun card and envelope tutorial that uses the Simply Scored and Diagonal Plate from Stampin’ Up! If you are visiting to see the long envelope tutorial, you can see it here…but stick around for a minute to see this fun fold card, too! We’ll start with the card front:
 
The finished card is 4″x4″ and opens like this:

To create this card, use a piece of 12″x4″ card stock (I used Marina Mist). Score it at 4″ and 8″ on the Simply Scored, then put on your diagonal plate and score diagonally at from the top corner and at the 8″ mark. Fold the straight score lines in toward the center of the card and then fold the triangle folds BACK away so that two folded edges meet in the center of the front of your card.

Cut your Designer Series Paper to 3.5″ square and cut in half diagonally to put on the front of the card inside the scored diagonal areas. I used the Nursery Nest DSP which has been retired, but try any of our fun NEW Designer Series Paper and create your own!

Next, create a 3″x3″ focal point (the baby feet on this sample) and when you are adhering it to the front of the card, ONLY use adhesive in the bottom left corner/triangle so that your card can open! For my focal point, I did the emboss resist technique with the Baby Prints stamp set: Stamp baby feet on white card stock using Versamark ink and emboss in white (or clear). Sponge ink over cooled, embossed image and wipe off the excess with a tissue: Voila! Your feet appear magically!

Of course, this card needs a special envelope, so I created a matching one with the Simply Scored tool and Diagonal Plate (for tutorial, click HERE): 

Long Envelope Tutorial

UPDATED 6/6/12: Thanks to Mary Fish of Stampin’ Pretty, she let me know that the minimum envelope width for mailing is 3 1/2″ and she suggested a few adjustments to the envelope measurements, which are now reflected in the following instructions!

When you cut a piece of 12×12 card stock into quarters, you can create FOUR 6×3 cards, like this one created from a new set called “Betsy’s Blossoms”

And here is how to create a beautiful envelope to match! 
First, cut a piece of Designer Series Paper 7.5 “x8.5″ (this sample created with the new Floral District DSP). With the 7.5″ side along the top of your Simply Scored tool, score at 1 3/8″ and 4 7/8” 
(red lines shown below) 
Hint: the Simply Scored tool has grooves and marks every 1/8 inch!
Turn the paper so the 8.5″ is along the top of the Simply Scored tool and score at 1″ and 7 1/8″
(Green lines shown below)
Now you can trim off each corner along the score marks (or use the 1 3/8″ square punch…it works perfectly!)
Your envelope will now look like this:
Optional: Use the 1 3/8″ circle punch and insert the top and bottom tab corners in the back to round the corners like this:
Now it looks like this:
Fold over the side pieces and adhere first, then the bottom flap folds up:
Voila! it fits your 6×3 card perfectly!
(Finished Envelope size is now 3.5″ x 6 1/8″)

DIY Envelopes

My apologies for being absent for so long! What could I blame it on?? End of school? Yard work? A Solar Eclipse?

Yes to all of the above, but that is no excuse, really. If you have been following my Facebook Page, you’ll know that I have been pretty faithful with the Retirement Parade this month (a card each day showcasing the Stampin’ Up! sets that will be retired in less than a week now!!).

I have been thinking about sharing this for a while, so today I want to give some hints for creating your own envelopes with the Simply Scored and Diagonal Plate. First, a video from Stampin’ Up!
 (Or if you are in too much of a hurry to watch the video, scroll down for a quick picture of how to create envelopes with the Simply Scored Diagonal Plate)

Simply Scored Envelopes

The Diagonal plate comes with measurements for a few basic cards, so let me share a quick reference for some other envelope sizes: Mary Fish (of Stampin’ Pretty) has created a fabulous chart HERE…print it off and then come back to add these sizes:

* For a 6×6 card size, the finished envelope is approx. 6 1/4″ square. Cut your paper to 10″ square and both “A” and “B” scores are at 4 1/2″  (BONUS: I’ll be demonstrating this envelope along with a scrapbook page you can mail at my JUNE workshops, so book yours today!)

* For a 2×2 card size, a finished envelope is approx. 2 1/8″ square. Cut your paper to 4″ square and score at 1 5/8″ on both A and B sides. I love to make these envelopes using vellum and the cards are a petite size for gift giving 🙂

REMEMBER: Some of these envelope sizes are too small to mail, so they must be given in person, allowing you time to visit with a friend as you deliver your thoughtful hand-crafted gift 🙂
Envelope on front of card

Coming soon: A NEW envelope tutorial that you won’t want to miss!